
Warning: This process is complex, tedious, and requires interacting with data that may not be backed up. Variations in software may result in your experience and results being different from mine. We recommend that you not attempt these procedures if you are not a qualified Hyper-V and Windows Clustering specialist. Consider consulting with a professional before proceeding at your own risk.
If you’ve read part 1 and continued on to this post, you have probably experienced some type of catastrophic failure. Before attempting a cluster rebuild, you should have exhausted all other recovery options such as restoring from backup or forcing the cluster online manually.. There’s a reason this post starts with a warning. Data loss, up to and including entire VMs, is possible.
If you have rebuilt a VMware cluster, you should find this process to be familiar. In a Hyper-V failover cluster, the virtual machines are roles that are managed by the failover cluster service whose resources are tracked by the failover cluster database. When that database becomes corrupted or malfunctions your only options are to restore it, or to rebuild the cluster and import the VMs from storage.
The virtual machines themselves consist of a series of files that are stored on the cluster shared volume. Other resources like CPU and memory are provided by the host node a VM is mounted on at any given time. Therefore, if the shared storage system has remained intact during the failure, the VMs can be recovered from its files.

The first step in the recovery process is to locate the virtual hard disk files and verify that they are intact. If the virtual machines were deployed into the cluster properly, they should be located on a shared cluster volume partition. Typically, this is a mount point under the folder C:\ Clusterstorage\ which should be accessible on the host that last had ownership of the CSV.
Note: Many novice admins do not provision VMs in Hyper-V clusters properly. They tend to locate the storage on a host rather than on the mount point for the cluster-shared volume. If you are unable to locate a VM in C:\Clusterstorage (CSV mount point), try examining each host’s local storage.
A good place to start is by opening the Disk Management service console from one of the cluster members. If you see the CSV drives but they are not mounted, DO NOT TRY TO MANUALLY MOUNT THEM. That will be done by the cluster after we rebuild it. One of the nodes will have been the CSV owner, the volume will be mounted on that host. If no host sees the CSV in disk management, stop and correct any storage or connectivity issues before proceeding.
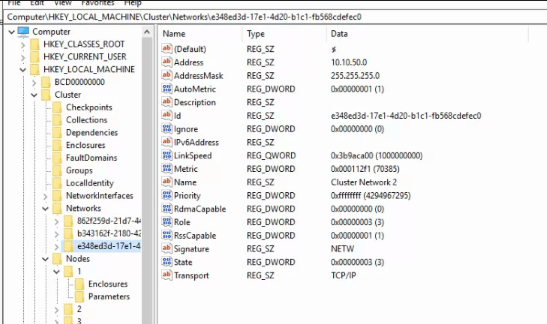
Once you have located the VM files, you can proceed to identifying key configurations of the cluster. If you have documentation that provides the cluster name, cluster IP, and network configuration you can skip this step. If not, the easiest method is to open the registry on one of the host systems. Browse to HKEY_LOCAL_MACHINE\CLUSTER and examine the subkeys to locate the information required for the rebuild process. It is a good idea to export the entire key.
The next step of this process is to remove any remnants of the failed cluster from the hosts (the registry keys above) as well as from Active Directory. Open an administrator PowerShell console on one of the cluster nodes and run the following commands.
Remove-ClusterNode -Name COMPUTERNAME (where computername is the host’s NetBIOS name) then press Enter. Repeat for each host computer.
Remove-Cluster -CleanUpAD then press Enter. Occasionally, this command will not be able to remove the Cluster’s computer account from Active Directory. If this occurs, use ADUC to locate the machine account and delete it.
Now, a new cluster with the same configuration can be created on the hosts. I recommend that you use the same cluster name, network names, and cluster IP. This is not an appropriate time to redesign the cluster. Reduce the chances of your network, security systems, software, and other integrations causing issues by restoring everything to the previous state. Make any desired modifications after the restoration of services.
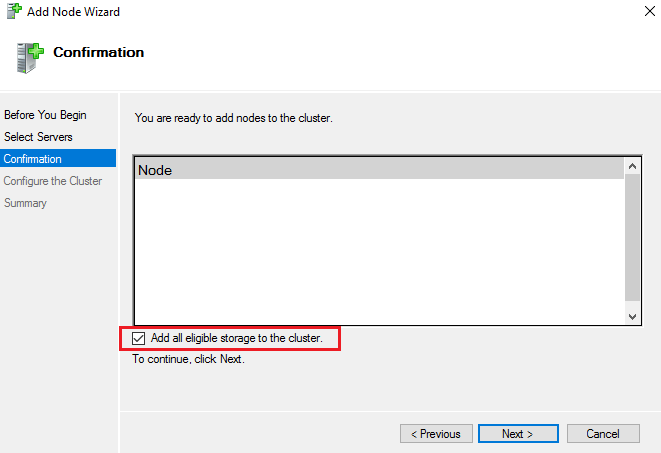
You can use PowerShell to create the new cluster, but I actually prefer the GUI for this task. There are quite a few steps and parameters that need to be specified to get the results you are after. Always start the process by running a cluster validation report. Make sure all the hosts are on the same patch levels and driver versions. Step-by-step instructions for the cluster wizard are easy to find online. Just make sure that you check the box to add all eligible storage.
Once the new cluster has been established you will probably need to add the disks to the cluster shared volumes before the mount point becomes available. Open the Failover Cluster Manager console from one of the nodes. Browse to storage, right click on the disks and add them.

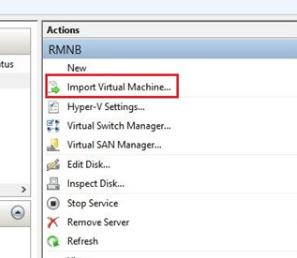
Now we are ready to import the virtual machines into our freshly rebuilt cluster. Open the Hyper-V management console. Use the option on the right-hand menu to launch the import wizard.
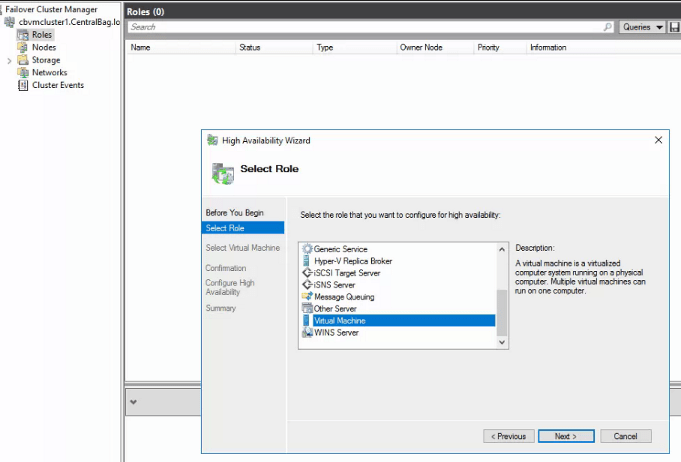
Locate the directory that contains your virtual machines and select one to import. After importing a machine into Hyper-V, but before booting it up, add it as a role to the cluster. Open the Failover cluster manager, select or right-click on the Roles node and choose the option to add a role.
After you have added the virtual machine as a cluster role, use the Failover cluster manager to start it. Repeat the process for each VM. You may need to search for some VM’s files or configs. In extreme cases you may need to build a new VM in Hyper-V and then attach the VHDX to it. Once you finished importing the VMs and adding them to the cluster, I suggest you test migrate them to another node. Congratulations, you’re done.

One thought on “Hyper-V Failover Cluster Troubleshooting and Recovery Part 2, How to Rebuild It.”