After you have used Microsoft Teams for a while, your navigation bar is likely to become a befuddled mess. Chats, meetings, people, and channels end up all over the place. Some folks thrive in that environment. I get it, using search for everything is a successful strategy for today’s deluge of data and messages.
Searching works, but sometimes it can be a lot slower than I would like. The new Teams client has added the ability to insert sections into the Teams nav bar. At first, it might not seem like that change would be very helpful in taming the mess. However, they have also added the ability to drag nearly any Teams object into those sections.
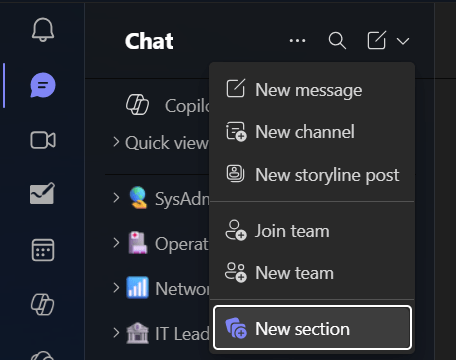
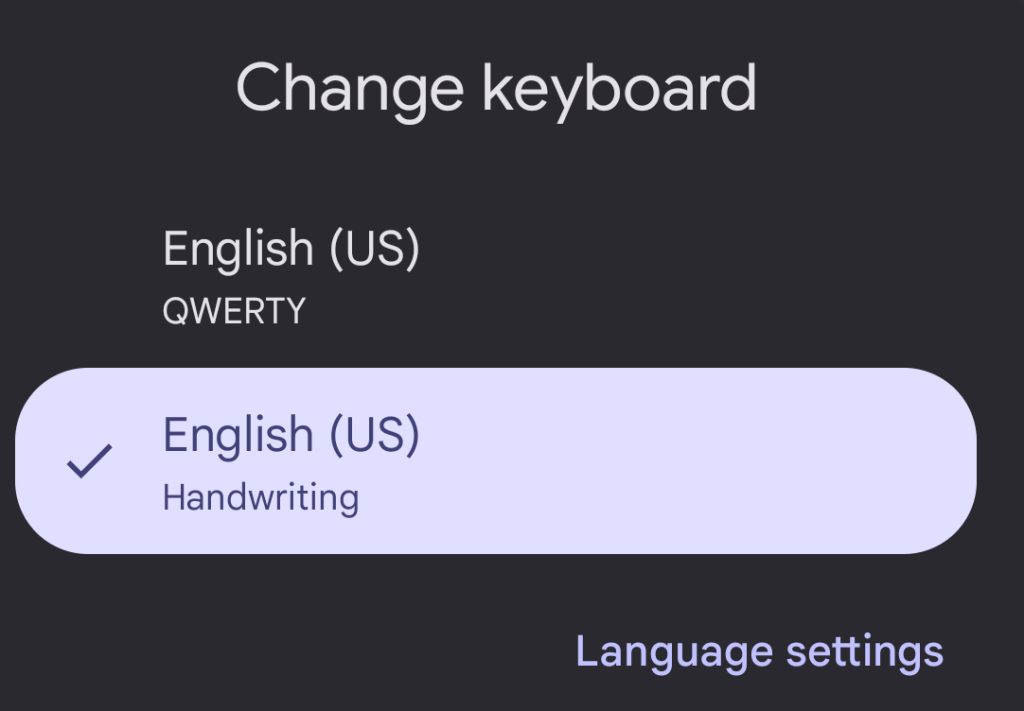
Create a new section from the compose drop-down menu.
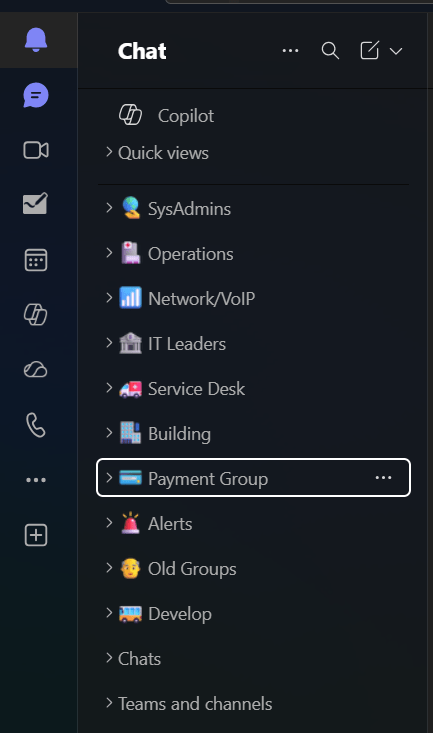
I like to create a section for each department that I work and meet with on a regular basis. Then I drag the respective people chats, meeting chats, group chats, and channels into their corresponding departmental sections. I also pick an icon for each section for faster recognition.
For me, the result of doing the work up-front, is less friction during day-to-day communications. I spend less time trying to locate the right Tom Smith from HR and not the one from finance, in the company directory. I also have the chat from the meeting we were in last week right there next to his name in HR section.
An organized navigation bar is easier and faster to use.
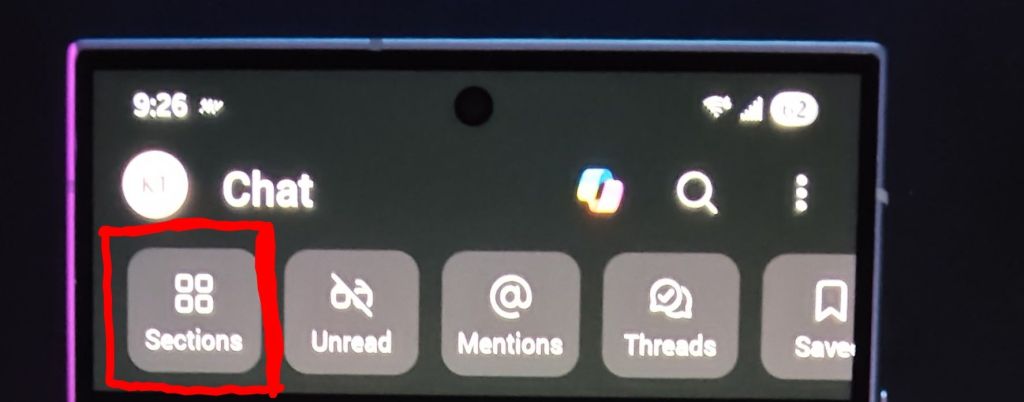
I was happy to discover that I only needed to do the work of organizing the sections once. The changes sync to my other computers automatically. They also replicate to my mobile phone and tablet. It isn’t entirely obvious how use sections in the Mobile client. There’s a “Sections” button at the top of the Teams mobile menu bar, tap it and the view will change to your neatly organized groups.
Mobile synchronization makes the feature even more useful.
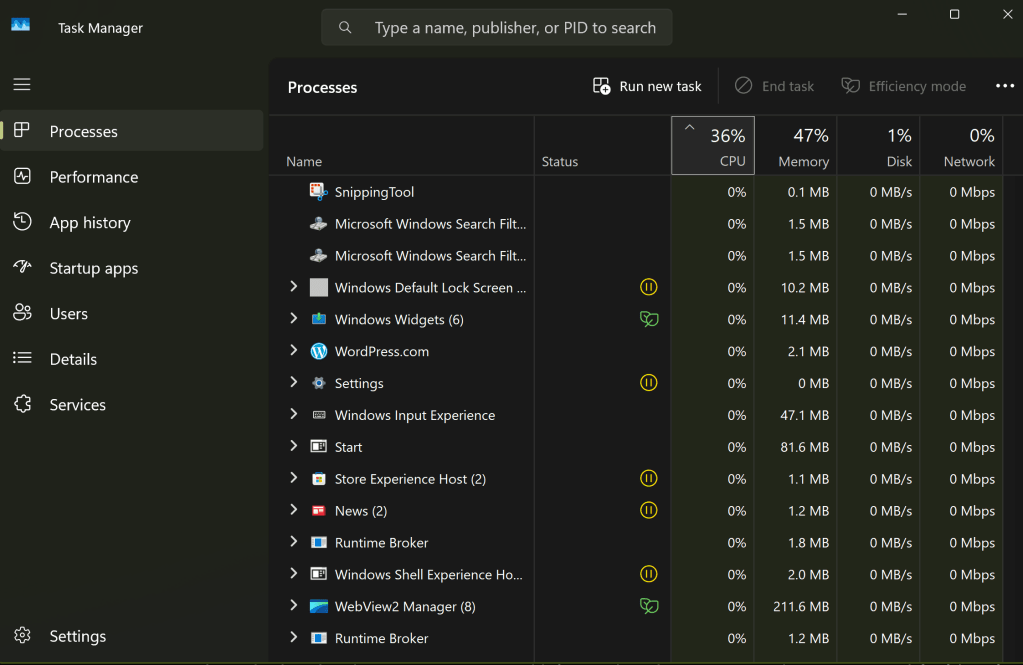
When you receive a new message, the entire section that the sender was in will light up. I find that I can collapse the sections by rolling up the chevrons. Then, I am able to shrink the Team’s window to just large enough to show the collapsed section list, like the screen shot above. I move the smaller window into the lower right corner of my screen. Then I use the handy Power Toys always on top feature (CTRL + Win + T) to pin it there. This setup lets me see and respond to pings quickly without consuming a lot of screen real estate.
If you have a difficult time using Teams efficiently, sections might be helpful. I’ve found the time that it took to be more than worthwhile. Friends and co-workers that have adopted them report an improved experience over the standard UI. I know that I prefer the organization over chaos.
I was experiencing a minor annoyance between Microsoft Word on my PCs and mobile devices in some files. Dark mode was reversed on Word mobile. Switching to light mode on a tablet displayed the file as white text on a black background. Because of this, I had to flip back to dark mode on my desktop or have my giant monitor fry my retinas.
I’ve been using Word more frequently as of late, which motivated me to fix it. I decided to see if I could find a pattern or some scenario that caused the problem. First, I started opening lots of files from OneDrive and from backup. I discovered that dark and light modes functioned normally if the file hadn’t been used cross platform.
I kept at it and eventually stumbled onto the cause. The page color was set to black in my default desktop template. I presume this was something I did and then forgot about. Talk about set it and forget it. If you have weird formatting repeatedly happening to your documents, take a look at the normal.dotm template. It controls Word’s default document settings like fonts, colors, margins, and the like.
It’s a good idea to make a backup copy of the file before trying to change anything. Open Explorer and copy the normal.dotm file in the folder @ C:\Users\user name\AppData\Roaming\Microsoft\Templates to another directory. Then follow the steps below to open and edit the template.
Open Word.
On the File tab, click Open.
Go to C:\Users\user name\AppData\Roaming\Microsoft\Templates.
Open the Normal template (Normal.dotm).
Make the changes that you want to the fonts, margins, spacing, and other settings as you would in any other Word file. Remember any changes will be applied to all future documents.
When you have finished, click the File tab, and then click Save.
Besides potentially solving document format issues, the normal.dotm file can be used to fully customize Word. It’s also relatively easy to push those customizations to computers in an organization. Common deployment methods include GPOs and scripts.
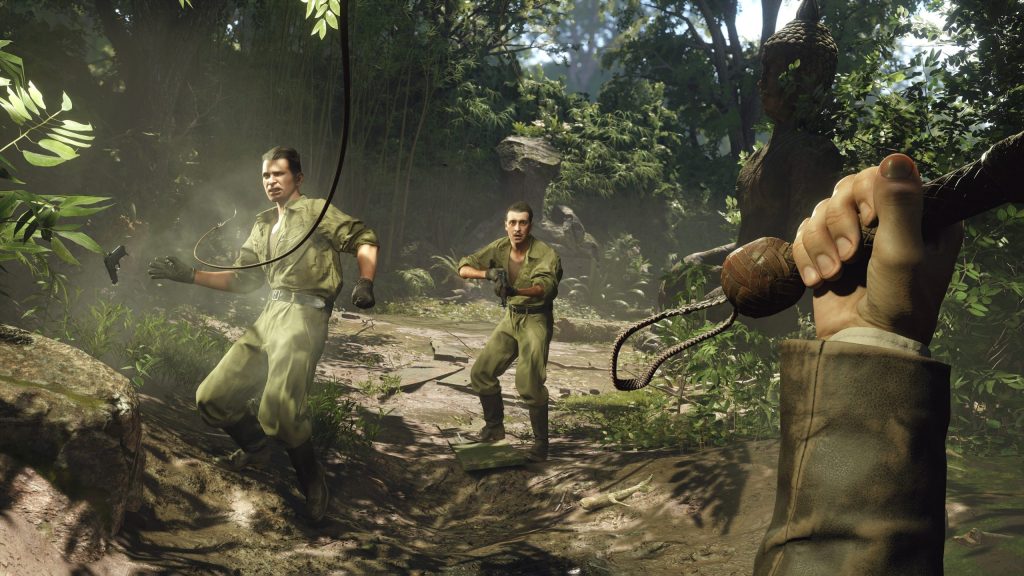
When it comes to Indiana Jones, I’ve been a fan since the beginning. I’ve seen all the movies, visited the Disney stage show, played most of the games, and even watched the cartoons. I enjoy the adventure, humor, and supernatural twist on historical events.
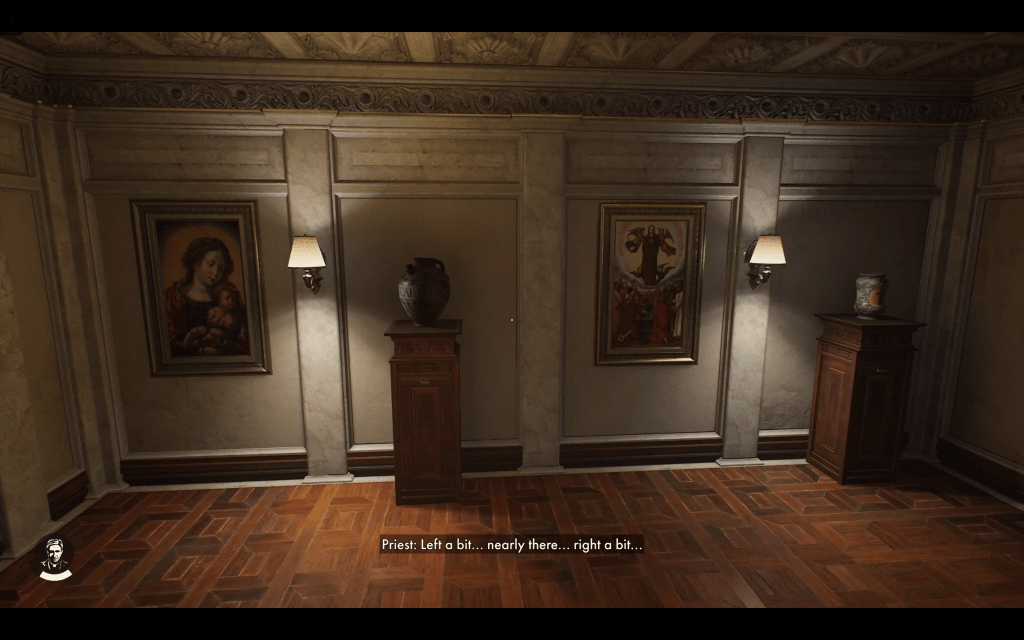
Right from the start, The Great Circle feels like an authentic Indiana Jones adventure. The game takes players to dramatized versions of past locations around the world starting at The Vatican in 1937, just before World War II’s start. As you wander the Vatican’s halls to complete the game’s various tasks you might notice the classical looking paintings that adorn the walls. Each is a picture-perfect reproduction of a classical artwork. The list of works and artists is provided in the game’s credits.
Copies of famous paintings adorn the halls and stairways of the Vatican.
The entire game features this level of attention to the most miniscule of details. Exploring all of the environments is rewarded by the discovery of similar creative details. The curious are also rewarded by hidden collectibles of several types. After I completed the game, I fast-traveled back to Giza just to explore the area at my leisure. I wasn’t disappointed that I took the time.
The locations and architecture are not the only incredibly detailed assets in the game. The characters are fantastic too. Indiana Jones looks, sounds, and moves like he does when Harrison Ford plays him in a movie. The witty humor, silent brooding, and athleticism of the character are spot on.
The Great Circle’s story is classic Indiana Jones. Almost real archeology and history, combined with just a touch of the occult and the supernatural. Other reviewers thought the story reached franchise movie heights. I know that I frequently played longer than normal sessions just to see what happened next.
I played the game on my i9/4090 desktop, a R5/3080 Ti desktop, my Gen 1 Legion Go, an Xbox X, and via Gamepass streaming. I’ve seen the game on screens ranging in size from eight inches to seventy-seven. Personally, I thought the bigger the screen the better for this entry. I preferred playing in the living room with a controller rather than at my desk or on handhelds. Probably because the game played so much like a Hollywood movie. With the graphics cranked to their max on the PC with the 4090 the visuals are impressive and immersive. Even on the small Legion Go with the graphics on low, the game looked great.
Navigating the world should be familiar to adventure game fans. Climbing, jumping, sprinting, sliding, and sidling are all movement options. Whipping and swinging is common as it should be. You unlock fast travel points as the main story is progressed. Indiana’s fighting, health, stamina, and other attributes can be ranked up.
Like any good adventure game, you can use several strategies to make it through to the end. The main two paths in this title are stealth exploration or combat. Explore enough and you’ll find ways to sneak through and reach your goals. The other option means getting good at combat, especially picking up and using weapons in the environment. Then you can clear each area of bad guys before searching for your goal. No sneaking required. Both strategies can be used alone or in combination throughout most of the game.
Whip it Good!
Combat consists of punching, blocking, cracking your whip and shooting Indiana’s iconic revolver. In addition to those, there are various environmental items that can be picked up and used as a makeshift weapon. Shovels, picks, hammers, and other tools are generally lying around. You can recover weapons from vanquished foes. Rifles, pistols, and various period machine guns are easy to get in most of the bigger fight scenes.
The rest of the game is straight out of the movies. Follow the clues to figure out what is happening. The Great Circle is billed as an RPG. I tended to complete all of the side quests, and missions for each geographic area. Then I would advance the main quest line causing the game to unlock and move play to the next geographic region. Playing this way made the experience feel much more chronological and linear than the back and forth travel that often occurs in RPGs.
I played for 150 hours. I finished the main story and all of the side quests. I found all of the books and fully upgraded Indiana. I enjoyed the puzzles and took the time to figure them out on my own. There were several puzzle types that adventure game fans will recognise. One was new to me, which I always appreciate.
I went through this run on normal difficulty. On this setting, the enemies were challenging enough to make sneaking worth the effort. However, anytime I tried to blast my way through an area, I was able to. Be aware that going loud has consequences. Some of the battles to exhaust an area’s supply of Nazi soldiers took more than twenty minutes of intense fighting.
I’m pleased to report that there is an actual ending to the game’s storyline. It isn’t a cliffhanger set up for the next title or DLC. There aren’t any major plot holes, assuming that you have completed all of the side quests. Overall, I had a great time playing through this adventure. The gameplay was fun and the story kept me engaged all the way to the end. Indiana Jones and The Great Circle is a game worth finishing.
It has been interesting to watch backup technology evolve over the years. Technological innovations like volume snapshots have made restoring from a backup one of the primary means of recovering from IT issues quickly. It hasn’t always been that way though. In the not-so-distant past, many businesses didn’t value having backup copies of digital information. They operated in a hybrid world where paper was still a functional fallback.
Somewhere between the mid to late nineties paper fell out of being an operational option almost entirely. More data existed only in a digital form. There wasn’t a “hardcopy” someone could retrieve from a filing cabinet. Most business leaders and workers hadn’t really seemed to notice the transition from hybrid to fully digital. On May 5th, 2000, a young Filipino computer science student brought the revelation to everyone’s attention.
Onel de Guzman was trying to steal Internet access. He ended up composing the “Love Bug”, a computer worm written in VBS that had two main functions. It arrived as an attachment in an email with the subject line of “ILOVEYOU”. When someone opened the file, the worm stole the person’s passwords. Then it used their email account to send copies of itself to everyone in their contacts list. The result was an estimated loss of more than six billion dollars. Guzman wasn’t punished because computer crimes weren’t specifically against the law in most places at the time.
Many of the companies that got hit with the Love Bug invested in backup technology. Backup and recovery software packages like Commvault, Backup Exec, and Acronis started to earn their place in permanent IT budgets and staffing. The Love Bug was big, and it caused some level of industry change. Especially in larger corporations. Smaller shops still struggled to justify a capital investment for “something that just sits there doing nothing most of the time”. As it turns out, the universe was not done teaching us its lesson.
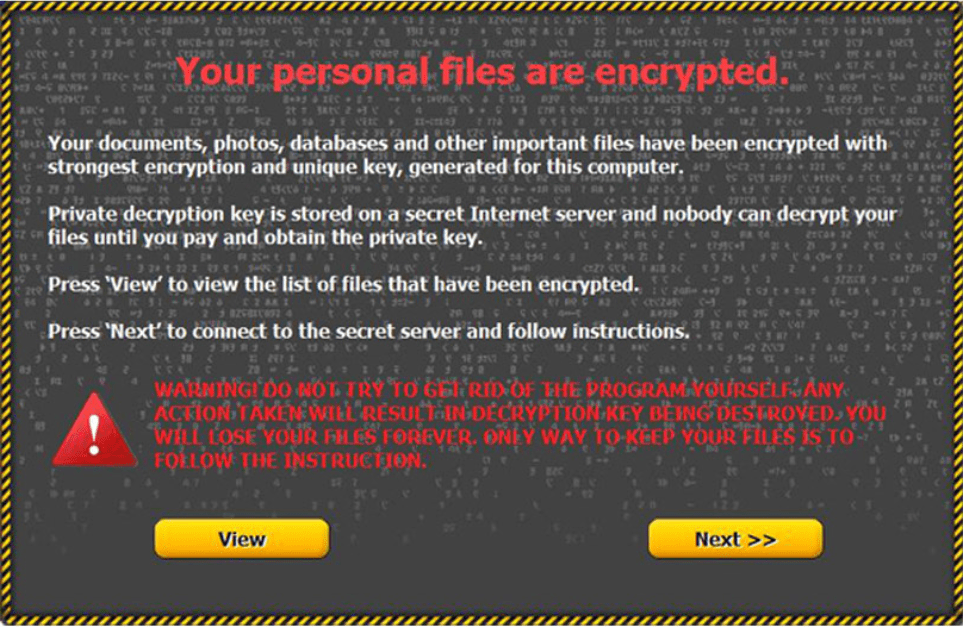
I don’t remember the exact date, but somewhere around the Christmas season of 2010 one of my colleagues asked me to come take a look at something on his screen. There was a full screen dialog box on his monitor that couldn’t be dismissed or minimized. It informed us that his files had been encrypted using a private key. Furthermore, it stated the only way to get access to the files back was to contact a sketchy international phone number and pay them a ransom. It was my first run-in with commercial ransomware.
The impact to businesses from ransomware has been enormous. In my opinion, nothing has transformed backup and recovery strategies across the industry more than ransomware’s direct financial impact. All of the sudden, your companies’ data and systems didn’t have to be valuable to a third party to make you a target for computer criminals. Small businesses were practically defenseless against these types of attacks, and the black hats of the world knew it. Organized dark business that operated on Bitcoin sprang up to blackmail the world’s companies into paying to get their own data back. They made away with untold billions in pure un-taxed and un-traceable profit.
One of the best defenses against ransomware was and is a good backup and recovery strategy. Companies rushed to move their data into the cloud where it was copied multiple times. Other organizations hired MSPs to get the technical help they needed to implement sound backup strategy. The “No thanks, I’ll just have my IT team restore it” answer, really took the wind from the bad guy’s sails. Making restoring faster and easier than paying has had the effect of robbing the entire dark business model of its profit motivator.
Ransomware still exists, but it has been diminished. Start-ups rarely enter the market without proven backup and restoration methods now. Investors know to inquire about recovery options. Work forces have been trained to scrutinize the minute details of emails and other incoming communications. Security scanners and teams have been deployed. Data loss is taken seriously by business leaders that used to be far removed from IT.
If my time in IT has taught me anything, it’s that the “next big thing” is just around the corner. Whether that thing is a marvelous invention, or the next super effective way of robbing the world’s companies is always a gamble. Now that most of us have backup solutions in place, the challenge is to not become complacent. Automation fails; backups can be located and compromised, and restoring isn’t an answer to the problem if it takes too long. When was the last time you fully tested restoring your company’s data? Today is a good day to get started on that.
I have long been enamored by the experimentation and learning that is achieved via simulation. Simulation is used in everything from lab experiments to analysis models. The concept of simulating circumstances and environments has arguably helped jump start the modern era.
Virtual Reality (VR) is the ultimate form of simulation in the digital realm. One could argue that no single entity has pushed the technology further than Oculus ->Meta. I first noticed Oculus when they demonstrated a prototype of their glasses at E3 back in 2012. I purchased the first gen Oculus Rift on launch day and have been involved with the VR ever since.
Like a lot of folks, I’ve spent money and put countless hours into my VR hobby. I’ve replaced computers, upgraded GPUs, and installed new network gear. I’ve bought a driving simulator cockpit. I coped with the horrible performance of early systems. I pushed through the VR induced motion sickness. I have a near permanent kink in my neck from wearing the heavy face masks too much. As I sit here writing and reflecting on everything. I find myself wondering, “Has it been worth it?”
Yes. The answer is yes. Even with all of its flaws, virtual reality is still one of my favorite forms of entertainment. Nothing else immerses me in an activity like VR. The experiences invoke much stronger reactions than equivalent flat screen activities. I’ve caught myself bracing for impact in virtual racing accidents. I have mistaken my companion in Skyrim VR for a person standing behind me more than once. Fumbling a shotgun reload right before you get overwhelmed by zombies is intense in virtual reality. It causes a true panic feeling in most people, especially the first few times. Flat screens don’t trigger my flight-or-fight response like VR does.
I have improved in real world activities thanks to virtual practice. I am better at bowling, golf, and playing table tennis. My improvements in each have been confirmed in the real-world versions. I don’t have a pilot’s license, but I can absolutely fly (and land) many different types of planes. I have also improved my driving skills well past my commuter origins.
True scale, 3D vision, and 360° head tracking exceed many people’s expectations all on their own. Surround sound and various controller accessories further enhance certain activities. Simulations that feature controlling vehicles like racing and flying are shockingly realistic. Several companies manufacture full vehicle cockpits. Realistic controls and motion platforms also further enhance the realism while simulating every type of vehicle out there. Cars, fighter jets, 18-wheelers, tractors, construction equipment, and even spaceships have full setups available.
Several sports are also replicated in astonishing accuracy by modern VR. In my Quest 3 the Golf+ app, no PC needed, is the most educational golf experience I’ve ever had. The app lets you play and practice on digital copies of real courses. No green fees, cart rentals, or walking required. I learned which club to pick and how to stand. I understood how slicing affects the ball’s path. I also learned lay-up strategy and how to line up a putt. Then I had my swing analyzed and got tips from an AI golf pro. I frequently choose Golf+ when demonstrating the Quest 3 to someone that hasn’t tried VR. Check them out at https://www.golfplusvr.com/.
While trying to answer the question that started this post,”Is it worth it?”. I assessed all the costs and time involved. I decided that I still feel good about the hobby. Apparently, the folks at Meta have also been assessing their investments in virtual reality. They announced layoffs and a reduction of priority in their Reality Labs division. The group is responsible for much of the company’s efforts in virtual reality. Many VR enthusiasts and market analysts view this as a sign of doom and gloom. They see the long predicted demise of this run of VR development on the horizon.
Enthusiasts and analysts have suggested various reasons for VR’s failure to reach widespread adoption. Two of the most commonly sighted are cost and complexity. Like all technology, there are levels of VR. Starting at the top-level of any hobby is usually difficult and expensive. I personally don’t think the entry level of this hobby is particularly costly though. A Quest 3S costs two hundred less than a Switch 2 in the US right now and includes everything needed.
In my experience, standalone VR headsets are as easy to set up and operate as any other gaming console. Connecting to Wi-Fi, creating an account, and opening the app store seems like a well established process in the world. Strapping the headset to your face is uncomfortable, but so is my motorcycle helmet. It doesn’t stop me from riding my family’s 4-wheeler. Don’t even get me started on the amount of effort it takes to trailer that thing and take it somewhere to ride.
So, what is it then? Why isn’t a VR headset in everyone’s home? Most of the friends and family I have demonstrated VR to have been impressed with the experience. But only a few have gone on to purchase their own gear. I suspect that some folks just don’t enjoy the increased intensity of virtual reality experiences. Facing a thirty-foot-tall dragon with a short sword is a lot when that dragon is at full scale.
Whatever the reasons are, we can’t deny that VR is not taking off like other technology has. I wouldn’t go so far as to say that the entire industry is a failure. I don’t think most technologies are a good fit for huge swaths of the population very often. Aren’t smartphones used as the ultimate example of digital tech adoption because of how rare numbers like that are?
Meta sits at the head of the VR table because they purchased Oculus and funded its rapid expansion. Their other contributions to VR have largely been focused on replicating the Facebook and Instagram experiences in a 3D interactive environment. Wall Street seems to think this makes them the indicator for the entire VR industry. Maybe that is true from a financial standpoint. The money angle always feels short sighted to me though.
Meta isn’t the only big player in VR. Apple, Sony, and Steam are all still in the game and making progress. We also shouldn’t forget that much of the true innovation happening in the VR space is being driven by the smaller organizations. Companies like Pimax, Bigscreen, and DPVR are pushing the hardware forward at an impressive rate.
AI seems to be on the cusp of helping us render computer graphics that look nearly as realistic as video recorded on analogue film. If the hype is to be believed, AI should also streamline hardware and software development cycles in pretty much every industry. We should be getting those ultra-real graphics and headsets that are as lightweight as your favorite sunglasses sooner than we expected.
VR has already proven its worth to society. I don’t see it disappearing in the in the near future. Even if it loses all appeal to gamers, it will probably continue as a simulation tool. I can’t say if it will ever become as ubiquitous as the smartphone and television or not. I don’t think it needs to.
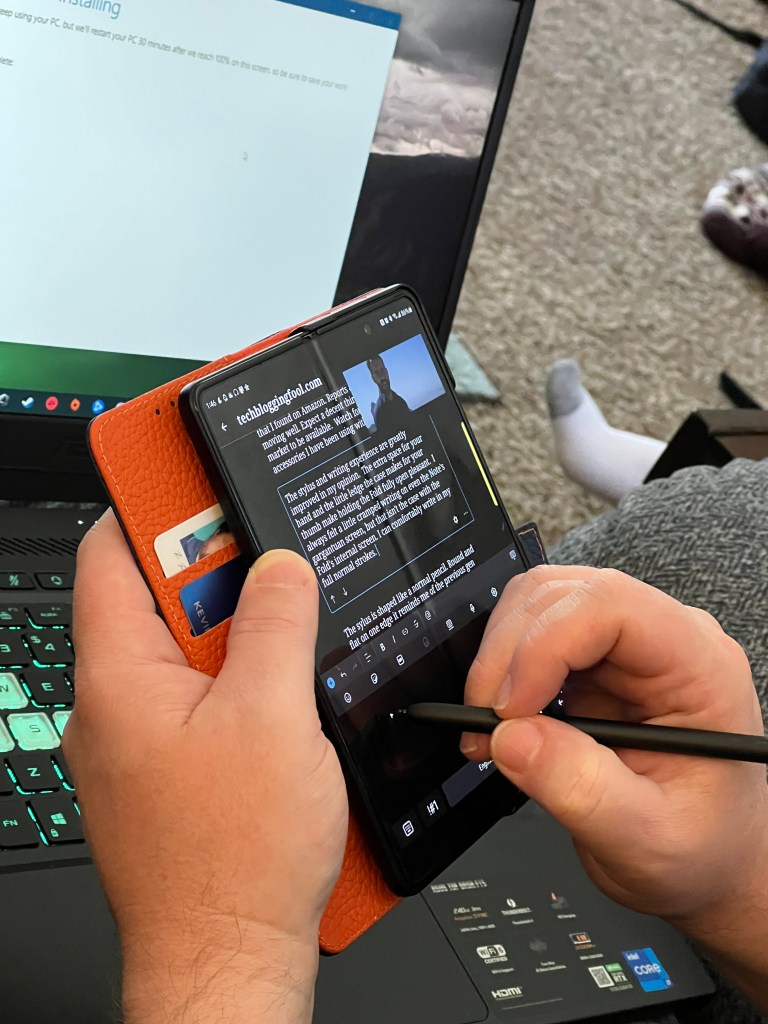
I’ve been looking for a small lightweight Android based tablet with good HCR (Handwritten Character Recognition) for a while now. I like to write while kicking back in my recliner and watching TV. A phone is too small for me to comfortably write on for very long.
I’ve always thought that the iPad mini was about the perfect size and weight. I have tried one several times, but I struggle to write with Scribble (Apple’s HCR). My Galaxy Fold 3 was a perfect fit for using in relaxed writing positions. The Fold 7 didn’t support an S-Pen, so I skipped it and went with an Ultra phone. Hence my desire for a mini tablet.
I borrowed my spouse’s 6th gen iPad mini to give Scribble another chance recently. I wanted it to work, I really like the form factor and screen.. Scribble has improved. It works great for forms and jotting a few lines. It still feels clunky for my style of handwriting. I have to correct more than I would like.
There are more Android based tablets than I expected in the 8-to-9-inch range. I appreciated having choices, but many candidates were under powered and easily ruled out. Lots of the mini tablets seem to favor a generic octa-core CPU with 4 gigabytes of RAM. I passed on them because HCR takes a lot of computer resources all on its own. Slow recognition makes handwriting a miserable input option for me.
Read the fine print, this generic tablet has 3GB of RAM and a 9GB swap file.
I ordered the Legion Tab from Lenovo’s site. It was on sale for $420.00 with free expedited shipping if you’re a member of their rewards program. Even with the sale, it is on the more expensive side of the mini-tablet market. You get a lot for the price though. It has a late model Snapdragon chip, 12 GB of RAM, a 165 FPS HDR screen, and 256GB of storage capacity. It ships with a 65 watt power brick, a fitted folio case, and high-end screen protector. The active stylus is a $40.00 accessory.
I haven’t used a Lenovo Android device before this. I wasn’t sure what to expect. Lenovo’s fit and finish is top-shelf. The cameras are good enough and include an LED flash. The speakers are the best sounding, loudest speakers, I have heard on any tablet or phone to date. There are two USB-C ports. The bezels are thin and straight. The chip is intentionally positioned far away from where your hands touch the back. The case hovers just above the tablet’s back surface to further dissipate heat away from your hands.
An unedited photo captured with the Tab’s 13 MP rear camera. All settings are automatic.
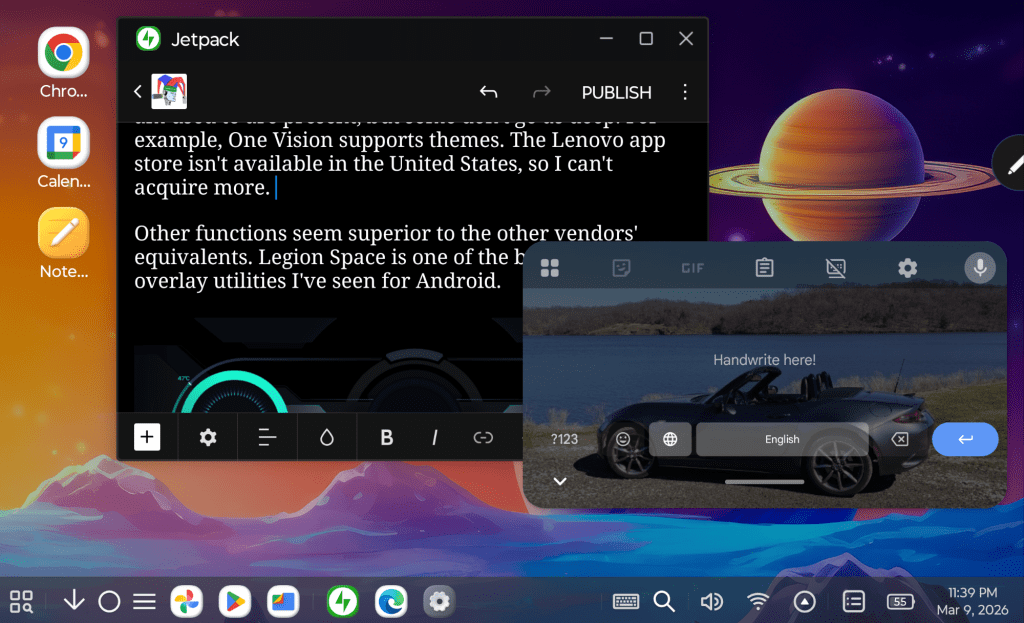
Lenovo’s One Vision launcher provides similar functionality as Samsung’s One UI. Most of the features I am used to are present, but some don’t go as deep. For example, One Vision supports themes. The Lenovo app store isn’t available in the United States, so I can’t acquire more.
I didn’t realize that Lenovo had a PC Mode on their tablets. If you have ever seen Samsung’s DEX, the idea is similar. In PC Mode everything runs in a floating window. There’s a start button and taskbar, all the hallmarks of a PC operating system are there.
PC Mode is exactly that. Activate it from the quick settings menu.
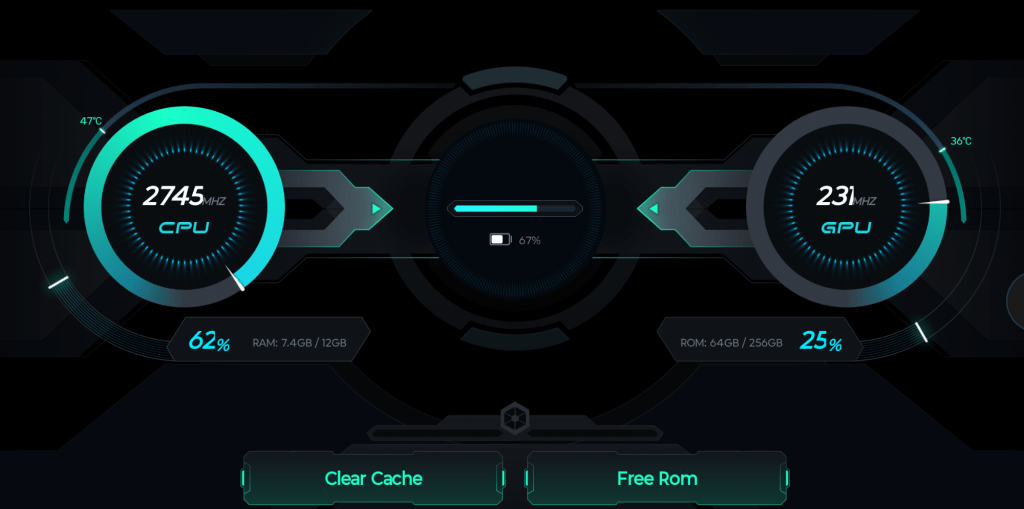
Some of the UI functions seem superior to the other tablet manufacturers’ equivalents. Legion Space is one of the best gaming overlay utilities I’ve seen for Android.
Legion Space is a fantastic game monitor and system utility.
Lenovo opts for GBoard instead of a homegrown keyboard like Samsung does. GBoard is excellent and has the functions I rely on. You can float or split the keys and swiping is available too. The handwriting recognition mode offered by default is in-line and similar to Scribble. I’m adjusting to its quirks and getting better at it every day.
At first, I didn’t realize that I needed to install the English handwriting language option. Without it you can’t access the full writing input panel experience. I’m getting closer to writing at top speed. I’m confident I’ll get there with a little more practice.
By default, the handwriting is in-line only. Install this keyboard from settings to access a full input panel.
The stylus links to the tablet via Bluetooth. It’s USB-C rechargeable. The shape is round, except for the flat edge that it magnetically sticks to the back of the tablet with. The tips are stiffer than an S-Pen’s. The writing instrument glides across the screen smooth and fast like the Apple pencil on an iPad does. It’s well balanced in the hand and features a single button. I’ve written this entire post with it and have enjoyed the experience.
The pen feels great and works well.
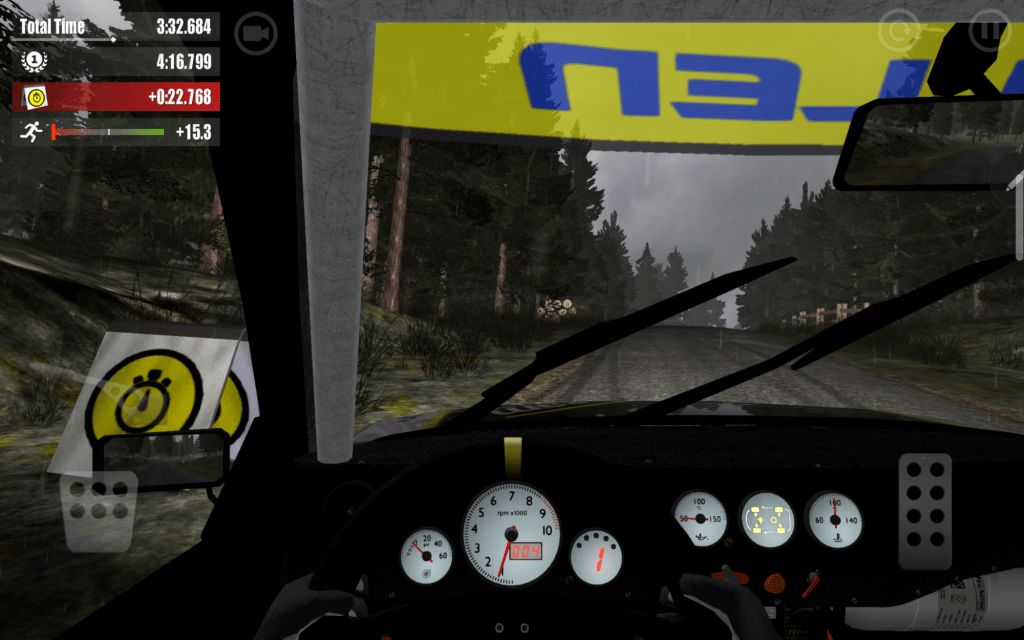
Of course, bearing the Legion moniker in its name means this thing is built for gaming. Let me tell you it doesn’t disappoint. In fact, it is the best experience I’ve had playing on any Android device. Rush Rally 3 runs at 130 FPS in 1440 P ultra. Destiny Rising plays perfectly on Ultra settings too.
Captured in game playing Rush Rally 3
It’s small and light enough to hold while using the on-screen controls. It’s also large and loud enough to use as a tabletop console when paired with a controller. The power, screen refresh rate, and screen size are astonishing compared to a phone, any phone. Legion Space lets you monitor and tweak your settings to squeeze the most out of each game while you are playing.
The Android gaming experience is second to none.
The learning curve going from Samsung to Lenovo has been easier than I expected. Android is Android, but I have had issues when changing device brands in the past. Once I ended up with a tablet that couldn’t access the Google Play store without me resorting to trickery. There’s been none of that this time around. All of my apps, games, and cloud connections work well with the device.
If you have wished somebody would make an Android based iPad mini competitor, Lenovo has granted it. Even improved on it I dare say. The Legion Tab 8.8 Gen 3 has quickly become my favorite device for home use. Now I can sit in my recliner and write for as long as I please without sacrificing comfort or functionality.
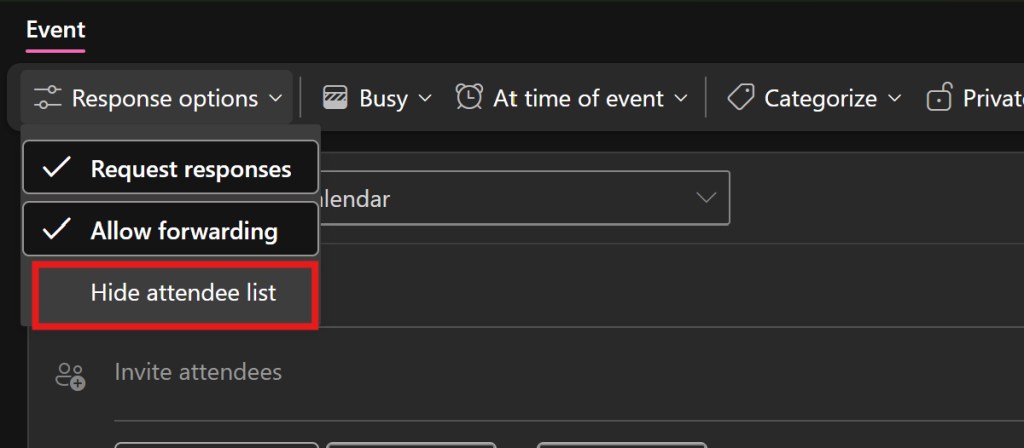
I learned something new this morning. A colleague asked how they could send an Outlook meeting invitation to a large group. They wanted to do this without exposing the attendee’s email addresses to the entire group. A quick on-line search suggested that it wasn’t an easy thing to do.
As it turns out, that search was wrong. Another colleague enlightened us. If you are using the new Teams or new Outlook, you can easily hide attendees. This option is available in the “Response Options” menu on the invitation form itself.
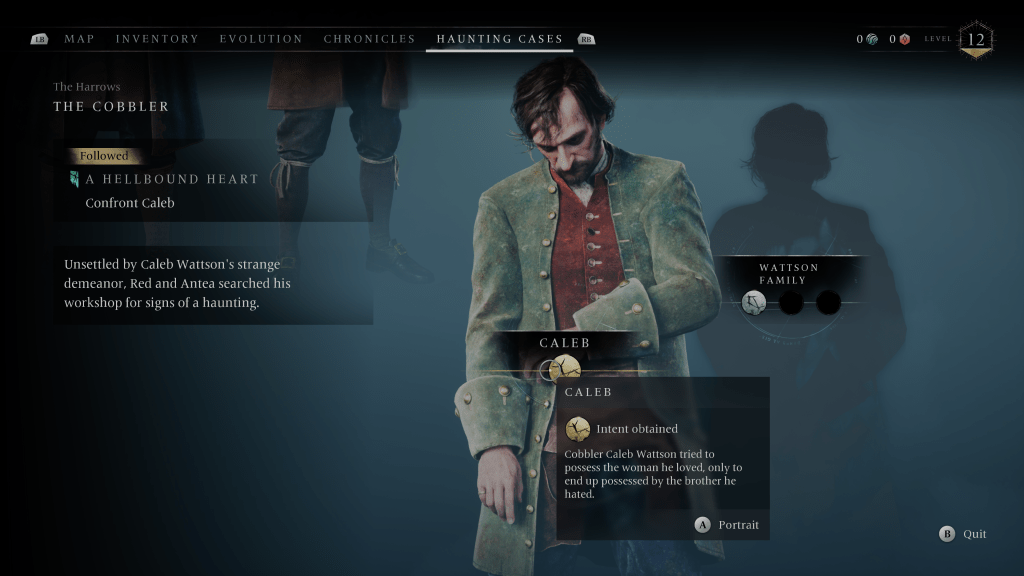
Having a subscription to Microsoft’s Game Pass has expanded the number and type of games I play. I try titles from the subscription-based catalog that I probably would not have purchased individually. Banishers Ghosts of New Eden is one of those. I don’t typically enjoy games that feature ghosts as a main story element. This time, the game play video looked interesting and that was enough to convince me to try it.
At its core, Banishers is an adventure RPG based on ghost hunting. It’s set in the sixteen nineties in and around a very haunted colonial North American town. The main characters Antea and Duarte have been summoned to address the situation. They are Banishers, a type of old-school ghost hunter, and their job is to rid the area of supernatural malfeasance.
In part I chose to try Banishers because it looked like a game my spouse would enjoy watching. I was right. From the opening scene, this game is gorgeous. The environments are all so detailed. The weather is almost an NPC by its own right. Much of world is cold, wet, foggy, and just plain dreary. The color scheme and artistic slant lean toward realistic. The costume director deserves an industry award all their own.
I have been impressed by the graphics. I play the game on my PC, Handheld PC, Xbox, and via Game pass streaming to my phone and laptop. It looks and plays great on all of them provided you tune the game for the hardware. In 4K ultra on an OLED screen the scenery is stunning. Remember how you used to stop and stare off the top of hills in The Witcher 3 or Uncharted? You’ll be doing it in this game too.
The world isn’t open, but it’s not on rails either. Traveling, navigating, maneuvering, looting, and unlocking will be familiar to anyone that has played the modern Tomb Raider series. Down to having campfires that you save, upgrade, and fast travel from sprinkled all over the map. The classic adventure game mobility methods are all featured. Rope climbing, mantling, sidling, ducking, jumping, grappling, and eventually fast traveling get you around the game’s world.
After a major event in the game’s early levels, you gain the ability to control both Antea and Duarte. You can swap between them with a button press to take advantage of their unique abilities. The game is played from the 3rd person view for the most part. Your main weapons are a saber (sword not light), a flint lock rifle, punching, and several types of magic attacks. The characters also feature ultimate attacks, linked combo attacks, and charge attacks.
The rifle is powerful when you hit weak spots and ammo is unlimited. Don’t get too excited though. The agonizingly slow reload will keep you from playing the game as a full-on shooter. If you focus resources on rifle related upgrades you can get close to blasting your way through, but not quite. Well play developers, well played.
The combat starts out easy and increases in difficulty as your characters and their gear rank up. There are several types of evil entities to do battle with on your journey. There are also mini bosses and bosses that must be conquered to unlock new map areas. On normal mode, the AI is quite challenging. Expect to die a few times in each new mini-boss area.
Normal mode and above makes the combat feel very souls like. Over ranked baddies with shields and multiple attackers that work together will have you fully engaged to keep up. I also tried a few fights on easy mode. They are still challenging and require strategic decisions, but I cleared areas without dying more often than not.
Frame perfect parries with your saber are the best defensive move in your arsenal. Generic blocking is moderately effective depending on your gear and the attacker. There isn’t any cover, but you can dodge.
Attacks and defensive moves have to be balanced to win against the more powerful enemy encounters. I often find myself backpedaling to shoot, then rushing in close in to do heavy damage with melee attacks. I customized my characters armor, weapons, and abilities to match this strategy. The terrain usually locks you into a fighting arena like God of War.
What makes Banishers so good to watch, and play is the combination of high production value and interesting combat. The theatrics are simply fantastic. The sets, actors, voices, and storytelling are all dazzling. The dialogue sounds like natural conversation from the time and place. Overheard conversations often provide subtle clues. Emotions are well conveyed by seamless in-game cinematic experiences and direct individual dialogue scenes. There are no loading screens.
You’ll meet and work with all types of characters as you progress through the game. The witches are some of my favorites. They are presented as wise naturalists rather than as villainous. Banisher’s story arcs are good at getting you to care about the character’s plights.
Even side quest characters have a tall enough story arch to invoke a mild sense of empathy. I’ve encountered stories based on cannibalism, mariticide and uxoricide, a mass murder caused by moral circumstances and more. I keep playing just to see what happens next, well past my bedtime on several occasions.
Side quests start when you talk to folks in each newly unlocked area to acquire work. If someone hires you, an investigation is started. You’ll be looking for clues and talking to NPCs to figure out who or what is causing the problem.
Some of the so called “haunting cases” are pretty grizzly murder mysteries in which multiple people were murdered. Others are accidents and everyone is innocent. It’s your job to figure out which. Along the way you will collect resources and battle supernatural creatures. Each quest features a moral decision at the end that has an effect on the game’s overall outcome.
I’ve been playing the game for about thirty hours. In that time, I’ve ranked up to a level twelve. I’ve upgraded all of my gear and weapons to mid-level. I have faced most types of enemies and mastered the combat as well as navigation. I’ve gotten a real feel for the game, and I can tell that I will play until I finish it. Banishers Ghosts of New England surprised me. I expected it to be a mediocre adventure game, but it is clearly top shelf.
I am frequently asked to generate various reports for SharePoint Online. Usually, I can get the requested information from the Microsoft 365 Reports console, this time was different. We had just merged two Microsoft 365 tenants. The data move had worked according to the tools. The problem was that independent reports showed people were still using the old target sites after the cut date.
Microsoft’s SharePoint activity reports obscure the user’s identity for security reasons. We specifically needed to identify who was accessing data in the old tenant to troubleshoot the issue. There is a setup option you can toggle to display user identities in the reports. I turned on the switch and waited five business days with no results. I couldn’t wait any longer and needed to pivot to another solution. If you want to try, the Microsoft documentation is here.
I decided to go with a PowerShell generated report instead. Power BI would also have been a good choice, but I had an ace up my sleeve. I have been using a PowerShell script written by Salaudeen Rajack on his SharePoint Diary blog for quite a while. I knew that it was almost perfect for this project. I would just need to craft a method for looping it through all of the sub-sites in our old tenant.
Salaudeen’s script is based on the open-source PnP SharePoint PowerShell module. He uses it to create a PowerShell function. This function takes a folder and file level inventory of all the documents stored in any given SharePoint site. It generates a report showing the URL, total size, type, creation date, last accessed date, along with the user account.
I didn’t want to authenticate hundreds of times as the function looped through each site in the tenant. So, I registered the PnP module as an App in Entra ID and used certificate-based authentication. Again, Salaudeen’s blog provides excellent instructions.
All that was left was to generate a list of all the individual site URLs. Then I needed to pass them through a logic loop to call the report function. The resulting report is perfect for understanding your SharePoint Online environment as a whole.
Import-Module -Name PnP.PowerShell
#Function to collect site Inventory
Function Get-PnPSiteInventory{
[cmdletbinding()]
   param([parameter(Mandatory = $true, ValueFromPipeline = $true)] $Web)
    #Skip Apps
    If($Web.url -notlike "$SiteURL*") { return }

    Write-host "Getting Site Inventory from Site '$($Web.URL)'" -f Yellow

    #Excluded libraries
    $ExcludedLists = @("Form Templates", "Preservation Hold Library")

    #Get All Document Libraries from the Site
    $Lists= Get-PnPProperty -ClientObject $Web -Property Lists
    $Lists | Where-Object {$_.BaseType -eq "DocumentLibrary" -and $_.Hidden -eq $false -and $_.Title -notin $ExcludedLists -and $_.ItemCount -gt 0} -PipelineVariable List | ForEach-Object {
        #Get Items from List
        $global:counter = 0;
        $ListItems = Get-PnPListItem -List $_ -PageSize $Pagesize -Fields Author, Created, SMTotalSize -ScriptBlock `
                 { Param($items) $global:counter += $items.Count; Write-Progress -PercentComplete ($global:Counter / ($_.ItemCount) * 100) -Activity "Getting Inventory from '$($_.Title)'" -Status "Processing Items $global:Counter to $($_.ItemCount)";}
        Write-Progress -Activity "Completed Retrieving Inventory from Library $($List.Title)" -Completed

            #Get Root folder of the List
            $Folder = Get-PnPProperty -ClientObject $_ -Property RootFolder

            $SiteInventory = @()
            #Iterate through each Item and collect data
            ForEach($ListItem in $ListItems)
            {
                #Collect item data
                $SiteInventory += New-Object PSObject -Property ([ordered]@{
                    SiteName  = $Web.Title
                    SiteURL  = $Web.URL
                    LibraryName = $List.Title
                    ParentFolderURL = $Folder.ServerRelativeURL
                    Name = $ListItem.FieldValues.FileLeafRef
                    Type = $ListItem.FileSystemObjectType
                    ItemRelativeURL = $ListItem.FieldValues.FileRef
                    CreatedBy = $ListItem.FieldValues.Author.Email
                    CreatedAt = $ListItem.FieldValues.Created
                    ModifiedBy = $ListItem.FieldValues.Editor.Email
                    ModifiedAt = $ListItem.FieldValues.Modified
                    FileSize =  $ListItem.FieldValues.SMTotalSize.LookupID
                })
            }
            #Export the result to CSV file
            $SiteInventory | Export-CSV $CSVReport -NoTypeInformation -Append
        }
}
#Parameters
$CSVReport = "C:\Temp\SharePoint_Site_Inventory_And_Activity_Report.csv"
$Pagesize = 2000
#Connect to the SharePoint 365 admin console with a registerd app and get all of the SharePoint Site's URLs
Connect-PnPOnline -Url "https://yoursite-admin.sharepoint.com/" -Interactive -ClientId xxxxxxxxxx-xxxxx-xxxxxxx-xxxxxxxx-xxxx
$Sites = Get-PnPTenantSite
#Call the Function for all SharePoint Online sites in the tenant, one at a time.
Foreach ($Site in $Sites){
    $SiteUrl = $site.Url
    #Connect to each site with the registered app before calling the function for it.
    Connect-PnPOnline -Url $SiteURL -Interactive -ClientId xxxxxxxxxx-xxxxx-xxxxxxx-xxxxxxxx-xxxx
    Get-PnPSubWeb -Recurse -IncludeRootWeb | ForEach-Object { Get-PnPSiteInventory $_ }
}
I ran the script above on a tenant with around 500 sub-sites and about a thousand users. It took nine and a half hours to finish. The resulting CSV file was 42 megabytes in size. You’ll need to know the URL for your SharePoint Online admin console. You’ll also need the ClientID from the Entra app you registered.
The script is configured for an interactive logon so that it will work with MFA. After the first logon prompt each sub-site will use the same session. Once you have generated the report, there is a lot you can do with Excel to highlight various aspects.
Have you ever wondered if radar detectors still work? They were all the rage back in the day. I remember having one in my Mustang. It faithfully hung from its little suction cup on my windshield for years. It’s annoying squawk and flashing red LEDs reminding me to slow down. I eventually lost track of the power cord. Most of my driving was just for commuting by then so I didn’t bother replacing it.
Recently, I was watching a video on YouTube where the creator was discussing the true cost of speeding tickets. They had mentioned radar detectors as one method to avoid being saddled with the exorbitant insurance increases. I decided that I wanted to find out what modern detectors were like.
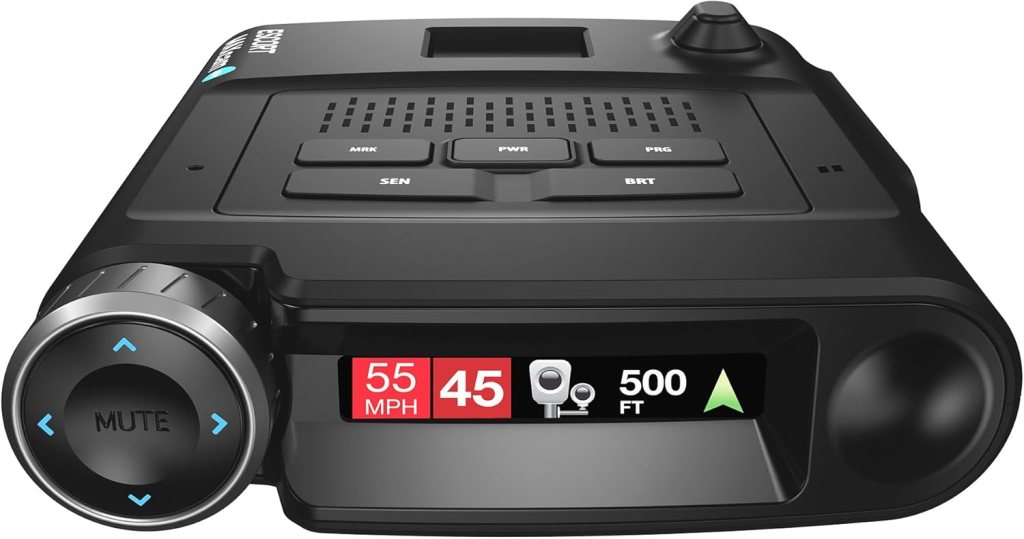
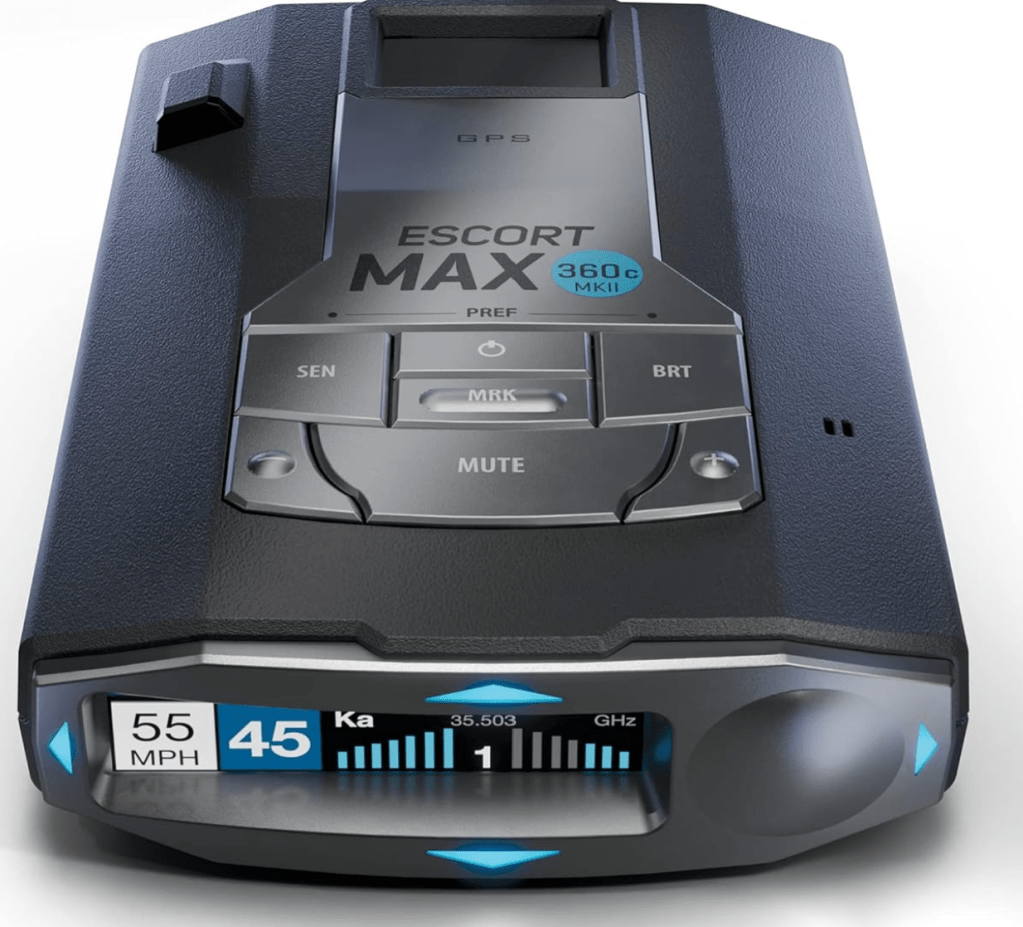
I did a bunch of research and narrowed down the field to a couple of choices. At first, I was pretty convinced that I wanted an Escort MaxCam 360c. It combines a high-end radar detector with a decent dashcam in a single unit. There are some trade-offs of course. It is both larger and heavier than a standalone detector. Some people report that the range is shorter than its standalone counterpart. It’s also incredibly expensive at almost a thousand dollars.
What really dissuaded me from going with a combo unit was the difference in pace between each technology’s development. Radar detector improvements are slow. People keep these things for several years. Camera upgrades on the other hand, are fast and furious.
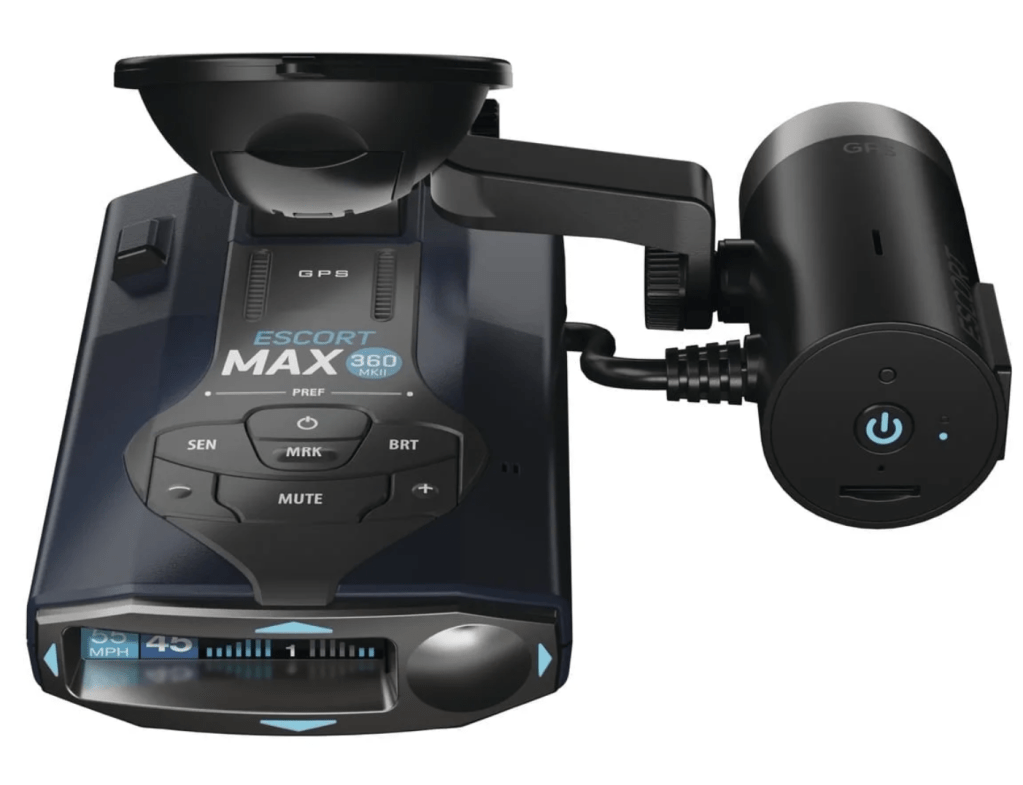
Eventually, I chose the Escort Max 360c Mark II. It was on sale at my local Best Buy for $499.00 which is in the middle of the cost spectrum for these types of devices. It has a ton of features and functions for its price. One that stood out is the expansion capability. Escort makes an add-on camera module that costs around $150.00 online. There are only a few detectors on the market that offer an expansion feature.
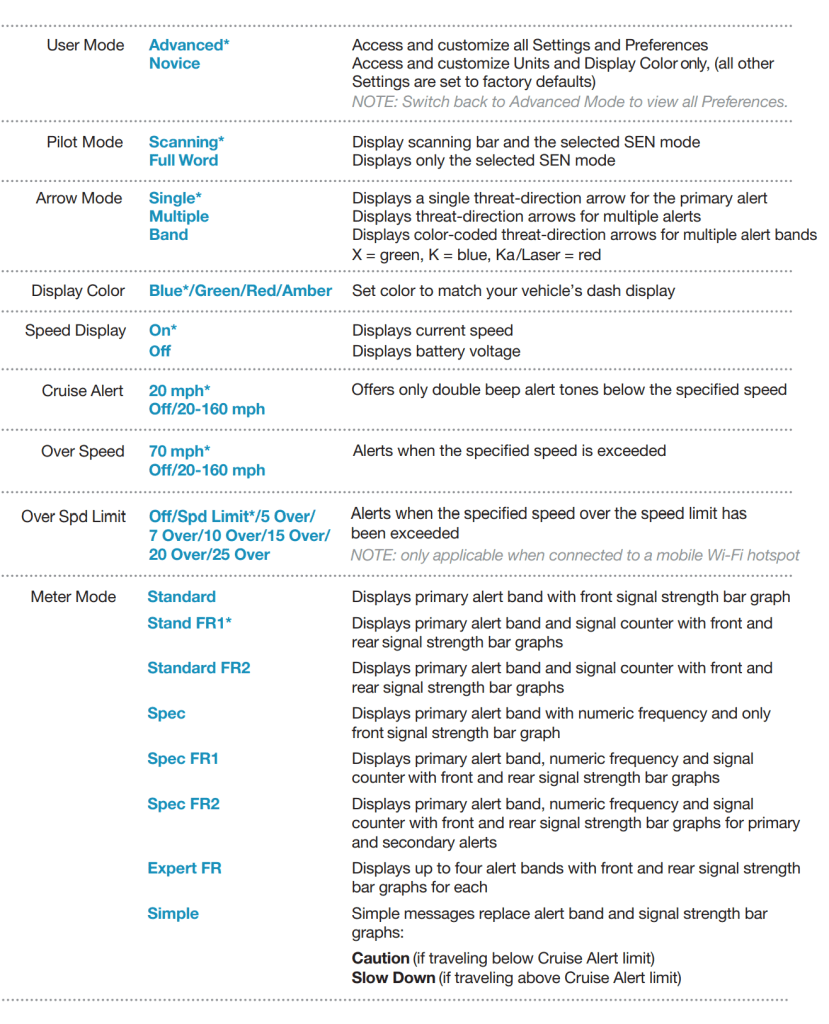
There are multiple radio sensors in the 360c’s chassis. Its brain tracks which one gets hit by the radar gun’s pulse first. The detector uses that information to calculate which direction the hit came from. It also works out how strong (far away) the signal was. A directional arrow on the screen tells you where to look. Bar graphs on the screen show you how much energy the signal carried across each sensor.
The Max 360c Mark II also has a built-in GPS sensor. The unit will warn you when you are over the speed limit by a certain amount (you set). It can also warn you about known speed cameras and other road challenges in your vicinity. It uses the GPS to record each detection it makes in an internal database. If the same detection is made three times that location is marked as a false positive result. False alerts played a big part in giving up on radar detectors the first time around.
I also ordered a couple of radar detector/dashcam mirror mounts from Amazon. The mounts are comprised of an articulating clamp. This clamp attaches to the support your rear-view mirror hangs from with a U-bolt and a couple of nuts. They were easy to install in both of my vehicles. The radar detector magnetically attaches to them which makes moving between vehicles much easier.
The 360c Mark II comes with a cigarette lighter based power cord. Our car does not have this type of power connector. Like I said, radar detector tech is in the R&D slow lane. Oh well, I wouldn’t have wanted the cable stretched across my dash and windshield anyway. I ordered two mirror power pass-through adapters from Amazon. They power the detector and add an extra USB power port near the windshield. If you’re in the market for one, shop around. The first ones I found were more than $100.00, these were $24.95.
I had intentionally ordered the Max 360c and accessories a couple of weeks before a big family road trip. We’d be driving nearly two thousand miles in total. I got the detector mounted and all the options and preferences configured to my liking before we left. The Mark II has dozens of settings you can adjust. You need to install the Drive Smarter app on your phone and connect to the detector via Bluetooth. Then you can use the app to manage the device’s configuration.
There are a lot of settings that control the receivers themselves. Things like which one is active when, how sensitive they are to the different radar frequencies, that type of thing. I left them on automatic. You can change the alert tones, set speed limits, change the look of the screen’s various messages, and more. It is a little over-whelming at first, I left most of the settings on automatic.
The trip involved driving through small towns, hundreds of miles of highway, and navigating two major US cities. We went across the Midwest Plains and up into the Colorado Rocky Mountains. The Escort worked better than I had expected. One of my concerns had been the proliferation of laser speed guns.
The Escort 360c Mark II can detect lasers from both the front and back. Unfortunately, that still isn’t a lot of protection. The speed of light is nearly instant at these distances. You don’t get enough of an advanced warning to adjust your speed. I had assumed they would be everywhere by now, given that they existed way back in the nineties. To my surprise, the laser band was only triggered a handful of times on the entire trip.
The direction indicator works as designed. I visually located the source of the signal in most of the detection events that were triggered on our trip. In fact, to answer my opening question, yes, radar detectors still work in general. They also still have all the same problems.
False alerts are minimized by the GPS system, but they still happen a lot. On one-time trips like ours, the false alert database doesn’t apply at all. Physics also suggests problems with the entire concept of radar detection. Radar is faster than you are even when it’s based on a radio wave. If you turn to look and see a cop, it’s already too late.
Shortly after we returned from our trip, my Mark II suffered a major hardware failure. The GPS receiver failed, and the screen would only flash an error. During the trip I learned something important. I don’t have any need for a radar detector. I’m a safe driver that follows the rules of the road. So rather than exchanging my broken unit (they offered), I returned it and all the accessories for a refund.
I have a high-end Dell XPS laptop that I love. Recently, I ran into an issue where the Intel Killer Performance Suite would no longer update. The Killer Performance Suite is a package of advanced network control software and drivers. It’s frequently used in gaming and high-performance computers to boost network speed and reliability.
The failing update wasn’t worth a lot of time or energy. I’m not using this system for anything that requires extraordinary network performance. So, I did what any computer savvy person would and uninstalled the app. Problem solved.
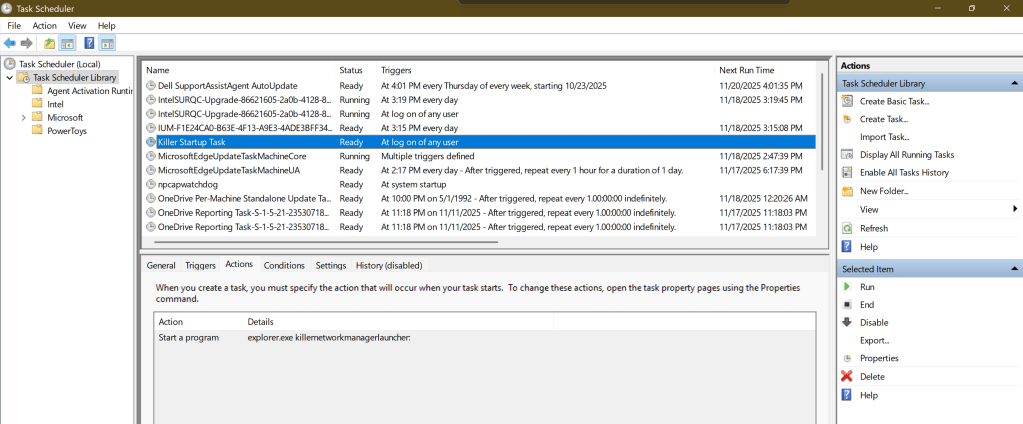
Or so I thought. Uninstalling the software caused a really annoying error to start popping up. Every so often my system would popup an error dialog saying that that it couldn’t find the “killernetworkmanagerlauncher link”. It wasn’t the worst thing in the world, but after a while it got on my nerves.
I installed and removed the software again. I searched through the startup apps and start folder in Windows for any references to the Killer software. I even searched for and deleted quite a few registry keys left over by the program. None of it helped. I found a knowledge base article on Intel’s site, there were no solutions mentioned on it at the time either.
Tonight, I booted up my laptop and got the prompt again. That was it, I was going to fix it or re-install Windows. I stopped looking for answers and decided to solve it myself. I thought about it the problem rationally. Start-up items launch from just a handful of places. The registry, start-up folder, via a service, and the task scheduler are about it. Guess which one I didn’t check?
If you are also suffering from this repeated nag, delete the “Killer Start Up” task. Open the Windows Task Scheduler application, find the task below right click on it and delete it. Then reboot.
At the beginning of our relationship, my spouse and I discovered that we had very different sleeping habits. She slept with the TV on, while I preferred only the white noise from a small fan. Tinnitus made having some noise masking solution in the bedroom a must for both of us.
I struggled to get used to the TV being on while trying to sleep. The sound wasn’t so bad, but the light and commercials screaming at me were bothersome. She needed more engagement than a fan or white noise generator produced.
We tried various earbuds. She did better with them. I wasn’t able to adjust to sleeping with something in my ear. She tried a headband that had embedded speakers in it, but that was uncomfortable for sleeping in. Eventually we stumbled across a “pillow speaker” at some old-time electronics store. It was just a little hockey puck sized speaker. You plugged it into your phone via the built-in 3.5 mm jack. Then you slipped the disk into your pillowcase.
The Radio Shack pillow speaker worked, but it had some issues. It wasn’t very loud. To hear it well enough, you had to put the speaker on the topside of your pillow. If you rolled over in the night, your ear would be uncomfortably smashed against the hard case. It was also just a plain speaker and didn’t have any controls of its own. This made operation at night an ordeal. Changing the media or adjusting the volume required unlocking your phone and using its controls.
We kept an eye out for improved devices throughout the years. When phones lost their headphone jacks, we had no choice but to find something that used Bluetooth. We found a unit that offered several improvements over the puck design. The new speaker used bone conduction tech to boost the sound volume and quality. It was also housed in a soft-sided case that wasn’t supposed to mangle your ear. Control buttons on the device made life easier too.
The conduction-based pillow speaker actually worked well. It’s loud enough to go underneath your pillow and still be able to hear it. Its soft sides made it more comfortable, but it still hurt if you rolled straight onto it in the night. Its biggest issue was the Bluetooth signal. If the speaker descended too far into the recesses of your pillowcase, it would disconnect from your phone.
While randomly browsing Amazon one night, I found the unicorn of pillow speakers. I reflex ordered it without showing it to my wife first. It had our entire wish list of features according to the description. Reviews were positive. If it even got close to the ad’s hype it would be a perfect upgrade.
The Avantree Slumber 2 showed up a couple of days after I ordered it. As soon as I got it out of the box, I could tell it was a winner. There are 4 speakers surrounded by a soft rectangular pillow that is just the right length for a pillowcase. The controls, Bluetooth, and battery are housed in a small case connected to the speaker assembly via 3.5 mm. This means the Bluetooth signal stays nice and strong all night since the unit remains outside of your pillow.
The sound is fantastic. I usually have mine connected to my phone. I listen to podcasts and audio books more than anything else. The speakers sound so good that use them for other stuff too. I pair my Switch 2 for playing in bed. I also frequently connect to my laptop for an excellent personal movie experience.
You can’t feel the speakers under your pillow while you sleep. They flex and move with you. The controller has nice big buttons that glow in the dark. You can play and pause, skip tracks, or adjust the volume. You can also enable a timer that will stop your chosen media player in 30, 60, or 90 minutes.
The Avantree Slumber 2 can run from battery when you travel. It can also play while being charged from its USB-C cable. The battery lasts through the night on a single charge but won’t make it through two. The controls are in-line meaning that USB-C connects on one end while the speaker pack connects on the other. Theoretically you should be able to use it as a Bluetooth connector for any 3.5 mm speaker set. I haven’t tested using them this way yet.
The cover is removable and washable.
We’ve had the Slumber 2 speakers for a couple of months now. It is made of high-quality materials, sounds great, and maintains a strong link with your device. If you want a speaker embedded into your pillow, there are no downsides to this model that I can find. It does its job perfectly.
A few days back I was browsing the Microsoft App store on my laptop. I wasn’t looking for anything specific. I was just filling the time between meetings. I had searched the store for “Microsoft”, I like to keep tabs on any new software they release. That’s when I noticed it.
A new app named PC Manager was in the list. The description was interesting. Microsoft has created an app to make monitoring and managing your computer easier. The Windows Settings and Task Manager apps are notoriously confusing for folks that don’t live and breathe IT work. This had all the hallmarks of a better solution.
Task Manager has been the default Windows system utility app since 1996.
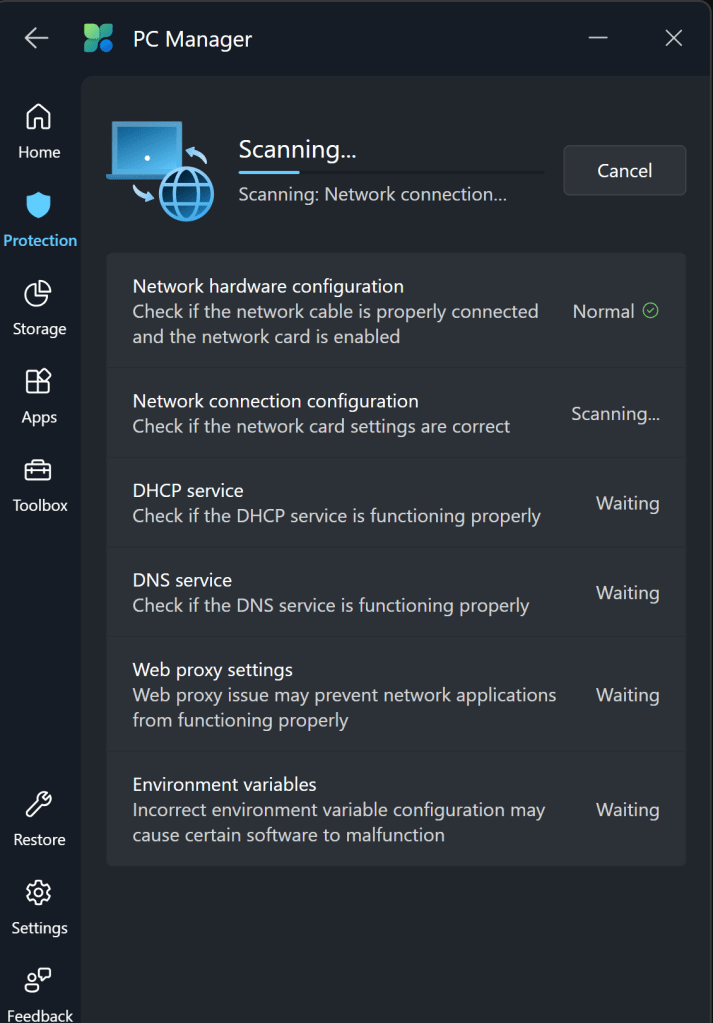
From my point of view, PC Manager delivers. It has quick links to things like take a screen shot, and the calculator app. You can easily see and manage the running apps and processes on your system. It can automatically clean up your hard drive by removing temp files from the OS and apps. The network test shows you everything about your system connectivity in one place.
The toolbar is a fantastic edition to my Windows desktop. The feature isn’t turned on by default. If you want to try it, look in the Toolbox and flip the toggle to on. If you drag the toolbar to an edge of your screen, it will attach to that spot and auto-hide itself. The toolbar shows your total memory use, Wi-Fi signal stats, 4 shortcuts, and a search bar.
Snap the PC Manager toolbar to a screen edge and it will auto-hide. You can choose your own shortcuts and quick links.
There aren’t any new abilities or information; all of this stuff is available in Windows via other methods. IT workers don’t always appreciate Microsoft adding another way to do stuff. It adds to their already full workloads. That being said, this particular tool seems useful. I like the toolbar, and it simplifies maintenance tasks. It’s free, give it a try and see what you think.
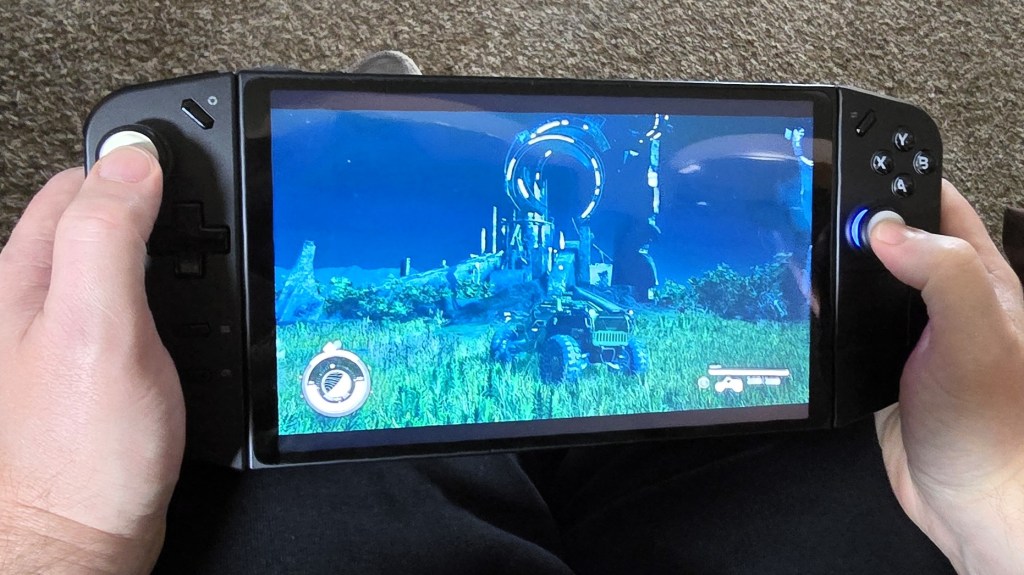
I have learned so much about the Lenovo Legion Go handheld gaming PC over my time owning and using one. I’ve gone to great lengths to tune mine for everyday couch and mobile gaming. It has all my games installed and ready to go. It’s stable, games and power can be suspended and resumed mid play for convenience. Everything runs screaming fast and looks fantastic. Games and media sound so good, too!
Read on to discover the settings, tweaks, and modifications that I’ve used to get the most out of my Go. You won’t believe the difference these settings can make in your experience. As a bonus, most of them are free and easy.
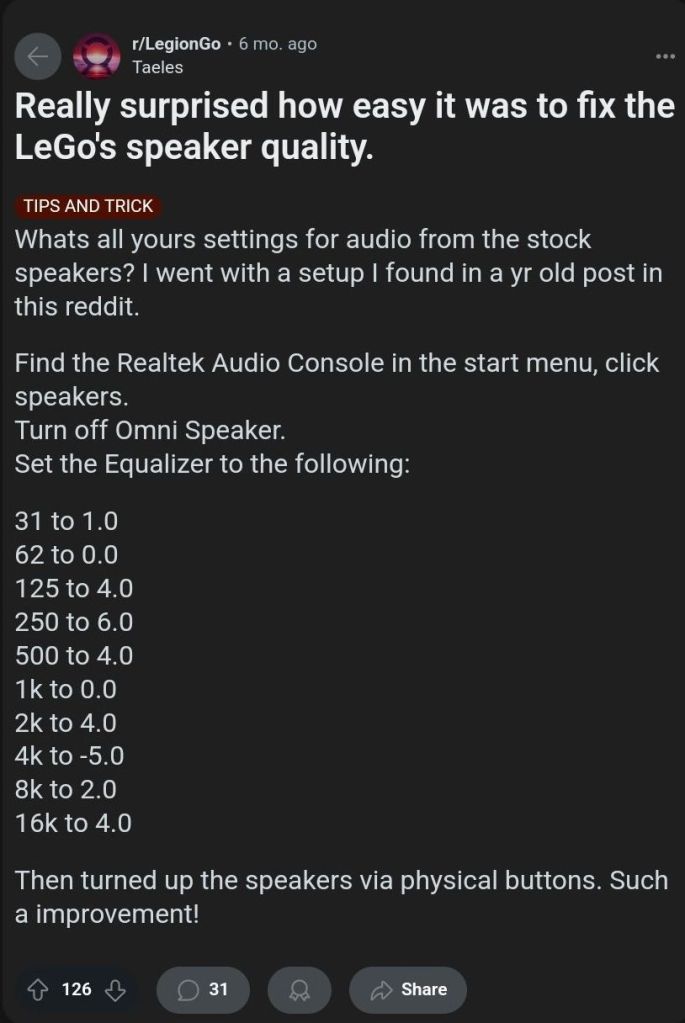
The first pain point with my precious handheld gaming PC. The speakers are subpar. Left at their default settings, they are high-pitched and struggle with power. Much of the potential volume is lost due to the speaker ports being on the top edge and angled away. Hold your hands up like rabbit ears behind the mesh while watching a video. You’ll be shocked by how much sound the speakers are really pumping out.
If you research the topic of poor sound, you’ll see there are several software workarounds that help considerably. The easy/free method is to use the Realtek Audio Console. Open it from the Start Menu to toggle off a feature called the “Omni Speaker”. Then use the same software to adjust the equalizer frequencies. Find this idea and lots of others at: https://www.reddit.com/r/LegionGo/
I used the equalizer changes above in conjunction with an app I already owned. Dolby Access is a Windows Store App that applies a Dolby Atmos surround sound effect to your PC’s sound system. The Go’s speakers sound so much better with the effect enabled. The dimensional soundscape achieved by applying some cheap software is surprising.
Dolby’s magic app features a gaming performance mode that increases the accuracy of sound location. This is especially important in competitive games. It works well. I don’t fully understand how they trick your hearing so well. Things that are supposed to be behind you, sound like it.
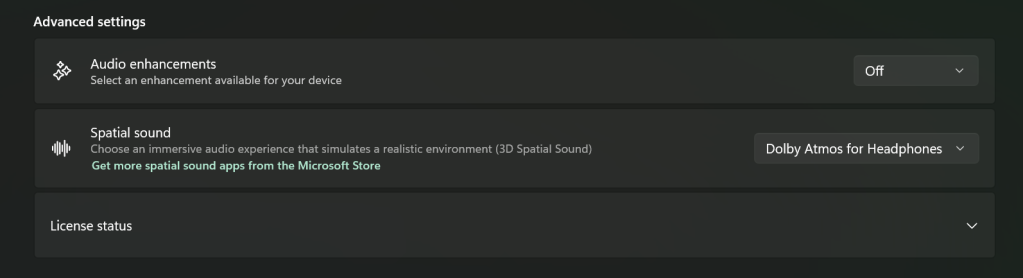
For Dolby Access, or any spatial sound app to be the most effective, disable Window’s sound enhancements. Go to Settings -> System -> Sound and click on the speakers. Advanced -> Audio enhancements toggle off.
If you don’t have or want to purchase Dolby Access, there are some open-source options out there. I haven’t tried it yet, but I’ve seen FXSound mentioned several times while doing my research. It gets a lot of recommendations and positive reviews and is donation-ware.
Update Everything
The Legion Go is a complex machine. Especially its software layer. The sheer number of places you must check for updates is astonishing. Here’s a rundown of everywhere you need to check. I try to do this at least once a week.
Windows Update
Accessed by going to Settings -> Windows Update
I like to open the advanced options and flip on the toggle to receive updates for all Microsoft products.
Microsoft App (MSIX packages) Updates
Open the Microsoft Store App (shopping bag icon in start menu). Then click on Downloads (menu on left) from there click the Get Updates.
Legion Space
Disks and Drivers. Open Legion Space ->Settings -> Scroll down -> Disks and Drivers -> Check for Updates.
Controller Firmware Updates. Go to Controllers in the menu, scroll the bottom menu left to More. Scroll to the bottom of More page and click the Controller Firmware Update button.
App Updates.
Game Launchers. Steam, Xbox, Ubisoft, and EA Desktop, all have client updates in each app’s settings menu
Game updates. Each game gets its own updates (usually handled by the launchers).
Other software.
Example: The emulator app Dolphin needs updated frequently.
Touch Screen
One quality of life upgrade was realized just by changing my bad habit of touching the screen too much. I had been using the touch screen to enter my PIN and to scroll. This was making my screen filthy. Every time I picked up the little machine to play something, it was covered in fingerprints and smudges.
There were two changes I made to drastically reduce how often I had to clean the screen. First, at the PIN prompt you can usually click the A button to get the on-screen number pad to open. Then you can use the buttons, D-pad, shoulders, and triggers to enter your PIN code just like on an Xbox.
Using the scroll wheel reduces fingerprints. Tapping and holding on the touch pad activates the right-click menu.
Second, the little wheel on the upper rear nook of the right controller is for scrolling. It works better and is more comfortable than touching the screen in most situations. The only trick is to remember that it’s back there.
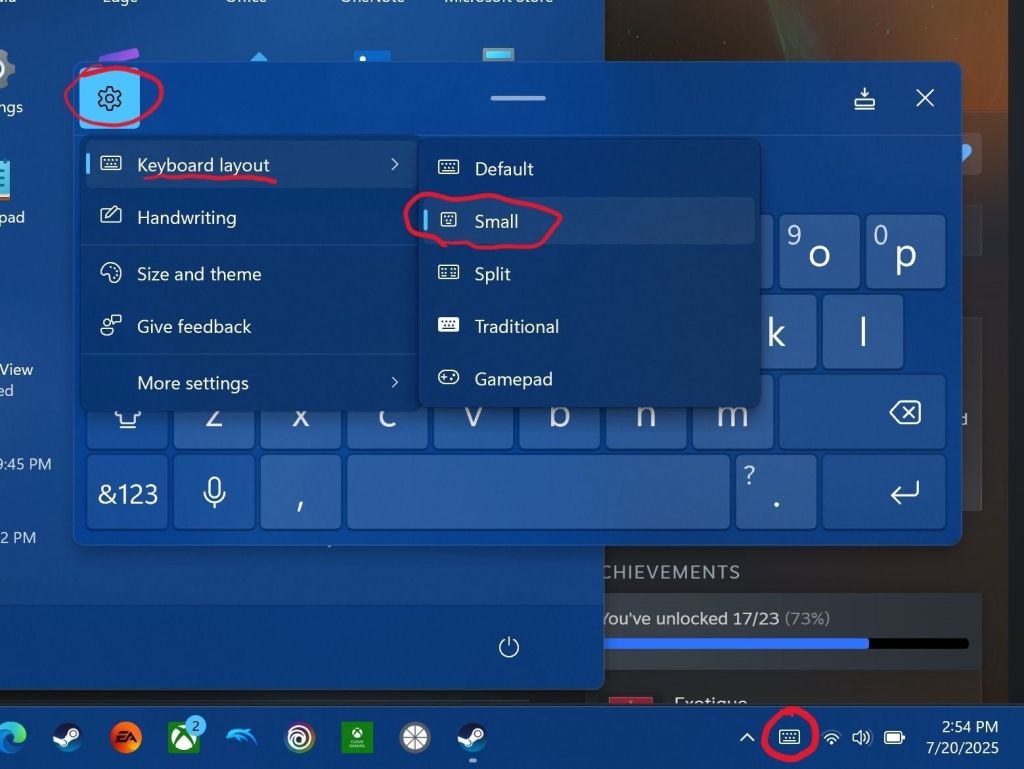
Floating Keyboard
The OSK (On-Screen Keyboard) is huge the first time you try and enter text with it. It takes up the entire bottom half of the screen. This makes entering information into forms very difficult. The form either gets cut in half or squished to an illegible size when the keyboard opens. It’s a good thing there’s a built-in solution. You can resize and float the OSK in Windows.
Open the keyboard by touching or clicking the icon for it near the clock on your taskbar. Click or tap on the settings gear in the upper left corner of the keyboard’s panel. Then select Keyboard Layout from the menu and click small. Now you can use the little dash at the top of the OSK to drag it out of your way!
The small floating keyboard layout is easy to drag at of your way. Clicking Size and theme in the Keyboard’s settings will let you change its color size, and key size.
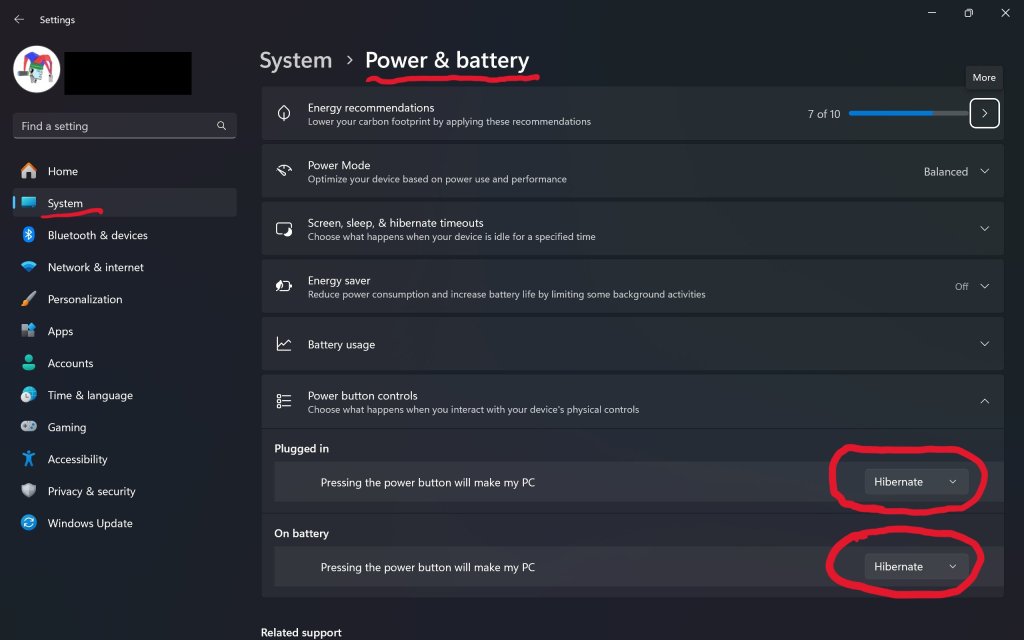
Hibernation Is Better
Batteries suck, but we’re stuck with them until some genius invents something else. For some unknown reason, the Go drains its battery in just a few hours of sleep mode. Do yourself a solid and change the power button’s function to hibernate instead of sleep.
There are two benefits hibernation has over sleep mode. The first is that your battery won’t be dead the next time you pick it up. Hibernation uses a lot less power over time than sleeping does.
The hibernation process exports everything in the computer’s memory to a save file on the hard drive. Then it powers down the RAM chips. This reduces power consumption. It also gives us our other benefit.
Go to Settings-> System-> Power & Battery to change what the power button does.
Everything running in RAM is saved to a file. This includes any game that is actively playing or paused when you pressed the power button. The LeGo can stay in hibernation for days with your game perfectly suspended in time.
The process takes a few seconds at most. In my opinion, hibernation makes the device more usable in real life situations. I play on my lunch break at work. Hibernating when my break is over means my battery and game will be ready to resume on the next day. You usually can’t do that with sleep mode.
Controllers and Buttons
The controllers on the Legion Go are a work of art. They are well constructed, feel great, and are tuned for a light touch. They disconnect from the main chassis like the Nintendo Switch’s do.
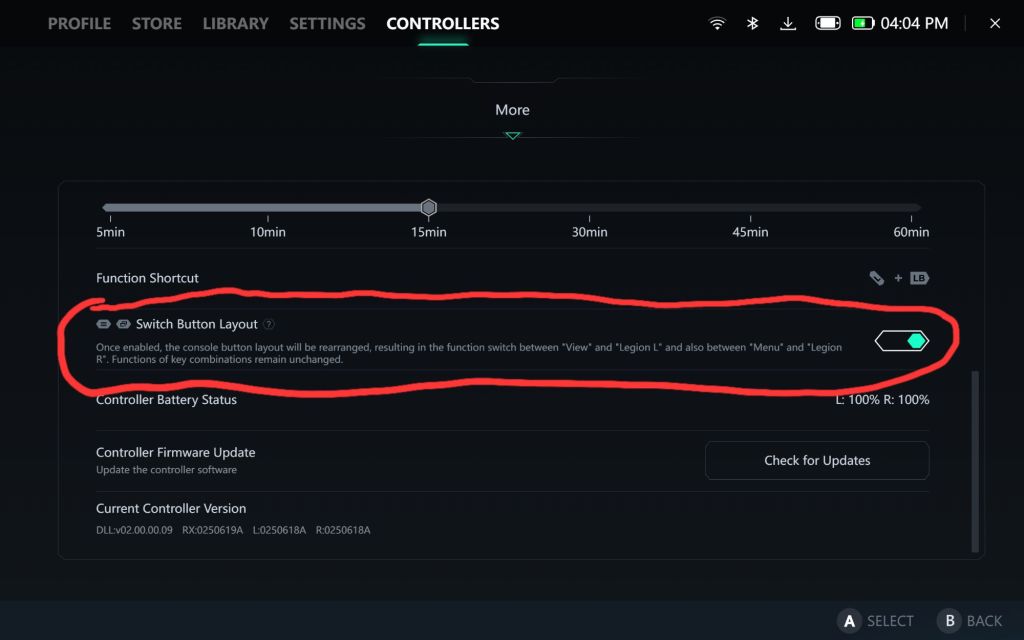
The placement of the menu and view buttons near the bottom of the left controller is a problem though. Those buttons are used in games heavily and stretching your thumb down to click them gets old. Especially in a game like Destiny 2 where you constantly need access to the character menu and maps.
There is an option to swap their functions with the Legion Space and Quick Control menu buttons. Open Legion Space and go to Controllers, then scroll to More. Scroll down the page and flip the toggle to swap the buttons.
Your thumbs will thank you for flipping this toggle on.
My other tip about the controllers is to take the time and map the back buttons. I tie them to crouch/slide, melee, reload, and jump in almost every FPS game that I play. Back buttons allow you to keep both thumbs on the sticks while performing button actions. This can be a big advantage in some games.
To map them, open Legion Space. Go to Controllers in the top menu then click the Button Mapping button in the list at the bottom. Now click the top View/Edit Layout button. Finally, click the Rear-View choice at the bottom of the screen. Click on each button to pull up the mapping menu for it.
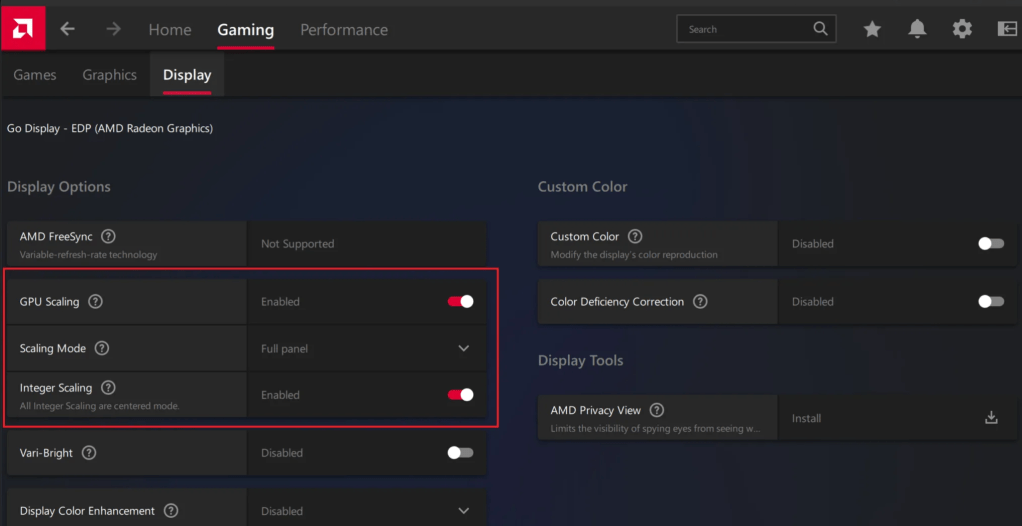
GPU Upscaling
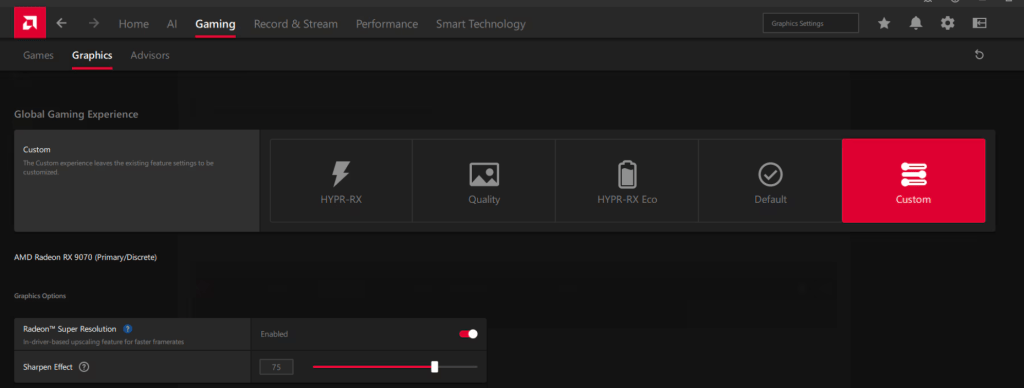
There are lots of tweaks and changes you can make to boost the performance of your Go in various games. One of the most potent is to setup the various upscale options for both on your GO and in your games. The Legion Go supports AMD’s Radeon Super Resolution and their FidelityFX (FSR 3) technologies. Taking advantage of them reduces the load on your GPU which usually translates to an increased frame rate.
AAA titles can run in the 60-110 FPS range with good fidelity once you learn to tune and upscale them. I haven’t written a comprehensive guide to upscale games yet, but the basics are easy. Open the AMD Adrenaline app and turn on the scaling options.
There’s also a switch for RSR in the Legion quick menu.
The details of scaling are a rabbit hole of advanced tweaks and changes. Things like algorithms, game resolution options, post-processing settings, and sharpening effects can alter your experience. YouTube and the sub-Reddit mentioned above are good places to start building knowledge if you want to go deep.
GPU scaling options are dependent on driver and software versions. If you don’t see the options, make sure your software is all updated.
Learning to upscale and tweak your games is probably the most impactful performance boost you can get on this system. If you’re not already familiar with scaling, try using 1600X1200 @ 144Hz as your display resolution. Then run your games at 800X600. If you can’t set the game’s resolution to 800×600, change the resolution scale to 50%. It amounts to the same thing.
If you are less than impressed with AMD’s GPU scaling abilities, there are also other options available. While doing research, I noticed that lots of people are mentioning the Steam App Lossless Scaling as a great alternate. The app is $6.99 in the Steam store: https://store.steampowered.com/app/993090/Lossless_Scaling/
BIOS/UEFI Tweaks
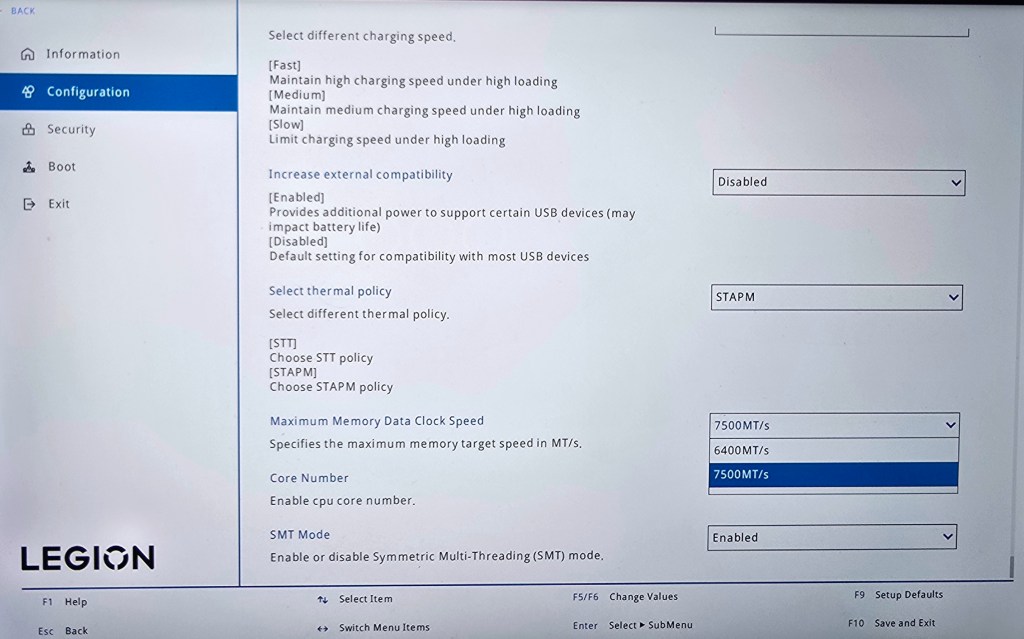
In the Legion Go’s BIOS there are two settings we can adjust that effect game performance. The first is how much of the system’s 16 Gigabytes of RAM is reserved to support the GPU. By default, 3 GB of VRAM is selected but this can slow some games down. I get better performance and game stability with 4 GB assigned to graphics processing. That leaves 12 GB for Windows and your game, which is plenty in most cases.
Shutdown -> Hold Power + Volume Up Overclock the RAMReserve 4GB VRAM
You can also overclock the RAM for an overall performance boost. Increasing the RAM’s speed will cause it to generate more heat. Excessive heat can impact CPU and GPU throttling. Consider the environment you play in.
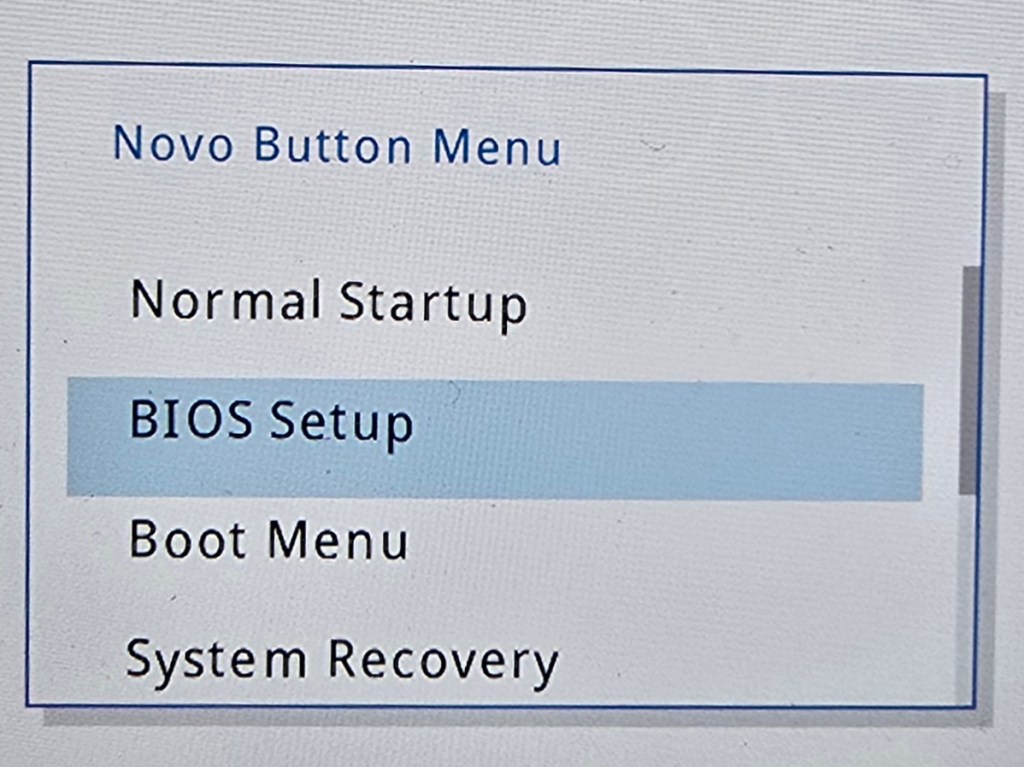
Before you make either change, verify you are on the newest version of the system firmware. You Boot to the UEFI control screen to make these changes by shutting down first. Then hold down the Power and Volume up buttons at the same time for a few seconds.
Optimize Windows 11 for Gaming
The Legion Go is running Windows 11 Home. The default security posture of Windows 11 is not optimized for gaming. Specifically, memory integrity and the Virtual Machine Platform features of Windows 11 can slow down some games.
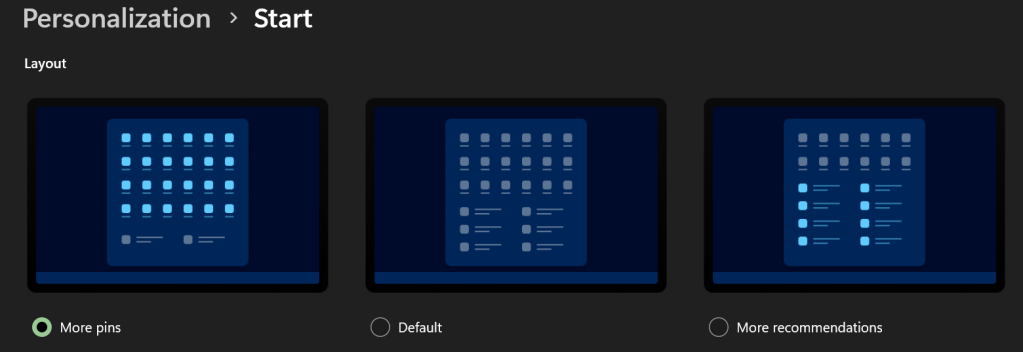
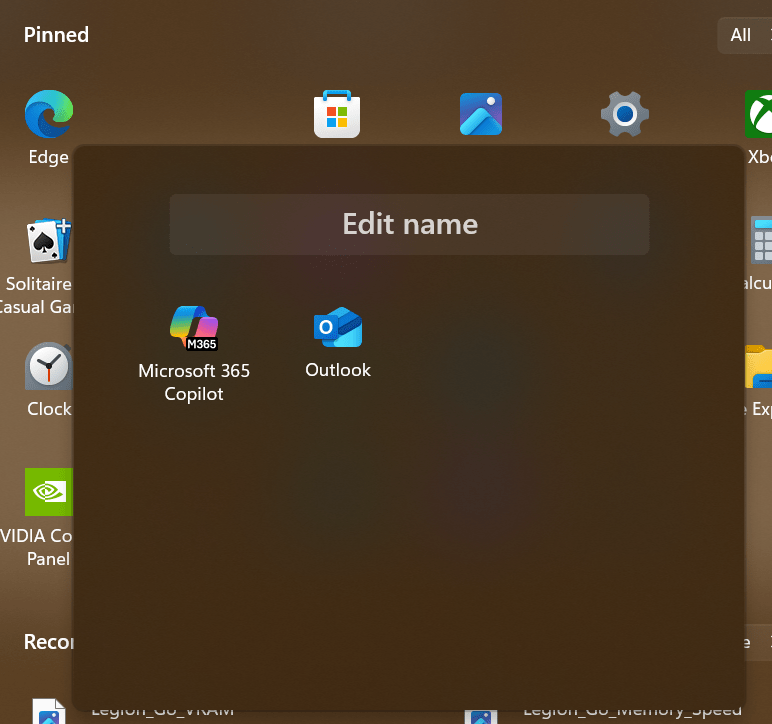
I like to PIN my games to Start. Go to Settings -> Personalization -> Start -> and select the option for more PINs if you do too.
Make folders on the Start Menu. Dragging one icon onto another. Drag and drop icons as needed to add. Rename a folder by clicking into it. Right click on folders in the start menu to move them left or right.
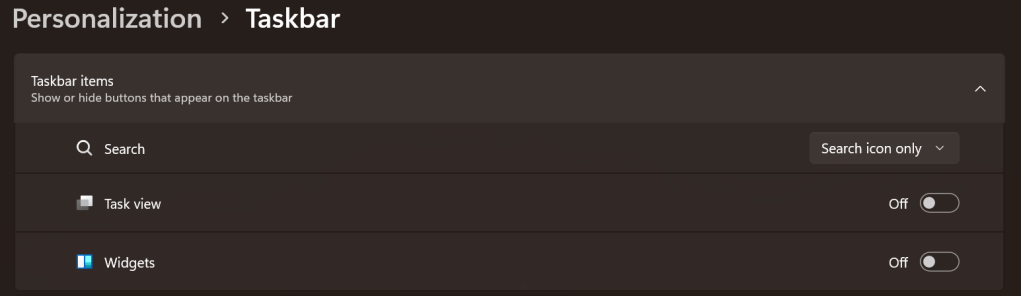
Maximize the task bar space. Settings -> Personalization -> Taskbar: Search -> Icon. Disable Task View. Disable Widgets.
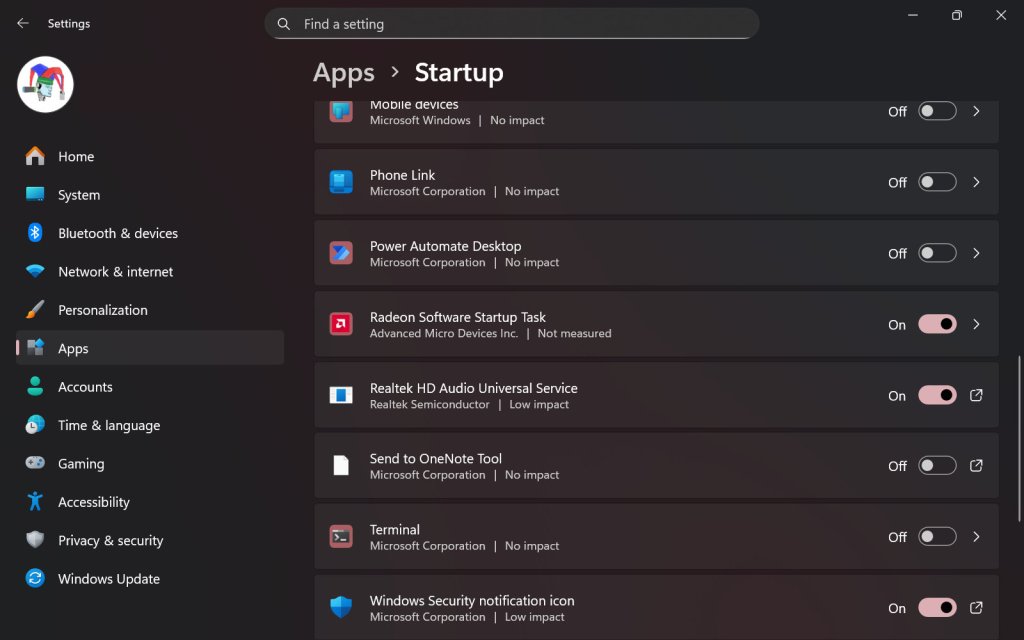
On my Legion Go, I disable most of the start-up apps. It helps conserve CPU cycles, RAM, and disk I/O for the games. Go to Settings-> Apps -> Startup. I only leave three apps toggled on. The Radeon Software Startup Task, Realtek HD Audio Universal Service, and the Windows Security notification icon.
SSD Swap
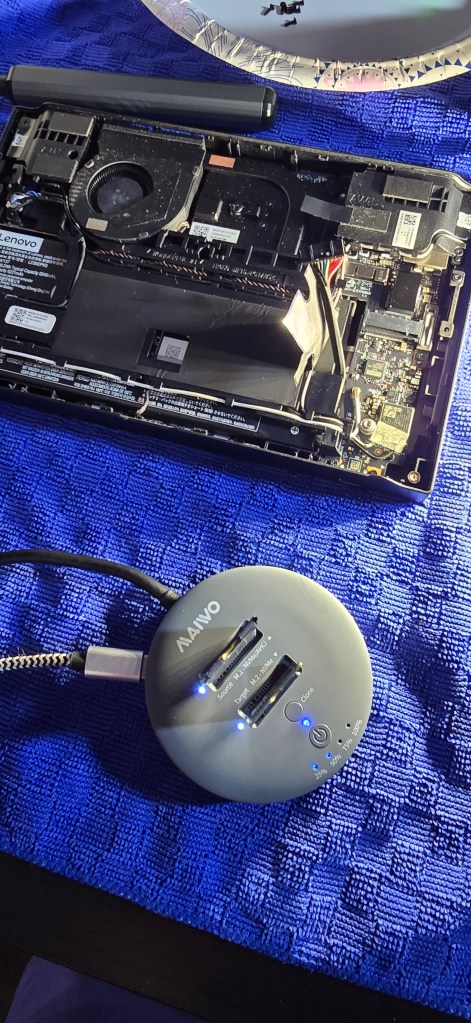
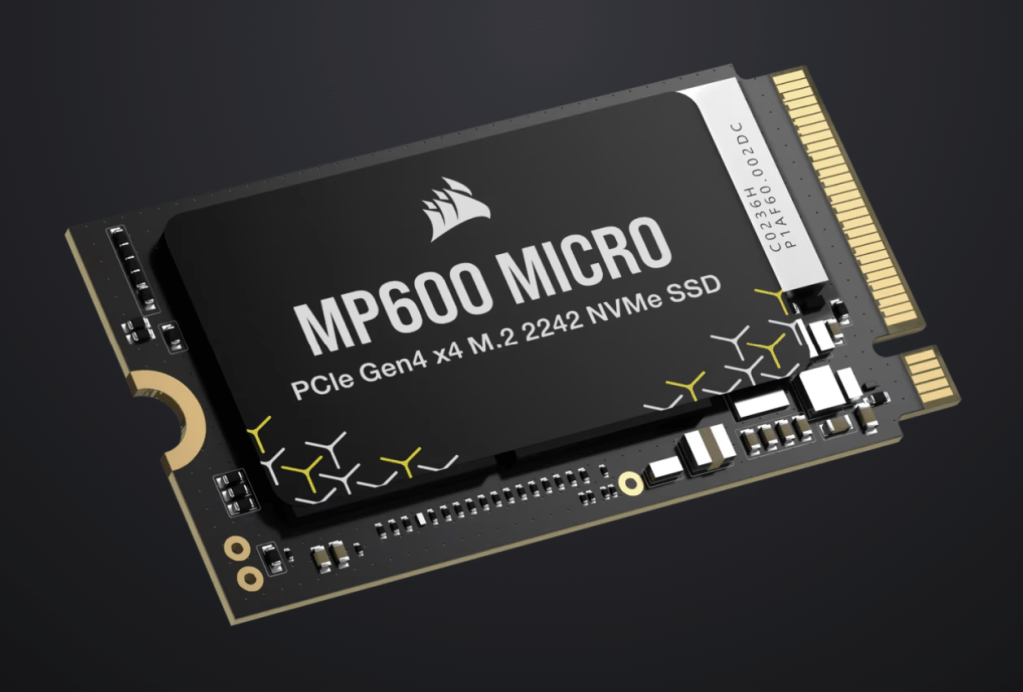
I replaced the factory storage with a much faster and higher-capacity unit from Corsair. The upgrade has had a major impact on daily life with the LeGo. Downloads, and loading times are much faster. I can store my entire active catalog of games. Everything feels snappy. Read I SSD Swapped My Lenovo Legion Go. It Was Worth It for the details and instructions.
Installing faster high high-capacity storage is a great upgrade.
The Legion Go is an excellent gaming computer right out of the box. Tweaks, changes, and upgrades like the ones above help make it even better. I use mine more than any other gaming system and that’s saying something.
Outlook often struggles with erroneous junk mail classifications. It seems that some messages can pass through the SMTP perimeter scanning and email authentication, but still end up in Outlook’s junk folder.
The internal workings of Outlook’s built-in message filters aren’t fully documented anywhere that I know of. This can lead to some perplexing situations. Last week my own company’s newsletter was being routed to the junk folder. This was out of the blue, the monthly messages had never been considered SPAM before?
I went to some drastic lengths trying to determine why an internal message was triggering Outlook’s junk filter. I enabled logging, reviewed mail traces, and all the rest to no avail. The only way I could get the message to stay in the inbox was to add the entire sending domain to the safe list.
To run the script below you need the Exchange Online Management module installed. You also need access to credentials with the appropriate permissions in Microsoft 365 and Exchange Online. If the script is going to be your permanent solution, I suggest adding it to your onboarding processes.
New jobs are full of discovery and new situations. I usually enjoy the acclimation process. However, there is one thing that often proves to be a challenge for me. Somehow, my mobile service provider never works in my new employer’s building.
This should be an easy problem to solve in the modern world. My Samsung Galaxy S24 Ultra is multiple SIM capable. Meaning it can use signals from two different carriers. Great I thought. I’ll just get an eSIM from the carrier that has a signal at work. Problem solved! Of course, there’s a catch. To use another carrier’s SIM, your phone has to be paid off and unlocked.
There’s even a catch to paying the phone off and having it unlocked. The discount I got from my carrier’s trade-in program is paid out as a credit every month. If I pay the phone off early, I lose those two years’ worth of credits, almost $600.00.
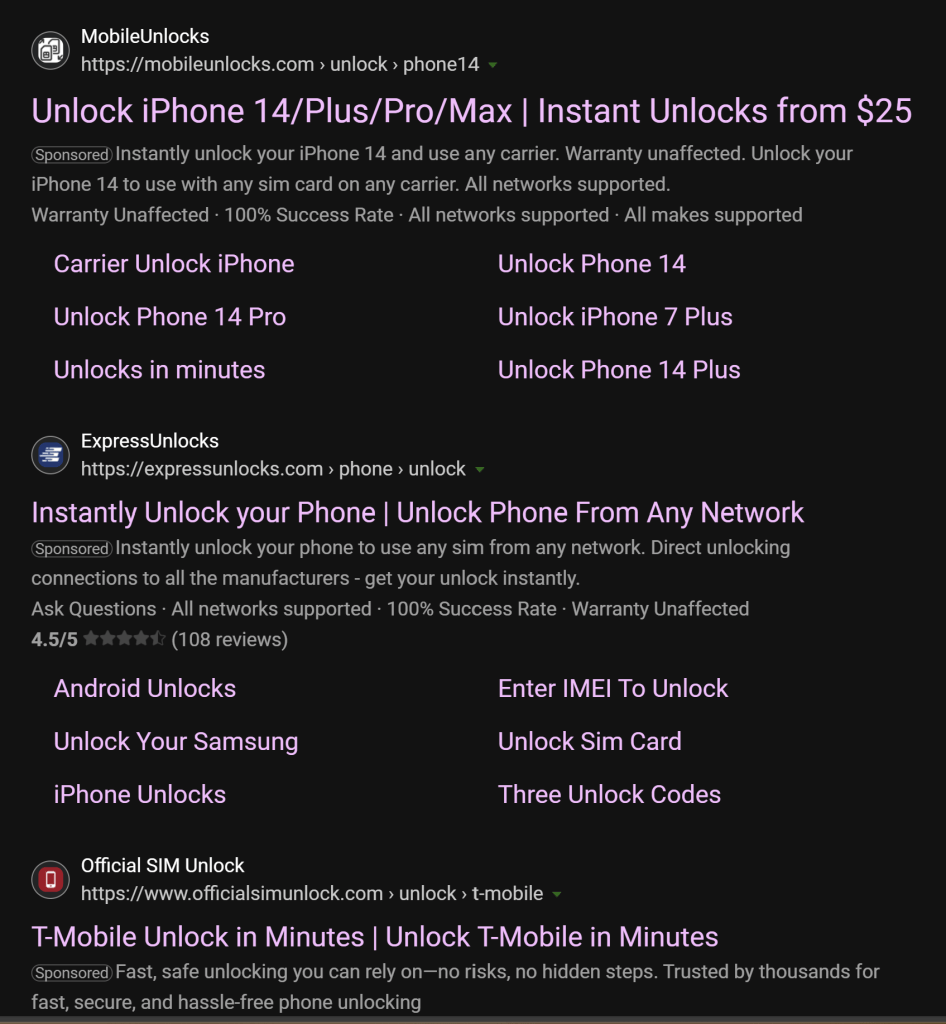
I did some research to see if there are workarounds and it turns out there are. There are services that advertise on-line that they can unlock a phone even if it is still under contract. According to the documentation on their sites, the process is legal, quick, and painless. Reviews on independent sites are hard to come by.
There are dozens of sites offering unlock services.
Here’s how my IMEI unlock experience went. I gave one of these services my IMEI number and a twenty-five-dollar fee to get started. The fee is for the company to investigate the chances of their ability to unlock my phone. This fee is not the cost of actually unlocking the device. The first round “Investigation fee” is $25 – $45 depending on the phone and the service provider.
There is a second payment required before your phone is unlocked. The unlock fee is $100 to $150 depending on the device and carrier. You’re only offered this second round if their investigation’s results are positive. I used a one-time payment method and continued with the second round after they approved me.
I submitted the IMEI of my Galaxy S24-U on their site. If you are reading this post because you are interested in using a similar service, be warned. Some IT security professionals consider giving your IMEI number to anyone a risk. Please research the consequences of sharing an IMEI before proceeding.
Next, they wanted me to confirm my identity. This step was not mentioned on any of their documentation and made me very uncomfortable. I had to provide them with a bank statement showing the card charges from their company. If I couldn’t do that, they would accept a picture of me holding my driver’s license. As if? I gave them something that convinced them to move forward.
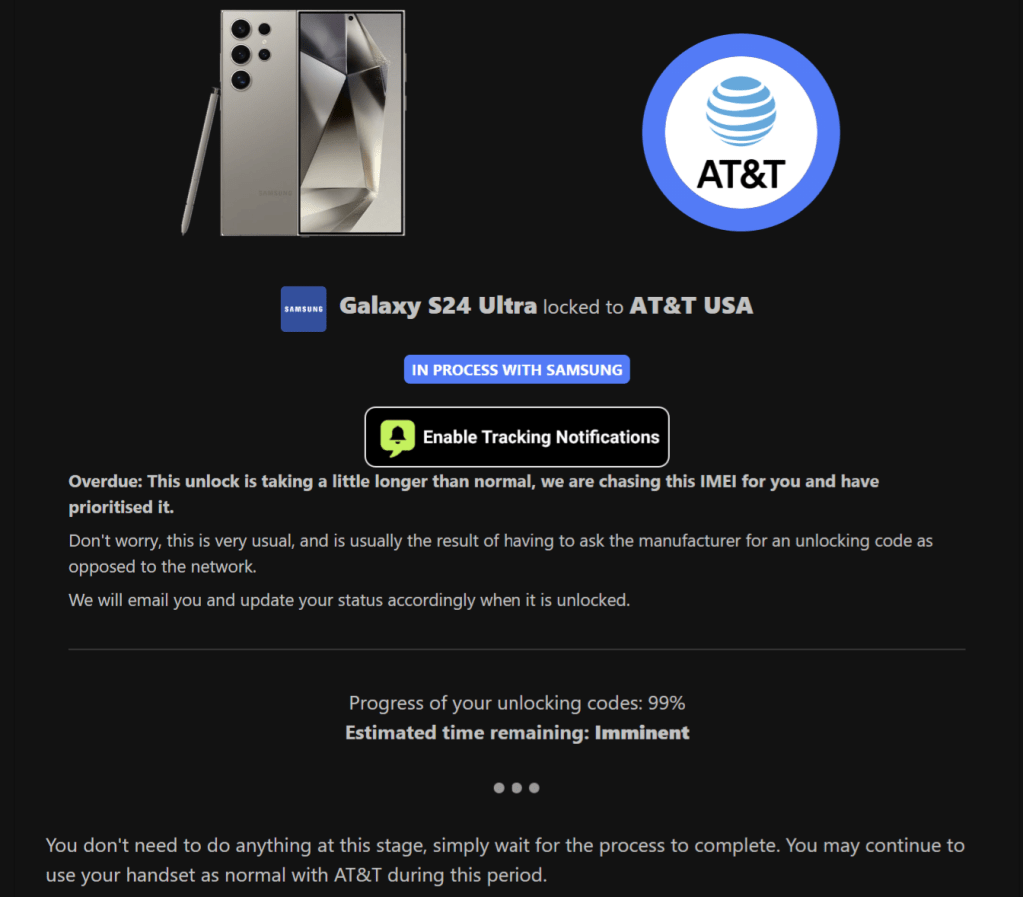
After I finished jumping through their hoops, they agreed to unlock my phone. They sent me an email with a link to my personal unlock tracking page. It showed which stage the unlock process was in along with the percentage of completion.
The dashboard also provided a support chat window. The tracking page listed an estimated completion time based on the investigation results. They thought it would take three days to unlock my phone.
The progress percentage is misleading.
At first the service seemed to be working. Except for the identity verification step, I was comfortable with the transactions. The emails they sent were professional looking and informative. The tracking dashboard was convenient. Everything was great except for one thing.
It didn’t work. They’ve been stringing me along for more than two months now. My status page showed 99% on the second day. On the fifth day I contacted them via the support chat. They let me know it was taking a little longer than usual but to just be patient. They were certain my phone would be unlocked in the next couple of days.
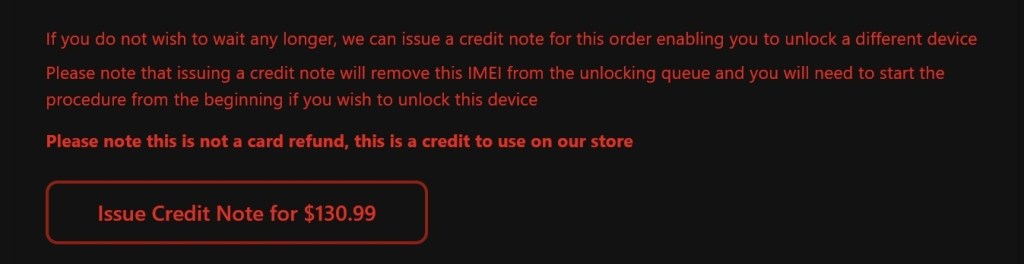
In fact, that is all they ever say. A variation of, “We understand you’re not happy. Just wait a little longer.” At the one-month mark, I asked for a refund. Their reply stated that the unlock process was at 99%. It had not encountered any errors, so I couldn’t be issued a refund.
Today, exactly two months has passed since I decided to burn $130 on the altar of finding out. The company eventually offered to try and unlock another device. I didn’t have one, but I don’t think I would try even if I did.
To this day they swear that my unlock code is just moments away. There have been no errors and the process is still running so they can’t provide a refund. It anything ever changes, I’ll update this post. I’m not holding my breath.
One of the many advantages of the advent of computers has been the ability to create perfect copies. Backups have been a cornerstone of the technology scene since the invention of electronic storage in 1953.
Microsoft has offered numerous backup utilities over the years. Some, like Windows Server Backup, have been great. Others not so much. Not so long ago, Microsoft decided to get into the enterprise backup market and launched Data Protection Management, aka DPM.
Per Microsoft’s marketing tradition, the product has been renamed to “something with Azure in it.” Don’t be fooled, Data Protection Manager (DPM) and Microsoft Azure Backup Server (MABS) are the same solution.
Naming challenges aside, the backup platform is top-notch in my opinion. MABS offers the modern backup features companies need. Features like snapshot mounting, Hyper-V and VMware protection, local disk to cloud replication, application-aware agents, and bare metal recovery of entire hosts are all part of the tool’s offerings.
Understanding the pricing model for Microsoft Azure Backup services can be challenging. Recent changes have attempted to simplify the options by moving from a storage space model to an object instance model.
In their documentation, Microsoft discusses backing up a 250GB SQL VM. When using standard retention and DR protection options, the backup of a server costs twenty dollars per month. Ten for the local (on-prem) copy and ten dollars for the cloud. Detailed pricing information is available on Microsoft’s site at: https://azure.microsoft.com/en-us/pricing/details/backup/
There are some key differences to be aware of in Microsoft’s backup tool. MABS must be installed on a domain member server. At first glance, this requirement would seem to prevent backup immutability. Microsoft Azure Backup Server utilizes a PIN code to ensure immutability. The PIN is generated and retrieved from the Azure Admin Portal.
Like other enterprise backup apps, MABS uses an agent to manage the backup process. That agent can be pushed to target systems from the MABS console, installed manually, or deployed via many package managers.
Both the MABS server software and its agents are automatically updated via Windows Update. Automation like this is where Microsoft’s advantage lies. MABS more or less takes care of itself. Automatic maintenance, the ability to backup and restore via PowerShell, and robust monitoring options help ensure it is running even when you forget to check on it.
I’ve used many of the major enterprise-grade backup tools over my career. Microsoft Azure Backup Server compares well to them. If you are considering which package to use in your environment, it’s worth taking a look at. I’ve been using it for more than a year in a medium-sized, multi-cloud, hybrid organization to great success.
I’ve written about my Legion Go before. It is a great machine for playing while hanging out with my family in the living room. I find playing games on the couch to be far more enjoyable than doom-scrolling these days. I don’t necessarily want to take the main screen in my house to do it.
I constantly switch out the games that I am playing at any given time. It helps keep my interest in the hobby active. The downside is that it can take a year or more to finish some of them. If I fall into playing a single title too much it starts feeling like a job rather than an escape. My solution is to have fifteen to twenty games in active rotation at any given time. This is where the Legion Go presents an issue for me.
Starfield consumes 150 GB by itself. In that context 512 GB can be a small amount to work with.
The SSD that comes in the Go from Lenovo is 512 GB. Five hundred and twelve gigabytes is enough storage to give most people an enjoyable gaming experience. For a game hoarder like me, it is a little restrictive. A few AAA titles and a handful of oldies is all that will fit on the factory drive.
The device has an SD card slot, but I haven’t found a chip that can keep up with modern games. Older titles and emulated games work on the SD card without issue. The same goes for video and music.
SD Cards work well for small games and media. Large titles struggle.
Complex games like Battlefield 2042 and Doom Dark Ages fail to install on cards. Even my best SD doesn’t handle the big stuff. When I try, the install gets to between 40 and 50 percent and then crashes. I suspect the chip is overheating, but I haven’t investigated it yet.
After struggling with storage anxiety for a while, I decided to SSD swap my Go. I did some research online and watched several different sets of step-by-step instructions on YouTube. I cobbled together the procedure below from them.
If you proceed with any of these instructions, you are doing so at your own risk. These machines are full of small, fragile parts. Electronics are sensitive in general. You could brick or otherwise damage your machine if you make a mistake.
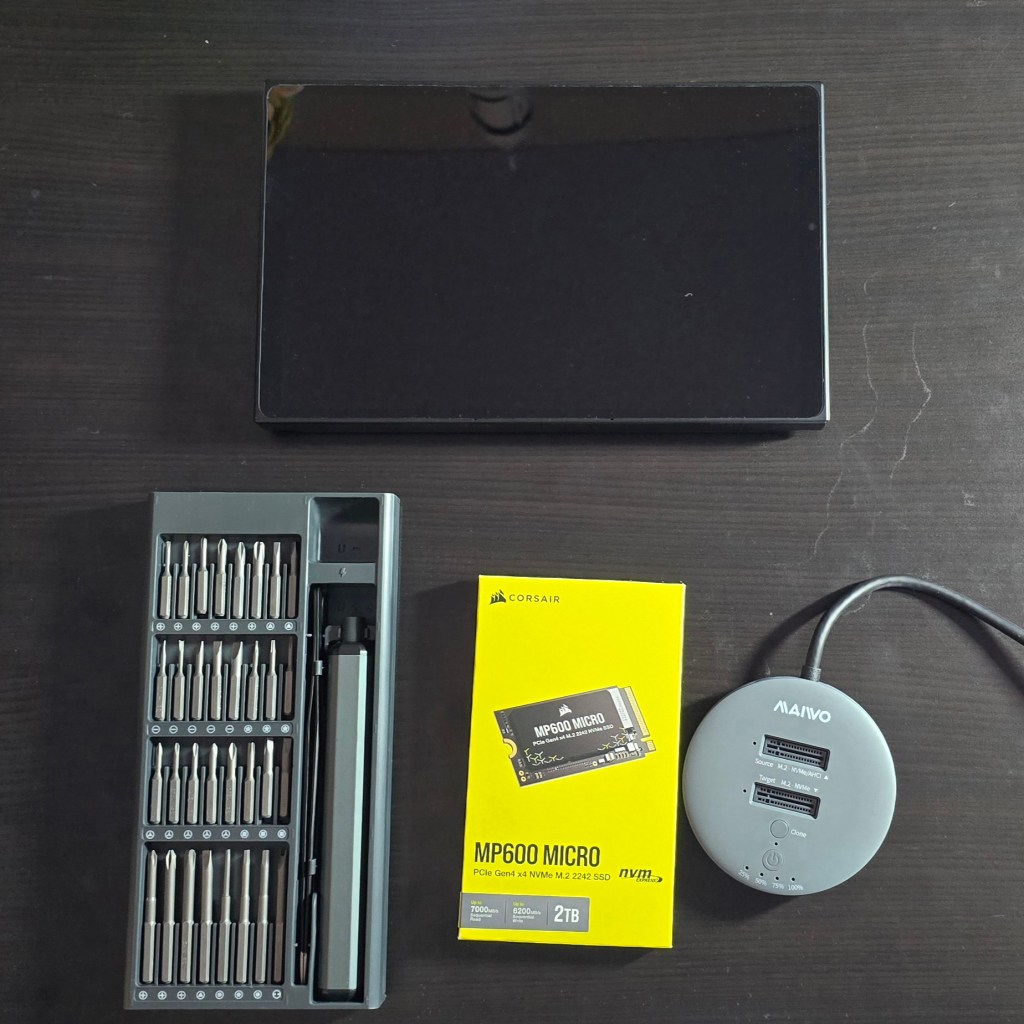
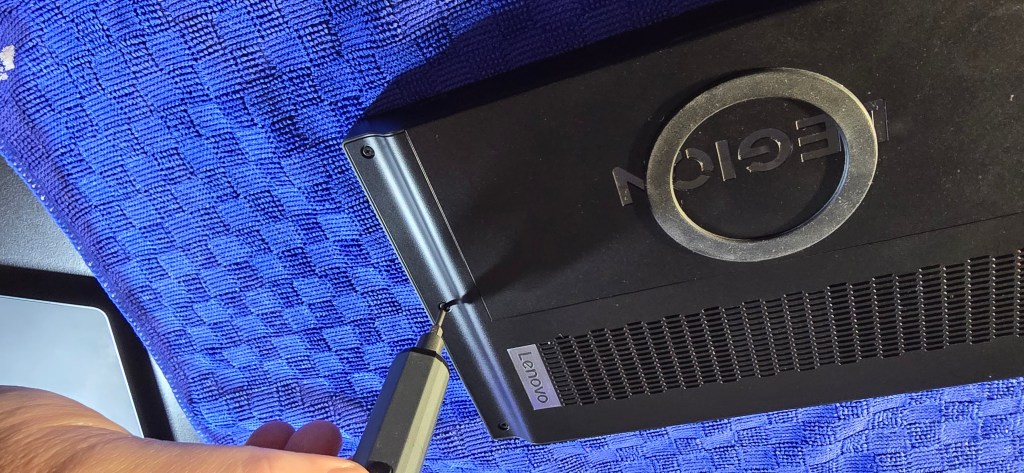
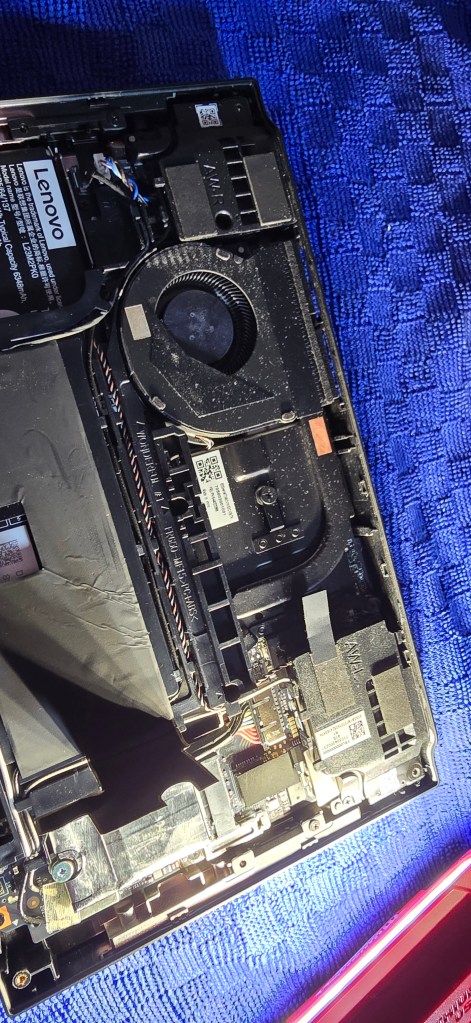
Undo the six case screws on the back of the unit.
You need a size 0 Phillips screwdriver for this.
Use a guitar pic, or plastic spludger to pry the rear panel off the Go.
It helps to insert your tool just to the right of the corners on each side.
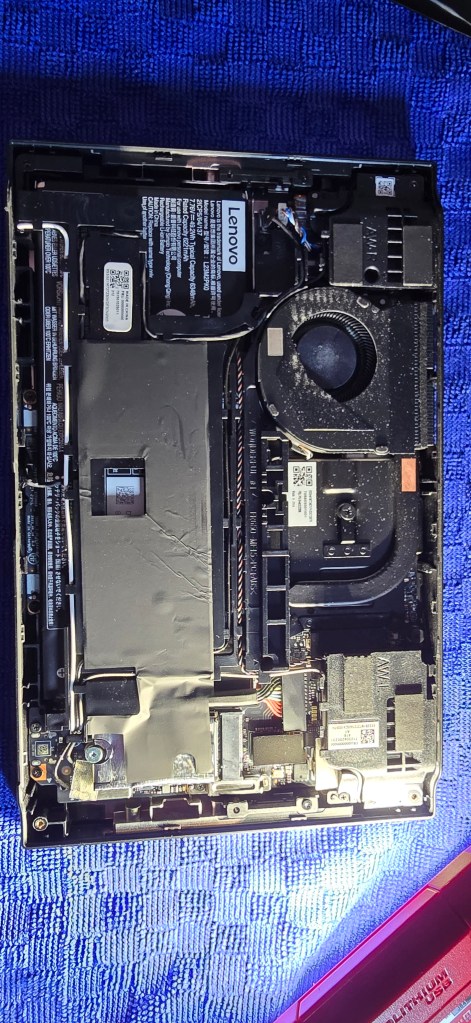
Remove the sticker that covers the battery terminal.
Do not discard or damage it.
Peel back the sticker that covers the battery lead and the M.2 drive.
Do not completely remove this sticker, just peel back the portion covering the SSD and fold it back.
Verify that your Go didn’t get turned back on while you were removing the case. It’s easy to bump the power button. Shut down if it did.
Unscrew the silver M.2 screw.
Size 1 Phillips screwdriver bit.
Unplug the battery lead from the terminal.
It pulls out easily. If you need to apply force to get the cable loose, you probably missed step 3. I did 😀.
If you want a contiguous C partition after cloning, you’ll also need to extend the 512 GB C volume. There are multiple options for doing this. Partition management software like AOMEI’s partition assistant is a free and easy option.
Peel the Mylar sleeve off of the factory SSD without damaging the wrap.
It is very fragile. I suggest using fine tweezers and a lot of patience.
Wrap your new M.2 SSD with the Mylar.
You can run without the Mylar, but your new drive will wear out faster.
Install your new M.2.
Reconnect the battery lead.
Replace both the battery terminal and SSD stickers.
Replace the rear panel. Press down firmly along the edges to click it back into place.
Replace the six case screws.
I went with a Corsair MP 600 Micro 2 TB NVMe M.2, size 2242 for my new storage. It is a much faster drive than the original. It hits 7,000 MB/s while reading and 6,200 MB/s while writing.
The new disk has boosted the Go’s overall performance more than I expected. I did not realize the factory disk was slow enough to have been affecting the entire machine.
Using the Go as a computer is an improved experience. Downloading and installing games, updating software, rebooting, they’re all noticeably faster after the upgrade. The Windows OS feels snappier. There are benefits in many areas besides just fitting in more games.
Many aspects of game performance are also improved. Shader caches are processed faster. Games load in half the time. Matches start faster since the maps load quicker. Patching and updating all of my titles is a breeze now too.
I have been happy with the results of the upgrade. It took me about forty-five minutes to complete from start to finish. If you are considering the mod yourself, I suggest spending a little more on a fast drive. You’ll get both a snappier computer and the ability to keep more of your library on hand.
There are two separate quotas for a Microsoft 365 mailbox. One is for the size of the mailbox. The other lesser-known limit is on the recoverable items database.
It is the recoverable items that frequently catch people off-guard. This quota isn’t shown in the admin portal dashboards. Furthermore, the limit is usually only an issue if you have a mailbox on legal hold.
These two things combine to make a frustrating situation. A user’s mailbox can stop due to a quota violation when it isn’t shown as being full on the portal. Here is a link to Microsoft’s documentation on the subject if you would like to know more.
I use the report to help prevent quota lockouts at my employer. You will need to run the script from a machine that has the Exchange Online Management Powershell module installed. Executing the script also requires an account with Exchange Online mailbox administrator permissions.
The output is an easy-to-read three-column report. The headers are Name (the user’s UPN), Mailbox, and RecoverableItems. The script takes around one hour per thousand mailboxes on average. This time can vary wildly, the point is that it’s slow. Don’t let the computer running it go to sleep.
Troubleshooting Windows update can be a fruitless waste of time. The update service is complicated and often intertwined with third-party management tools. Thanks to supply chain attacks, updates get super scrutinized by security tools. That extra level can cause interference issues. In short, the Windows update process breaks a lot for a lot of reasons.
From my point of view, the best way to fix Windows update in many cases is to reset it. To do that, we need to stop the services so that the files are not in use. Then we’ll need to delete them. We also need to delete all of the Windows update settings from the registry.
In organizations that are audited it is ideal to make backups before altering settings or files. This script makes copies of all the files and settings before any changes are made. The backup copies are named with a date value known as ticks which generates a new number on every run. This makes the script an easy one to schedule as a repeating task using various methods.
# This script executes the following actions:
# 1. Stops the Windows Services that access files in the SoftwareDistribution and CatRoot2 folders.
# 2. Appends the SoftwareDistribution and CatRoot2 folder names with a date stamp.
#       The SoftwareDistribution folder contains the cache for downloaded and installed updates.
#       The CatRoot2 folder contains the cache for downloaded and installed updates.
#       These folder contain the cache for downloaded and installed updates. Refreshing them often clears
#       patching issues.
# 3. Backs up, then removes the registry records under the key HKLM\SOFTWARE\Policies\Microsoft\Windows\WindowsUpdate\*
#       The records will automatically repopulate when Windows Update is run or on the next GPO cycle.
# 4. Starts the services that were stopped.
# If at all possible you should immediately run Windows update on a system after executing this script.
# Before the next GPO cycle runs and the changes are reverted.
# This script backs up the SoftwareDistribution and CatRoot2 folders by renaming them with a date stamp.
# This script is intended to be run as a local administrator on the system that needs repaired.
$DateStamp = Get-Date |Select-Object Ticks -ExpandProperty Ticks
Write-Host -ForegroundColor Yellow "Stopping Services that access Windows Update's files."
    Stop-Service "Windows Update" -Force -Confirm:$false
    Stop-Service "Background Intelligent Transfer Service"
    Stop-Service "Cryptographic Services"
    Stop-Service "Windows Installer" -Force -Confirm:$false
Write-Host  -ForegroundColor Yellow "Renaming C:\Windows\SoftwareDistribution to SoftwareDistribution.$DateStamp"
    Rename-Item -Path "C:\Windows\SoftwareDistribution" -NewName "SoftwareDistribution.$DateStamp" -Force -ErrorAction SilentlyContinue
Write-Host  -ForegroundColor Yellow "Renaming C:\Windows\System32\CatRoot2 to CatRoot2.$DateStamp"
    Rename-Item -Path "C:\Windows\System32\CatRoot2" -NewName "CatRoot2.$DateStamp" -Force -ErrorAction SilentlyContinue
Write-Host  -ForegroundColor Yellow "Renaming C:\Windows\System32\Catroot to Catroot.$DateStamp"
Write-Host  -ForegroundColor Yellow "Resetting WindowsUpdate Registry Keys to Default"
    # The registry keys will be recreated when Widows Update is run or on the next GPO cycle.
    If (Get-ItemProperty -Path "HKLM:\SOFTWARE\Policies\Microsoft\Windows\WindowsUpdate" -ErrorAction SilentlyContinue) {
        Write-Host -ForegroundColor Yellow "Backing up the Windows Update registry keys to $env:USERPROFILE\Downloads\widowsupdateregistrykeys.$DateStamp.txt"
        Get-ItemProperty -Path "HKLM:\SOFTWARE\Policies\Microsoft\Windows\WindowsUpdate" | Out-File -FilePath $env:USERPROFILE\Downloads\widowsupdateregistrykeys.$DateStamp.txt
        Remove-Item -Path "HKLM:\SOFTWARE\Policies\Microsoft\Windows\WindowsUpdate" -Recurse -Force
        Write-Host -ForegroundColor Green "The Windows Update registry keys have been removed."
     } Else {
        Write-Host -ForegroundColor Green "The Windows Update registry keys do not exist."
    }
Write-Host -ForegroundColor Green "Starting services that were previously stopped."
    Start-Service "Windows Update"
    Start-Service "Background Intelligent Transfer Service"
    Start-Service "Cryptographic Services"
    Start-Service "Windows Installer"
Write-Host -ForegroundColor Green "The script is complete. Windows Update has been repaired, please try your updates again ASAP."
Write-Host -ForegroundColor Red "The following errors occurred."
Write-Host -ForegroundColor Red $error
Pause
Exit
I tried to include some good feedback. Errors are displayed at the end.
I have relied on this script for a while. In its current form, it is intended to be run interactively in an admin PowerShell session. If you remove the write-host lines, the rest of the code makes a good function to add to the beginning of your patching processes.