I have a high-end Dell XPS laptop that I love. Recently, I ran into an issue where the Intel Killer Performance Suite would no longer update. The Killer Performance Suite is a package of advanced network control software and drivers. It’s frequently used in gaming and high-performance computers to boost network speed and reliability.
The failing update wasn’t worth a lot of time or energy. I’m not using this system for anything that requires extraordinary network performance. So, I did what any computer savvy person would and uninstalled the app. Problem solved.
Or so I thought. Uninstalling the software caused a really annoying error to start popping up. Every so often my system would popup an error dialog saying that that it couldn’t find the “killernetworkmanagerlauncher link”. It wasn’t the worst thing in the world, but after a while it got on my nerves.
I installed and removed the software again. I searched through the startup apps and start folder in Windows for any references to the Killer software. I even searched for and deleted quite a few registry keys left over by the program. None of it helped. I found a knowledge base article on Intel’s site, there were no solutions mentioned on it at the time either.
Tonight, I booted up my laptop and got the prompt again. That was it, I was going to fix it or re-install Windows. I stopped looking for answers and decided to solve it myself. I thought about it the problem rationally. Start-up items launch from just a handful of places. The registry, start-up folder, via a service, and the task scheduler are about it. Guess which one I didn’t check?
If you are also suffering from this repeated nag, delete the “Killer Start Up” task. Open the Windows Task Scheduler application, find the task below right click on it and delete it. Then reboot.
A few days back I was browsing the Microsoft App store on my laptop. I wasn’t looking for anything specific. I was just filling the time between meetings. I had searched the store for “Microsoft”, I like to keep tabs on any new software they release. That’s when I noticed it.
A new app named PC Manager was in the list. The description was interesting. Microsoft has created an app to make monitoring and managing your computer easier. The Windows Settings and Task Manager apps are notoriously confusing for folks that don’t live and breathe IT work. This had all the hallmarks of a better solution.
Task Manager has been the default Windows system utility app since 1996.
From my point of view, PC Manager delivers. It has quick links to things like take a screen shot, and the calculator app. You can easily see and manage the running apps and processes on your system. It can automatically clean up your hard drive by removing temp files from the OS and apps. The network test shows you everything about your system connectivity in one place.
The toolbar is a fantastic edition to my Windows desktop. The feature isn’t turned on by default. If you want to try it, look in the Toolbox and flip the toggle to on. If you drag the toolbar to an edge of your screen, it will attach to that spot and auto-hide itself. The toolbar shows your total memory use, Wi-Fi signal stats, 4 shortcuts, and a search bar.
Snap the PC Manager toolbar to a screen edge and it will auto-hide. You can choose your own shortcuts and quick links.
There aren’t any new abilities or information; all of this stuff is available in Windows via other methods. IT workers don’t always appreciate Microsoft adding another way to do stuff. It adds to their already full workloads. That being said, this particular tool seems useful. I like the toolbar, and it simplifies maintenance tasks. It’s free, give it a try and see what you think.
Outlook often struggles with erroneous junk mail classifications. It seems that some messages can pass through the SMTP perimeter scanning and email authentication, but still end up in Outlook’s junk folder.
The internal workings of Outlook’s built-in message filters aren’t fully documented anywhere that I know of. This can lead to some perplexing situations. Last week my own company’s newsletter was being routed to the junk folder. This was out of the blue, the monthly messages had never been considered SPAM before?
I went to some drastic lengths trying to determine why an internal message was triggering Outlook’s junk filter. I enabled logging, reviewed mail traces, and all the rest to no avail. The only way I could get the message to stay in the inbox was to add the entire sending domain to the safe list.
To run the script below you need the Exchange Online Management module installed. You also need access to credentials with the appropriate permissions in Microsoft 365 and Exchange Online. If the script is going to be your permanent solution, I suggest adding it to your onboarding processes.
One of the many advantages of the advent of computers has been the ability to create perfect copies. Backups have been a cornerstone of the technology scene since the invention of electronic storage in 1953.
Microsoft has offered numerous backup utilities over the years. Some, like Windows Server Backup, have been great. Others not so much. Not so long ago, Microsoft decided to get into the enterprise backup market and launched Data Protection Management, aka DPM.
Per Microsoft’s marketing tradition, the product has been renamed to “something with Azure in it.” Don’t be fooled, Data Protection Manager (DPM) and Microsoft Azure Backup Server (MABS) are the same solution.
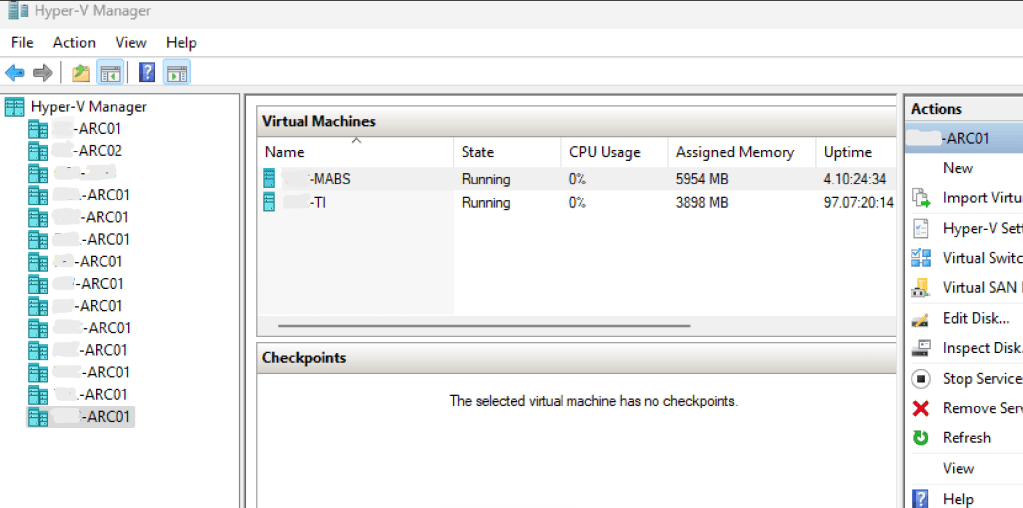
Naming challenges aside, the backup platform is top-notch in my opinion. MABS offers the modern backup features companies need. Features like snapshot mounting, Hyper-V and VMware protection, local disk to cloud replication, application-aware agents, and bare metal recovery of entire hosts are all part of the tool’s offerings.
Understanding the pricing model for Microsoft Azure Backup services can be challenging. Recent changes have attempted to simplify the options by moving from a storage space model to an object instance model.
In their documentation, Microsoft discusses backing up a 250GB SQL VM. When using standard retention and DR protection options, the backup of a server costs twenty dollars per month. Ten for the local (on-prem) copy and ten dollars for the cloud. Detailed pricing information is available on Microsoft’s site at: https://azure.microsoft.com/en-us/pricing/details/backup/
There are some key differences to be aware of in Microsoft’s backup tool. MABS must be installed on a domain member server. At first glance, this requirement would seem to prevent backup immutability. Microsoft Azure Backup Server utilizes a PIN code to ensure immutability. The PIN is generated and retrieved from the Azure Admin Portal.
Like other enterprise backup apps, MABS uses an agent to manage the backup process. That agent can be pushed to target systems from the MABS console, installed manually, or deployed via many package managers.
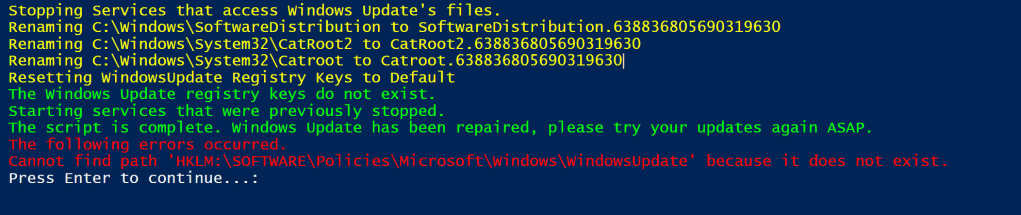
Both the MABS server software and its agents are automatically updated via Windows Update. Automation like this is where Microsoft’s advantage lies. MABS more or less takes care of itself. Automatic maintenance, the ability to backup and restore via PowerShell, and robust monitoring options help ensure it is running even when you forget to check on it.
I’ve used many of the major enterprise-grade backup tools over my career. Microsoft Azure Backup Server compares well to them. If you are considering which package to use in your environment, it’s worth taking a look at. I’ve been using it for more than a year in a medium-sized, multi-cloud, hybrid organization to great success.
There are two separate quotas for a Microsoft 365 mailbox. One is for the size of the mailbox. The other lesser-known limit is on the recoverable items database.
It is the recoverable items that frequently catch people off-guard. This quota isn’t shown in the admin portal dashboards. Furthermore, the limit is usually only an issue if you have a mailbox on legal hold.
These two things combine to make a frustrating situation. A user’s mailbox can stop due to a quota violation when it isn’t shown as being full on the portal. Here is a link to Microsoft’s documentation on the subject if you would like to know more.
I use the report to help prevent quota lockouts at my employer. You will need to run the script from a machine that has the Exchange Online Management Powershell module installed. Executing the script also requires an account with Exchange Online mailbox administrator permissions.
The output is an easy-to-read three-column report. The headers are Name (the user’s UPN), Mailbox, and RecoverableItems. The script takes around one hour per thousand mailboxes on average. This time can vary wildly, the point is that it’s slow. Don’t let the computer running it go to sleep.
Troubleshooting Windows update can be a fruitless waste of time. The update service is complicated and often intertwined with third-party management tools. Thanks to supply chain attacks, updates get super scrutinized by security tools. That extra level can cause interference issues. In short, the Windows update process breaks a lot for a lot of reasons.
From my point of view, the best way to fix Windows update in many cases is to reset it. To do that, we need to stop the services so that the files are not in use. Then we’ll need to delete them. We also need to delete all of the Windows update settings from the registry.
In organizations that are audited it is ideal to make backups before altering settings or files. This script makes copies of all the files and settings before any changes are made. The backup copies are named with a date value known as ticks which generates a new number on every run. This makes the script an easy one to schedule as a repeating task using various methods.
# This script executes the following actions: # 1. Stops the Windows Services that access files in the SoftwareDistribution and CatRoot2 folders. # 2. Appends the SoftwareDistribution and CatRoot2 folder names with a date stamp. # The SoftwareDistribution folder contains the cache for downloaded and installed updates. # The CatRoot2 folder contains the cache for downloaded and installed updates. # These folder contain the cache for downloaded and installed updates. Refreshing them often clears # patching issues. # 3. Backs up, then removes the registry records under the key HKLM\SOFTWARE\Policies\Microsoft\Windows\WindowsUpdate\* # The records will automatically repopulate when Windows Update is run or on the next GPO cycle. # 4. Starts the services that were stopped. # If at all possible you should immediately run Windows update on a system after executing this script. # Before the next GPO cycle runs and the changes are reverted. # This script backs up the SoftwareDistribution and CatRoot2 folders by renaming them with a date stamp. # This script is intended to be run as a local administrator on the system that needs repaired. $DateStamp = Get-Date |Select-Object Ticks -ExpandProperty Ticks Write-Host -ForegroundColor Yellow "Stopping Services that access Windows Update's files." Stop-Service "Windows Update" -Force -Confirm:$false Stop-Service "Background Intelligent Transfer Service" Stop-Service "Cryptographic Services" Stop-Service "Windows Installer" -Force -Confirm:$false Write-Host -ForegroundColor Yellow "Renaming C:\Windows\SoftwareDistribution to SoftwareDistribution.$DateStamp" Rename-Item -Path "C:\Windows\SoftwareDistribution" -NewName "SoftwareDistribution.$DateStamp" -Force -ErrorAction SilentlyContinue Write-Host -ForegroundColor Yellow "Renaming C:\Windows\System32\CatRoot2 to CatRoot2.$DateStamp" Rename-Item -Path "C:\Windows\System32\CatRoot2" -NewName "CatRoot2.$DateStamp" -Force -ErrorAction SilentlyContinue Write-Host -ForegroundColor Yellow "Renaming C:\Windows\System32\Catroot to Catroot.$DateStamp" Write-Host -ForegroundColor Yellow "Resetting WindowsUpdate Registry Keys to Default" # The registry keys will be recreated when Widows Update is run or on the next GPO cycle. If (Get-ItemProperty -Path "HKLM:\SOFTWARE\Policies\Microsoft\Windows\WindowsUpdate" -ErrorAction SilentlyContinue) { Write-Host -ForegroundColor Yellow "Backing up the Windows Update registry keys to $env:USERPROFILE\Downloads\widowsupdateregistrykeys.$DateStamp.txt" Get-ItemProperty -Path "HKLM:\SOFTWARE\Policies\Microsoft\Windows\WindowsUpdate" | Out-File -FilePath $env:USERPROFILE\Downloads\widowsupdateregistrykeys.$DateStamp.txt Remove-Item -Path "HKLM:\SOFTWARE\Policies\Microsoft\Windows\WindowsUpdate" -Recurse -Force Write-Host -ForegroundColor Green "The Windows Update registry keys have been removed." } Else { Write-Host -ForegroundColor Green "The Windows Update registry keys do not exist." } Write-Host -ForegroundColor Green "Starting services that were previously stopped." Start-Service "Windows Update" Start-Service "Background Intelligent Transfer Service" Start-Service "Cryptographic Services" Start-Service "Windows Installer" Write-Host -ForegroundColor Green "The script is complete. Windows Update has been repaired, please try your updates again ASAP." Write-Host -ForegroundColor Red "The following errors occurred." Write-Host -ForegroundColor Red $error Pause Exit
I tried to include some good feedback. Errors are displayed at the end.
I have relied on this script for a while. In its current form, it is intended to be run interactively in an admin PowerShell session. If you remove the write-host lines, the rest of the code makes a good function to add to the beginning of your patching processes.
The Microsoft Teams mobile client has been notorious for driving people mad with false unread notification badges. Android or Apple, it doesn’t matter. The problem has affected both over the years. Sometimes, it will clear up after an update or re-install, but the issue always seems to come back.
Recently, I found myself cursed with the red one taunting me from the edge of the chat icon. I searched through every message, rebooted, checked for updates, and cleared the app’s cache. No dice. My inability to make it go away was slowly driving me insane.
While poking around in the software’s menus, I came across Data and Storage section. I wasn’t aware that Team’s had built-in solutions for dealing with this situation. There are multiple options for dealing with issues in this menu. The first two options are clear app data and clear temp files. They are the same as Android’s app menu functions. Unfortunately, they didn’t help me.
I hadn’t looked in the Data and Storage Menu recently.
The third choice, reset database, is unique to the data and storage menu. Resetting the database has worked every time I have used it. In fact, it’s become the first thing I try when faced with a ghost notification.
Reset Database seems to correct most mobile client issues.
There doesn’t seem to be any downside to using the reset database option. I’ve done it several times now. The only noticeable side effect has been a short delay the next time you open Teams. It takes a minute or two to download the data it needs from your cloud account. The next time your phone suffers from a Teams ghost notification badge, try resetting the database.
There are lots of methods available to server administrators for checking the last reboot time of Windows machines. One of the quickest and most useful continues to be provided via Microsoft’s super CLI, PowerShell.
Those few lines will scan the Active Directory database for computer accounts with the word “server” in their names. Once located, the DNS name property of each matching record is stored in the variable $Servers.
The function named CheckReboot processes each DNS name stored in $Servers by sending it through a logic loop. The for each loop uses WMI to subtract the boot up time from the current time. Then, it displays a table showing the computer’s name, along with how many days, hours, and minutes each system has been running for.
You will need to run the script from an administrative terminal session. If it doesn’t work for you, try adding a lime to import the Active Directory Powershell module and check your execution policy. The machine and account running the script also need remote access to WMI.
There are more IT shops using Microsoft’s Hyper-V than ever before. Thanks in part to Broadcom’s shenanigans with the licensing after they purchased VMware, more are considering making the change every day. One challenge that causes organizations to pause when considering Hyper-V is the apparent lack of centralized host management.
It’s true, Hyper-V doesn’t include a direct vCenter equivalent without purchasing System Center’s Virtual Machine Manager module. vSphere isn’t free either, but that’s a different subject. The Hyper-V Manager MMC works well enough. Most of us have figured out how to connect the console to any host. One host at a time, is slow and ineffective when the pressure is on.
At first glance, there does not seem to be a way to save the connections you make to those remote hosts. There’s no save option in the MMC itself. However, unbeknownst to most there is a file that you can manipulate to pre-configure the remote hosts that you manage. Follow the instructions below to setup your Hyper-V Manager console to manage all the servers in your environment at once.
Preconfiguring all of your hosts in the Hyper-V MMC makes managing them much easier.
Add the Hyper-V role to your computer or logon to the server you are going to manage Hyper-V from (Hyper-V Management Tools are the minimum requirements).
Open the Hyper-V console and connect to a Hyper-V server at least once (builds the profile paths).
Close the Hyper-V console (can’t make changes to the file with it open).
Search for Notepad or use the start menu to locate it. Right click on it and choose to “Run as Administrator” enter your admin level credentials.
In Notepad’s menu go to File, then Open, browse to: C:\Users\adminaccountname\AppData\Roaming\Microsoft\Windows\Hyper-V\Client\1.0\ (where adminaccountname = the admin level account you use to access Hyper-V systems)
Open the file named virtmgmt.VMBrowser.txt
Under the tag for “BrowserComputerNames” enter the names of the Hyper-V servers that you connect to between <value> and </value>. Each name should be separated by a semi-colon.
Example: <setting name = “BrowserComputerNames” type=”System.String”> <value>ServerName1.domain.com; ServerName2.domain.com; ServerName3.domain.com</value>
Save the virtmgmt.VMBrowser.txt file (you will not be able to save the changes if Notepad isn’t running with admin credentials).
Important TIPs: Each time that you open the Hyper-V management console, it tests the connection to all the servers stored in the file via WMI. This connectivity test can take a while, especially if the device isn’t responding for some reason. If you interrupt the test before it completes, or if anything goes wrong it will stop. The console will remove any of the servers past the point of failure. Keep a copy of the file after you get it all configured or keep these instructions handy.
The instructions above assume that your Hyper-V hosts are member servers in Active Directory. If they are not, the process requires extra steps to handle authentication from the remote Hyper-V Manager console. See this post for those instructions.
For the last several months I’ve noticed that my Ethernet (wired) network connection will drop unexpectedly. Of course, it does this at the most inconvenient times. It dropped in one of the best Halo matches I’ve had in a while. One minute I was slaying with the Ghost on my way to a Killtrocity, and a Steaktacular team win. Next thing I know, I was staring at the “You’ve been disconnected” banner.
I’ve been meaning to dig in and see what could be done about the issue for a while now. Unfortunately, I’ve been distracted due to dealing with my CPU issues. You can read about that saga in Intel i-9 CPU Issues: From Failures to Fixes , good times. Getting booted out of that Halo match was the last straw though.
The first diagnostics tool I looked at was the Windows System Event Log. If you are having similar issues and are trying to follow along type “Event” into your Windows search bar. Open the app it finds and look under Windows Logs, then System to see the section I am referring to.
The Windows System Event Log is a great place to start when you think hardware might be causing your problem.
After I found the event 27 and read its description, “Network link is disconnected” I considered the situation. I had not unplugged my network cable, and I know my network is pretty solid. So rather than go down the network troubleshooting route, I decided to try a clean install of the driver.
Once the zip file downloads, extract its contents (right click and choose extract). Then open the extracted folder and double click SetupBD.exe (image above) to start the new driver installation. Make sure that you have followed the Intel instructions to remove the old driver first. Click yes if you are prompted for administrator rights. Then click the OK button to start the installation.
The drivers only take a second to install. I suggest that you reboot your computer even though the installation doesn’t require it. I noticed that my original driver from 10/08/2023 stayed loaded in the device manager until I rebooted. The date changes to 2/20/24.
What I find most interesting is that I run the Intel Driver Support Assistant agent on my machine. It checks for Intel updates continuously. I also run MSI Center at startup and have it configured to install all updates. Windows Update is set to check for and install driver updates too. At no time did any of these tools recommend or install an updated driver for the wired network card.
Anyway, this probably isn’t a universal fix for all the network problems people have with this particular card. The Intel support document in the link above has several more “workarounds” for other various issues. So far, the clean install of the new driver seems to have fixed my issue. I haven’t randomly dropped since I completed the procedure and rebooted. It’s too early to call it 100%, I’ll update the post if it happens again.
Manually reviewing the membership roster for each of the dozens of RBAC roles in a Microsft 365 tenant is quite the undertaking. Since this is something I need to keep an eye on, I decided to automate a report. Run the script, then look in your documents folder for the report.
I’ve been caught by an automatic service not starting after system reboots from things like patching. I’ve written several versions of the script below over the years. This is my most recent edition. You’ll need the Active Directory module installed on the system that executes the script.
The code will scan your entire AD for member systems with a Windows Server operating system. It will present you with a list to choose from. It will then test RPC (135) connectivity and scan the automatic services on those that are reachable. The script will report any servers that do not have a status of “running” along with any that were not reachable.
<#
.SYNOPSIS
Checks Acitive Directory Memeber Servers for Automatic Serices that are not currently running.
.DESCRIPTION
Dynamically generates list of Active Directory Servers.
Uses WMI to examine the status of all services set to automatically start on selected servers.
Filters common automatic services that do not stay started by default: mapsbroker, cdpsvc, gupdate, remoteregistry, sppsvc, wbiosrvc,
iphlpsvc, tiledatamodelsvc, clr_optimization, and Microsoft Edge Update are currently excluded from the report.
.INPUTS
Get-ServerAutoSerivcesStatus displays a gridview of selectable Active Directory memeber servers.
Shift+ and CTRL+ select are enabled.
CTRL+A to select all.
Criteria to filter.
.OUTPUTS
System.String. / Gridview Get-ServerAutoSerivcesStatus returns a string showing all status on selected servers running,
or a gridview of the servers and services that are not.
Get-ServerAutoSerivcesStatus also displays a string listing servers that did not respond on TCP 135 (RPC).
.EXAMPLE
PS> Get-ServerAutoSerivcesStatus.ps1
#>
$ErrorActionPreference = "SilentlyContinue"
$Servers = Get-ADComputer -Filter 'Operatingsystem -Like "*server*"' -Properties dnshostname|
Select-Object dnshostname -ExpandProperty dnshostname|
Out-GridView -Title "Select Servers To Enumerate AutoServices. CTRL+A to Select All" -PassThru
$Report = @()
$ErrorLog = @()
$ServersOnline = @()
Write-Host -ForegroundColor Yellow "Please wait, testing connectivity to selected servers....."
Foreach ($Server in $Servers) {
If ((Test-NetConnection -WarningAction SilentlyContinue -ComputerName $Server -Port 135).tcptestsucceeded){$Serversonline += $Server}
Else {$Errorlog += $Server}
}
ForEach ($Server in $ServersOnline) {
$Wmi = Get-WMIObject win32_service -ComputerName $Server -Filter 'State != "Running" AND StartMode = "Auto"'|
Select-Object @{n="ServerName"; e={$server}}, @{n="ServiceName";e={$_.name}},@{n="Status";e={$_.state}},@{n="Start Account";e={$_.startname}}
$Report += $Wmi | Write-Host
}
$Report | Where-Object {($_.ServiceName -notlike "mapsbroker") -and ($_.ServiceName -notlike "cdpsvc") -and ($_.ServiceName -notlike "gupdate") -and
($_.ServiceName -notlike "remoteregistry") -and ($_.ServiceName -notlike "sppsvc") -and ($_.ServiceName -notlike "wbiosrvc") -and ($_.ServiceName -notlike "iphlpsvc") -and
($_.ServiceName -notlike "tiledatamodelsvc") -and ($_.ServiceName -notlike "*clr_optimization*") -and ($_.ServiceName -notlike "Microsoft Edge Update") |
Select-Object @{n="Server";e={$server}}, @{n="Stopped Service";e={$_.displayname}
}
}
If ($Rerport -ne $null) {$Report | Out-GridView -Title "These automatic serivces are not running"}
Else {Write-Host -ForegroundColor Green "All Automatic Services on $($Serversonline.count) reachable servers are started."}
If ($ErrorLog -ne $null) {Write-Host -ForegroundColor Red "These $($ErrorLog.count) servers were not reachable via RPC (port 135)`n `n" ($ErrorLog -join ",`n")}
Else {Write-Host "No connection issues to selected servers detected."}
Pause
Exit
I recently noticed that my smart watch was not notifying me for messages. I know from experience that Android’s work profile function has contributed to challenges with work apps being able to notify personal companion devices like smartwatches and car infotainment systems.
If you are missing work notifications on your watch, try this. Open the Wear app on your phone and tap Watch Settings. Then go to Notifications and tap App Notifications. Scroll down the list to find the app you wish to receive notifications from, for example, Teams or Outlook.
You should see a toggle to enable the work profile version’s notifications. Flip the toggle to on, that’s it. Assuming that your company isn’t blocking them, you should start receiving notifications immediately. I found this setting to be available for every work profile app installed on my device, and they were all off by default, except Outlook. I hope it works for you as well as it did for me.
Remote Desktop Servers have a way of multiplying themselves like some kind of organic creature. Most administrators know how to deploy RDS and it is a good to solution for a variety of issues. The simple script below scans domain servers for the installed features.
Running the script below requires the RSAT (Remote Server Administration Tools) be installed on the system you are running it from. The account used must have enough permissions to read from Active Directory and the selected server’s registries.
The script will read the machine accounts of AD joined servers looking for those with the word “server” in the operating system attribute. It will prompt the user to select any of those servers to scan. It will also prompt the user for a DNS name to search the certificates for.
The script will attempt to test connectivity to RPC (TCP 135) for each of the selected servers. It will then open the registry and search the computer account’s personal certificate store for the entered domain name. A report will be generated that shows pertinent details for each certificate that is found.
$Servers = Get-ADComputer -Filter 'Operatingsystem -Like "*server*"' -Properties dnshostname|
Select-Object dnshostname -ExpandProperty dnshostname|
Out-GridView -Title "Select Servers To Scan for Certificates. CTRL+A to Select All" -PassThru
$CertificateDomain = Read-Host "Enter public DNS host name of certificate to check; example: mydoamin.com"
$ServersOnline = @()
Foreach ($Server in $Servers) {
If ((Test-NetConnection -WarningAction SilentlyContinue -ComputerName $Server -Port 135).tcptestsucceeded){$Serversonline += $Server}
}
ForEach ($System in $ServersOnline){
Try {
Invoke-Command -ComputerName $System -ErrorAction Stop {
Get-ChildItem Cert:\LocalMachine\My|Select-Object DnsNameList, Subject, Issuer, NotAfter|Where-Object {$_.DnsNameList -like "*$CertificateDomain*"}}|
Format-List PSComputerName, DnsNameList, Subject, Issuer, @{N="Expires"; E={$_.NotAfter}}
}
Catch {Write-Host "No Public CA issued certificate for $CertificateDomain detected on $System"}
}
Microsoft’s 365 has a ton of built-in reports for almost every metric you can think of. I recently needed to show Exchange Online and OneDrive consumption in the same report for a migration project. I was surprised to find the data I needed was available in separate reporting functions, but not together.
A VPN or virtual private network is a tunneled session established between your computer (or local network) and a remote server, or entire remote network. The tunnel travels through the inter-connected web of networks we call the Internet. A VPN tunnel on-line is to the Internet as a physical tunnel blasted through rock is to a mountain highway. They both provide secure transportation to the other side.
When your car passes into and through the mountain highway tunnel, it becomes hidden from any observer that is not in the tunnel with you. The same goes for the information exchanged between your computer and the remote systems it communicates with over a VPN. Data in the tunnel is hidden from other nodes on the Internet by the encryption algorithm (math scramble) that established it.
Microsoft offers a free VPN connection to their platform from their Edge web browser. This essentially means that only you, Microsoft, and the web farm you are using will be able to see what you are doing. The catch is that the system is only free for 5 GB of information per month.
To be limited, free, and still try to be useful, there are several compromises Microsoft has made. The Edge VPN offering is constrained to just browser traffic. A traditional VPN service would cover all data types. Not all browser traffic is sent through the tunnel either. This protects only certain sites and excludes things like video streams in the browser.
Access these choices in the Edge Browser’s Settings Menu, under the sub-menu Privacy, Search, and Services.
To enable this feature first update Edge to the newest version. Then click the Browser Essentials button in the tool bar. It is the heart shaped icon. Scroll down to the VPN section and click the toggle.
I recently needed to create a comprehensive report out of some exported log data. The system I was working with exported timestamps in the UTC format of YYYY-MM-DDTHH:MM:SSZ. For example, 2023-10-08-T13:43:30Z would be 1:43:30 PM on October 8th, 2023, in my time zone.
I figured it would be easy to change in Excel. I assumed I could do it with a custom date map on the row that the time data was in. It wasn’t that simple. I could covert the digits to something resembling local time, but I wasn’t able to remove the T and Z from the string by formatting cells.
I read a post on Exceljet about the basics of how Excel handles time in general. From that and a little more research, I derived a formula to convert the timestamps to local time.
The “LEFT” and “MID” are trimming the T and Z, the DATE and TIME value functions convert the remaining digits to an Excel time serial number. The -TIME statement changes the UTC to my local time zone. Alter F2 to the cell that contains your timestamp data. Set the cell (row) format to Time or Date depending on your needs. Since the data has been converted to a time serial, any of the various time/date formats should work now.
Warning: This process is complex, tedious, and requires interacting with data that may not be backed up. Variations in software may result in your experience and results being different from mine. We recommend that you not attempt these procedures if you are not a qualified Hyper-V and Windows Clustering specialist. Consider consulting with a professional before proceeding at your own risk.
If you’ve read part 1 and continued on to this post, you have probably experienced some type of catastrophic failure. Before attempting a cluster rebuild, you should have exhausted all other recovery options such as restoring from backup or forcing the cluster online manually.. There’s a reason this post starts with a warning. Data loss, up to and including entire VMs, is possible.
If you have rebuilt a VMware cluster, you should find this process to be familiar. In a Hyper-V failover cluster, the virtual machines are roles that are managed by the failover cluster service whose resources are tracked by the failover cluster database. When that database becomes corrupted or malfunctions your only options are to restore it, or to rebuild the cluster and import the VMs from storage.
The virtual machines themselves consist of a series of files that are stored on the cluster shared volume. Other resources like CPU and memory are provided by the host node a VM is mounted on at any given time. Therefore, if the shared storage system has remained intact during the failure, the VMs can be recovered from its files.
The first step in the recovery process is to locate the virtual hard disk files and verify that they are intact. If the virtual machines were deployed into the cluster properly, they should be located on a shared cluster volume partition. Typically, this is a mount point under the folder C:\ Clusterstorage\ which should be accessible on the host that last had ownership of the CSV.
Note: Many novice admins do not provision VMs in Hyper-V clusters properly. They tend to locate the storage on a host rather than on the mount point for the cluster-shared volume. If you are unable to locate a VM in C:\Clusterstorage (CSV mount point), try examining each host’s local storage.
A good place to start is by opening the Disk Management service console from one of the cluster members. If you see the CSV drives but they are not mounted, DO NOT TRY TO MANUALLY MOUNT THEM. That will be done by the cluster after we rebuild it. One of the nodes will have been the CSV owner, the volume will be mounted on that host. If no host sees the CSV in disk management, stop and correct any storage or connectivity issues before proceeding.
Once you have located the VM files, you can proceed to identifying key configurations of the cluster. If you have documentation that provides the cluster name, cluster IP, and network configuration you can skip this step. If not, the easiest method is to open the registry on one of the host systems. Browse to HKEY_LOCAL_MACHINE\CLUSTER and examine the subkeys to locate the information required for the rebuild process. It is a good idea to export the entire key.
Export the Cluster key for reference during the rebuild.
The next step of this process is to remove any remnants of the failed cluster from the hosts (the registry keys above) as well as from Active Directory. Open an administrator PowerShell console on one of the cluster nodes and run the following commands.
Remove-ClusterNode -Name COMPUTERNAME (where computername is the host’s NetBIOS name) then press Enter. Repeat for each host computer.
Remove-Cluster -CleanUpAD then press Enter. Occasionally, this command will not be able to remove the Cluster’s computer account from Active Directory. If this occurs, use ADUC to locate the machine account and delete it.
Now, a new cluster with the same configuration can be created on the hosts. I recommend that you use the same cluster name, network names, and cluster IP. This is not an appropriate time to redesign the cluster. Reduce the chances of your network, security systems, software, and other integrations causing issues by restoring everything to the previous state. Make any desired modifications after the restoration of services.
You can use PowerShell to create the new cluster, but I actually prefer the GUI for this task. There are quite a few steps and parameters that need to be specified to get the results you are after. Always start the process by running a cluster validation report. Make sure all the hosts are on the same patch levels and driver versions. Step-by-step instructions for the cluster wizard are easy to find online. Just make sure that you check the box to add all eligible storage.
Don’t worry if no disks are found, and do not use disk manager to manually mount them.
Once the new cluster has been established you will probably need to add the disks to the cluster shared volumes before the mount point becomes available. Open the Failover Cluster Manager console from one of the nodes. Browse to storage, right click on the disks and add them.
Now we are ready to import the virtual machines into our freshly rebuilt cluster. Open the Hyper-V management console. Use the option on the right-hand menu to launch the import wizard.
Locate the directory that contains your virtual machines and select one to import. After importing a machine into Hyper-V, but before booting it up, add it as a role to the cluster. Open the Failover cluster manager, select or right-click on the Roles node and choose the option to add a role.
Add a Virtual Machine role to the cluster for each VM you need to recover.
After you have added the virtual machine as a cluster role, use the Failover cluster manager to start it. Repeat the process for each VM. You may need to search for some VM’s files or configs. In extreme cases you may need to build a new VM in Hyper-V and then attach the VHDX to it. Once you finished importing the VMs and adding them to the cluster, I suggest you test migrate them to another node. Congratulations, you’re done.
I write a lot of documents in Word. You can imagine my frustration this morning when confronted with an error while trying to change a simple option for pen usage. After fiddling about with it for several minutes, I determined that any change of options resulted in the frustrating error.
The error message appears both in a pop-up dialog box and in the Microsoft Office Alerts section of the event viewer. It reads ” The server drafts location you entered for offline editing is not valid or you do not have permission to access that location. Specify a location on your local computer.” What? This is my home computer. I’m not connected to a server.
My first thought was to specify a location and continue on my merry way, but no joy. You cannot edit the field in question because it also causes the error. My next action was to run a repair on Office by going to Settings -> Apps -> Selecting the Office app and then Modify. This didn’t work either.
I found a few other people suggesting various fixes on-line including adding a string value registry key named “Location” with a valid path for the value (example, C:\users\username\documents\) in HKEY_CURRENT_USER\Software\Microsoft\Office\Common\Offline\Options. This workaround did in fact allow the settings to change, but I was not satisfied with this solution. It seems unlikely that Microsoft intends for users to edit the registry on every computer with Word installed on it. Something else was causing this problem.
Eventually I traced the problem down to a OneDrive failure that had occurred on my system a while back. I had previously configured OneDrive to sync files to a D drive. That drive became problematic, so I unlinked my PC from OneDrive synching and removed the disk. Then I re-enabled OneDrive pointing it at the default location on C.
I had not noticed that the Documents library in Windows Explorer remained pointed at the previous location on the D drive, so was the Pictures library. This was the true cause of the error message. Microsoft 365 products save to OneDrive by default. I reset the libraries by right clicking on them, going to the location tab, and clicking the “Restore Default” button. This generates an error, just click ignore.
If you are experiencing this error and the traditional fixes haven’t worked. Try checking the location of your document libraries and ensure they are fully accessible.