At the beginning of our relationship, my spouse and I discovered that we had very different sleeping habits. She slept with the TV on, while I preferred only the white noise from a small fan. Tinnitus made having some noise masking solution in the bedroom a must for both of us.
I struggled to get used to the TV being on while trying to sleep. The sound wasn’t so bad, but the light and commercials screaming at me were bothersome. She needed more engagement than a fan or white noise generator produced.
We tried various earbuds. She did better with them. I wasn’t able to adjust to sleeping with something in my ear. She tried a headband that had embedded speakers in it, but that was uncomfortable for sleeping in. Eventually we stumbled across a “pillow speaker” at some old-time electronics store. It was just a little hockey puck sized speaker. You plugged it into your phone via the built-in 3.5 mm jack. Then you slipped the disk into your pillowcase.
The Radio Shack pillow speaker worked, but it had some issues. It wasn’t very loud. To hear it well enough, you had to put the speaker on the topside of your pillow. If you rolled over in the night, your ear would be uncomfortably smashed against the hard case. It was also just a plain speaker and didn’t have any controls of its own. This made operation at night an ordeal. Changing the media or adjusting the volume required unlocking your phone and using its controls.
We kept an eye out for improved devices throughout the years. When phones lost their headphone jacks, we had no choice but to find something that used Bluetooth. We found a unit that offered several improvements over the puck design. The new speaker used bone conduction tech to boost the sound volume and quality. It was also housed in a soft-sided case that wasn’t supposed to mangle your ear. Control buttons on the device made life easier too.
The conduction-based pillow speaker actually worked well. It’s loud enough to go underneath your pillow and still be able to hear it. Its soft sides made it more comfortable, but it still hurt if you rolled straight onto it in the night. Its biggest issue was the Bluetooth signal. If the speaker descended too far into the recesses of your pillowcase, it would disconnect from your phone.
While randomly browsing Amazon one night, I found the unicorn of pillow speakers. I reflex ordered it without showing it to my wife first. It had our entire wish list of features according to the description. Reviews were positive. If it even got close to the ad’s hype it would be a perfect upgrade.
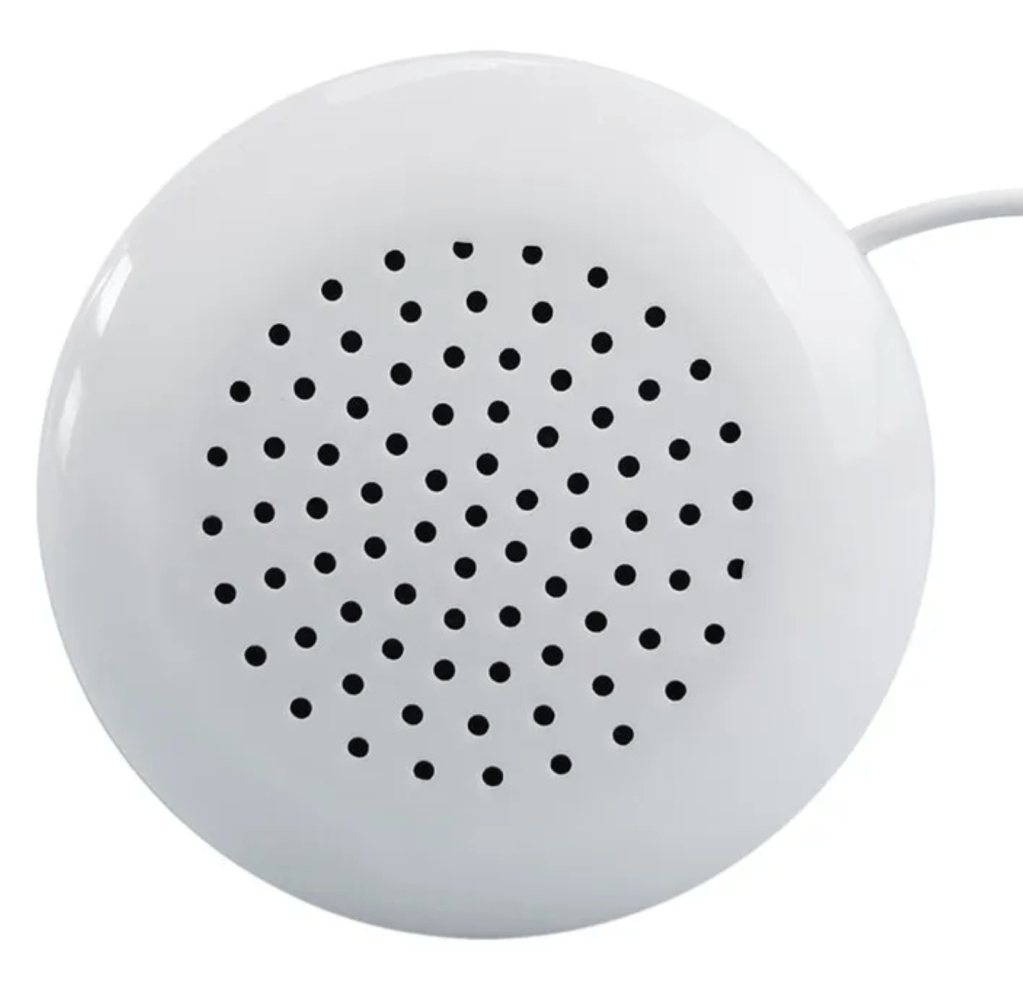
The Avantree Slumber 2 showed up a couple of days after I ordered it. As soon as I got it out of the box, I could tell it was a winner. There are 4 speakers surrounded by a soft rectangular pillow that is just the right length for a pillowcase. The controls, Bluetooth, and battery are housed in a small case connected to the speaker assembly via 3.5 mm. This means the Bluetooth signal stays nice and strong all night since the unit remains outside of your pillow.
The sound is fantastic. I usually have mine connected to my phone. I listen to podcasts and audio books more than anything else. The speakers sound so good that use them for other stuff too. I pair my Switch 2 for playing in bed. I also frequently connect to my laptop for an excellent personal movie experience.
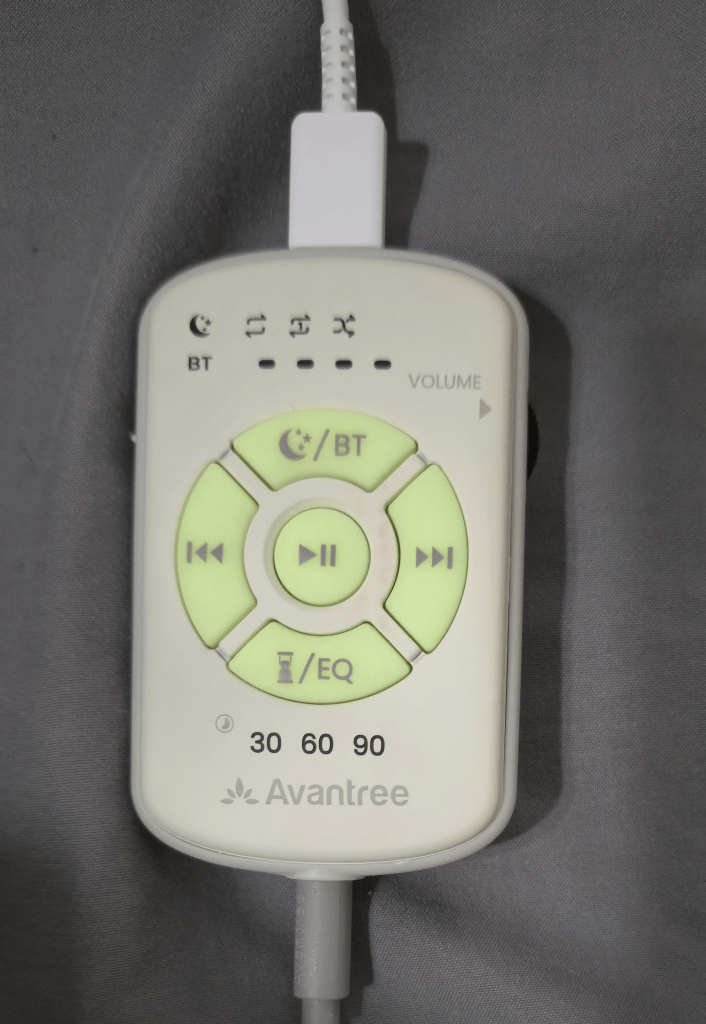
You can’t feel the speakers under your pillow while you sleep. They flex and move with you. The controller has nice big buttons that glow in the dark. You can play and pause, skip tracks, or adjust the volume. You can also enable a timer that will stop your chosen media player in 30, 60, or 90 minutes.
The Avantree Slumber 2 can run from battery when you travel. It can also play while being charged from its USB-C cable. The battery lasts through the night on a single charge but won’t make it through two. The controls are in-line meaning that USB-C connects on one end while the speaker pack connects on the other. Theoretically you should be able to use it as a Bluetooth connector for any 3.5 mm speaker set. I haven’t tested using them this way yet.
The cover is removable and washable.
We’ve had the Slumber 2 speakers for a couple of months now. It is made of high-quality materials, sounds great, and maintains a strong link with your device. If you want a speaker embedded into your pillow, there are no downsides to this model that I can find. It does its job perfectly.
A few days back I was browsing the Microsoft App store on my laptop. I wasn’t looking for anything specific. I was just filling the time between meetings. I had searched the store for “Microsoft”, I like to keep tabs on any new software they release. That’s when I noticed it.
A new app named PC Manager was in the list. The description was interesting. Microsoft has created an app to make monitoring and managing your computer easier. The Windows Settings and Task Manager apps are notoriously confusing for folks that don’t live and breathe IT work. This had all the hallmarks of a better solution.
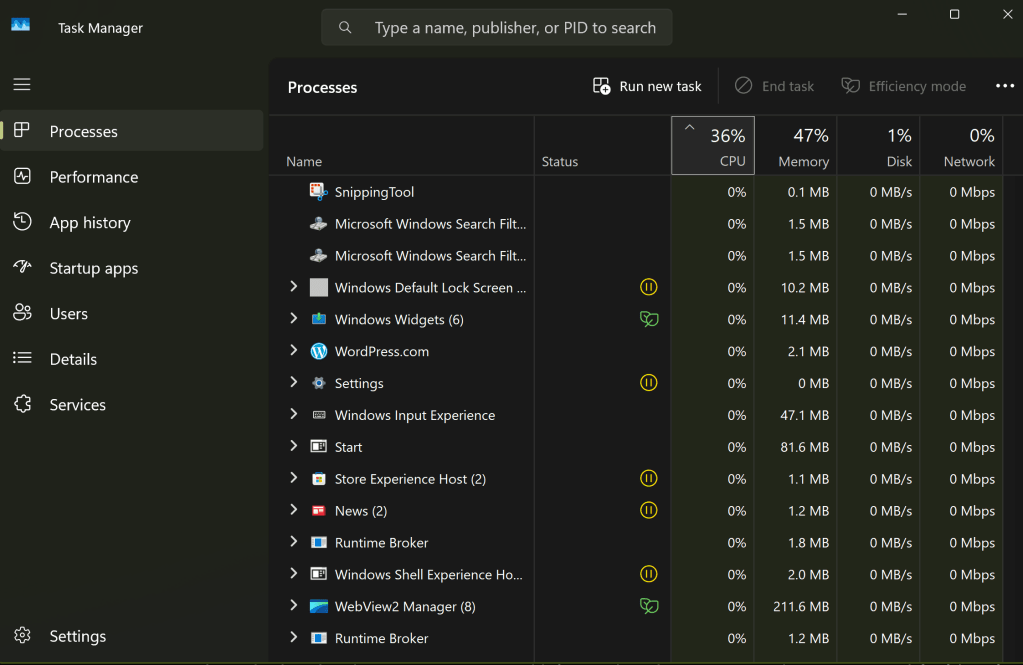
Task Manager has been the default Windows system utility app since 1996.
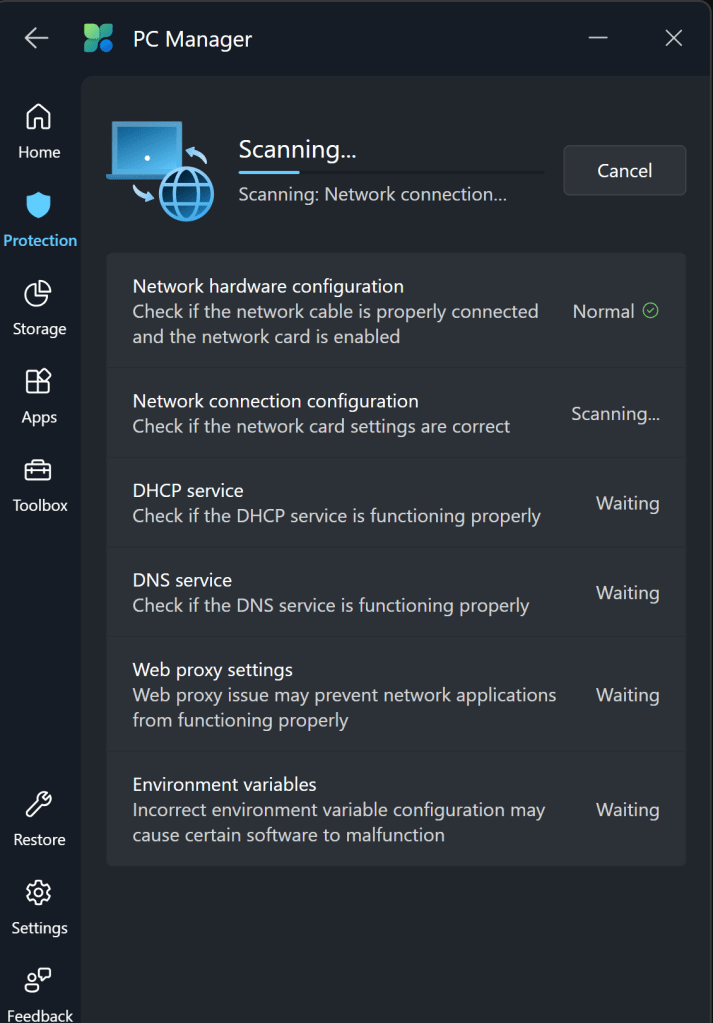
From my point of view, PC Manager delivers. It has quick links to things like take a screen shot, and the calculator app. You can easily see and manage the running apps and processes on your system. It can automatically clean up your hard drive by removing temp files from the OS and apps. The network test shows you everything about your system connectivity in one place.
The toolbar is a fantastic edition to my Windows desktop. The feature isn’t turned on by default. If you want to try it, look in the Toolbox and flip the toggle to on. If you drag the toolbar to an edge of your screen, it will attach to that spot and auto-hide itself. The toolbar shows your total memory use, Wi-Fi signal stats, 4 shortcuts, and a search bar.
Snap the PC Manager toolbar to a screen edge and it will auto-hide. You can choose your own shortcuts and quick links.
There aren’t any new abilities or information; all of this stuff is available in Windows via other methods. IT workers don’t always appreciate Microsoft adding another way to do stuff. It adds to their already full workloads. That being said, this particular tool seems useful. I like the toolbar, and it simplifies maintenance tasks. It’s free, give it a try and see what you think.
I have learned so much about the Lenovo Legion Go handheld gaming PC over my time owning and using one. I’ve gone to great lengths to tune mine for everyday couch and mobile gaming. It has all my games installed and ready to go. It’s stable, games and power can be suspended and resumed mid play for convenience. Everything runs screaming fast and looks fantastic. Games and media sound so good, too!
Read on to discover the settings, tweaks, and modifications that I’ve used to get the most out of my Go. You won’t believe the difference these settings can make in your experience. As a bonus, most of them are free and easy.
The first pain point with my precious handheld gaming PC. The speakers are subpar. Left at their default settings, they are high-pitched and struggle with power. Much of the potential volume is lost due to the speaker ports being on the top edge and angled away. Hold your hands up like rabbit ears behind the mesh while watching a video. You’ll be shocked by how much sound the speakers are really pumping out.
If you research the topic of poor sound, you’ll see there are several software workarounds that help considerably. The easy/free method is to use the Realtek Audio Console. Open it from the Start Menu to toggle off a feature called the “Omni Speaker”. Then use the same software to adjust the equalizer frequencies. Find this idea and lots of others at: https://www.reddit.com/r/LegionGo/
I used the equalizer changes above in conjunction with an app I already owned. Dolby Access is a Windows Store App that applies a Dolby Atmos surround sound effect to your PC’s sound system. The Go’s speakers sound so much better with the effect enabled. The dimensional soundscape achieved by applying some cheap software is surprising.
Dolby’s magic app features a gaming performance mode that increases the accuracy of sound location. This is especially important in competitive games. It works well. I don’t fully understand how they trick your hearing so well. Things that are supposed to be behind you, sound like it.
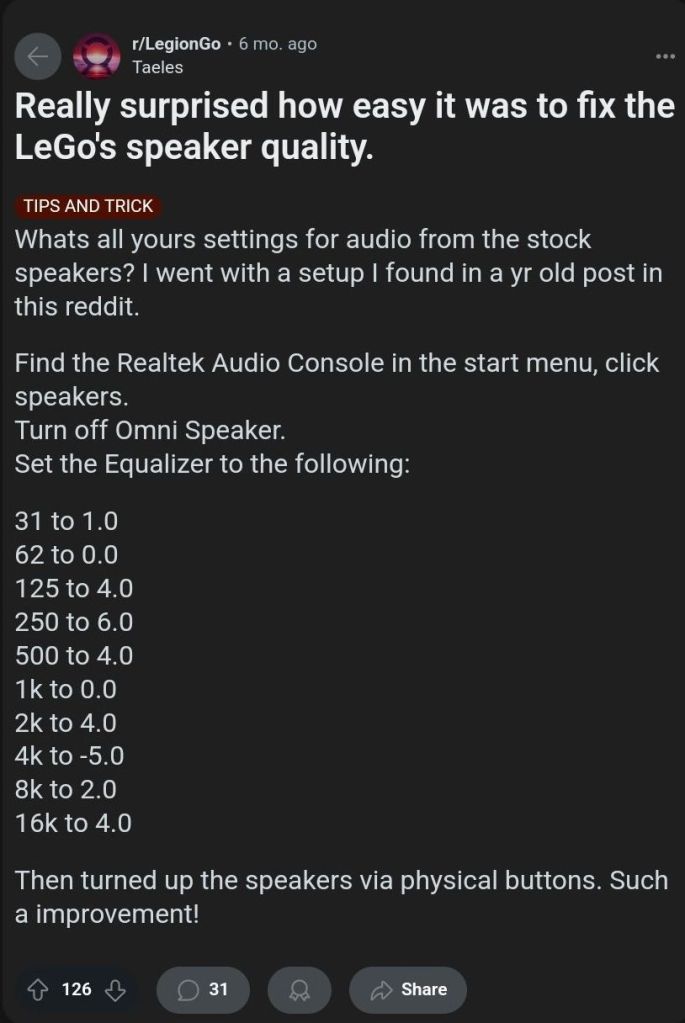
For Dolby Access, or any spatial sound app to be the most effective, disable Window’s sound enhancements. Go to Settings -> System -> Sound and click on the speakers. Advanced -> Audio enhancements toggle off.
If you don’t have or want to purchase Dolby Access, there are some open-source options out there. I haven’t tried it yet, but I’ve seen FXSound mentioned several times while doing my research. It gets a lot of recommendations and positive reviews and is donation-ware.
Update Everything
The Legion Go is a complex machine. Especially its software layer. The sheer number of places you must check for updates is astonishing. Here’s a rundown of everywhere you need to check. I try to do this at least once a week.
Windows Update
Accessed by going to Settings -> Windows Update
I like to open the advanced options and flip on the toggle to receive updates for all Microsoft products.
Microsoft App (MSIX packages) Updates
Open the Microsoft Store App (shopping bag icon in start menu). Then click on Downloads (menu on left) from there click the Get Updates.
Legion Space
Disks and Drivers. Open Legion Space ->Settings -> Scroll down -> Disks and Drivers -> Check for Updates.
Controller Firmware Updates. Go to Controllers in the menu, scroll the bottom menu left to More. Scroll to the bottom of More page and click the Controller Firmware Update button.
App Updates.
Game Launchers. Steam, Xbox, Ubisoft, and EA Desktop, all have client updates in each app’s settings menu
Game updates. Each game gets its own updates (usually handled by the launchers).
Other software.
Example: The emulator app Dolphin needs updated frequently.
Touch Screen
One quality of life upgrade was realized just by changing my bad habit of touching the screen too much. I had been using the touch screen to enter my PIN and to scroll. This was making my screen filthy. Every time I picked up the little machine to play something, it was covered in fingerprints and smudges.
There were two changes I made to drastically reduce how often I had to clean the screen. First, at the PIN prompt you can usually click the A button to get the on-screen number pad to open. Then you can use the buttons, D-pad, shoulders, and triggers to enter your PIN code just like on an Xbox.
Using the scroll wheel reduces fingerprints. Tapping and holding on the touch pad activates the right-click menu.
Second, the little wheel on the upper rear nook of the right controller is for scrolling. It works better and is more comfortable than touching the screen in most situations. The only trick is to remember that it’s back there.
Floating Keyboard
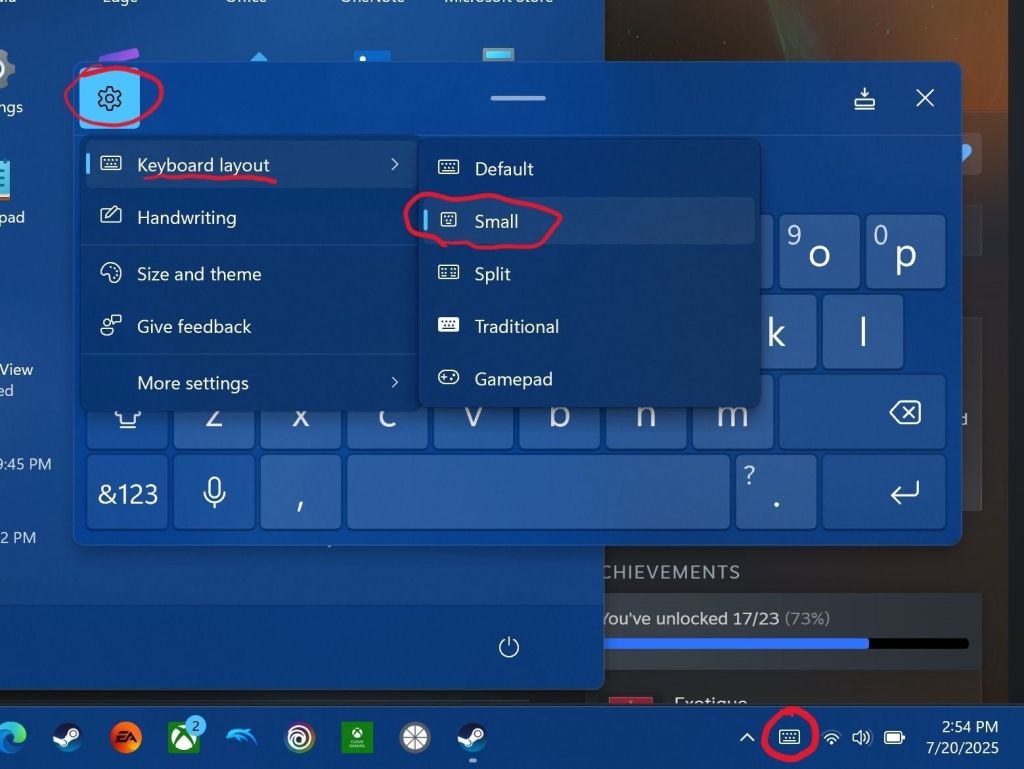
The OSK (On-Screen Keyboard) is huge the first time you try and enter text with it. It takes up the entire bottom half of the screen. This makes entering information into forms very difficult. The form either gets cut in half or squished to an illegible size when the keyboard opens. It’s a good thing there’s a built-in solution. You can resize and float the OSK in Windows.
Open the keyboard by touching or clicking the icon for it near the clock on your taskbar. Click or tap on the settings gear in the upper left corner of the keyboard’s panel. Then select Keyboard Layout from the menu and click small. Now you can use the little dash at the top of the OSK to drag it out of your way!
The small floating keyboard layout is easy to drag at of your way. Clicking Size and theme in the Keyboard’s settings will let you change its color size, and key size.
Hibernation Is Better
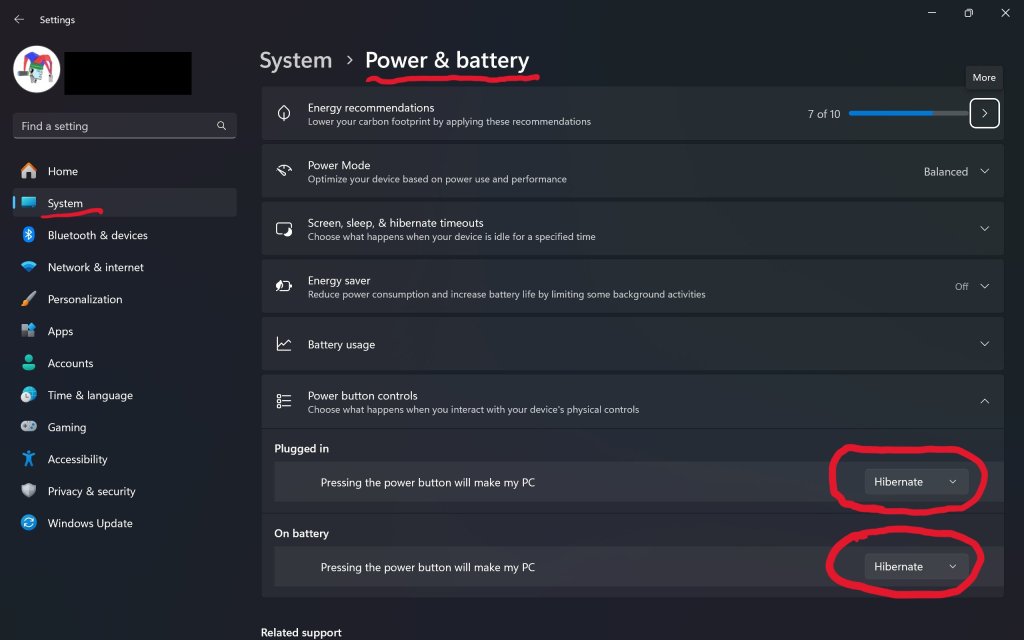
Batteries suck, but we’re stuck with them until some genius invents something else. For some unknown reason, the Go drains its battery in just a few hours of sleep mode. Do yourself a solid and change the power button’s function to hibernate instead of sleep.
There are two benefits hibernation has over sleep mode. The first is that your battery won’t be dead the next time you pick it up. Hibernation uses a lot less power over time than sleeping does.
The hibernation process exports everything in the computer’s memory to a save file on the hard drive. Then it powers down the RAM chips. This reduces power consumption. It also gives us our other benefit.
Go to Settings-> System-> Power & Battery to change what the power button does.
Everything running in RAM is saved to a file. This includes any game that is actively playing or paused when you pressed the power button. The LeGo can stay in hibernation for days with your game perfectly suspended in time.
The process takes a few seconds at most. In my opinion, hibernation makes the device more usable in real life situations. I play on my lunch break at work. Hibernating when my break is over means my battery and game will be ready to resume on the next day. You usually can’t do that with sleep mode.
Controllers and Buttons
The controllers on the Legion Go are a work of art. They are well constructed, feel great, and are tuned for a light touch. They disconnect from the main chassis like the Nintendo Switch’s do.
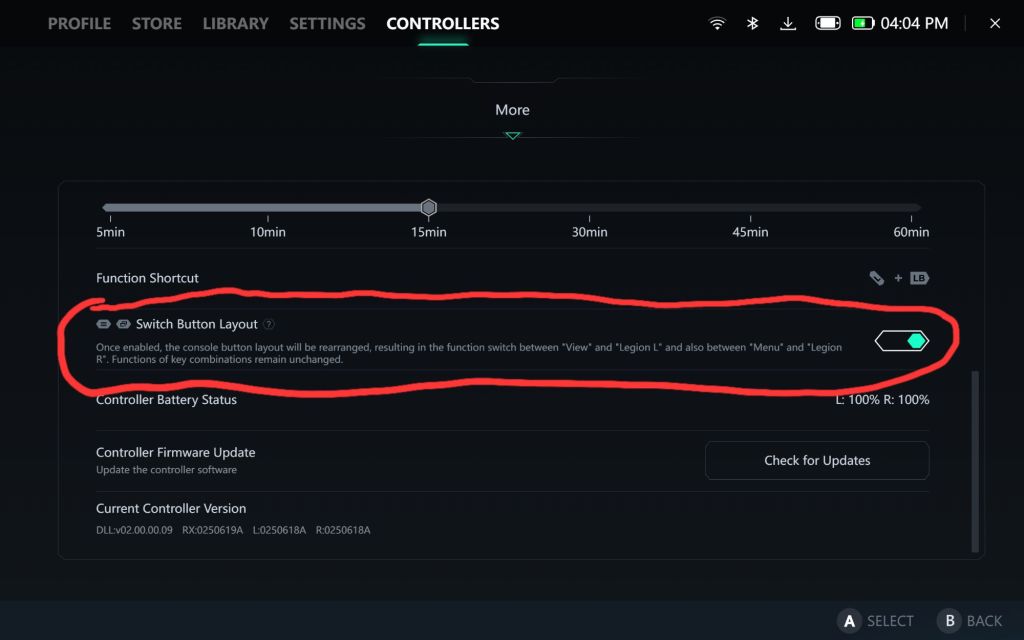
The placement of the menu and view buttons near the bottom of the left controller is a problem though. Those buttons are used in games heavily and stretching your thumb down to click them gets old. Especially in a game like Destiny 2 where you constantly need access to the character menu and maps.
There is an option to swap their functions with the Legion Space and Quick Control menu buttons. Open Legion Space and go to Controllers, then scroll to More. Scroll down the page and flip the toggle to swap the buttons.
Your thumbs will thank you for flipping this toggle on.
My other tip about the controllers is to take the time and map the back buttons. I tie them to crouch/slide, melee, reload, and jump in almost every FPS game that I play. Back buttons allow you to keep both thumbs on the sticks while performing button actions. This can be a big advantage in some games.
To map them, open Legion Space. Go to Controllers in the top menu then click the Button Mapping button in the list at the bottom. Now click the top View/Edit Layout button. Finally, click the Rear-View choice at the bottom of the screen. Click on each button to pull up the mapping menu for it.
GPU Upscaling
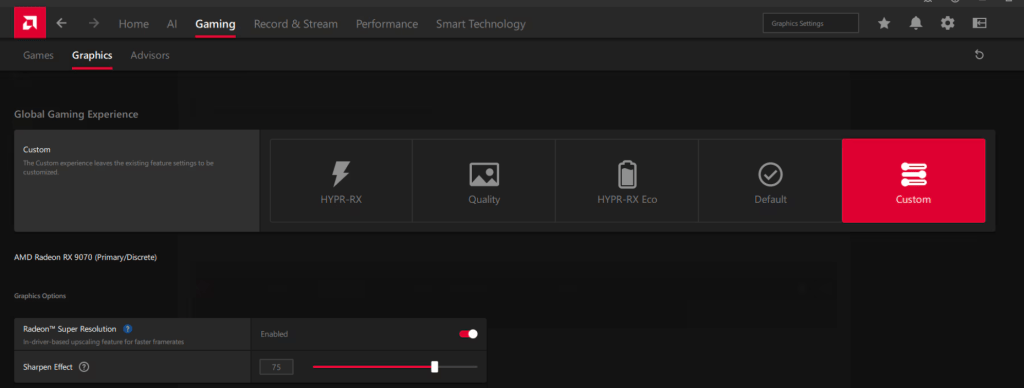
There are lots of tweaks and changes you can make to boost the performance of your Go in various games. One of the most potent is to setup the various upscale options for both on your GO and in your games. The Legion Go supports AMD’s Radeon Super Resolution and their FidelityFX (FSR 3) technologies. Taking advantage of them reduces the load on your GPU which usually translates to an increased frame rate.
AAA titles can run in the 60-110 FPS range with good fidelity once you learn to tune and upscale them. I haven’t written a comprehensive guide to upscale games yet, but the basics are easy. Open the AMD Adrenaline app and turn on the scaling options.
There’s also a switch for RSR in the Legion quick menu.
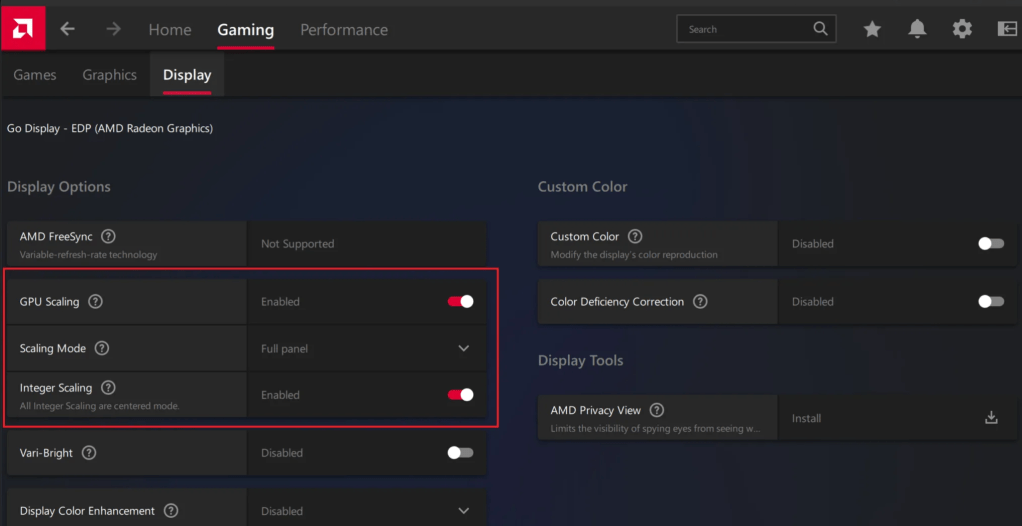
The details of scaling are a rabbit hole of advanced tweaks and changes. Things like algorithms, game resolution options, post-processing settings, and sharpening effects can alter your experience. YouTube and the sub-Reddit mentioned above are good places to start building knowledge if you want to go deep.
GPU scaling options are dependent on driver and software versions. If you don’t see the options, make sure your software is all updated.
Learning to upscale and tweak your games is probably the most impactful performance boost you can get on this system. If you’re not already familiar with scaling, try using 1600X1200 @ 144Hz as your display resolution. Then run your games at 800X600. If you can’t set the game’s resolution to 800×600, change the resolution scale to 50%. It amounts to the same thing.
If you are less than impressed with AMD’s GPU scaling abilities, there are also other options available. While doing research, I noticed that lots of people are mentioning the Steam App Lossless Scaling as a great alternate. The app is $6.99 in the Steam store: https://store.steampowered.com/app/993090/Lossless_Scaling/
BIOS/UEFI Tweaks
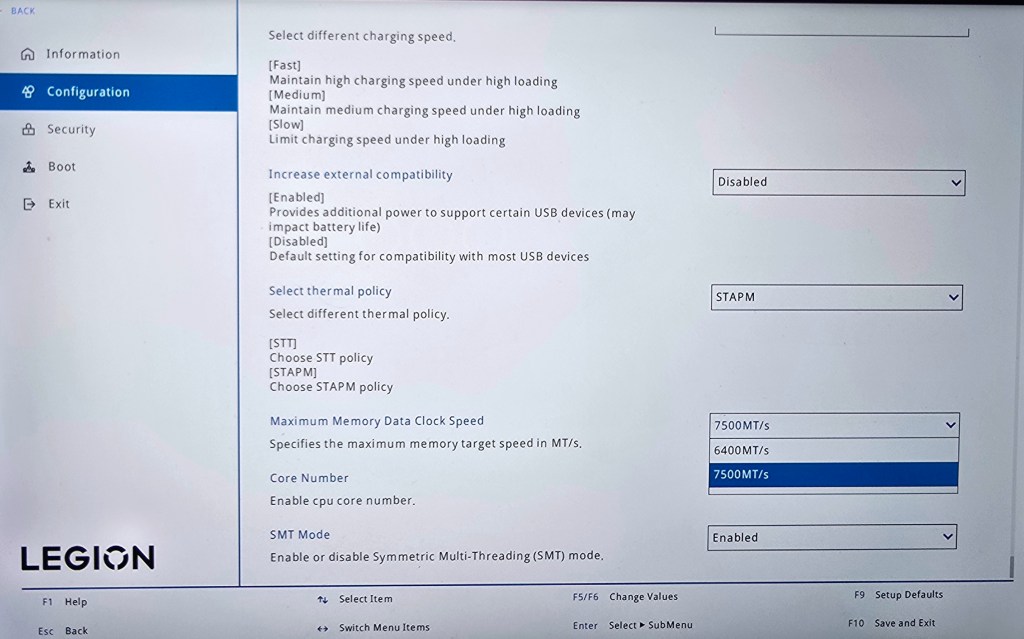
In the Legion Go’s BIOS there are two settings we can adjust that effect game performance. The first is how much of the system’s 16 Gigabytes of RAM is reserved to support the GPU. By default, 3 GB of VRAM is selected but this can slow some games down. I get better performance and game stability with 4 GB assigned to graphics processing. That leaves 12 GB for Windows and your game, which is plenty in most cases.
Shutdown -> Hold Power + Volume Up Overclock the RAMReserve 4GB VRAM
You can also overclock the RAM for an overall performance boost. Increasing the RAM’s speed will cause it to generate more heat. Excessive heat can impact CPU and GPU throttling. Consider the environment you play in.
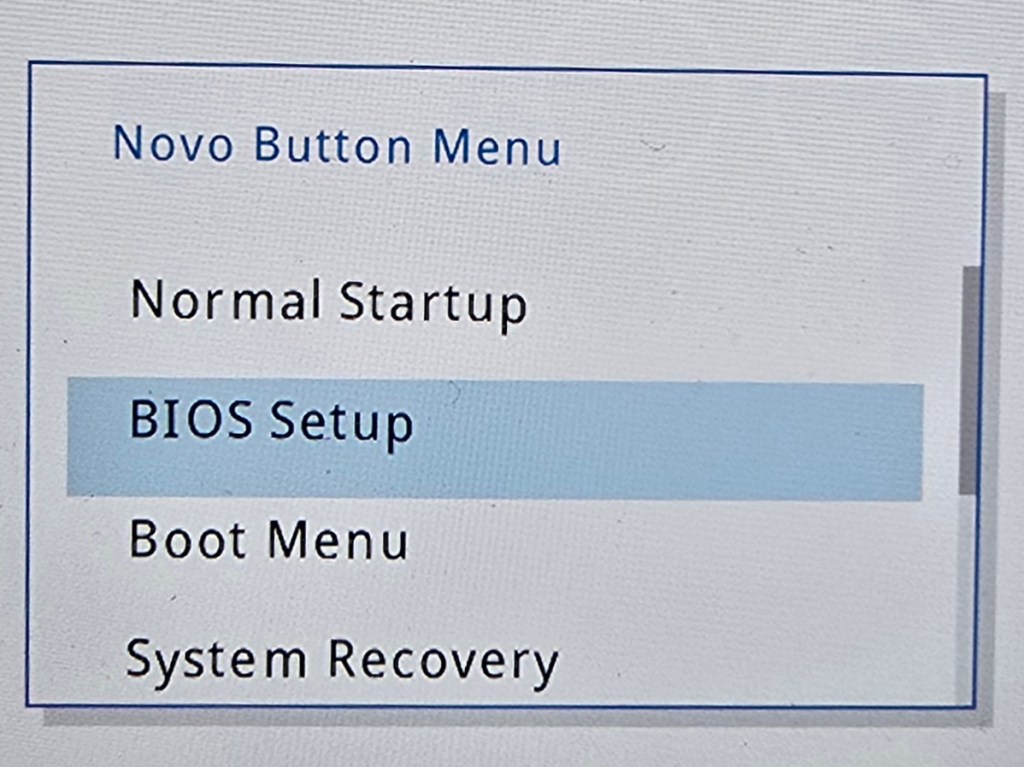
Before you make either change, verify you are on the newest version of the system firmware. You Boot to the UEFI control screen to make these changes by shutting down first. Then hold down the Power and Volume up buttons at the same time for a few seconds.
Optimize Windows 11 for Gaming
The Legion Go is running Windows 11 Home. The default security posture of Windows 11 is not optimized for gaming. Specifically, memory integrity and the Virtual Machine Platform features of Windows 11 can slow down some games.
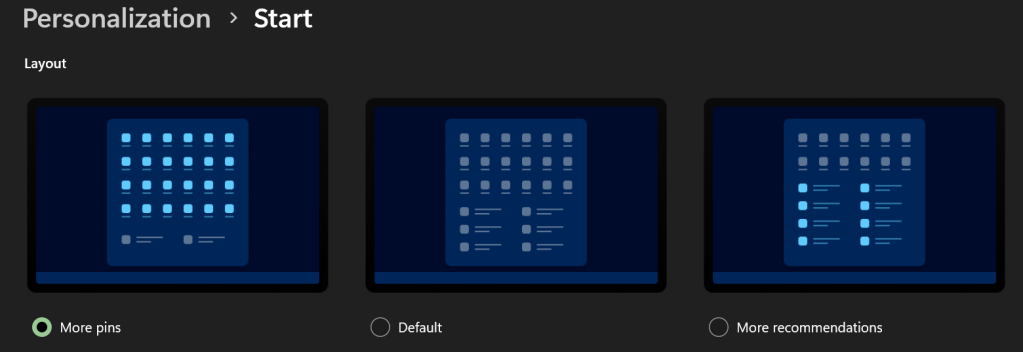
I like to PIN my games to Start. Go to Settings -> Personalization -> Start -> and select the option for more PINs if you do too.
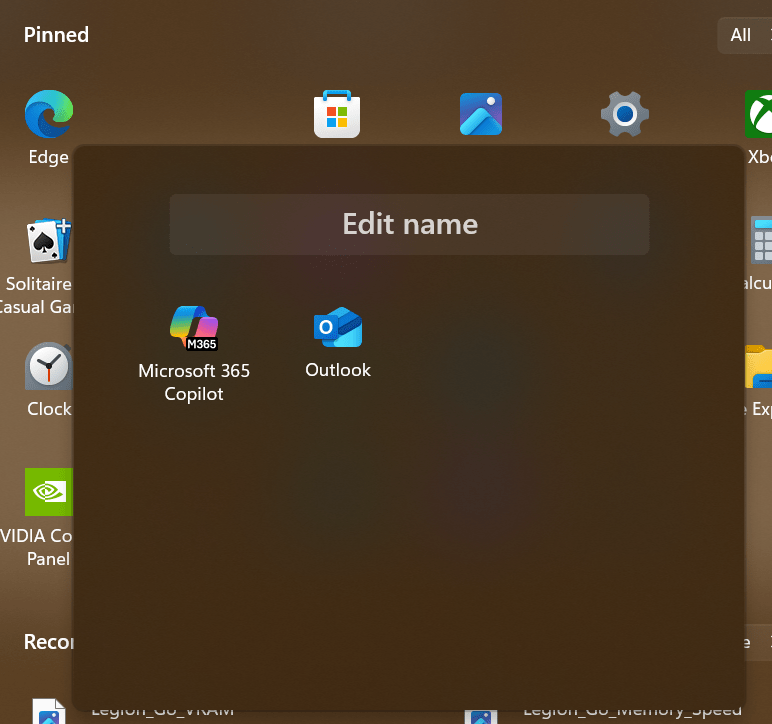
Make folders on the Start Menu. Dragging one icon onto another. Drag and drop icons as needed to add. Rename a folder by clicking into it. Right click on folders in the start menu to move them left or right.
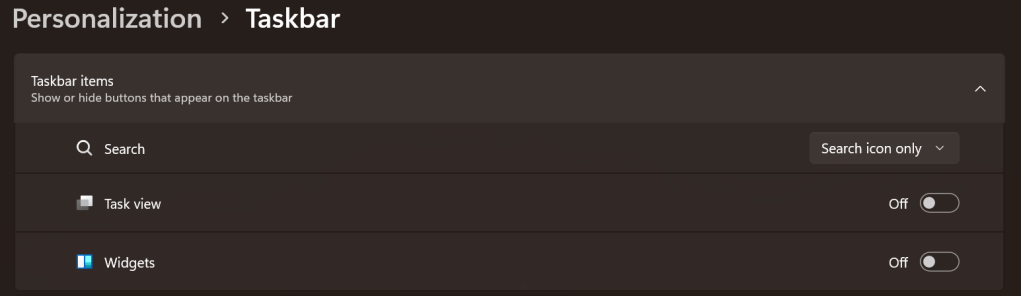
Maximize the task bar space. Settings -> Personalization -> Taskbar: Search -> Icon. Disable Task View. Disable Widgets.
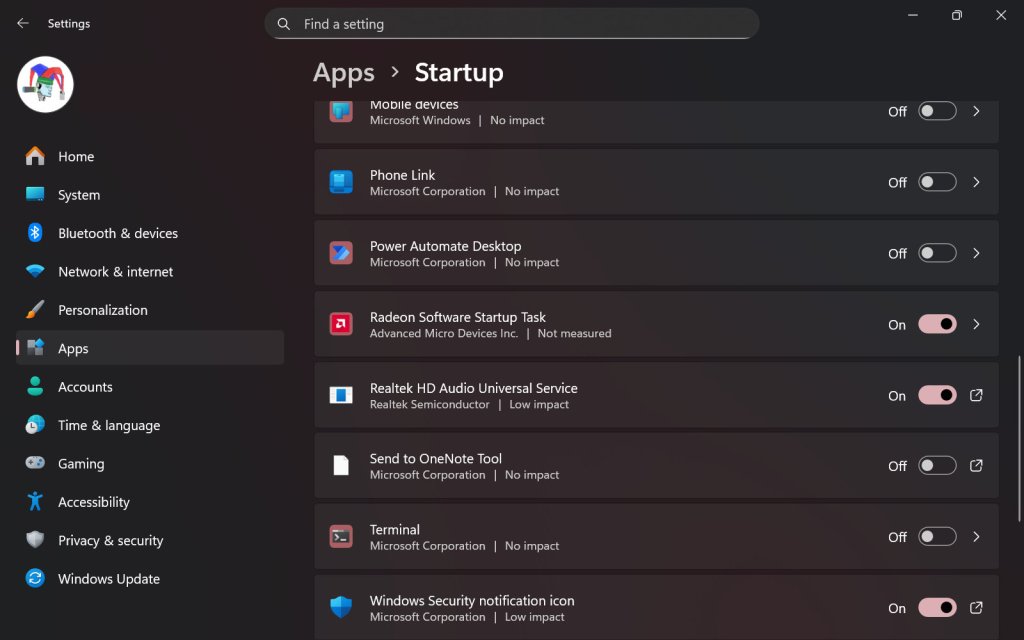
On my Legion Go, I disable most of the start-up apps. It helps conserve CPU cycles, RAM, and disk I/O for the games. Go to Settings-> Apps -> Startup. I only leave three apps toggled on. The Radeon Software Startup Task, Realtek HD Audio Universal Service, and the Windows Security notification icon.
SSD Swap
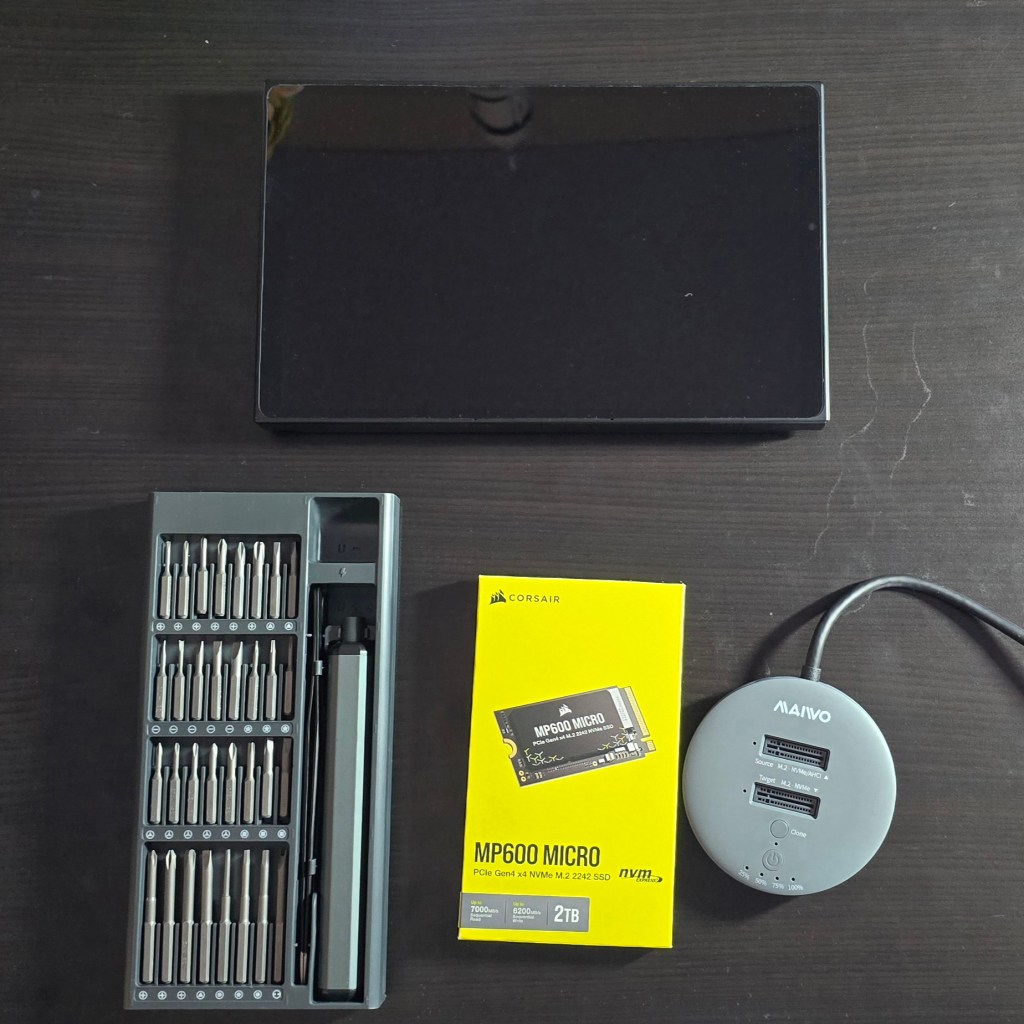
I replaced the factory storage with a much faster and higher-capacity unit from Corsair. The upgrade has had a major impact on daily life with the LeGo. Downloads, and loading times are much faster. I can store my entire active catalog of games. Everything feels snappy. Read I SSD Swapped My Lenovo Legion Go. It Was Worth It for the details and instructions.
Installing faster high high-capacity storage is a great upgrade.
The Legion Go is an excellent gaming computer right out of the box. Tweaks, changes, and upgrades like the ones above help make it even better. I use mine more than any other gaming system and that’s saying something.
Where to start this months long saga? Initially, my i-9 and MSI MAG z790 Tomahawk WiFi motherboard seemed to be a big upgrade. Unfortunately, it wasn’t long until some games and apps would completely crash my system to a powered off state. There was a fairly low occurrence rate when the issue started, but it happened more over time.
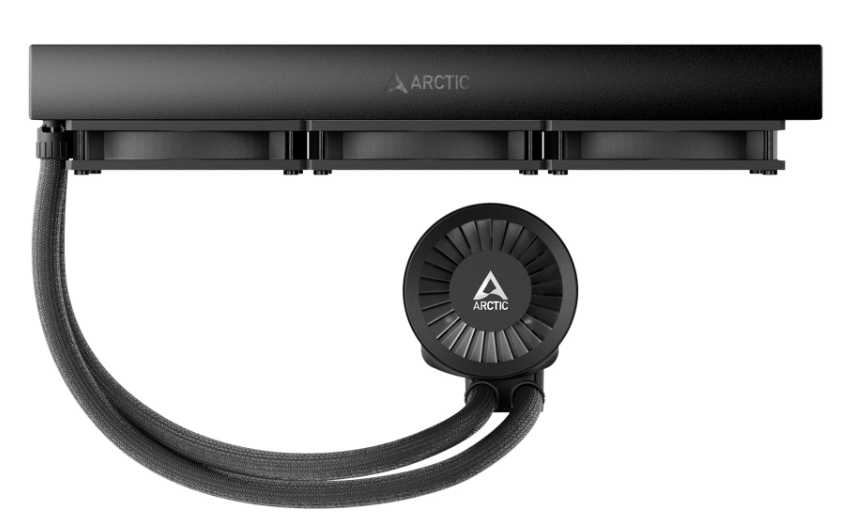
I checked everything multiple times. I disassembled and rebuilt my entire PC and completely reinstalled everything. I reset and updated my motherboard’s firmware. Nothing helped. The games still crashed. I decided that my AIO cooler’s internals must have failed. I replaced it with an Arctic Liquid Freezer III. Sadly, the crashes continued, and they were getting worse by the day.
Rumors started in the MSI forums. They said that the 13th and 14th Gen i-7 and i-9 CPUs were susceptible to flaws in their original microcode. Microcode is logic software that directs traffic inside the processor. The flaw caused the processor to draw too much power during heavy loads. That overdraw causes the shutdown.
It took Intel a long time to publicly acknowledged the flaw. They also said that the situation could permanently damage the chips. By the time they had made the announcement, my system wouldn’t even boot anymore. It just flashed the CPU error light after powering up. I worked with Intel Tech support. They determined that my Raptor Lake i-9 was damaged. It needed to be replaced. So, I RMA’d it (Return to Manufacturing) for a refund.
I chose the refund option because Intel was already out of stock on replacement CPUs. The process of getting the RMA was time consuming. I had to provide a full tech support ticket on their site at: https://supporttickets.intel.com/ then I worked with the assigned tech to troubleshoot. We finished the diagnostics. I removed the CPU from my system. I then boxed it up and sent it to Intel.
I submitted my warranty request to Intel on 8/17/2024 and shipped the CPU to them via UPS the next morning. I received my refund via Western Union on 10/8/2024. They are extremely backlogged to say the least. Intel needs to examine each CPU. To issue a refund, they must find it faulty due to the microcode problem, not some other issue. That is where the time went, waiting for a diagnostics technician to examine the chip. Intel support was extremely professional and kept me updated with regular emails.
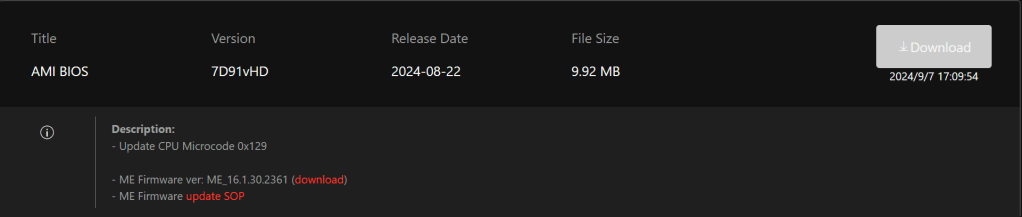
I used the refund to purchase another i-9 from Microcenter.com after Intel thought they had fixed the issue with a microcode update. I downloaded the 0x129 microcode update on my laptop. I also downloaded the newest firmware for my motherboard from MSI’s site. Then, I transferred them to a thumb drive. I used the thumb drive to flash the motherboard and install the new microcode, again.
By this time, I have lost count of how many times I’ve performed a firmware flash on my system. It has to be more than ten. The 0x129 update corrected the issue in some games but not in others. The games that most reliably caused me a crash were Battlefield 2042, Doom Eternal, and Starfield. The system also suffered frame drops and fuzz outs in Halo, CoD MWIII, and Assetto Corsa. These issues seemed to also be caused by the P-cores thermally throttling themselves.
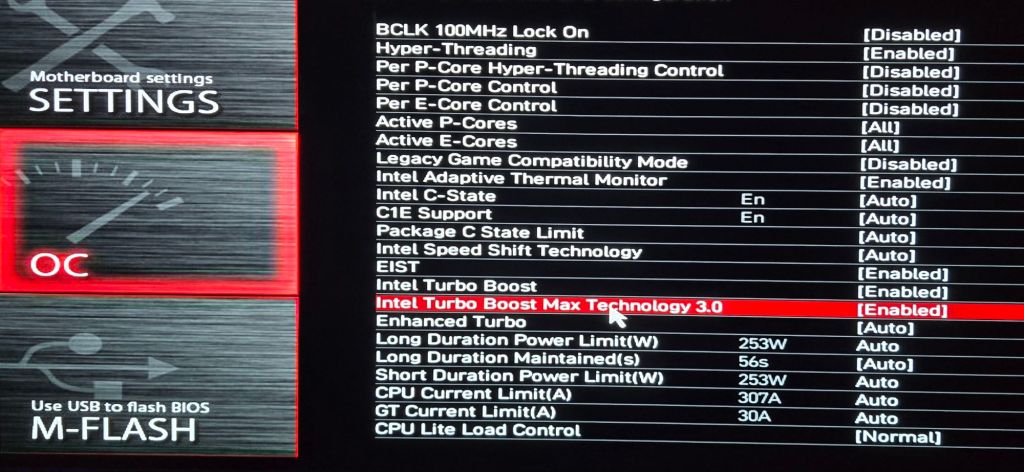
I wanted to continue playing the games that were triggering the shutdown. To protect the system from damage, I detuned the CPU via the motherboard’s overclocking options. My goal was to keep the power draw as low as possible and still maintain decent performance.
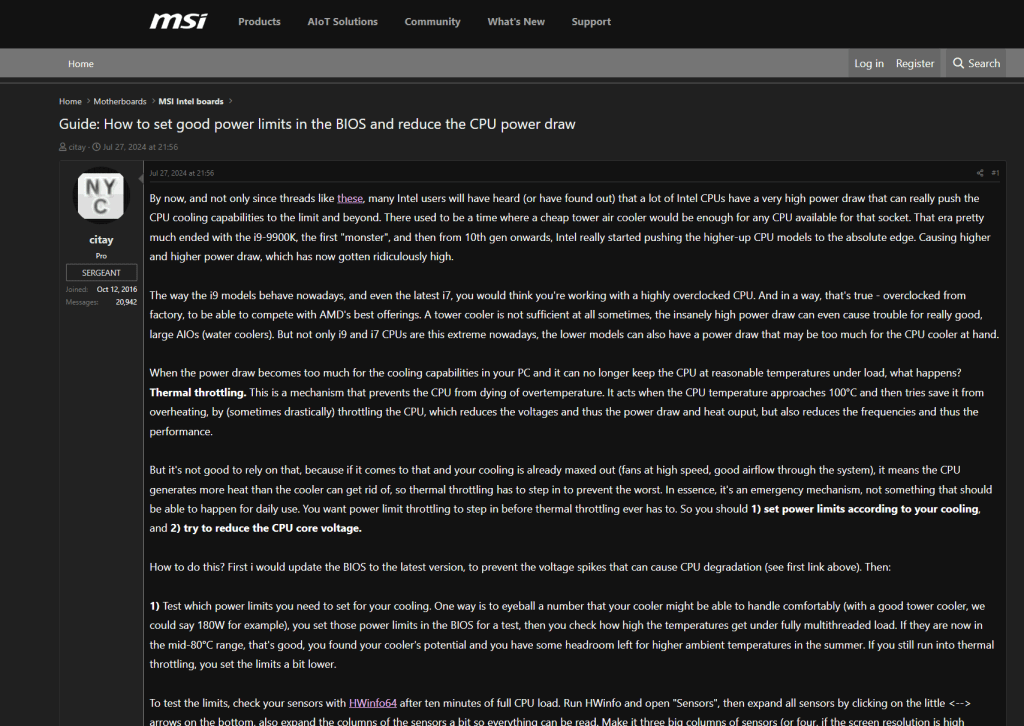
Many of the options in UEFI for an Intel processor make only a slight difference in actual game performance. The trick is knowing which ones to adjust and which to leave alone. Refer to your motherboard manufacturer’s documentation for information on the settings.
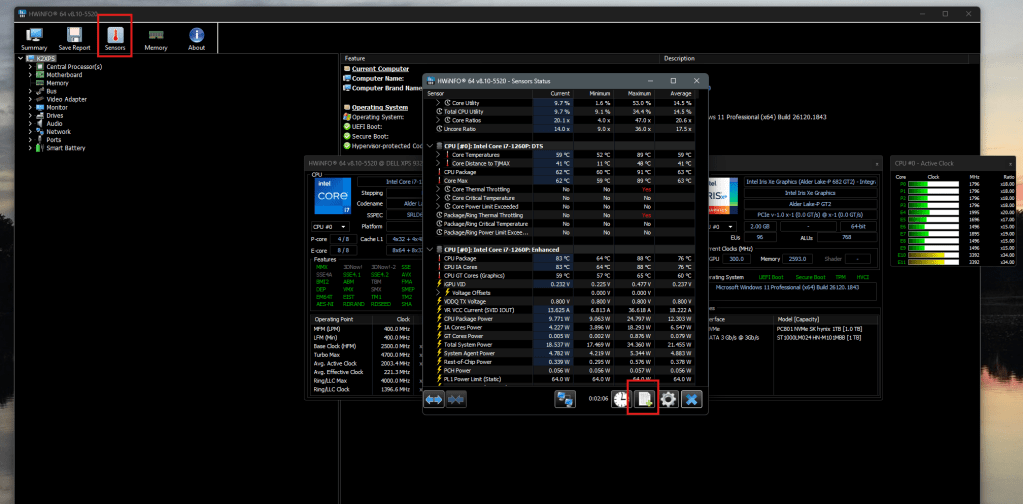
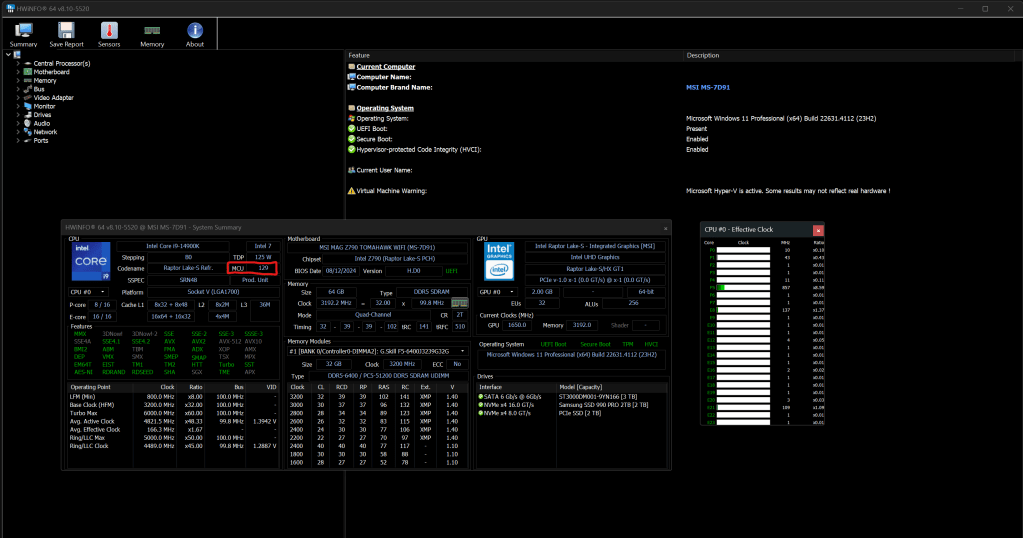
I ran an analysis with the classic tuner’s app HwInfo. I deduced that CPU temps were still spiking past the threshold in certain games. This was initiating the Emergency Shutdown function. This was a disappointing discovery, to say the least. At least the shutdown was kicking in right at 100c (Intel’s suggested limits) so it shouldn’t be damaging.
To get this type of information in HwInfo, you need to open sensor mode and start logging. When your system crashes, open the file it was writing. You will be able to see the status of all your components at the time of the shutdown.
To Start an HwInfo log file, click the Sensors button and then click the Start Logging button in the Sensors window.The red box highlights the microcode version of the CPU. 12B is the newest update available at the time of this writing.
After reading various posts in the MSI and Intel forums, I decided to turn off the “Intel® Turbo Boost Max Technology 3.0” function. I also manually set my P-Core ratios to 56 to slow the physical cores down to 5.6 gigahertz. These two changed fixed the remaining problems, but I wasn’t getting the performance I had paid for this running way. I tested each game for about an hour while running full monitoring, which itself causes a CPU load. The cores stayed well under the 100c threshold.
Two weeks later, Intel announced another microcode issue in the Raptor Lake processor. This new issue was causing a Vmin Shift Instability in certain situations. Later that same day, Intel and MSI released microcode update 0x12B. Which was supposed to be the final fix.
Once again, I ran through the flash process. I noticed that the Motherboard’s UEFI BIOS now prompts me with options on its boot screen. I can choose either Intel Defaults, MSI Safe, or MSI Performance profiles. I chose Intel defaults and verified that it undid the P-core and Turbo customizations that I had made earlier.
Thankfully 0x12B seems to have done the trick. I’m able to run my system at its maximum performance for up to two hours. I’m sure it can go indefinitely; the temperatures never get much above 85c now. I don’t’ really notice any performance degradation in the games I play after the update. The system performs better than it did while it was detuned, that’s for sure. It’s been quite the PC gamer adventure dealing with this mess. I’m glad it worked out in the end.
I traded in my Galaxy Fold 3 for the S24 Ultra five months ago. I did it for the cameras and I’m still happy with my decision. They’re fantastic. The whole phone is.
None of the pictures in this article are using filters or editing. The camera was in my hand and on full auto mode.
The cameras take stunning photos. There’s nothing to nitpick. If you become adept at using Samsung’s camera applications and understand some photography basics about framing and lighting, the results are masterful.
Notice how clear the reflection in the side mirror is.
Photogs love to dig into the metrics and compare numbers. I’m more into the astatic value of the pictures than I am the camera’s technical performance. To my eye, Samsung is the best for this generation of mobiles. The images are crisp, focus is fast, and auto mode is ready for those fleeting moments no matter the situation. Samsung has been perfecting mobile photography for decades and their experience shows in the results.
Like a lot of people, I’ve completely transitioned to taking all pictures on my phone. One trick I’ve learned is to set up the voice trigger. No matter how careful you are, moving your hand to tap the screen can mess up your shots. Even the most careful tap can cause the lenses to jitter.
Use the gear icon in the camera app to access settings. Show palm is an interesting option but it doesn’t work as well as Voice commands.
There’s a lot to like besides the camera system. The battery and power management algorithms are equally impressive. I’ve been able to limit charging to eighty percent of the battery’s available capacity and still make it through an average office worker’s day. Limiting lithium batteries from reaching their full charge capacity increases their useful lifespan.
Try adaptive if you can’t live on eighty percent.
Samsung’s stylus is still great. I’ve written, sketched, and scribbled pages and pages with mine already. Including this entire article. Coming from the Fold 3, I had forgotten how convenient pop out pens and the ability to write on the powered off screen truly are.
One review that I had read before purchasing the S24U said the speakers were of poor quality and down firing only. I’m not sure that person actually had access to the phone when they reviewed it. It gets ridiculously loud and sounds great in my opinion. It has both top and bottom speakers.
Dolby Atmos, a custom EQ, and adaptive sound let you tune your audio experience to fit your ears.
The Snapdragon 8 Gen 3 processor is blazing! In fact, the phone can get physically hot if you push it hard. Mine hasn’t overheated, but it would be uncomfortable to hold sometimes if not for my case. The performance is worth a few scorched fingertips if you ask me.
Speaking of performance, this thing is a gaming phenomenon. AAA titles like Call of Duty Mobile and Grid feel like the full console versions. Some mobile games support ray tracing and super smooth 120 FPS, and the S24U is all about it. Game Pass Ultimate streaming works well.
Don’t forget to use the built-in gaming options to tune your experience.
Business apps like OneNote, Outlook, and Excel are quicker to get into than they are on my high-performance laptop. There’s plenty of RAM for browser tabs and multiple background apps. I find that I rarely need to take my laptop to meetings with me. I’m just as productive from the Ultra at notes, plans, sketches, and even light presentations.
I ended up with a case that I found on Amazon. It has a built-in camera cover that slides open and shut. It also features a wallet that easily holds my ID, bank card, and some cash. The back of the wallet makes a perfect stand for watching streams and playing games with a controller.
The side-effect of this style of case (wallet on back) is that it doesn’t work with wireless charging. It does however work fine with Tap to Pay, and it fits in my car’s phone holder.
The TONGATE case is available in multiple colors and costs $25.99 on Amazon.
Many motherboard manufacturers are including RGB controllers on their wares now. MSI’s version is called Mystic Light, the control software runs as an add-on to the Motherboard’s MSI Center console. There are numerous PC hardware manufacturers. Custom PC builders frequently use components from each. For example, my motherboard is from MSI, but my power supply is made by Corsair.
The market situation and custom build scenes have led to a series of API’s being included in the various manufacturer’s software so that control bridges could be established. On my system, this allows MSI Center and it’s Mystic Light add-on to control the lighting connected directly to the motherboard along with my Lian-Li Galahad 360, and SL fans which are connected to a Lian-Li control box.
In my setup, I use Mystic Light to control all the RGB, but control the fans via L-Connect. The Lian Li software’s cooling options and programable curves are much more precise than those offered by MSI Center.
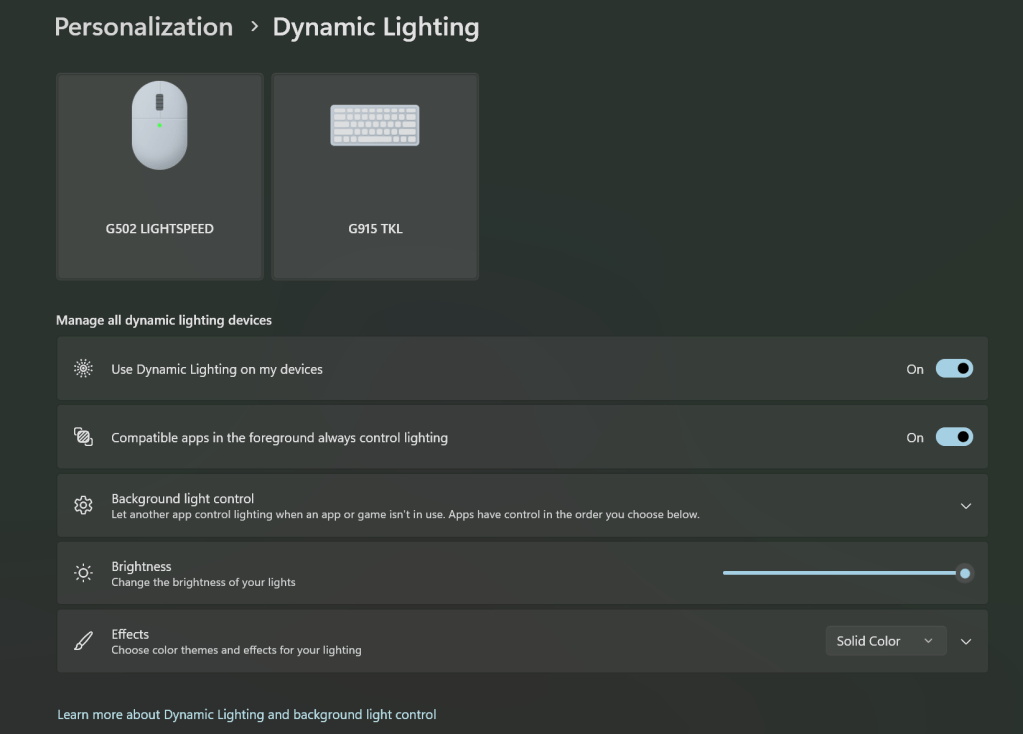
In a recent Windows update, Microsoft has also added its own take on a universal light controller protocol and software package they’re calling Dynamic Lighting. The option can be found under Settings and then under Personalization. Microsoft’s entry into the space seems to have spurred manufactures to update their software and firmware to either gain or block compatibility depending on their particular market strategy.
These are the default Microsoft Dynamic Lighting settings on my systems. In this configuration, MSI Center and L-Connect remain in control.
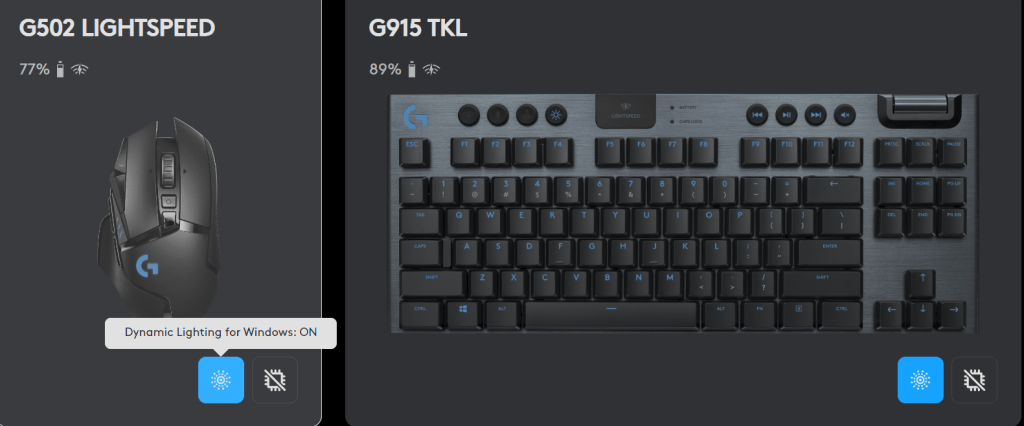
I use Logitech accessories. Their controller software, G-Hub, updated and added Dynamic Lighting compatibility. MSI Center’s Mystic Light add-on updated but does not seem to have gained any options in the Dynamic Lighting control screen. One of the three updates broke the Lian Li L-Connect software on my system. I am unable to tell which one for sure because they all applied around the same time. Read on to see how I found and fixed the issue.
You can turn Windows Dynamic Lighting on/off for individual G-Hub devices.