Who needs a keyboard and mouse when you have a pen?

I frequently take my tablet to a park, museum, or other public space to get inspiration for my work. When I’m out with my Surface Go, I rarely have the keyboard attached. The Surface Pen is my primary input and control tool. Occasionally, someone will notice and ask how I am able to fully use my computer with just the pen. “What about selecting, copying, right-clicking, and all the other things you need a mouse for?” is an inevitable question during these conversations. Generally a statement like, “I can’t stand the way it feels,” also makes its way into the discussion.

The first thing most people need to address in order to be comfortable using their stylus, is the “feeling” of writing on a screen. There’s far less friction between glass and silicone than there is between paper and graphite. Some of us actually prefer the slicker strokes, but most people do not care for it, in the beginning at least. If you don’t like the slide, there are a few things that help. If your stylus has different tips, try them. Some are softer and offer more drag. They also change the contact patch size which further alters the experience.

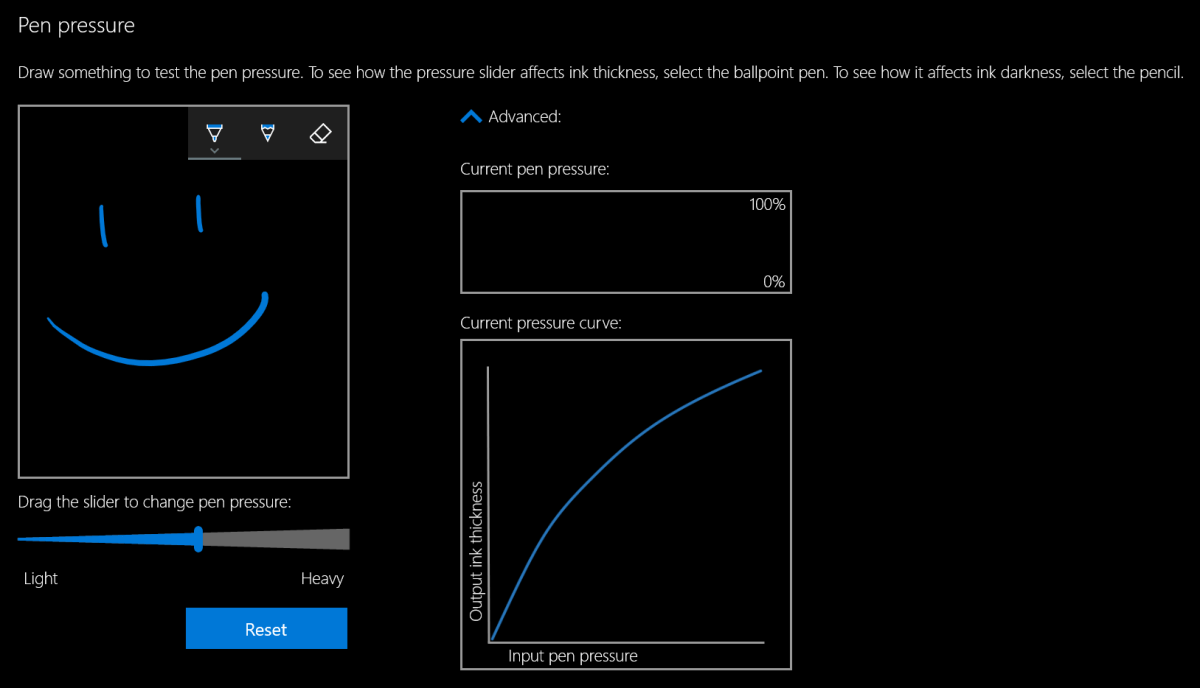
Most Windows 10 based tablets allow you to adjust the pressure sensitivity of your stylus, which in turn changes how hard you end up pressing on the pen tip to write or draw. Setting your system to require more pressure will cause you to press harder and feel more drag. On Microsoft Surface devices you use the Surface app to change the setting. Samsung tablets have a Samsung Book app, most manufacturers have some type of settings app; look in your start menu.

Pressure settings

The last piece of advice I have to offer around the “feeling” of writing on your screen is to add a soft silicone screen protector. A significant part of the difference between drawing on a paper versus drawing on glass, is that the paper will slightly give way to the tip of your writing instrument. Silicone on silicone also results in more drag and lessens the likelihood of over-strokes occurring. Personally, I prefer the matte options because they also help reduce glare.

Once you have the physical issues addressed, you’ll need to spend some time with settings in both your operating system and applications. I suggest that you start off getting your windows profile all squared away. Lucky for you, I’ve written a detailed post about how to go about it. The 1809 update for Windows 10 caused me to change a few of my settings since writing that guide. You can see the updated configuration below.

Pen setting

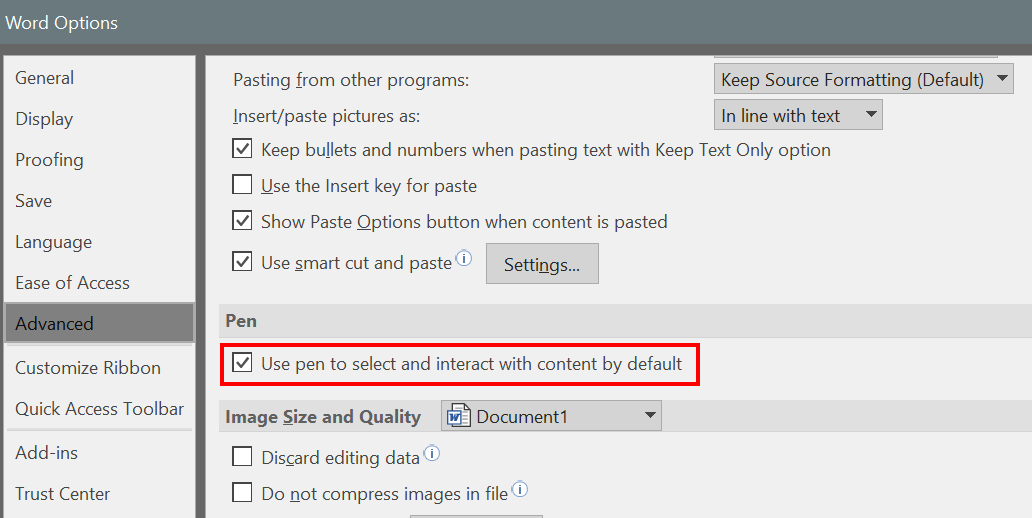
Great, so we’ve taken care of the way it feels to write on your screen and adjusted Windows to operate with a pen, we’re done right? Ha, don’t you wish…. Unfortunately, most applications also have specific settings that improve the stylus experience. Quite a few of the Microsoft Office programs, Word, Excel, PowerPoint, etc., have a setting in their advanced options that allows the pen to automatically select text. The function is turned off by default and I cannot fathom why Microsoft doesn’t turn it on for everyone. Checking this box will drastically improve the pen experience in these apps.

Word_Pen
This setting is in most MS Office apps. Go to File -> Options -> Advanced Options to find it.

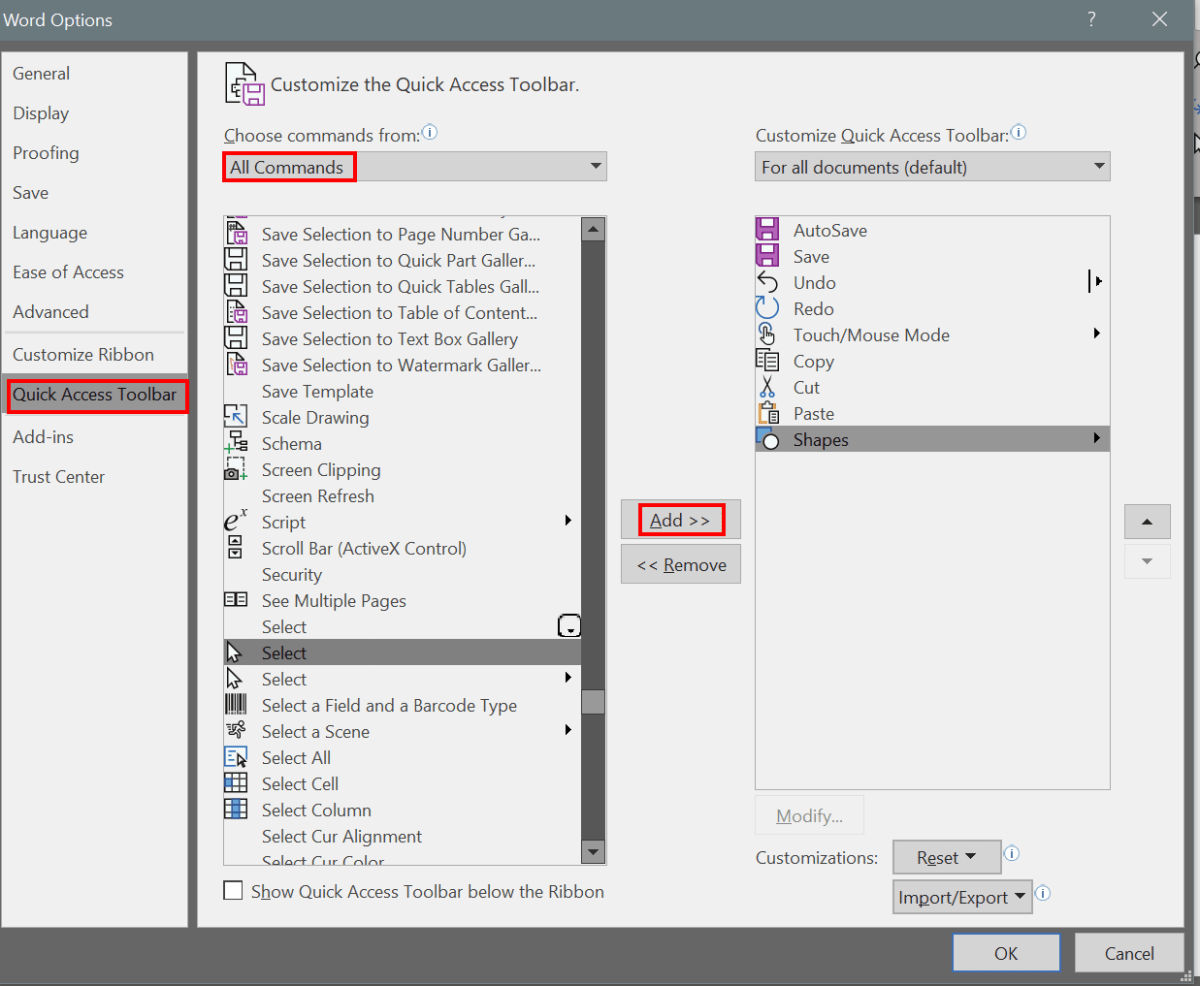
Whether you use a pen or a mouse, customizing the quick access toolbar in Microsoft Office applications adds efficiency to your workflow by reducing the amount of time you spend hunting for commands. The quick access toolbar is different for each application but can literally save you thousands of clicks and taps if you spend a little time setting them up.

Quick_Access
Add your most used commands to the quick access toolbar.

Quick_Access_Bar

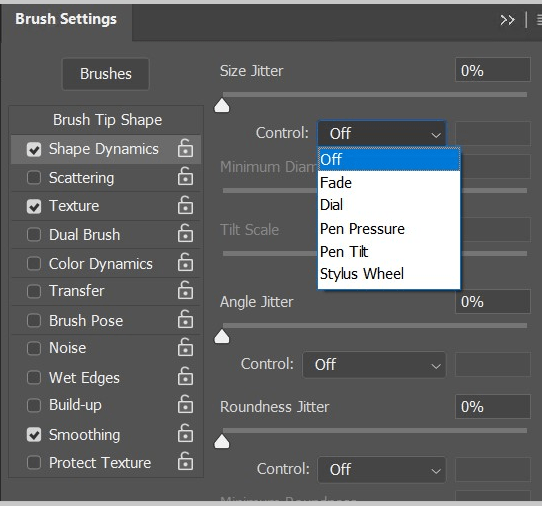
I wouldn’t want you to go away thinking that MS Office apps are the only ones that have specific pen settings that you may need to turn on or adjust. Of course purpose-built drawing and editing apps have all kinds of pen settings. I’ve even seen the options to use a pen show up in games. Take a few minutes to poke around in the menus of the software that you use, it’s almost always worth your time.

Photoshop_Brush_Settings
Each brush or tool in Photoshop has multiple pen settings

Diagnosing and correcting Windows power and sleep issues for a single system or en mass.

After we push out updates to Windows desktops we will inevitably end up with some that will no longer go to sleep. Occasionally they will sleep but their monitors won’t turn off. When this happens to one or two systems it’s an annoyance. If it happens to a lot of them, there can be a financial impact due to the extra power consumption.

Generally, the problem is caused by an incompatibility between one of the newly installed updates and a system driver. Sometimes it’s caused by the update itself. How are you supposed to figure out exactly what is causing the problem?

Microsoft has embedded a utility named “powercfg” in the operating system. This tool can diagnose and assist in the repair of most power related problems. The first step is to run a diagnostics report. You can do this from a command prompt on a single computer but you should be getting used to PowerShell by now and if you’ve got lots of systems you need to check, it will be your best bet anyway.

Open an elevated PowerShell console, the command is;

PowerCfg /SystemSleepDiagnostics /Output $env:userprofile\Documents\sleep-diagnostics-report.html

The command will create a nicely formatted report in your documents folder showing all the information you should need to determine the cause. Scroll through the user sessions and expand the Red menus to see the cause of your issue.

PowerReport_Red

Below, you can see that in my case, OVRServer_x64.exe continued to request power after the system had tried to sleep. As you can probably tell from the file path, that EXE file is part of the Oculus Rift software package. Again, you can click the Red bar to gain more information.

PowerReport_Error

Now that we know what’s causing the problem there are several things we can try to correct it. First, I always check to see if there’s an update for the application or driver. For many programs, in the help menu you’ll find a “Check for updates” option. If you need to visit the software or hardware vendor’s web site, updates are usually found under the “Support” section.

What if there is no update? Are you just out of luck? There are still options available that we need to investigate before giving up. PowerCfg can be used to override power requests from mis-behaving apps and drivers. The command differs depending on what’s causing the problem. Let’s check help to see what our options are.

PowerCfg_OverRide_Help

Looks easy enough, to create an override for my trouble maker the command would be;

PowerCfg /RequestsOverRide PROCESS OVRServer_x64.exe DISPLAY

As the help suggests, to figure out the name and type of your issue you can run “PowerCfg /Requests”  After creating the override you’ll need to wait for the sleep interval to occur to know if it worked or not. Most of the time it will.

If the override doesn’t solve your problem you are left with rolling back the update. You can either uninstall the update or use a system restore point. I also recommend waiting a few days and checking for updates from both Microsoft and the vendor again. Many times, once they become aware of the issue one of them will release a patch for the problem.

So how do we apply what we’ve learned to a lot of systems? We use a PowerShell script of course. Since PowerCfg is an exe embedded on each computer we’ll use invoke-command to activate it in a foreach loop. You’ll probably want to redirect the reports to a network share rather than connecting to each system to view them. That will mean naming the reports in a way that tells you where they came from.

Import-Module ActiveDirectory
$domains=(Get-ADForest).domains

$dcs = foreach ($domain in $domains) {Get-ADDomainController -DomainName $domain -Discover -Service PrimaryDC|select -ExpandProperty hostname}

$systems = foreach ($dc in $dcs) {
Get-ADComputer -properties * -Filter {(OperatingSystem -like "*Windows*") -and (OperatingSystem -NotLike "*Server*")} -Server $domain |select DNSHostName -ExpandProperty DNSHostName}

Foreach ($system in $systems) {
Invoke-Command -ComputerName $system -ScriptBlock {PowerCfg /SystemSleepDiagnostics /Output \\report_share\$system+sleep-diagnostics-report.html}}

The script above will generate the sleep diagnostics report for every workstation computer on your network and store the report in the share you specify with the computer’s name in appended to the report. The same invoke-command technique would let you create an override for each computer that has an issue.

Family Fun with Super Mario Party on the Nintendo Switch

My family has been playing Mario Party together since our children were big enough to hold a controller. I firmly believe that families who play together, stay together; some of our favorite memories are centered around this title. We’ve been playing the newest edition all weekend, (yeah for cold rain) read-on to find out how it holds up now that the kids are in their teens and accomplished gamers in their own right.

Choose_your_game

If you’ve never played a Mario Party game before you should watch a round on YouTube or Twitch they can be very entertaining. The game is a melding of traditional “roll the dice and pick your space” board games combined with multi-player mini-games as events that are triggered when you land on certain spots. You make your way around the game board to collect coins and stars, the player with the most wins. There is of course far more to it than that, but a fuller description would be boring to read.

Many a gamer disliked the car in Mario Party 10 on the Wii U. It forced the players to move together and removed the strategic element that most board games thrive on. Neither the mini-games nor the board game is strong enough on their own. Thankfully Nintendo has realized that and added path choice on a multi-directional board back to the title. In this version your decisions regarding the route your character takes are more important than ever.

GarmePlay

You’ll need a Joy-Con for each player, your Switch came with two, but if you want to play with four players, you’ll need an extra set. At sixty to eighty dollars for a pair, this can be expensive. Especially if you have no other reason to own an extra pair. The controllers work really well as long as you stay in bluetooth range. Keep in mind the signal runs on the same 2.5 Ghz wave length that Wi-Fi does, so the range can be shorter than the listed 33 feet due to interference. Look in your router’s settings for an option to get along better with bluetooth, some wireless systems have the setting and some don’t.

The mini games are easy in practice or when playing on your own against the AI, but challenging when playing against human opponents. They can make for some spirited play if you are with a competitive group like ours. The bad luck and good luck spaces on the board along with special abilities and random rewards keep the board play fun as well. I expect our family will get lots of entertainment hours out of the game this winter. I liked playing with the kids when they were younger better, I could win that way. Now they are able to beat me seemingly at will, I’m not sure how those tables turned. Apparently this makes the game even more fun for them. Shouts of “Yes, I destroyed dad” were ringing through my living room only moments ago.

If you liked previous Mario Party titles but didn’t care too much for 10 or, if you’re from a board game generation and looking to do something with your video game playing children/grand-children, I think you’ll enjoy Super Mario Party. Happy gaming and remember it’s not the motion controls, it’s just you!

Mario_Gang