
In a previous article I explained how to use PulseAudio with XRDP to allow your Ubuntu Hyper-V VM to pass audio through your host machine’s sound system. It has been brought to my attention that the instructions do not work for everyone.
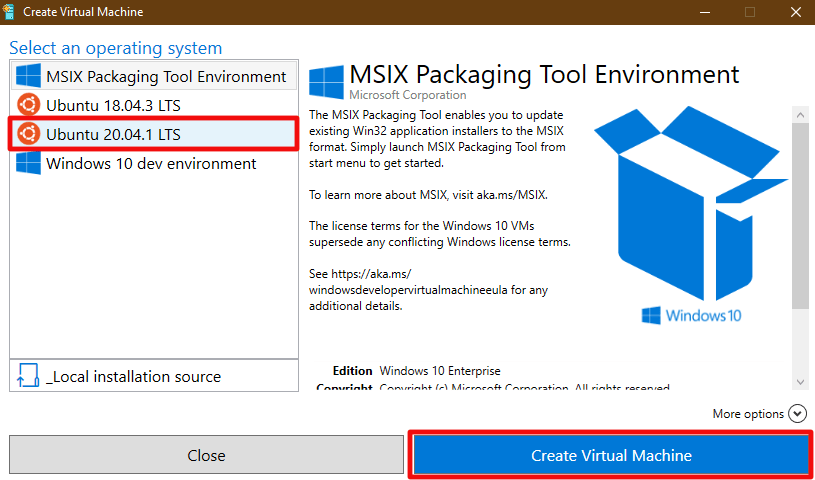
I believe most of the people that have issues are choosing the 20.04 version of Ubuntu when deploying their Hyper-V VM. The 20.04 edition of Ubuntu is not running XRDP (Linux RDP Server) by default. When you connect to it from the Hyper-V manager you are directly viewing the machine’s console. PulseAudio requires an enhanced XRDP session to work.
I’ve spent a lot of time getting pass-through sound working in 20.04. Deploy the VM as outlined in the original document choosing the 20.04 version instead. Once you have completed the operating system installation, run the software updater (in the apps menu) until everything is patched to the newest version.
Please Note: These instructions will not work if your VM is configured for auto logon. PulseAudio runs in the user space and requires active logon to work. It would be possible to convert the daemon to a service, but that is beyond the scope of this post.
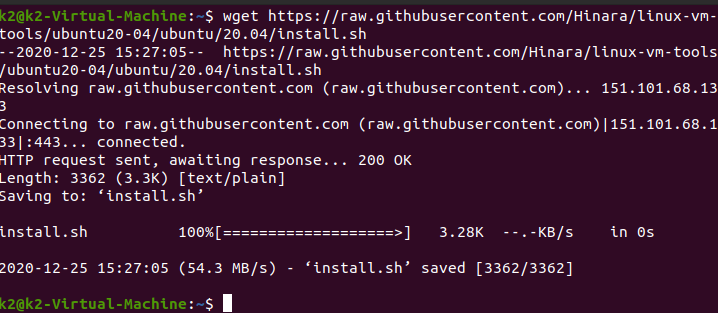
Once Ubuntu is installed and up to date we’ll need to manually configure it for an enhanced session. Open a terminal and run this command to download the configuration script:
wget https://raw.githubusercontent.com/Hinara/linux-vm-tools/ubuntu20-04/ubuntu/20.04/install.sh Once the download finishes run:
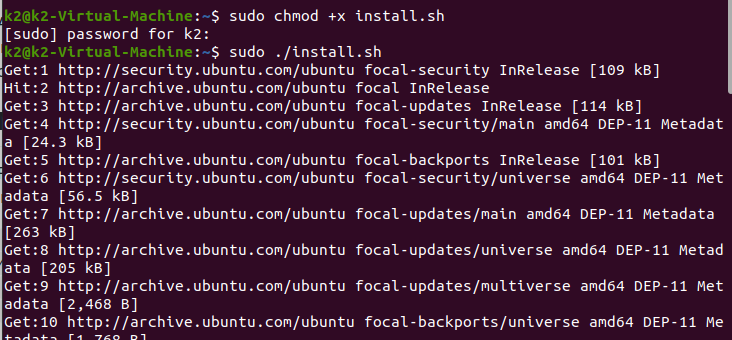
sudo chmod +x install.shfollowed by:
sudo ./install.sh
to install and configure XRDP.
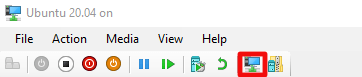
You will be prompted to logon to your VM with XRDP, but it will not work until you reboot. Use the button in the tool bar to return to the basic session and power off the VM.
Open PowerShell on your host system and run the command below, where the name of your particular VM is between the quote marks.
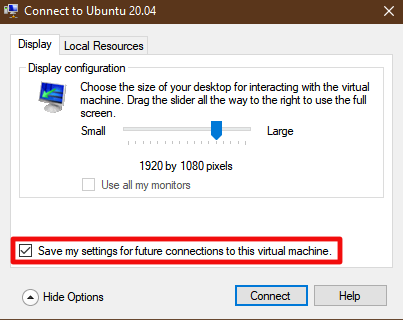
Set-VM -VMName "Ubuntu 20.04" -EnhancedSessionTransportType HvSocket Power on the VM and you will be prompted by the RDP client to select your monitor size. Logon to XRDP with your Linux credentials and the desktop will load. Now that we have installed and configured XRDP we can proceed to install and configure PulseAudio.
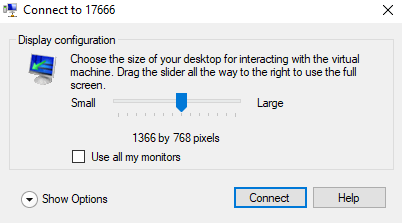

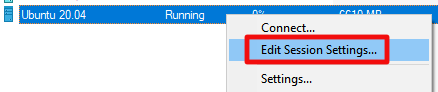
Occasionally you may stop being prompted to change your monitor size, etc. by the RDP client when you connect to your VM. There is a check box that can accidently be selected that stores your current settings for all future connections. To get the controls back, right click on your VM in the Hyper-V manager and then click Edit Session Settings.
Open a terminal.
Install the pre-requisite libraries with this command:
sudo apt-get install git libpulse-dev autoconf m4 intltool build-essential dpkg-dev libtool libsndfile-dev libspeexdsp-dev libudev-dev -yNext we need to enable the “source” repository so that we can download PulseAudio and compile it. You can enable the “source” repo in the GUI:
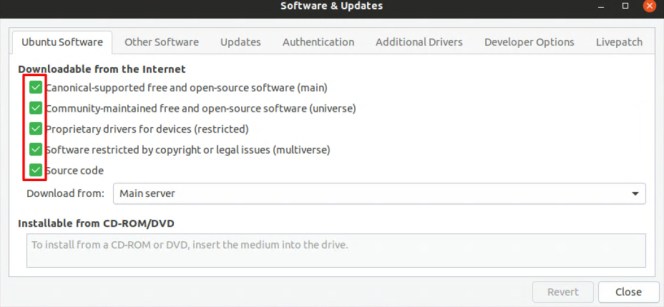
Or run:
sudo cp /etc/apt/sources.list /etc/apt/sources.list~
sudo sed -Ei 's/^# deb-src /deb-src /' /etc/apt/sources.list
sudo apt-get update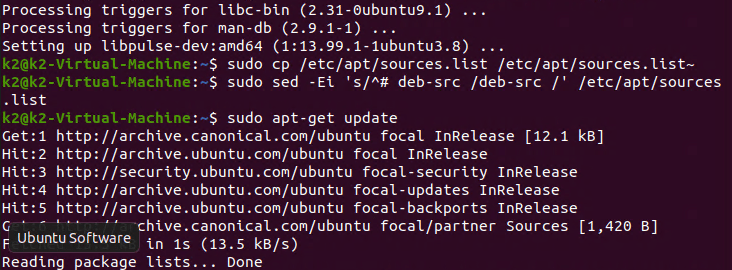
Now we need to get the source code for pulse audio and compile it. Run the following command groups one after the other. Each will take some time to complete.
sudo apt build-dep pulseaudio -ycd /tmp
sudo apt source pulseaudiopulsever=$(pulseaudio --version | awk '{print $2}')
cd /tmp/pulseaudio-$pulsever
sudo ./configuresudo git clone https://github.com/neutrinolabs/pulseaudio-module-xrdp.git
cd pulseaudio-module-xrdp
sudo ./bootstrap
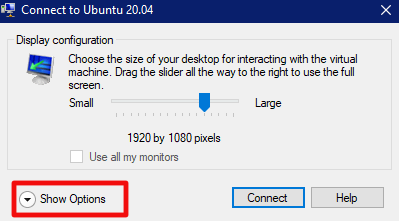
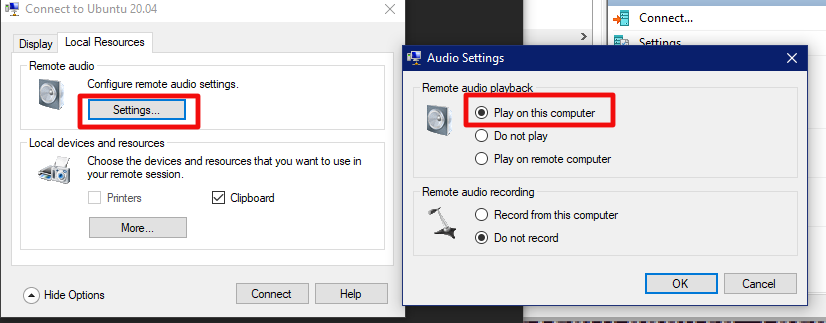
sudo ./configure PULSE_DIR="/tmp/pulseaudio-$pulsever"sudo makecd /tmp/pulseaudio-$pulsever/pulseaudio-module-xrdp/src/.libssudo install -t "/var/lib/xrdp-pulseaudio-installer" -D -m 644 *.soPower off your VM and wait until the snapshot merge in Hyper-V completes then power it back on. When you connect to it this time, use the “Show Options” down arrow and then click the “Local Resources” tab. Click the settings button and then choose the option to play back audio on this device.
Now open the setting applet on your Ubuntu VM and go to sound. Use the drop down to select xrdp-sink as the audio device. Sometimes the option will be missing. Generally, if you wait some random amount of time the daemon will start on its own, I’m not sure what causes the inconsistency.
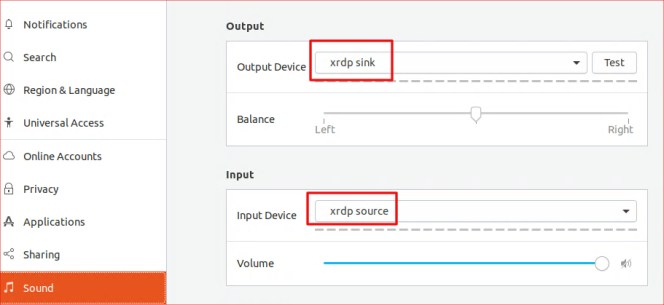
If the option never appears or you get tired of waiting. Close the Settings applet and open a terminal. Run: pulseaudio -k to start the daemon yourself. Then use settings to adjust the output device again.


I tried this on Ubuntu 20.10 and I can confirm that it’s working absolutely fine. Thanks a lot.
LikeLike
I ran through the instructions as I posted them again to make sure I didn’t miss something. The pulsever line is creating a variable that contains the pulseaudio version number so that the next line can change to the correct directory. I noticed in your comment that it shows as pulsever=$(pulseaudio –version | awk ‘{print $2}’), but it should be pulsever=$(pulseaudio –version | awk ‘{print $2}’). There should be a double dash before the version number. The windows clipboard or WordPress is doing something odd to that line when you copy and paste it. It is doing it to me as well and I haven’t figured out why yet. If fixing the dash doesn’t let the line work, you should be able to change the next line to manually go to the correct directory. If you build a new VM and still end up with 13.99.2 it would be: “cd /tmp/pulseaudio-13.99.2”.
The other issue I know about from working with someone else, is that you cannot have your virtual machine configured to automatically logon. Pulseaudio runs as a daemon in the user space and it doesn’t work with auto logon.
I plan on updating the post with both of these pieces of info. Thanks for letting me know about that line not working.
This is the wiki for the plug-in itself, you might find some useful info there: https://github.com/neutrinolabs/xrdp/wiki/Audio-Output-Virtual-Channel-support-in-xrdp
The other tip I can give you is that usually when you only get prompted to configure the RDP client once it is because the “save these settings for all sessions” box was checked. If you right click on the VM in the Hyper-V manager you should see an option to “Edit Session Settings” that will give you the controls again.
With all the versions of Hyper-V, Ubuntu, XRDP, and the Pusleaudio plug-in, it is difficult to write instructions that cover every scenario. If you decide to try again maybe knowing about the logon and — issue will be enough to get you over the hurdle.
Good luck.
LikeLike
Thank you so much! I had tried everything else I could find prior to this because it seemed so involved. Yet, your instructions were the only ones to actually work.
Thanks for taking the time to put this in a post and sharing your knowledge!
LikeLike
Thank you , this works on PopOS with windows 10 enterprise host(build 19041.) . As you mentioned, I did have to ‘pulseaudio -k’ for the XRDP source/sink to appear within the linux VM.
Aside, I could never find the edit session properties once its ‘saved’ in Hyper-V, so currently taking good care of never storing it :).
LikeLike
Hey Raj,
If you need to open Session Settings but the options don’t appear, open an administrative powershell:
vmconnect localhost NAMEOFYOURVM /edit
(use double-quotes if the vm’s name has spaces in it, i.e. “NAME OF YOUR VM”)
TD
LikeLike
This was a clutch comment!
LikeLike
Howdy!
Nice tut but I ran into a problem: after running the install.sh on Ubuntu 20.04LTS I’m unable to connect by RDP from other machines – except the Hyper-V host itself. Is this normal or do I have to modify anything in the xrdp.ini?
Thx and stay healthy!
Cheers
Chris
LikeLike
As it turns out, the answer to your question was the subject of my newest article. https://techbloggingfool.com/2021/02/28/hyper-v-nat-remote-access-to-windows-and-linux-virtual-machines/
LikeLike
Hi,
yesterday I found this instruction and thought: finally I will get sound from my Ubuntu VM! I had tried many times before with guides for older Ubuntu versions which never worked for 20.04. I managed to have an xrdp session soon after having created the VM but I never succeeded to get pulseaudio (or other solutions) to work.
And after having updated my VM and executed all the commands listed here there is still nothing else to select than “dummy source” (sorry if this does not match the real English text! I have to translate from my language).
I had no obvious error executing the commands but when I use “pulseaudio -k” nothing happens. When trying using sudo I get an error message though (again, a translation): Background process could not be stopped. No matching process found.
Does somebody have an idea what might go wrong? By the way, I do not use autologon. As far as I remember I did not do a quick create of the VM because I was not able to establish an xrdp session with it. After having read that an “normal” install is necessary to use xrdp I succeeded to set up the VM and connect via xrdp. But could it be possible that pulseaudio does not work for this reason?
Thanks,
Roland
LikeLike
Hello,
I had to do this in order to work:
sudo cp /var/lib/xrdp-pulseaudio-installer/* /usr/local/lib/$pulsever/modules
Regards
LikeLike
Thank you!
LikeLike
This works great! Thanks for creating this reference.
FWIW, I put ” pulseaudio -k ” as a Startup Application, to resolve the random delay in audio availability
LikeLike
Holy crap! All that just to get sound working!? So sad, Microsoft. With VMware Player v16, sound works right away. No fu*)king around with making a wedding cake. Actually, making a wedding cake would be easier than this. And having to manually set screen resolution to 1920×1080 (Hyper-V screwed that up to), Hyper-V client can kiss my a$$. VMware all the way from now on.
LikeLike
Kevin – Thanks so much! HUGE help. Crystal clear, easy to follow, works great.
LikeLike
Worked really great, I’m far from being a Linux expert and was able to make it work, with this I hopefully will be able to use my Ubuntu VM instead of my existing Windows 7 VM to do all sort of things that I don’t risk doing in my host machine.
thank you so much
LikeLike
this worked 100%
Instructions legit
LikeLike
Thank you for this tutorial! Truly incredible that it worked
LikeLike
thank you for the detailed steps. Everything worked. I had to do this on sudo apt-get install libpulse-dev Ubuntu 20.04 and also had to start the daemon manually. But it worked. Thank you again for the help.
LikeLike
It didn’t work in Ubuntu 20.04.3 LTS. It doesn’t show the xrdp sink option in audio settings
LikeLike
Hi Rick,
I had the same problem (see my post from March 26, 2021) but there was no direct answer to my post. I tried the things that later posters described, too, but nothing helped. Pulseaudio never starts and therefore the xrdp sink option never shows up. If ever you found a solution please let me know!
LikeLike
Hi, great guide, the XRDP keeps crashing at login with Pop OS.
LikeLike
Once more, an alternative would be to use VLC, as in https://mclark.wordpress.com/2020/07/23/how-to-stream-audio-from-pc-to-another-pc-phone-or-tablet-with-vlc-media-player-a-step-by-step-guide/.
Would xpra, Remmina, or No Machine work?
I’ll try the xrdp and Enhanced Session.
LikeLike
Edit session settings is missing.
LikeLike
Oh! RDP client came in, but when I log in, it’s all black!
LikeLike
I ran into trouble at this section:
pulsever=$(pulseaudio –version | awk ‘{print $2}’)
cd /tmp/pulseaudio-$pulsever
sudo ./configure
“pulseaudio –version” returns “pulseaudio 15.0”, so $pulsever ends up as “15.0”.
However, there is no “pulseaudio-15.0” directory, but there is a “pulseaudio-15.0+dfsg1” directory. But in that directory, there is no “configure” file.
Suggestions?
LikeLike
Versions of pulseaudio newer than 15.0 use the meson build system.
After running ‘sudo apt source pulseaudio’ in /tmp
cd /tmp/pulseaudio-15.xx+dfsg1 (whatever your version is, mine was 15.99.1)
sudo meson –prefix=/tmp/pulseaudio-15.xx+dfsg1
sudo ninja -C build install
cd /tmp
git clone https://github.com/neutrinolabs/pulseaudio-module-xrdp.git
cd pulseaudio-module-xrdp
./bootstrap
./configure PULSE_DIR=/tmp/pulseaudio-15.xx+dfsg1
make
sudo make install (will install to /usr/lib/pulse)
Then add /usr/bin/pulseaudio to your autostart application list
Taken from the source code at https://c-nergy.be/blog/?p=17810
This worked for me, hope it works for you!
LikeLike
Thank you.
LikeLike
@tuxsam’s suggestion worked almost perfectly for me, except instead of the line
$ sudo meson –prefix=/tmp/pulseaudio-15.xx+dfsg1
I had to use
$ sudo meson /tmp/pulseaudio-15.99.1+dfsg1/build
I have meson version 0.61.2 installed.
For folks wondering about the autostart application list, I created a startup job as follows:
$ crontab -e
This prompts a choice of text editor. I chose nano.
Then I added the following line to my crontab file:
@reboot /usr/bin/pulseaudio -k
and saved the file.
And now I have full audio integration with my VM.
Thanks!
LikeLike
Nice work!
LikeLike