Use Your Phone to Scan Real Objects into Your Digital Projects

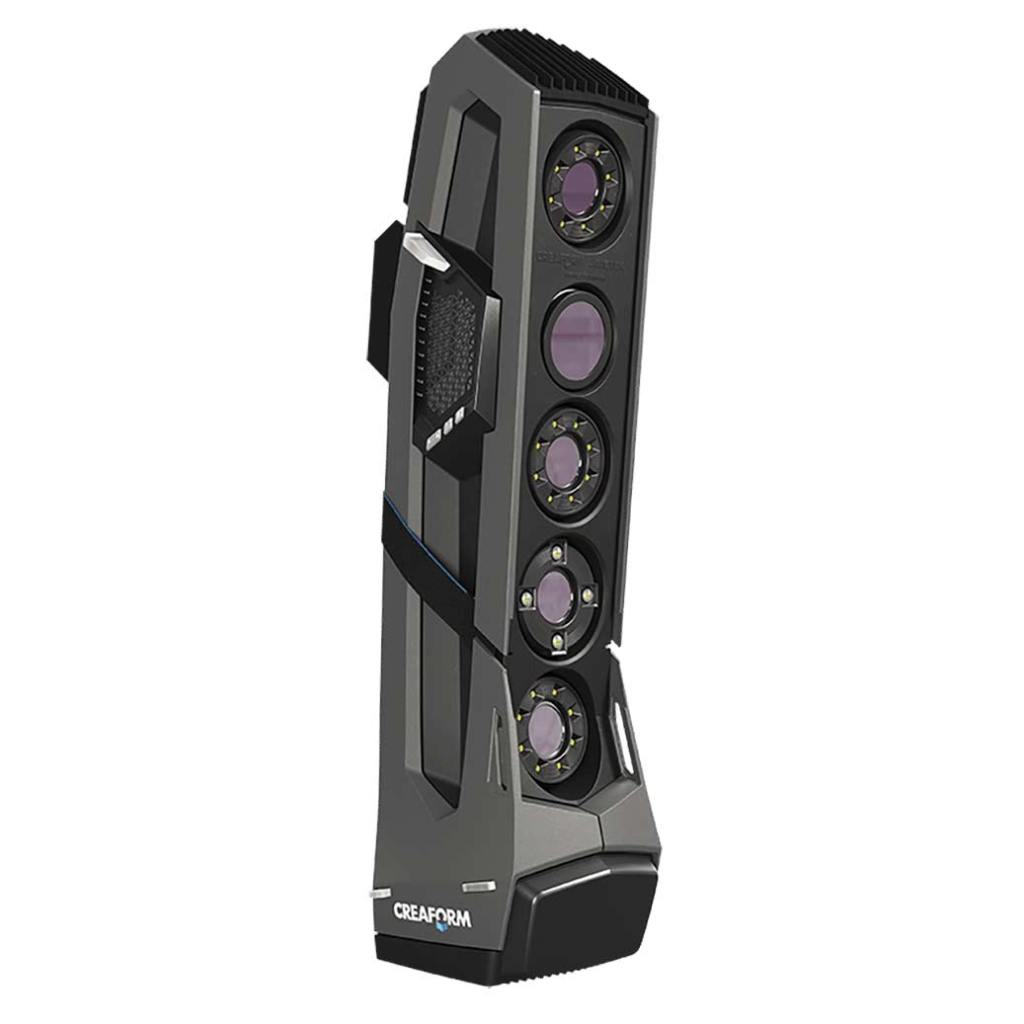
If you have a 3D printer, an interest in augmented reality, are a film maker, or game developer, chances are that at some point you have wanted to scan a real world object into your work. There are many systems and tools on the market to do exactly that. Solutions like the Go!Scan range in price from a few hundred, to thousands of dollars.

These uber-tech devices are so close to Star Trek that you can almost hear the warp core humming in the background when you pick one up. Point it at any person or thing, pull the trigger, move around for even coverage, and your target will be transported into your CAD package as a fully detailed mesh. No dilutetium chamber required.

Even if I had enough funds to purchase a 3D scanner, I couldn’t justify the expense. I wouldn’t get enough use out of it. I am sure that somebody rents them, but I didn’t come up with an option close enough to my location. So how is an enterprising tech head supposed to get his hands on one?

To continue our Star-Trek themed post, just use your tricorder. Most newer smart-phones are able to act as an object scanner through a process known as photogrammetry. Software helps you take multiple photographs of an object while tracking the angle and exact position of the camera during each snap.

The app will stitch all of the photos together along their X, Y, and Z plot points. Presto, a three dimensional representation of your subject is rendered on your two dimensional screen. You’ll be able to rotate and twist it to see every nook and cranny. Many of the apps support drawing lines between each point in the cloud, which results in a wireframe mesh.

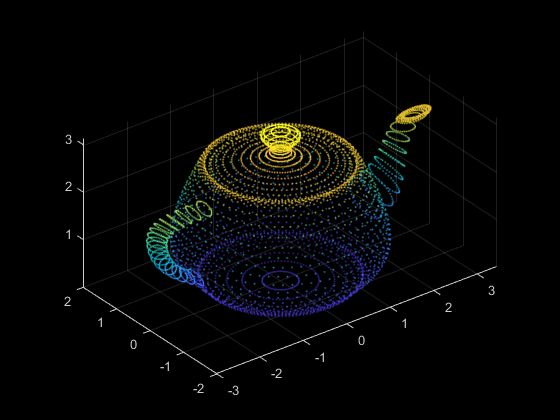
The best apps like Display.Land will allow you to export that mesh to a file that can be imported into your favorite CAD package. I use the open source Blender software and Display.Land has published an end-to-end instructional video for it and several other solutions. Once you’ve imported your object’s scanned mesh into your CAD software, you’ll be able to manipulate it to your heart’s content.

Blender for all has published an excellent three part video series on using Blender with Cura to generate STL files for a 3D printer. I am attempting to use this process to create an adapter that will allow my friend’s gaming headset to fit over his hearing-aid. We’ll scan his headset and his head, then use both wireframes to design an adapter that fits between them. Keep an eye out for more posts on the project.

My Favorite Network Edge Device for Home and Small Business

Network Edge Devices act as the brains for a computer network. They combine functions like Routing, Firewall, VPN hosting, Network Load Balancing, DNS, DHCP, Intrusion Detection & Prevention, and Data Classification into a single device. Network edge systems offer a single pane of glass to monitor and control your entire network from.

Throughout my IT career, I have encountered countless models of these devices. From Enterprise equipment like Cisco, NetScaler, and Fortinet, to SOHO grade systems like Netgear, Linksys, and ASUS; I’ve worked with them all. Overall, they provide the same basic functionality. From the point of view of a small business or home administrator, their biggest differences lie in how much technical expertise is required to configure them.

The majority of edge devices take a two prong approach to management by providing a graphical “easy mode” interface and an advanced command line for the more experienced. Unfortunately, there are major gaps in the intuitive operation of these systems, especially if the manufacturer was first involved in the enterprise market. They tend to do things like providing a button to set up a VPN that does not configure the firewall rules or authentication systems that are required for a VPN to work.

Out of all the edge devices that I’ve worked with, Ubiquiti’s Unified Security Gateway is my favorite. The unit is the perfect balance between ease of use and robust functionality. Ubiquiti’s Unifi series of products are the very definition of software defined networking. The entire line is managed by a single piece of software. Install the controller on your Windows, Mac, or Linux PC, or run it on a cloud key, go through an automated adoption process and you will immediately understand your network topology like never before.

Setup is simple and guided by the software. Once you have the system up and running you can forget about it. I have an advanced network in my home. My previous network edge struggled to deal with multiple Xbox, PlayStation, and Switch on-line gaming sessions. I had to constantly futz with it to keep things running. Other than to review usage reports, I haven’t needed to touch my USG since they day I installed it.

Speaking of usage reports, they are fantastic. Check the box to enable DPI and the USG will automatically classify all of your internet traffic and present it on an easy to read dashboard. Beyond the dashboard you can easily schedule emailed reports.

Easy to use reports show how your data is being used.
Drill down in each category to see specific details

Sign up for a free cloud account and you will be able to securely mange your network from your mobile with the Unify App or from any computer with a web browser. With the mobile app and cloud account configured you can also have your controller push notifications to you.

With extremely advanced options like the ability to support dual internet connections, host your own VPN, and Intrusion detection it is hard to believe the USG retails for $130.00, lifetime updates and tech support included. I’ve been extremely impressed by the unit and have recommended it to all my friends, family, and colleagues.

Remove a Message from All Office 365 Mailboxes

Nefarious characters are using the pandemic as a weapon. They’re sending emails to your employees with subjects and content that make them think it is important news or instructions. If your email is hosted by Office 365 the following script will permanently delete a message by subject from all mailboxes.

Paste the text below into your favorite text editor and save it with the .ps1 extension. When you are ready to run it, right click on the file and choose “Run with PowerShell”. Enter your Office 365 credentials and the subject of the message when prompted.

# RemoveMessage-Office365Mailboxes
#
Write-Host "This script will permanently delete a message from all Office 365 mailboxes. Use with caution!"
Pause
$MessageSubject = Read-Host "Enter Subject of the Message to be Deleted"
$UserCredential = Get-Credential
	$ExchangeOnline = New-PSSession -ConfigurationName Microsoft.Exchange -ConnectionUri https://outlook.office365.com/powershell-liveid/ -Credential $UserCredential -Authentication Basic -AllowRedirection
	Import-PSSession $ExchangeOnline
$mailboxusers = Get-Mailbox -ResultSize Unlimited

Foreach ($user in $mailboxusers)
	{
		Search-Mailbox -Identity $user.alias -SearchQuery 'Subject:$MessageSubject' -DeleteContent -Force
	}