For as long as I have been using the Moonlight app to stream games from my PC to various screens, it has exhibited an annoying issue. Occasionally, the stream freezes on the client device but continues playing on the host. I usually end up having to restart both systems to reconnect.
The problem was worse in some games than in others. Hogwarts Leagacy really triggered the issue on my setup a lot. Destiny 2 suffered from the drop as well. There were no error messages in any log file that I was able to locate. It happened often enough that I mentioned the problem in my first article about Moonlight. Not often enough for me to give up on samestream technology.
Searching online led me to this Redditt Moonlight Freezes Up. The answer to my issue was in the comments. I turned off the hardware GPU scheduling feature found in Windows 10 and Windows 11 on the host system and on any Windows PC clients. Disabling this feature configures the operating system and CPU to manage VRAM. When the feature is turned on, the task is offloaded to your graphics card. Which can boost overall system performance if you have the free cores.
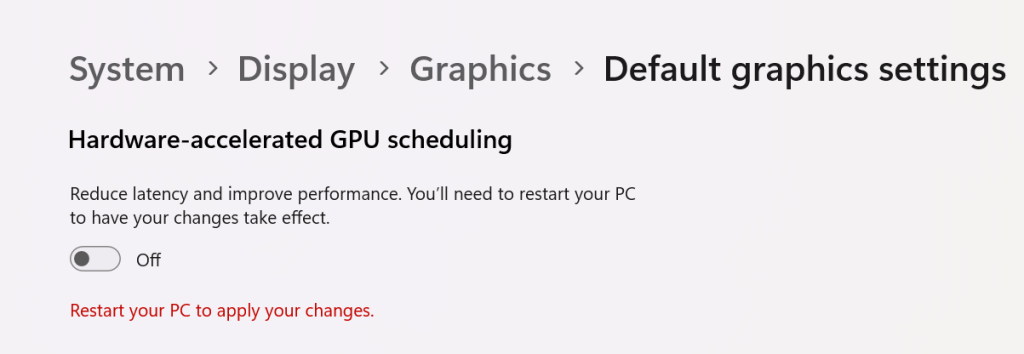
Go to Settings -> System -> Display -> Graphics and click Change Default Graphics Settings. Then disable Hardware-accelerated GPU scheduling by sliding the toggle to the off position. You will need to restart your computer for the change to take effect.
Disable HAGS
The other possible solution is to use the famous Display Driver Uninstaller utility to uninstall your current driver completely. Then, download and install what many consider to be NVIDIA’S best driver release ever, version 472.12.
Once upon a time, I had an idea for home entertainment nirvana. I would purchase the same brand of smart TV for each screen in my home. I reasoned that it would simplify the cable-cutting experience for the whole family.
For the most part, it worked. I ended up going with various models of Samsung smart TVs. They all used the same operating system and had very similar remotes. They could also synchronize favorites, apps, and settings if you logged on to a Samsung cloud account. It was very convenient, nobody missed cable at all.
Fast forward several years, and it was time to replace one of the screens. I really liked OLED, and the best bang for my buck was an LG. The LG features a remote that resembles a Wii controller. LG’s WebOS is vastly different than Samsung’s Tizen. Not too long after, we also eventually ended up with an Amazon Fire-TV based screen in the kitchen area.
Remotes that come with the screen control the it well, but can struggle with all the connected gear and apps.
There went my master-plan. Now, we were using three different operating systems and three vastly different and uniquely ackward remotes. Adjusting to different functionality and layout of the remotes and in the streaming apps themselves, was fun to a tech-head like me. Not so much for the family. I started thinking along the lines of getting the same universal remote for each system to at least lessen the confusion.
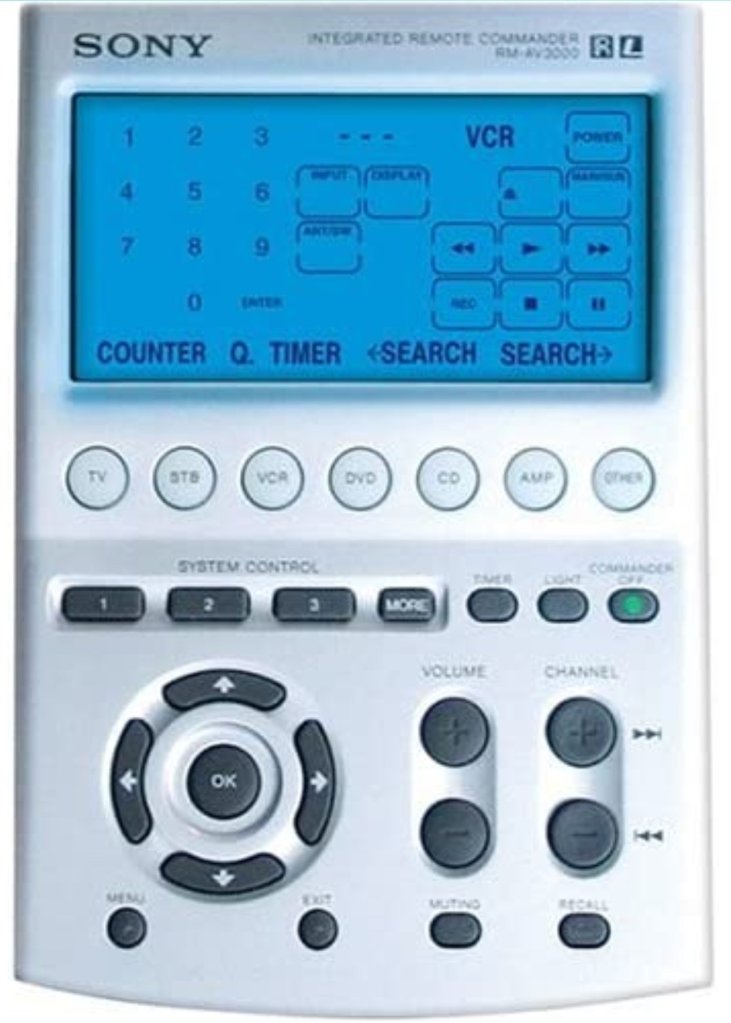
The Sony Remote Commander was one remote to rule them all back in the day. Mine would even operate the garage door.
A few minutes of research online nixed that idea. Universal remotes are not as robust as they used to be. Most of them do not support modern radio frequency based televisions. Of those that did, I couldn’t locate one that would do everything else I wanted. I really prefer to have one remote that controls everything. The fewer buttons, the better, but I don’t want to have to look at the remote for every function either.
I tried using the smartphone apps, and they work but are also vastly different between Apple and Android versions. The three different apps for each TV have very unique interfaces and functionality. The lack of tactile feedback makes the touchscreen apps difficult to use. You have to look at (and sometimes unlock) your smartphone every time you change the channel, adjust the volume, fast forward, etc. It’s a lot of looking and switching between active apps. There’s more of a “works in a pinch” feel overall.
Phone apps feel unintuitive.
While discussing the remote situation with my partner, she casually said something along the lines of “almost makes you miss the good ole’ days of cable boxes.” My brain jumped from her remark to “Why not use a streaming box to do the same job?”
I started my little project by hooking up a Roku to the living room TV. It worked fine, but if truth be told, it was clunkier to use than Samsung’s SmartTV OS. It also seemed a little under-powerd. Switching between the streaming apps was annoyingly slow, so was flipping channels in any of the live-TV apps. To be fair, it was a low- level Roku that I had won in a raffle. It’s my understanding that the higher-end models do not suffer the same performance problems.
I learned several things from the Roku. First, it convinced me that the idea of using streaming boxes to get a consistent experience across the screens was going to work. Second, it convinced me that a minimalist remote control backed by the right software would be able to control my screens, audio systems, and streaming apps. Lastly, I had decided that it would be worth purchasing wired network boxes for less chance of issues and better overall streaming performance.
Over the next few weeks, I contemplated and researched the options. In the and, it came down to an Amazon cube, or Apple TV. They’re both high-performance devices with multi-core processors, plenty of RAM, gaming capable graphics, and gigabit wired ethernet.
Amazon Fire-TV Cube and Apple TV Wi-Fi + Ethernet are both high-powered streaming boxes.
The Amazon Fire-TV operating system is based on Android. However, like all Fire based devices, they don’t have access to the Google Play store (without extra work). The Amazon shop has most of the apps people are looking for, but not all. The UI is a little frustrating at times. Unexpectedly most of the annoyances seem to be caused by a lack of notification.
For example, after certain updates, the Amazon Fire OS needs to reboot. There’s no on-screen notification that you need to initiate a full restart from the advanced options menu buried in the control panel. The way many Fire-TV owners discover the situation is by searching online for troubleshooting instructions after noticing that apps are not working properly.
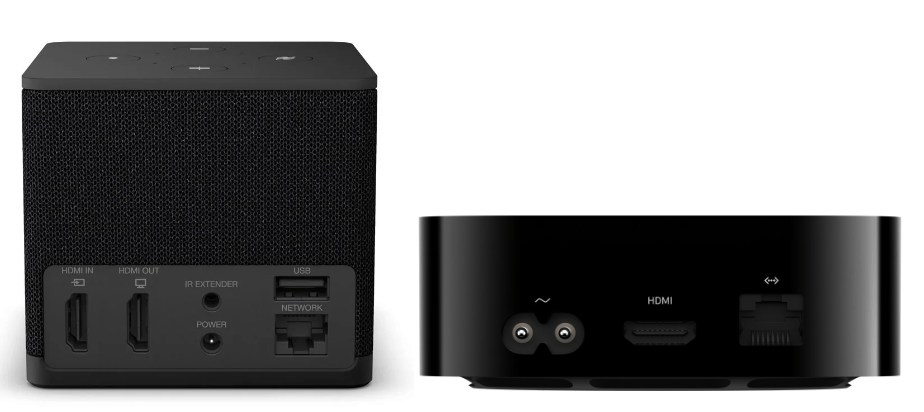
The Apple TV hasn’t had any type of technical issue in all the months I’ve been using it. I have it connected to the LG OLED screen and wired to the network. My cheap Visio surround sound bar is connected to the TV via an optical cable. The Apple TV detected and configured everything on its own as soon as it booted up and finished its “hello world” routine. I was impressed.
My hardware was automatically detected even though it was infrared only.
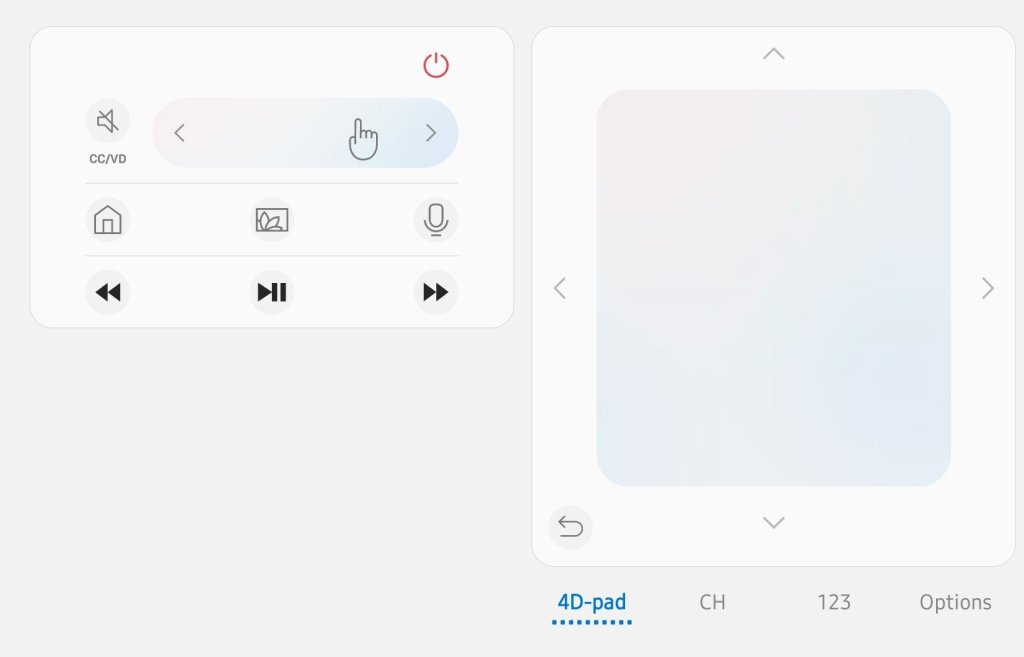
I find the Apple TV remote to be the best overall media controller I’ve ever used. It’s small, light, made of cool metal, and rounded in all the right places. The main interface is a large depression that your thumb naturally gravitates toward. Clicking in is the Ok or action button, and sliding your finger over the surface moves the cursor like a laptop’s touch pad. Each cardinal edge of the circle can be clicked in to activate a D-Pad function. I find myself holding a nd fidgeting with the remote even when I’m not changing the channel.
It is a fantastic remote for app, device, and media control.
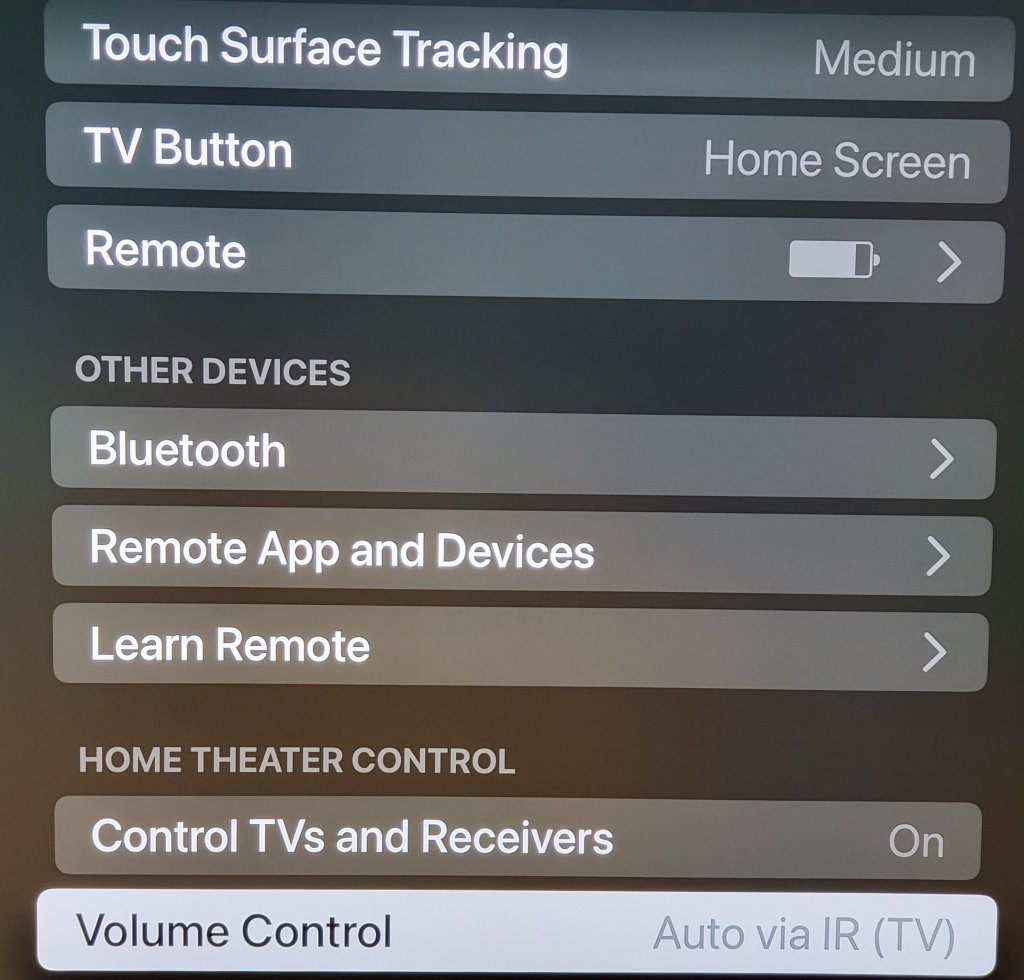
Like all things Apple, it is the little things and attention to detail that helps the Apple TV stand out in the crowd. Double-click the home button, and a card deck of all your open apps makes getting back to your previous activities a breeze. Hold the same button down for a couple of seconds and a quick access menu appears to change users or adjust common settings. Click the same button once to wake up the screen, audio system, and automatically switch everything to the correct inputs and outputs.
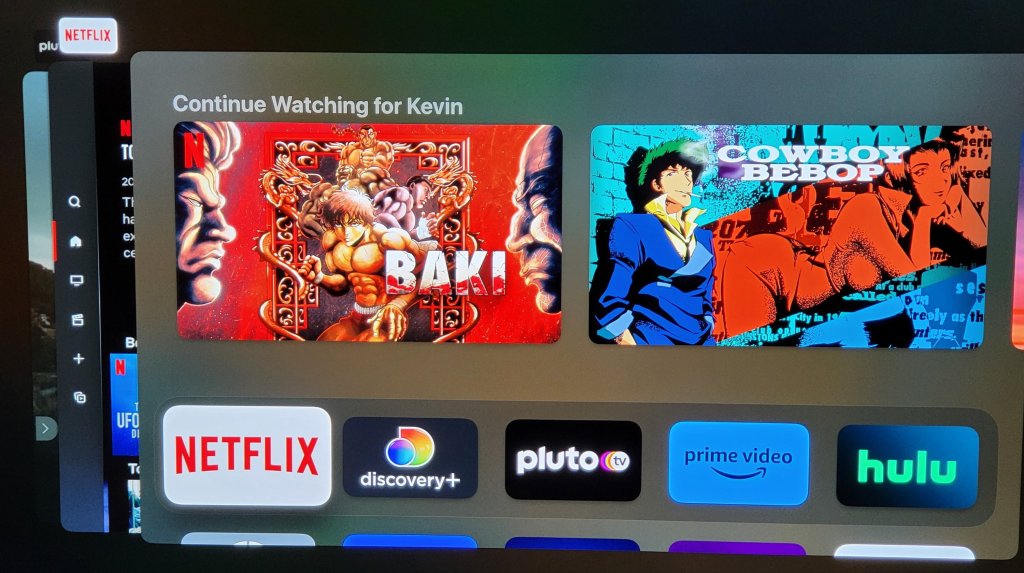
The app deck works the same as your iPhone you can select or dismiss previously open apps with ease.
Eventually I installed the Moonlight streaming app on the Apple TV and paired a Bluetooth Xbox controller to it. The game streaming experience is great, but the Apple TV had an unexpected surprise that I use as a result. When you have paired a gamepad you can also fully control the apps and TV with it. I also noticed the my iPhone and iPad both immediately detected the Apple TV units and allowed me to fully control it without doing anything, no app, no setup, just pull down the quick menu and there’s my TV.
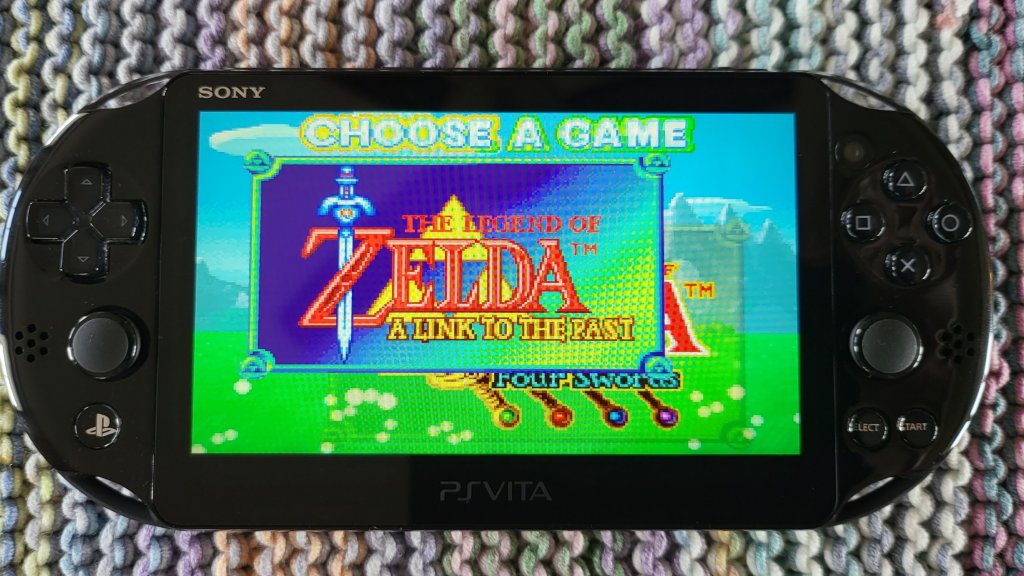
I’ve had a PlayStation Vita (2000 model) sitting in my junk drawer collecting dust for a long time. I had just completed a post on setting up Moonlight game streaming a few weeks ago. While doing the research for that post, I discovered that the online gaming community had created a custom port of the Moonlight software that runs on a jailbroken PS Vita.
Generally, I don’t tend to jailbreak my stuff. However, Sony has absolutely abandoned the Vita line of devices, which means there’s nothing to lose. The last time I went through the jailbreaking process, it was extremely technical and required some advanced knowledge to accomplish. To my surprise, it was very easy to accomplish this time around. Anyone with patience and the right guide should be able to pull it off.
Retro Game Corp’s guide got me through the process.
I’m not going to write a full step-by-step guide. There’s plenty of them out there already. This is the one I used, and I commend the author for including all the steps. If you are thinking about jailbreaking your Vita, you should consider the process permanent. You should also be aware that occasionally, the process fails and can brick your device.
More or less, you need to upgrade the firmware to version 3.74. Next, you’ll want to factory reset the Vita (look in Settings -> System -> Format). Then, you connect to Wi-Fi and sign in or create a temporary PSN account.
Update the Vita’s Firmware before jailbreaking.
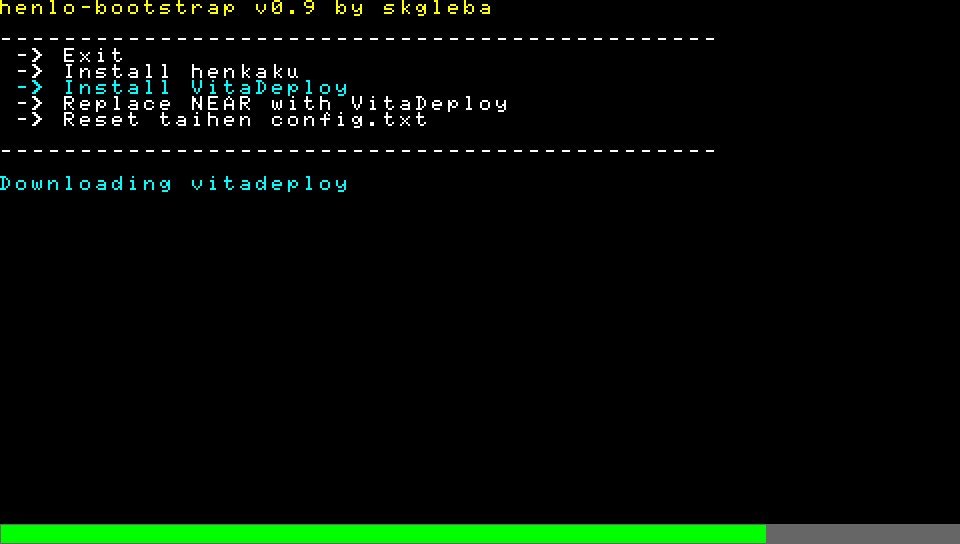
The easy part is the hack itself. Just visit jailbreak.psp2.dev in the Vita’s web browser and click the button to proceed. Follow the on-screen instructions and reboot when prompted. Eventually you will end up installing a custom hacked copy of the 3.65 firmware via an automated process that takes care of everything for you.
Emulators to play backups of your old game cartridges are in VitaDeploy.
Once you’ve completed the custom firmware replacement and installed the software mentioned in the guide, adding emulators for GameBoy, GameBoy Advanced, NES, SNES, PS1, PS2, and more is as easy as browsing an Appstore and picking them. Again, this is all covered in the guide I linked to above. You’ll need your own ROM files and, in some cases, will need to locate the BIOS of the various consoles in order to play emulated games.
Vita Deploy is an app store for homebrew.
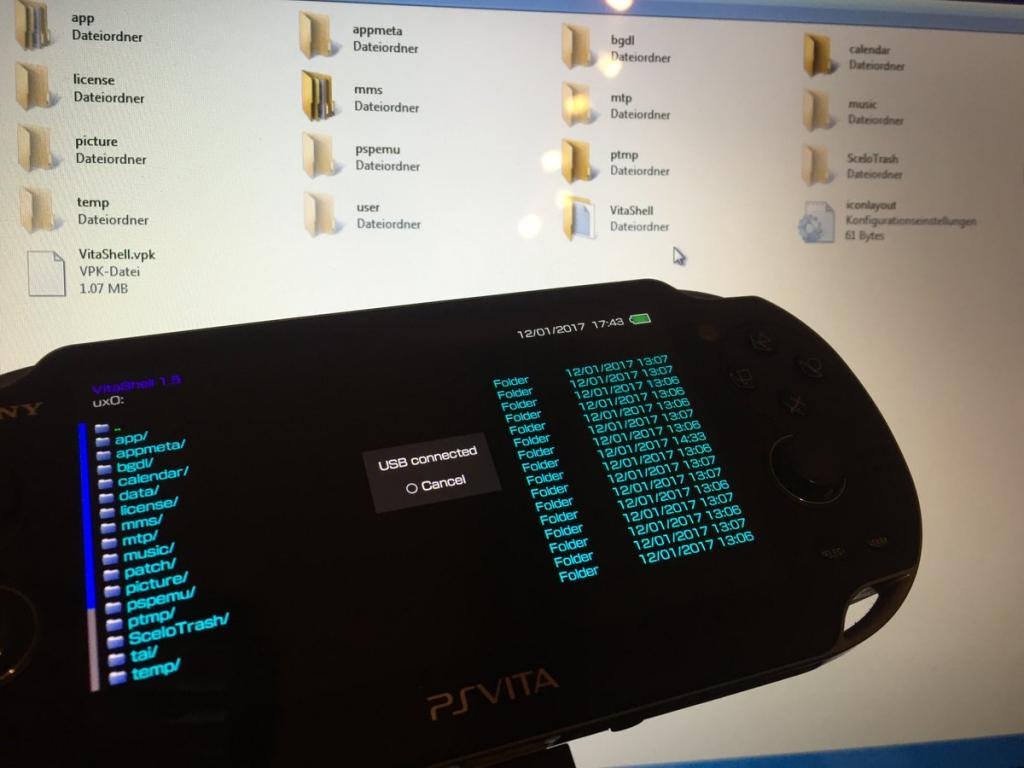
When it comes time to move files from your PC to the Vita, don’t spend time trying to get the old Content Manager software working. It doesn’t work on modern operating systems. Open the VitaShell app and connect the Vita to your PC via USB. Then click the select button to enable your PC to use the Vita as a USB drive.
Pressing select in the Vitashell app starts USB mode to mount the Vita as a drive in Windows Explorer.
The version of Moonlight currently in VitaDeploy is .92 and has an issue pairing with the Gamestream host. Download version .93 from github @ https://github.com/xyzz/vita-moonlight/releases/download/0.9.3/moonlight.vpk . Use VitaShell, Windows Explorer, and a USB cable to move it to your device. Then, find the .vpk file in VitaShell and open it to install the software. Aftwards, it works like any other moonlight client. The menus are text only and navigated with the D-pad.
The Vita doesn’t have clickable sticks, so you will need to be creative mapping controls in the games that you stream from your PC. I move aim and fire to the RB and LB (Vita’s shoulder buttons), and the controls that were previously RB and LB to the LT and RT which are default mapped to the Vita’s back touchpad. This works for most games like Destiny 2 and Cyberpunk 2077.
The client software is not without issue. Occasionally, it locks up or crashes for no apparent reason. Sometimes, the screen seems to be over saturated with white. When bad stuff happens, you can usually end and resume the session to recover and continue playing. Generally, it happens to me at the start of a session if it happens at all. Other than that, games look and perform well.
I’ll leave you with some hard-won tips for using the Moonlight app itself. Holding the select button and tapping up or down on the D-pad will cycle through various telemetry screens. Tapping the upper left corner of the Vita’s touchscreen will open the menu for pausing, quiting, or changing the game.
Way back in 1998 I saw Lost in Space (the movie) and was fascinated by their portrayal of augmented reality. It wasn’t the first time AR was presented as technology that would be common in our future, but it was done in a way that made it seem fairly realistic. I remember hoping the fictional system would become reality in my time. Fast forward twenty-five years and AR is on the verge of becoming a real thing.
In my line of work, I can end up working in cramped spaces like server rooms (aka closets), IDFs (aka also closets), or a stolen sliver of someone else’s desk. I’ve been using the “sidecar” technique of turning whatever tablet I have handy into a second monitor since the idea was invented. There isn’t always room to setup like that where I need to work. I’ve been waiting for a hi fidelity, lightweight, hands-free display. Keep my goals in mind while reading my thoughts on the Nreal Air Glasses. I bought them for a very specific reason, to use them as a hands and desk-space free external monitor for various devices. Anything else they do is gravy.
I’ve tried a few display goggles and smart glasses over the years. Until now, they’ve always left me extremley disappointed. Most often because they were uncomfortable. There have also been some severe battery limitations, connectivity challenges, and other fundamental flaws that kept the previous contenders from being useful. More than one set had low resolution and suffered from blurry text when used as a computer display.
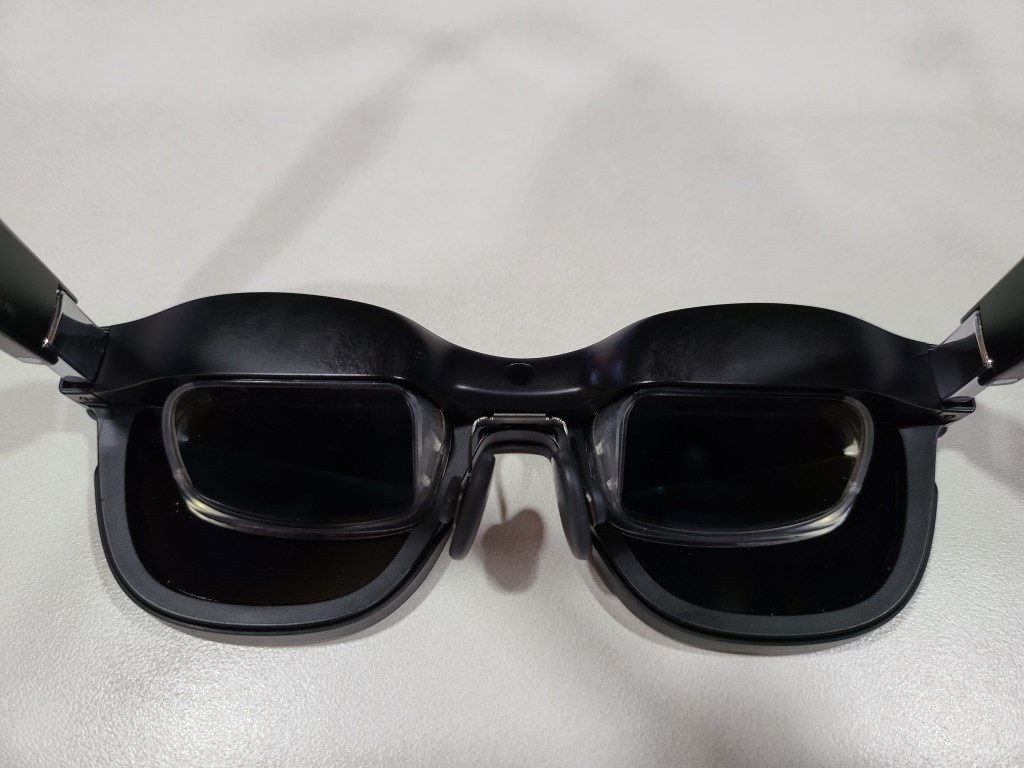
Enter the Nreal Air. Essentially a pair of OLED micro-screens mounted in slightly oversized sunglass frames with clever prisms to control the light you see. The screens are combined with speakers and microphones in the earpieces. There is a USB-C connector on the back of one ear. You’ll find tiny buttons for on/off and brightness control on the bottom edge of the other. That’s it. No batteries, no setup, plug in one cable and go. Connect them into anything that can output video and audio through USB-C, or Thunderbolt (aka Alt-DP Mode) and they work. Most Windows, Macs, Linux, many Android devices, even the Steam Deck, will automatically recognize the glasses as an external 1080P 60 Hertz/FPS display.
The embedded screens bounce light off the prisms straight into your eyes.
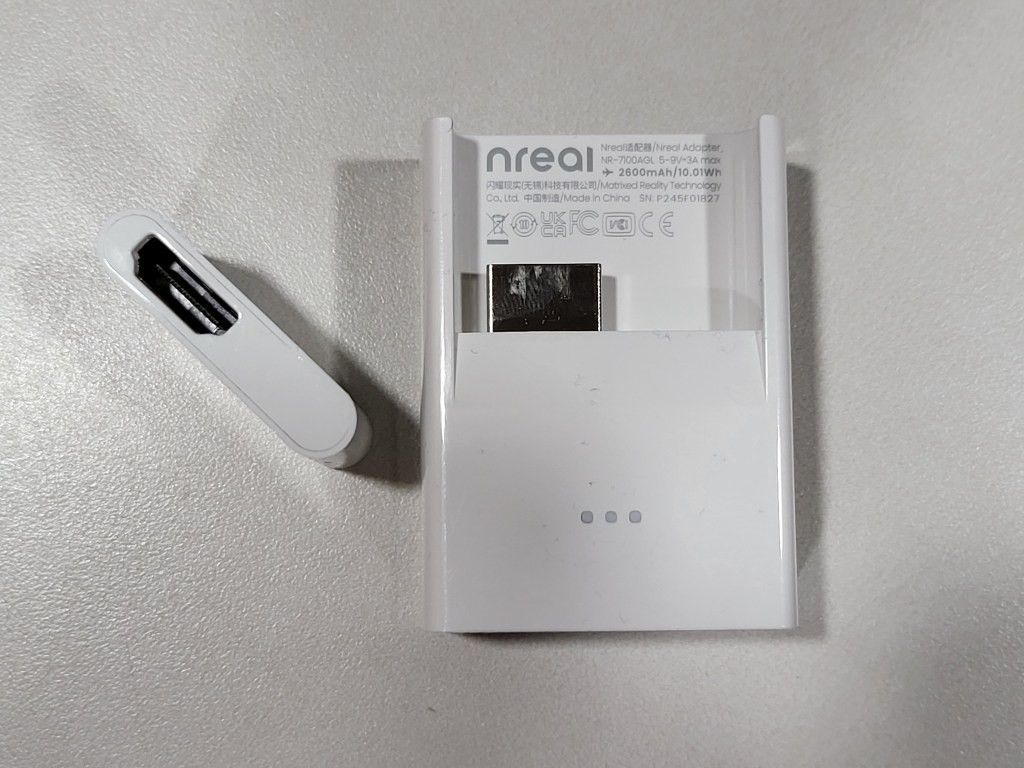
If you want to use them with an iPhone or other systems that need HDMI, you are going to need some adapters. Nreal makes a USB-C to HDMI adapter that is available for purchase separately, or as a bundle. The sixty-dollar adapter is powered by a built-in rechargeable battery to run the glasses since HDMI doesn’t typically include power distribution. I’ve used the adapter to connect the Airs to my iPhone, iPad, Switch, Xbox, and PlayStation without issue. The adapter is designed specifically to work with Apple’s Lightning to HDMI adapter, which you’ll also need to purchase separately.
The adapter provides power and connectivity to any almost any HDMI device. The Apple Lightning to HDMI adapter fits in the slot perfectly.
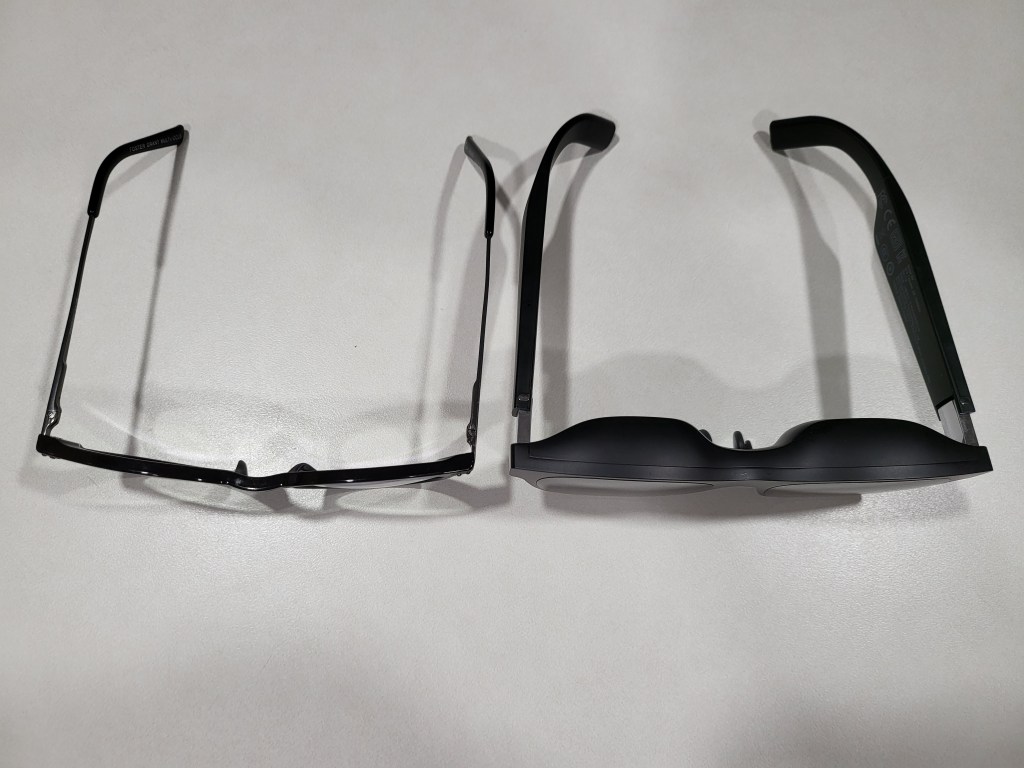
The Air glasses feel a tad heavier than my normal reading pair when wearing them. The bridge of the glasses’ frame is considerably thicker than standard eye-glass frames. It makes sense, there are two computer screens and a bunch of electronics in there. For me, this thickness makes positioning the nose piece at the bridge of my nose challenging. I spent some time flexing and bending the metal nose piece support to get a good fit. I was eventually able to get them to rest in a comfortable position. The adjustable angles provided by the ear pieces really help.
The AR glasses frames are thicker in every way, but still smaller than I expected.
The Airs connect with a single lightweight cable for both signal and power. They don’t need any headphones or earbuds, all though it is easy to use them to improve the soundstage. They stay in position on my face. The lightweight glasses are comfortable for long periods, I’ve worn them for entire eight-hour work days. They’re always ready and don’t get hot because their power comes from the device.
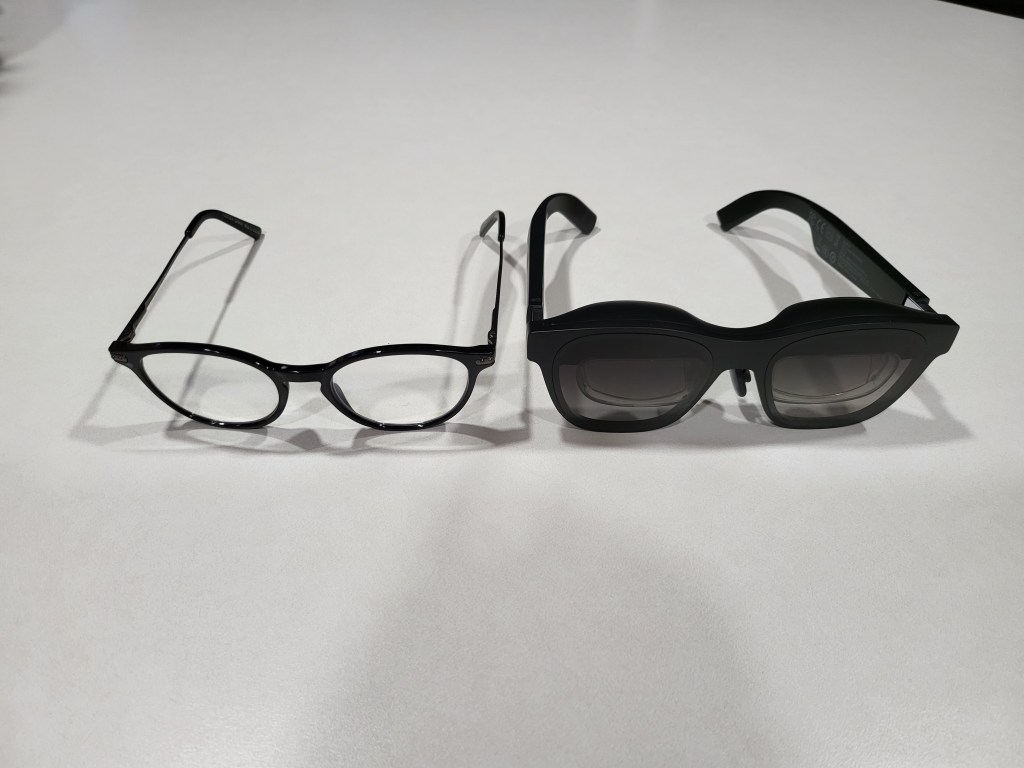
There are bigger and more awkward looking fashion frames in the world. Counting on the look to be the excuse against purchasing tech gadgets isn’t as reliable as it used to be. These look and feel like the oversized glasses you get after an eye exam. I’ve had the Airs on in the grocery store, while walking the dog, and even at an old-fashioned IRL conference. No one has given me a second glance, that I noticed anyway. P.S. They were a lifesaver for combating boredom while waiting in line at the conference.
They are very similar in appearance to my reading glasses, just slightly larger.
My co-workers spotted them pretty quickly when I wore them at my desk. Several tried them on and I think they were shocked at how good the displays actually are. The biggest drawback has nothing to do with the design or capabilities. People seem to think the four-hundred-dollar base price is too steep.
Most face-worn displays are opaque googles, but you can see through these lenses. There are some obstructions from the prisms if you look for them, but they are generally not in the way. Transparency of the image is controlled by changing the brightness. When turned up to full, the image can be seen outside, but in bright sunlight it helps to face something that provides background contrast. Turning down the brightness allows you to float your display over the real world in a very pleasing way. This trick works best in darker indoor environments, but they work even in our super-bright office without trouble.
For a more private or immersive experience, there is a snap on shield that makes the front view completely opaque. I find that I use them equally in “see-though” and “private” modes. The “see-though” mode is what impresses people most when trying the Air glasses for the first time. This mode is also why they tend to be classified as augmented reality glasses.
I use them more often than I had expected to when I first decided to purchase them. I have them hooked up to my MacBook Air writing this post right now. No matter how my head is positioned, the screen I’m working on is centered in my vision. The ergonomic and comfort advantages of the glasses over a traditional screen are significant. You don’t have to tip your chin down to see the screen while lying in bed, or are fully reclined in the easy chair.
When connected to a MacBook, the glasses can emulate three wrap-around monitors that float in space. I’m using the Nebula app right now and have this post on the center “screen”, the Nreal website on my right monitor, and a Netflix show playing on the left one. I can still see my family members going about their day and my dog begging for a bite of the pop-tart from the table next to me. I can even watch the living-room TV though the floating computer monitors. The experience is surreal.
If you have a Windows PC, you can use them as a stand-alone, duplicated, or extended screen just like any other monitor. NReal has released the beta version of the Windows Nebula app. It supports the same three-monitor trick that the Mac software does. It also allows for a single ultra-wide curved screen to float in your vision too. There are some hoops to jump through to gain access to the Windows Beta see this reddit post for the details: https://www.reddit.com/r/nreal/comments/1306xqs/nebula_for_windows_test_has_finally_begun_join_us/
Walking while wearing the Airs takes some practice, but it’s easy enough and didn’t make me feel queasy. Once you have mastered it, walking the dog will never be the same. I watched an episode of “Drive to Survive” on Netflix while walking the around the neighborhood with my pooch last evening. I ran the cable down my back, under my shirt, and kept the phone in my pocket.
I’ve used them while cooking and grilling. It is super useful to keep the recipe and video instructions you are following hovering above the food while you prepare it. Never having to look away cuts down on the burnt and overcooked results. Watching a show while literally keeping an eye on the burgers is backyard life at its best.
Any mind-numbing task that I normally put off to watch Netflix, can now be done while watching Netflix. Cleaning the house is a whole different experience when you’ve got Farzar floating above the floor you’re vacuuming. Doing the laundry, folding clothes, and doing the dishes (careful with this one, they are not water resistant) are all a little less dreary.
Watching the YouTube video instructions for fixing a broken shifter cable in my car while actually doing it, cemented the glasses’ usefulness for me. I only needed to look at the same area in my vehicle to overlay the mechanic’s video on to my broken part. The repair was much easier to follow along with. The project was also finished in less time since I didn’t have to keep going back and forth between my work and the video.
On family game nights, I have a big screen all my own. The same goes for work, having the glasses to function as a portable three-monitor stack has been extremely helpful. When I am in the field, they function as an instant private workspace and give me the screen real-estate to spread my work out. Even in a small network closet while diagnosing switch gear, I have a full desk’s worth of screens at my disposal. I can’t overstate how huge this is for field engineers.
Most of the people I know that have tried them imagine they will replace desk monitors in the very near future. The glasses themselves are very refined and feel like a fully developed product. The Nebula software can be challenging to work with in the current beta editions. Since the app isn’t absolutely required to use them, it is less of a hinderance than it might otherwise be. If you are the type of person that likes to be an early adopter and doesn’t mind some tinkering, they are fantastic right now. Mine have already earned a full time spot in my bag.