Organizations that subscribe to Microsoft 365 and also have on-premises IT infrastructure, tend to synchronize accounts from their local Active Directory database(s) to the cloud. Hybrid accounts (synchronized) simplify things like user login and password management.
In the Microsoft 365 portal, you can discern which accounts have been synched from the local Active Directory by their icon. Unfortunately, the on-premises Active Directory database does not have an attribute that indicates when an account has been synched with the cloud. This can lead to confusion.
Azure AD Connect, the tool used to perform the synchronization, has numerous options and features. So many that it can become difficult to tell which accounts have been hybridized and which have not. An administrator may be left attempting to compare the accounts in each database manually.
I was assigned this task for an AD database with more than two-hundred accounts. It wasn’t feasible to compare them one by one. Lucky for me, my PowerShell skills were up to the task. Run the script below, from a system that has both the Active Directory and Azure AD PowerShell modules installed. The report it outputs will show you which on-premises accounts are synchronized to the cloud.
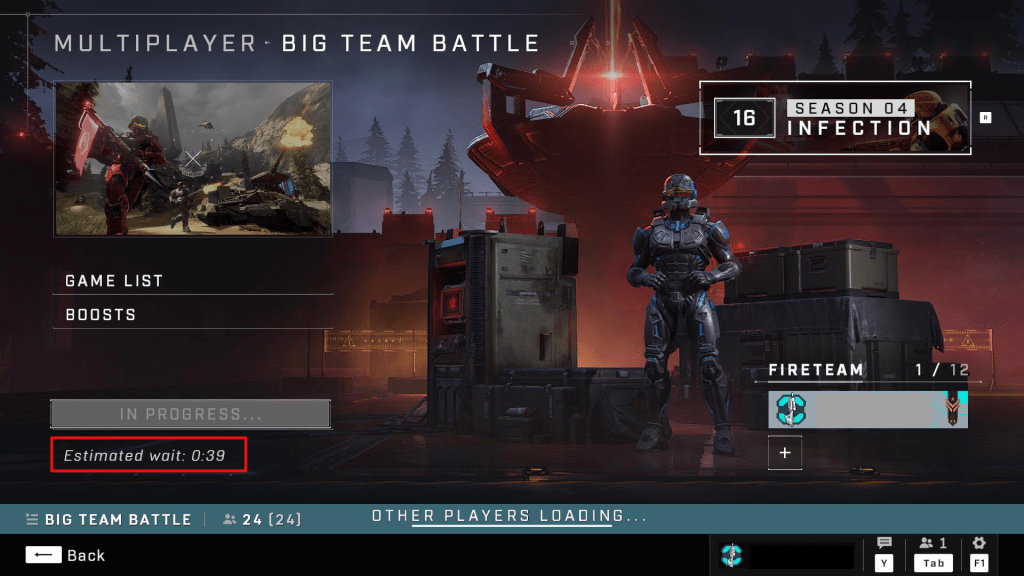
If you can’t tell from my most recent articles, I’ve got an ASUS ROG Ally. While setting it up and evaluating its capability, I randomly decided to install Halo Infinite. I thought a few rounds of Team Slayer would be a fun way to put the little machine through its paces.
The first match I joined was on a map I had never previously encountered. So were the second and third round’s maps. Like a lot of people, I hadn’t played much Halo for the last few months. They added a lot of new content while I was away. Check out the news section of Halo’s Waypoint site for all the latest info.
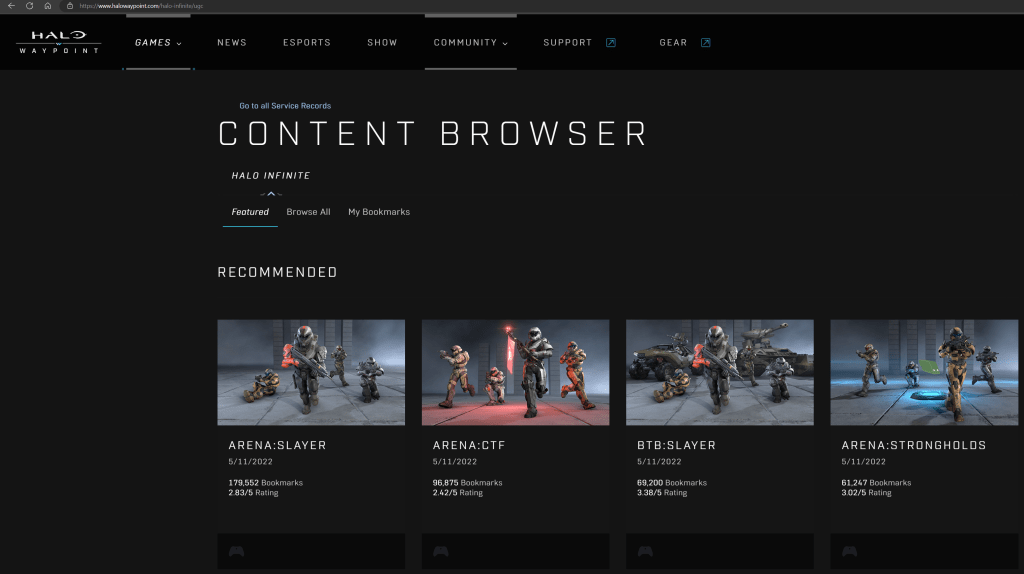
Halo Waypoint’s Content Browser is the place to see all the content without installing the game.
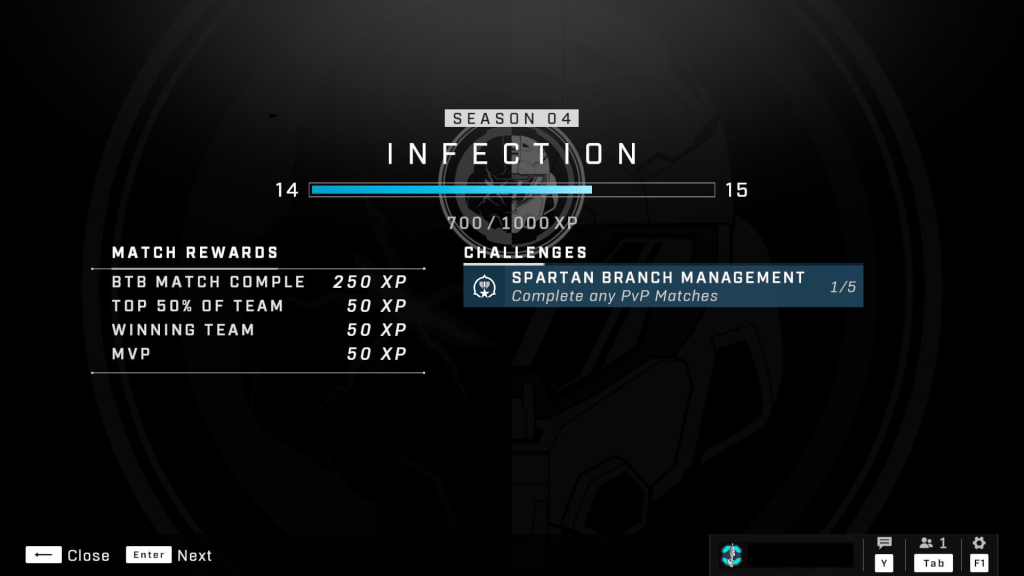
In addition to interesting new map content, customizations seem to be unlocking faster than when I last played. The slow rolling of play-based unlocks has long been a complaint against 343’s stewardship of the iconic franchise. This time around, I was able to unlock several armor pieces, weapon charms, and color packs in a four-hour session without purchasing the premium battle pass.
Custom armor unlocks are much faster in season 4.
It took me a while to find my rhythm and get my head to play Halo instead of Call of Duty. Halo’s time to kill is longer. Emptying a full clip without getting a kill is not a rare occurrence in this game. Multi-kills almost always require reloading in between targets. Shields, agility, and speed, mean that your opponent has a fifty-fifty chance of escape, or a reverse attack after you have opened fire. This type of play encourages extended one-on-one battles that can be intense, especially if both combatants are skilled Halo enthusiasts.
I think a lot of the negative vibes you see on-line stem from players whose FPS experience is rooted in other titles. They dominate at their preferred games and are expecting to drop into Halo and win, but the time to kill throws their rhythm off. They fire what would be an appropriate amount to frag their target in most FPS games and move to the next, only to have their efforts reversed.
The top of the scoreboard is challenging to reach after being away. Be patient with yourself if you have taken a long break.
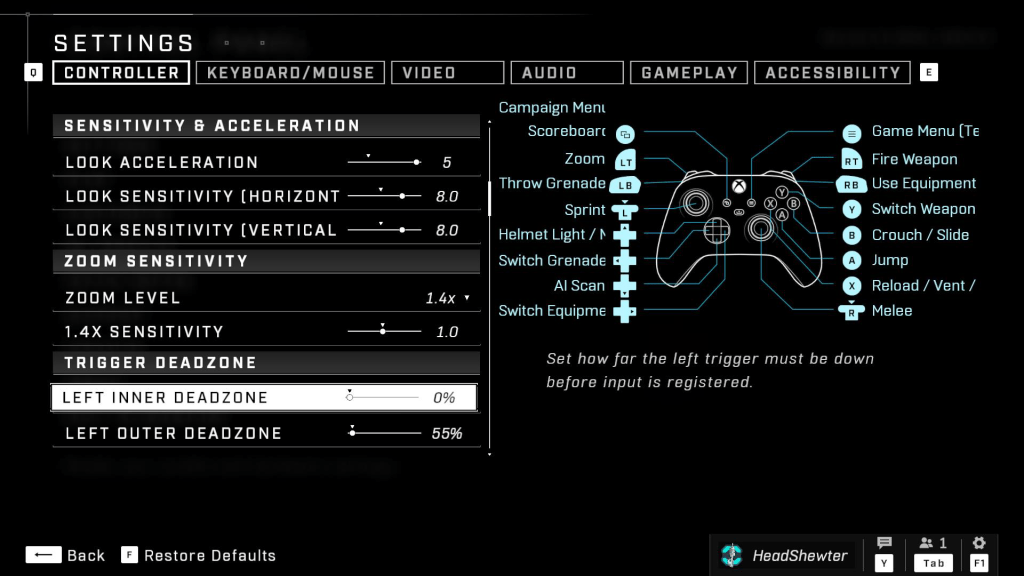
Some tips for those playing on an Ally. I set both joystick dead zones to zero. I also turn up all the look sensitivities to the middle of their scales. I make these changes in Halo’s settings menu. In the Ally’s controller profiles menu (auto-mode), I map the rear buttons to sprint and melee.
Adjusting the deadzones smoothed out the Ally’s controls.
I am impressed with how the ASUS ROG Ally handles the game’s demanding graphics. Plugged-in, set to max performance mode, with Halo at 1080P-low settings, the Ally held a steady 94 fps. The smaller screen translates to a high DPI for that resolution, and the game looks great. The Ally is a marvelous machine for playing on the couch, or in the car, or anywhere.
Snagging an S7 sniper rifle off the map’s spawn point and decimating the other team with it is still one of my favorite feels in all of gaming. The complex new maps provide plenty of ambush and crossfire zones. The new armor customizations and updates seem to have pulled people back into the matchmaking queues. Getting into a game is taking less than a minute on average.
Time between matches is shorter than ever thanks to the new content drawing in players.
343 has also introduced a new play list. Squad Battles features some of Halo 3’s most popular maps that have been completely remastered for modern graphics and sound. In addition to the maps the new playlist also returns 8v8 matchmaking.
Classic Big Team Battles can be found in the new Squad Battles playlist.
I personally feel that Halo Infinite is one of the best Halo titles to date. The variety of game types, graphics that run on most systems, free-to-play unlocks, and new content make it one of the top FPS titles available on the market today. If you haven’t played, or stepped away for a while, consider giving Season 4 a chance.
The Xreal Air augmented reality glasses have been superb since the day I got them. I continue to use them in unexpected ways because they are quick and simple to connect to almost anything. To their credit, the company has remained steadfastly committed to the success of the product. Even suffering a re-name didn’t slow them down.
Recently, Xreal released the beta edition of their Nebula app for Windows. The update lets Windows users experience two-wide, three-wide, and ultrawide monitor setups without any actual screens. They’ve also released several VR apps in their Nebula store. The last firmware update added the ability to consume traditional side-by-side 3-D video.
The newest firmware release adds support for video refresh rates up to 120 hertz. The update is simple to acquire, just upgrade your Android or Mac Nebula app to the latest edition and connect the glasses, accept the update when prompted.
If you don’t use the Nebula app, connect your glasses to a computer with the Edge or Chrome web browser installed. Then visit this page: https://ota.xreal.com/en/air-update.html and follow the instructions to download and install the new firmware. There are reports on Reddit that the web page (over the air) upgrade isn’t functioning properly.
Once you have completed the firmware update, press and hold the brightness + button until you hear two beeps. The first beep is side-by-side 3D mode, the second is 120 hertz. The glasses remain in 120hz mode until you disconnect them. At the moment, the faster refresh rate has to be engaged in this manner every time.
When designed and implemented correctly, Windows failover clusters can be one of the most resilient server architectures available for your datacenter. Unfortunately, this does not translate into their never having issues. When they do suffer some type of trouble; diagnostics and recovery can be challenging due to the complexity of clusters resources.
I generally start the troubleshooting process by having Windows test and report the status of all the components. Generating the report is much faster than logging into each component individually and the report frequently points directly to the cause of an outage. To get started, open an elevated PowerShell console on any of the cluster node servers and run the following.
Get-Cluster | Test-Cluster
The one-liner should start a cluster validation report. The default CVR process is not invasive, no systems will be rebooted or otherwise heavily impacted. Invasive disk tests are skipped in the default report (at the time of this writing). If you didn’t redirect the output, the results will be located @ %SystemRoot%\Cluster\Reports. Three files are generated in the folder.
Please check official Microsoft documentation yourself. Microsoft has been known to change a PowerShell cmdlet’s default functions as a result of updates and upgrades, link below.
Open the .htm file in a web browser and look for items that do not report success. Click their links to see more information about the alert. Resolve any issues and reboot the cluster nodes or affected hardware, if you know it is safe to do so.
Rebooting a cluster node or other components can cause, or make a cluster failure worse. Hardware failure, data loss, and/or the interruption of services from multiple IT assets and business IT processes can, and does, occur. If you are not comfortable with, or are not authorized for these types decisions; stop-here and find someone that is.
To make this decision you should be fully confident in all aspects of the underpinning network, data-storage platforms, machine-level hardware, the operating systems of all involved equipment and their configurations and interactions. You should also know how to restore the cluster, and anything hosted on it, from backups.
Any action you take, is of course at your own risk. The idea of this article is to get you pointed in the right direction. Things like deciding what to do, and the results of any action, or inaction, are on you!
Standard cluster events populate the event viewer and you should review them. One of the easiest ways, is to open the failover cluster management console and look for cluster events on the dashboard.
Those that mention any malfunction of the Failover Cluster Database, but do not have a corresponding all clear message further down the log stream, are one indication of a possible cluster failure.
In addition to the Cluster Validation Report and events, Windows clusters also include node-level logging facilities. To generate them we need to switch back over to an elevated PowerShell console.
Get-ClusterLog
Running the cmdlet will export the running log for each of the nodes to a file. These reports can take much longer to compile than the CVR did, the reason for checking them, is that these logs will often compile even when the cluster, or its components, have suffered a major failure. The files created by the cmdlet will also be located @ C:\Windows\Cluster\Reports, assuming you did not specify a destination.
If you run Get-ClusterLog without specifying a time span, the resulting files can be very large. Hundreds of megabytes, or hundreds of gigabytes are not uncommon, depending on the cluster’s number of nodes, number of roles, and logging level configuration. You may actually struggle to open the files depending on your computer and its available software options.
Get-ClusterLog -Timespan 5 would pull logs for the last 5 minutes.
As for what to do with the files. Alas, that too is out of scope for a blog post. A good place to start is by searching them for key words like “error”. If you’ve gotten this far and haven’t found a solution, you might consider contacting a professional with Hyper-V Cluster experience, or opening a support ticket with Microsoft’s Hyper-V support team.
This may also be a good point to restore the host’s Windows session state backups or the hosts themselves. Either restoration option should let you restore the cluster to a working state. The catch is that restoration itself, is an expert-level decision and action. A decision with whole separate sets of requirements and consequences that you need to fully understand before deciding on.
If you don’t have backups, or the restore didn’t work, you’re going to want to stay tuned for my next post in this series.
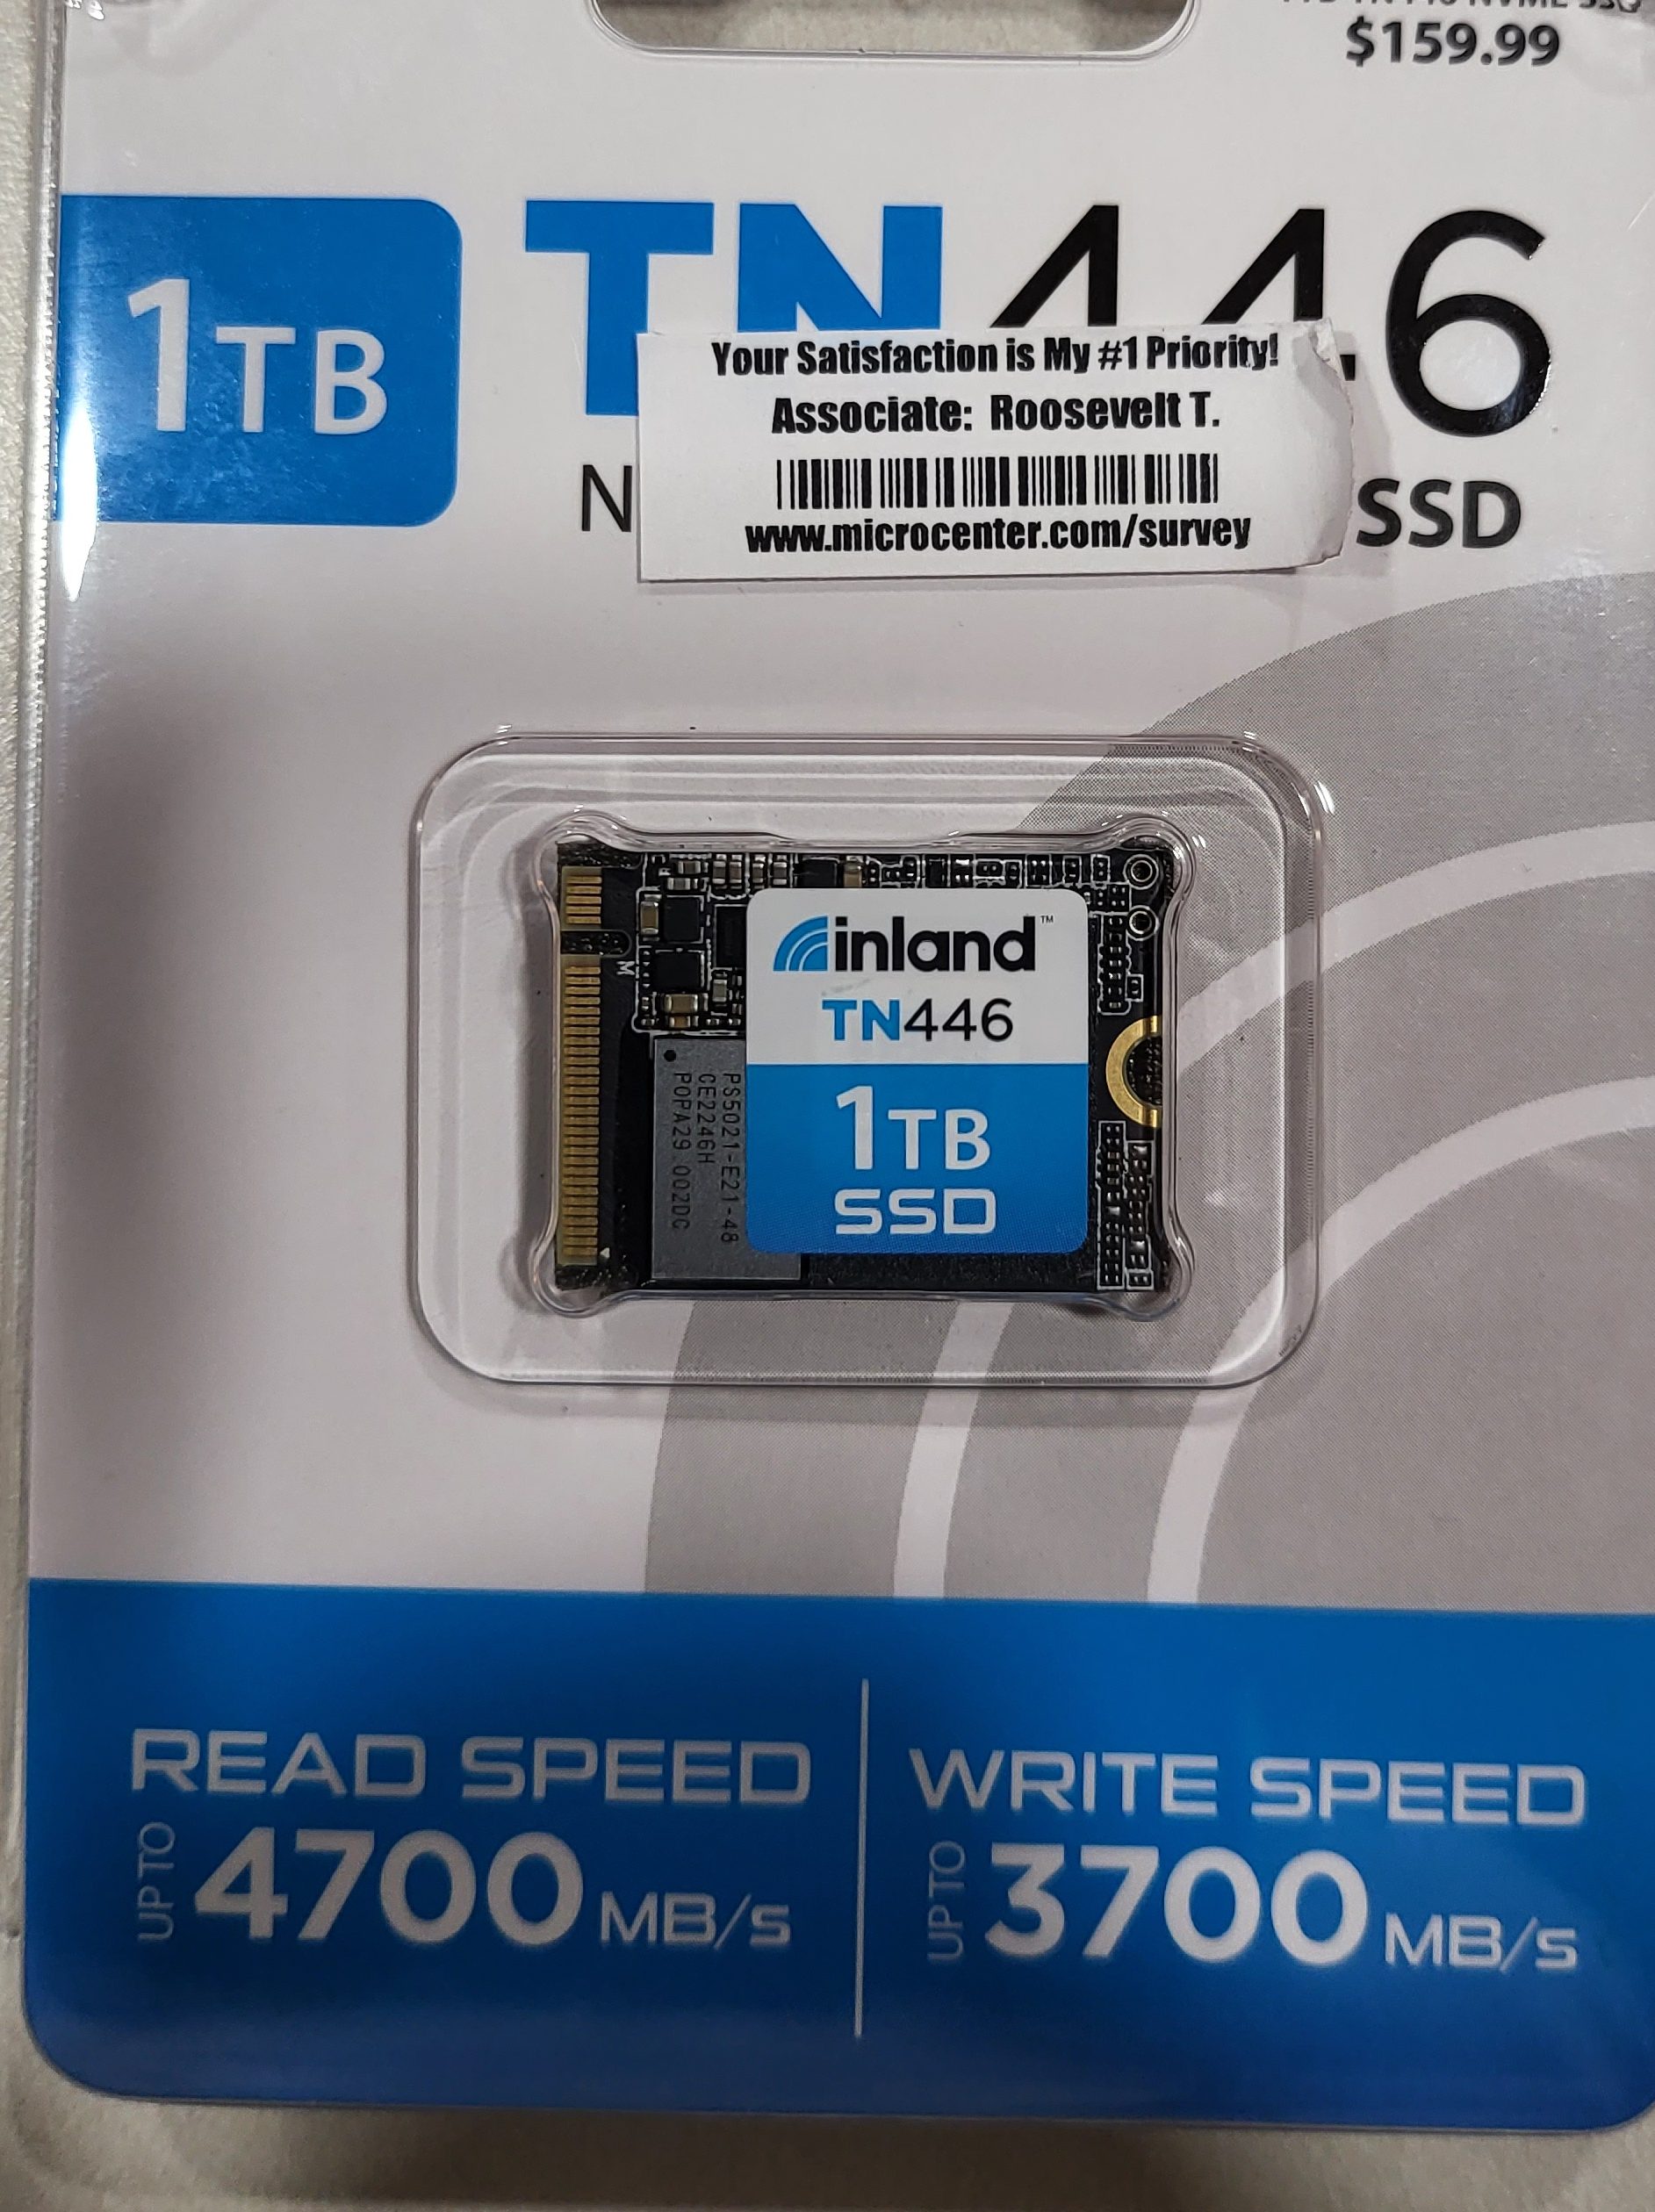
I like my ROG Ally so much that I filled its 512GB SSD in a matter of days. Today’s games are huge, many titles are over the 100GB mark, some even pass 200 GB. Lucky for me ASUS fully supports the end user swapping out the disk, they even provide a step by step guide on their website. Of course as with any guide you see on-line you are proceeding at your own risk.
I picked up an Inland 1TB M.2 2230 SSD at my local Microcenter store for $109.00 on sale. I would have preferred to go with 2 TB but those are hard to find and I didn’t want to wait any longer. If you are not familiar, the 2230 designates the length (short in this case) of the disk. Make sure you are getting the compact size SSD, regular or long disks will not fit in the case.
Only the compact nVME disks will fit.
I just followed the ASUS guide carefully. I suggest that you watch the embedded YouTube video. One of their technicians goes through the entire process step by step. With the Ally lying face down, top edge of the device (exhaust ports) away from your body, on a soft surface in front of you, the middle screw in the bottom row is captive. It will not fully unscrew from the case. Instead, it will make a clicking sound and assist in splitting the case halves apart when it is fully unscrewed. The other five screws are all fully removable.
The highlighted screw does not come all the way out.
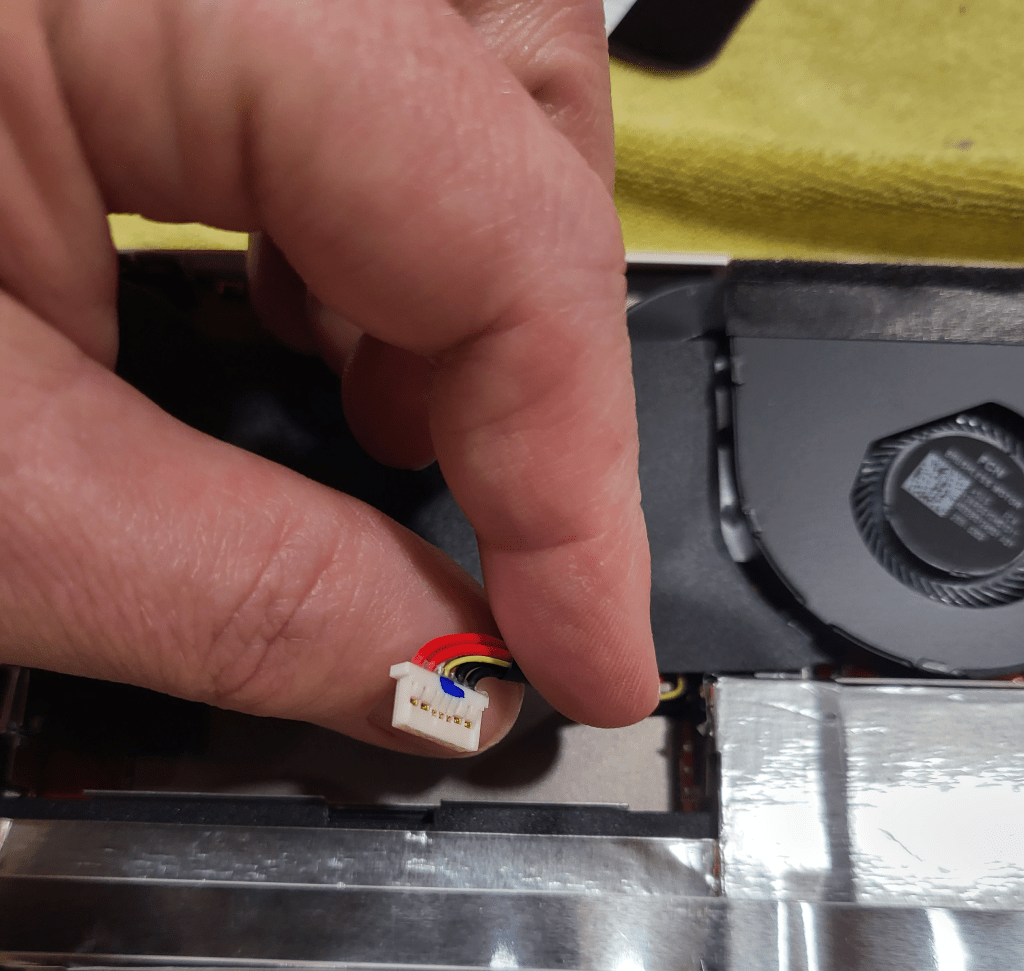
Once you have removed the screws and un-screwed the captive screw to its limit, use a guitar pick or other plastic pry tool (old credit card, old driver’s license) to slide between the halves of the shell and pop the clips. Go slow and undo one clip at a time to avoid breakage. Once the shell is open, disconnect the battery by removing its connector lead.
Remove the battery’s lead to prevent accidental discharge from frying you components.
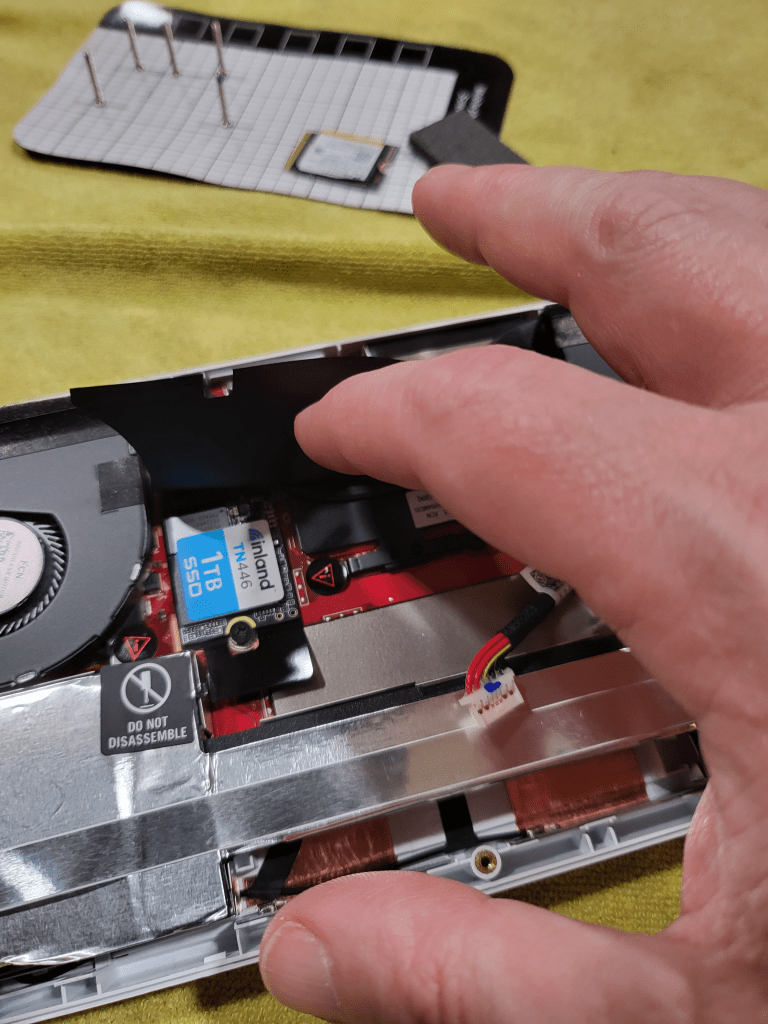
Carefully lift the large rectangular black plastic flap to reveal the SSD slot and drive. Remove the SSD retaining screw and gently slide the disk toward you. If you have trouble breaking the SSD loose, gently lift up on the plastic tab underneath the drive slot. Install the new disk, being careful to replace the screw and battery connector. Re-assemble the case by aligning the two halves and snapping them back together. Finally, screw everything back together by returning each screw to its original location.
The drive is under a protective flap.
Now comes the tricky part, booting into the BIOS. This isn’t tricky because the process is difficult, it’s actually very easy. Just press the volume down and power buttons at the same time. The tricky part is that there’s some mysterious timing required to get the BIOS to load and I can’t describe it. I think you need to let go of the Power button and keep the volume button down as soon as you see the screen light up, but I can’t promise that was it. In any case keep pressing these two buttons until you see the normal start up screen followed by the UEFI BIOS.
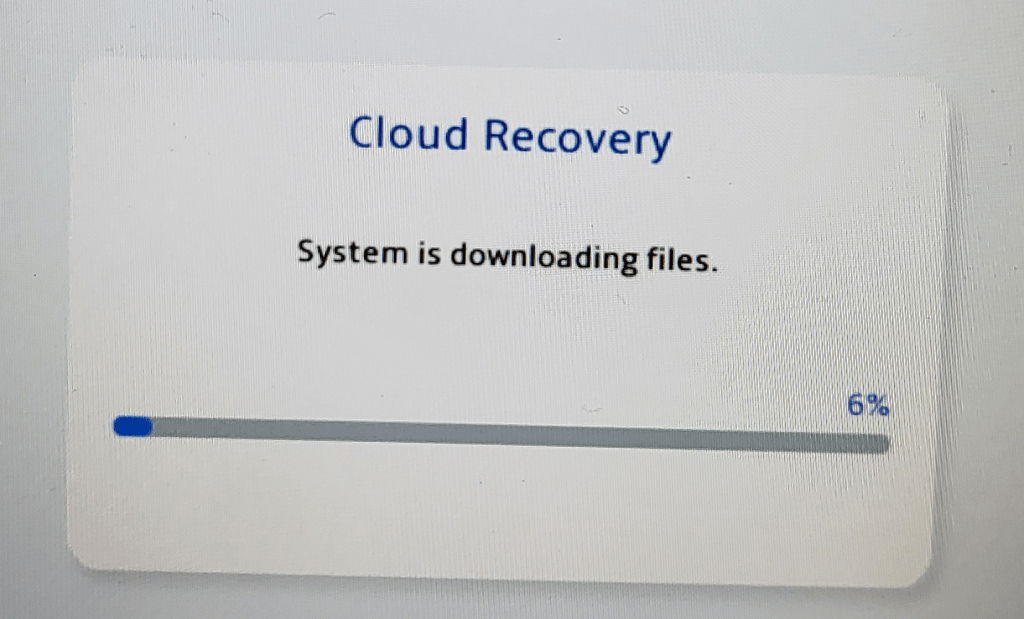
Once you get the BIOS to load, hit the Y button to enter advance mode and use the D-pad to navigate to advanced. Hit A to start the first option (ASUS Cloud Recovery). Read and agree to the EULAs for ASUS and Windows, then connect to your WiFi and download the files. I had to do this twice for the download to actually start.
If you don’t see this screen you didn’t complete all the steps to start the download, try again. I had to boot to the BIOS and tell it to download twice before it worked.
The system will now automatically download and install Windows 11, Armory Crate, and all the drivers and software that came on it out of the box. It will reboot several times. Mine took about 3.75 hours from the time I started until Windows was fully loaded and I had installed all the latest updates for everything.
I cannot stress how important it is that you update everything, not just Windows updates. Many of the tools and software like Armory Crate, My ASUS, the Microsoft Store, any of your game launchers, etc. will all have their own updates. Open the application and look in the help menu if it isn’t immediately obvious where to download updates. This system offers a much better playing experience when it is fully updated than it does when you first unpack it.
I’ve been a fan of handheld electronic and video games for as long as I can remember. Over the years I’ve had lots of LCD Games, GameBoys, Game Gears, Vitas, and various Android based gaming devices. Heck, there’s even a Steam Deck in my household that’s been here since launch day.
I pre-ordered the ASUS ROG Ally right after the first reviews were released. My spouse has the Steam Deck and I’ve spent a lot of time with it. Most recently, I spent the better part of a weekend getting the EA edition of SIMS4 running on it after EA ended support for their Origin launcher. That experience led me to think that Windows may ultimately be an easier path for gaming overall.
Publishers are loathe to unify their frameworks and launchers. How many of them are there now, anyway? EA Desktop, Steam, BattleNet, Ubisoft Connect, Xbox, Epic Games, COG Galaxy, the list goes on and on. The studios and publishers seem to believe that their particular launcher gives them some kind of edge in the market. Sure, they’ll release some of their stuff on other launchers as a form of advertisement. The premium titles often remain locked.
The Steam Deck’s Linux-based operating system does not run most of these launchers natively. There can be a lot of setup to get them running in the Proton emulation layer. In addition, there are several games that use various anti-cheat mechanisms like Ricochet and Easy Anti-Cheat that simply do not function properly on the Linux OS (yet).
Enter the Ally. ASUS’s handheld features a similar form as the famous Steam Deck, but packs in even more power. The Ally can process data at up to 8.6 teraflops compared to the Steam Deck’s 1.6. The performance that the diminutive PC is capable of is frankly astonishing. The Ally runs AAA titles like Halo Infinite, Destiny 2, The Witcher 3, and Call of Duty Modern Warfare II at 1080P on low, at nearly 100 frames per second.
ASUS also wisely chose Microsoft’s Windows 11 and some clever add-ons for it’s operating system. This choice ensures maximum compatibility with all of your titles no matter which launcher they require.
Windows 11 is not customized for the Ally like Steam OS has been for the Steam Deck, but it effectively does not matter in my opinion. Steam OS is limited to playing games that have been specifically written for it, or those that work with its Proton emulation layer.
Those limitations can be extremely frustrating to deal with if you aren’t into engineering tech workarounds. The amount of work that went into getting SIMS4 to run properly on the Deck was immense.
It took less than 15 minutes to install SIMS4 on my Ally. No modifications of any kind were needed. The game just worked. I might recommend a Steam Deck to some of my engineering minded co-workers, but I’ll point my normal friends and family to the Ally every time. After my experiences with both, I can honestly say “Windows is the way”.