I’ve been a OneNote user since the beginning. I’ve used Microsoft’s fantastic tool to organize my life, work, and to augment my memory. The software has previously featured an OCR engine that would allow for the conversion of selected handwriting to typed text. Not long after that feature was added, another option to search handwritten notes was included.
OneNote has included optical character recognition since the early days. Select some inked text and use the menu to convert it to typed data.
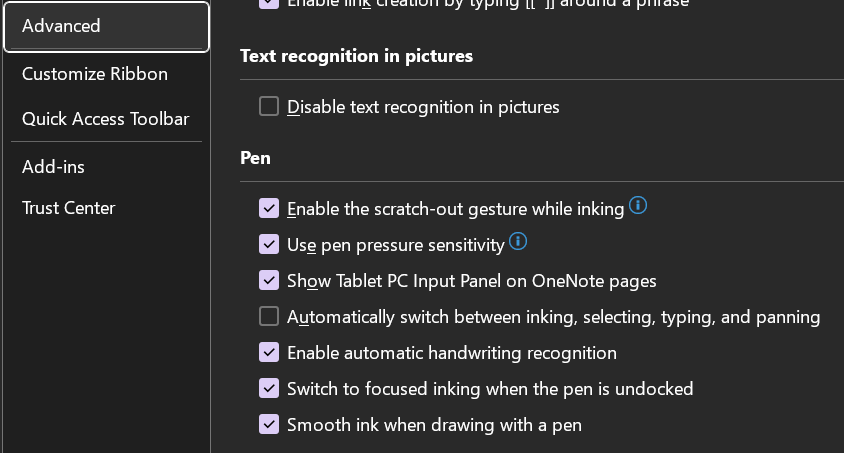
These features were game changers. They were the reason I switched from other note taking apps to permanently using OneNote. Eventually many OneNote users, me included, learned to disable automatic pen detection and to manually select Window’s text input panel to achieve real-time writing to text in their notes.
Disabling the advanced option to automatically switch the pen modes allows you manually select the Windows Input Panel and write in it. You will need to manually select draw mode to sketch in your notes.
Using the Window’s Ink Input Panel trick has been my go-to method of creating easily read and shared notes for the last several years. Documentation for my work projects usually consists of me copy-pasting the notes I took while working. Many of my coworkers and peers do the same. It’s a timesaver to be sure.
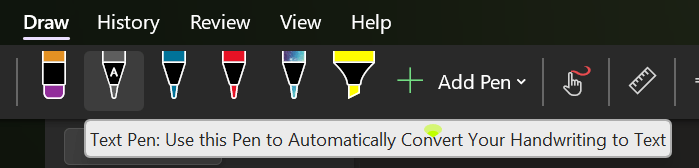
Today, I noticed there is another option for handwriting in OneNote available in the Draw tab. The icon is a white pen with the letter A on it. I first saw this icon in the iPad version of OneNote when they added it to induce Scribble (Apple’s Handwriting Recognition Tool). I am an Office Insider and am currently on Microsoft® OneNote® for Microsoft 365 MSO (Version 2308 Build 16.0.16731.20052) 64-bit. I am not sure if this is first version to include the new feature but suspect that it is. I have not been able to find any documentation on it as of yet.
Tap on the screen to place the cursor, then select the A pen from the draw tab and write on the page. Your writing will be translated into typed text in real-time. The tool is more efficient and easier to use than the manual select method I mentioned above. It also allows for easy editing, draw a line through text to select it and the editing menu will hover over it.
I’m enjoying the new feature, I’m sure the help and documentation for it will be updated as soon as it hits the mainstream version of the software. Happy note taking.
I write a lot of documents in Word. You can imagine my frustration this morning when confronted with an error while trying to change a simple option for pen usage. After fiddling about with it for several minutes, I determined that any change of options resulted in the frustrating error.
The error message appears both in a pop-up dialog box and in the Microsoft Office Alerts section of the event viewer. It reads ” The server drafts location you entered for offline editing is not valid or you do not have permission to access that location. Specify a location on your local computer.” What? This is my home computer. I’m not connected to a server.
My first thought was to specify a location and continue on my merry way, but no joy. You cannot edit the field in question because it also causes the error. My next action was to run a repair on Office by going to Settings -> Apps -> Selecting the Office app and then Modify. This didn’t work either.
I found a few other people suggesting various fixes on-line including adding a string value registry key named “Location” with a valid path for the value (example, C:\users\username\documents\) in HKEY_CURRENT_USER\Software\Microsoft\Office\Common\Offline\Options. This workaround did in fact allow the settings to change, but I was not satisfied with this solution. It seems unlikely that Microsoft intends for users to edit the registry on every computer with Word installed on it. Something else was causing this problem.
Eventually I traced the problem down to a OneDrive failure that had occurred on my system a while back. I had previously configured OneDrive to sync files to a D drive. That drive became problematic, so I unlinked my PC from OneDrive synching and removed the disk. Then I re-enabled OneDrive pointing it at the default location on C.
I had not noticed that the Documents library in Windows Explorer remained pointed at the previous location on the D drive, so was the Pictures library. This was the true cause of the error message. Microsoft 365 products save to OneDrive by default. I reset the libraries by right clicking on them, going to the location tab, and clicking the “Restore Default” button. This generates an error, just click ignore.
If you are experiencing this error and the traditional fixes haven’t worked. Try checking the location of your document libraries and ensure they are fully accessible.
Battlefield 2042 is a fantastic game if you enjoy first person shooters. The graphics are jaw dropping, especially if your system is strong enough to crank the settings past medium. The environments are very realistic looking and feature the franchise’s trademark destructive elements. Numerous game types with anywhere from twenty-four to one-hundred and twenty-eight players keeps the action fresh.
However, the more ambitious a game is, the more likely bugs are. That’s just the nature of computer software in general. More lines of code equals more chances for failure. Battlefield 2042 is no exception. It was ridiculed at launch for being too buggy to play at all for some people. Thankfully the vast majority of issues have been patched out at this point.
Unfortunately, one issue still frequently haunts all of the PCs my family and friends play the game on. That is the “Unable to Load Persistence” message with error codes that vary depending on where in the launch process the failure occurred. The message itself means your computer did not connect to the Battlefield servers correctly. The problem is more prevalent after updates in my experience.
There are lots of posts on Reddit and various blogs that suggest everything from closing overlays to re-installing the game, but they rarely work for me. WindowsCentral has a good example. I’ve discovered a simple process that works to fix the issue about ninety-five percent of the time.
Close the game.
Type “Services” in your Windows search bar and open the app it finds.
Sort the list of services by clicking the top of the name column.
Scroll through the list, right-click on the EABackgroundService and stop it. Continue if this service is not listed on your system.
Right-click on the EasyAntiCheat service and stop it too.
Open Windows Explorer and paste/type “%USERPROFILE%\Documents\Battlefield 2042\Cache” in the address bar or browse to that location.
Select all the files by pressing CTRL+A then hold down Shift and press the Delete key (Shift + Del) to permanently delete all of the files. Click yes if prompted.
Close the Windows you have open and start the game again.
I hope this fix works as well for you as it usually does for me. Feel free to post your results in the comments or let us know if you have something that works better for you.
What’s not to love about wireless network printers? The flexibility to place them where they are needed, rather than where there’s a network jack nearby, is great. Plop them on a desk or table, plug them in, join the Wi-Fi network and you’re in business.
The majority of wireless network printers on the market today run a type of Wi-Fi known as 802.11n aka Wi-Fi 4. By now, many people and businesses have replaced their gen 4 Wi-Fi router combo or access points with the much faster Wi-Fi 5, or current Wi-Fi 6 gear. Many of us have also upgraded our phones, tablets, televisions, laptops, and consoles to models that run the newer standards.
Wireless Generation
Standard
Speed
Wi-Fi 4
802.11n
Up to 600 Mbps
Wi-Fi 5
802.11ac
Up to 1300 Mbps
Wi-Fi 6
802.11ax
Up to 7600 Mbps
Each successive generation of wireless technology is more than twice as fast as its predecessor.
It is tempting to dismiss a printer’s network speed as irrelevant. “Who cares if my printer is slow? It’s not like I’m streaming Netflix to it.” If we only needed to consider was how fast your print job or scan finished, this sentiment would be spot on. Here’s the thing, wireless networks have a couple of limitations that many people are unaware of.
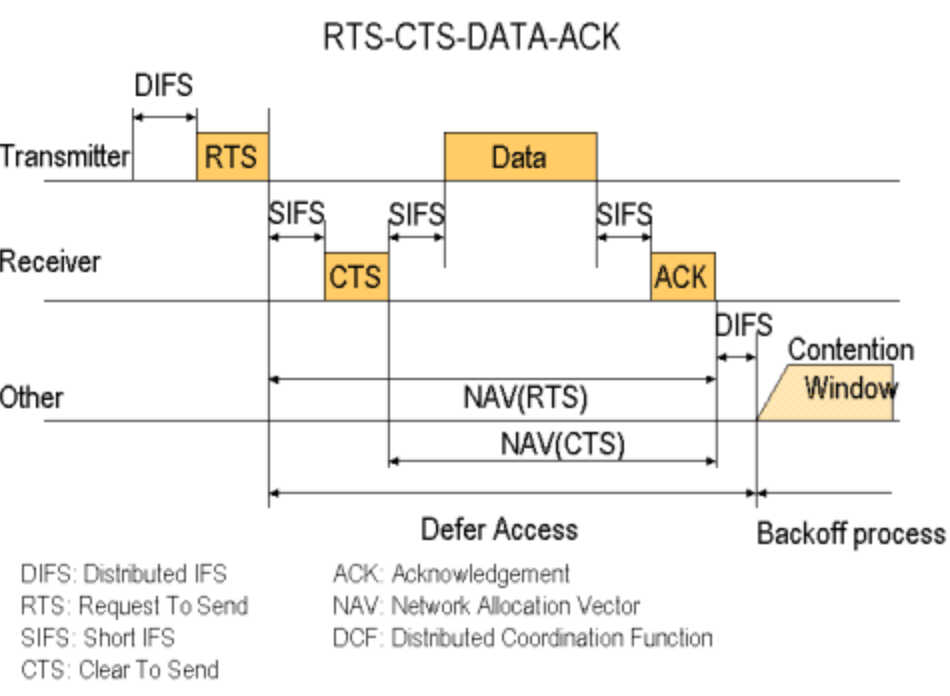
One of the lesser known shortcomings is that wireless networks are half-duplex. The devices connected to them can only transmit or receive data. They can’t do both at the same time like most wired network gear can. The speed data is able to move about on a wireless connection is effectively cut in half right off the bat.
To understand these limitations research 802.11 RTS/CTS. Visualization provided by Stanford University.
The other little known issue with wireless networking is that a radio generally performs at the speed of its slowest connected device. In our case, the printer. This is true even when the Wi-Fi 4 device is idle (not printing). In other words, if your new Macbook and your printer are connected to the same access point your M2 is stuck in slow lane behind ole’ inky.
There are a few possibilities for workarounds. The first is the easiest. Do you really need a printer anymore? Unplug it and see how life goes. Seriously, not printing is better for your bank account, the planet, and your blood pressure.
If going paperless isn’t an option, ask yourself a simple question, “Does the printer really need to be wireless?” Can you switch to using the printer via USB or a network cable? When considering this question, keep in mind how often you use the printer. Plugging in a USB cable once a month isn’t that inconvenient, but doing it several times a day sure would be.
Assuming you need to print wirelessly, there are still a few more options. The least technical of which is to purchase a printer that supports Wi-Fi 5. They can be very difficult to find, but Canon and HP currently offer models that feature 802.11ac. Others are likely to come to market. Check out the Canon Pixma G4270, or the HP Deskjet 2755e.
The only printers that support the 802.11ac standard that I have found so far are linked above. Check the spec sheet for any that you may be considering.
If your current printer does not see or will not connect to your Wi-Fi, the older 802.11 b/g/n is probably disabled. You can enable Wi-Fi 4 on wireless networks because backwards compatibility is a requirement of each new version of the 802.11 standard (to date). Typically turning it on is done by logging on to your Wi-Fi controller/router and accessing the wireless configuration menu. Doing so will introduce the slow down.
The final option requires network engineering skills. Isolate the printer(s) and other 802.11b/g/n devices to a single radio, access point, or access point group that is configured to run the older standard. Creating an SSID on the same radio you run 802.11ac on is not sufficient, the access point(s) will still run at 802.11n speeds on both SSIDs. VLANs have the same problem unless your AP has multiple radios that you can pin the Wi-Fi 4 network to.
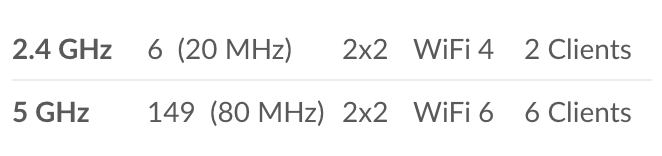
Pinning the older standard to a separate radio is a good strategy. Here’s I’ve forced the Wi-Fi 4 devices onto the 2.4 GHz radio and restricted them from the 5 GHz side of my AP.
Best of luck on your journey to wireless printing happiness.