The Meta Quest 3 headset has been limited to a ninety-hertz refresh rate while connected to a gaming PC via link cable. The previous generation Quest 2 had started that way but was eventually upgraded to one hundred and twenty hertz. That left many of us early adopters wondering if, or when the Quest 3 might enjoy the same upgrade.
That day has come. Upgrade your Meta Quest 3 and the Oculus apps on your gaming PC to the latest version. Then connect your headset with a supported USB 3 Gen1 Type 2 cable and you can select 120Hz as an option in the Oculus device settings. Project Cars 2 in VR has never felt so smooth.
I booted up my ASUS ROG Ally to play some Doom Eternal last night and was confronted with an error message. The message said that the Vulkan initialization had failed. I rebooted and tried again but no dice.
Vulkan is a 3D graphics API similar to Microsoft’s Direct3D and Apple’s Metal APIs. It forms the bridge between the game or app you are using and the GPU in your system. Several mainstream games have adapted it due to lower licensing costs and improved scalability over the older OpenGL.
All of the games installed on my Ally that didn’t use Vulkan worked fine. Those that did, crashed with various errors. My assumption was that some type of software issue was the culprit. I opened up Settings -> Apps -> Installed Apps and sorted by date installed. Sure enough, there was a new piece of software that had installed just a few days ago with Vulkan in the title.
I uninstalled the OpenCL, OpenGL, and Vulkan Compatibility Pack and all my Vulkan games started working normally. I can only guess that something in Microsoft’s Compatibility Pack is not compatible with the Ally’s GPU drivers. I have several gaming systems, but the others have NVidia GPUs. None of them had this particular piece of software installed.
Many motherboard manufacturers are including RGB controllers on their wares now. MSI’s version is called Mystic Light, the control software runs as an add-on to the Motherboard’s MSI Center console. There are numerous PC hardware manufacturers. Custom PC builders frequently use components from each. For example, my motherboard is from MSI, but my power supply is made by Corsair.
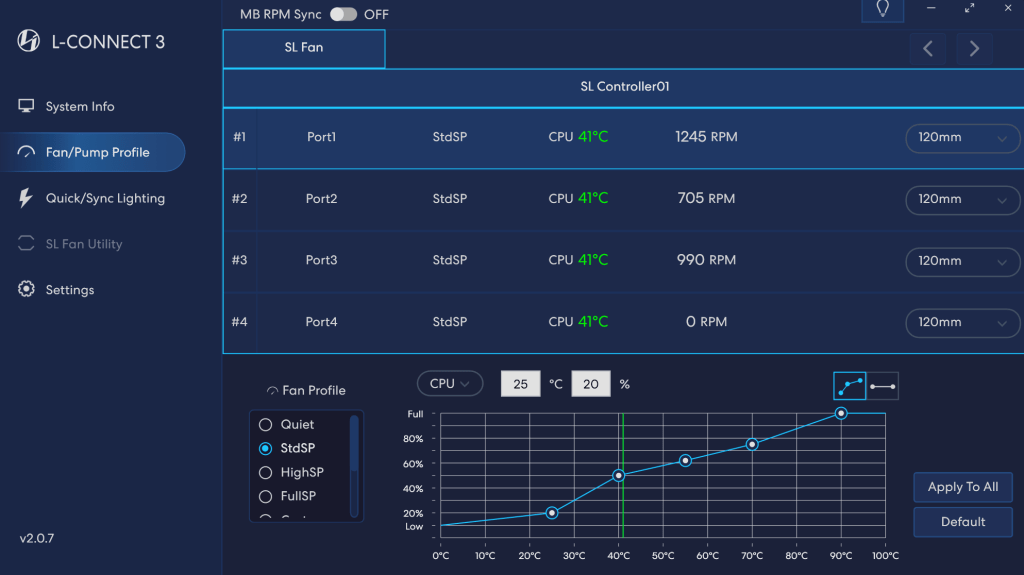
The market situation and custom build scenes have led to a series of API’s being included in the various manufacturer’s software so that control bridges could be established. On my system, this allows MSI Center and it’s Mystic Light add-on to control the lighting connected directly to the motherboard along with my Lian-Li Galahad 360, and SL fans which are connected to a Lian-Li control box.
In my setup, I use Mystic Light to control all the RGB, but control the fans via L-Connect. The Lian Li software’s cooling options and programable curves are much more precise than those offered by MSI Center.
In a recent Windows update, Microsoft has also added its own take on a universal light controller protocol and software package they’re calling Dynamic Lighting. The option can be found under Settings and then under Personalization. Microsoft’s entry into the space seems to have spurred manufactures to update their software and firmware to either gain or block compatibility depending on their particular market strategy.
These are the default Microsoft Dynamic Lighting settings on my systems. In this configuration, MSI Center and L-Connect remain in control.
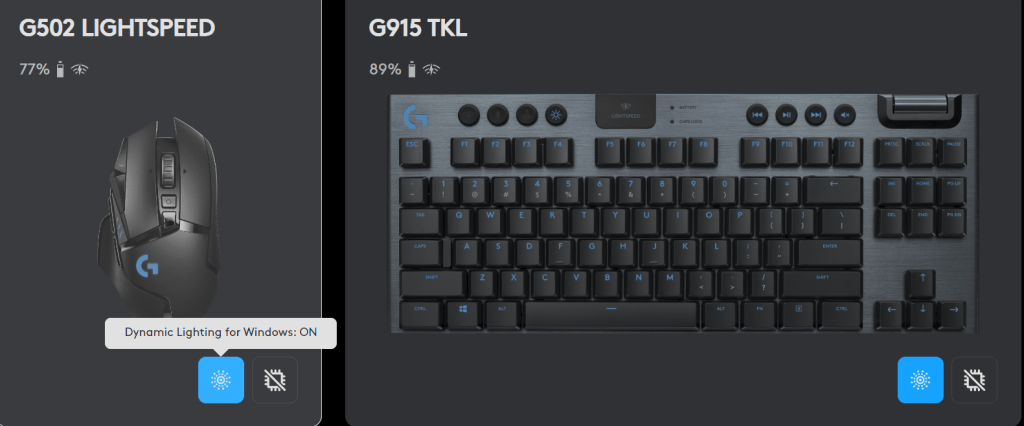
I use Logitech accessories. Their controller software, G-Hub, updated and added Dynamic Lighting compatibility. MSI Center’s Mystic Light add-on updated but does not seem to have gained any options in the Dynamic Lighting control screen. One of the three updates broke the Lian Li L-Connect software on my system. I am unable to tell which one for sure because they all applied around the same time. Read on to see how I found and fixed the issue.
You can turn Windows Dynamic Lighting on/off for individual G-Hub devices.
Remote Desktop Servers have a way of multiplying themselves like some kind of organic creature. Most administrators know how to deploy RDS and it is a good to solution for a variety of issues. The simple script below scans domain servers for the installed features.
The ice maker in our old fridge died again a few weeks ago. I’ve already replaced the unit two times along with all the water lines and filters. I’ve had a professional plumbing outfit look at everything, but they couldn’t seem to find the cause of the ice-maker failures. Filling ice trays from the kitchen faucet works, but it gets old in a hurry. It was time to bite the bullet and get a new fridge.
With that thought in mind, my wife and I visited the local Best-Buy, Lowe’s, and Home-Depot stores to compare prices, features, looks, and useability. We also checked on-line via Amazon, Walmart, and Nebraska Furniture Mart and a few others. It didn’t take long for us to narrow down our preferences given our budget.
Side by side models are still popular. –
Side-by-side setups didn’t seem as user friendly as having the freezer on the bottom in a pull-out drawer did to us. We also wanted glass shelving instead of wire. We didn’t care for those with built-in displays. We already have enough screens in our kitchen.
We reasoned that the smart displays would become outdated before the analog components of the refrigerator do. The manufacturer will almost certainly stop supporting the Android OS version that runs the smart screens at some point, they all eventually do. If you leave the device connected to your internet access after OS upgrade and patching period(s), it will likely become a network security risk.
Some models we looked at had quick access doors embedded in the main door that seemed likely to cut down on power use if you kept frequently used items there. We also liked those that had water pitchers that automatically refilled in addition to a traditional water tap. Gourmet ice of various types seemed to be a common premium function, we preferred those with two separate ice makers that each made a different style and/or size.
The pitcher refills when you put it back in place. The water is filtered and refrigerated. There’s an included attachment for cold-brewing tea in it. It’s a huge hit and used all the time in our house.
Several manufacturers include a small multi-function drawer between the refrigerator and the and freezer. On LG and Samsung units with the extra drawer, you can choose to have it function as freezer or, a refrigerator. They were the perfect size to store drinks, quick foods, and stuff for events. After getting ours home we found that the drawer also makes a great place for staging the ingredients for your next meal in.
Our preferences for the refrigerator on-top, freezer on bottom, multi-function drawer, separate ice makers, and water pitcher features narrowed our choice to just two models. In the end we went with the Samsung because its extra drawer was deeper than an LG model with very similar features at a very similar price.
The Samsung drawer would be able to hold US soda-pop and beer cans upright. The LG didn’t look quite deep enough for that. I never confirmed that the LG couldn’t, I just eyeballed it at the store. If you have the LG with a drawer and know it holds upright cans, please feel free to say so in the comments. We also appreciated that the Samsung model we decided on had user replaceable panels that completely change the appliance’s look.
The model we ended up bringing home is a named the Samsung Bespoke 29cu. ft. 4-Door French Door Smart Refrigerator (model#: RF29BB8600QLAA). It has upper French doors that open into the fridge, a hidden pass-through door, an automatic filtered water pitcher, a filtered water tap, a freezer/fridge drawer, two icemakers, user changeable front panels, and it connects to wi-fi.
It’s this last feature, connecting to wi-fi, that I thought was going to be a useless gimmick. It turns out that I was wrong. My living-room TV is made by Samsung. Both it and the fridge are on the same network, and both are connected to the SmartThings app on my phone. This lets the fridge pop up a message on the television and my phone if someone leaves a door or the drawer open. It has already saved my bacon, literally.
We’ve had the new appliance for several months now and I still firmly believe we made the right choice for our home and lifestyle. With no handles on the front, the fridge looks modern, sleek, and clean. It is super easy to wipe down with a rag anytime it gets smudged.
It has numerous modern features that are all upgrades from the previous ten-year-old unit. The upper fridge space is much easier to keep organized and clean than our side-by-side was. Loading groceries is easier on my back now that the coke goes in a waist height drawer.
The stainless-steel panels we opted for are a little more fragile than I would like. They seem to dent and scratch very easily. Nothing too major has happened to ours yet, but we’re considering ordering the glass replacements at some point down the road.
The ice is fantastic. Each maker is mounted under the drawer, but above the freezer. There’s a catch bin that is divided in two with one side below each maker when the drawer is shut. The entire ice bin is covered by a sliding plastic lid. There is no built-in ice crusher. It does come with an ice scoop that fits in a slot on the lid.
The left ice maker produces regular size “traditional” ice cubes, similar to those from most plastic ice trays and older built-in freezer units. The right maker produces smaller ice nuggets. They are not as small as Sonic, or McDonald’s ice, about half the of the left’s size. Using my area’s local water (known to be hard) passing through the fridge’s double filtration system, the ice is pretty clear and super hard. The production rate of both sides easily keeps up with the four of us even in a mid-western summer heat wave.
It turns out that scooping ice out of a drawer is quite a bit quicker and much quieter than filling a vessel from an auger mechanism in the front door was. The tradeoff is that having ice in the drawer is more physically demanding than pushing your glass against a lever and waiting. The process of bending, opening the drawer, sliding open the ice bin’s lid, scooping, closing the ice bin’s lid, putting the scoop back, and closing the freezer-drawer has not been a problem for those in my household.
In my opinion, when viewed in terms of quality-of-life upgrades that you can afford to splurge on, the drawer is worth the three-hundred-dollars extra that units with the feature cost. It isn’t completely necessary for a refrigerator to do its job, but we sure use ours a lot.
The Flex Drawer is a great option if you can afford a unit that has the three-hundred-dollar feature.
We set ours to “fridge-mode” and load it with pop-cans, lunch meats, stuff we’re preparing to grill, cheeses, and other frequently used items like lettuce and sliced vegetables or fruits. It slides open and closed quickly, quietly, and easily. The pull grasp is at “waist-height” for average standing adults. We’ve never flipped it to the colder “freezer” temperatures, other than to test it once, but we like having the flexibility to do so if needed.
The pass-through door and the small shelves behind it are great to store things like ketchup, mustard, mayo, sauces, etc., but they are too small for larger items like milk containers. All three of the doors are opened by pulling on hand-sized recesses which are located in the top and bottom edges. The two drawers have recesses in their top edges to pull open from as well.
One shelf on the right-hand side of the main refrigerator collapses. This makes it perfect for taller items like two-liter bottles and one-gallon jugs to sit on the bottom shelf. This low profile makes it much easier to find what you’re looking for when you open either one, or both of the main doors. We’ve never extended ours other than to test it once, but we like having the flexibility to do so if needed.
We ended up purchasing ours at the local Best Buy store because it was the best price for the model we wanted at the time. At the time of this writing, they still have the best price I could find for model number RF29BB8600QLAA at this link. The new design and technology upgrades are great. The price is high, considering that my old one cost less than $1000.00.
Cyberpunk 2077’s Night City seems like it would be a perfect location to hang out in using virtual reality. In-fact, the whole game looks like it would be fantastic in 3D at a realistic scale. I bet the futuristic theme would also lend itself well to the immersive nature of VR.
Luckily, there are few ways to get the PC version of the game to play using main-stream virtual reality headsets. Luke Ross’s REAL VR mod is one popular method. I’ve decided to experiment with the free option from the people that make VORP X.
VORP X is a well-known piece of software that enables many PC games to be played in VR even if they don’t natively support it. If you don’t already know about them, check out their site @:https://www.vorpx.com/. The team at VORP X has made a standalone mod for Cyberpunk 2077 and that is what I’ll be working with throughout this article.
According to everything that I’ve read on the subject, you’ll need a very powerful gaming PC to have a satisfactory play experience using this method. I’m running a 4090, Intel 12700K, 980 Pros, and 32GB of DDR4. The headset I’m using is a Meta Quest 3.
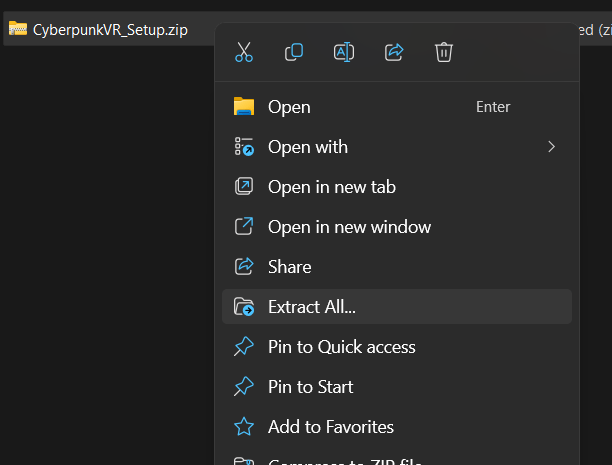
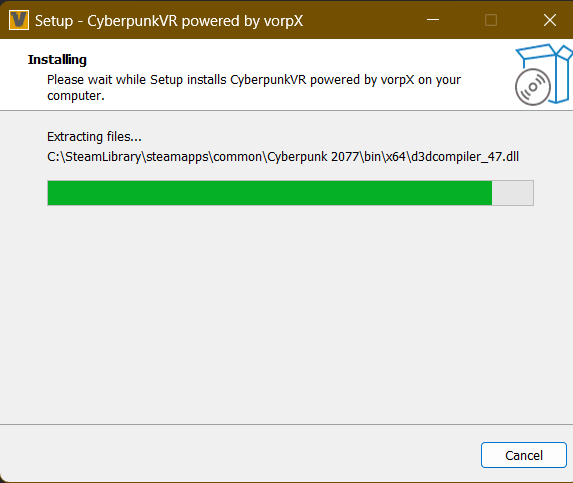
To install the VR mod, download it from the VORP X download page. Then right click on the downloaded file and choose the option to Extract All. Double click on the extracted CyberpunkVR_Setup.exe to start the installation.
You may be prompted that an unknown application is requesting to make changes to your system. This prompt is generated because the alpha code we are downloading from VORP X is not properly signed by a publicly certified certificate.
Proceed at your own risk. If you want to use the VR mod. the only choice is to click yes and/or allow. There can be more than one prompt depending on the security configuration of your gaming PC and network.
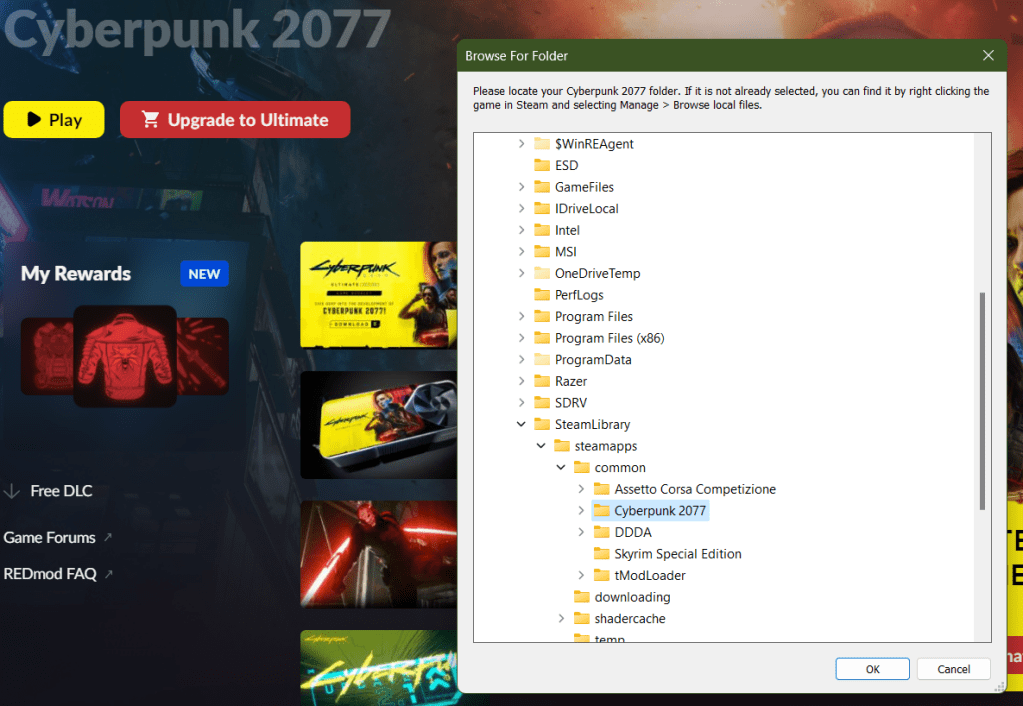
After the prompt, you will need to locate the installation files for Cyberpunk 2077. The installer attempts to find them for you and was successful in my case. If it doesn’t locate yours use the “manage files” function of the launcher to see the path.
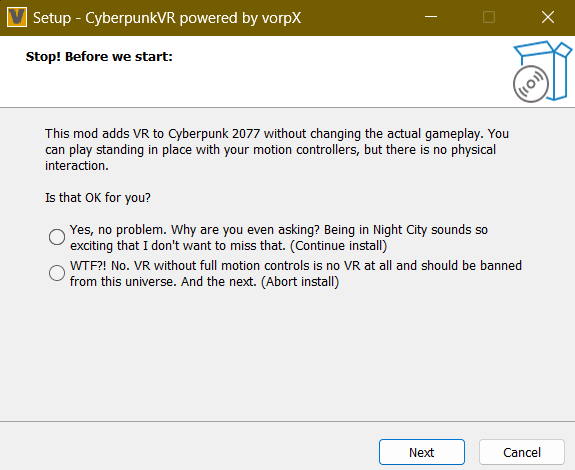
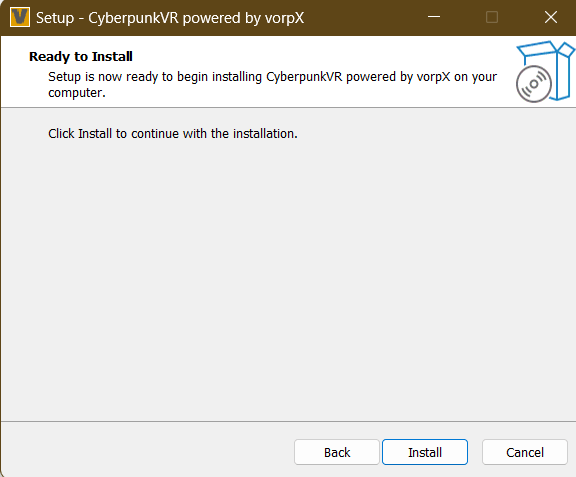
When you locate the install folder and click ok, there will be a message to tell you that the mod does not support motion controls (it does some now). Select yes, then click the next button. Accept the license agreement and then click Next. Finally click Install.
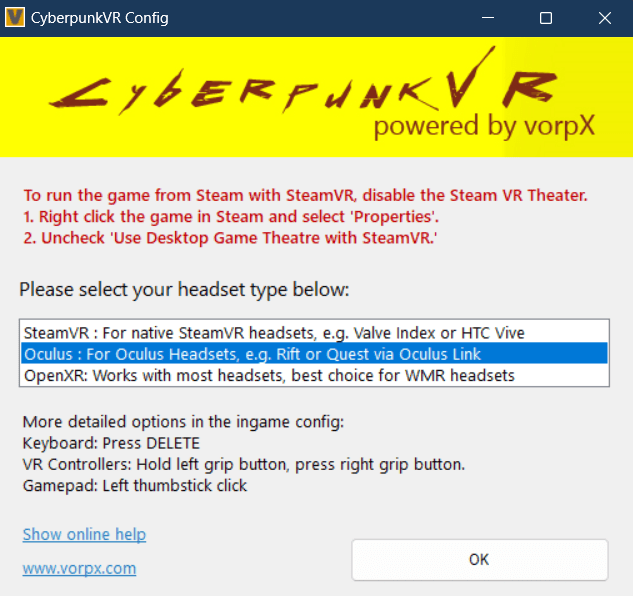
To play Cyberpunk in VR, put on your headset and enable Oculus Link (Air and Cable link both work). Once you are in the Oculus Desktop environment, show the game library (click the library button on the tool bar) and you should see Cyberpunk 2077 as an available title. Point at it and press A to start the game.
You can use the Quest controllers along with some basic gestures for aiming down site and using your sword, among others, but there really aren’t enough buttons to get the job done. I preferred using my Xbox controller paired to my PC to play. A tutorial explaining the controls is displayed every time you start the game. Press the A button on your controller to skip it.
The world is presented in 3D VR but appears almost like it is on a giant wall-sized curved monitor that you are standing really close to. If you turn your head to quickly, the tracking fails to keep up and you see the edges of the display. Don’t get me wrong the effect is functional and the game plays fine this way, it just isn’t a typical VR AAA experience. What do you expect for free?
I was able to achieve a stable frame rate with good looking graphics running on high with ray tracing disabled. I was averaging right at seventy frames per second with this config, but I expect anyone playing on a system with a less powerful GPU will need to turn down graphics options in the game’s settings menu, first thing. Or risk being made nauseous.
Overall, it was fun to see Night City at scale and in 3D. The people watching in down-town alone is worth the thirty minutes of effort and zero dollars it took to make this work. I don’t think VR will be anyone’s primary play mode just yet, but you can tell the Devs are serious about getting there.
Running the script below requires the RSAT (Remote Server Administration Tools) be installed on the system you are running it from. The account used must have enough permissions to read from Active Directory and the selected server’s registries.
The script will read the machine accounts of AD joined servers looking for those with the word “server” in the operating system attribute. It will prompt the user to select any of those servers to scan. It will also prompt the user for a DNS name to search the certificates for.
The script will attempt to test connectivity to RPC (TCP 135) for each of the selected servers. It will then open the registry and search the computer account’s personal certificate store for the entered domain name. A report will be generated that shows pertinent details for each certificate that is found.
$Servers = Get-ADComputer -Filter 'Operatingsystem -Like "*server*"' -Properties dnshostname|

    Select-Object dnshostname -ExpandProperty dnshostname|

    Out-GridView -Title "Select Servers To Scan for Certificates. CTRL+A to Select All" -PassThru

$CertificateDomain = Read-Host "Enter public DNS host name of certificate to check; example: mydoamin.com"


$ServersOnline = @()


Foreach ($Server in $Servers) {

    If ((Test-NetConnection -WarningAction SilentlyContinue -ComputerName $Server -Port 135).tcptestsucceeded){$Serversonline += $Server}

}


ForEach ($System in $ServersOnline){

    Try {

        Invoke-Command -ComputerName $System -ErrorAction Stop {

        Get-ChildItem Cert:\LocalMachine\My|Select-Object DnsNameList, Subject, Issuer, NotAfter|Where-Object {$_.DnsNameList -like "*$CertificateDomain*"}}|

        Format-List PSComputerName, DnsNameList, Subject, Issuer, @{N="Expires"; E={$_.NotAfter}}

        }

    Catch {Write-Host "No Public CA issued certificate for $CertificateDomain detected on $System"}

}
It took me around one hundred and fifteen hours to finish the game. When I considered myself done, I had technically completed just over 90% of the challenges. My rank was 37. I had finished all the main and side quests. My clothing was comprised of legendary and fully upgraded items. My broom was fully upgraded, and my room of requirement was fully populated with every type of plant, potion, station, and animal.
At my character’s level 37, I could two-shot most Trolls if the first hit was Petrificus Totalus. I fully upgraded the binding spell along with the stealth Disillusionment charm as fast as the game would allow. The sneak attack that is possible when the two spells are used in conjunction was invaluable throughout the entire game. I used the combo for clearing bandit camps, spider’s nests, and troll lairs galore. The strategy works best once you are able to run while under Disillusionment.
Overall Hogwarts Legacy was a fantastic adventure game. If you are a Harry Potter fan in general, then roaming the castle in all its 4K glory on a high-end PC or console is an epic experience all on its own. Even if you don’t play the rest of the game, it is worth the cost to be able to dig into every nook and cranny of the famous castle and its grounds.
Taken as a whole, the game’s main story was interesting and easy to follow. The plot twists weren’t unexpected, but at least they made sense in the story’s context. The characters were fairly well developed. There were lots of enemy form factors to master, each with their own strengths and weaknesses.
I was surprised by the number of mini games like broom racing, bowling with a magical twist, puzzles (Merlin Trials), shape matching, some simple math problems. The list goes on and on. The game is also a collector’s paradise, clothing, wands, brooms, animals and plants, potions, money, upgrades, and more are found all over the place.
The story lines in most of the side-quests aligned with the main branch in the end. There weren’t any major plot holes or open-ended story lines left dangling once I’d finished all the quests. If you are considering playing the game all the way though, you should be aware that the difficulty increases significantly once you travel to the southern portion of the map.
The scenery was beautiful. The mountains, streams, towns, buildings and various environments were all well-crafted, kept in decent scale to each other, and the color palette was realistic. The NPCs had varying snippets and there were enough of them to make the world feel populated.
The shops and shopkeepers were interesting. The currency system was easy to understand, and it didn’t take much effort to earn enough to be successful. A tip for those just getting started, capturing and selling animals to Brood and Peck in Hogsmeade is one of the fastest ways I found to amass a fortune.
The broom racing was fun, easy to do as a form of transportation, but difficult to master for racing. The combat was well designed. It offered a lot of strategic options once I got used to the complicated control scheme. There are some great power moves that feel exhilarating to pull off in a fight. The difficulty settings can be changed on the fly and affect more than just the number of enemies.
Anytime you spend more than a hundred hours with a game there are bound to be some gripes. Hogwarts Legacy had relatively few from my point of view. Most of them were minor things like quest glitches that eventually got fixed. There are a few quality-of-life issues. My biggest complaints are against the lock picking and load-out controls. Neither was a big enough problem to “break” the game.
Opening locked rooms and chests was boring, I tried not to sigh every time I had to do it. The process seemed like something that got added during a committee meeting rather than being carefully planned. More of a “RPGs always have lock picking.” rather than, “How do locks work in the magic world we are making?” situation. I cast a spell to open the lock. Then I have to manually open it? If I have to align the lock’s mechanisms, then what did the spell do? I think they should have added a skill tree item to allow skipping the mini game.
The load-out management for controlling which spells are equipped can be irritating. There aren’t enough slots to create a build for each type of mission you encounter. This means that you are stuck constantly breaking immersion to enter the menu system and change out the spells for a given task. If they would have added a shift button to the system and given you four more groups for spells, it would have been almost perfect in my opinion.
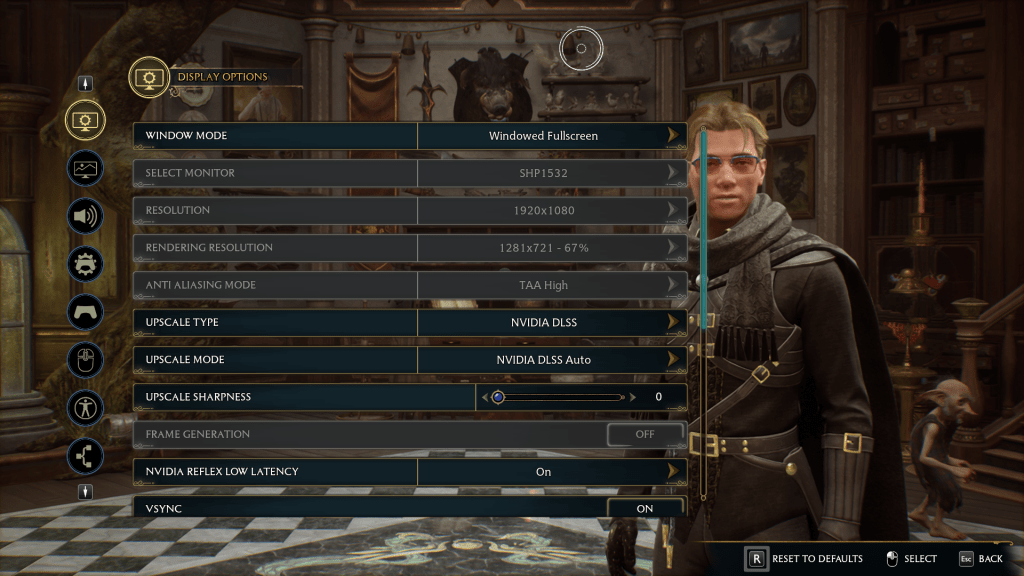
In the early days, the game was a mess as far as performance was concerned. I was experiencing tearing, dropped frames, and general poor performance trying to run 1080P/120/High on a 3080Ti and Ryzen 7. Patches to video drivers, the game itself, and Windows 11 eventually got everything running reliably and smooth with top notch visuals.
I used NVIDIA’s hardware scaling to get the best balance between FPS and appearance on the desktop and laptop gaming systems. On the Steam Deck and Ally, i let the respective devices configure themselves except for mapping a few buttons. Speaking of mapping, putting Revelio and dodging on the back paddles saved my hands from a lot of wear and tear.
I played most of the game on that PC with a 3080 Ti, 32 GB RAM, and a liquid cooled AMD Ryzen 7 5800X. I have also played the game on a higher-end PC with a 4090 and Intel i-7 12700k, an i-7 3070 laptop, as well as, on a Steam Deck, and ASUS ROG Ally Z1 Extreme. No matter the hardware, I was able to tune the game to look and play fantastically after the first round of patches had dropped.
As for control options I tried a keyboard and mouse, the Steam Deck and Ally’s built-in controllers, and a Gen 2 Xbox Elite controller. I preferred controllers to the keyboard and mouse for this title. The combat’s lock-on targeting, and the flight controls felt better on the sticks than they did on the WASD keys.
I had a good time playing the game and stuck with it all the way to the end. You don’t have to be a Harry Potter fan to enjoy Hogwarts Legacy, but it probably helps if you are. You don’t have to be an accomplished RPG gamer to play either, but it probably helps if you are. I’ve recommended it to friends and family and the feedback from those that have played has been positive for the most part. I think Portkey Games deserves the accolades and awards it has received from the industry for this title.
I picked up my Surface Go and opened WordPress while I thought about what to work on next. I flipped through the app’s menu options until I landed on statistics. That is when I noticed the total number of posts on Techbloggingfool was sitting at 299. Wow, had I really written that much?
I started this blog out of curiosity more than anything else. I remember wanting to learn more about how public websites worked. I thought about how much I have learned from other people’s technical writings. I wanted to continue the tradition and add what I have learned to the mix. Thus, Techbloggingfool.com was born.
I had expected to write a handful of posts and to spend enough time with WordPress to figure it out. I thought if I made it a year, I would be doing pretty well. I figured if a hundred people visited, it would be enough to claim success. That would be enough to learn how web analytics worked.
Six years later, I’ve got more than 350,000 views from a quarter of a million people. According to IP GEO location, someone from every country on Earth has visited the site. While those stats aren’t even a tiny blip compared to most tech blogs, it is far more attention than I had ever intended to attract.
Now that I find myself writing the ubiquitous “How I got this far” post. it’s surprisingly difficult to define why I keep writing well after my original goals were accomplished. I occasionally refer to some of my own articles from time to time, almost like a notebook of sorts. I also point at the blog during job interviews as proof that I can deliver on the promise of “good documentation.” I don’t think either of those are the real motivation though.
I have to say that my favorite effect from writing the blog happens when I find out that I helped someone. Getting feedback that my instructions or the way I set something up helped a reader accomplish their goals is just one of the best feelings.
All tech is a complicated web of simple ideas layered on and linked to each other. Figuring out how the stack works can be difficult for all of us sometimes. I know how relieved I feel when I find the post or video that helps me move forward. It is fantastic to know I have helped others get that relief, too.
If you are considering starting your own blog, the best advice I can give is to stop thinking and start writing. Using a host like WordPress, Square Space, or GoDaddy is a real labor-saver. They take care of the servers, software, IP and DNS info, certificates, patching, backups, and everything else that goes into hosting public websites. They also give you the framework and tools that make creating your blog as easy as writing a Word document.
There are lots of resources for aspiring bloggers online. The KnowledgeBase section of your hosting provider’s site is a good place to start. I know that WordPress runs a blog about blogging, check it out https://wordpress.com/create-blog/. For the most part, though, I winged it. It shows, especially in my early posts.
I have always tried to post a minimum of one article per week. I don’t worry about original topics like some pros advise. You can find dozens of articles that explain almost any technical subject. The originality in my writings comes from my experiences, personality, prose, and my take on the subject at hand. Often, I write about solutions that I came up with when searching the Internet didn’t provide a satisfactory answer.
The most difficult part of blogging for me is the media creation. Text only blogs do exist, but they aren’t very engaging in my opinion. Making pictures and videos to help visualize complicated instructions is time consuming no matter what software you use. I enjoy flexing my creative muscle but there are six posts in my queue behind this one that are finished except for the visuals.
As I sit here and finish the three hundredth post, I’ve thought of an idea of what to write about next. Who knows how long I’ll keep it going for? Thanks for reading. Subscribe in the WordPress App to get notified about new articles. Leave a comment or a like if something I wrote helped you out.
Microsoft’s 365 has a ton of built-in reports for almost every metric you can think of. I recently needed to show Exchange Online and OneDrive consumption in the same report for a migration project. I was surprised to find the data I needed was available in separate reporting functions, but not together.
I have written several articles about the ROG Ally and its abilities. The Nintendo Switch sized gaming PC makes playing on the couch, in bed, or on the go a comfortable and fun experience. It is the device I play on most because of its combination of portability and performance.
I recently upgraded my earbuds to the new Bose Quiet Comfort Ultras. ANC earbuds make it easy to escape the noises of the world when you want to. As one might expect, the Bose active nose canceling feature of their flagship earbuds is exceptional. While they cannot achieve total silence in loud environments, they certainly make almost any noise tolerable.
The new QC Ultras are smaller and lighter than previous Quiet Comfort earbuds. They also feature a a new method to achieve a secure comfortable fit. I find the new tips and fins to be a welcome upgrade over my original QC earbuds. The Ultras stay in my ears while walking, running, and while I’m chewing, or talking. So far, they don’t seem to leave sore spots where they make contact.
The pointed fin tips on the old style frequently made my ears sore where they touched.
The original QC earbuds are the black ones.
My favorite feature is the immersive audio. The QC Ultras use Bose magic to make any type of audio source sound like you are listening to it on a hi-fi stereo speaker setup and sitting right in the sweet spot. When I first read about the function, I was skeptical. Now that I’ve experienced it for myself, I am impressed. The wide sound stage and auto ANC combine to great effect.
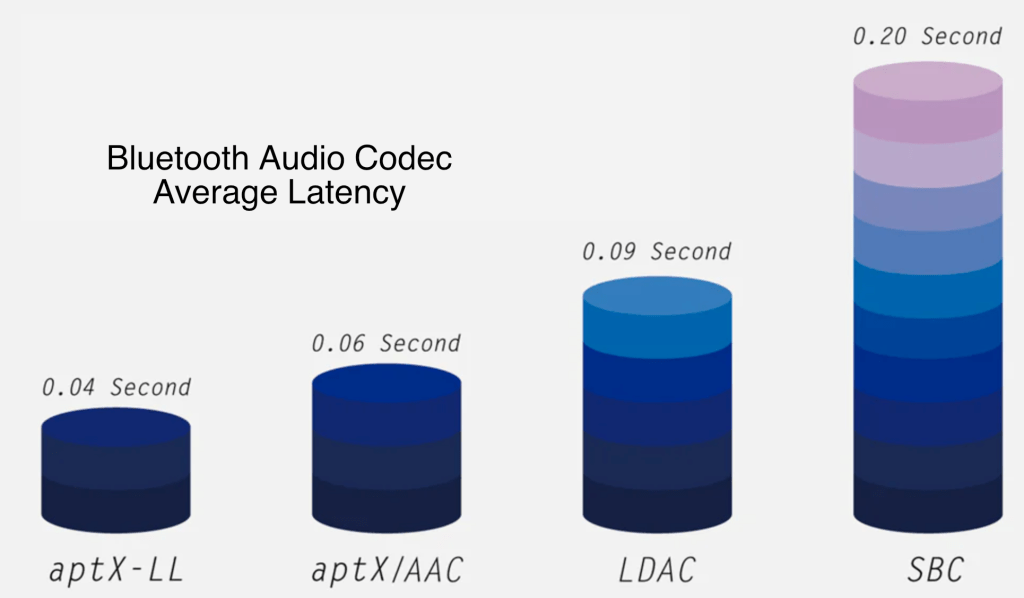
The most important reason for me upgrading to the new earbuds was their low latency support. I have struggled to play games with BT headphones and earbuds since the beginning. I just can’t get over the audio lag that almost all of them suffer from.
Pulling the trigger to take a shot and not hearing the sound until after the next round is chambered, is distracting. Hearing footsteps coming up behind you, knowing it is too late to do anything about them is frustrating. Watching cutscenes that play like old voiced-over karate films is annoying.
The QC Ultra earbuds completely solve these issues. When paired with my phone there is no detectable lag in any of the games I have tested so far. There’s also no lag in video streams or video calls, people’s lip movements and sounds stay in sync on both.
This lack of lag on my phone got me wondering what the performance would be like if I paired the earbuds with my Ally. It has literally been years since I’ve bothered using Bluetooth audio with a PC for anything but Teams and Zoom. The lag was just insufferable.
I was pleased to discover that I could not detect any lag while playing PC games with the Ultra earbuds. I tried several modern and older games along with a couple of emulators, and they all worked perfectly. The earbud’s mics were great for game chat, too.
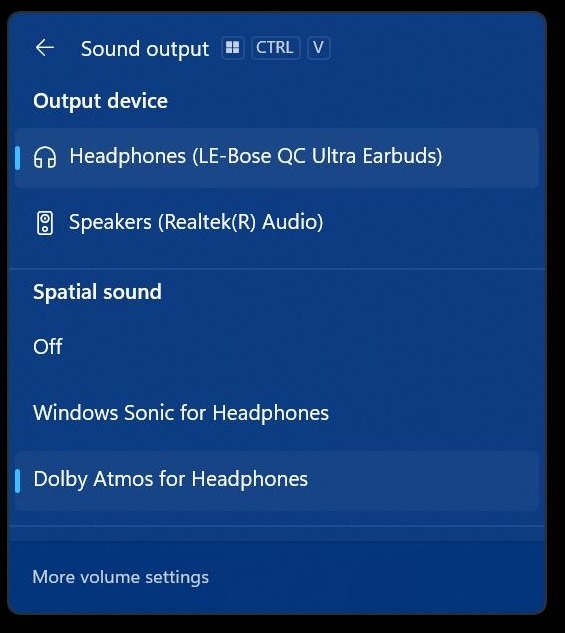
I have the Dolby Atmos for Headphones, DTS for Headphones, and Windows Sonic for headphones, audio apps for Windows. All of the virtual surround sound drivers worked with the QC Ultras and did not introduce any detectable lag.
Dolby Atoms is a licensed app you can purchase from the Microsoft Store. It is not included with the earbuds.
I’ve paired the QC Ultra Earbuds with my wife’s Steam Deck and I’ve also paired them with my Meta Quest 3. I got fantastic results with both. The Bose Music app for your phone lets you add multiple devices and switch between them, but they only connect to one thing at a time.
I upgraded to get a better experience from the advertised low latency. Bose delivered on that promise. Audio sites are giving the new earbuds high marks overall, subtracting a few points due to the lack of multi-point and wireless charging. If you’ve been looking for BT earbuds specifically for gaming, I’m not sure you can do better right now.
A VPN or virtual private network is a tunneled session established between your computer (or local network) and a remote server, or entire remote network. The tunnel travels through the inter-connected web of networks we call the Internet. A VPN tunnel on-line is to the Internet as a physical tunnel blasted through rock is to a mountain highway. They both provide secure transportation to the other side.
When your car passes into and through the mountain highway tunnel, it becomes hidden from any observer that is not in the tunnel with you. The same goes for the information exchanged between your computer and the remote systems it communicates with over a VPN. Data in the tunnel is hidden from other nodes on the Internet by the encryption algorithm (math scramble) that established it.
Microsoft offers a free VPN connection to their platform from their Edge web browser. This essentially means that only you, Microsoft, and the web farm you are using will be able to see what you are doing. The catch is that the system is only free for 5 GB of information per month.
To be limited, free, and still try to be useful, there are several compromises Microsoft has made. The Edge VPN offering is constrained to just browser traffic. A traditional VPN service would cover all data types. Not all browser traffic is sent through the tunnel either. This protects only certain sites and excludes things like video streams in the browser.
Access these choices in the Edge Browser’s Settings Menu, under the sub-menu Privacy, Search, and Services.
To enable this feature first update Edge to the newest version. Then click the Browser Essentials button in the tool bar. It is the heart shaped icon. Scroll down to the VPN section and click the toggle.
I recently needed to create a comprehensive report out of some exported log data. The system I was working with exported timestamps in the UTC format of YYYY-MM-DDTHH:MM:SSZ. For example, 2023-10-08-T13:43:30Z would be 1:43:30 PM on October 8th, 2023, in my time zone.
I figured it would be easy to change in Excel. I assumed I could do it with a custom date map on the row that the time data was in. It wasn’t that simple. I could covert the digits to something resembling local time, but I wasn’t able to remove the T and Z from the string by formatting cells.
I read a post on Exceljet about the basics of how Excel handles time in general. From that and a little more research, I derived a formula to convert the timestamps to local time.
The “LEFT” and “MID” are trimming the T and Z, the DATE and TIME value functions convert the remaining digits to an Excel time serial number. The -TIME statement changes the UTC to my local time zone. Alter F2 to the cell that contains your timestamp data. Set the cell (row) format to Time or Date depending on your needs. Since the data has been converted to a time serial, any of the various time/date formats should work now.
Almost everyone knows a paper-oriented organization person. They want to draw on a paper calendar and stick sticky notes to everything. Long ago, I attempted to convert one from paper notebooks that were easily lost or damaged and impossible to search to a digital system.
The only thing I found that the friend enjoyed using nearly as much as paper was Goodnotes on an iPad. A few years ago, they had hoped to migrate from an iPad to a Windows tablet. Not because of anything against iPads, but because they were growing tired of needing to carry an iPad and a laptop, along with a phone everywhere they went. Ultimately, they kept the iPad because there wasn’t a satisfactory digital paper app for Windows.
Goodnotes has been a favorite note taking app of Apple users for years.
No doubt everyone that just read that paragraph asked themselves “What about OneNote?”. I am a OneNote fan and tried to get my person to use it. There’s a fundamental difference that keeps paper people from really getting into OneNote. It was designed as a digital note taking system from the ground up. Whereas, Goodnotes emulates paper journals. They both have very similar functions, but the overall feeling is different.
Goodnotes requires a Microsoft or Google account to sign in with.
While searching the Microsoft store last night, I noticed that Goodnotes was out of beta and downloaded it. The app installs from the store, but upon opening, it is obviously a PWA (Progressive Web Application), which means it is running the Edge browser. There’s nothing wrong with this method. I was just surprised. It’s the first PWA app from a vendor other than Microsoft I have personally encountered.
The notebook covers make each one easy to identify at a glance.
I’m happy to report that the application functions pretty much exactly like its Apple counterpart. The ability to lasso and move anything is there. Dozens of templates for things like calendars and todo lists are easily accessible and well designed for their roles. Inserting pictures, sticky notes, text boxes, and handwriting are all based on a simple tool selection menu that hangs out at the top of every page.
Goodnotes insertion tools, sticky notes that you can write on, and lasso tool make it function like digital paper more than other apps.
The application is free to download and trial for 7 days. After the trial you’ll need to decide between a yearly subscription, or a one-time purchase. You can find more info about pricing options on their website @ https://www.goodnotes.com/pricing. If you wished that your Windows or Android device could operate more like a paper notebook you probably won’t find a better experience than Goodnotes.
Warning: This process is complex, tedious, and requires interacting with data that may not be backed up. Variations in software may result in your experience and results being different from mine. We recommend that you not attempt these procedures if you are not a qualified Hyper-V and Windows Clustering specialist. Consider consulting with a professional before proceeding at your own risk.
If you’ve read part 1 and continued on to this post, you have probably experienced some type of catastrophic failure. Before attempting a cluster rebuild, you should have exhausted all other recovery options such as restoring from backup or forcing the cluster online manually.. There’s a reason this post starts with a warning. Data loss, up to and including entire VMs, is possible.
If you have rebuilt a VMware cluster, you should find this process to be familiar. In a Hyper-V failover cluster, the virtual machines are roles that are managed by the failover cluster service whose resources are tracked by the failover cluster database. When that database becomes corrupted or malfunctions your only options are to restore it, or to rebuild the cluster and import the VMs from storage.
The virtual machines themselves consist of a series of files that are stored on the cluster shared volume. Other resources like CPU and memory are provided by the host node a VM is mounted on at any given time. Therefore, if the shared storage system has remained intact during the failure, the VMs can be recovered from its files.
The first step in the recovery process is to locate the virtual hard disk files and verify that they are intact. If the virtual machines were deployed into the cluster properly, they should be located on a shared cluster volume partition. Typically, this is a mount point under the folder C:\ Clusterstorage\ which should be accessible on the host that last had ownership of the CSV.
Note: Many novice admins do not provision VMs in Hyper-V clusters properly. They tend to locate the storage on a host rather than on the mount point for the cluster-shared volume. If you are unable to locate a VM in C:\Clusterstorage (CSV mount point), try examining each host’s local storage.
A good place to start is by opening the Disk Management service console from one of the cluster members. If you see the CSV drives but they are not mounted, DO NOT TRY TO MANUALLY MOUNT THEM. That will be done by the cluster after we rebuild it. One of the nodes will have been the CSV owner, the volume will be mounted on that host. If no host sees the CSV in disk management, stop and correct any storage or connectivity issues before proceeding.
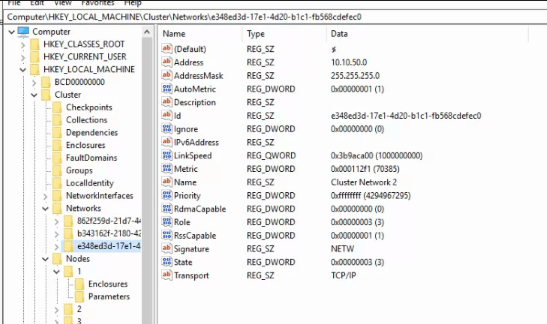
Once you have located the VM files, you can proceed to identifying key configurations of the cluster. If you have documentation that provides the cluster name, cluster IP, and network configuration you can skip this step. If not, the easiest method is to open the registry on one of the host systems. Browse to HKEY_LOCAL_MACHINE\CLUSTER and examine the subkeys to locate the information required for the rebuild process. It is a good idea to export the entire key.
Export the Cluster key for reference during the rebuild.
The next step of this process is to remove any remnants of the failed cluster from the hosts (the registry keys above) as well as from Active Directory. Open an administrator PowerShell console on one of the cluster nodes and run the following commands.
Remove-ClusterNode -Name COMPUTERNAME (where computername is the host’s NetBIOS name) then press Enter. Repeat for each host computer.
Remove-Cluster -CleanUpAD then press Enter. Occasionally, this command will not be able to remove the Cluster’s computer account from Active Directory. If this occurs, use ADUC to locate the machine account and delete it.
Now, a new cluster with the same configuration can be created on the hosts. I recommend that you use the same cluster name, network names, and cluster IP. This is not an appropriate time to redesign the cluster. Reduce the chances of your network, security systems, software, and other integrations causing issues by restoring everything to the previous state. Make any desired modifications after the restoration of services.
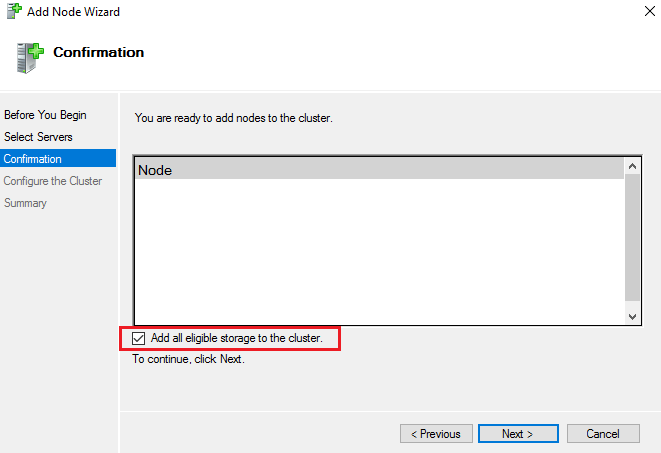
You can use PowerShell to create the new cluster, but I actually prefer the GUI for this task. There are quite a few steps and parameters that need to be specified to get the results you are after. Always start the process by running a cluster validation report. Make sure all the hosts are on the same patch levels and driver versions. Step-by-step instructions for the cluster wizard are easy to find online. Just make sure that you check the box to add all eligible storage.
Don’t worry if no disks are found, and do not use disk manager to manually mount them.
Once the new cluster has been established you will probably need to add the disks to the cluster shared volumes before the mount point becomes available. Open the Failover Cluster Manager console from one of the nodes. Browse to storage, right click on the disks and add them.
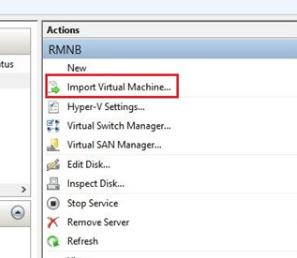
Now we are ready to import the virtual machines into our freshly rebuilt cluster. Open the Hyper-V management console. Use the option on the right-hand menu to launch the import wizard.
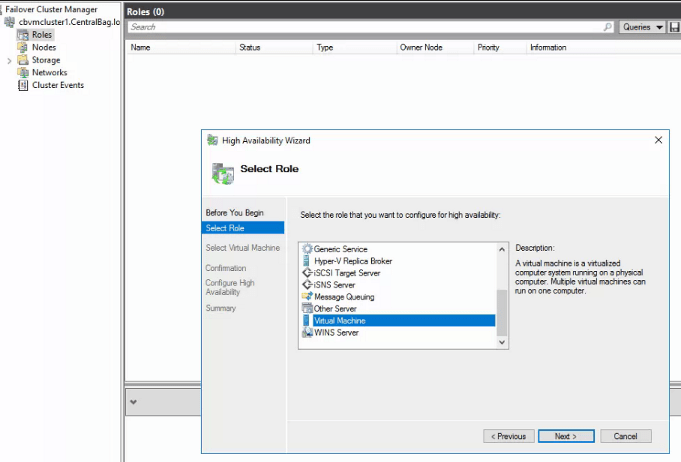
Locate the directory that contains your virtual machines and select one to import. After importing a machine into Hyper-V, but before booting it up, add it as a role to the cluster. Open the Failover cluster manager, select or right-click on the Roles node and choose the option to add a role.
Add a Virtual Machine role to the cluster for each VM you need to recover.
After you have added the virtual machine as a cluster role, use the Failover cluster manager to start it. Repeat the process for each VM. You may need to search for some VM’s files or configs. In extreme cases you may need to build a new VM in Hyper-V and then attach the VHDX to it. Once you finished importing the VMs and adding them to the cluster, I suggest you test migrate them to another node. Congratulations, you’re done.
I’ve been a OneNote user since the beginning. I’ve used Microsoft’s fantastic tool to organize my life, work, and to augment my memory. The software has previously featured an OCR engine that would allow for the conversion of selected handwriting to typed text. Not long after that feature was added, another option to search handwritten notes was included.
OneNote has included optical character recognition since the early days. Select some inked text and use the menu to convert it to typed data.
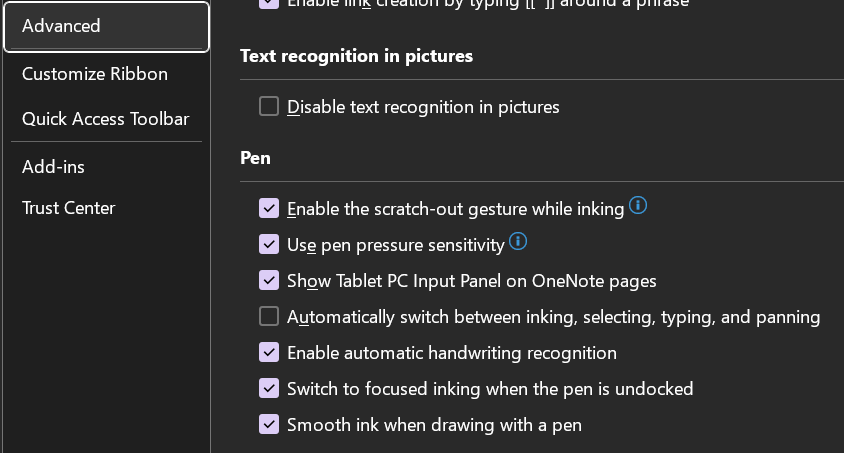
These features were game changers. They were the reason I switched from other note taking apps to permanently using OneNote. Eventually many OneNote users, me included, learned to disable automatic pen detection and to manually select Window’s text input panel to achieve real-time writing to text in their notes.
Disabling the advanced option to automatically switch the pen modes allows you manually select the Windows Input Panel and write in it. You will need to manually select draw mode to sketch in your notes.
Using the Window’s Ink Input Panel trick has been my go-to method of creating easily read and shared notes for the last several years. Documentation for my work projects usually consists of me copy-pasting the notes I took while working. Many of my coworkers and peers do the same. It’s a timesaver to be sure.
Today, I noticed there is another option for handwriting in OneNote available in the Draw tab. The icon is a white pen with the letter A on it. I first saw this icon in the iPad version of OneNote when they added it to induce Scribble (Apple’s Handwriting Recognition Tool). I am an Office Insider and am currently on Microsoft® OneNote® for Microsoft 365 MSO (Version 2308 Build 16.0.16731.20052) 64-bit. I am not sure if this is first version to include the new feature but suspect that it is. I have not been able to find any documentation on it as of yet.
Tap on the screen to place the cursor, then select the A pen from the draw tab and write on the page. Your writing will be translated into typed text in real-time. The tool is more efficient and easier to use than the manual select method I mentioned above. It also allows for easy editing, draw a line through text to select it and the editing menu will hover over it.
I’m enjoying the new feature, I’m sure the help and documentation for it will be updated as soon as it hits the mainstream version of the software. Happy note taking.
I write a lot of documents in Word. You can imagine my frustration this morning when confronted with an error while trying to change a simple option for pen usage. After fiddling about with it for several minutes, I determined that any change of options resulted in the frustrating error.
The error message appears both in a pop-up dialog box and in the Microsoft Office Alerts section of the event viewer. It reads ” The server drafts location you entered for offline editing is not valid or you do not have permission to access that location. Specify a location on your local computer.” What? This is my home computer. I’m not connected to a server.
My first thought was to specify a location and continue on my merry way, but no joy. You cannot edit the field in question because it also causes the error. My next action was to run a repair on Office by going to Settings -> Apps -> Selecting the Office app and then Modify. This didn’t work either.
I found a few other people suggesting various fixes on-line including adding a string value registry key named “Location” with a valid path for the value (example, C:\users\username\documents\) in HKEY_CURRENT_USER\Software\Microsoft\Office\Common\Offline\Options. This workaround did in fact allow the settings to change, but I was not satisfied with this solution. It seems unlikely that Microsoft intends for users to edit the registry on every computer with Word installed on it. Something else was causing this problem.
Eventually I traced the problem down to a OneDrive failure that had occurred on my system a while back. I had previously configured OneDrive to sync files to a D drive. That drive became problematic, so I unlinked my PC from OneDrive synching and removed the disk. Then I re-enabled OneDrive pointing it at the default location on C.
I had not noticed that the Documents library in Windows Explorer remained pointed at the previous location on the D drive, so was the Pictures library. This was the true cause of the error message. Microsoft 365 products save to OneDrive by default. I reset the libraries by right clicking on them, going to the location tab, and clicking the “Restore Default” button. This generates an error, just click ignore.
If you are experiencing this error and the traditional fixes haven’t worked. Try checking the location of your document libraries and ensure they are fully accessible.
Battlefield 2042 is a fantastic game if you enjoy first person shooters. The graphics are jaw dropping, especially if your system is strong enough to crank the settings past medium. The environments are very realistic looking and feature the franchise’s trademark destructive elements. Numerous game types with anywhere from twenty-four to one-hundred and twenty-eight players keeps the action fresh.
However, the more ambitious a game is, the more likely bugs are. That’s just the nature of computer software in general. More lines of code equals more chances for failure. Battlefield 2042 is no exception. It was ridiculed at launch for being too buggy to play at all for some people. Thankfully the vast majority of issues have been patched out at this point.
Unfortunately, one issue still frequently haunts all of the PCs my family and friends play the game on. That is the “Unable to Load Persistence” message with error codes that vary depending on where in the launch process the failure occurred. The message itself means your computer did not connect to the Battlefield servers correctly. The problem is more prevalent after updates in my experience.
There are lots of posts on Reddit and various blogs that suggest everything from closing overlays to re-installing the game, but they rarely work for me. WindowsCentral has a good example. I’ve discovered a simple process that works to fix the issue about ninety-five percent of the time.
Close the game.
Type “Services” in your Windows search bar and open the app it finds.
Sort the list of services by clicking the top of the name column.
Scroll through the list, right-click on the EABackgroundService and stop it. Continue if this service is not listed on your system.
Right-click on the EasyAntiCheat service and stop it too.
Open Windows Explorer and paste/type “%USERPROFILE%\Documents\Battlefield 2042\Cache” in the address bar or browse to that location.
Select all the files by pressing CTRL+A then hold down Shift and press the Delete key (Shift + Del) to permanently delete all of the files. Click yes if prompted.
Close the Windows you have open and start the game again.
I hope this fix works as well for you as it usually does for me. Feel free to post your results in the comments or let us know if you have something that works better for you.
What’s not to love about wireless network printers? The flexibility to place them where they are needed, rather than where there’s a network jack nearby, is great. Plop them on a desk or table, plug them in, join the Wi-Fi network and you’re in business.
The majority of wireless network printers on the market today run a type of Wi-Fi known as 802.11n aka Wi-Fi 4. By now, many people and businesses have replaced their gen 4 Wi-Fi router combo or access points with the much faster Wi-Fi 5, or current Wi-Fi 6 gear. Many of us have also upgraded our phones, tablets, televisions, laptops, and consoles to models that run the newer standards.
Wireless Generation
Standard
Speed
Wi-Fi 4
802.11n
Up to 600 Mbps
Wi-Fi 5
802.11ac
Up to 1300 Mbps
Wi-Fi 6
802.11ax
Up to 7600 Mbps
Each successive generation of wireless technology is more than twice as fast as its predecessor.
It is tempting to dismiss a printer’s network speed as irrelevant. “Who cares if my printer is slow? It’s not like I’m streaming Netflix to it.” If we only needed to consider was how fast your print job or scan finished, this sentiment would be spot on. Here’s the thing, wireless networks have a couple of limitations that many people are unaware of.
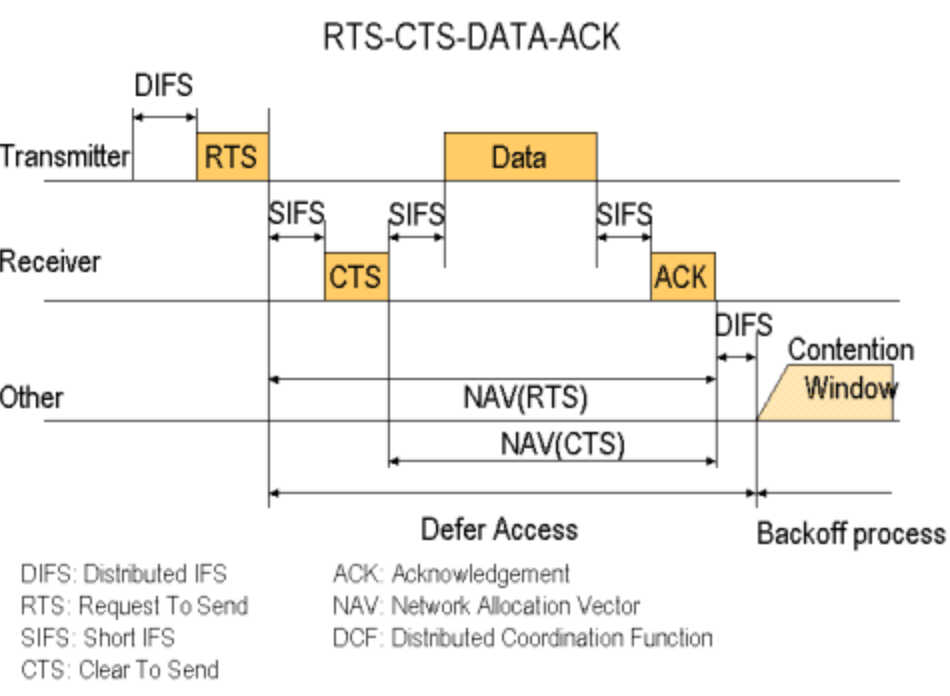
One of the lesser known shortcomings is that wireless networks are half-duplex. The devices connected to them can only transmit or receive data. They can’t do both at the same time like most wired network gear can. The speed data is able to move about on a wireless connection is effectively cut in half right off the bat.
To understand these limitations research 802.11 RTS/CTS. Visualization provided by Stanford University.
The other little known issue with wireless networking is that a radio generally performs at the speed of its slowest connected device. In our case, the printer. This is true even when the Wi-Fi 4 device is idle (not printing). In other words, if your new Macbook and your printer are connected to the same access point your M2 is stuck in slow lane behind ole’ inky.
There are a few possibilities for workarounds. The first is the easiest. Do you really need a printer anymore? Unplug it and see how life goes. Seriously, not printing is better for your bank account, the planet, and your blood pressure.
If going paperless isn’t an option, ask yourself a simple question, “Does the printer really need to be wireless?” Can you switch to using the printer via USB or a network cable? When considering this question, keep in mind how often you use the printer. Plugging in a USB cable once a month isn’t that inconvenient, but doing it several times a day sure would be.
Assuming you need to print wirelessly, there are still a few more options. The least technical of which is to purchase a printer that supports Wi-Fi 5. They can be very difficult to find, but Canon and HP currently offer models that feature 802.11ac. Others are likely to come to market. Check out the Canon Pixma G4270, or the HP Deskjet 2755e.
The only printers that support the 802.11ac standard that I have found so far are linked above. Check the spec sheet for any that you may be considering.
If your current printer does not see or will not connect to your Wi-Fi, the older 802.11 b/g/n is probably disabled. You can enable Wi-Fi 4 on wireless networks because backwards compatibility is a requirement of each new version of the 802.11 standard (to date). Typically turning it on is done by logging on to your Wi-Fi controller/router and accessing the wireless configuration menu. Doing so will introduce the slow down.
The final option requires network engineering skills. Isolate the printer(s) and other 802.11b/g/n devices to a single radio, access point, or access point group that is configured to run the older standard. Creating an SSID on the same radio you run 802.11ac on is not sufficient, the access point(s) will still run at 802.11n speeds on both SSIDs. VLANs have the same problem unless your AP has multiple radios that you can pin the Wi-Fi 4 network to.
Pinning the older standard to a separate radio is a good strategy. Here’s I’ve forced the Wi-Fi 4 devices onto the 2.4 GHz radio and restricted them from the 5 GHz side of my AP.
Best of luck on your journey to wireless printing happiness.
Organizations that subscribe to Microsoft 365 and also have on-premises IT infrastructure, tend to synchronize accounts from their local Active Directory database(s) to the cloud. Hybrid accounts (synchronized) simplify things like user login and password management.
In the Microsoft 365 portal, you can discern which accounts have been synched from the local Active Directory by their icon. Unfortunately, the on-premises Active Directory database does not have an attribute that indicates when an account has been synched with the cloud. This can lead to confusion.
Azure AD Connect, the tool used to perform the synchronization, has numerous options and features. So many that it can become difficult to tell which accounts have been hybridized and which have not. An administrator may be left attempting to compare the accounts in each database manually.
I was assigned this task for an AD database with more than two-hundred accounts. It wasn’t feasible to compare them one by one. Lucky for me, my PowerShell skills were up to the task. Run the script below, from a system that has both the Active Directory and Azure AD PowerShell modules installed. The report it outputs will show you which on-premises accounts are synchronized to the cloud.