I have purchased an unbelievable amount of tech over the years, one might call it an addiction LOL. Here I will review the gear that I own and use in real life. My long term relationships with things I paid money for offers you a different perspective than sponsored reviews.
I’ve been looking for a small lightweight Android based tablet with good HCR (Handwritten Character Recognition) for a while now. I like to write while kicking back in my recliner and watching TV. A phone is too small for me to comfortably write on for very long.
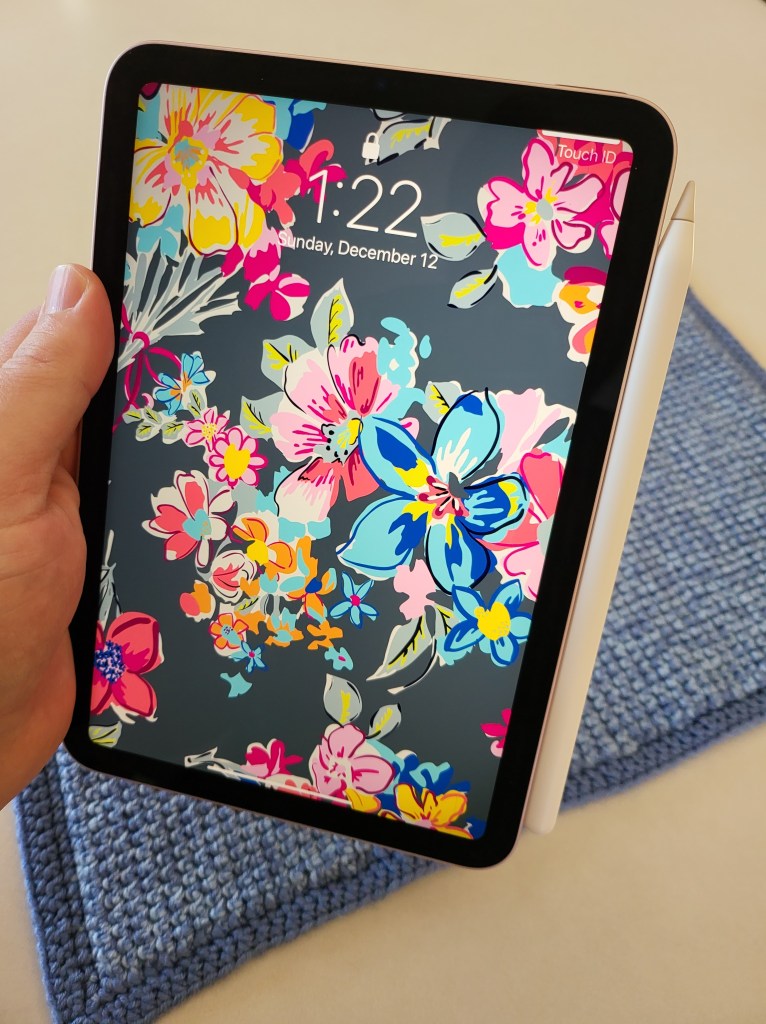
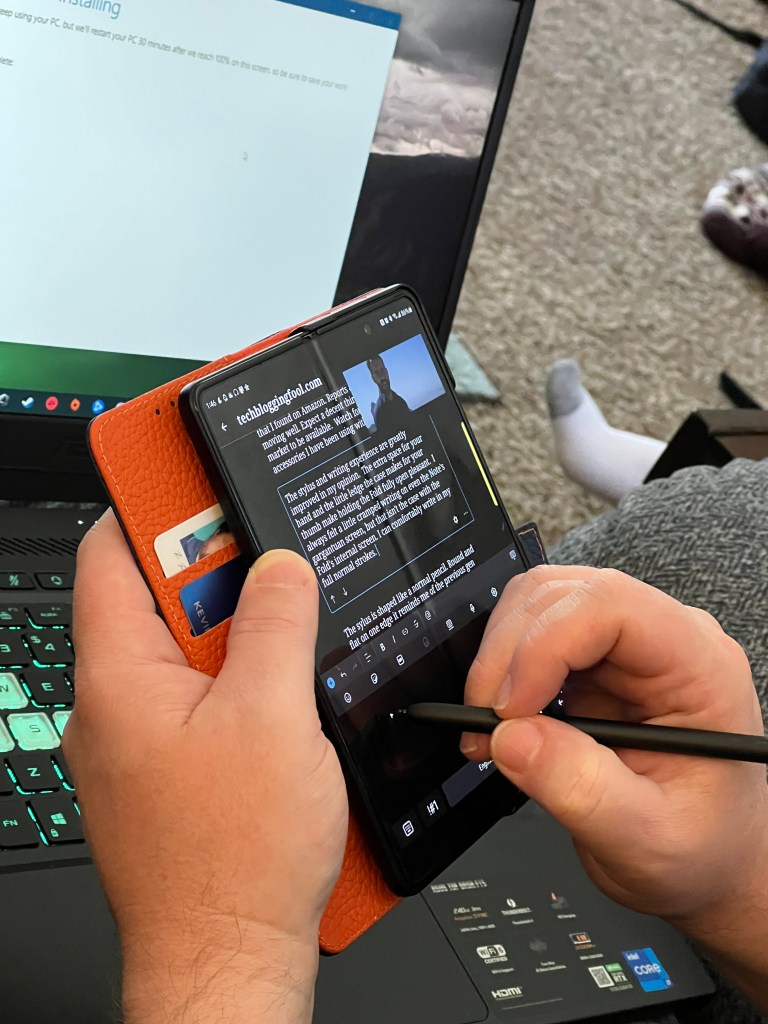
I’ve always thought that the iPad mini was about the perfect size and weight. I have tried one several times, but I struggle to write with Scribble (Apple’s HCR). My Galaxy Fold 3 was a perfect fit for using in relaxed writing positions. The Fold 7 didn’t support an S-Pen, so I skipped it and went with an Ultra phone. Hence my desire for a mini tablet.
I borrowed my spouse’s 6th gen iPad mini to give Scribble another chance recently. I wanted it to work, I really like the form factor and screen.. Scribble has improved. It works great for forms and jotting a few lines. It still feels clunky for my style of handwriting. I have to correct more than I would like.
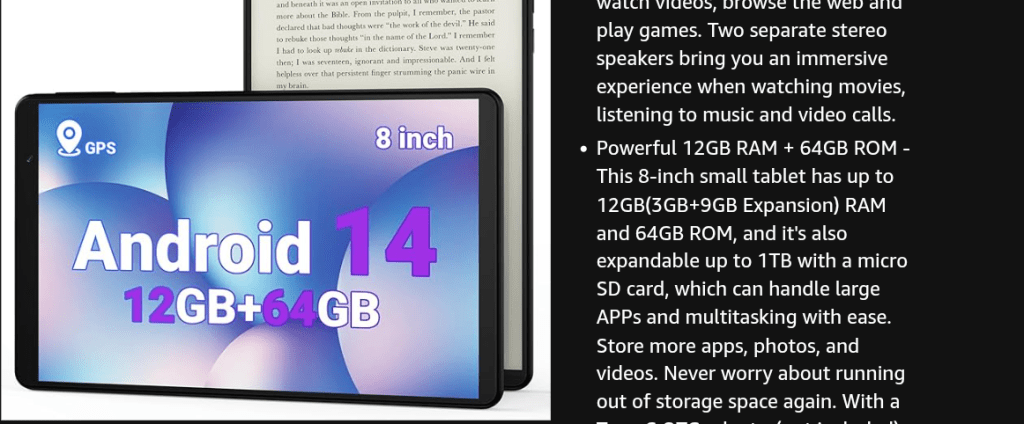
There are more Android based tablets than I expected in the 8-to-9-inch range. I appreciated having choices, but many candidates were under powered and easily ruled out. Lots of the mini tablets seem to favor a generic octa-core CPU with 4 gigabytes of RAM. I passed on them because HCR takes a lot of computer resources all on its own. Slow recognition makes handwriting a miserable input option for me.
Read the fine print, this generic tablet has 3GB of RAM and a 9GB swap file.
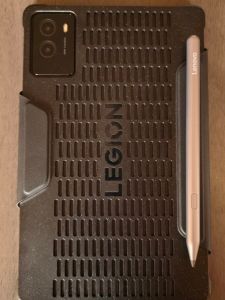
I ordered the Legion Tab from Lenovo’s site. It was on sale for $420.00 with free expedited shipping if you’re a member of their rewards program. Even with the sale, it is on the more expensive side of the mini-tablet market. You get a lot for the price though. It has a late model Snapdragon chip, 12 GB of RAM, a 165 FPS HDR screen, and 256GB of storage capacity. It ships with a 65 watt power brick, a fitted folio case, and high-end screen protector. The active stylus is a $40.00 accessory.
I haven’t used a Lenovo Android device before this. I wasn’t sure what to expect. Lenovo’s fit and finish is top-shelf. The cameras are good enough and include an LED flash. The speakers are the best sounding, loudest speakers, I have heard on any tablet or phone to date. There are two USB-C ports. The bezels are thin and straight. The chip is intentionally positioned far away from where your hands touch the back. The case hovers just above the tablet’s back surface to further dissipate heat away from your hands.
An unedited photo captured with the Tab’s 13 MP rear camera. All settings are automatic.
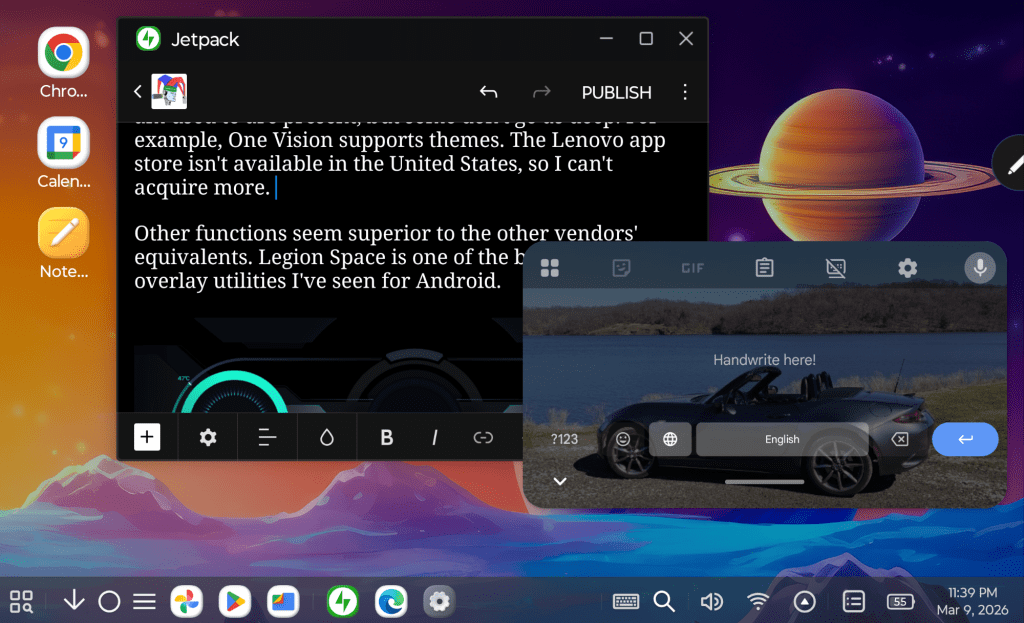
Lenovo’s One Vision launcher provides similar functionality as Samsung’s One UI. Most of the features I am used to are present, but some don’t go as deep. For example, One Vision supports themes. The Lenovo app store isn’t available in the United States, so I can’t acquire more.
I didn’t realize that Lenovo had a PC Mode on their tablets. If you have ever seen Samsung’s DEX, the idea is similar. In PC Mode everything runs in a floating window. There’s a start button and taskbar, all the hallmarks of a PC operating system are there.
PC Mode is exactly that. Activate it from the quick settings menu.
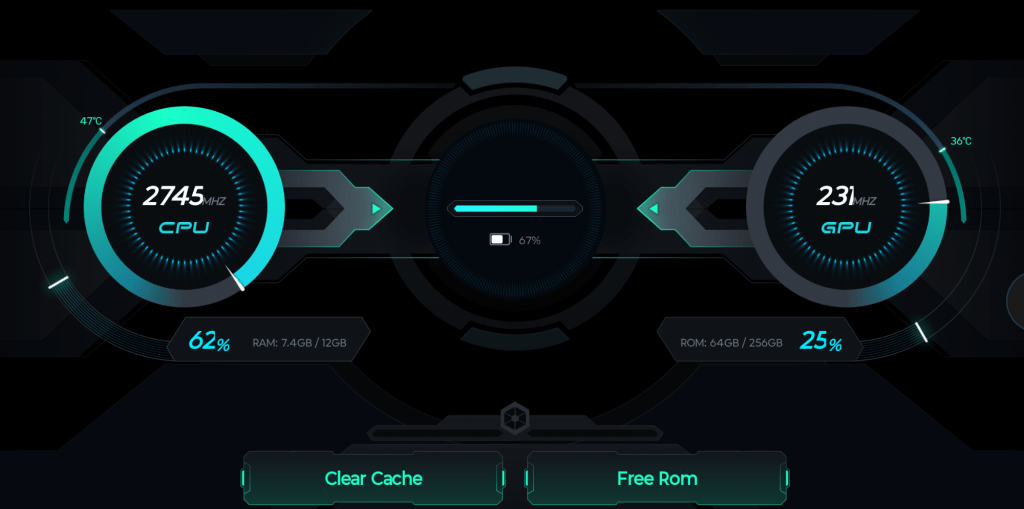
Some of the UI functions seem superior to the other tablet manufacturers’ equivalents. Legion Space is one of the best gaming overlay utilities I’ve seen for Android.
Legion Space is a fantastic game monitor and system utility.
Lenovo opts for GBoard instead of a homegrown keyboard like Samsung does. GBoard is excellent and has the functions I rely on. You can float or split the keys and swiping is available too. The handwriting recognition mode offered by default is in-line and similar to Scribble. I’m adjusting to its quirks and getting better at it every day.
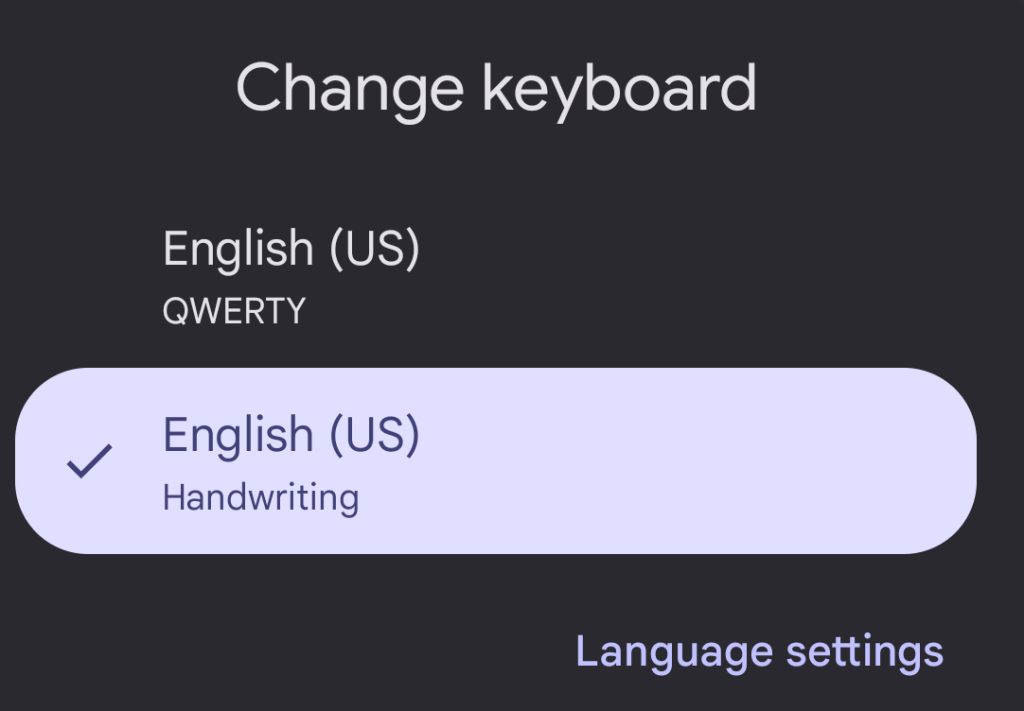
At first, I didn’t realize that I needed to install the English handwriting language option. Without it you can’t access the full writing input panel experience. I’m getting closer to writing at top speed. I’m confident I’ll get there with a little more practice.
By default, the handwriting is in-line only. Install this keyboard from settings to access a full input panel.
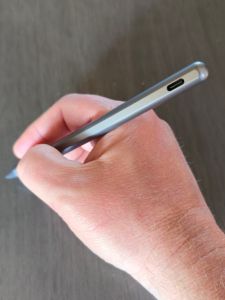
The stylus links to the tablet via Bluetooth. It’s USB-C rechargeable. The shape is round, except for the flat edge that it magnetically sticks to the back of the tablet with. The tips are stiffer than an S-Pen’s. The writing instrument glides across the screen smooth and fast like the Apple pencil on an iPad does. It’s well balanced in the hand and features a single button. I’ve written this entire post with it and have enjoyed the experience.
The pen feels great and works well.
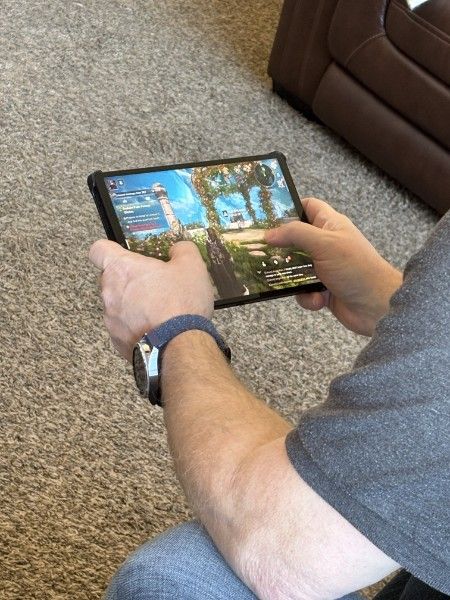
Of course, bearing the Legion moniker in its name means this thing is built for gaming. Let me tell you it doesn’t disappoint. In fact, it is the best experience I’ve had playing on any Android device. Rush Rally 3 runs at 130 FPS in 1440 P ultra. Destiny Rising plays perfectly on Ultra settings too.
Captured in game playing Rush Rally 3
It’s small and light enough to hold while using the on-screen controls. It’s also large and loud enough to use as a tabletop console when paired with a controller. The power, screen refresh rate, and screen size are astonishing compared to a phone, any phone. Legion Space lets you monitor and tweak your settings to squeeze the most out of each game while you are playing.
The Android gaming experience is second to none.
The learning curve going from Samsung to Lenovo has been easier than I expected. Android is Android, but I have had issues when changing device brands in the past. Once I ended up with a tablet that couldn’t access the Google Play store without me resorting to trickery. There’s been none of that this time around. All of my apps, games, and cloud connections work well with the device.
If you have wished somebody would make an Android based iPad mini competitor, Lenovo has granted it. Even improved on it I dare say. The Legion Tab 8.8 Gen 3 has quickly become my favorite device for home use. Now I can sit in my recliner and write for as long as I please without sacrificing comfort or functionality.
Have you ever wondered if radar detectors still work? They were all the rage back in the day. I remember having one in my Mustang. It faithfully hung from its little suction cup on my windshield for years. It’s annoying squawk and flashing red LEDs reminding me to slow down. I eventually lost track of the power cord. Most of my driving was just for commuting by then so I didn’t bother replacing it.
Recently, I was watching a video on YouTube where the creator was discussing the true cost of speeding tickets. They had mentioned radar detectors as one method to avoid being saddled with the exorbitant insurance increases. I decided that I wanted to find out what modern detectors were like.
I did a bunch of research and narrowed down the field to a couple of choices. At first, I was pretty convinced that I wanted an Escort MaxCam 360c. It combines a high-end radar detector with a decent dashcam in a single unit. There are some trade-offs of course. It is both larger and heavier than a standalone detector. Some people report that the range is shorter than its standalone counterpart. It’s also incredibly expensive at almost a thousand dollars.
What really dissuaded me from going with a combo unit was the difference in pace between each technology’s development. Radar detector improvements are slow. People keep these things for several years. Camera upgrades on the other hand, are fast and furious.
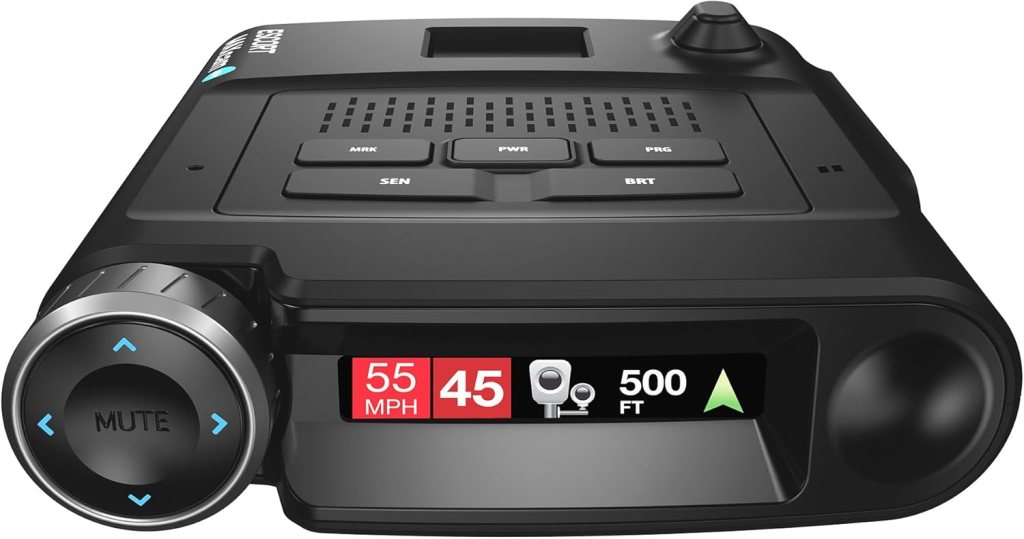
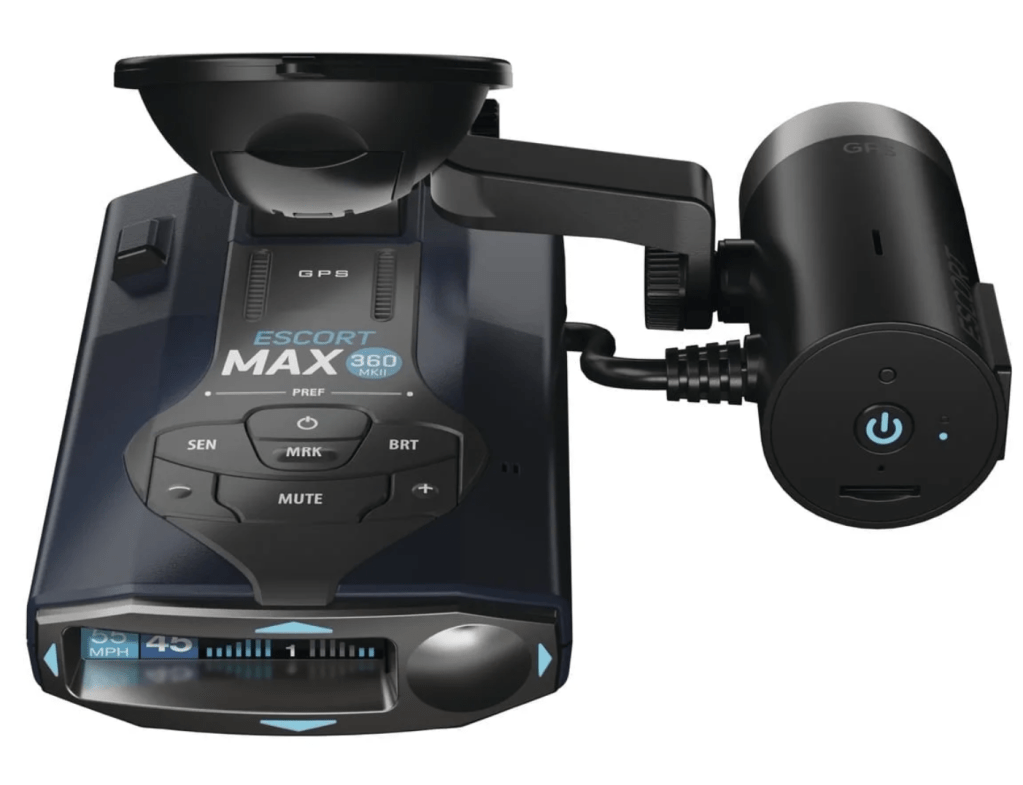
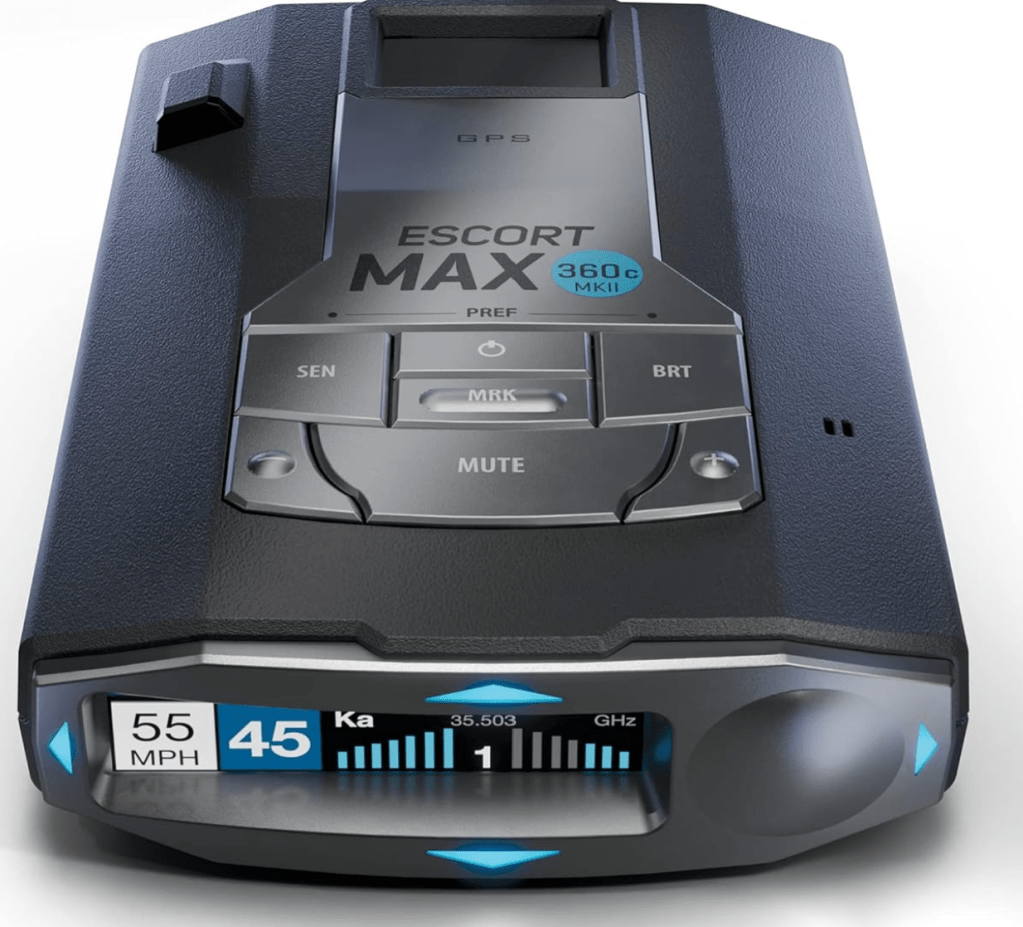
Eventually, I chose the Escort Max 360c Mark II. It was on sale at my local Best Buy for $499.00 which is in the middle of the cost spectrum for these types of devices. It has a ton of features and functions for its price. One that stood out is the expansion capability. Escort makes an add-on camera module that costs around $150.00 online. There are only a few detectors on the market that offer an expansion feature.
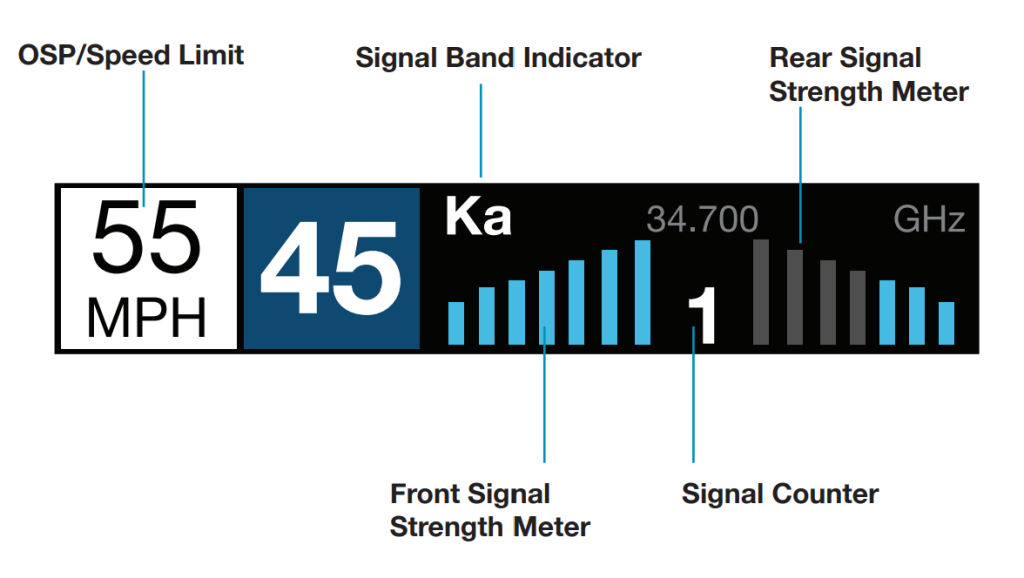
There are multiple radio sensors in the 360c’s chassis. Its brain tracks which one gets hit by the radar gun’s pulse first. The detector uses that information to calculate which direction the hit came from. It also works out how strong (far away) the signal was. A directional arrow on the screen tells you where to look. Bar graphs on the screen show you how much energy the signal carried across each sensor.
The Max 360c Mark II also has a built-in GPS sensor. The unit will warn you when you are over the speed limit by a certain amount (you set). It can also warn you about known speed cameras and other road challenges in your vicinity. It uses the GPS to record each detection it makes in an internal database. If the same detection is made three times that location is marked as a false positive result. False alerts played a big part in giving up on radar detectors the first time around.
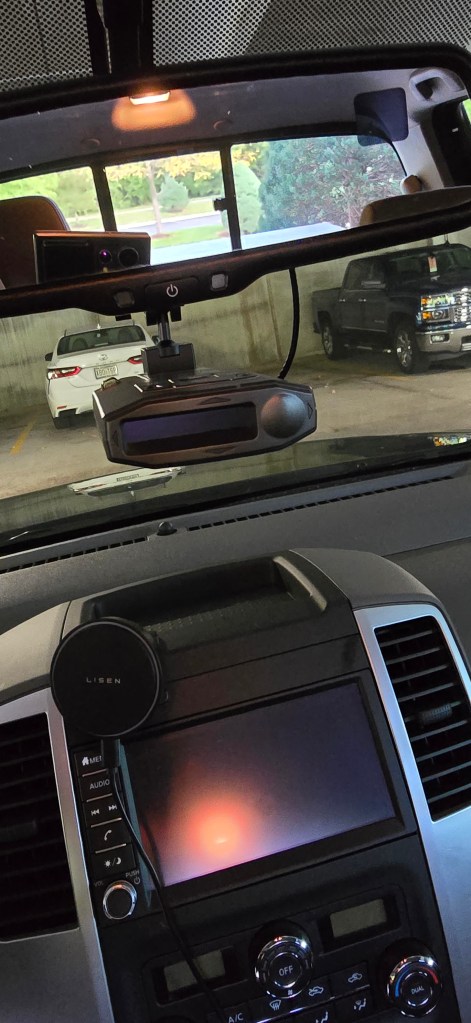
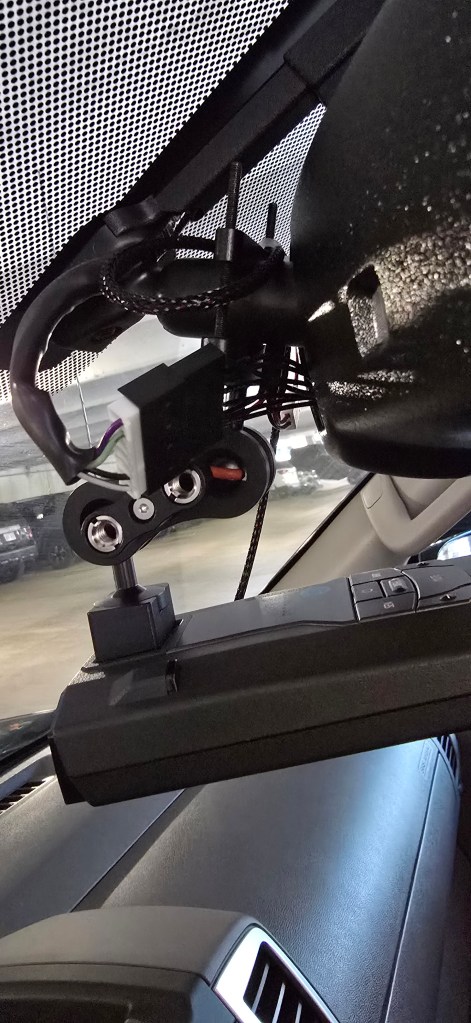
I also ordered a couple of radar detector/dashcam mirror mounts from Amazon. The mounts are comprised of an articulating clamp. This clamp attaches to the support your rear-view mirror hangs from with a U-bolt and a couple of nuts. They were easy to install in both of my vehicles. The radar detector magnetically attaches to them which makes moving between vehicles much easier.
The 360c Mark II comes with a cigarette lighter based power cord. Our car does not have this type of power connector. Like I said, radar detector tech is in the R&D slow lane. Oh well, I wouldn’t have wanted the cable stretched across my dash and windshield anyway. I ordered two mirror power pass-through adapters from Amazon. They power the detector and add an extra USB power port near the windshield. If you’re in the market for one, shop around. The first ones I found were more than $100.00, these were $24.95.
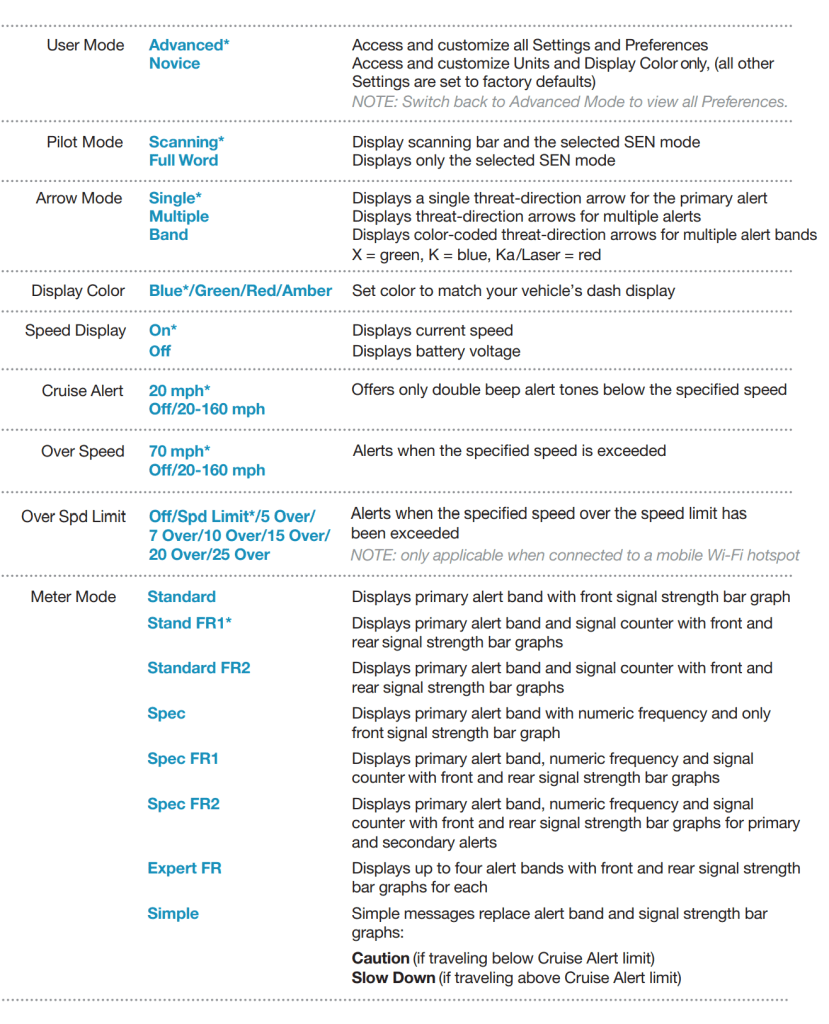
I had intentionally ordered the Max 360c and accessories a couple of weeks before a big family road trip. We’d be driving nearly two thousand miles in total. I got the detector mounted and all the options and preferences configured to my liking before we left. The Mark II has dozens of settings you can adjust. You need to install the Drive Smarter app on your phone and connect to the detector via Bluetooth. Then you can use the app to manage the device’s configuration.
There are a lot of settings that control the receivers themselves. Things like which one is active when, how sensitive they are to the different radar frequencies, that type of thing. I left them on automatic. You can change the alert tones, set speed limits, change the look of the screen’s various messages, and more. It is a little over-whelming at first, I left most of the settings on automatic.
The trip involved driving through small towns, hundreds of miles of highway, and navigating two major US cities. We went across the Midwest Plains and up into the Colorado Rocky Mountains. The Escort worked better than I had expected. One of my concerns had been the proliferation of laser speed guns.
The Escort 360c Mark II can detect lasers from both the front and back. Unfortunately, that still isn’t a lot of protection. The speed of light is nearly instant at these distances. You don’t get enough of an advanced warning to adjust your speed. I had assumed they would be everywhere by now, given that they existed way back in the nineties. To my surprise, the laser band was only triggered a handful of times on the entire trip.
The direction indicator works as designed. I visually located the source of the signal in most of the detection events that were triggered on our trip. In fact, to answer my opening question, yes, radar detectors still work in general. They also still have all the same problems.
False alerts are minimized by the GPS system, but they still happen a lot. On one-time trips like ours, the false alert database doesn’t apply at all. Physics also suggests problems with the entire concept of radar detection. Radar is faster than you are even when it’s based on a radio wave. If you turn to look and see a cop, it’s already too late.
Shortly after we returned from our trip, my Mark II suffered a major hardware failure. The GPS receiver failed, and the screen would only flash an error. During the trip I learned something important. I don’t have any need for a radar detector. I’m a safe driver that follows the rules of the road. So rather than exchanging my broken unit (they offered), I returned it and all the accessories for a refund.
At the beginning of our relationship, my spouse and I discovered that we had very different sleeping habits. She slept with the TV on, while I preferred only the white noise from a small fan. Tinnitus made having some noise masking solution in the bedroom a must for both of us.
I struggled to get used to the TV being on while trying to sleep. The sound wasn’t so bad, but the light and commercials screaming at me were bothersome. She needed more engagement than a fan or white noise generator produced.
We tried various earbuds. She did better with them. I wasn’t able to adjust to sleeping with something in my ear. She tried a headband that had embedded speakers in it, but that was uncomfortable for sleeping in. Eventually we stumbled across a “pillow speaker” at some old-time electronics store. It was just a little hockey puck sized speaker. You plugged it into your phone via the built-in 3.5 mm jack. Then you slipped the disk into your pillowcase.
The Radio Shack pillow speaker worked, but it had some issues. It wasn’t very loud. To hear it well enough, you had to put the speaker on the topside of your pillow. If you rolled over in the night, your ear would be uncomfortably smashed against the hard case. It was also just a plain speaker and didn’t have any controls of its own. This made operation at night an ordeal. Changing the media or adjusting the volume required unlocking your phone and using its controls.
We kept an eye out for improved devices throughout the years. When phones lost their headphone jacks, we had no choice but to find something that used Bluetooth. We found a unit that offered several improvements over the puck design. The new speaker used bone conduction tech to boost the sound volume and quality. It was also housed in a soft-sided case that wasn’t supposed to mangle your ear. Control buttons on the device made life easier too.
The conduction-based pillow speaker actually worked well. It’s loud enough to go underneath your pillow and still be able to hear it. Its soft sides made it more comfortable, but it still hurt if you rolled straight onto it in the night. Its biggest issue was the Bluetooth signal. If the speaker descended too far into the recesses of your pillowcase, it would disconnect from your phone.
While randomly browsing Amazon one night, I found the unicorn of pillow speakers. I reflex ordered it without showing it to my wife first. It had our entire wish list of features according to the description. Reviews were positive. If it even got close to the ad’s hype it would be a perfect upgrade.
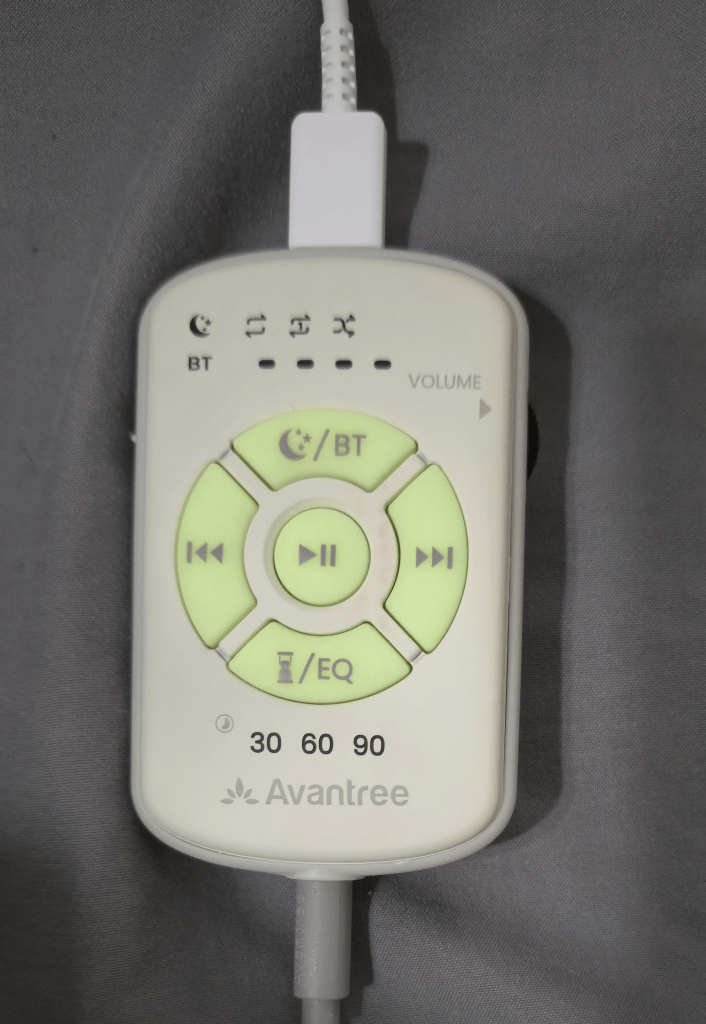
The Avantree Slumber 2 showed up a couple of days after I ordered it. As soon as I got it out of the box, I could tell it was a winner. There are 4 speakers surrounded by a soft rectangular pillow that is just the right length for a pillowcase. The controls, Bluetooth, and battery are housed in a small case connected to the speaker assembly via 3.5 mm. This means the Bluetooth signal stays nice and strong all night since the unit remains outside of your pillow.
The sound is fantastic. I usually have mine connected to my phone. I listen to podcasts and audio books more than anything else. The speakers sound so good that use them for other stuff too. I pair my Switch 2 for playing in bed. I also frequently connect to my laptop for an excellent personal movie experience.
You can’t feel the speakers under your pillow while you sleep. They flex and move with you. The controller has nice big buttons that glow in the dark. You can play and pause, skip tracks, or adjust the volume. You can also enable a timer that will stop your chosen media player in 30, 60, or 90 minutes.
The Avantree Slumber 2 can run from battery when you travel. It can also play while being charged from its USB-C cable. The battery lasts through the night on a single charge but won’t make it through two. The controls are in-line meaning that USB-C connects on one end while the speaker pack connects on the other. Theoretically you should be able to use it as a Bluetooth connector for any 3.5 mm speaker set. I haven’t tested using them this way yet.
The cover is removable and washable.
We’ve had the Slumber 2 speakers for a couple of months now. It is made of high-quality materials, sounds great, and maintains a strong link with your device. If you want a speaker embedded into your pillow, there are no downsides to this model that I can find. It does its job perfectly.
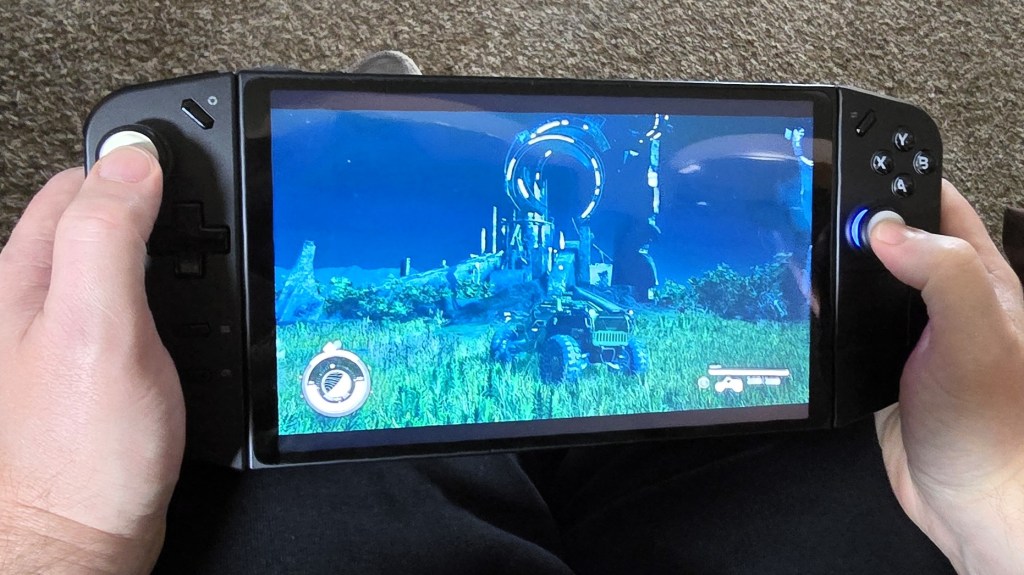
I have learned so much about the Lenovo Legion Go handheld gaming PC over my time owning and using one. I’ve gone to great lengths to tune mine for everyday couch and mobile gaming. It has all my games installed and ready to go. It’s stable, games and power can be suspended and resumed mid play for convenience. Everything runs screaming fast and looks fantastic. Games and media sound so good, too!
Read on to discover the settings, tweaks, and modifications that I’ve used to get the most out of my Go. You won’t believe the difference these settings can make in your experience. As a bonus, most of them are free and easy.
The first pain point with my precious handheld gaming PC. The speakers are subpar. Left at their default settings, they are high-pitched and struggle with power. Much of the potential volume is lost due to the speaker ports being on the top edge and angled away. Hold your hands up like rabbit ears behind the mesh while watching a video. You’ll be shocked by how much sound the speakers are really pumping out.
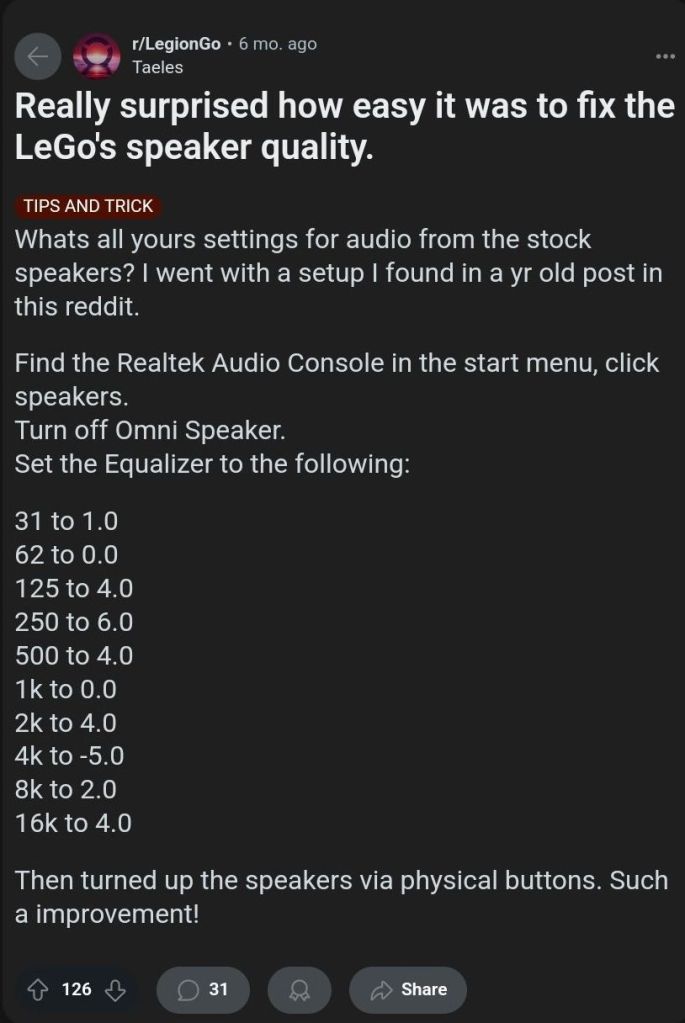
If you research the topic of poor sound, you’ll see there are several software workarounds that help considerably. The easy/free method is to use the Realtek Audio Console. Open it from the Start Menu to toggle off a feature called the “Omni Speaker”. Then use the same software to adjust the equalizer frequencies. Find this idea and lots of others at: https://www.reddit.com/r/LegionGo/
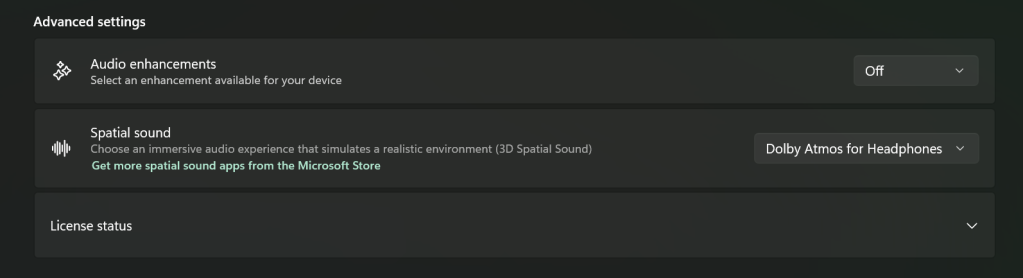
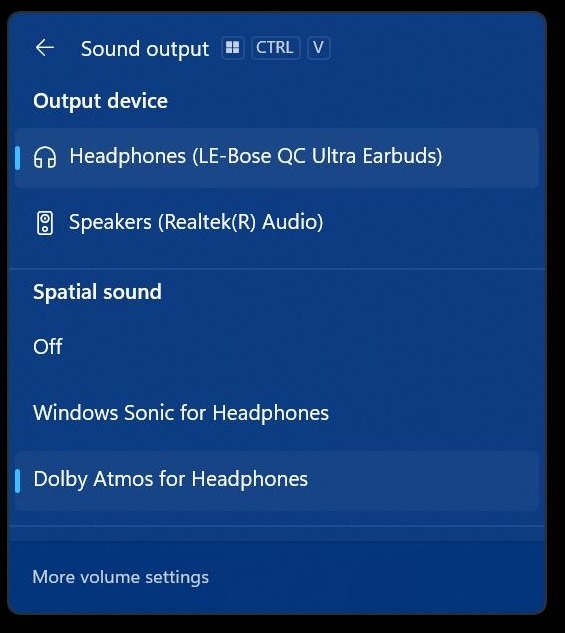
I used the equalizer changes above in conjunction with an app I already owned. Dolby Access is a Windows Store App that applies a Dolby Atmos surround sound effect to your PC’s sound system. The Go’s speakers sound so much better with the effect enabled. The dimensional soundscape achieved by applying some cheap software is surprising.
Dolby’s magic app features a gaming performance mode that increases the accuracy of sound location. This is especially important in competitive games. It works well. I don’t fully understand how they trick your hearing so well. Things that are supposed to be behind you, sound like it.
For Dolby Access, or any spatial sound app to be the most effective, disable Window’s sound enhancements. Go to Settings -> System -> Sound and click on the speakers. Advanced -> Audio enhancements toggle off.
If you don’t have or want to purchase Dolby Access, there are some open-source options out there. I haven’t tried it yet, but I’ve seen FXSound mentioned several times while doing my research. It gets a lot of recommendations and positive reviews and is donation-ware.
Update Everything
The Legion Go is a complex machine. Especially its software layer. The sheer number of places you must check for updates is astonishing. Here’s a rundown of everywhere you need to check. I try to do this at least once a week.
Windows Update
Accessed by going to Settings -> Windows Update
I like to open the advanced options and flip on the toggle to receive updates for all Microsoft products.
Microsoft App (MSIX packages) Updates
Open the Microsoft Store App (shopping bag icon in start menu). Then click on Downloads (menu on left) from there click the Get Updates.
Legion Space
Disks and Drivers. Open Legion Space ->Settings -> Scroll down -> Disks and Drivers -> Check for Updates.
Controller Firmware Updates. Go to Controllers in the menu, scroll the bottom menu left to More. Scroll to the bottom of More page and click the Controller Firmware Update button.
App Updates.
Game Launchers. Steam, Xbox, Ubisoft, and EA Desktop, all have client updates in each app’s settings menu
Game updates. Each game gets its own updates (usually handled by the launchers).
Other software.
Example: The emulator app Dolphin needs updated frequently.
Touch Screen
One quality of life upgrade was realized just by changing my bad habit of touching the screen too much. I had been using the touch screen to enter my PIN and to scroll. This was making my screen filthy. Every time I picked up the little machine to play something, it was covered in fingerprints and smudges.
There were two changes I made to drastically reduce how often I had to clean the screen. First, at the PIN prompt you can usually click the A button to get the on-screen number pad to open. Then you can use the buttons, D-pad, shoulders, and triggers to enter your PIN code just like on an Xbox.
Using the scroll wheel reduces fingerprints. Tapping and holding on the touch pad activates the right-click menu.
Second, the little wheel on the upper rear nook of the right controller is for scrolling. It works better and is more comfortable than touching the screen in most situations. The only trick is to remember that it’s back there.
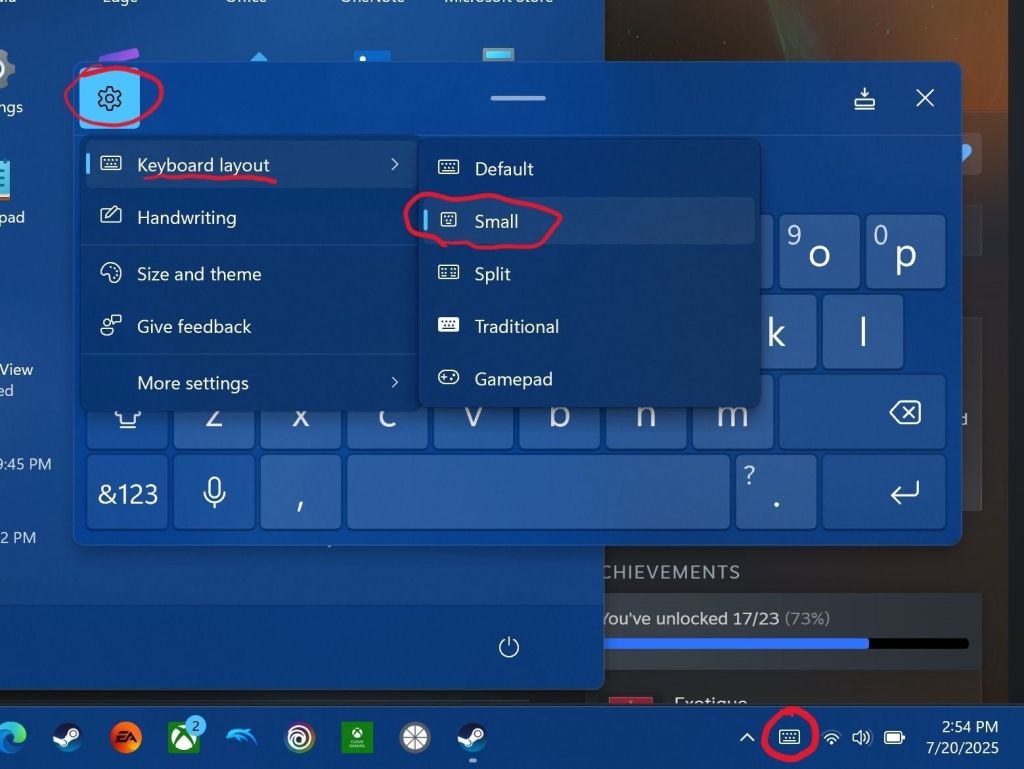
Floating Keyboard
The OSK (On-Screen Keyboard) is huge the first time you try and enter text with it. It takes up the entire bottom half of the screen. This makes entering information into forms very difficult. The form either gets cut in half or squished to an illegible size when the keyboard opens. It’s a good thing there’s a built-in solution. You can resize and float the OSK in Windows.
Open the keyboard by touching or clicking the icon for it near the clock on your taskbar. Click or tap on the settings gear in the upper left corner of the keyboard’s panel. Then select Keyboard Layout from the menu and click small. Now you can use the little dash at the top of the OSK to drag it out of your way!
The small floating keyboard layout is easy to drag at of your way. Clicking Size and theme in the Keyboard’s settings will let you change its color size, and key size.
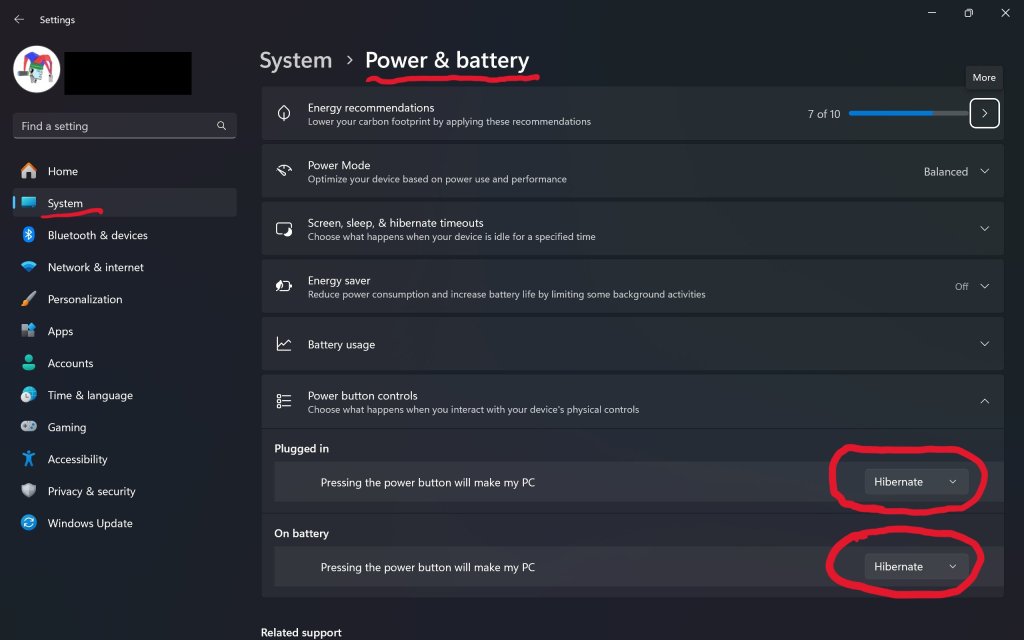
Hibernation Is Better
Batteries suck, but we’re stuck with them until some genius invents something else. For some unknown reason, the Go drains its battery in just a few hours of sleep mode. Do yourself a solid and change the power button’s function to hibernate instead of sleep.
There are two benefits hibernation has over sleep mode. The first is that your battery won’t be dead the next time you pick it up. Hibernation uses a lot less power over time than sleeping does.
The hibernation process exports everything in the computer’s memory to a save file on the hard drive. Then it powers down the RAM chips. This reduces power consumption. It also gives us our other benefit.
Go to Settings-> System-> Power & Battery to change what the power button does.
Everything running in RAM is saved to a file. This includes any game that is actively playing or paused when you pressed the power button. The LeGo can stay in hibernation for days with your game perfectly suspended in time.
The process takes a few seconds at most. In my opinion, hibernation makes the device more usable in real life situations. I play on my lunch break at work. Hibernating when my break is over means my battery and game will be ready to resume on the next day. You usually can’t do that with sleep mode.
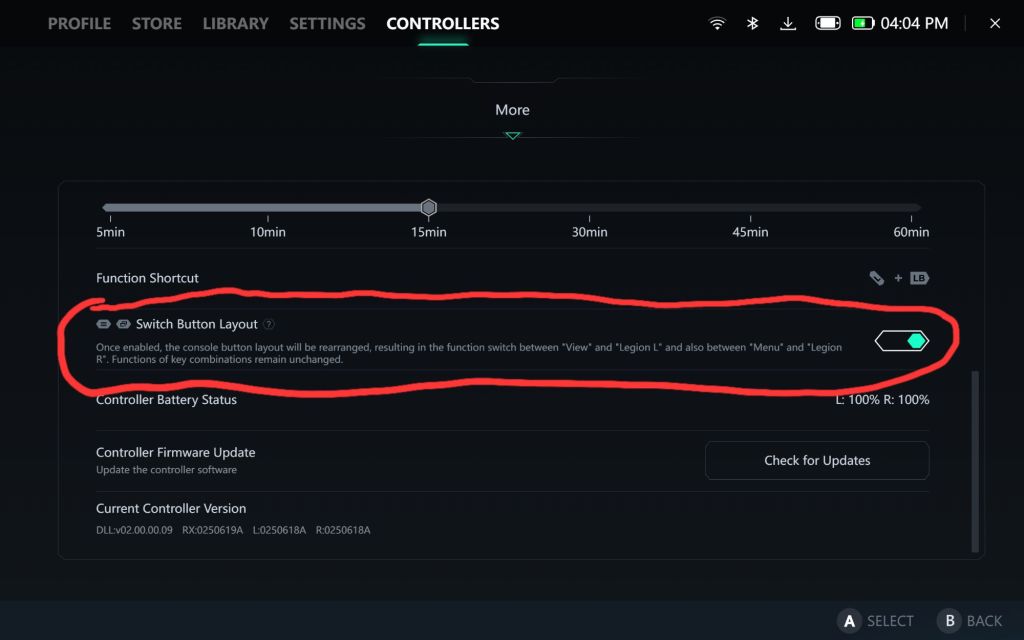
Controllers and Buttons
The controllers on the Legion Go are a work of art. They are well constructed, feel great, and are tuned for a light touch. They disconnect from the main chassis like the Nintendo Switch’s do.
The placement of the menu and view buttons near the bottom of the left controller is a problem though. Those buttons are used in games heavily and stretching your thumb down to click them gets old. Especially in a game like Destiny 2 where you constantly need access to the character menu and maps.
There is an option to swap their functions with the Legion Space and Quick Control menu buttons. Open Legion Space and go to Controllers, then scroll to More. Scroll down the page and flip the toggle to swap the buttons.
Your thumbs will thank you for flipping this toggle on.
My other tip about the controllers is to take the time and map the back buttons. I tie them to crouch/slide, melee, reload, and jump in almost every FPS game that I play. Back buttons allow you to keep both thumbs on the sticks while performing button actions. This can be a big advantage in some games.
To map them, open Legion Space. Go to Controllers in the top menu then click the Button Mapping button in the list at the bottom. Now click the top View/Edit Layout button. Finally, click the Rear-View choice at the bottom of the screen. Click on each button to pull up the mapping menu for it.
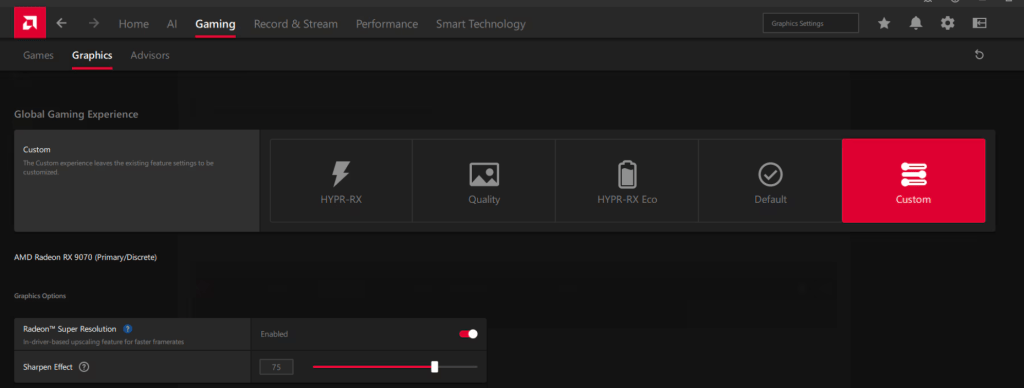
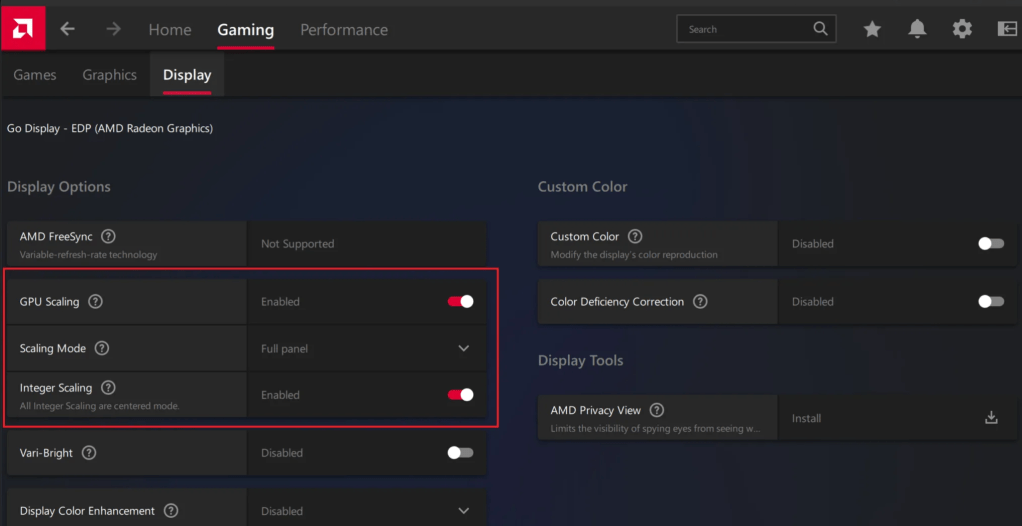
GPU Upscaling
There are lots of tweaks and changes you can make to boost the performance of your Go in various games. One of the most potent is to setup the various upscale options for both on your GO and in your games. The Legion Go supports AMD’s Radeon Super Resolution and their FidelityFX (FSR 3) technologies. Taking advantage of them reduces the load on your GPU which usually translates to an increased frame rate.
AAA titles can run in the 60-110 FPS range with good fidelity once you learn to tune and upscale them. I haven’t written a comprehensive guide to upscale games yet, but the basics are easy. Open the AMD Adrenaline app and turn on the scaling options.
There’s also a switch for RSR in the Legion quick menu.
The details of scaling are a rabbit hole of advanced tweaks and changes. Things like algorithms, game resolution options, post-processing settings, and sharpening effects can alter your experience. YouTube and the sub-Reddit mentioned above are good places to start building knowledge if you want to go deep.
GPU scaling options are dependent on driver and software versions. If you don’t see the options, make sure your software is all updated.
Learning to upscale and tweak your games is probably the most impactful performance boost you can get on this system. If you’re not already familiar with scaling, try using 1600X1200 @ 144Hz as your display resolution. Then run your games at 800X600. If you can’t set the game’s resolution to 800×600, change the resolution scale to 50%. It amounts to the same thing.
If you are less than impressed with AMD’s GPU scaling abilities, there are also other options available. While doing research, I noticed that lots of people are mentioning the Steam App Lossless Scaling as a great alternate. The app is $6.99 in the Steam store: https://store.steampowered.com/app/993090/Lossless_Scaling/
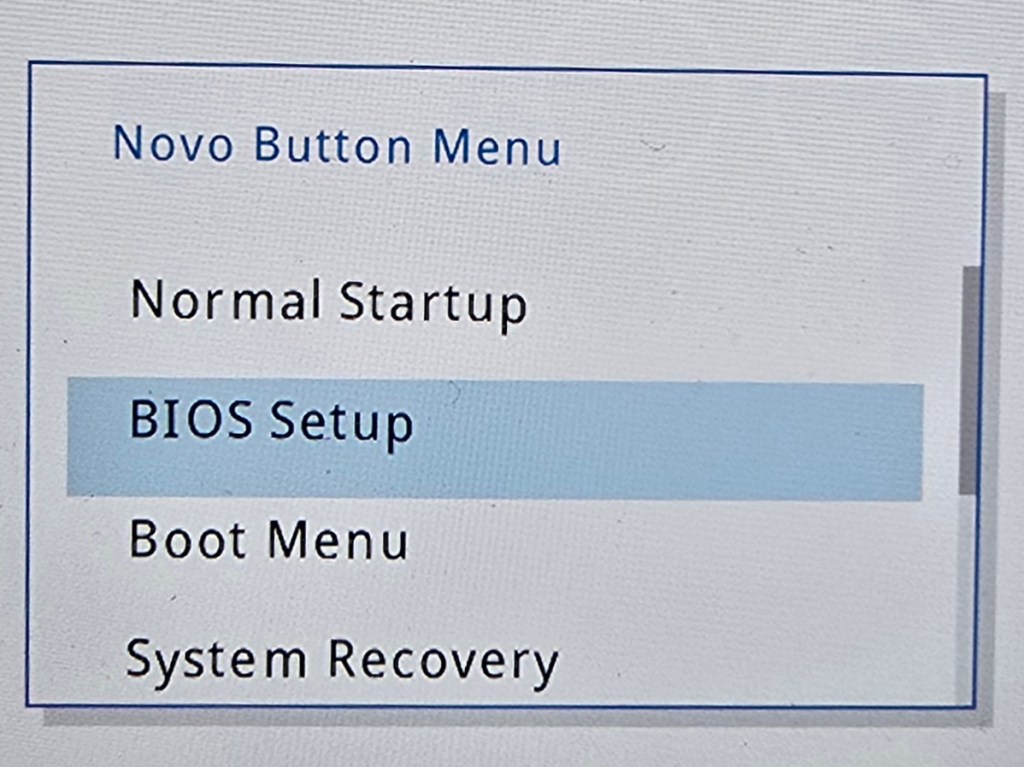
BIOS/UEFI Tweaks
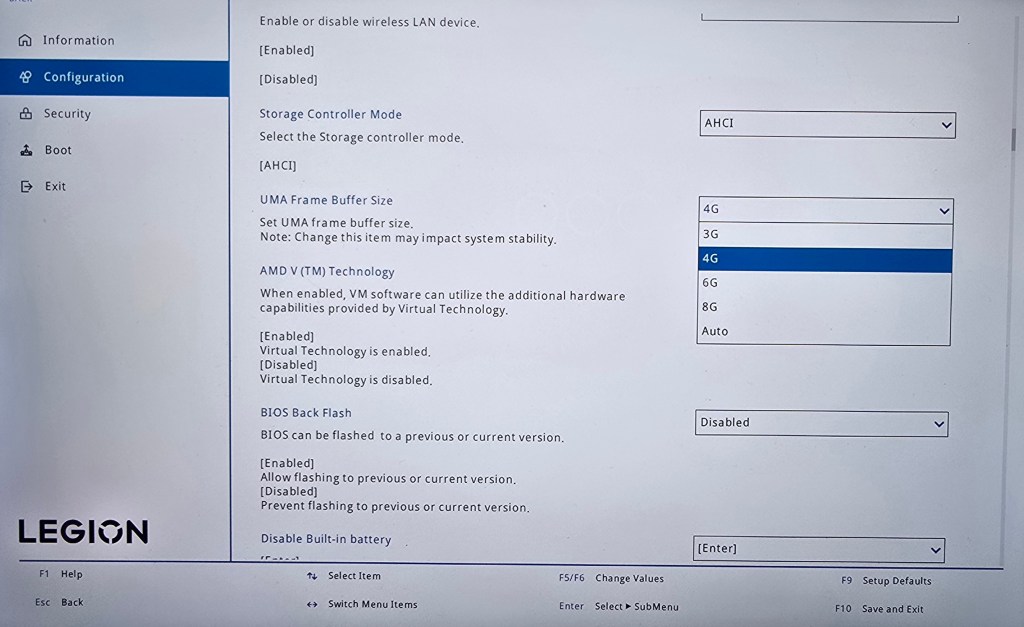
In the Legion Go’s BIOS there are two settings we can adjust that effect game performance. The first is how much of the system’s 16 Gigabytes of RAM is reserved to support the GPU. By default, 3 GB of VRAM is selected but this can slow some games down. I get better performance and game stability with 4 GB assigned to graphics processing. That leaves 12 GB for Windows and your game, which is plenty in most cases.
Shutdown -> Hold Power + Volume Up Overclock the RAMReserve 4GB VRAM
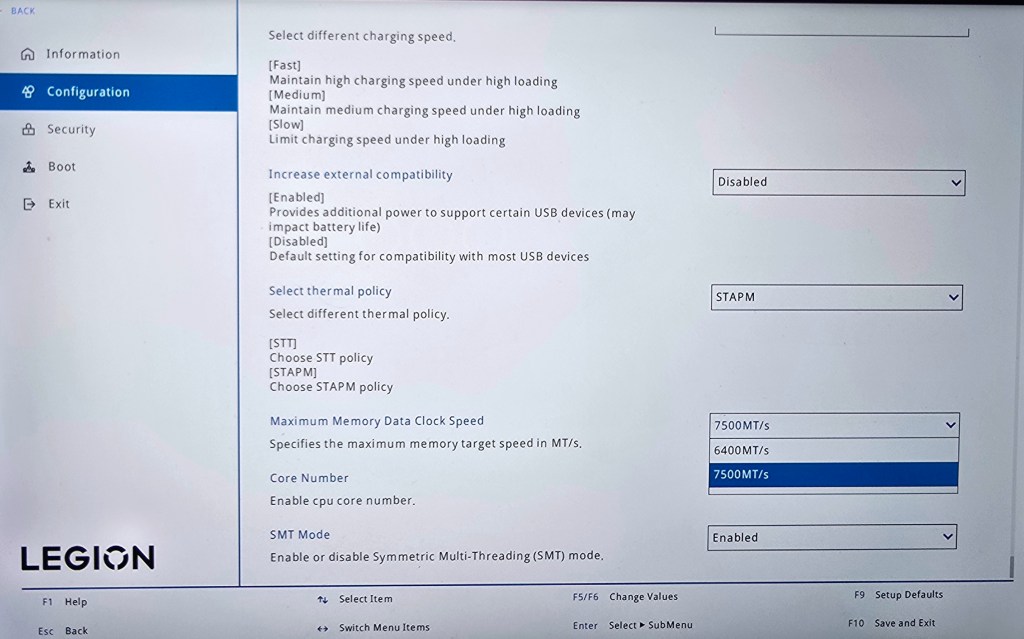
You can also overclock the RAM for an overall performance boost. Increasing the RAM’s speed will cause it to generate more heat. Excessive heat can impact CPU and GPU throttling. Consider the environment you play in.
Before you make either change, verify you are on the newest version of the system firmware. You Boot to the UEFI control screen to make these changes by shutting down first. Then hold down the Power and Volume up buttons at the same time for a few seconds.
Optimize Windows 11 for Gaming
The Legion Go is running Windows 11 Home. The default security posture of Windows 11 is not optimized for gaming. Specifically, memory integrity and the Virtual Machine Platform features of Windows 11 can slow down some games.
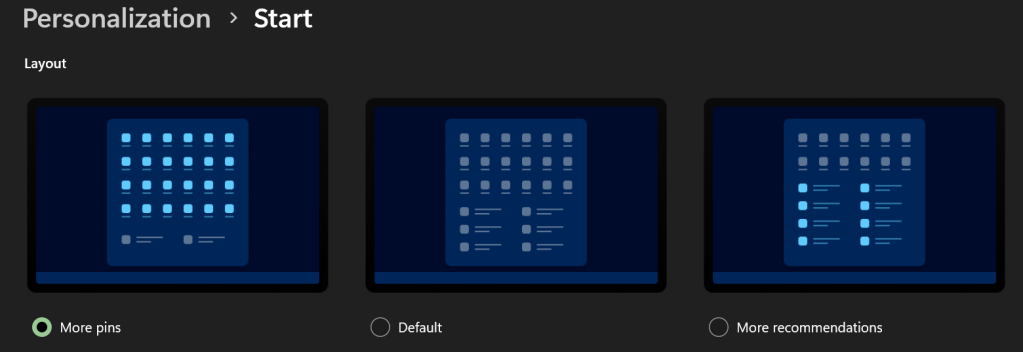
I like to PIN my games to Start. Go to Settings -> Personalization -> Start -> and select the option for more PINs if you do too.
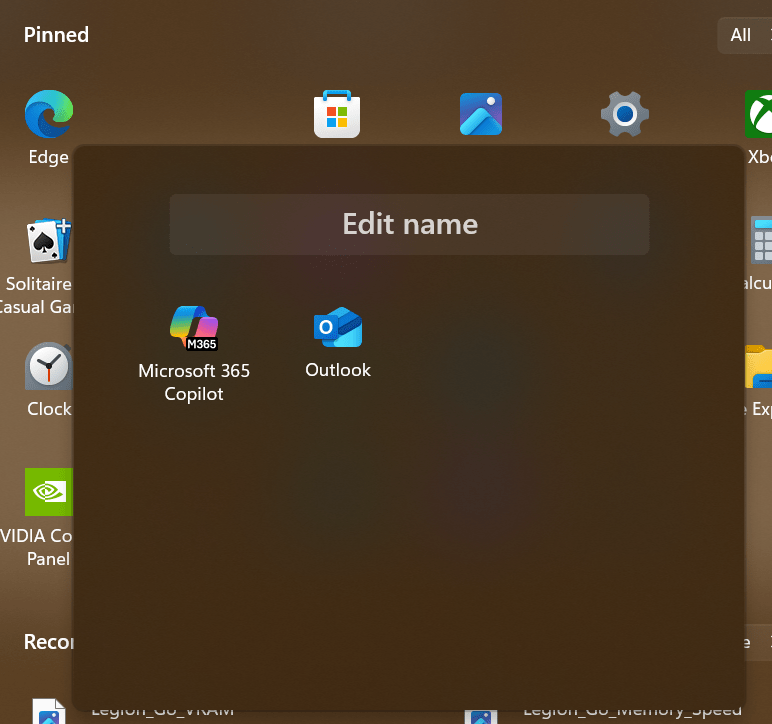
Make folders on the Start Menu. Dragging one icon onto another. Drag and drop icons as needed to add. Rename a folder by clicking into it. Right click on folders in the start menu to move them left or right.
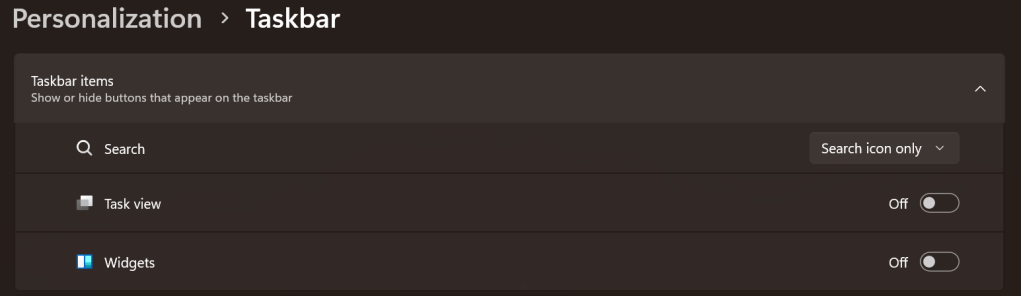
Maximize the task bar space. Settings -> Personalization -> Taskbar: Search -> Icon. Disable Task View. Disable Widgets.
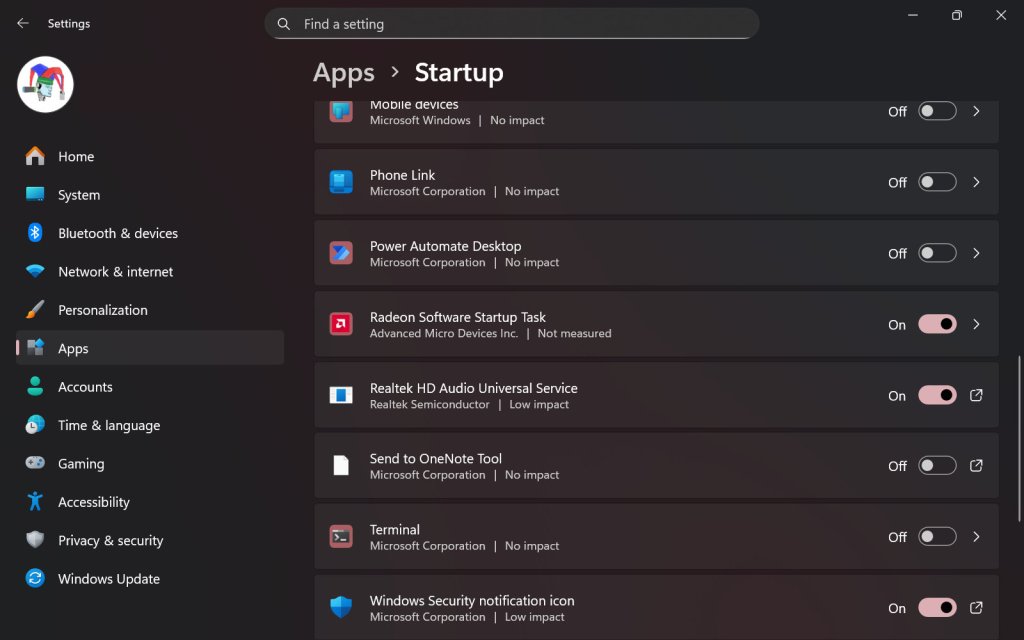
On my Legion Go, I disable most of the start-up apps. It helps conserve CPU cycles, RAM, and disk I/O for the games. Go to Settings-> Apps -> Startup. I only leave three apps toggled on. The Radeon Software Startup Task, Realtek HD Audio Universal Service, and the Windows Security notification icon.
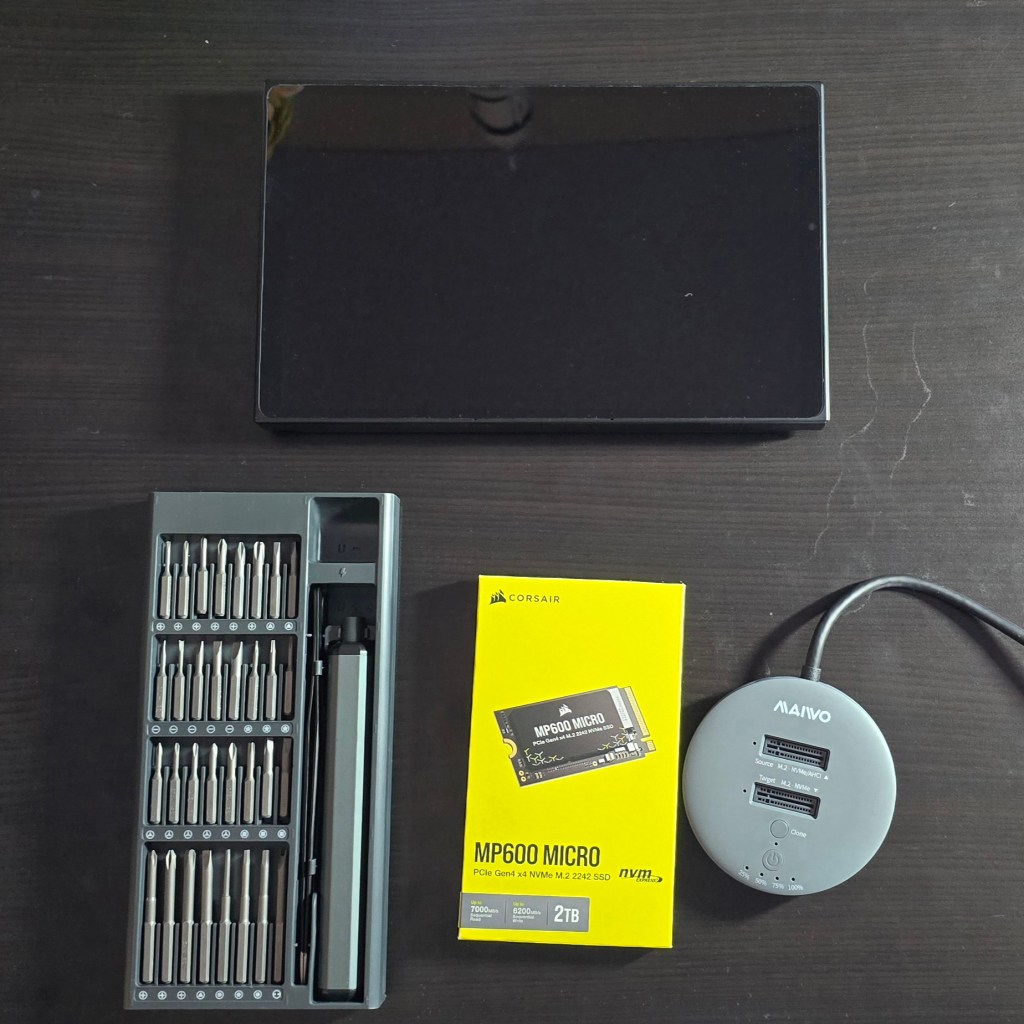
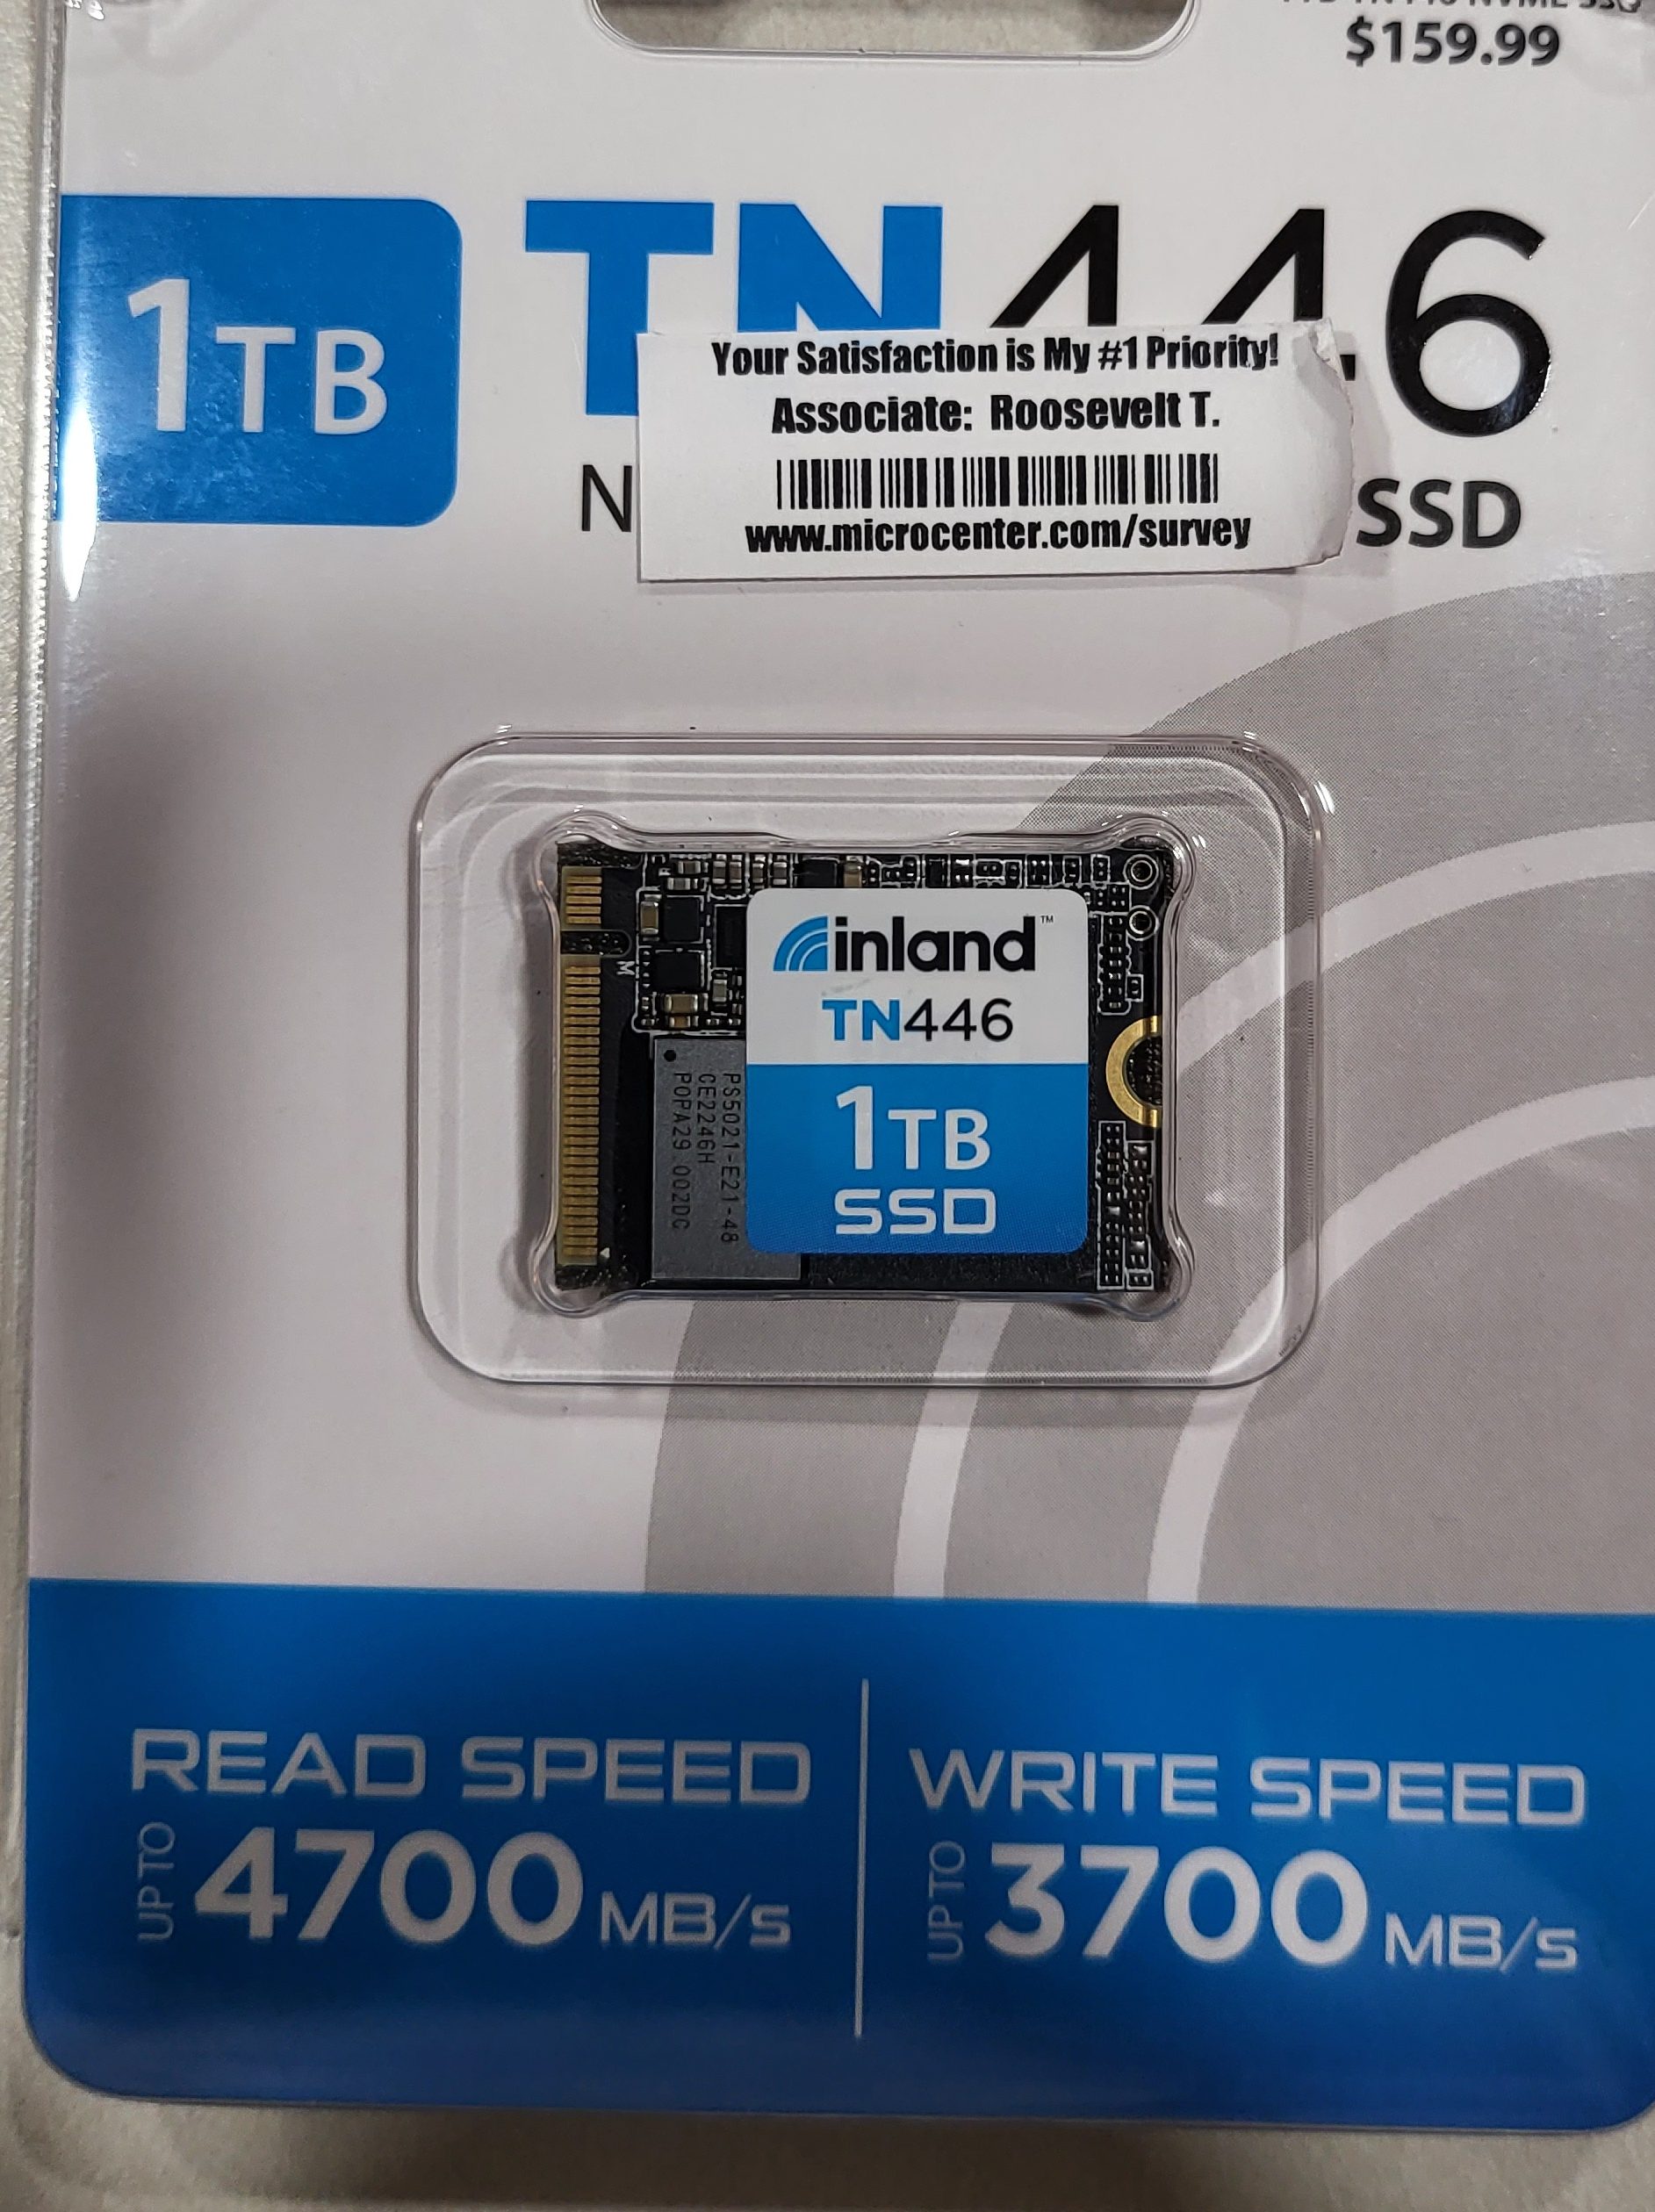
SSD Swap
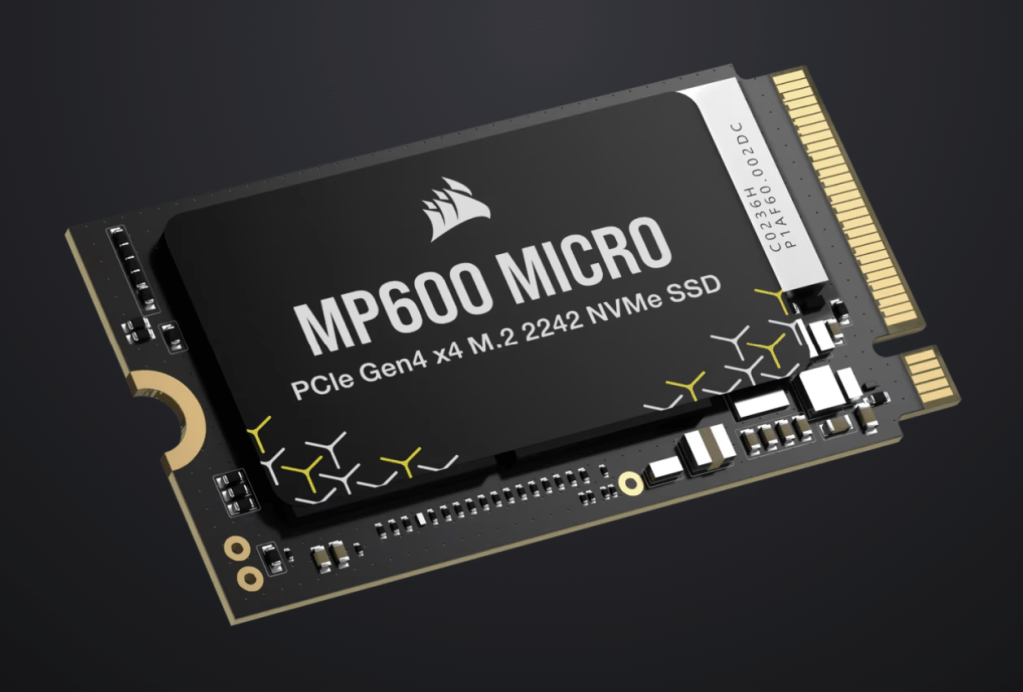
I replaced the factory storage with a much faster and higher-capacity unit from Corsair. The upgrade has had a major impact on daily life with the LeGo. Downloads, and loading times are much faster. I can store my entire active catalog of games. Everything feels snappy. Read I SSD Swapped My Lenovo Legion Go. It Was Worth It for the details and instructions.
Installing faster high high-capacity storage is a great upgrade.
The Legion Go is an excellent gaming computer right out of the box. Tweaks, changes, and upgrades like the ones above help make it even better. I use mine more than any other gaming system and that’s saying something.
I’ve written about my Legion Go before. It is a great machine for playing while hanging out with my family in the living room. I find playing games on the couch to be far more enjoyable than doom-scrolling these days. I don’t necessarily want to take the main screen in my house to do it.
I constantly switch out the games that I am playing at any given time. It helps keep my interest in the hobby active. The downside is that it can take a year or more to finish some of them. If I fall into playing a single title too much it starts feeling like a job rather than an escape. My solution is to have fifteen to twenty games in active rotation at any given time. This is where the Legion Go presents an issue for me.
Starfield consumes 150 GB by itself. In that context 512 GB can be a small amount to work with.
The SSD that comes in the Go from Lenovo is 512 GB. Five hundred and twelve gigabytes is enough storage to give most people an enjoyable gaming experience. For a game hoarder like me, it is a little restrictive. A few AAA titles and a handful of oldies is all that will fit on the factory drive.
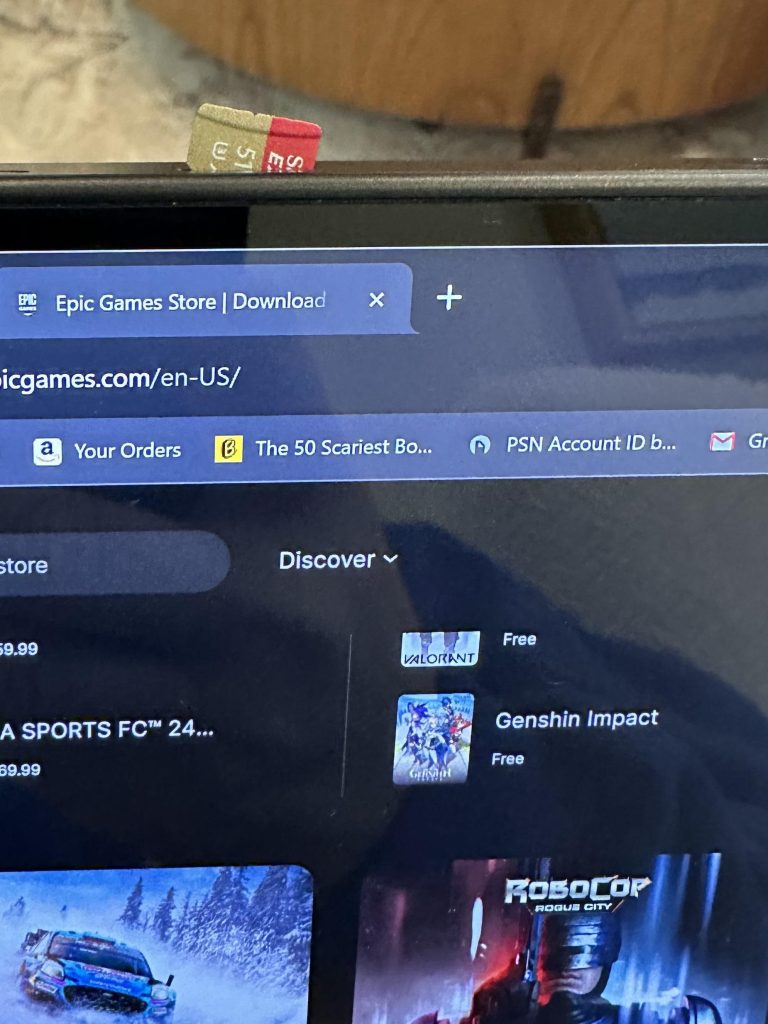
The device has an SD card slot, but I haven’t found a chip that can keep up with modern games. Older titles and emulated games work on the SD card without issue. The same goes for video and music.
SD Cards work well for small games and media. Large titles struggle.
Complex games like Battlefield 2042 and Doom Dark Ages fail to install on cards. Even my best SD doesn’t handle the big stuff. When I try, the install gets to between 40 and 50 percent and then crashes. I suspect the chip is overheating, but I haven’t investigated it yet.
After struggling with storage anxiety for a while, I decided to SSD swap my Go. I did some research online and watched several different sets of step-by-step instructions on YouTube. I cobbled together the procedure below from them.
If you proceed with any of these instructions, you are doing so at your own risk. These machines are full of small, fragile parts. Electronics are sensitive in general. You could brick or otherwise damage your machine if you make a mistake.
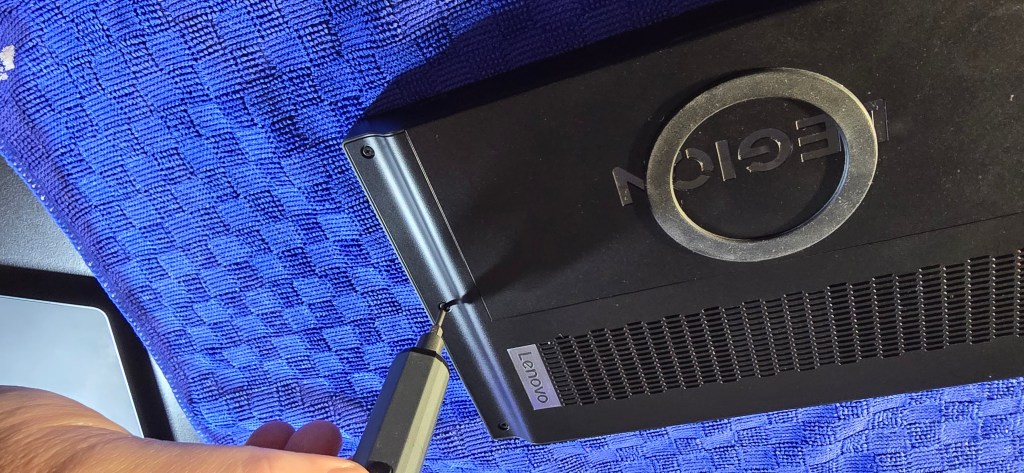
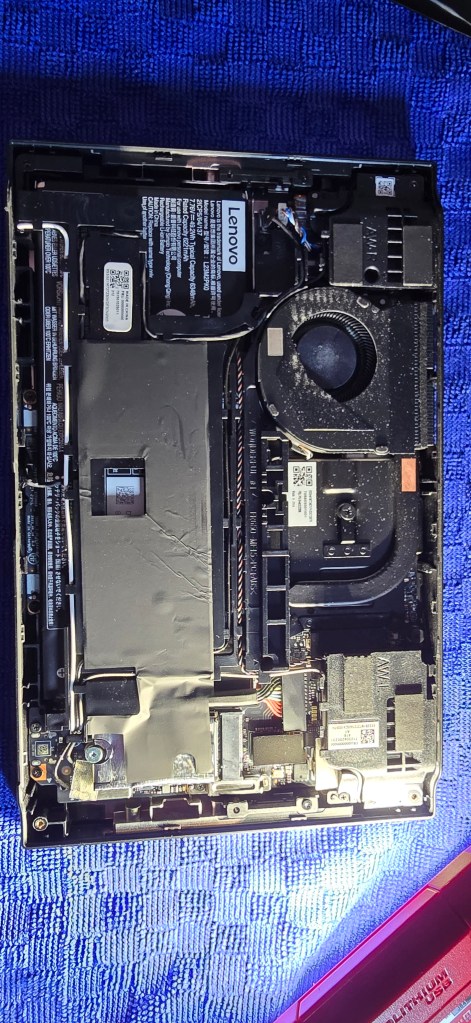
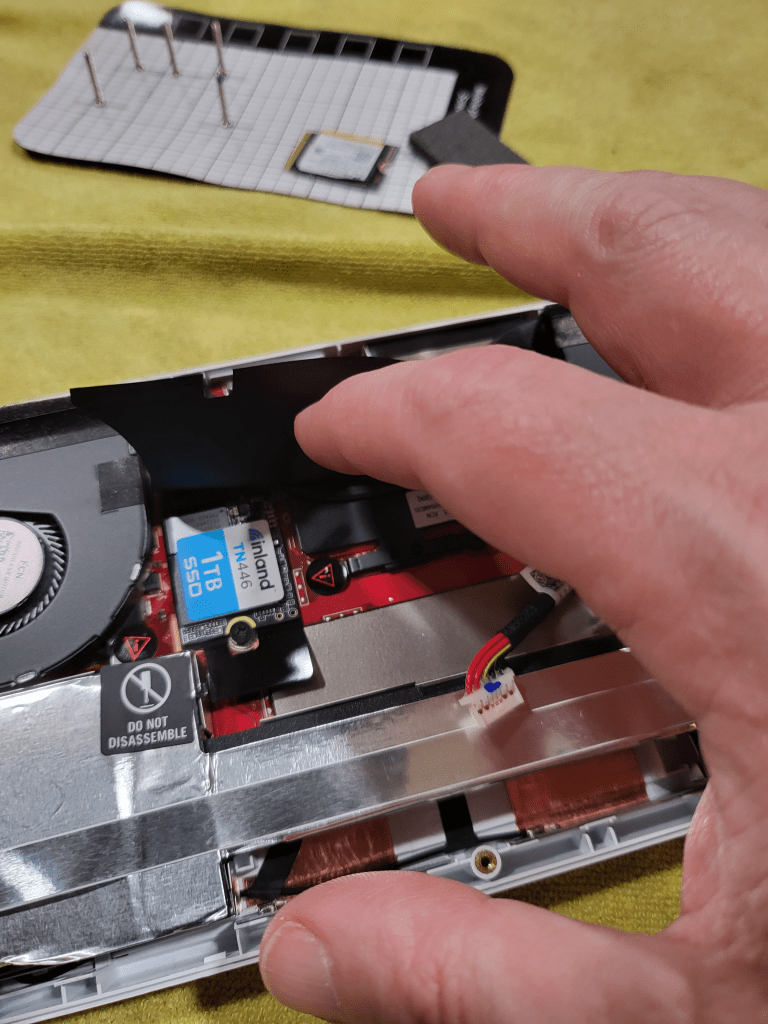
Undo the six case screws on the back of the unit.
You need a size 0 Phillips screwdriver for this.
Use a guitar pic, or plastic spludger to pry the rear panel off the Go.
It helps to insert your tool just to the right of the corners on each side.
Remove the sticker that covers the battery terminal.
Do not discard or damage it.
Peel back the sticker that covers the battery lead and the M.2 drive.
Do not completely remove this sticker, just peel back the portion covering the SSD and fold it back.
Verify that your Go didn’t get turned back on while you were removing the case. It’s easy to bump the power button. Shut down if it did.
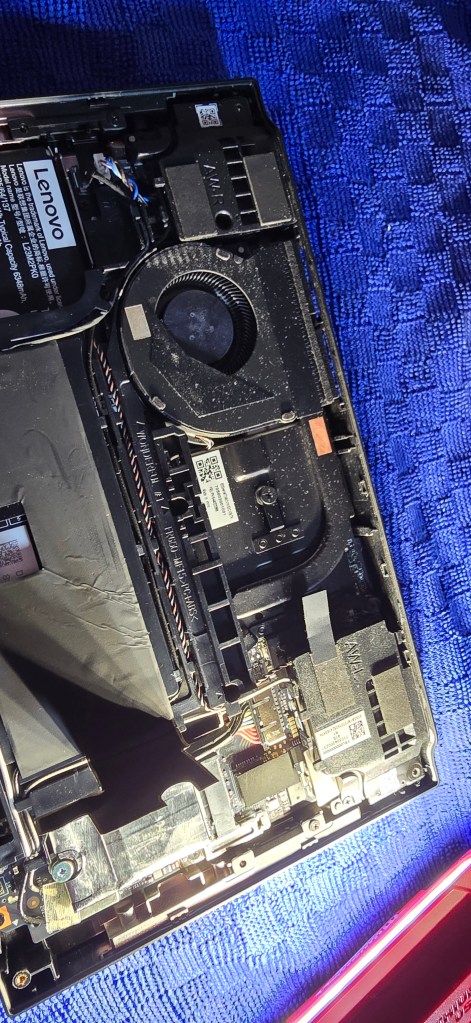
Unscrew the silver M.2 screw.
Size 1 Phillips screwdriver bit.
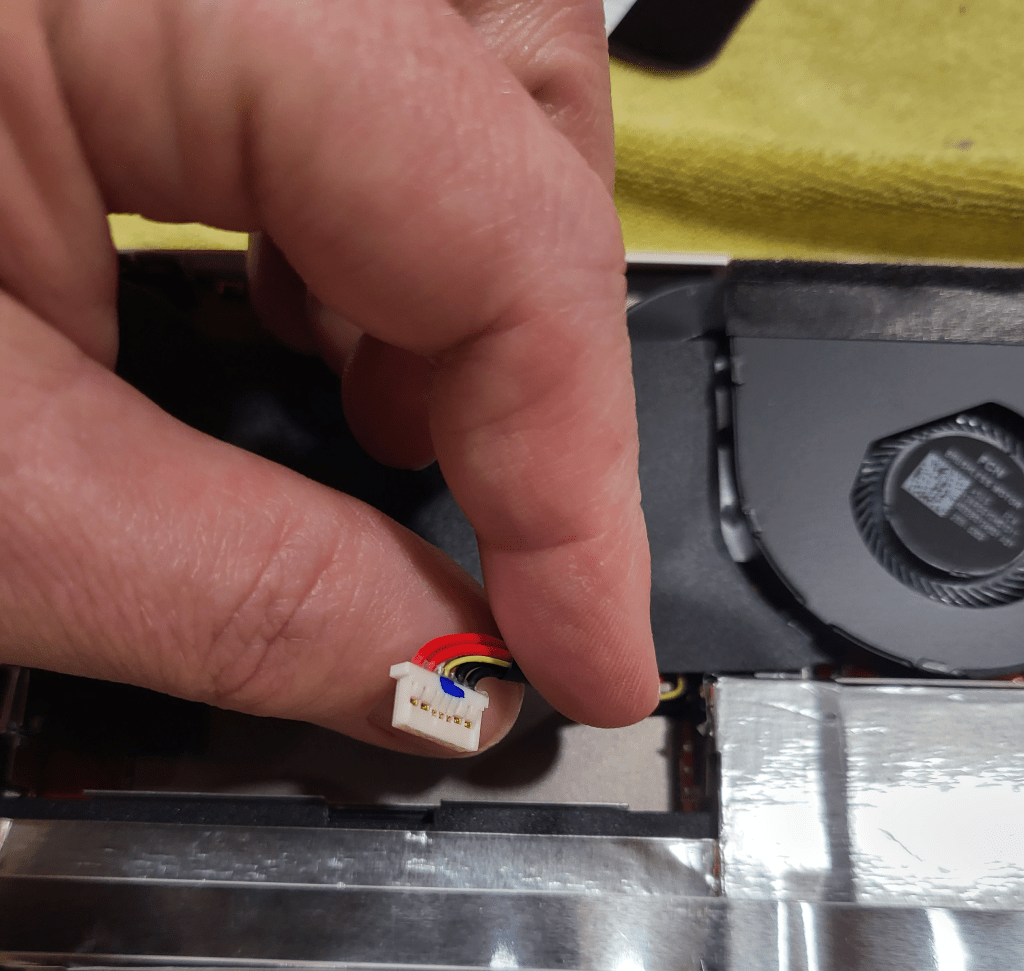
Unplug the battery lead from the terminal.
It pulls out easily. If you need to apply force to get the cable loose, you probably missed step 3. I did 😀.
If you want a contiguous C partition after cloning, you’ll also need to extend the 512 GB C volume. There are multiple options for doing this. Partition management software like AOMEI’s partition assistant is a free and easy option.
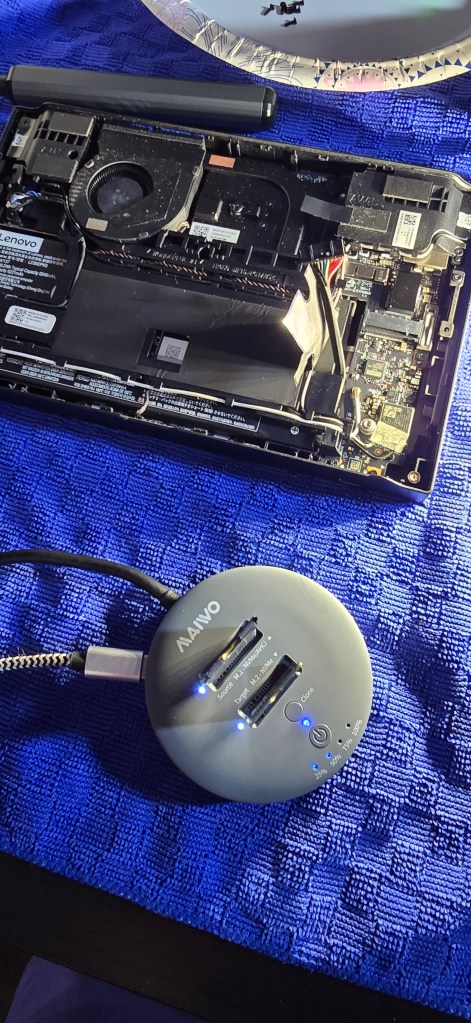
Peel the Mylar sleeve off of the factory SSD without damaging the wrap.
It is very fragile. I suggest using fine tweezers and a lot of patience.
Wrap your new M.2 SSD with the Mylar.
You can run without the Mylar, but your new drive will wear out faster.
Install your new M.2.
Reconnect the battery lead.
Replace both the battery terminal and SSD stickers.
Replace the rear panel. Press down firmly along the edges to click it back into place.
Replace the six case screws.
I went with a Corsair MP 600 Micro 2 TB NVMe M.2, size 2242 for my new storage. It is a much faster drive than the original. It hits 7,000 MB/s while reading and 6,200 MB/s while writing.
The new disk has boosted the Go’s overall performance more than I expected. I did not realize the factory disk was slow enough to have been affecting the entire machine.
Using the Go as a computer is an improved experience. Downloading and installing games, updating software, rebooting, they’re all noticeably faster after the upgrade. The Windows OS feels snappier. There are benefits in many areas besides just fitting in more games.
Many aspects of game performance are also improved. Shader caches are processed faster. Games load in half the time. Matches start faster since the maps load quicker. Patching and updating all of my titles is a breeze now too.
I have been happy with the results of the upgrade. It took me about forty-five minutes to complete from start to finish. If you are considering the mod yourself, I suggest spending a little more on a fast drive. You’ll get both a snappier computer and the ability to keep more of your library on hand.
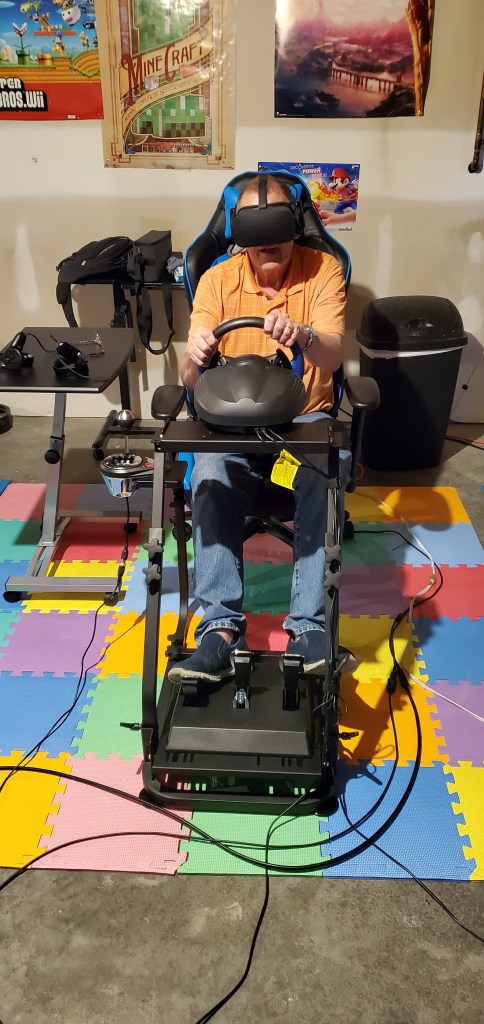
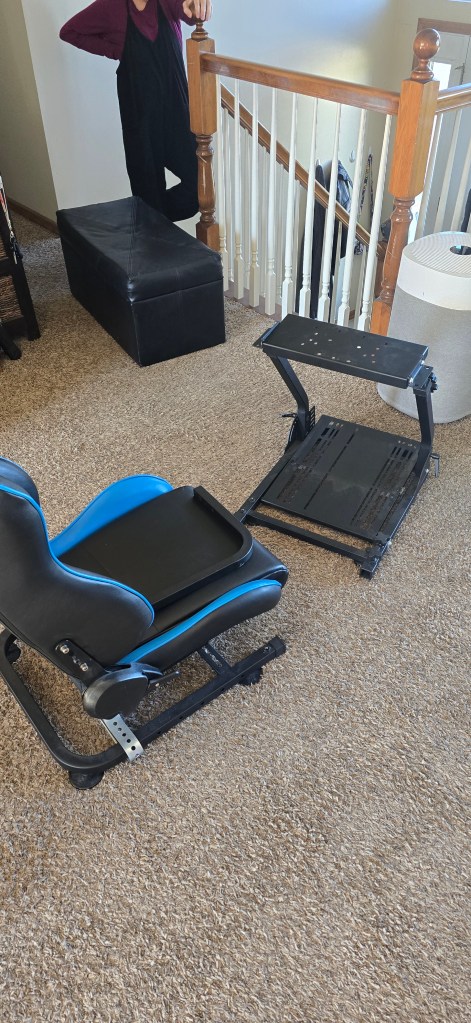
I have steadily upgraded my driving simulation cockpit over the years. I started out by mounting my wheel to a table. Then I upgraded to a folding wheel stand. Eventually I combined several parts into a makeshift simulator. I used this last set up for almost two years. It had a decent seat on one metal frame and the controls mounted on another. I parked it in front of a wall-mounted screen and called it good enough.
My dad testing out my first cockpit frameTS150 based cockpit with gaming chair, first manual setupLogitech wheel mounted to table connected to Xbox 360
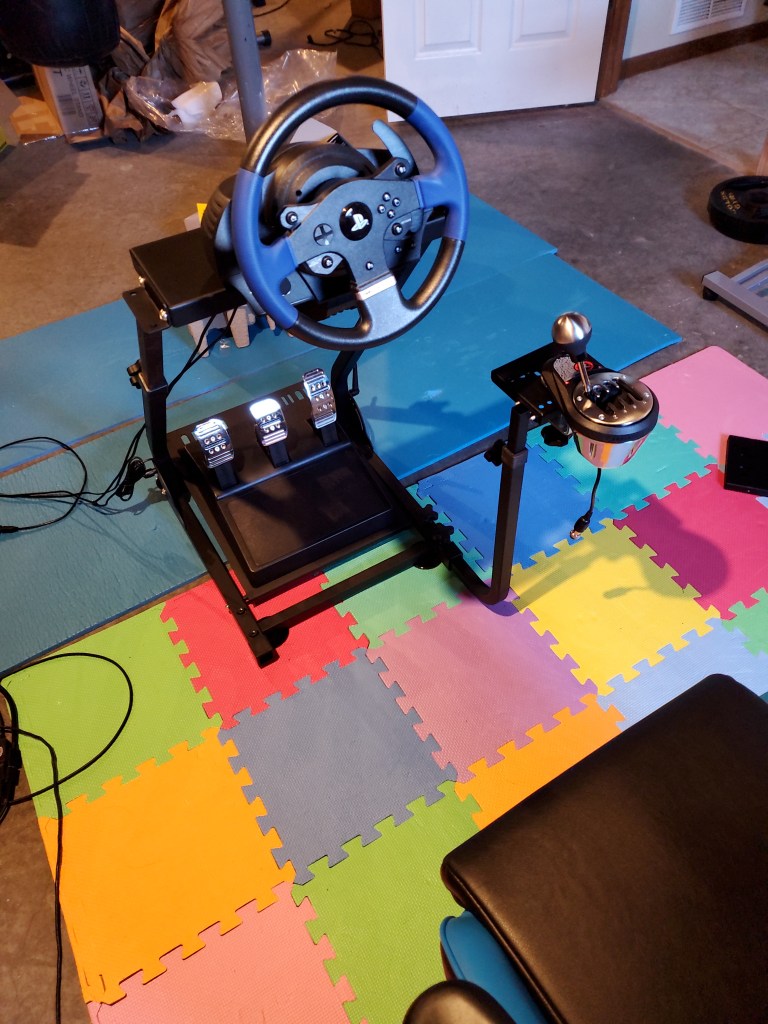
The DIY simulator worked. I used it for more than a year. But… there were problems. It wasn’t very comfortable for one. The chair and wheel being on separate frames meant they didn’t line up perfectly. They weren’t quite the correct height for each other either. The wall mounted screen made achieving the ideal distance between it and the wheel a problem.
A DIY simulator built from a gaming style office chair on a floor stand, an Amazon office chair cockpit, and a wall mounted screen.
Being too aggressive on the pedals caused the two units to slide away from each other mid race. That was always fun. Oh, and there wasn’t anywhere to mount the gear shift. I was stuck using just the paddles. I had plans to fix the problems. While listing out the stuff I would need, I reconsidered. It was going to take a lot of time and effort to fix all of the issues. Not to mention materials.
Frames together as close as I can get themFrames apart
I eventually convinced myself that I was spending enough time with the hobby to justify investing in a better setup. I had some specific requirements in mind. I wanted something that was stiff enough to not flex, move, or shake. It needed to be as small as possible since it had to fit in the spare bedroom, aka my office. Comfort and good ergonomics were high on the list too.
The solution I ended up with would also need to be very adjustable. Besides driving, I am also a MechWarrior player and space combat fan. I plan to take up fighter-jet combat and Microsoft Flight Simulator games when I have mastered my current genres. Who knows? Maybe I’ll want to give World of Tanks a shot sometime too.
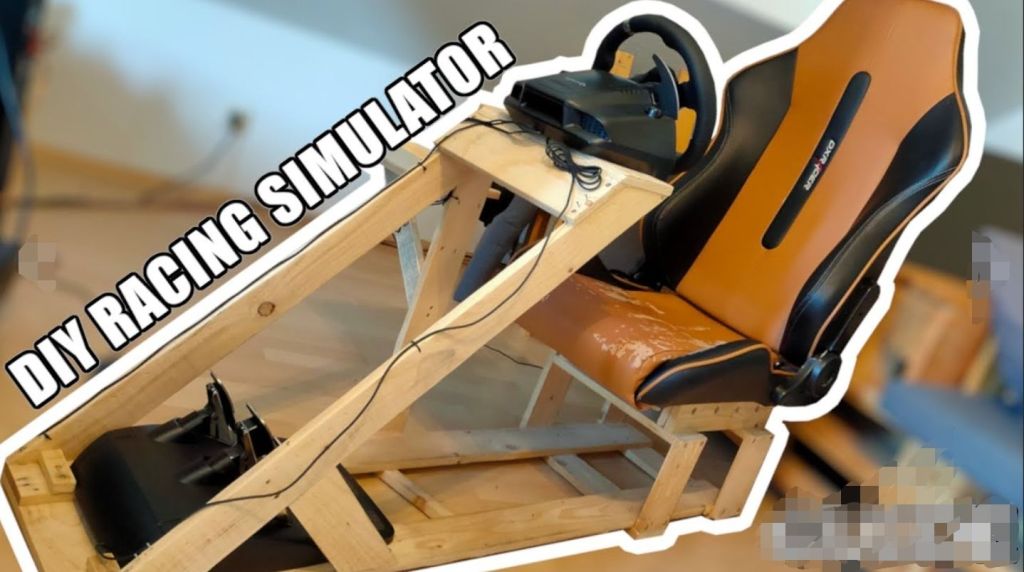
I started researching options. There are so many choices! There are plans to build your own from PVC, wood, and even metal. Extreme builds use the shells and interiors of real vehicles. There are also vendors like NLR, Sim Lab, PX1, and others that manufacture ready to race products.
DIY is a popular option.
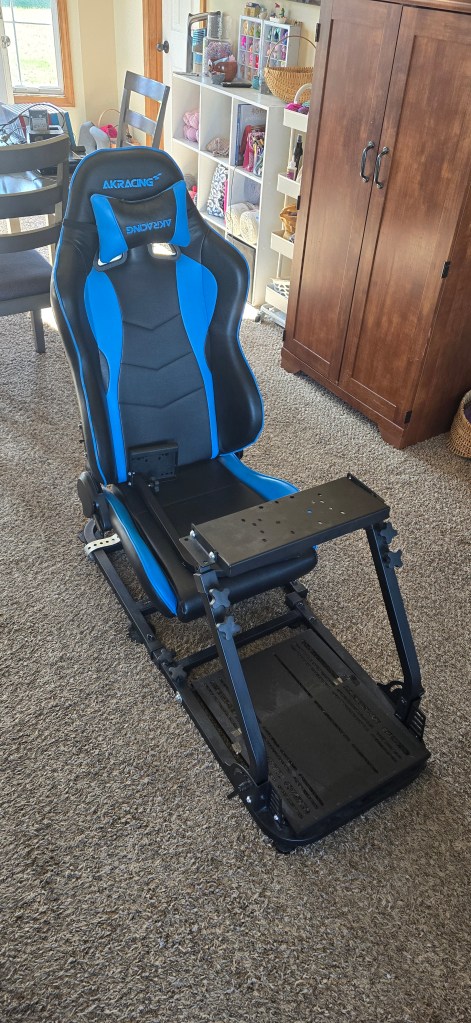
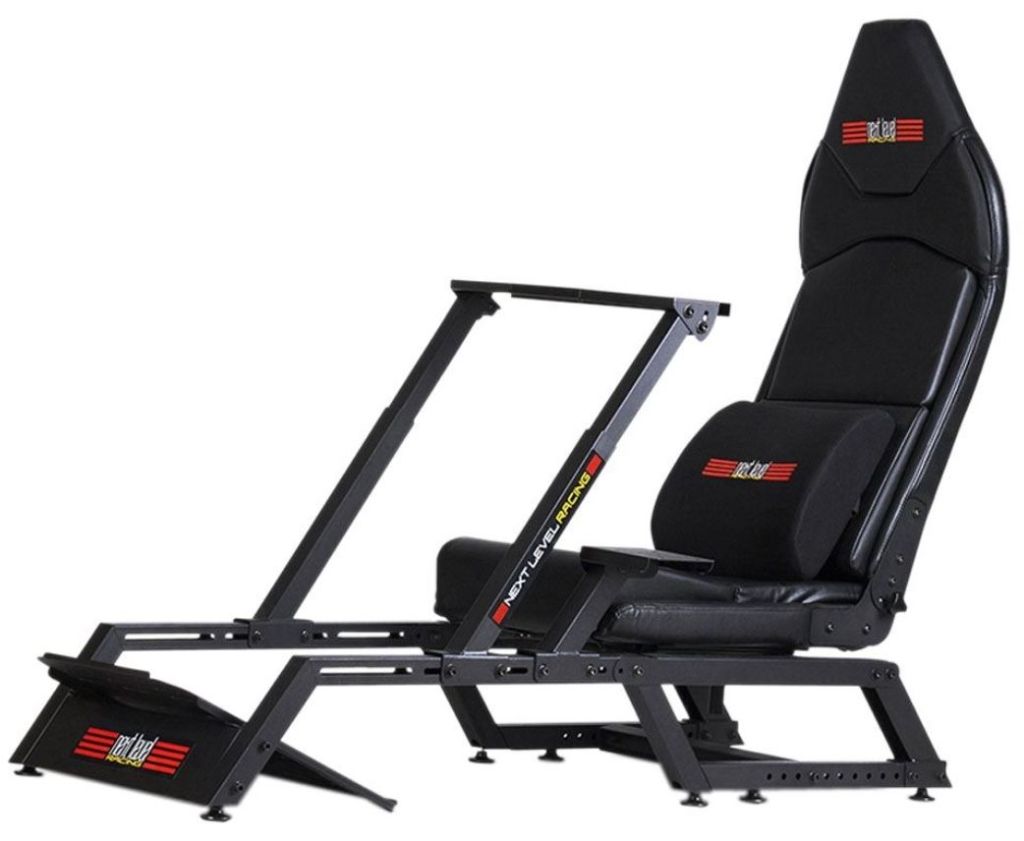
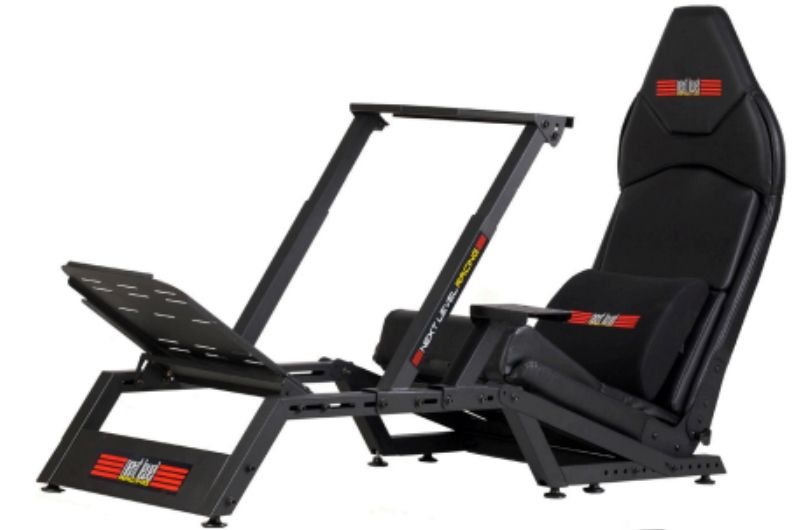
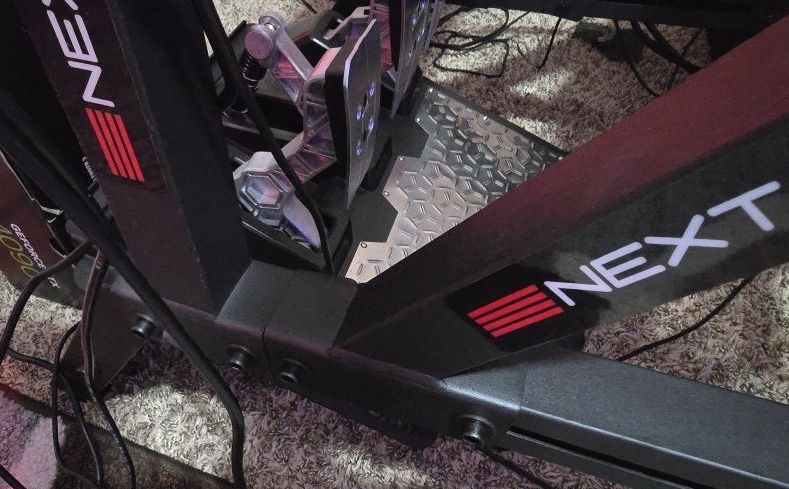
In the end, I went with Next Level Racing’s NLR-S010 model. I chose it because it is a medium weight, super adaptable, multi-role frame. It can adjust between the upright seating position of GT/sports cars and the zero-G position of a formula driver. It takes up less floor space than many other cockpits. NLR also sells a bolt-on kit that transforms the unit into a fighter jet / mech cockpit.
GT / Sports Car PositionF1 / Fighter jet
I bought the F-GT, the HOTAS mounting kit, and the optional monitor stand. The unit includes a built-in seat. I already had the PC, monitor, wheel, pedals, and speakers.
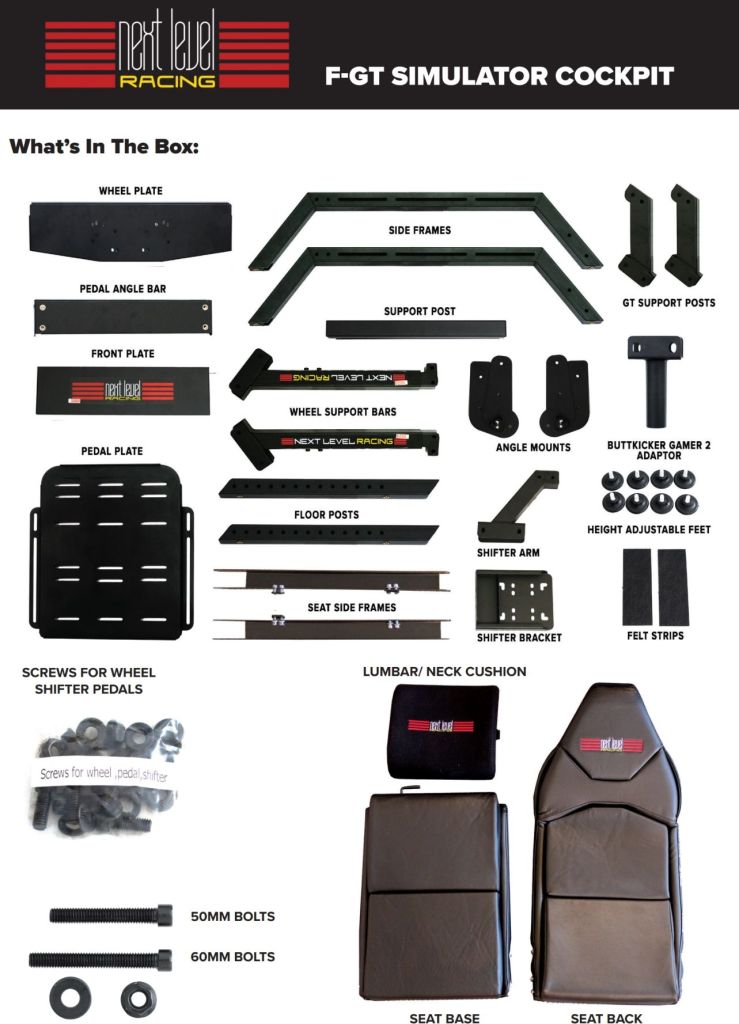
The frame is built from all metal parts. You are responsible for all of the assembling. I highly recommend securing some assistance. You are also going to be ahead of the game if you acquire a drill with both screw driver and allen key bits. I also suggest a good wrench set.
The instructions are pretty straightforward. We didn’t have any issues putting the frame together. We didn’t screw anything down past finger tight until we had a chance to position everything to fit me.
The parts
I went through with the power tools and cranked everything as tight as it would go to lock the setup in. It took two of us ( experienced build team ) about four hours to assemble the frame and get my electronics bolted on. Everything was ready for the first run in five hours. You can speed assembly up if each person has a drill with the oposing bit. For example, one with a socket wrench and the other with the allen key.
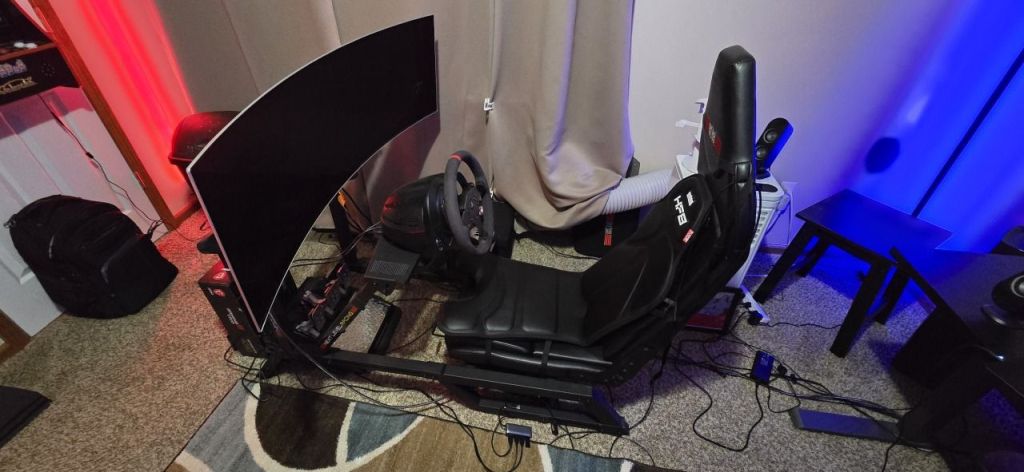
On that first run, I was astonished by how much my sense of immersion was improved. It was obvious right off the bat. Almost every driving setup I have used to date moved in some unwanted way. The NLR-S010 didn’t. No twisting, sliding, or shaking was detected.
Comfort was also exponentially improved over any of my previous setups. The seat and wheel were realistically positioned relative to each other. The angles and locations of the controls and screen were as they would be in many real-world vehicles.
The seat is not as bolstered or as cushioned as I would like, but it does the job. It is rail mounted and can move forward or back.
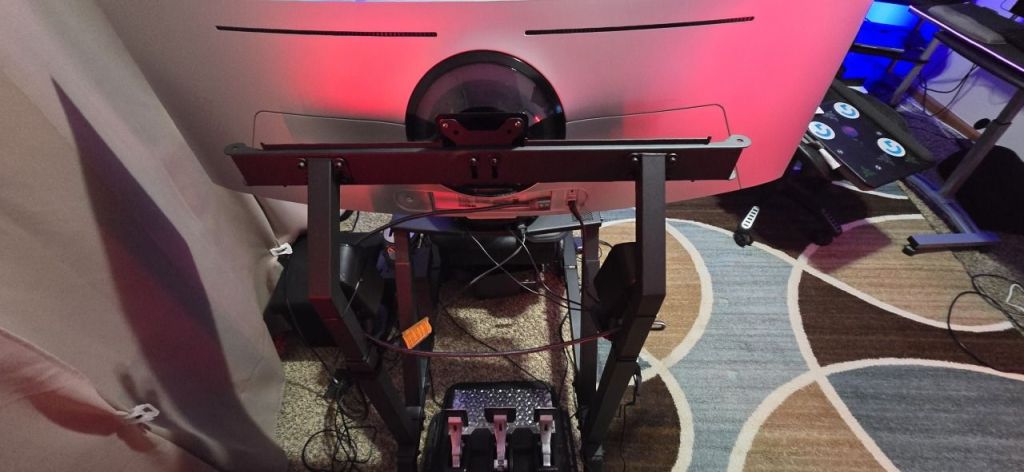
The unit fits me well. I am five feet and nine inches tall. If I were much taller, this cockpit would be too tight. This is especially true if you purchase the integrated monitor stand like I did. The stand takes up space on the frame that would otherwise be used to increase the distance between the wheel and driver.
The optional monitor stand fills the mounting rail.
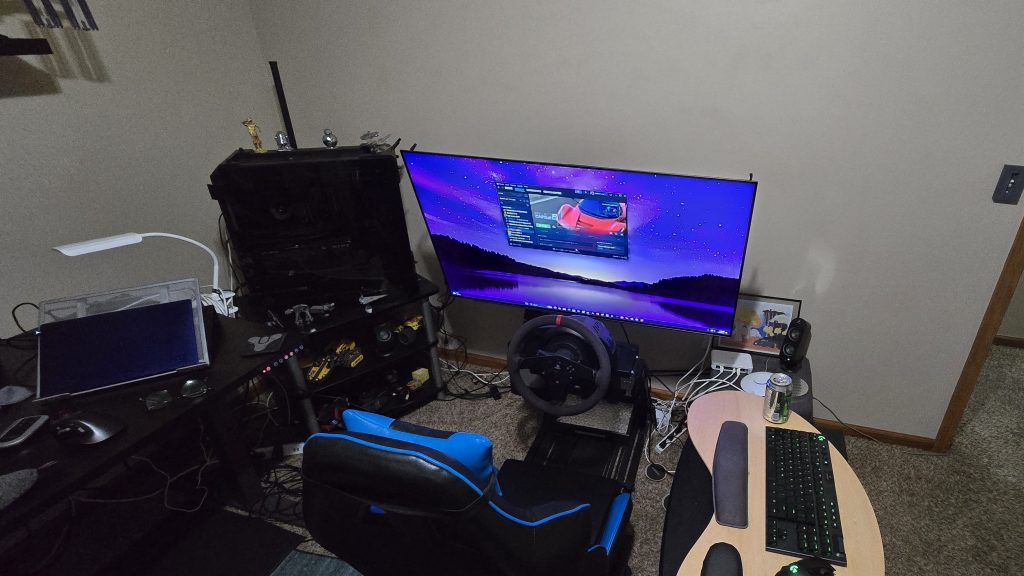
The F-GT is smaller than other full cockpits, but it is still a big piece of furniture. You need a dedicated space about the size of a couch for this thing to live in. I went with a 49″ ultrawide monitor instead of a three-screen setup to save even more space. It’s still huge.
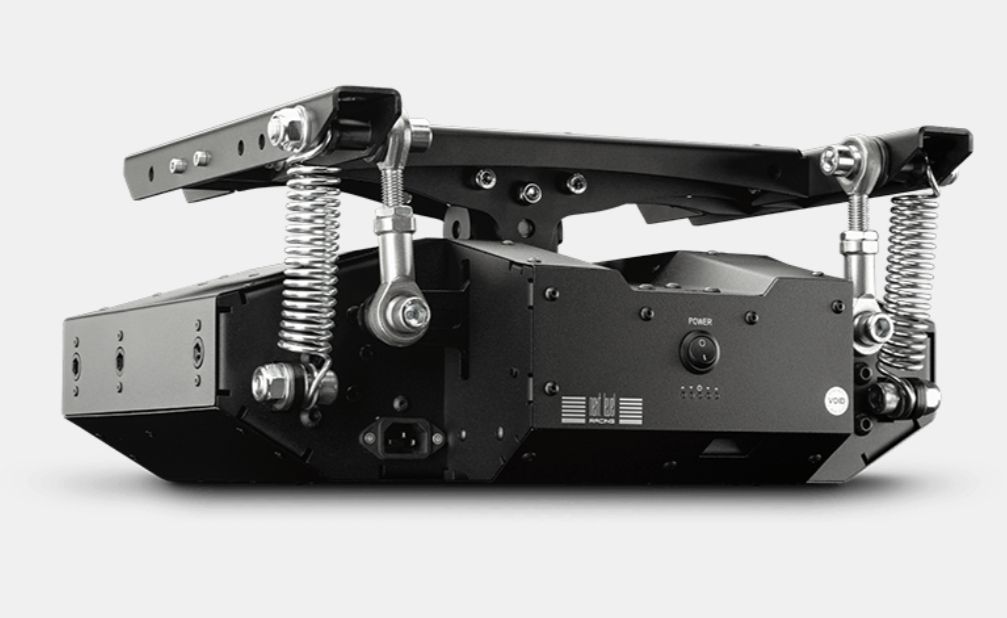
Supposedly, this thing is compatible with Next Level Racing’s motion modules. I don’t know if I’ll ever take it that far. I did pick up one of their H8A haptic chair add-ons. It uses a bunch of vibrating pads sown into a chair cushion to further simulate a car. There will be a full review of it published soon.
The NLR-S010 is compatible with the v3 motion platform.
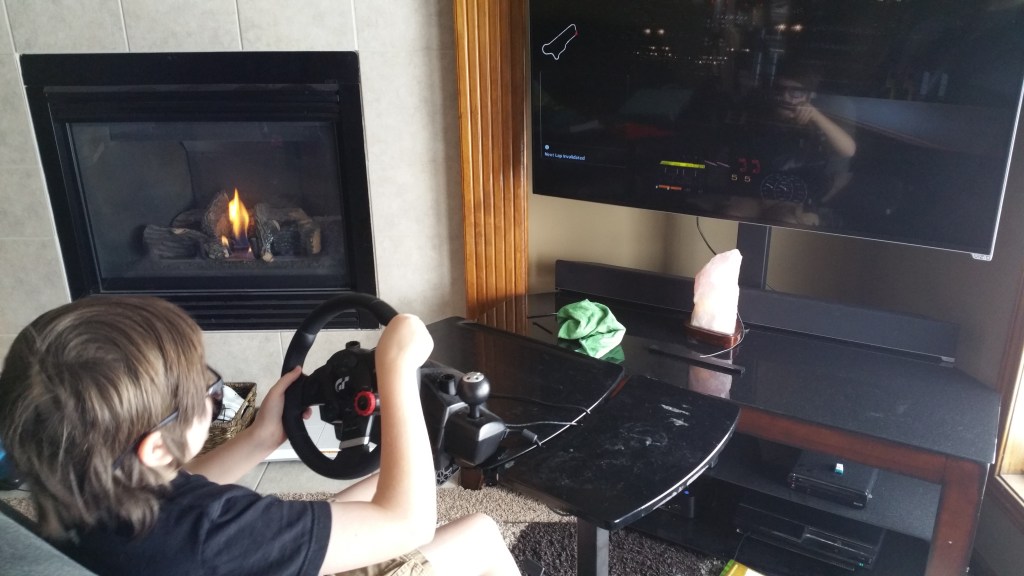
I’ve had the F-GT set up for several months and have spent a lot of hours in the seat. I practiced for and raced in the Logitech racing series in Forza Motorsport. I had a lot of fun learning to drive that McLaren to the edge of my abilities. I’m happy with my purchase. I expect to be using this thing for the next several years.
My spouse and I had stopped wearing our jewelry during the COVID lock downs and subsequent work from home years. Now I’m back in the office. I was in for a surprise when I tried to put my wedding band back on.
My ring was extremely tight the last time I had worn it. Now, it won’t go back on my ring finger at all. Well, that isn’t quite true. I got the ring to slide into place using soap. I noticed my finger swelling just a few seconds after I got it on. I wrenched it off and ordered a bag of cheap silicone bands from Amazon while I considered my options.
Since purchasing a new ring was on the table, my spouse suggested that I consider smart rings. I liked the idea, but everything I read said they needed to be on your index finger. It wasn’t clear if there was a specific feature that didn’t work on other fingers.
I had to up size my ring after not wearing it for almost two years.
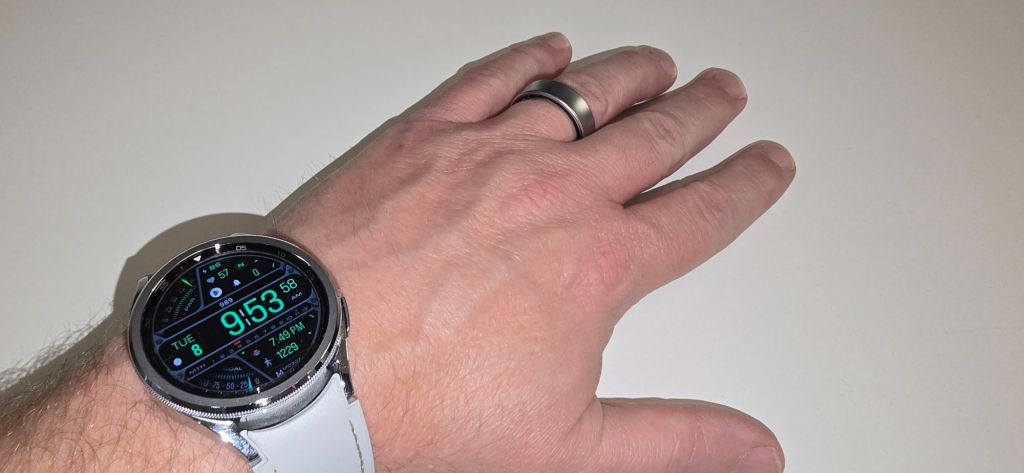
Samsung shows the ring being worn on other fingers in some of their advertising. That was all the encouragement I needed. I know there are other smart rings on the market. Some of them have more robust feature sets. I already have a Samsung smart watch and phone. We all know that sticking to your preferred manufacturer’s ecosystem gets you added functionality.
The Galaxy ring continues with the brand boosting trend. Samsung’s ring and watches work together to conserve power. The ring will turn off certain sensors when it detects a compatible Samsung smart watch being worn. The ring’s battery can last up to thirty percent longer because of the co-op feature.
The Galaxy watch and ring work together.
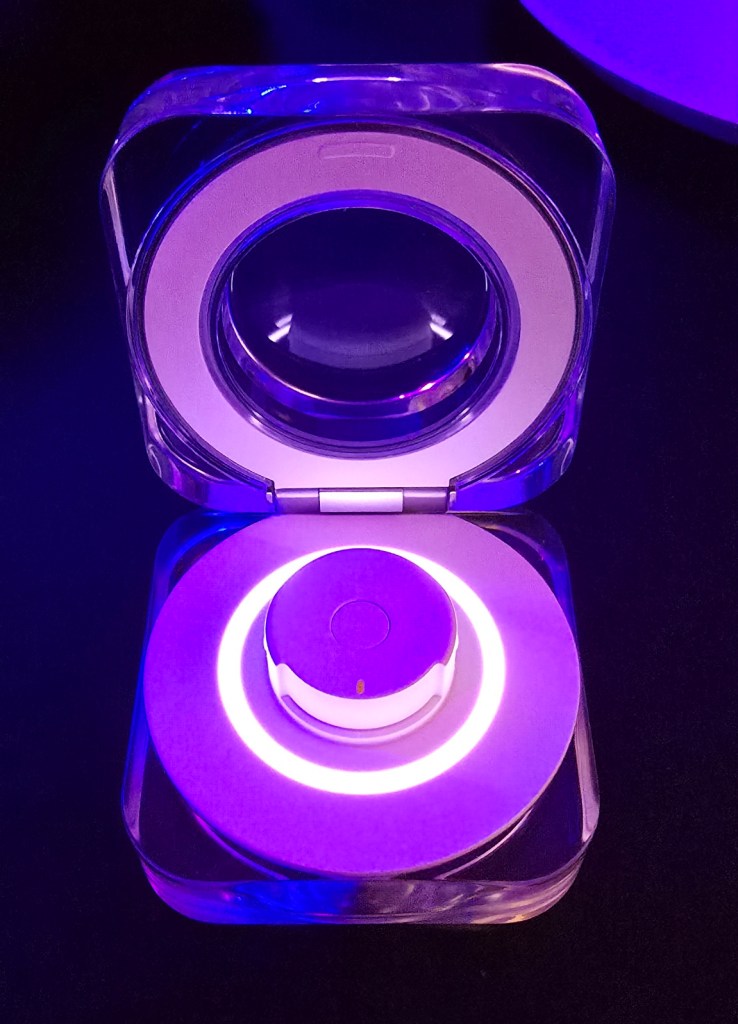
The ring charges in the attractive case, included in the box. The charging case has its own built-in battery that can juice up the ring one and half times. I haven’t needed to change it more than the advertised once a week. Except for charging sessions, I’ve worn the smart ring twenty-four hours a day over the last two months.
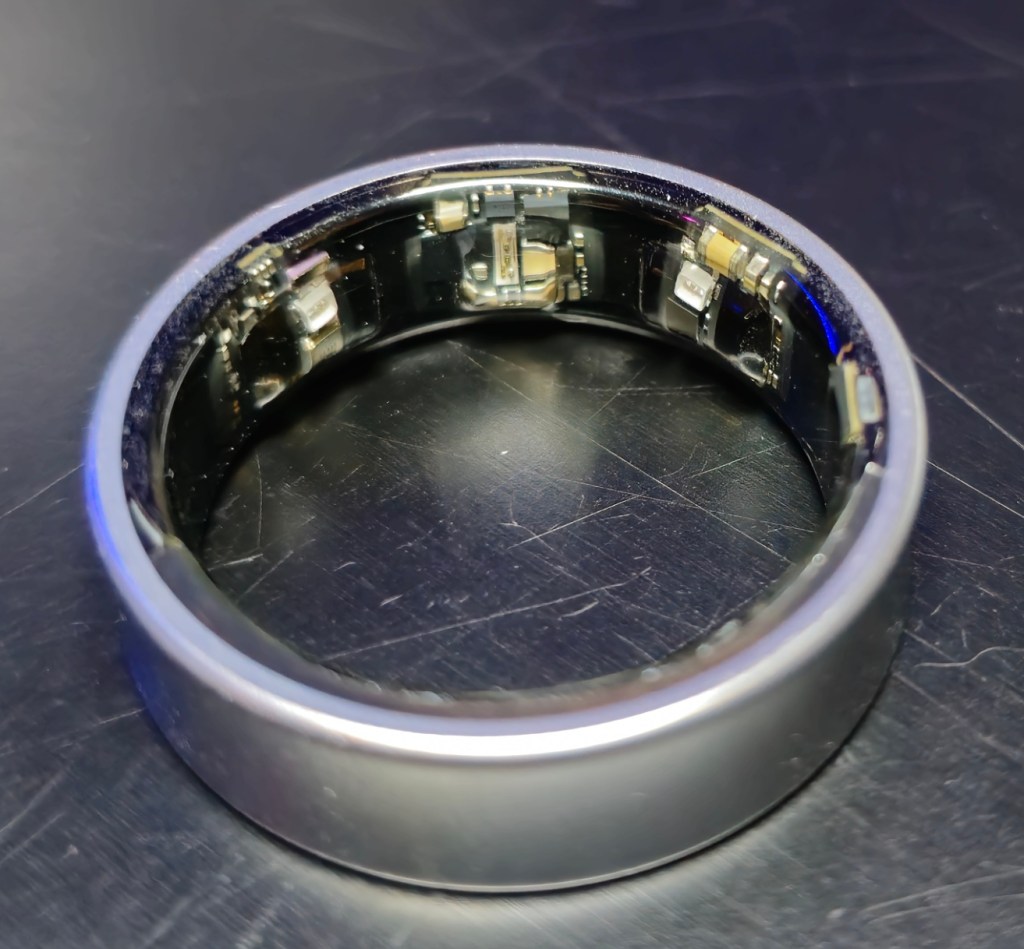
The interior surface of the Samsung smart ring is not entirely smooth. There are some small bumps where the LEDs used to peer through your skin are housed. The band itself is a couple millimeters wider than my wedding ring. It’s also a little thicker than a metal ring would normally be. The added height makes it stand prouder on your finger. Wearing a smart ring takes some getting used to for sure.
Samsung will send you a set of replica rings to find your size. They also suggest that you wear the replica for at least 24 hours, preferably even longer. They are aware that some people won’t tolerate the differences between it and a perfectly smooth metal cylinder. After a few days of acclimation, the fit isn’t any more uncomfortable than any other ring is to me. I notice it on my finger if I pay attention. Otherwise, it fades into the background.
The three LED housings are almost smooth, but not quite. Don’t skip wearing the replica for a full day and night to be sure the textures don’t bother you.
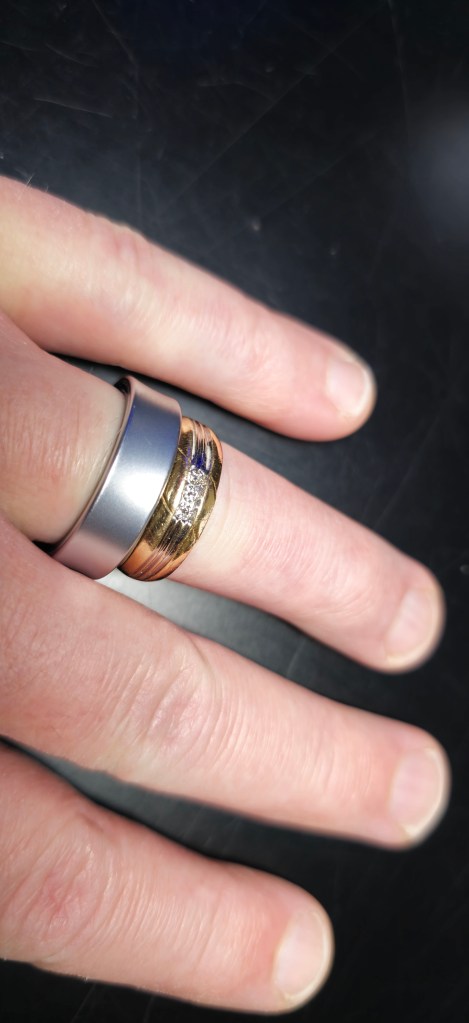
My titanium smart ring is fifty percent lighter than my traditional gold wedding band. I intentionally ordered a size eleven even though the ten would also slip on and off my finger. An eleven was the largest size that would stay on my finger while I vigorously shook my open hand about. I’m still happy with that decision. I’m convinced that the LED bump-outs would be more uncomfortable on the smaller sized ring.
When I wear new jewelry, the contact between metal and skin causes a sensitivity. It feels like a sunburn. If the metal is hypoallergenic, like gold or stainless steel, the spots dissipate quickly. Otherwise, they turn into an allergic rash.
Even with that metal sensitivity, I can tolerate Samsung’s ring. My skin was slightly irritated where the laser housings made contact. There was also a tiny spot on the top of my finger. The titanium edge touches it when my hand is closed. All were gone within a week.
The bottom of the smart ring is not tapered like a gold band typically is. I was concerned this would make it push into my adjacent fingers uncomfortably. I don’t really notice it though.
I’m an average office worker and suburban family man. The Galaxy ring has been durable enough to keep up with my daily life. Washing hands, sleeping, showering, and exercising, have not phased it. I’ve worn it while working in the yard, working on my car, and while squeezing my hands inside computer cases. It has been banged against plenty of hard surfaces and shows no signs of wear so far.
Nobody casually notices that it isn’t a traditional wedding band. Or at least nobody mentions it when we are chatting. If I point it out during conversations, people seem surprised to not have noticed. Then they are usually interested in its features and functions and the reasons why I would wear one.
There are several reasons. The first is that I’ve always been a technologist. I live to mess with this stuff. The second is that I want to monitor my sleeping habits and correlate that data with how I feel overall. I find that my smartwatch is not comfortable enough to wear overnight. The ring is easy to sleep in.
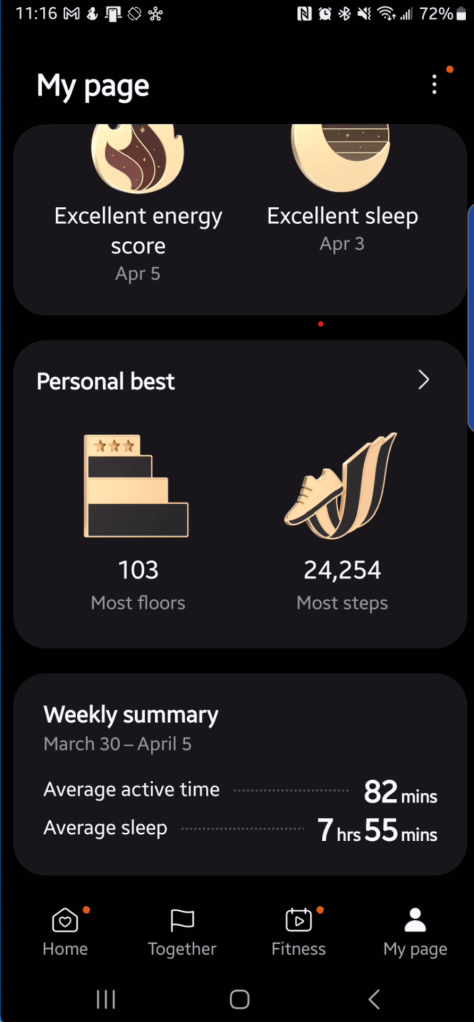
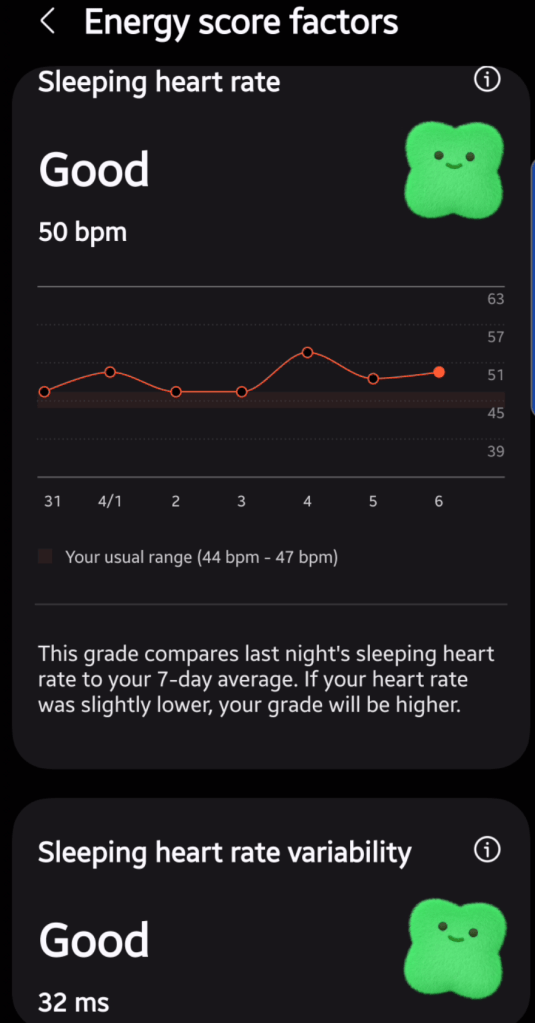
The data the ring tracks is revealing. I wear it for more hours than my smartwatch, so it collects much more data. I can see the impact of the decisions made about physical activity. For example, if I skip my exercise routine, my energy score drops, and I don’t sleep as well. Something I knew already, but it is interesting to see it spelled out on a dashboard.
I appreciate the heads up from the app when I haven’t gotten the right sleep. Occasionally I wake up feeling fine, but it warns me that I could have a challenging day ahead. It’s usually correct when that happens. It’s like GPS for my mood. Knowing about it ahead of time helps me re-route some of the negativity caused from being tired.
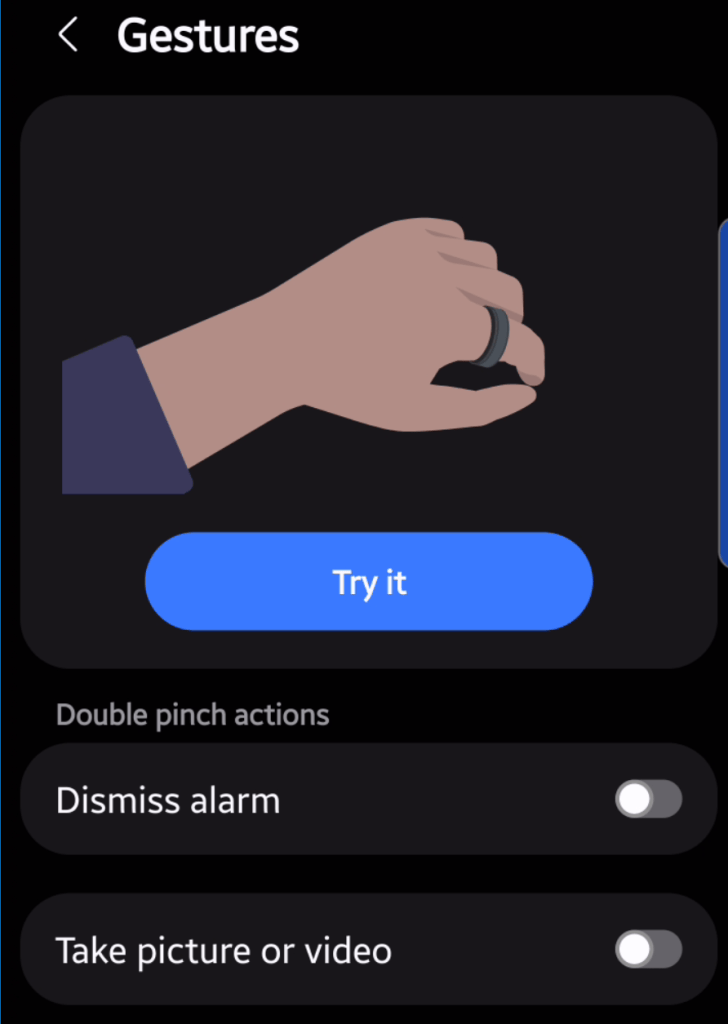
The Galaxy ring senses your heart rate, blood oxygen, and skin temperature. It also includes an accelerometer to track steps. There are a couple of gestures you can turn on. One snaps a phone pic and the other turns off your phone’s alarm. They activate when the ring detects your fingers making a pinching motion.
The pinch motion’s detection is probably one reason for Samsung recommending your index finger over others. I am able to engage the gesture with my ring finger and thumb. It is a lot more difficult than activating it with my index finger. I can see how some people might struggle with it.
Making the gesture with my ring finger and thumb is challenging but workable.
Samsung’s Health application is impressive all on its own. It acts as a dashboard for your body and is capable of tracking a mind-boggling number of attributes. Their gear detects and feeds the app health metrics. The data is used to create impressive charts and graphs showing the impact of your health choices over time.
Samsung’s Health app is a dashboard for your body. The more data you feed it, the better the gauges are.
Seeing how my choices influence daily life is my favorite motivating factor of Samsung Health. The downsides of using it are the ubiquitous plagues of modern life. Chiefly, data collection and leaking concerns. You have to trust Samsung’s Galaxy AI with a lot of personal information to get the best reports and insight.
If you can tolerate sharing your health data with Galaxy AI and its masters, the insight is useful. I’m not sure it is necessary, but it is useful. I seem to notice and correct poor health choices faster when I check the app and its notifications. Predictions about my overall mood and energy are helpful in preparing for my day ahead, much like checking the weather.
There’s a peace of mind that comes from wearing sensors that track your body’s hidden functions. Occasionally, I wake up and catch the LEDs in full scan mode under the edge of the ring. For some reason that I can’t articulate, I find it comforting.
The LEDs light up the underside of your finger while they are measuring.
Are smart rings revolutionary tech that will change the world? Probably not. You can absolutely gain insight into your body’s workings from wearing one, though. It you wear rings anyway, swapping an analog one out to get the data could be worth it. So far, it has been for me.
When the Legion Go launched, I was really interested in it. On paper, it fixed the minor annoyances I had with my ASUS ROG Ally. It wasn’t quite enough of an upgrade to justify purchasing one.
Lucky me, my partner got me one for Christmas, and I’ve been playing it ever since. I’ve played Call of Duty Black Ops 6, Halo Infinite, and Project Cars 2&3. I’ve also played Microsoft Flight Simulator, SIMS 4, Marvel Rivals, and various emulators on the handheld.
The built-in kickstand is something I use a lot.
I can’t say enough about the AMD Ryzen Z1 Extreme APU. The powerhouse chip runs games from this generation at 1900×1200 and nearly 100 FPS. You’ll need to enable AMD FSR on the device and configure your game to use it to get that performance.
An AMD APU shares RAM between the GPU and CPU. You can adjust the amount of DDR memory that each function is assigned from the available pool. Most games will work on 4GB of Video RAM and 4GB of System RAM as other similar handhelds have proven time and again.
The Go has 16GB, so you can assign 8GB to the CPU and 8GB to GPU. This lets you run more graphical processes. This means higher textures, more shadows, and better post processing without losing frame speed.
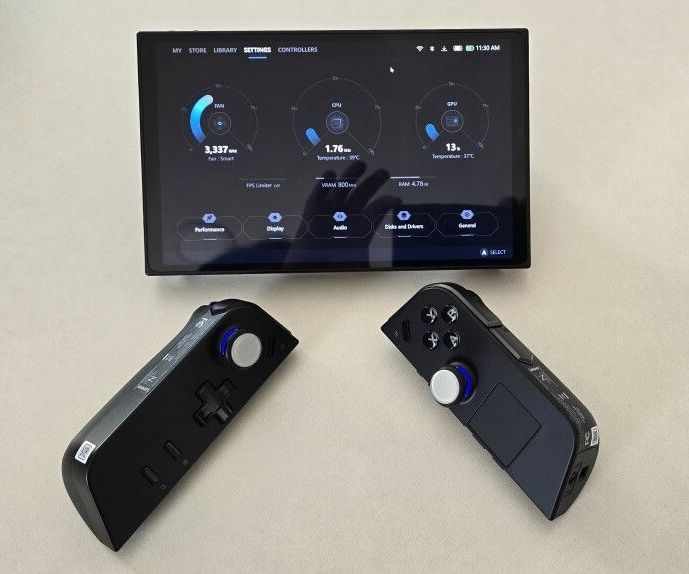
In addition to the memory advantage it has over similar systems, the Go has a small built-in touch-pad. It’s located on the lower portion of the right controller. The little pad is not unlike those found on Valve’s Steam Deck, but it lacks the advanced pressure sensing.
I use the mouse function constantly when navigating game menus. It’s a bar setting kind of feature. I think manufacturers should include one on all handheld game systems released in the future.
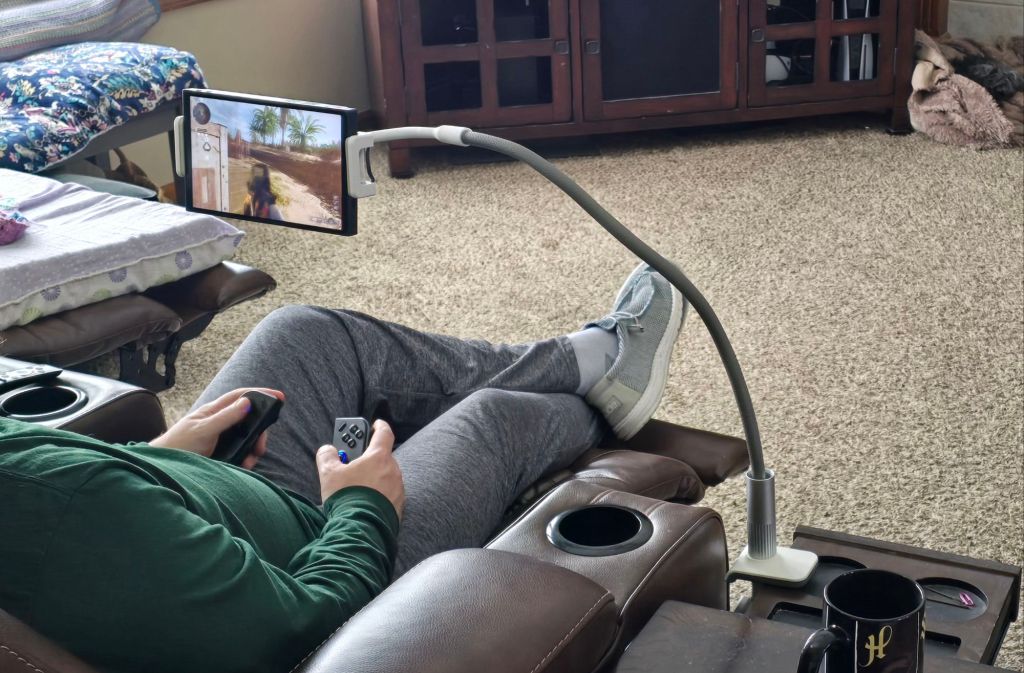
Speaking of controllers, the Go’s are removable a la’ the Nintendo Switch. I can not overstate how much of an advantage in ergonomics this design is. I have a “gooseneck mount” that I put the display in. It holds my screen in the perfect position, even in bed. Then, I remove the controllers and am able to keep my arms and hands in natural positions instead of crossing my body.
Removable controllers are a big ergonomic advantage.
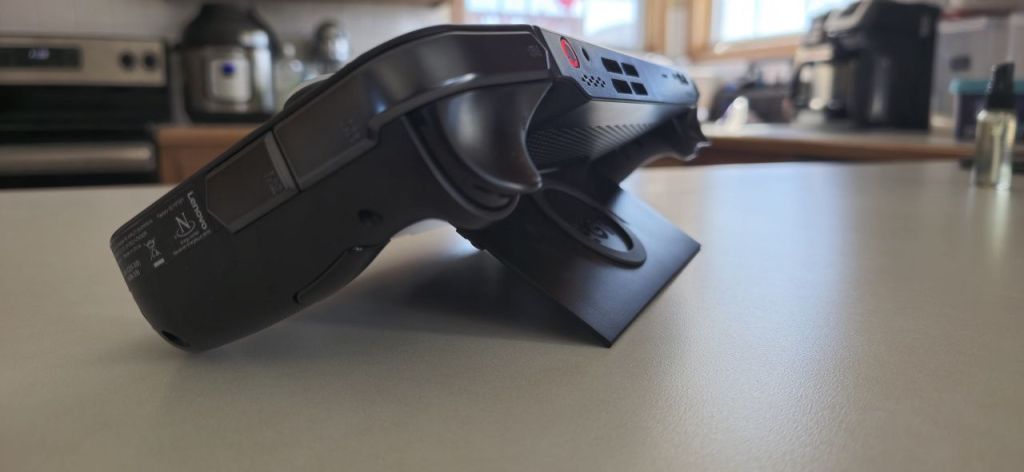
You might think that I’ve run out of upgraded features to describe, but the Lenovo engineers were working overtime on this thing. Pop the right controller off and flip the FPS switch on the bottom. Set it in the included slider stand, and it becomes a pistol grip mouse. This function takes some getting used to, but is quite effective once you master it.
In addition to the gaming prowess, the Legion Go is a surprisingly capable laptop replacement. Remove the controllers, open the built-in stand, and pair a Bluetooth mouse and keyboard. The experience is similar to other 2-N-1 tablets. All beit on a slightly smaller screen than most. I’ve written docs, worked on spreadsheets, and remoted into all kinds of systems this way.
The Go makes a great portable computer if you add a keyboard and mouse.
The Legion Go can play most modern AAA titles like Starfield, Black Ops 6, Halo Infinite, and Forza Horizons 5 in 1900×1200 at around on one hundred frames per second. After you tune the game for the device. I frequently win online matches on my lunch break at work using it.
Beyond the normal future device wishes of better battery, lighter, and more powerful, there’s nothing to complain about. My Legion Go is the perfect form factor for this type of device, given the available technology. I’ve been extremely happy with it. Does anybody want to buy a used Ally Z1 Extreme?
I’ve had my eye on a new tablet for quite a while. I’ve been using my wife’s old 5th generation iPad mini and a Surface Go 2, but both of those devices are getting a little old, and their batteries are shot. So, when I learned that Best Buy was having tablet sale to compete with Prime Day, I headed over to see what they had.
I didn’t want to spend more than five hundred dollars, needed something that worked with a stylus, and it had to have at least a ten inch screen. These parameters still left a lot of choices on the table. The options were further narrowed by my work. The device would need to support multiple profiles so I could use it in the office and at home while keeping the data and apps for each separate. This last requirement effectively removed all of the iPads from consideration.
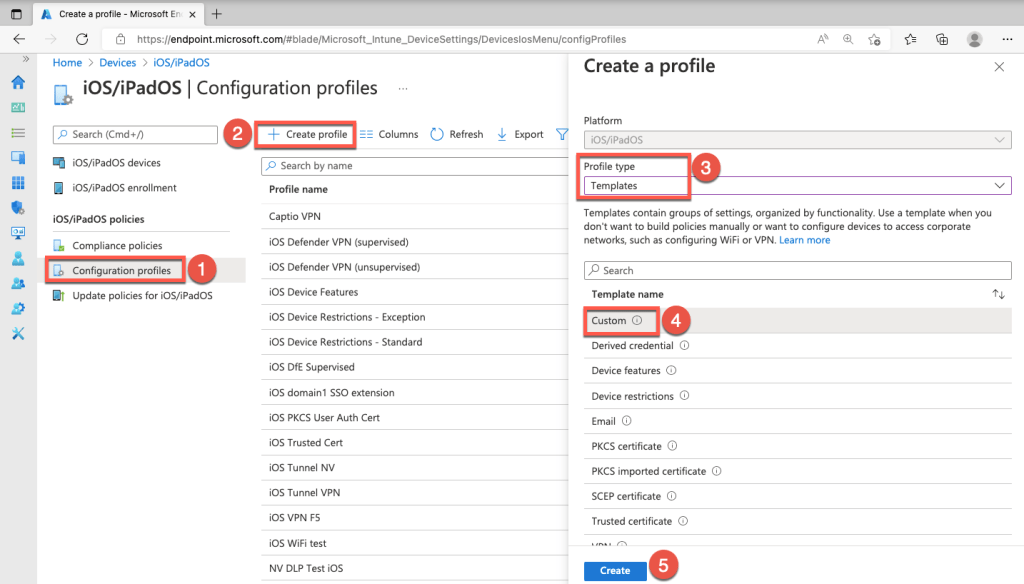
Microsoft Intune is a common MDM solution.
For those who aren’t aware, businesses tend to use what is commonly known as mobile device management software. MDM apps monitor and control your tablets and phones if you use them to get access to your employer’s network services. These MDM apps make you agree to give your IT team full control over your gear, and that can be a recipe for disaster. Samsung and some other Android devices sandbox your work and private data and apps. It means you don’t need to carry two separate sets of mobiles.
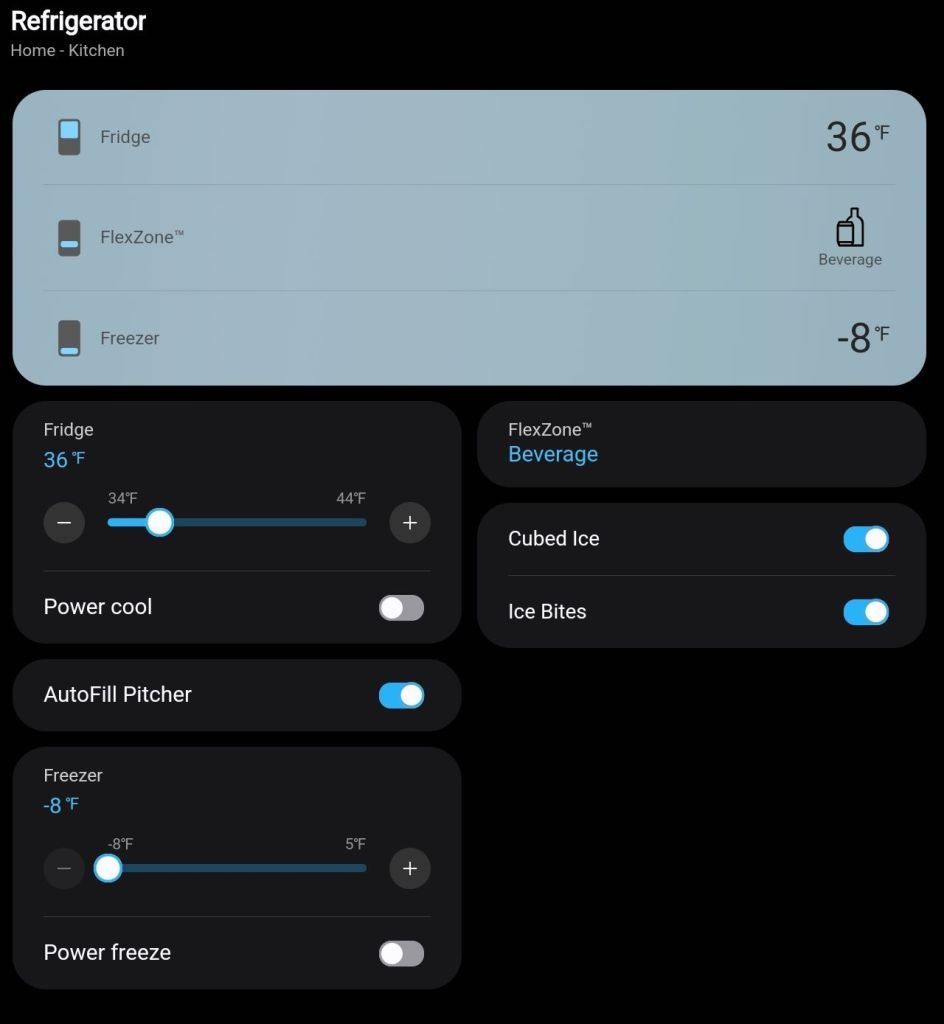
I have a lot of Samsung branded equipment in my home. I was always likely to end up with a tablet made by them because SmartThings means it would seamlessly work with everything else. Even my appliances can talk to a Samsung tablet to tell me when the laundry is done or that I left my refrigerator door open. I seriously considered models made by LG that had similar specs, met my requirements, and had the same price point. In the end, the ecosystem’s pull won out.
Samsung’s SmartThings is embedded in almost everything they make.
The S9FE model is a member of Samsung’s flagship S9 series of tablets. It has a little less RAM, slightly slower processor, and a little less capable screen than a full–power S9 Tab Ultra. However, it still out performs the last gen S8 Tab. The S9FE was just shy of half the cost of a full S9 unit with about 75% of the power and features. Samsung’s FE (Fan Edition) versions of devices usually come out about halfway through the generation’s lifespan. They fill the sweet spot of new and powerful, but not the most expensive. They often have some confusing options. This year, the FE comes with either six or eight gigabytes of ram for some reason. If you are considering this tablet for yourself, look for one with eight.
I’ve had the S9FE for several months now. It’s been fantastic. I tend to use my tablet in place of a laptop. Writing blog posts, email, surfing socials, editing media, note-taking, Teams and Zoom meetings, and remoting into the servers that I support are all things I prefer to be on a tablet for. Laptops are still too heavy and too hot to be comfortable on your lap for long. Phone screens are too small for complicated or extended tasks. That’s where tablets live in my world. The in-between.
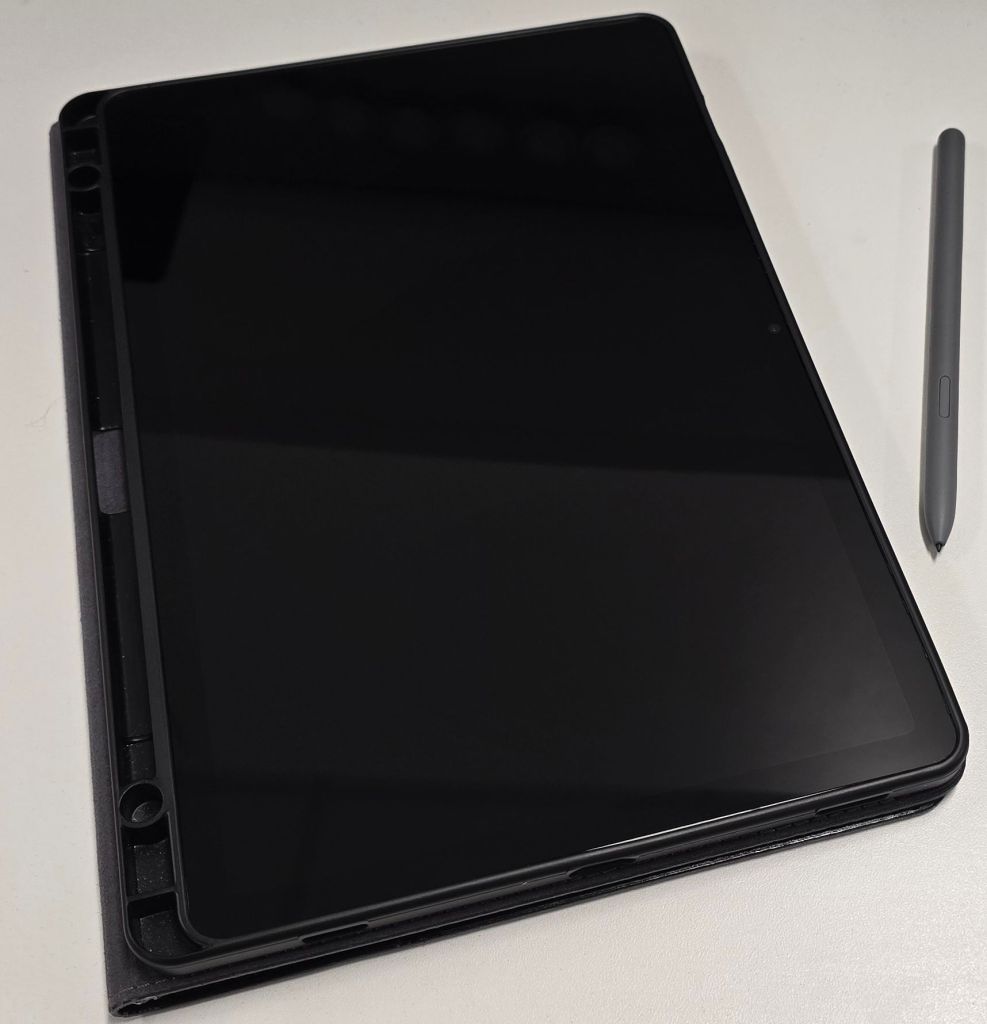
The tablet version of the S-Pen is larger than the phone’s and made of a soft plastic that is more comfortable to hold.
The tablet version of the S-Pen is one of the best screenwriting utensils available. The cameras work great for meetings and quick snaps or posts. The speakers and screen are epic. While on vacation, a hotel we stayed at had a horrible TV. I just put my tablet on the dresser, and we watched Netflix. I was shocked that the volume was easily loud enough to fill the room.
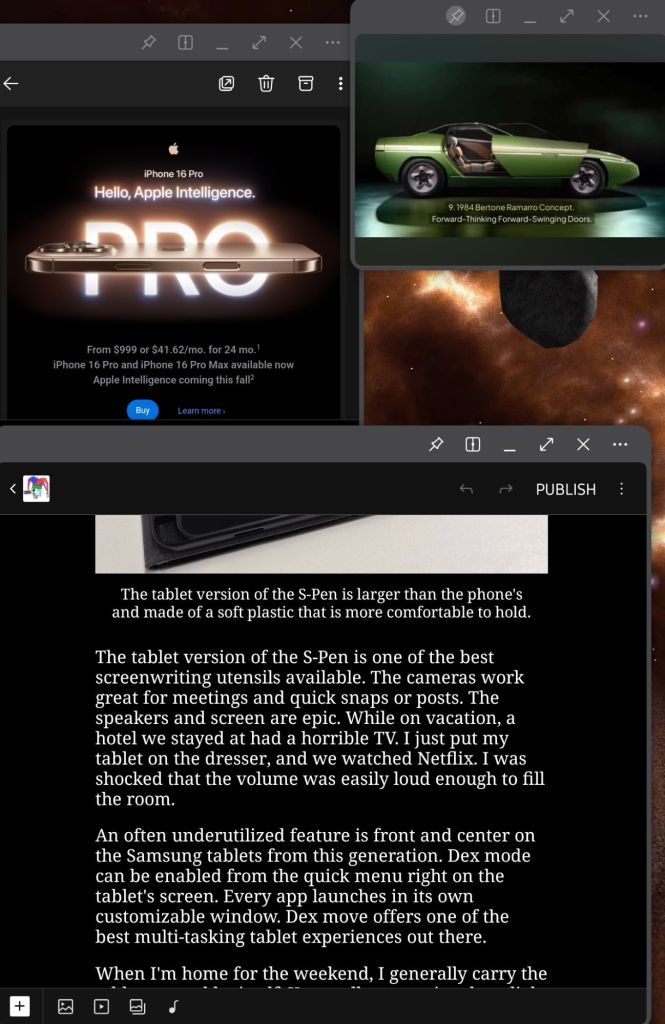
An often underutilized feature is front and center on the Samsung tablets from this generation. Dex mode can be enabled from the quick menu right on the tablet’s screen. Every app launches in its own customizable window. Dex move offers one of the best multi-tasking tablet experiences out there.
Dex Mode runs apps in windows that can be tiled, stacked, pinned, and made transparent. Samsung tablets rival a laptop’s productivity because of it.
When I’m home for the weekend, I generally carry the tablet around by itself. I appreciate how light it is when it’s naked and it is tough enough to survive the house. I’ve dropped it on the carpet without damaging it. The screen has just enough of a bezel to hang onto while you browse or write. Samsung offers a fill replacement warranty for a reasonable cost, so I’m not too nervous about it.
During the week, when I’m dragging it back and forth to work, I put the S9FE in a case. I get the tablet in and out of my bag, toss it on my desk, and use it as a TV at the office. I found a leather folio case that doubles as a stand. Check it out here: Nanruil Samsung S9FE Leather Case.
Usually, I try to point out the negative attributes of the hardware that I write reviews of, but in this case, there just aren’t any. Sure, there are always future state wishes like lighter, faster, and cheaper. You can also argue the intracasies of operating systems and overlays until the end of time. However, when compared to its contemporaries, the S9FE is exactly what it should be. A light, fast, capable system with a battery that lasts all day that I didn’t have to max out my card to buy.
I got lucky and obtained a 4090 GPU in the second wave, just before their prices skyrocketed. The purchase was expensive for me. My entire entertainment budget was blown for several winter months.
I went with an MSI 4090 Gaming TRIO 24G. It was the most affordable, and in-stock option that included 3 decent fans and had some mild factory overclocking. I was running an MSI DDR4 motherboard at the time and assumed that the MSI Center software should be able to control its lighting and cooling systems natively.
MSI 4090 Gaming TRIO 24G
The software adapted to the new card like I thought it would. I ran it that way for almost a year. It had an i-7 Kaby Lake CPU, 270Z Chipset, 32 GB of DDR4 PCRAM, and a Samsung 980 Pro SSD. The components were being powered by a Corsair 1000-Watt power-supply and housed in a Thermaltake View 71 Full Tower case. A Lian-Li Galahad 360 AIO CPU cooler, and 6 SL case fans connected to Lian Li v 3 controllers and synced to the motherboard kept everything cool.
For the most part, the PCIe 4 platform and PCIe 5 card hybrid performed well. However, there were telltale signs of mismatched hardware generations showing up in odd places. For example, I could play Halo Infinite in 4K with everything on Ultra but if I didn’t enable V-Sync I heard a mild coil whine and suffered pretty serious screen tearing even though my monitor and cables are G-Sync rated and G-Sync is enabled.
I couldn’t get anywhere near the performance I had expected from my VR driving titles. In several other games like Hogwarts Legacy, I had to leave specific functions such as Volumetric Fog disabled, or the frame rate would tank. These signs combined with benchmarks and some good old-fashioned troubleshooting led me to understand that the previous PCIe-4 gen components were bottlenecking my super-expensive GPU.
Recently, I’ve finally saved up enough to upgrade the rest of my components to match the new GPU. I decided to stick with MSI when it came time to choose the new motherboard. I appreciate not having to run more software to control the GPU lighting and cooling features. I had also been impressed with the frequency and quality of their updates for the MSI Center software.
I ended up going with an MSI Tomahawk Z790 motherboard. I paired it with sixty-four gigs of GSKILL DDR5-6000 RAM. For storage, I opted for a Samsung 990 Pro. When it came to the CPU, I chose an i-9 14900K. Last, I installed a Thermaltake PCIe-5 1650 PSU just to be sure everything could run hard.
I spent four or five hours updating firmware for everything, installing Windows, all the drivers, all the control software (MSI Center, NVidia GeForce Experience, Lian-Li Connect, Samsung Magic Disk, etc.), and all the game launchers. Then I started on getting the games going. I couldn’t help myself and launched the first one, Halo Infinite, as soon as it finished installing.
Halo Infinite runs at 4K, 120, Ultra with ease.
Even with other games still in the process of downloading and installing I could visually tell that Halo was running better. I cranked up all the settings to Ultra and jumped into a Team Slayer match. There were no tears on the team presentation that plays just before a match starts and my system always suffered during that sequence, pre-upgrade. Best of all, no V-Sync was required. Yes, I know it is still checked in the screenshot above, but when I got around to unchecking the box, the coil whine was gone.
The entire game played smoother than I’ve ever seen it. Even at 4K with raytracing, HDR, and the post effects turned up to max, the game was pretty much flawless as far as graphical performance goes. My performance on the other hand, had some flaws. I lost several matches in a row. In my defense, I was distracted by trying to judge the outcome of all my efforts and expense.
Halo Infinite plays like a dream on this setup.
It didn’t just look better and play smoother. It was better in every way. The iconic soundtrack had more depth and richness coming out of the same speakers that were connected prior to the upgrade. Even the controls seemed more responsive.
I’ve been up and running on the new build for about three months. In that time, MSI has released several features and updates for MSI Center. A BIOS upgrade, new drivers, an updated Xbox game bar widget, and more.
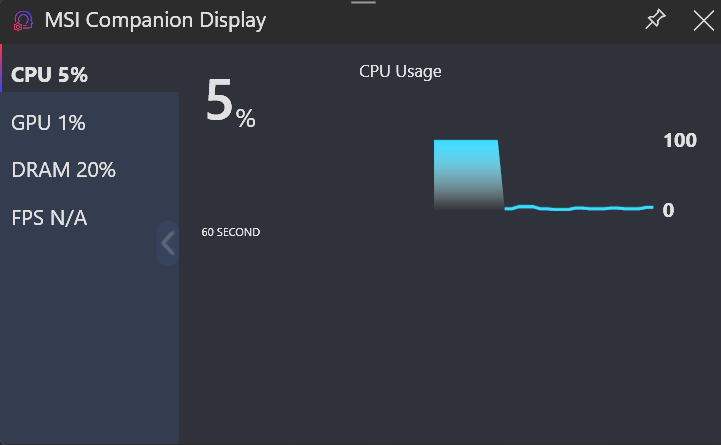
MSI’s Companion Game Bar Widget is an easy way to check performance while playing.
This is the fourth motherboard from MSI that I’ve installed into one of my personal systems. I’ve been impressed each time. The connections are well labeled, and everything plugs in securely. The metal re-enforced GPU slot on their gaming-class boards holds up to the beefy 4090’s weight.
The UEFI BI0S is simple to use but powerful. The Z790 automatically detected all of the components and booted on the first attempt. The EZ user interface makes basic. overclocking and tuning a snap. Windows 11 detected the MSI motherboard and offered to install MSI Center automatically.
MSI Tomahawk Z790
The MSI Center software allows for integration better than its predecessor, MSI Dragon Center, did. By supporting numerous plug-ins, the software is able to become the single-pane-of-glass dashboard and control center usually found on more mainstream manufactured PCs. A series of toggles is used to control which piece of software is in charge of a particular component.
Everything you need to know in one window.
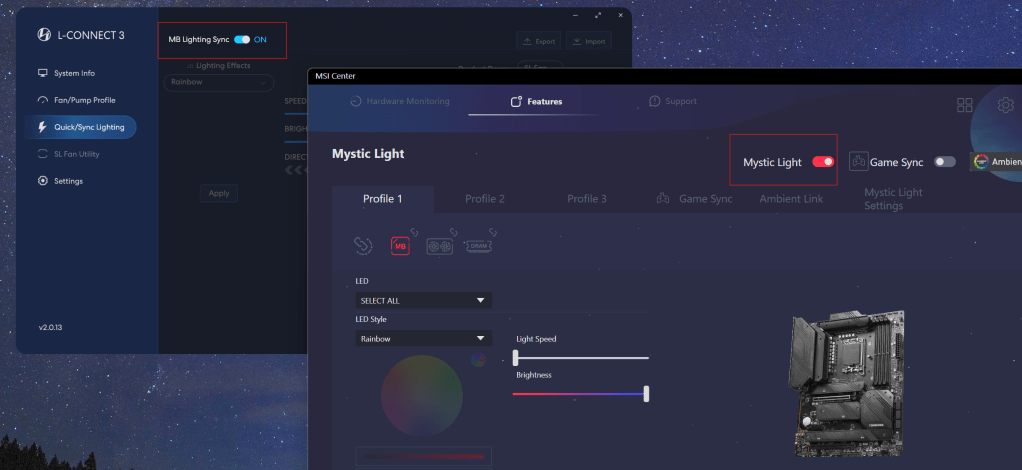
For the most part, the plug-in solution works well. However, it is fairly easy to misconfigure the toggles and end up in a situation where something isn’t working properly. I’ve accidentally disabled my case fans by having both MSI Center and Lian-Li Connect toggled on to control them.
The toggles can be tricky.
In the picture above you can see that both toggles must be on to allow Mystic Light control over the Lian-Li cooling gear’s lights. There’s no checking or error control, so if you don’t get them set correctly across the board, something doesn’t work. This is not an issue inherent to MSI software. It’s an industry wide issue as far as I can tell.
Toggles aside, the MSI components and software I’ve used over the last few years have been top-notch in quality and performance. I haven’t had to RMA a single MSI product yet (knock-on-wood). That’s saying something considering that I’ve got an eight-year-old MSI RX-480 graphics card that’s still going strong in an active gaming PC.
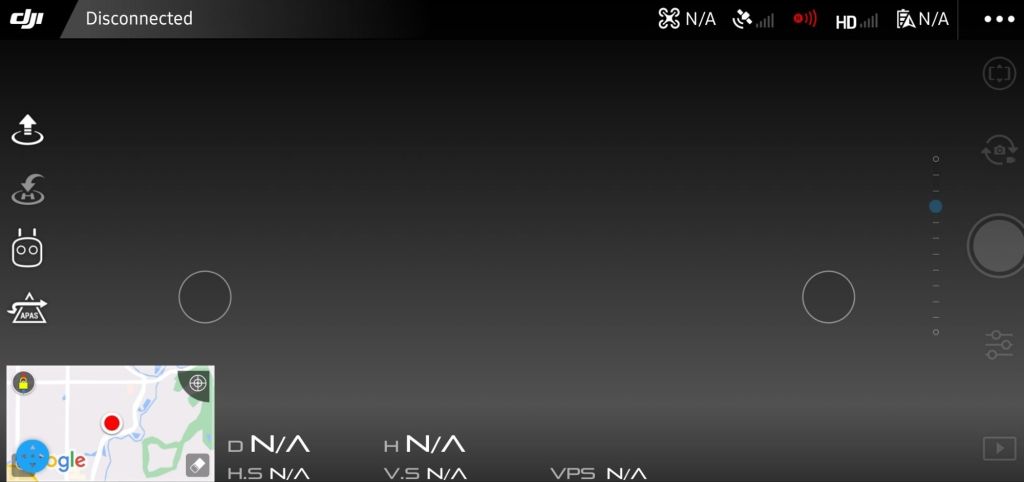
I’ve had a DJI Mavic Air for years. I still get the little craft out from time to time. It’s fun to fly, and the AI keeps my rusty piloting skills from reeking too much havoc when I do.
The Mavic Air is an older drone but is still viable with a 4k camera and its 3-axis gimble.
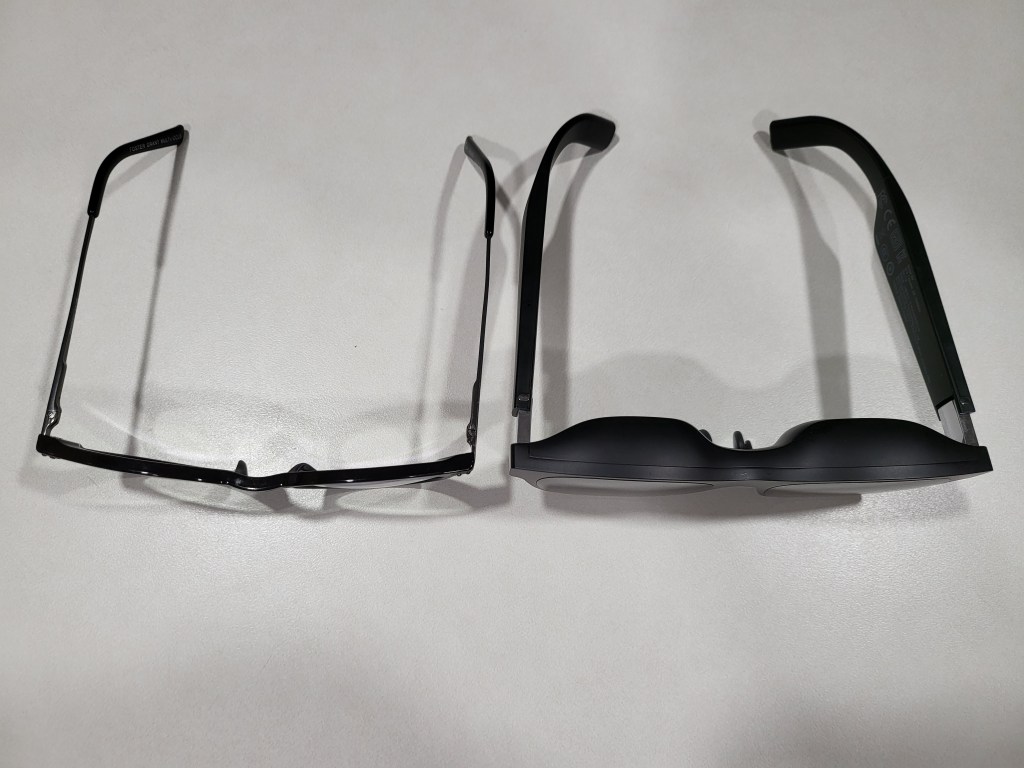
I also have the first generation of XREAL’S AIR glasses. Another gadget I’ve gotten a lot of use out of. I started working on using them as first-person pilot goggles the day I unboxed them. The challenge has been that both my drone’s remote and the XREAL Air glasses need to connect to my phone via USB-C. Like most phones, mine only has one port.
I prefer AR glasses over external monitors for getting extra screen real-estate when I need it.
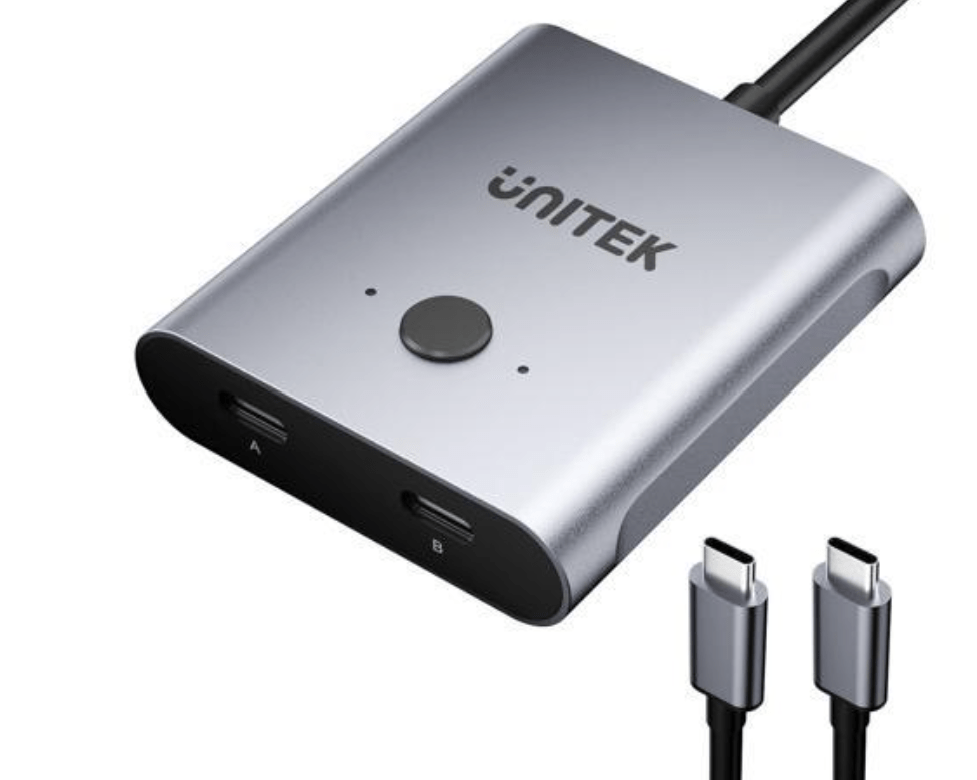
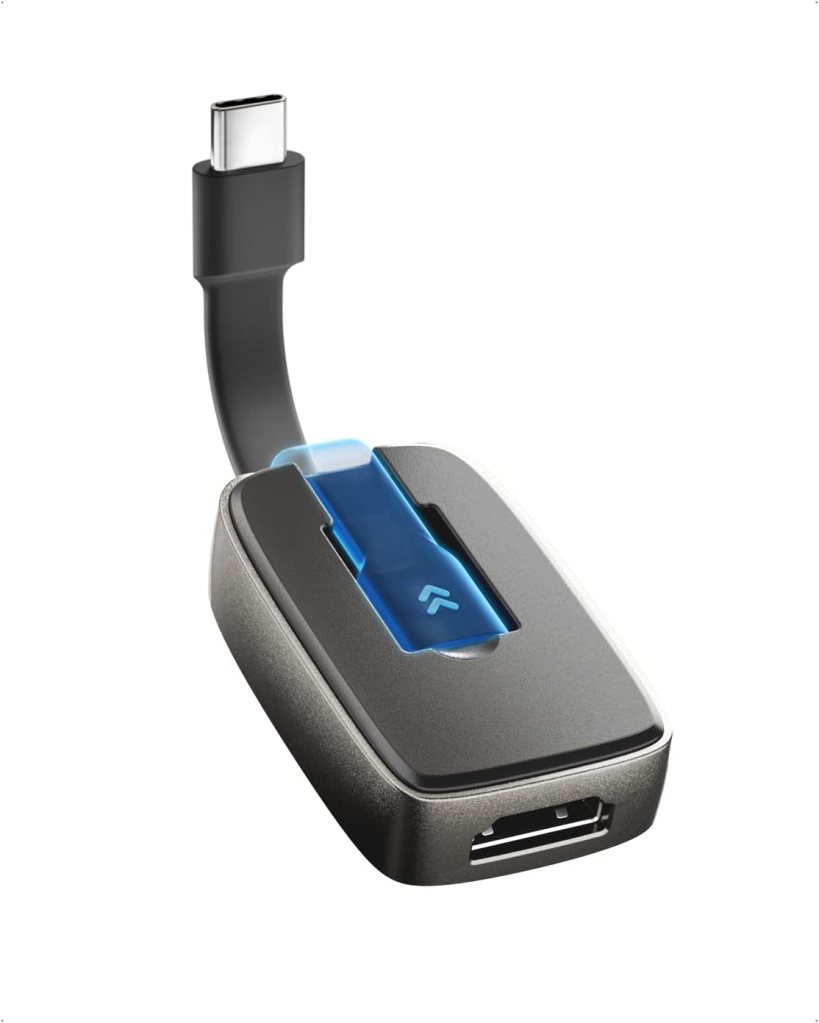
There are such things as USB-C splitters. Apparently, it should be technically possible to split the USB-C port with the correct cables and adapters. All of the adapters I found online were for power on one side and signal on the other. Or they were true splitters like the one below in which only one connection could be active at a time. The goggles idea would need both power and signal on both channels to work simeltaneously. If you know of something that works, please tell us in the comment section.
I tried several USB-C “Splitters” but was unable to get any of them to work.
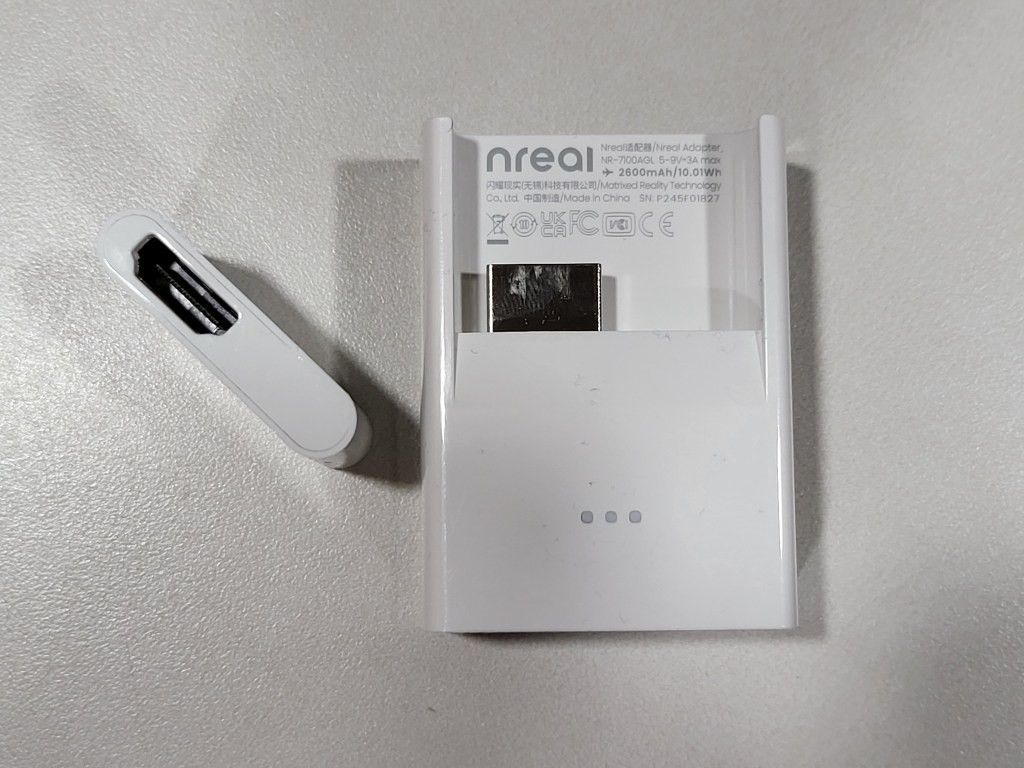
Enter the XREAL BEAM. Just when I was about to give up and order an official pair of DJI goggles, XREAL releases an affordable option. The Beam is a small device that acts as a wireless bridge between the AIR glasses and other devices that can cast their screens.
You just cast your screen to the Beam in the same way you might cast to a Chromecast from Android or to your Apple TV from your iPhone. The screen or app is then displayed in the glasses. It has a battery that can power the glasses and the Beam itself for a couple of hours. The Beam device is doing quite a bit of the heavy lifting when it comes to processing the wireless video.
The Xreal Beam is a Wi-Fi screen mirroring companion device for the AIR/2 glasses.
It was all I needed to realize the first-person drone pilot experience. I connected my phone to the drone’s remote as normal. Then, I put on the AIR glasses and connected them to the Beam with their USB-C cable. I opened the DJI 4 Go software and logged in to the drone from my phone after I mounted it in the remote’s clamp, then used Smart View on my Samsung phone to cast its screen to the Beam.
The resulting experience was fantastic. The DJI app is rendered in near life-size on the AIR’s OLED display. The screen inside the glasses looks like a giant monitor because of the proximity to your eyeballs. The app shows the drone’s first-person view that is overlaid with pilot info. The heading, speed, altitude, GPS location, and object detection are all visible and easy to read because they are huge.
Casting the app to the Beam is almost perfect.
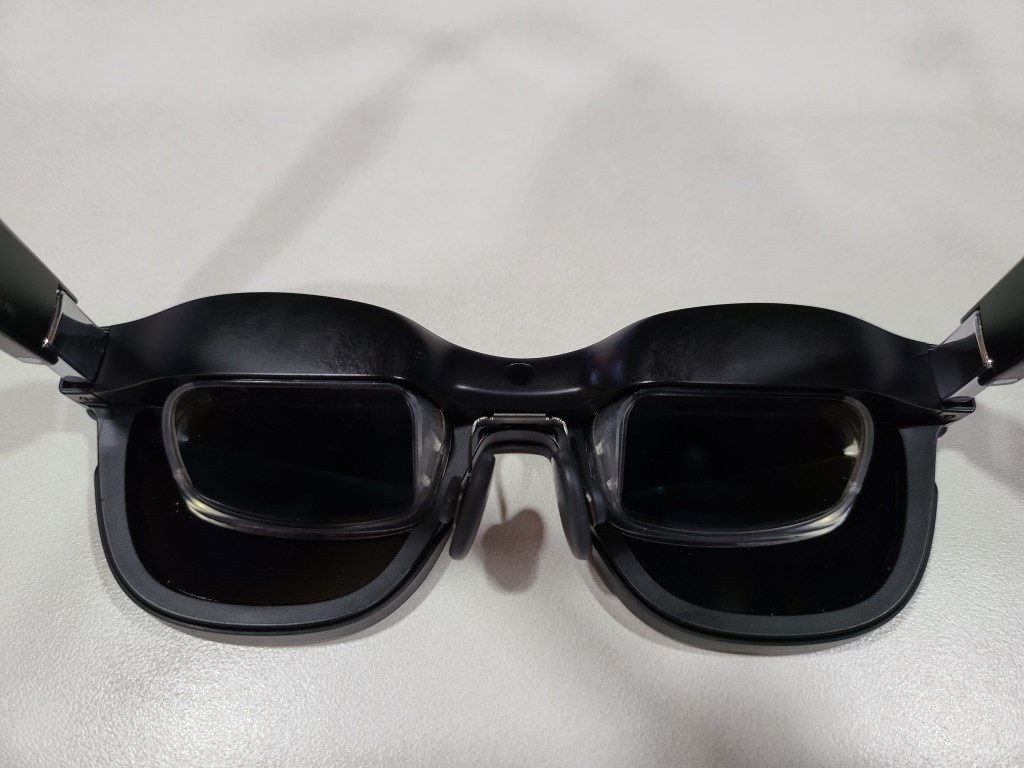
Flying in FPS is so much easier for my video game trained brain than ground piloting is. The thing is, though, when I remove the AIR’s sunshields, they become transparent. This allows me to see both the FPS view and the drone in reality simultaneously. As far as I know, this feature is unique to a setup like mine.
I was at a farm when I tested using the AIR and Beam in combination with my drone and phone. The signals involved are the 2.4 and 5 Ghz Wi-Fi bands for the most part. I was able to pilot the drone about one hundred meters away before the video signal dropped.
The video in the glasses was fast, clear, and smooth enough that I felt comfortable going into Sport mode and pushing the little tone to its max speed (40/64). I don’t think any DRL pilots are going to be ditching their goggle setups for this one anytime soon, but these things are awesome for an amature. Especially if you already have most of the equipment on hand.
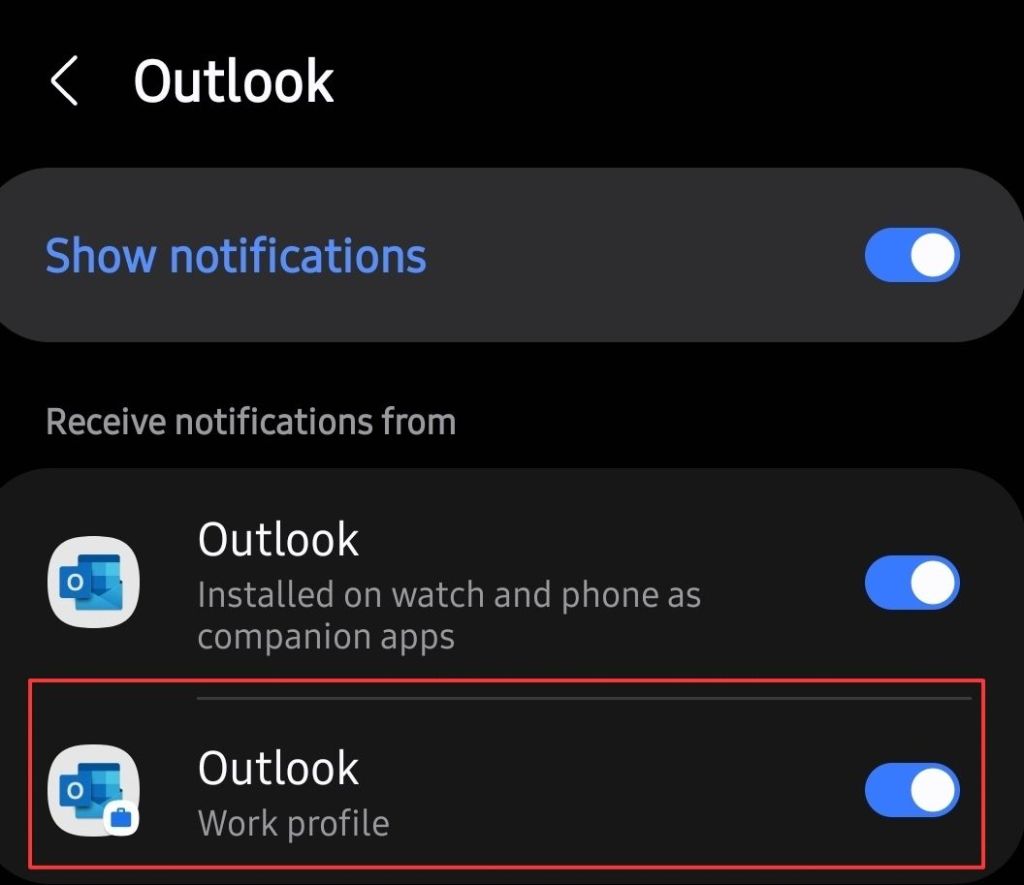
I recently noticed that my smart watch was not notifying me for messages. I know from experience that Android’s work profile function has contributed to challenges with work apps being able to notify personal companion devices like smartwatches and car infotainment systems.
If you are missing work notifications on your watch, try this. Open the Wear app on your phone and tap Watch Settings. Then go to Notifications and tap App Notifications. Scroll down the list to find the app you wish to receive notifications from, for example, Teams or Outlook.
You should see a toggle to enable the work profile version’s notifications. Flip the toggle to on, that’s it. Assuming that your company isn’t blocking them, you should start receiving notifications immediately. I found this setting to be available for every work profile app installed on my device, and they were all off by default, except Outlook. I hope it works for you as well as it did for me.
The ice maker in our old fridge died again a few weeks ago. I’ve already replaced the unit two times along with all the water lines and filters. I’ve had a professional plumbing outfit look at everything, but they couldn’t seem to find the cause of the ice-maker failures. Filling ice trays from the kitchen faucet works, but it gets old in a hurry. It was time to bite the bullet and get a new fridge.
With that thought in mind, my wife and I visited the local Best-Buy, Lowe’s, and Home-Depot stores to compare prices, features, looks, and useability. We also checked on-line via Amazon, Walmart, and Nebraska Furniture Mart and a few others. It didn’t take long for us to narrow down our preferences given our budget.
Side by side models are still popular. –
Side-by-side setups didn’t seem as user friendly as having the freezer on the bottom in a pull-out drawer did to us. We also wanted glass shelving instead of wire. We didn’t care for those with built-in displays. We already have enough screens in our kitchen.
We reasoned that the smart displays would become outdated before the analog components of the refrigerator do. The manufacturer will almost certainly stop supporting the Android OS version that runs the smart screens at some point, they all eventually do. If you leave the device connected to your internet access after OS upgrade and patching period(s), it will likely become a network security risk.
Some models we looked at had quick access doors embedded in the main door that seemed likely to cut down on power use if you kept frequently used items there. We also liked those that had water pitchers that automatically refilled in addition to a traditional water tap. Gourmet ice of various types seemed to be a common premium function, we preferred those with two separate ice makers that each made a different style and/or size.
The pitcher refills when you put it back in place. The water is filtered and refrigerated. There’s an included attachment for cold-brewing tea in it. It’s a huge hit and used all the time in our house.
Several manufacturers include a small multi-function drawer between the refrigerator and the and freezer. On LG and Samsung units with the extra drawer, you can choose to have it function as freezer or, a refrigerator. They were the perfect size to store drinks, quick foods, and stuff for events. After getting ours home we found that the drawer also makes a great place for staging the ingredients for your next meal in.
Our preferences for the refrigerator on-top, freezer on bottom, multi-function drawer, separate ice makers, and water pitcher features narrowed our choice to just two models. In the end we went with the Samsung because its extra drawer was deeper than an LG model with very similar features at a very similar price.
The Samsung drawer would be able to hold US soda-pop and beer cans upright. The LG didn’t look quite deep enough for that. I never confirmed that the LG couldn’t, I just eyeballed it at the store. If you have the LG with a drawer and know it holds upright cans, please feel free to say so in the comments. We also appreciated that the Samsung model we decided on had user replaceable panels that completely change the appliance’s look.
The model we ended up bringing home is a named the Samsung Bespoke 29cu. ft. 4-Door French Door Smart Refrigerator (model#: RF29BB8600QLAA). It has upper French doors that open into the fridge, a hidden pass-through door, an automatic filtered water pitcher, a filtered water tap, a freezer/fridge drawer, two icemakers, user changeable front panels, and it connects to wi-fi.
It’s this last feature, connecting to wi-fi, that I thought was going to be a useless gimmick. It turns out that I was wrong. My living-room TV is made by Samsung. Both it and the fridge are on the same network, and both are connected to the SmartThings app on my phone. This lets the fridge pop up a message on the television and my phone if someone leaves a door or the drawer open. It has already saved my bacon, literally.
We’ve had the new appliance for several months now and I still firmly believe we made the right choice for our home and lifestyle. With no handles on the front, the fridge looks modern, sleek, and clean. It is super easy to wipe down with a rag anytime it gets smudged.
It has numerous modern features that are all upgrades from the previous ten-year-old unit. The upper fridge space is much easier to keep organized and clean than our side-by-side was. Loading groceries is easier on my back now that the coke goes in a waist height drawer.
The stainless-steel panels we opted for are a little more fragile than I would like. They seem to dent and scratch very easily. Nothing too major has happened to ours yet, but we’re considering ordering the glass replacements at some point down the road.
The ice is fantastic. Each maker is mounted under the drawer, but above the freezer. There’s a catch bin that is divided in two with one side below each maker when the drawer is shut. The entire ice bin is covered by a sliding plastic lid. There is no built-in ice crusher. It does come with an ice scoop that fits in a slot on the lid.
The left ice maker produces regular size “traditional” ice cubes, similar to those from most plastic ice trays and older built-in freezer units. The right maker produces smaller ice nuggets. They are not as small as Sonic, or McDonald’s ice, about half the of the left’s size. Using my area’s local water (known to be hard) passing through the fridge’s double filtration system, the ice is pretty clear and super hard. The production rate of both sides easily keeps up with the four of us even in a mid-western summer heat wave.
It turns out that scooping ice out of a drawer is quite a bit quicker and much quieter than filling a vessel from an auger mechanism in the front door was. The tradeoff is that having ice in the drawer is more physically demanding than pushing your glass against a lever and waiting. The process of bending, opening the drawer, sliding open the ice bin’s lid, scooping, closing the ice bin’s lid, putting the scoop back, and closing the freezer-drawer has not been a problem for those in my household.
In my opinion, when viewed in terms of quality-of-life upgrades that you can afford to splurge on, the drawer is worth the three-hundred-dollars extra that units with the feature cost. It isn’t completely necessary for a refrigerator to do its job, but we sure use ours a lot.
The Flex Drawer is a great option if you can afford a unit that has the three-hundred-dollar feature.
We set ours to “fridge-mode” and load it with pop-cans, lunch meats, stuff we’re preparing to grill, cheeses, and other frequently used items like lettuce and sliced vegetables or fruits. It slides open and closed quickly, quietly, and easily. The pull grasp is at “waist-height” for average standing adults. We’ve never flipped it to the colder “freezer” temperatures, other than to test it once, but we like having the flexibility to do so if needed.
The pass-through door and the small shelves behind it are great to store things like ketchup, mustard, mayo, sauces, etc., but they are too small for larger items like milk containers. All three of the doors are opened by pulling on hand-sized recesses which are located in the top and bottom edges. The two drawers have recesses in their top edges to pull open from as well.
One shelf on the right-hand side of the main refrigerator collapses. This makes it perfect for taller items like two-liter bottles and one-gallon jugs to sit on the bottom shelf. This low profile makes it much easier to find what you’re looking for when you open either one, or both of the main doors. We’ve never extended ours other than to test it once, but we like having the flexibility to do so if needed.
We ended up purchasing ours at the local Best Buy store because it was the best price for the model we wanted at the time. At the time of this writing, they still have the best price I could find for model number RF29BB8600QLAA at this link. The new design and technology upgrades are great. The price is high, considering that my old one cost less than $1000.00.
I have written several articles about the ROG Ally and its abilities. The Nintendo Switch sized gaming PC makes playing on the couch, in bed, or on the go a comfortable and fun experience. It is the device I play on most because of its combination of portability and performance.
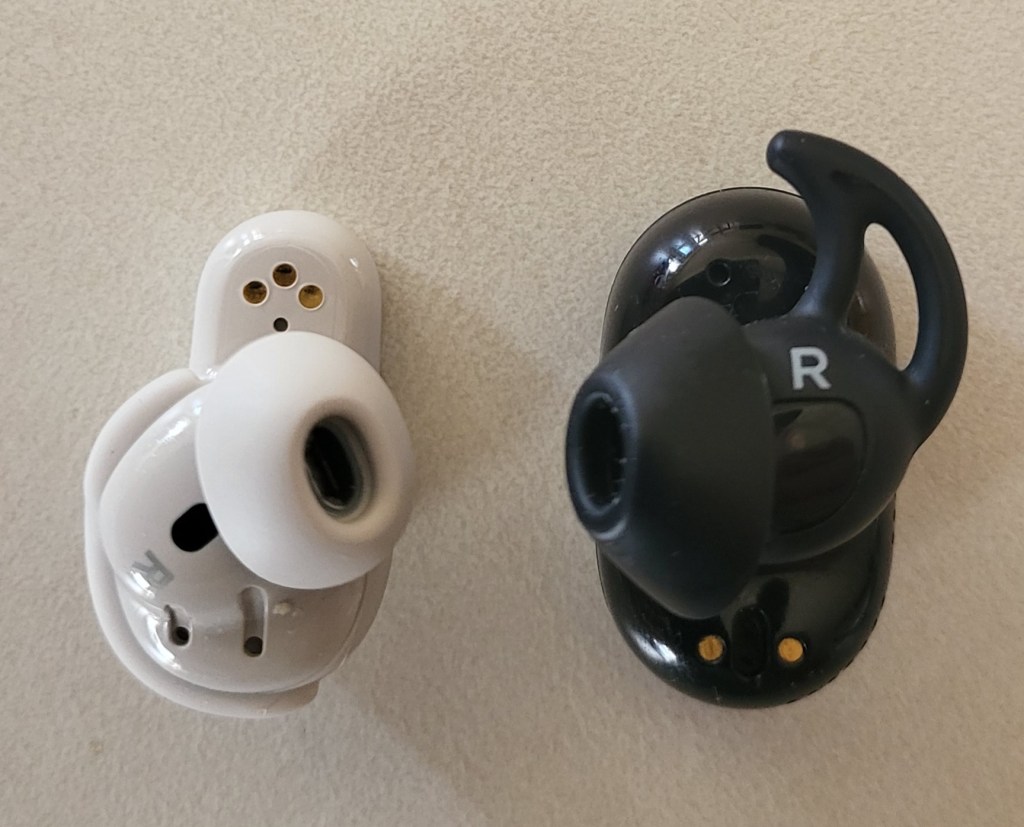
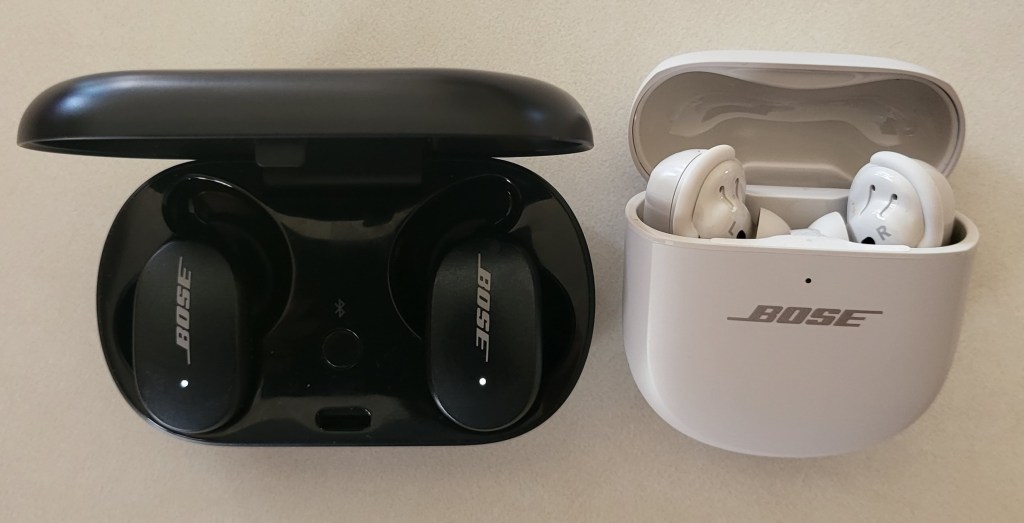
I recently upgraded my earbuds to the new Bose Quiet Comfort Ultras. ANC earbuds make it easy to escape the noises of the world when you want to. As one might expect, the Bose active nose canceling feature of their flagship earbuds is exceptional. While they cannot achieve total silence in loud environments, they certainly make almost any noise tolerable.
The new QC Ultras are smaller and lighter than previous Quiet Comfort earbuds. They also feature a a new method to achieve a secure comfortable fit. I find the new tips and fins to be a welcome upgrade over my original QC earbuds. The Ultras stay in my ears while walking, running, and while I’m chewing, or talking. So far, they don’t seem to leave sore spots where they make contact.
The pointed fin tips on the old style frequently made my ears sore where they touched.
The original QC earbuds are the black ones.
My favorite feature is the immersive audio. The QC Ultras use Bose magic to make any type of audio source sound like you are listening to it on a hi-fi stereo speaker setup and sitting right in the sweet spot. When I first read about the function, I was skeptical. Now that I’ve experienced it for myself, I am impressed. The wide sound stage and auto ANC combine to great effect.
The most important reason for me upgrading to the new earbuds was their low latency support. I have struggled to play games with BT headphones and earbuds since the beginning. I just can’t get over the audio lag that almost all of them suffer from.
Pulling the trigger to take a shot and not hearing the sound until after the next round is chambered, is distracting. Hearing footsteps coming up behind you, knowing it is too late to do anything about them is frustrating. Watching cutscenes that play like old voiced-over karate films is annoying.
The QC Ultra earbuds completely solve these issues. When paired with my phone there is no detectable lag in any of the games I have tested so far. There’s also no lag in video streams or video calls, people’s lip movements and sounds stay in sync on both.
This lack of lag on my phone got me wondering what the performance would be like if I paired the earbuds with my Ally. It has literally been years since I’ve bothered using Bluetooth audio with a PC for anything but Teams and Zoom. The lag was just insufferable.
I was pleased to discover that I could not detect any lag while playing PC games with the Ultra earbuds. I tried several modern and older games along with a couple of emulators, and they all worked perfectly. The earbud’s mics were great for game chat, too.
I have the Dolby Atmos for Headphones, DTS for Headphones, and Windows Sonic for headphones, audio apps for Windows. All of the virtual surround sound drivers worked with the QC Ultras and did not introduce any detectable lag.
Dolby Atoms is a licensed app you can purchase from the Microsoft Store. It is not included with the earbuds.
I’ve paired the QC Ultra Earbuds with my wife’s Steam Deck and I’ve also paired them with my Meta Quest 3. I got fantastic results with both. The Bose Music app for your phone lets you add multiple devices and switch between them, but they only connect to one thing at a time.
I upgraded to get a better experience from the advertised low latency. Bose delivered on that promise. Audio sites are giving the new earbuds high marks overall, subtracting a few points due to the lack of multi-point and wireless charging. If you’ve been looking for BT earbuds specifically for gaming, I’m not sure you can do better right now.
The Xreal Air augmented reality glasses have been superb since the day I got them. I continue to use them in unexpected ways because they are quick and simple to connect to almost anything. To their credit, the company has remained steadfastly committed to the success of the product. Even suffering a re-name didn’t slow them down.
Recently, Xreal released the beta edition of their Nebula app for Windows. The update lets Windows users experience two-wide, three-wide, and ultrawide monitor setups without any actual screens. They’ve also released several VR apps in their Nebula store. The last firmware update added the ability to consume traditional side-by-side 3-D video.
The newest firmware release adds support for video refresh rates up to 120 hertz. The update is simple to acquire, just upgrade your Android or Mac Nebula app to the latest edition and connect the glasses, accept the update when prompted.
If you don’t use the Nebula app, connect your glasses to a computer with the Edge or Chrome web browser installed. Then visit this page: https://ota.xreal.com/en/air-update.html and follow the instructions to download and install the new firmware. There are reports on Reddit that the web page (over the air) upgrade isn’t functioning properly.
Once you have completed the firmware update, press and hold the brightness + button until you hear two beeps. The first beep is side-by-side 3D mode, the second is 120 hertz. The glasses remain in 120hz mode until you disconnect them. At the moment, the faster refresh rate has to be engaged in this manner every time.
I like my ROG Ally so much that I filled its 512GB SSD in a matter of days. Today’s games are huge, many titles are over the 100GB mark, some even pass 200 GB. Lucky for me ASUS fully supports the end user swapping out the disk, they even provide a step by step guide on their website. Of course as with any guide you see on-line you are proceeding at your own risk.
I picked up an Inland 1TB M.2 2230 SSD at my local Microcenter store for $109.00 on sale. I would have preferred to go with 2 TB but those are hard to find and I didn’t want to wait any longer. If you are not familiar, the 2230 designates the length (short in this case) of the disk. Make sure you are getting the compact size SSD, regular or long disks will not fit in the case.
Only the compact nVME disks will fit.
I just followed the ASUS guide carefully. I suggest that you watch the embedded YouTube video. One of their technicians goes through the entire process step by step. With the Ally lying face down, top edge of the device (exhaust ports) away from your body, on a soft surface in front of you, the middle screw in the bottom row is captive. It will not fully unscrew from the case. Instead, it will make a clicking sound and assist in splitting the case halves apart when it is fully unscrewed. The other five screws are all fully removable.
The highlighted screw does not come all the way out.
Once you have removed the screws and un-screwed the captive screw to its limit, use a guitar pick or other plastic pry tool (old credit card, old driver’s license) to slide between the halves of the shell and pop the clips. Go slow and undo one clip at a time to avoid breakage. Once the shell is open, disconnect the battery by removing its connector lead.
Remove the battery’s lead to prevent accidental discharge from frying you components.
Carefully lift the large rectangular black plastic flap to reveal the SSD slot and drive. Remove the SSD retaining screw and gently slide the disk toward you. If you have trouble breaking the SSD loose, gently lift up on the plastic tab underneath the drive slot. Install the new disk, being careful to replace the screw and battery connector. Re-assemble the case by aligning the two halves and snapping them back together. Finally, screw everything back together by returning each screw to its original location.
The drive is under a protective flap.
Now comes the tricky part, booting into the BIOS. This isn’t tricky because the process is difficult, it’s actually very easy. Just press the volume down and power buttons at the same time. The tricky part is that there’s some mysterious timing required to get the BIOS to load and I can’t describe it. I think you need to let go of the Power button and keep the volume button down as soon as you see the screen light up, but I can’t promise that was it. In any case keep pressing these two buttons until you see the normal start up screen followed by the UEFI BIOS.
Once you get the BIOS to load, hit the Y button to enter advance mode and use the D-pad to navigate to advanced. Hit A to start the first option (ASUS Cloud Recovery). Read and agree to the EULAs for ASUS and Windows, then connect to your WiFi and download the files. I had to do this twice for the download to actually start.
If you don’t see this screen you didn’t complete all the steps to start the download, try again. I had to boot to the BIOS and tell it to download twice before it worked.
The system will now automatically download and install Windows 11, Armory Crate, and all the drivers and software that came on it out of the box. It will reboot several times. Mine took about 3.75 hours from the time I started until Windows was fully loaded and I had installed all the latest updates for everything.
I cannot stress how important it is that you update everything, not just Windows updates. Many of the tools and software like Armory Crate, My ASUS, the Microsoft Store, any of your game launchers, etc. will all have their own updates. Open the application and look in the help menu if it isn’t immediately obvious where to download updates. This system offers a much better playing experience when it is fully updated than it does when you first unpack it.
Way back in 1998 I saw Lost in Space (the movie) and was fascinated by their portrayal of augmented reality. It wasn’t the first time AR was presented as technology that would be common in our future, but it was done in a way that made it seem fairly realistic. I remember hoping the fictional system would become reality in my time. Fast forward twenty-five years and AR is on the verge of becoming a real thing.
In my line of work, I can end up working in cramped spaces like server rooms (aka closets), IDFs (aka also closets), or a stolen sliver of someone else’s desk. I’ve been using the “sidecar” technique of turning whatever tablet I have handy into a second monitor since the idea was invented. There isn’t always room to setup like that where I need to work. I’ve been waiting for a hi fidelity, lightweight, hands-free display. Keep my goals in mind while reading my thoughts on the Nreal Air Glasses. I bought them for a very specific reason, to use them as a hands and desk-space free external monitor for various devices. Anything else they do is gravy.
I’ve tried a few display goggles and smart glasses over the years. Until now, they’ve always left me extremley disappointed. Most often because they were uncomfortable. There have also been some severe battery limitations, connectivity challenges, and other fundamental flaws that kept the previous contenders from being useful. More than one set had low resolution and suffered from blurry text when used as a computer display.
Enter the Nreal Air. Essentially a pair of OLED micro-screens mounted in slightly oversized sunglass frames with clever prisms to control the light you see. The screens are combined with speakers and microphones in the earpieces. There is a USB-C connector on the back of one ear. You’ll find tiny buttons for on/off and brightness control on the bottom edge of the other. That’s it. No batteries, no setup, plug in one cable and go. Connect them into anything that can output video and audio through USB-C, or Thunderbolt (aka Alt-DP Mode) and they work. Most Windows, Macs, Linux, many Android devices, even the Steam Deck, will automatically recognize the glasses as an external 1080P 60 Hertz/FPS display.
The embedded screens bounce light off the prisms straight into your eyes.
If you want to use them with an iPhone or other systems that need HDMI, you are going to need some adapters. Nreal makes a USB-C to HDMI adapter that is available for purchase separately, or as a bundle. The sixty-dollar adapter is powered by a built-in rechargeable battery to run the glasses since HDMI doesn’t typically include power distribution. I’ve used the adapter to connect the Airs to my iPhone, iPad, Switch, Xbox, and PlayStation without issue. The adapter is designed specifically to work with Apple’s Lightning to HDMI adapter, which you’ll also need to purchase separately.
The adapter provides power and connectivity to any almost any HDMI device. The Apple Lightning to HDMI adapter fits in the slot perfectly.
The Air glasses feel a tad heavier than my normal reading pair when wearing them. The bridge of the glasses’ frame is considerably thicker than standard eye-glass frames. It makes sense, there are two computer screens and a bunch of electronics in there. For me, this thickness makes positioning the nose piece at the bridge of my nose challenging. I spent some time flexing and bending the metal nose piece support to get a good fit. I was eventually able to get them to rest in a comfortable position. The adjustable angles provided by the ear pieces really help.
The AR glasses frames are thicker in every way, but still smaller than I expected.
The Airs connect with a single lightweight cable for both signal and power. They don’t need any headphones or earbuds, all though it is easy to use them to improve the soundstage. They stay in position on my face. The lightweight glasses are comfortable for long periods, I’ve worn them for entire eight-hour work days. They’re always ready and don’t get hot because their power comes from the device.
There are bigger and more awkward looking fashion frames in the world. Counting on the look to be the excuse against purchasing tech gadgets isn’t as reliable as it used to be. These look and feel like the oversized glasses you get after an eye exam. I’ve had the Airs on in the grocery store, while walking the dog, and even at an old-fashioned IRL conference. No one has given me a second glance, that I noticed anyway. P.S. They were a lifesaver for combating boredom while waiting in line at the conference.
They are very similar in appearance to my reading glasses, just slightly larger.
My co-workers spotted them pretty quickly when I wore them at my desk. Several tried them on and I think they were shocked at how good the displays actually are. The biggest drawback has nothing to do with the design or capabilities. People seem to think the four-hundred-dollar base price is too steep.
Most face-worn displays are opaque googles, but you can see through these lenses. There are some obstructions from the prisms if you look for them, but they are generally not in the way. Transparency of the image is controlled by changing the brightness. When turned up to full, the image can be seen outside, but in bright sunlight it helps to face something that provides background contrast. Turning down the brightness allows you to float your display over the real world in a very pleasing way. This trick works best in darker indoor environments, but they work even in our super-bright office without trouble.
For a more private or immersive experience, there is a snap on shield that makes the front view completely opaque. I find that I use them equally in “see-though” and “private” modes. The “see-though” mode is what impresses people most when trying the Air glasses for the first time. This mode is also why they tend to be classified as augmented reality glasses.
I use them more often than I had expected to when I first decided to purchase them. I have them hooked up to my MacBook Air writing this post right now. No matter how my head is positioned, the screen I’m working on is centered in my vision. The ergonomic and comfort advantages of the glasses over a traditional screen are significant. You don’t have to tip your chin down to see the screen while lying in bed, or are fully reclined in the easy chair.
When connected to a MacBook, the glasses can emulate three wrap-around monitors that float in space. I’m using the Nebula app right now and have this post on the center “screen”, the Nreal website on my right monitor, and a Netflix show playing on the left one. I can still see my family members going about their day and my dog begging for a bite of the pop-tart from the table next to me. I can even watch the living-room TV though the floating computer monitors. The experience is surreal.
If you have a Windows PC, you can use them as a stand-alone, duplicated, or extended screen just like any other monitor. NReal has released the beta version of the Windows Nebula app. It supports the same three-monitor trick that the Mac software does. It also allows for a single ultra-wide curved screen to float in your vision too. There are some hoops to jump through to gain access to the Windows Beta see this reddit post for the details: https://www.reddit.com/r/nreal/comments/1306xqs/nebula_for_windows_test_has_finally_begun_join_us/
Walking while wearing the Airs takes some practice, but it’s easy enough and didn’t make me feel queasy. Once you have mastered it, walking the dog will never be the same. I watched an episode of “Drive to Survive” on Netflix while walking the around the neighborhood with my pooch last evening. I ran the cable down my back, under my shirt, and kept the phone in my pocket.
I’ve used them while cooking and grilling. It is super useful to keep the recipe and video instructions you are following hovering above the food while you prepare it. Never having to look away cuts down on the burnt and overcooked results. Watching a show while literally keeping an eye on the burgers is backyard life at its best.
Any mind-numbing task that I normally put off to watch Netflix, can now be done while watching Netflix. Cleaning the house is a whole different experience when you’ve got Farzar floating above the floor you’re vacuuming. Doing the laundry, folding clothes, and doing the dishes (careful with this one, they are not water resistant) are all a little less dreary.
Watching the YouTube video instructions for fixing a broken shifter cable in my car while actually doing it, cemented the glasses’ usefulness for me. I only needed to look at the same area in my vehicle to overlay the mechanic’s video on to my broken part. The repair was much easier to follow along with. The project was also finished in less time since I didn’t have to keep going back and forth between my work and the video.
On family game nights, I have a big screen all my own. The same goes for work, having the glasses to function as a portable three-monitor stack has been extremely helpful. When I am in the field, they function as an instant private workspace and give me the screen real-estate to spread my work out. Even in a small network closet while diagnosing switch gear, I have a full desk’s worth of screens at my disposal. I can’t overstate how huge this is for field engineers.
Most of the people I know that have tried them imagine they will replace desk monitors in the very near future. The glasses themselves are very refined and feel like a fully developed product. The Nebula software can be challenging to work with in the current beta editions. Since the app isn’t absolutely required to use them, it is less of a hinderance than it might otherwise be. If you are the type of person that likes to be an early adopter and doesn’t mind some tinkering, they are fantastic right now. Mine have already earned a full time spot in my bag.
When it rains, it pours in software development. Nreal has made progress with their Nebula app on a couple of fronts this week. First, the bug that prevented multiple monitors in MacOS 13.3 or higher has been patched. Just connect your glasses and launch the software, it will prompt you to install the update.
If you have held off updating MacOS past 13.2 like I did, I recommend that you install the Nebula update and then update your operating system. Once everything was fully updated the software worked just as it did before. There are no new features or functions that I could find, it looks and works exactly the same.
The other, and perhaps more exciting, news is that the Nebula App for Windows is available in a semi-open beta. Semi-open meaning that anyone can get it, but you have to sign up. They’re giving away a Steam Deck handheld console to the person that tests the software on the most qualified systems. To get started visit their Reddit post at: https://www.reddit.com/r/nreal/comments/1306xqs/nebula_for_windows_test_has_finally_begun_join_us/
Downloading the software requires a Discord account. It also requires some pretty beefy hardware at the moment. They are suggesting Nvidia 1650 or higher GPUs. I installed it on my gaming laptop (3070) and it ran without too many issues.
You need admin access to install the virtual monitor driver. The driver is signed with a certificate from a public CA but most of the properties are in Chinese so it is difficult to read. The software is not “installed”, you launch the exe from the folder you extracted the compressed download to. It is an RAR download so you will need 3rd party software to decompress it in Windows (7-Zip, WinRAR, WinZip, etc.).
Once you have it up and running you’ll be able to choose from one, two, three, or a single ultra-wide monitor setup. It has crashed a couple of times on me while trying to play games, other than that it seems to work well on my hardware. You’ll want to carefully arrange all of your monitors once you have made your choice and have the app running. The mouse layout can be odd until you do.
Speaking of games, the refresh rate is 60 FPS and you should enable V-Sync. You cannot set the glasses as your main display so you’ll need to move the game to your glasses after it starts the first time. This can be tricky depending on the game itself, look for a “Windowed” mode in the game’s settings. This should get you a title bar to drag it by.
It is “beta” software in every sense of the term. If you are not used to testing mostly finished software, there’s a good chance you won’t enjoy the current state of this app. As I mentioned, it has crashed a few times, the layout needs to manually adjusted, and there’s an issue where the screen can stop responding to clicks that requires a restart. Happy testing.
I jumped on the 2080 Ti soon after it launched. Like everyone who purchased one in those early days, I paid more than I should have for the then cutting-edge hardware. Surprisingly, it lived up to the hype. At more than four years old, the 2080 Ti is still a strong card.
The limitations of its HDMI 2.0 connector prevent it from fully utilizing the newer models of 120 Hertz, 4K TVs. Of course, this only matters if you are using a HDMI 2.1 enabled TV in the first place. The HDMI 2.0 spec holds 4k performance to sixty frames per second and doesn’t work all that well with variable refresh rates either.
HDMI SPEC
Max Throughput (Gigabits per second)
1.0
4.95 Gbps
1.3
10.2 Gbps
2.0
18.0 Gpbs
2.1
48.0 Gpbs
I decided to try a DisplayPort to HDMI adapter to allow the 2080 TI to push my screen to its full 120 frames per second. I picked up a UPTab adapter for fifty bucks on Amazon. There are less expensive models available, but I’ve had good luck with UPTab in the past and decided to stick with them.
The adapter works great except for two minor issues. The first is that it gets very hot. To the point that it suffers from performance issues. To correct the problem, I point a fan at it. The other issue is that, at least in my case, it does not support variable refresh rates. So, I leave v-sync enabled to compensate.
Outside of those two issues, the adapter lets my 2080 Ti run at 4K 120 FPS with HDR enabled. I imagine the fifty dollars I spent on the adapter will get me at least another year or two of use from this GPU. Other adapters with the same function may produce better results, but I am happy with this one. https://www.amazon.com/gp/product/B01B6ZOMIS/ref=ppx_yo_dt_b_search_asin_image?ie=UTF8&psc=1
I’ve had my ASUS Dash FI5 3070-based laptop and my LG OLED TV for almost two years. In all that time, I have never managed to use them together. Anytime that I connect the laptop’s HDMI port to the TV and start any Direct X game, the computer reboots.
You read that right. The computer immediately reboots itself. There are no events logged in the event viewer, no pop-up errors, not even a sound, just a cold restart. I’ve flashed the BIOS and every piece of firmware. I have updated every driver and re-installed Windows. I’ve also taken the case off and re-seated everything. All to no avail.
If I connect the same laptop to my Samsung QLED TV, it works beautifully. When I carried my 3080Ti-based desktop in and hooked it up to the LG screen, the experience was fantastic. So the laptop and the TV worked separately. It didn’t seem to be a Nvidia bug either, both were using the same current Nvidia driver and application set.
Research online strongly suggested my problem could be caused by a low quality HDMI cable. I was already using an 8K HDMI certified cable from a reputable brand, but I went ahead and ordered several others to test. Not even a top-shelf, one-hundred dollar, super-cable, stopped the reboot. Here’s the link if you’re curious; https://www.bestbuy.com/site/audioquest-sky-5-4k-8k-10k-48gbps-hdmi-cable-blue-black/6428209.p?skuId=6428209.
Eventually, I gave up trying to use my laptop for gaming on the OLED screen. Until I ran across a little gadget I hoped might be the fix. A twenty dollar Thunderbolt to HDMI adapter that I picked up from Amazon completely solved the problem. Games start up at 4K, 120 FPS, HDR without issue.
There are several manufacturers making quite a few models of Thunderbolt to HDMI adapters. This is a link to the one I purchased: https://www.amazon.com/dp/B0B72B3V8L?psc=1&ref=ppx_yo2ov_dt_b_product_details. If you’re having a similar issue with your laptop connecting to a particular screen, perhaps a similar device might help? USB-C is not always Thunderbolt, but Thunderbolt can always use USB-C (I think). Both types of ports come in various versions, so do your research and good luck.