Move Games and Applications without Re-installing them; Symlinks (AKA mklink, symbolic links)

SSDs are the best thing to happen to computers since Windows 95. Running your computer from an SSD will increase it’s performance where it matters most. Your computer will boot in seconds instead of minutes, large applications will start almost instantly, load screens in games will zip by, and copying the pictures and videos off your camera will seem almost instant.

Unfortunately, most of us can’t afford an SSD drive large enough to handle all of our storage needs. Compare a 1 Terrabyte Evo 850 SSD at $350 to a 4 Terrabyte Toshiba 7200 RPM HD at $130 and you’ll see what I mean. Wouldn’t it be great if you had a fast SSD and a large capacity HD that you could easily move stuff between? The problem is that to move a program in Windows you have to re-install it, right?

Wrong! There’s a little known technique in Windows and Linux called Symlinks. A symlink or, symbolic link is a type of pointer that tells your operating system to look somewhere else for the data. A symlink will let you move the files and folders that make up a program or game to a new location and will tell the software where you moved them to. Our dream of having a small, fast SSD with our most used data and large HD to store everything else on, is in reach.

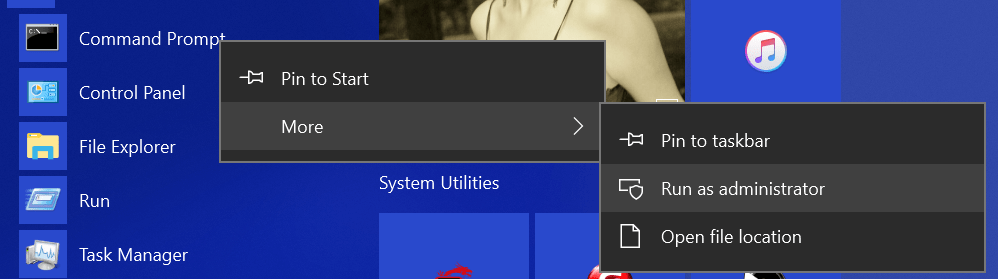
To make a symlink you’ll need to open PowerShell or a Command Prompt in administrator mode (right-click and choose Run As Administrator).

RunAsAdmin

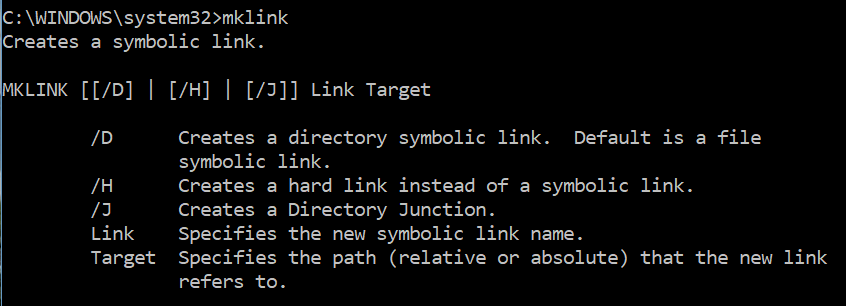
In Windows there are a few different types of links to choose from. Soft links are a kind of redirection similar to a shortcut. Hard links are impossible for software to see and are therefore the most useful. A hard link for an entire folder (vs. a single file) is called a junction in Windows. Typing mklink in our command prompt will show us the basics.

mklink

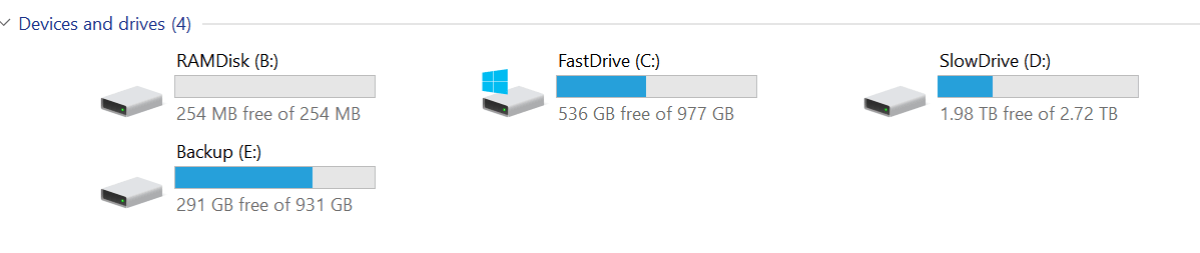
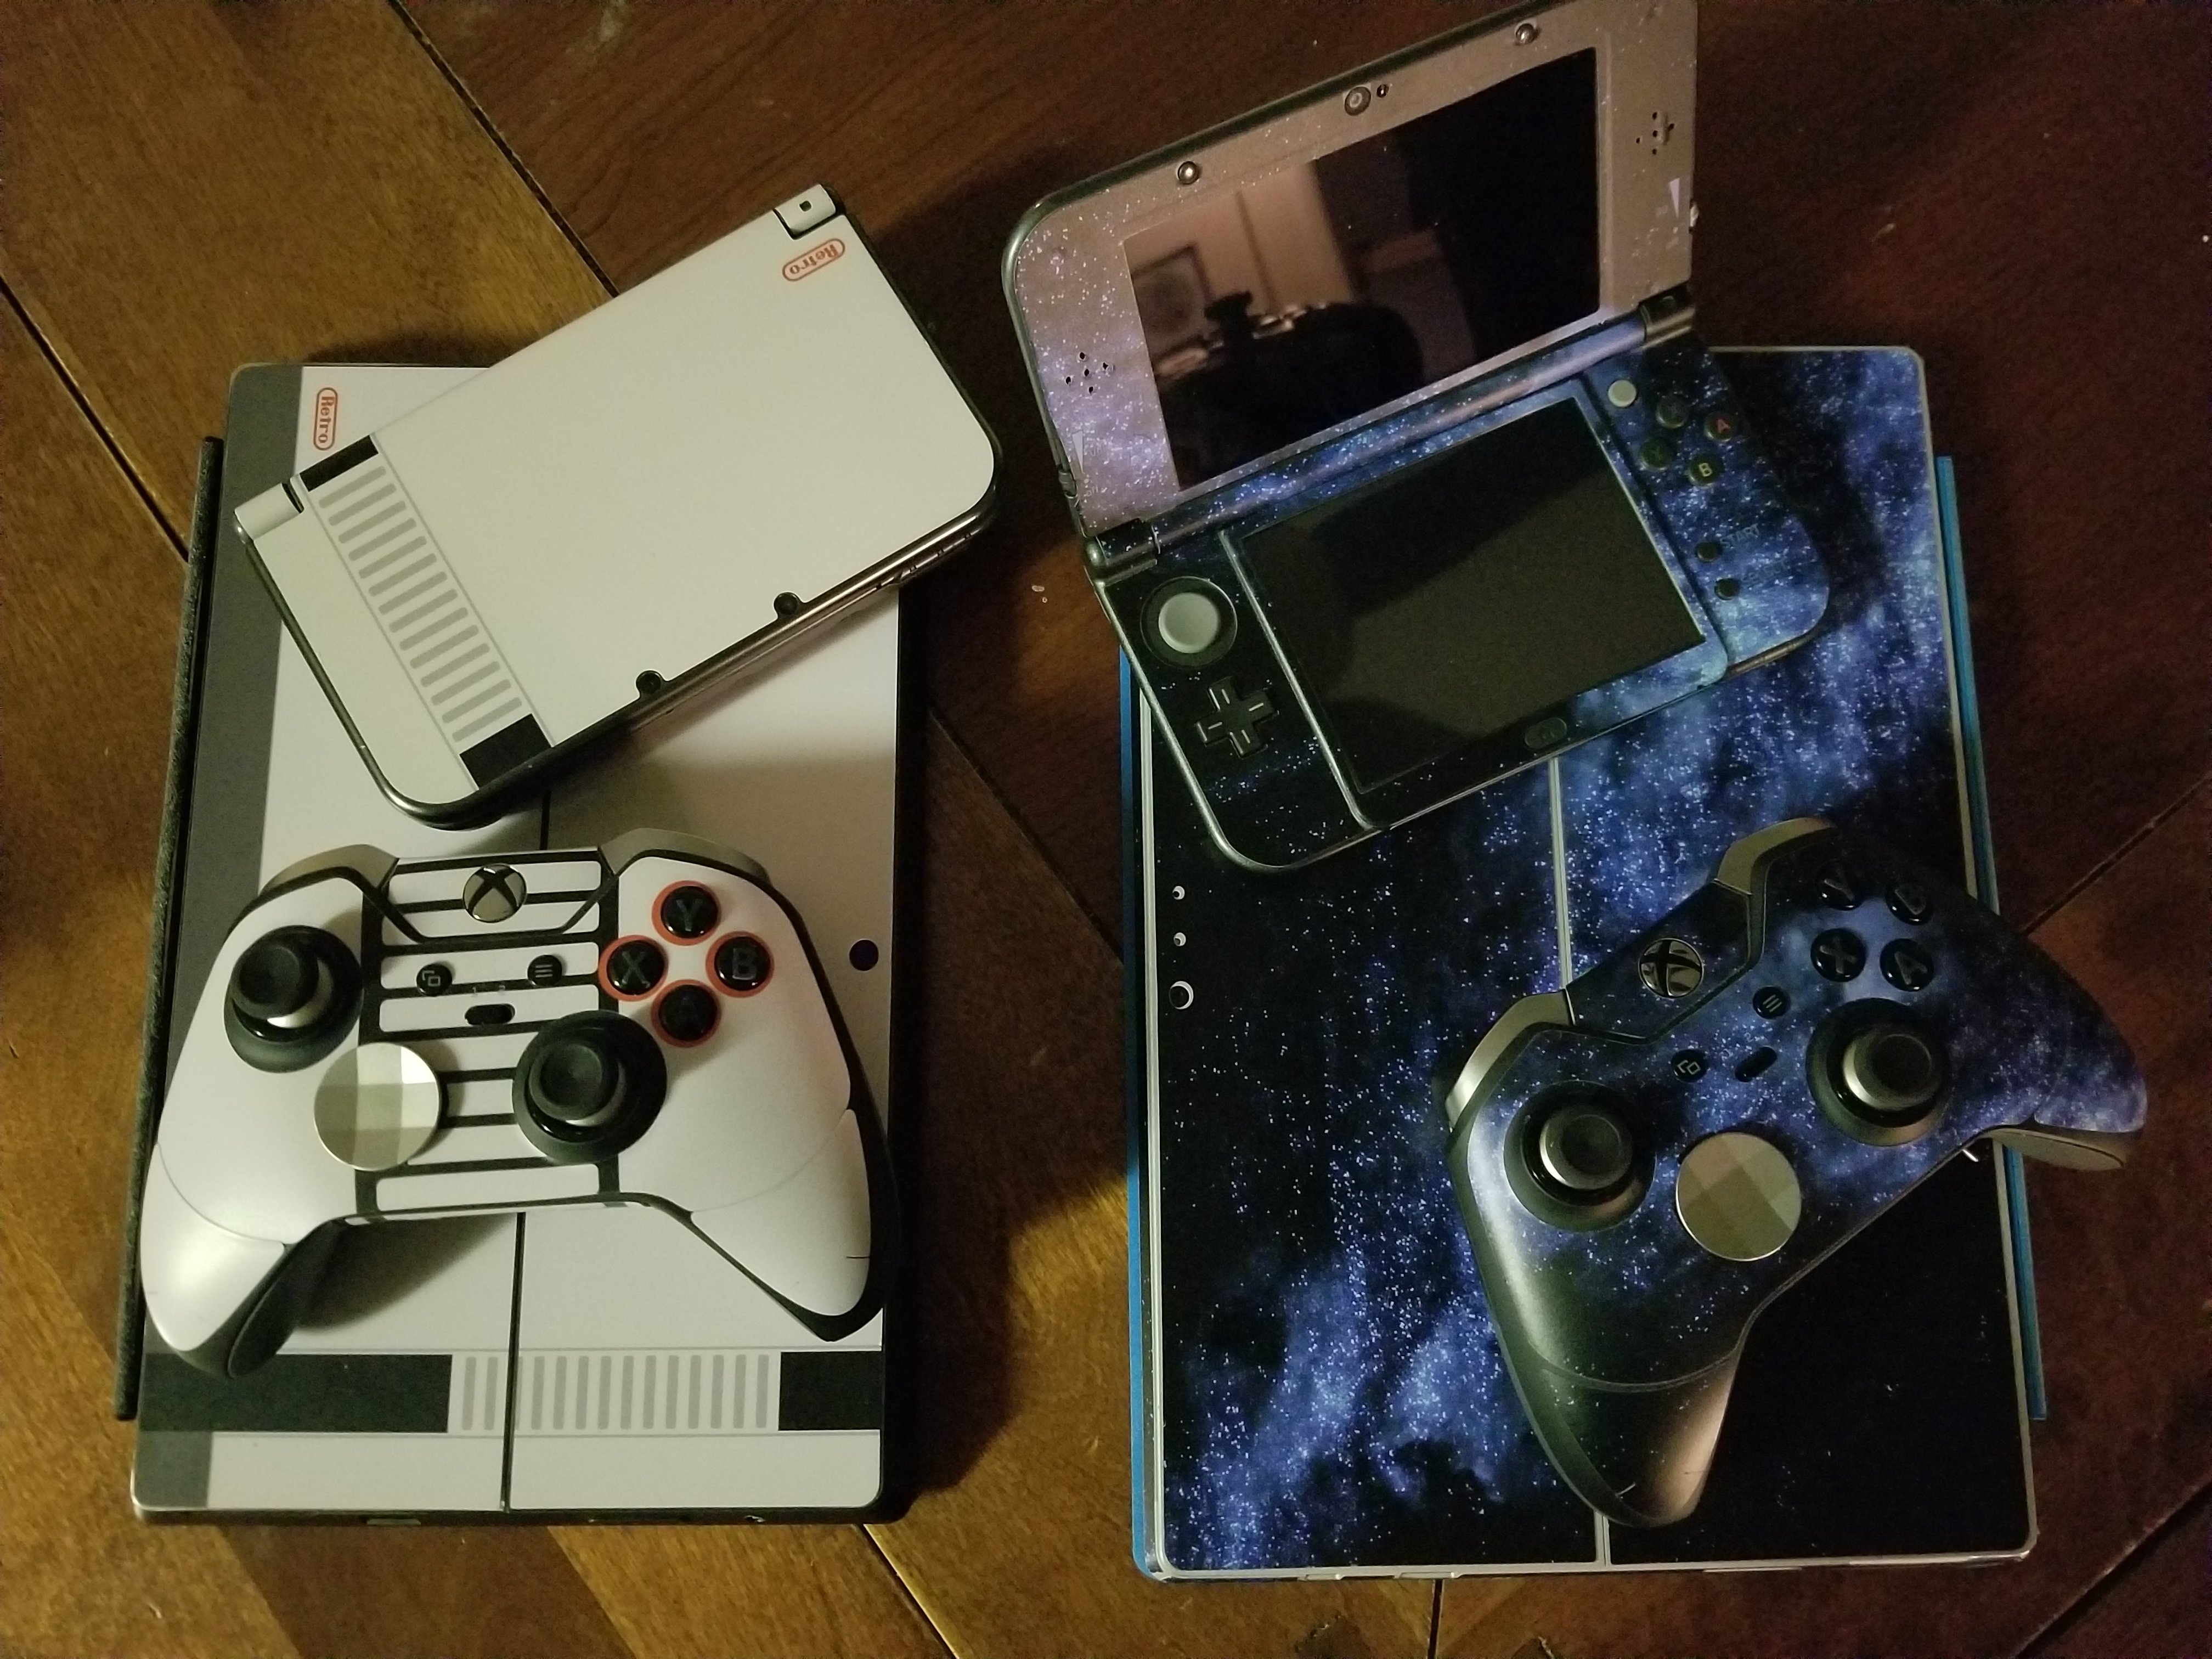
As you can see below, my gaming rig has several storage drives, the RAMDisk is RAM memory that can store files as long as the power isn’t turned off, the FastDrive is my SSD, and the SlowDrive is a 3TB 7200 RPM HD.

mydrives

When I installed Battlefield 1, I let it go to its default location (C:\Program Files (x86)\Origin Games\Battlefield 1) because I was playing it a lot and wanted it to start fast and have short load screens. Now that I’ve switched to mostly playing Destiny 2, I want to move Battlefield to free up the space on my SSD. The instructions below will work for any software you want to move on all versions of Windows since Vista (including servers). Just change the folder names in your commands. Be careful, quote marks and spacing matter.

  • I use Windows Explorer to cut the Battlefield 1 folder from its original location and paste it onto my SlowDrive.MoveGameFiles
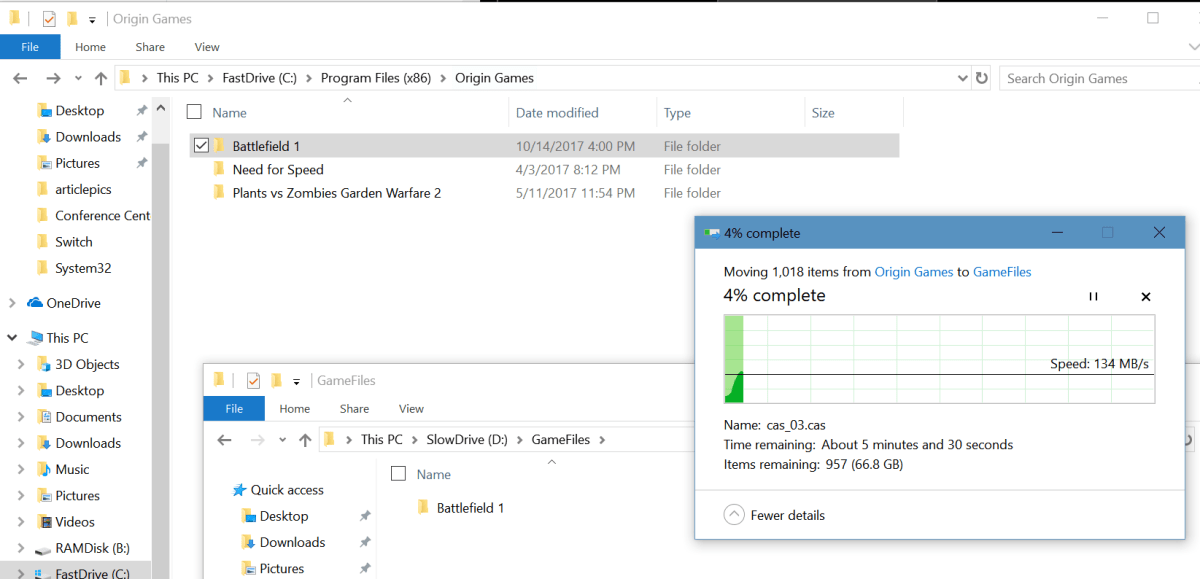
  • In this case we’re relocating an entire folder so our link needs to be a junction. The syntax is: mklink /j path I moved the folder to path of the original folder.  Note the quote marks, these are required if your path has spaces in any of the folder names. Also note, there is a space between the new location and original path.mklink-junction
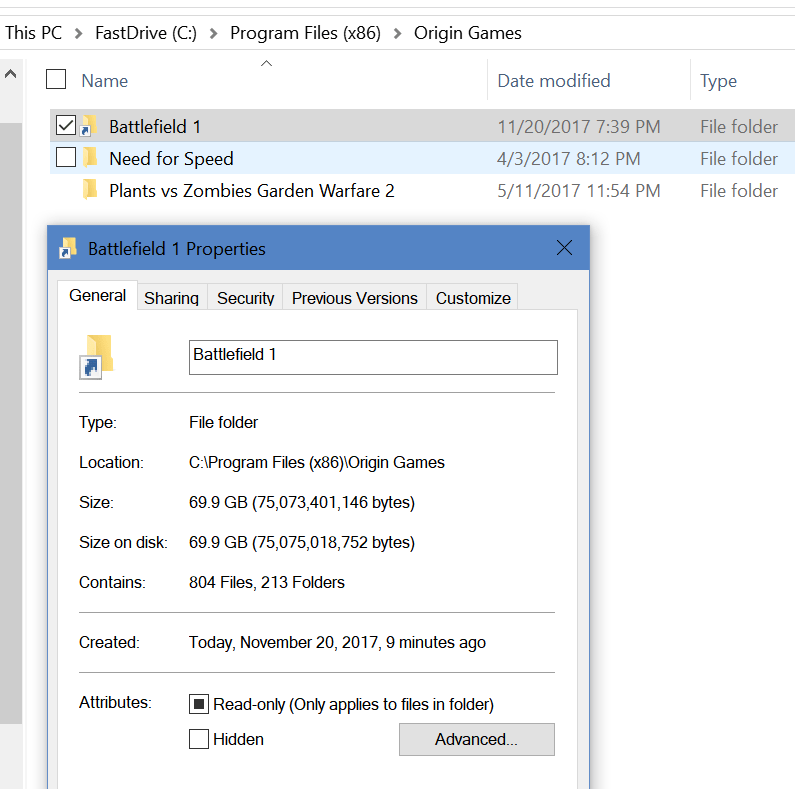
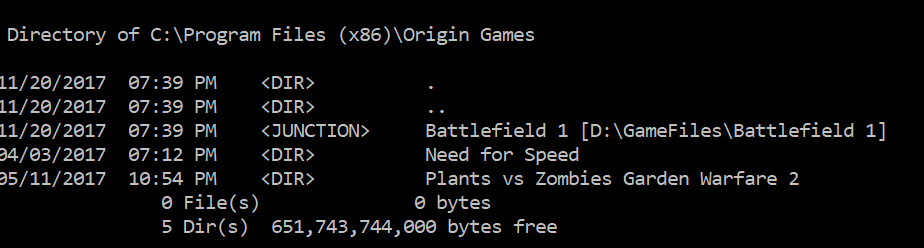
  • When I look in the original path of the data, I will see a shortcut. This is the link; it’s what fools our software into thinking the files are in their original location. In fact, if I check the properties of the link in Windows Explorer I will see the information (size, etc.) for the new location, it even shows the original path. Checking the directory in PowerShell or a command prompt will show us the truth.mklink-shortcut-propertiesmklink-cmd-properties

You can use symbolic linking to move software to any drive you like without having to re-install it. I took less than 6 minutes for me to move this game vs. hours of downloading and re-installing. I used this same technique to map my children’s Minecraft save data to my OneDrive account so that they can access their games from any of our computers or even from their friend’s houses. It’s a very handy thing to know. Let me know in the comments if this helped you out or if you have questions about using links.

How to choose a Gaming Laptop; Lenovo Y700 Review

Anybody that has read my blog will realize that I’m a gamer.  I enjoy all types of games on all types of systems and that includes the PC. My house has two gaming PC’s in it; my pervious setup and the one I just finished building a few months ago. This allows my family to play games together. Right now my son and I are playing Destiny 2 and I must say, if you’ve never tried it on a PC, you should.

My father has played with us on the Xbox 360 and Xbox One; recently he decided to join us in Destiny 2 and Overwatch on the PC, but he didn’t already own a machine with a GPU. My parents are retired and like to travel in their RV so he wanted something that could go with him. Gaming laptops are tricky to choose. There are a lot of systems out there that claim to be able to handle AAA games, but many really can’t unless you’re willing to turn the graphics down to low and make other sacrifices.

So it comes down to specs, but as usual the marketing people who work for the manufactures know that you’re looking at specs and muddy the waters with a bunch of useless jargon. In the end you’re looking for:

  • CPU – The calculating brains of the system. You’ll want an Intel Core i-5 or higher or an AMD Ryzen processor. Celeron, Atoms, and other names are lacking the floating point co-processor, extra cache, and fast lanes that are required to play intense games.
  • Memory – You’ll need at least 8 GB of RAM, but I recommend 16 GB if you can afford it. Especially if you want to have YouTube or music streaming in the background or like to broadcast your game play.
  • Storage – Modern laptops offer choices between SSDs, Physical Hard Disks, or both. SSD drives are usually lower in capacity but much, much faster than old school hard drives. This means your games load faster and load screens between sections are quicker. Games can be very large though; Battelfield 1 is a whopping 70 GB so capacity can be an issue if you plan on installing more than one AAA title at a time. I like the systems that offer both, you can put the game you are currently playing on the fast SSD and move your others to the large capacity physical drive. To save money get a system with just an SSD and put  your own physical drive in it later (requires two hard drives slots).
  • GPU – The graphics processing unit is what determines how well your game will look and how many frames per second it can play at. Laptop GPU’s have the same or similar names to their desktop counter parts, but they do not have the same power. A laptop Nvidia 1050 cannot run Destiny 2 in 4k at 60FPS but the desktop version can. I only mention this so your expectations are realistic. You are looking for an Nvidia or AMD GPU and the higher its number the better. Intel GPUs are not suited for AAA games, you might be able to get them to play but only by turning down the level of graphics to their minimums. In addition to the type of GPU, you’ll want to pay attention to how much video RAM is dedicated to it. Aim for 4GB or more.

There are a lot of choices in the market right now. All the major manufactures like Dell, HP, and Lenovo make dedicated gaming laptops and several make business class systems that include a GPU so you can work and play on the same computer. The newly released Microsoft Surface Book 2 can be purchased with an Nvidia GPU that makes it suitable for gaming. Any of them are fine, just watch the specs I’ve mentioned above.

In the end my father settled on the Lenovo Y700; it is a dedicated gaming laptop but isn’t quite as large as some of the other systems. His has and Intel Core i-7, 16GB of RAM, a 250GB SSD, and Nvidia GeForce GTX 960 with 4GB of VRAM. This laptop also has a 15″ 4k screen so it can run some games at their highest resolution without connecting to a TV. It’s keyboard includes a dedicated number pad so if you’re wanting a system that can double as your work laptop this one will fit the bill. 20171112_121805.jpg

It can easily run Overwatch at 4K 60FPS on medium but I have to turn Destiny 2 down to 1080P to reach 60 FPS. He’s been very pleased with it and the price was exceptional. Most gaming systems with these kinds of specs end up in the $1100 – $1500 price range but he picked this one up at Costco for $800.

Skin your Gear

All of our portable devices: laptops, phones, tablets, and game systems are subjected to the bumps and bangs of life when we take them on the go. It’s not the violent drops to the sidewalk that end up defiling my gear. I’m careful and rarely drop equipment.

My stuff always ends up scuffed and scratched from riding around in my laptop bag or being tossed in my desk drawer. For a lot of people the solution is to put their gizmo in a case. I can’t stand cases. Why would I pay a small fortune to get the slimmest, lightweight, super styled gadget and then turn around and stick it in a giant plastic box?

Luckily for people like me there’s a happy medium. Skins are vinyl decals that are cut to perfectly fit your device. They don’t alter the shape or weight but are sturdy enough to ward off most minor dings and scratches.

The sky is the limit when it comes to style. You can get clear skins or have then made out of your own photos. There are countless designs and several quality manufacturers. I like Decalgirl.com the site is easy to use and the skins are high quality. They have designs for almost every type of gadget. As you can see in the pic below, I’m partial to the blue galaxy design. My son prefers the retro NES look.

Razer Kraken USB vs. Razer Kraken 7.1 v2 Gaming Headsets

Over the years I have owned and used almost every type of headset out there. I started with the basic 3.5mm jack in sets that came with the Walkman. Then, when the original Xbox came out I got my first wireless set. I’ve had Bose, Apple, Samsung, Turtle Beach, Lenovo, Sony, Corsair, and everything in between since.

Recently I bought my son the Razer USB headset for $60.00 at Best Buy. We picked them because they had 7.1 surround sound, worked with both the PC and PS4, and felt pretty comfortable at the store. For the price they seemed like the best bang for my buck. 40mm drivers, a boom mike, and nice ear pads made them an upgrade over the iPhone ear buds he had been using with the PS4 and he was just starting to get into PC gaming so being able to plug into both devices was a nice feature.

20171110_221850.jpg
Razer Kraken USB

We got them home, downloaded the newest Razer Synapse software (required for the surround sound to work) and went through the simple setup process. I appreciate the way the software allows you to adjust the angle of each directional sound. It allows for some incredibly accurate sound only shots in games like TitanFall and Overwatch. Nothing lets you dodge Diva’s rocket attack like hearing where its coming from.

KrakenSurround The EQ lets you tune the sound of your game until it’s just right and you can easily create profiles (saved settings) for each game that you play. I have one for games and another for music.

The only negative thing we experienced was something my son noticed. There is a slight feedback tone when there’s no audio signal being played. It’s a common issue with USB headsets and is more related to the PC’s internal cable shielding than the headset itself, but it is annoying when you’re in between games or songs.

I liked the Krakens so much that I decided it was time for me to replace my trusty Turtle Beach XP400s. The Turtle Beach cans were just fine but I have so much wireless equipment in my house that they were occasionally dropping out from interference and I’ve worn them so much the ear pads were getting threadbare. I opted for the Kraken 7.1 v2 model, at $90.00 (on sale) they were a little more expensive but have some nice upgraded features for the extra thirty bucks.

20171110_220335.jpg
Razer Kraken 7.1 v2

The 7.1 v2 Krakens have 50 mm drivers, the base will shake your skull. Seriously, I have to turn it down on games because the explosions can hurt at high volume. The mic retracts all the way into the headset when you’re not using it and has a mute button embedded in it. When you mute the mic the tip glows red. The have the same surround sound features as the Kraken USB but add active noise cancelling for both ambient noise and your voice in the game. Most importantly they add mic monitoring; the ability to hear yourself in the headset when you talk. My wife thinks this is the most important feature in all headsets because it keeps me from talking quite so loud.

KrakenMic

The 7.1 set is also Chroma enabled which lets me match the color to my PC and other accessories. For me this is feature is important; my whole PC case, motherboard, keyboard, mouse and even my desk are all RGB LED and the ability to have my headset match the color of my mood is nice. The headband is wider, the ear pads are thicker, and they’re overall more comfortable.

The Kraken USB set sounds great, they are some of the best sounding headphones I’ve used, but the 7.1 edition takes the cake. They are flat-out the best sounding earphones I’ve owned so far. I think they sound better than my Bose Soundlink set that I use at work. The base is thumping, the highs are clear, and they filter out any feedback. You’ll be happy with whichever pair fits your budget but if you can afford them opt for the 7.1 v2, the extra $30 ($40 when they’re not on sale) is well worth it. No matter which set or brand of USB headset you buy, always check the manufactures site to see if there is related software. You don’t get the full set of features without it.

Network Speed Boost Part 3; Remove Legacy Devices

Now that you’ve upgraded your router and wireless access points its time to talk about letting go of the past. You see, an ethernet network (what we all use now days) slows down when slow devices are conversing on it. Think about your morning commute; if a car a mile up the road slows down to rubberneck the accident on the other side of the highway, so do you eventually. Networks are not all that different.

All of your devices are using the same pathways to connect to each other.  In the first article in this series we discussed packets. Some of the packets that run across your network are essentially advertisements for the type of device and services it offers to other systems. These are called broadcast packets because they are sent throughout your entire network. Layer 2 packets are started on their trip with a broadcast; like you trying to get your friend’s attention at the bar. You shout their name and everyone hears you but only Kevin turns around.  When this type of information hits an older device it leaves that device at a slower speed. Old man Bob hears you shout for Kevin but the has to think about who that is for a bit before he passes your shout on. This slows down your entire network just like the guy a mile up the road checking out the wreck. It doesn’t matter if the legacy system is wired or wireless the effect is the same.

What do you do if you need the older equipment to keep running but you don’t want the slow down it causes? This is a trickier situation that you might expect. No solution outside of removing the old equipment is going to be perfect. That being said, the strategy that is most effective is to isolate the equipment as much as is possible. Group all the old stuff together on its own separate network per se. This can be accomplished through a technology known as VLANs.

VLANs or Virtual Local Area Networks are a way for your router to separate traffic into groups of devices. Like the right lane on the highway, all the slow people are supposed to stay out of the fast driver’s way (in theory). It isn’t hard to accomplish but the way you do it, is different for each specific set of equipment you might be using. Google is going to be your friend.

In the case of wireless equipment it helps to run all of your faster equipment on the 5 GHz channels and all of your older tech on the 2.4 GHz channels if your wireless access point has the ability to do both. VLANs can provide wireless networks with isolation from the packets that go across them but not from the signal waves the Wi-Fi protocol uses to send an transmit the packets with.  Separation at the signal level requires running your equipment on two different stations as it were.