Modern Virtual Reality; 2.5 years in and better than ever

Way back in 1991, I played an RPG game called Legend Quest at an arcade in Kansas City. I had long been a gamer and spent many an hour trying to own the top scores for games like Pac-Man, Asteroids, 1942, Double-Dragon, and Out-Run, but this game was very different from those.

You stood on an elevated platform with a giant helmet that contained a screen and held a single controller in your hand. I felt like a dweeb getting all of the gear on in the middle of the mall. It was the Christmas shopping season and I was a teenager in the “big” city on a trip with some friends and no parents. I was hoping to meet some girls, but wearing this get-up was absolutely ruining any chances of romance.

1000seriesVR
Not Me I promise!!!!

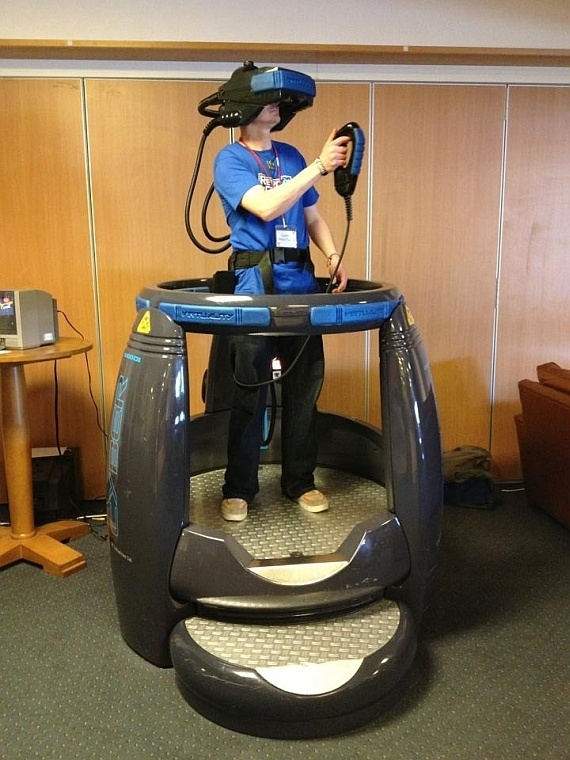
The game that I was playing was a fantasy adventure, not unlike some of the more modern 3D Zelda games. The graphics were atrocious by today’s standards, but they were more or less 3D and in full color, which was more than some games of the time could say. The graphics weren’t what enticed me spend every dollar I had on this thing.

Legeng Quest

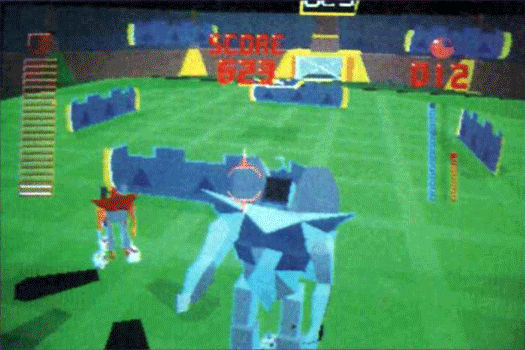
This was one of the first publicly accessible Virtual Reality experiences you could have. At the time, most people had never even heard the term Virtual Reality. Wherever I looked, the view in the game followed. I could move my hand and the sword, bow, or spell I was using moved with it. The thing made me sick and gave me a massive headache, but I didn’t care. I played until I was broke and then borrowed ten bucks from my BFF and played some more. In my head, the potential for this tech was world-changing.

I followed VR like a hawk through the 90’s and 00’s. It seemed like we were on the verge of something great. The Lawnmower Man movie introduced the concept of VR to the masses and several newer versions of the machine that I had played on made tours of the malls, arcades, and amusement parks.

Then it happened. Sega announced at E3 that they were going to make a VR console attachment for home use. They even had several games ready to go. I already had a Genesis console and started saving every penny I made. Eventually they canceled the project because they couldn’t make it cheap enough or good enough.

All was not lost though. Nintendo launched the Virtual Boy in 1995. I didn’t have a Nintendo, but one of my buddies did. He bought the VB and I headed over as soon as he had it hooked up. Unfortunately, it kind of sucked (I didn’t tell him that). The graphics were only in red and black and you had to set the thing on a table and lean into it.

Through the early 2000’s several companies tried various VR headset devices like the VFX 3D but none of them stuck. They were too expensive, too heavy, too low resolution, and too hard to use for any kind of mass appeal. Then in 2012 there was a Kickstarter campaign by a little known company named Oculus. The videos they were showing off of their dev unit looked amazing.

vfx3d

Fast forward to the present day. I’ve had my Oculus Rift for quite a while now. I’ve got the current retail edition and have 3 sensors, the touch controllers and a Xbox remote. I’ve also got a good force feedback steering wheel and pedal set that I use for driving games. It’s all hooked up to a dedicated gaming rig running an I-7, 270 chipset, 32GB of 3000 SDRAM, 1TB M2 SSD, 10 120mm fans, 1000 watt PS, and an 8GB RX480 with Windows 10 Professional as the OS. Everything in the system is overclocked to within an inch of its life. It’s name is the Elder-Wand and you’ve seen it featured in several of my other posts.

20180728_014902.jpg

What’s in the machine matters. If you’ve used an Oculus or Hive and come away feeling motion sick there’s a good chance it was caused by an underpowered box. To skip calling Ralph on the big white phone after a VR session, the system has to be able to play the game at 90 frames per second with no lag outs. It’s the “no lag” area where some rigs fall short. During high action scenes, systems that are on the edge of performance requirements will often drop down into the high seventies. Don’t get me wrong; if you do a barrel role in a fighter jet, you’re going to feel it, but that kind of reaction is normal and in some cases can be lessened with exposure over time.

Besides not getting sick, a beefy box will also allow you to SuperSample. SuperSampling is a technique employed to sharpen an image. A scene with a much higher resolution than the one being displayed is generated and its extra pixels are used by an algorithm to calculate smoother transitions between shapes and colors in the picture that your eyes are actually shown. The effect can be dramatic in some games and goes a long way toward making the VR world less blocky looking. SuperSampling is especially effective in VR because the screens are so close to your eyes. Many newer games have an option in their graphics menu to enable this feature (aka Pixel Density) but if not, your VR Visor (SteamVR or Oculus Home) can be used to turn it on.

Enable SuperSampling in the Oculus app:

  • Close all Oculus programs on your PC
  • Download the Oculus for Windows SDK from here
  • Unzip the download and find the Tools folder
  • Open the Oculus Debug Tool
  • Adjust the Pixels Per Display Override field to your desired multiplier
  • Launch the Oculus app you want to experience
  • Close the Oculus Debug Tool

Enable SuperSampling in SteamVR:

There are several ways to get super sampling working in SteamVR games, you can edit some JSON files or use one of several free utilities out there. Personally, I use this tool because it allows per game profiles and access to several other hidden settings. Be aware that downloading and installing software from the Internet can always be risky and you are doing so at your own discretion.

What’s the Verdict?

Chances are that you’ve read or watched some reviews of VR that were less than flattering. All tech has its detractors and negativity sells, but don’t believe the BS. Once you get the software and hardware sorted out, today’s VR experience is flat-out amazing. The family and friends I’ve shared my setup with have been shocked. Playing Skyrim in VR feels like traveling to another place and time. Driving in Assetto Corsa with a FFB wheel is good enough to make you fear crashing. Launching out of the tube in a Valkyrie space fighter is more exciting than any movie I’ve ever watched.

Is VR perfect? Nope, but name something that is. Does it have annoyances? You bet, the cable can be a problem. The headset can get hot after wearing it for a while; so does my baseball hat. You need a lot of room (8 – 10 square feet) if you want to move around much because the physical movement of a human body takes space.

As with all new gaming platforms, there was a content problem when modern VR first got started. I say was, because we’re a couple of years in and now there are tons of games, simulators and VR worlds to visit and more are being released at a rapid pace. You can visit anywhere like you’re standing there in Google Earth VR, see the inside of the International Space Station, scuba dive, sky dive, watch movies on an 80 ft screen, see the olympics like you bought a ticket, have a chat, paint, sculpt, build, go on an epic adventure, hit the shooting range, play a real-world sport, join a firefight, fly a space fighter, drive that exotic car you’ve always wanted, and get the crap scared out of you without leaving your home. Seriously, the horror games are just freaky.

Right now most of the experiences are focused on entertainment, but I think that in the near future we’ll start to see more educational productions. The ability to teach someone about a historic battle while participating in it, or to study the pyramids while walking through them will be epic. New doctors can practice operations, pilots can learn to fly, the possibilities are endless. Already my children are using VR to learn to drive.

The cost of getting into PC VR has never been lower. You can pick up a basic kit with headset, sensors, controllers, and starter games, for around the same price as a good gaming monitor and now that bitcoin mining has dropped off, you can find VR capable graphics cards for less than $300.00. It’s still not cheap but I’ve spent more than my whole setup costs taking my family to an amusement park for a single day.  #disneyisexpensive

It already lives up to what I imagined it could be like after that first expereince with the idea all those years ago. I can’t wait to see what VR evolves into in the not so distant future.

PowerShell System Monitoring Part 3. Server Status Report

If you’ve been following this series then you know that we’re on a mission to create a poor man’s monitoring system from just PowerShell scripts and a web hosting engine. So far we’ve created HTML pages that show the warnings and errors from a group of server’s event logs. We’ve also made a report that displays all of the server services set to automatic but not running.

The scripts that we’ve written so far, use parameters to specify their file output paths and input of a list of servers to scan. Later in the series, these options will help us create logical groups of systems that make our monitoring system easy to use. For example; all Exchange servers, or all Active Directory servers will be grouped together on separate pages. One of the scripts that we will write, will create the lists of servers that belong in each group. Those groups in-turn will be used to feed the scripts that are collecting our data and creating the HTML reports. It sounds confusing and it is, that’s why I’m writing about it one part at a time. It will all come together in the end, though.

Connectivity, CPU load, memory and storage consumption, are the basic metrics required for any monitoring system worth its salt. I could sit here and bang out the code needed to get the data we’re after from WMI \ CMI and output it to HTML easily enough. One of the great things about PowerShell though, is that its ubiquitous and you don’t always have to invent the wheel yourself. In this case, somebody else has already cranked out 99% of the code we need, so we’ll just modify his.

Mike Galvin, Dan Price, and Bhavik Solanki have written a wonderful PowerShell script called Windows Server Status Monitor. It uses WMI to pull CPU, memory, storage, and online status information from a list of servers and can display the results as a color coded HTML file. It also contains an alerting feature, emailed results, and can run once or continuously. You can download the script from Mike’s Blog, GitHub, or the PowerShell Gallery.

My personal project required trending data. I need to see these performance metrics over time. Mike’s script can output a CSV file instead of HTML, but it deletes the files it creates each time it is run. With just a little tweak to the CSV output file we can ensure each file is unique and therefor not deleted. If you need trending as well, make ths change. Under the comment ## Setting the location of the report output; find $OutputFile and set the variable to something like:

$Outputfile = $OutputPath\WinServ-Status-Report"+"_" + (get-date -Format M-dd-yyyy-h-m)+".csv

This change will create a CSV file that includes the date, hour, and minute in the filename. You could also include seconds or even milliseconds if you’re going to run this in a continous loop. Please be aware that you’ll need to monitor the folders you are outputing these files to. If you’re running WinServ-Status in a 5 minute loop against 20 groups of systems you’ll be making 1200 CSV files per hour. The files are small but they’ll add up over-time.

When we put all of this together a few posts down the line, you’ll see that we run WinServ-Status.PS1 twice; once to create the HTML file and again to make a CSV.  As with the other scripts in this series you’ll want to save them to C:\Program Files\WindowsPowerShell\Scripts\ to make them easier to run as a scheduled task or to call from any PowerShell session. If the “Scripts” folder isn’t in that path, just make it yourself. If you install the WinServ-Status script from the PowerShell gallery or from GitHub it will end up in that folder by default.

In the next article for this series we’ll build our lists of servers to run the data collection scripts against. After that, will be how to get IIS setup to host the HTML reports we are creating, followed by getting the scheduled tasks that run everything setup, and finally how to diplay all of this data in a sensible manner.

Appbot Riley, an affordable home security bot.

Not long ago I jumped on the IoT bandwagon and installed a Ring doorbell. I was surprised by how much peace of mind the thing provides. Getting a notification when somebody approaches my house, a doorbell that not only chimes but beeps my phone, and being able to tell salespeople that I’m not interested without getting off the couch are game changers in everyday life. Knowing that the UPS man dropped off my package on the porch and being able to keep an eye on it until someone gets home is just great, too.

Ring

These high-tech super powers of observation got me thinking that it would be awesome to keep an eye on the inside of my home too. I know there are several systems on the market that facilitate putting multiple cameras throughout your home and connecting them to a controller that monitors, records, and provides control over the camera network. Nightowl offers systems that are both wired and wireless with multiple cameras, indoor and outdoor options, and more. I wasn’t interested in having a system like that in my house though. My family and I think that having cameras staring us 24/7 would be creepy. My goal isn’t to spy on people. It’s to see what’s going on in my home when nobody is there.

I have experience with several models of office bots. You place an iPad or other tablet into them and then connect with 2 way video software to drive yourself around and talk to people (think Facetime on wheels). A couple of the companies that I’ve worked for have had these devices for employees that work from home or remote offices. They are surprisingly effective after everyone gets used to them. There are a couple of problems for my use case though; they are too expensive and just flat-out overkill. I like the idea of a camera I can pilot throughout my home but it doesn’t need to show my face.

ipadbot

I hadn’t run into a solution IRL so I did what I always do, research. It turns out there are a few options for home security bots that are basically web cams on wheels, but not as many as you might think. The lower tier of these devices are children’s toys, which I immediately ruled out. The upper tier is comprised of personal assistant robots, that look cool (to a geek) but are priced out of my budget. Right in the middle are a handful of home security bots that are basically web cams on wheels, or tracks as it were. I narrowed my list down to three based on customer reviews and the features each offered.

  1. YZ MeE Smart Home Security System
  2. FEISIER CLOUD ROVER IV Cloud Companion RC Car
  3. Appbot Riley App Controlled Movable Home Safety Robot Camera

My home has several different floor surfaces; shag carpet, tile, and various rugs, made me think that the option 3 might get around a little easier. Tracks offer excellent traction and weight dispersal. There’s a reason why tanks use them right? So I ordered the Appbot Riley from Amazon.

It had several features that I was interested in without being total overkill. The little bot has: 720P streaming video, a rotating docking station, automatic docking and undocking, a motion detector, IR night vision, picture and video recording (to your phone), face tracking, two-way audio, a tilt camera mount, and automatic self-righting.

We’ve had the robot (we named it Robby) in our home for a couple of months now. I’ve been happy with it overall, there are only two things bug me. When you pilot it at full speed it tends to turn left. There’s a sweet-spot at which you can drive forward at around 70% of the full speed and stay straight. The other is, every time you switch out of the app to say, check a text message, you have to go through the log on process all over again.

When the little guy is on its dock you can use it like a 360 pan/tilt security camera, the dock is motorized and spins while the “head” tilts up and down. We’ve strategically placed it so that its easy to see the front and rear doors without undocking. If we want to see what our dog is up to we just hit the undock button and the app bot orients itself and then backs out of the dock ready to go. When you’re done driving you only need to get it close to the dock (where the camera can see it) and then hit the dock button. It will position itself and start charging all on its own.

You see what the camera sees from the app on your phone and drive with virtual control sticks much like those in any FPS game that you’ve every tried on your smart phone. The controls are simple and the app works great on my Galaxy Note 8 and iPhone 8. It also works on my wife’s iPad. There isn’t a Windows or Linux app for it yet but the developer has mentioned they are considering creating one.

The bot connects to your wi-fi and then to cloud servers hosted by the manufacturer. Your mobile connects to the servers (not the bot directly) so you can use it anywhere that you have an internet connection. I’ve even tested turning off my LTE and was able to pilot it just fine on plain old 4g, although there is some lag and the picture quality degrades at this low-bandwidth.

We’ve traveled away from home a couple of times since setting up Robby and its nice to be able to check the outside of our home through the ring and then take a look inside to check the doors and windows. Once again, I find myself shocked at how much worry it relieves to be able to see that nothing is wrong, I didn’t leave the stove on, and just generally check things out. My son has a pet lizard that almost always stays home, but Gizmo’s tank is on a stand that is fairly high up and difficult to see from the floor. No problem, I just leaned a piece of cardboard up against the stand at a 45 degree angle and Robby can drive right up it to see in the tank. It’s night vision makes it easy to see the bearded dragon holed-up in its den and make sure she’s doing well.

I’ve used it to prank the wife a few times, we’ve checked on the kids when we’ve left them home alone. My dog is slowly getting used to it. At first she’d bark her fool head off when Robby undocked and started moving but now she just gives it the stink eye. It still freaks her out if we talk to her through it, though. It’s night vision and low profile makes it great for looking under beds for lost items.

My mom thought of another excellent use for it. If you have a loved one that isn’t quite fully independent it would be a great way to keep tabs on them. I wish it would have existed when my grandmother lived in her assisted living home. It would have been nice to have had the ability to check on her more often. It would also be great to leave in a vacation property or RV.

wp-1532285456383.jpg

PowerShell; System Monitoring Part 2. Stopped Automatic Services Report

In the first article in this series I explained the goal. I want to help you create a server monitoring dashboard with nothing more than a few PowerShell scripts and a web server. Before we build the web site, we need to create the scripts that gather the information and create the HTML reports.

In an article a while back, I showed how to use PowerShell to list stopped automatic services and suggested that you might want to output the data to HTML. That is exactly what we’re going to do here.

</p>
param (
[string] $list,
[string] $outputpath
)

$style = "&lt;style<span>&lt;/style&gt;BODY{font-family: Arial; font-size: 10pt;}"
$style = $style + "TABLE{border: 1px solid black; border-collapse: collapse;}"
$style = $style + "TH{border: 1px solid black; background: #dddddd; padding: 5px; }"
$style = $style + "TD{border: 1px solid black; padding: 5px; }"
$style = $style + ""</span>

Function Problems {
$servers = Get-Content $list

Foreach ($server in $servers)
{Get-Service -ComputerName $server |where {($_.StartType -eq "Automatic") -and ($_.Status -match "Stopped|.*Starting|.*Paused") -and
($_.Name -notmatch "CDPSvc.*|.*gupdate|.*RemoteRegistry|.*MapsBroker|.*sppsvc|.*WbioSrvc|.*iphlpsvc|.*tiledatamodelsvc|.*clr_optimization_v4.0.30319_64|
.*clr_optimization_v4.0.30319_32")}|
select @{n="Server";e={$server}}, @{n="Stopped Service";e={$_.displayname }}
}
}

$report = Problems|Sort-Object Server|ConvertTo-Html -Head $style|Out-String

#Send-MailMessage -SmtpServer my.emailserver.com -From alerts@mydomain.com -To me@mydomain.com -Subject "Stopped Server Services" -Priority High -BodyAsHtml:$true -Body $report}

$report|out-file -FilePath $outputpath

The script above is written to use two parameters when called, -list should be the path to a text file containing the severs you want to scan. The -outputpath parameter is the location to save the HTML report.

You’ll notice the $_.name -notmatch section contains several service names. These services are set to automatic but do not keep running if they don’t have work to do. The regex pattern keeps these services from showing up in the report as false positives. You may need to add a few more for your environment, especially .Net versions.

There’s also an option to email a copy of the report. Just un-remark the line and populate the sever name and addresses. The HTML report will be embedded in the email, not attached.

In the next post for this series, we’ll generate a system status report to go along with the events and services, then we’ll put them all together in a dashboard.

The lazy boy and his quest for the perfect living room chair.

We’ve had the same couch in our living room for a long, long, time. It’s gotten so worn out that there’s a permanent dent where my butt goes and the wooden frame pushes into my back every time I recline in it. The poor thing is permanently bent at an angle on one end and the material looks like a shirt that’s been through the wash one too many times. Furniture shopping time!

We started out at the local furniture store looking at couches that were similar to the one we needed to replace. We like having recliners on each end and cup holders are nice. My parents had recently picked up a unit with power recliners and built-in USB ports that we really liked.

☆▻ Home Furniture : Antique Living Room Chairs Ashley Furniture throughout Ashley Furniture Showroom

One might think that power recliners are just for lazy people; how hard can it be to pull a handle? The thing is, they can do some things that other seating just can’t. Power recliners can maintain any position your heart desires. Wherever you let go of the button is where they stay. For me, this is especially nice on the foot rest. Traditional reclining furniture usually has two foot positions, up or down. Having my feet fully up while sitting puts stress on my hip joints and lower back because they are almost always a too high of an angle for my build. Being fully reclined makes it difficult to watch TV or play a game. These are some serious first-world problems people!

So, power reclining is a requirement for us and you would think there’d be limited choices in the category, but you would be wrong. Apparently while I was working on digging a deeper butt hole in my old couch, the whole furniture world decided to make power everything. Guess we’ll have to pick the old fashioned way; by sitting on a bunch of them.

My wife and I tried out literarily hundreds, possibly thousands, of couches and chairs in a multitude of different stores. Aesthetics aside, we figured out some key features that make a big difference in comfort. First, a power headrest is important; much like power windows in a car, you can get a couch or recliner without the option but the savings aren’t worth it in the end. The power headrest allows you to prop your head and shoulders up for the perfect viewing angle, no matter how far you lay back.diagram
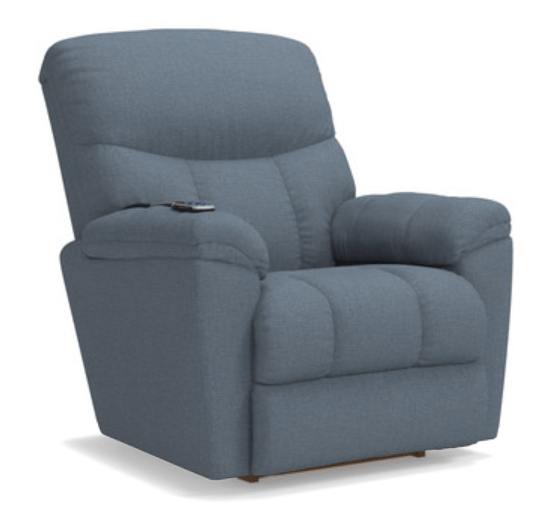
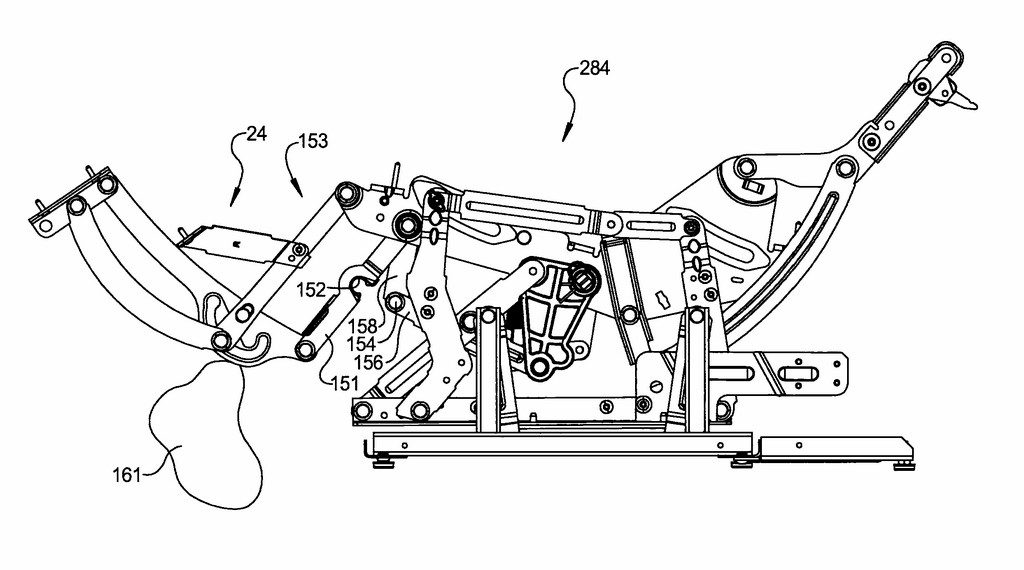
The ability to move the back separate from the footrest also dramatically improves comfort. Being able to get your perfect pelvis angle while sitting, removes stress points. Unfortunately this option is both rare and expensive. Out of the countless examples that we looked at, only a handful had it and most were well over $1300.00 for a single chair. We didn’t find any couches with the option at all.

Most of the power reclining furniture will raise the legs until they reach their maximum height and then the back will lower or vice versa; the two parts are connected via their movement mechanism. This is still better than the old fashioned pull a handle solution but, if you have the funds I suggest you try the indpendant movement before going this route. It’s uncomfortable for me to sit up-right with my legs fully extended and either power recliner configuration will fix this, you can put the legs at any angle that you like. Being able to get the same adjustability on the back is like having  steering wheel that tilts and telesopes; it provides a slightly better fit.

While looking at and testing all of these furniture pieces we both came to the realization that a couch wasn’t what we wanted at all. While they are the more traditional living room seating option, they have a lot of issues for us. Their footprint is too large given the seating surface, they are difficult to arrange in many rooms, and somebody always ends up with a worse view of the TV. We decided to go with two chairs and end-tables in between each.

Now that our list was narrowed down; power reclining chairs with seperate back and footrest mechanisms along with a power headrest our choices were pretty limited. Especially with regard to our budget. We really liked the Lazy Boy Morrison PowerReclineXR but at the time it was almost $1400. It was easily the most comfortable chair either of us have ever sat in but was out of our price range. We ended up finding it at our local Nebraska Furniture Mart for $749.00, the catch was that it only came in one color. Luckily we both liked the indigo fabric. Normally, I would provide you with a link to their site but it currently isn’t listed; the closest thing they have right now is the manual version of the same chair.

Ourchairs

We’ve had them in our home for more than a month now and couldn’t be happier. The chairs are a major uprade in comfort. Being able to slightly move your back, feet, head, and lumbar at any point you feel stress is a huge advantage over traditional seating. Remember when you first sat in a car with power seats and could adjust them just right? It’s like that but more cushy and with a footrest.

These chairs do not have cup holders or USB ports but our end-tables do. We had planned on getting end-tables to fill in the gaps between the chairs so why shouldn’t they be of the hi-tech variety? Again we spent several days looking on-line and in stores before we found the right pieces for our room. We ended up going with Laflorn Chair Side Tables from Ashley Furniture. They have built-in cup holders, power strips, and usb charging, along with closed in storage for all our controllers, game disks, and books. Several furniture stores carry a version of them but we found the best deal on Amazon.

end-tables

I never expected to write a piece about furniture on my tech blog. It just goes to show you how far technology has infiltrated our daily lives when chairs have controllers and motors and end-tables can charge your laptop and your phone. I predict that in the near future we’ll see smart chairs that automatically adjust to your body position and tables that wirelessley charge your devices while they back them up to the cloud.

PowerShell; System Monitoring Part 1. Get-ServerEvents, a windows event log error report.

After you have more than a handful of servers on your network, it can be challenging to catch small issues before they take something down and get noticed by users. What you need is a good monitoring tool; one that captures resource consumption, error events, installed software, shows patching status, and that generally helps you keep an eye on your systems.

If your place is like a lot of the businesses I’ve worked for, you probably have a bunch of emailed reports from various systems that amount to SPAM. You try to watch the emails and texts but they vomit so much useless data all over your inbox that its hard to make sence of it. Important notifications end up lost in the noise.

Purchasing a multi-thousand dollar monitoring tool is not always possible. The more nodes you have, the more expensive a monitoring tool will be. Math says that you won’t need a monitoring tool until you have a lot of stuff to watch, which almost guarantees that a commercial solution it isn’t going to be cheap. Spending money on something that doesn’t directly generate profitable returns can be a challenge for any company but outages hurt customer and worker confidence in your systems. This situation can leave technologists feeling trapped.

As system admins, engineers, or architects, we know that the operating system has and reports most, if not all, of the information that we require. We can connect the MMC Computer Management snap-in or the Server Administrator tool to almost any computer and see its event logs, service status, and more. The problem is, that the data isn’t correlated and filtered in a way that provides us with the up/down, big picture, view that we need to proactively correct small problems before they become big ones.

Computermanagement

In this series we’ll examine how PowerShell can help gather all of the data we need from every windows system attached to our network. We’ll use it to generate HTML reports that, in the end, will be uploaded to a web hosting engine so that we can see our system’s status at a glance. The solution isn’t going to compete with System Center or Solarwinds but its better than 10,000 unread items in your inbox and it is entirely free (assuming that you have Windows CALS).

I have to break this down into component parts, or the post would be a book. Stick with me and I think that you’ll end up with a functioning monitoring tool. Feel free to take all the credit for yourself. Maybe your boss will give you a raise. Just read my blog once in a while without your ad-blocker turned on and we’ll be even.

First up is the Windows event logs. Microsoft, in all of their geniousnous; has been spitting out the classic Application, Security, Setup, and System event logs for as long as I can remember. The amount of data they collect is impressive. Typically, they are my first stop on any trouble shooting endeavor. We all know the drill; open the Computer Management MMC, right-click on the system name to connect to a remote PC, and then filter for errors and warnings. You can configure them to dump to a database for correlation / indexing but most of us never get that far. We end up logging on to a problem system and manually checking the logs for relevant messages one at time. Stop doing that, you’ll go blind!

PowerShell will get us the same information, a nice filtered for errors, view of the logs but it can do it in bulk.. The code below is written to be a module that you can call from a scheduled task or from another script. If you’re going to follow the whole series to build my tool you will want to run it as a module. Copy the code and save it as a Get-ServerEvents.ps1 file in the C:\Program Files\WindowsPowerShell\Scripts folder. If the scripts folder isn’t there; make it.

Poweshell Modules

param (
[string] $list,
[string] $outputpath
)
$style = "
BODY{font-family: Arial; font-size: 10pt;}"
$style = $style + "TABLE{border: 1px solid black; border-collapse: collapse;}"
$style = $style + "TH{border: 1px solid black; background: #dddddd; padding: 5px; }"
$style = $style + "TD{border: 1px solid black; padding: 5px; }"
$style = $style + ""

Function Get-Events {
$servers = Get-Content $list
Foreach ($server in $servers) {
Get-WinEvent -ComputerName $server -MaxEvents 5 -FilterHashtable @{Logname ="Application"; Level=2,3;StartTime=(get-date).AddHours(-1)},
@{Logname ="System"; Level=2,3;StartTime=(get-date).AddHours(-1)} -ErrorAction SilentlyContinue|Select TimeCreated, MachineName, Logname,@{n="Level";e={$_.LevelDisplayName}},Message
}
}
$report = Get-Events|Sort-Object Machinename, Logname |ConvertTo-Html -head $style|Out-String
$report|out-file -FilePath $outputpath

The script will gather the last 5 application and system event log errors and warnings that occurred in the last hour for a list of servers and output them into a basic HTML table.

To run the script, create a *.txt or *.csv file containing the hostnames of the systems you want to see events for and then call or run it with the -list and -outputpath parameters. For example; Get-ServerEvents.ps1 -list c:\users\myname\my documents\ad_serverts.txt -outputpath \\reports_server\myreports\ad_serverts.html

If you don’t want to mess with text files you could also use the OU structure in AD as the source of your computer names. Mine organizational units didn’t line up with the way I needed my reports to look hence the text file parameter. If you don’t have that problem try changing the $server variable.

$servers = Get-ADComputer -Filter * -Searchbase “OU=MyOU, DC=mydomain, DC=com | Select dnshostname -ExpandProperty dnshostname
[/Code]

When you run the report you’ll end up with a nice, neat, HTML file like the one below. It’s easy to attach to an email notification; just add a Send-Mailmessage command to the bottom of the script. If you follow the rest of this series we’ll end up publishing the report(s) to a website.

Event report

Do smart doorbells live up to the hype?

In the age of the IoT (Internet of Things) almost any product is available in a model that will connect to the Internet for some reason or another. Cars, refrigerators, cameras, watches, and toys can all connect to your Wi-Fi and do various things that are supposed to improve your life experience in some fundamental way.

As a technologist, I am frequently an early adopter of these gadgets. Some of them turn out to accomplish their goal and make life easier like my smart phone. Some aren’t worth the trouble or money like my “smart” telescope. I was recently gifted with and installed a Ring doorbell (thanks, mom). Does it improve my life or is it a waste?

I didn’t jump on the smart doorbell bandwagon very early. To be honest they were too expensive, a pain to install, and I couldn’t see how they’d significantly make things easier. A doorbell does its job just fine, right? Why would it need to be smart? Ring has turned smart doorbells around. Their original unit can be found for under $100 dollars and is easy to install.

As with all IoT devices there are some technical requirements to using it. Namely, your Wi-Fi router will need to be powerful enough or close enough to reach outside. This is easily testable by taking your phone/tablet/laptop out to where you are mounting the, Ring and make sure you can still surf the web. While you’re out there, run a speed test, I like speedtest.net but any of them will work. You need to have at least 2 megabytes download and 2 Megabytes of upload bandwidth for the ring to work properly. Although we were able to make it work on a relative’s rural DSL with only .6MB of upload; you’ll be out of support if you attempt slower than 2.

It took me about 15 minutes to install my Ring. Everything you need comes in the box including a level, screws and anchors, a screw driver, and well written instructions. If you don’t like to read, install the app on your phone before you get started and it will play a high quality instruction video.

  1. Disconnect the power to your current doorbell (find the breaker).
  2. Remove your door bell. Usually two screws and then pry it off with a flat head screw driver.
  3. Attach the level to the mounting bracket.
  4. Pass the old door bells wires through the ring’s mounting bracket.
  5. Square up and level the bracket against your house.
  6. Drive in the four included screws; I cheated and used a drill. I also drilled four small pilot holes to make it easier.
  7. Attach the two wires from your original doorbell to the terminal screws on the mounting bracket. It doesn’t matter which one goes where. If your existing doorbell is digital (plays a tune instead of just ding-dong) you have to bridge the terminals with the included diode.
  8. Pair your Ring with your phone.
  9. Slide the Ring down on the bracket.
  10. Tighten the security screws at the bottom with the included star bit.
  11. Turn the power back on.

The device will draw power from the circuit that ran your old doorbell, but what if you don’t have one? Ring has thought of that. It has an internal rechargeable battery so you can still mount it outside. You’ll have to slide the unit off of its mounting bracket and charge it with a standard Micro-USB cable (included) every few months. The app will let you know when your battery is getting low.

After you have it installed, you’ll need to spend some time configuring the options that best fit your needs. The device has a motion detector, night vision, two-way audio, and can be shared with multiple users. You can also sign up for the Neighbors program; a high-tech twist on the old neighborhood watch in which you can post videos of suspicious activities. It’s a little eye-opening to see the flower-pot stealing crime syndicate at work.

Does it make life easier after you go through the trouble and expense? Yes, yes it does. If for no other reason than having the ability to tell sales people to go away without having to get off the couch. The notifications and functions work even when you’re not home. I wasn’t aware of how many neighborhood kids are playing basketball in my driveway while I am at work (don’t care, but nice to know). My wife and I can “answer” the door when we’re out shopping and leave the teenagers home, no one need know they’re home alone.

You can turn on Live view which lets you connect to the camera anytime you want (otherwise requires a doorbell ring / motion event) and see what’s going on in your front-yard from anywhere at anytime. I heard some big bangs this morning and from my bed looked out from the Ring camera and saw some kids getting a jump on the 4th of July celebrations. Back to sleep…

My family likes it so much that we are considering adding a couple of their security cameras and possibly even their full alarm system. I get some piece of mind knowing what’s happening at my home when we’re not there and better alerts (can’t hear a regular doorbell in the basement) when we are.