Microsoft’s 365 enrollment has three states: Enabled, Enforced, and Disabled. Enabled means that a user has, or will be prompted to enroll for multi-factor authentication. However, if they do not complete the enrollment and you do not have any type of enforcement policy, the account will continue to be authenticated without MFA. Once a person has completed the enrollment their account’s status is changed to Enforced. MFA is required from that point forward. An administrator can manually set an account to Enforced, but that account may not be able to logon and complete the enrollment on their own.
The multi-factor authentication page in Microsoft 365 admin portal will list all the users and show their states, but organizations with lots of users, SharePoint or Teams external accounts, and the like may have a difficult time displaying the data they need. The script below will list all licensed Microsoft 365 users that do not have an MFA state of “Enforced”.
Several of the solutions for controlling mobile data on the market claim to have provide simple solutions, but only one of them has impressed me. Microsoft’s Intune Endpoint Device Manager is extremely robust and very complicated. However, if you forget about trying to push apps and manage user profiles for now and concentrate on securing your corporate data on mobile devices, you’ll find Intune has a trick the others don’t.
Microsoft’s leg up comes from the fact that the software that is most likely being used to access company data is theirs, or one of their partners. Embedded in smart device apps like Outlook, Office, OneNote, Teams, Adobe, Box, Zoom and other popular titles is a process that checks for a special DNS record every few hours. If the record is found, its presence informs the device that there may be an Intune Mobile Application Policy configured for it’s user. The full list of apps that contain this feature is available on Microsoft’s site Supported Microsoft Intune apps | Microsoft Docs.
If you configure a Mobile Application Management policy and assign that policy to a user, when that person uses their company credentials with the specified program, they will be prompted to complete the protection process you have specified. You will also be able to stop access to the clipboard, prevent interactions of corporate data with non-approved apps, require extra device security, and more. Depending on the options you set in the policy, they will loose access to the resource if they refuse. No emailing codes to users, no trying to get them to follow odd instructions on a web page from their phone, they just open the app they have always used and follow the instructions.
Your accounts need to be licensed to use Intune before you can get started. The licenses are included with the Business Premium edition of Microsoft 365, they’re also included with several versions of Enterprise licensing. Licenses for Intune can also be purchased individually. Check Microsoft’s page for more details Licenses available for Microsoft Intune | Microsoft Docs.
Once you have the licenses taken care of you’ll need to configure your tenant. Assuming that you already have Microsoft 365 setup with your custom domain and user accounts, you’ll need to create a couple of DNS records for Intune. Log on to your public DNS host and create a CNAME for EnterpriseEnrollment.company_domain.com that points at EnterpriseEnrollment-s.manage.microsoft.com. Create another CNAME record for EnterpriseRegistration.company_domain.com that points at EnterpriseRegistration.windows.net. More detailed information about the full setup is available at Set up Microsoft Intune | Microsoft Docs and at Set up enrollment for Windows devices by using Microsoft Intune | Microsoft Docs.
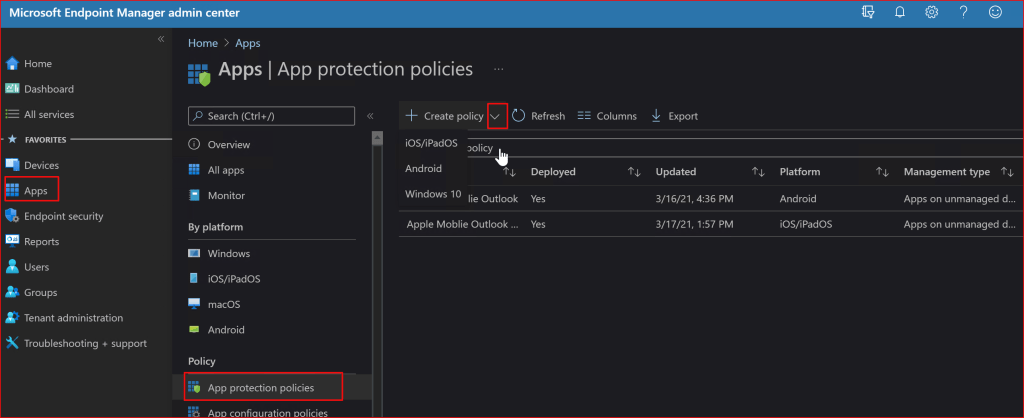
Once the basic setup is finished it is time to setup your first mobile application policy. In this post we’ll create a rule for Outlook. Log on to your Microsoft 365 admin portal and go to Admin -> Show All -> Endpoint Manager -> Apps -> App Protection Policies. Then click the drop down next to the Create Policy button and choose the OS you want to make a policy for.
Try not to get sidetracked by all the other options until you become more familiar with Intune.
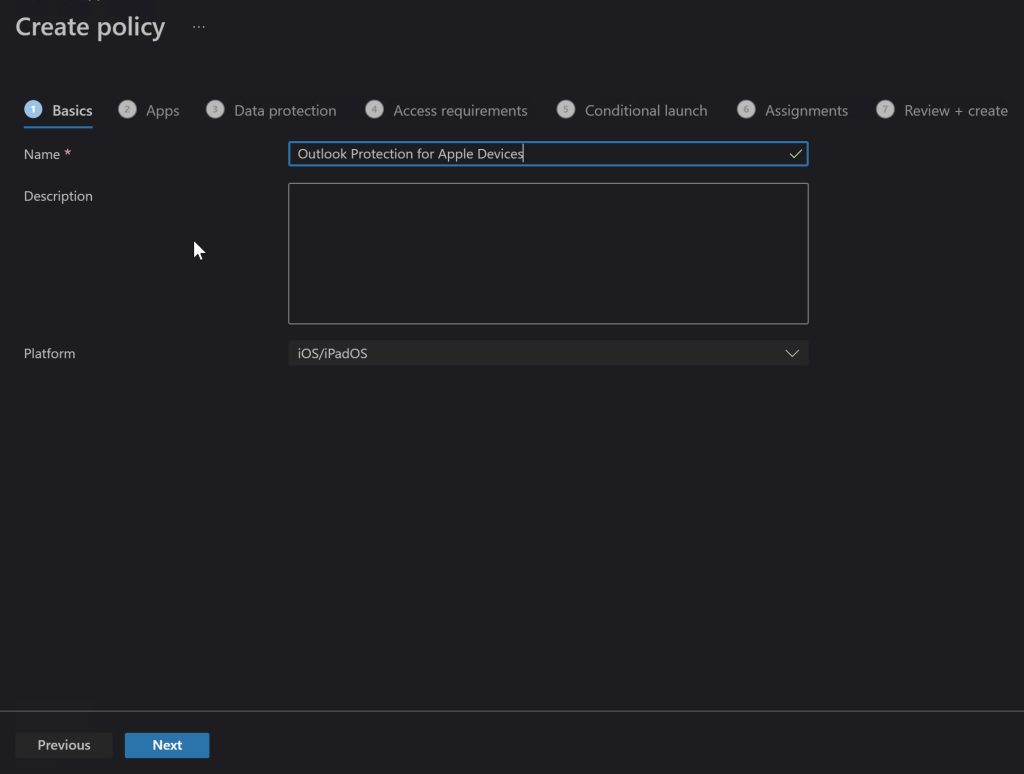
On the next screen, name your new policy something appropriate and add a description if you like. Click Next.
Naming becomes important when you have lots of rules so give it some thought.
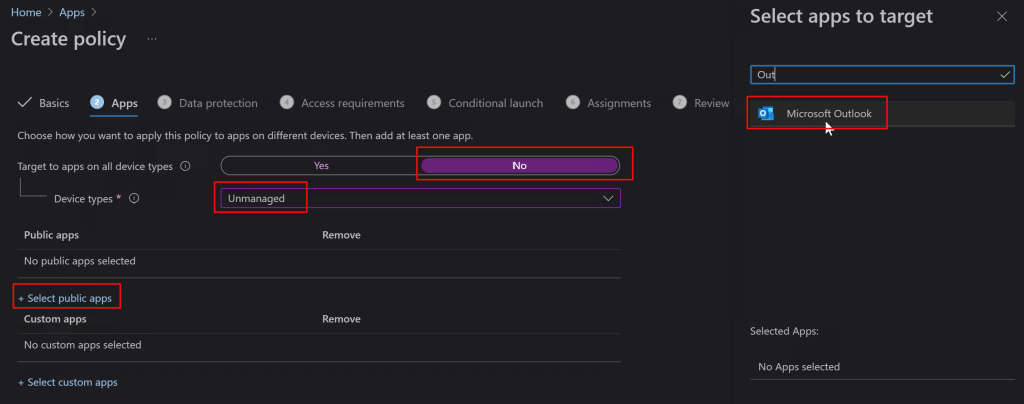
On the Apps screen, toggle the option to Target All Device Types to “No”. Then use the drop down to select device types and check “Unmanaged”. Now click the link to select public apps and type the name of the application you are interested in protecting in the search box, in our case Outlook. Select it and then click the next button to continue.
You can add your companies in-house apps too, but that is out of scope for this post.
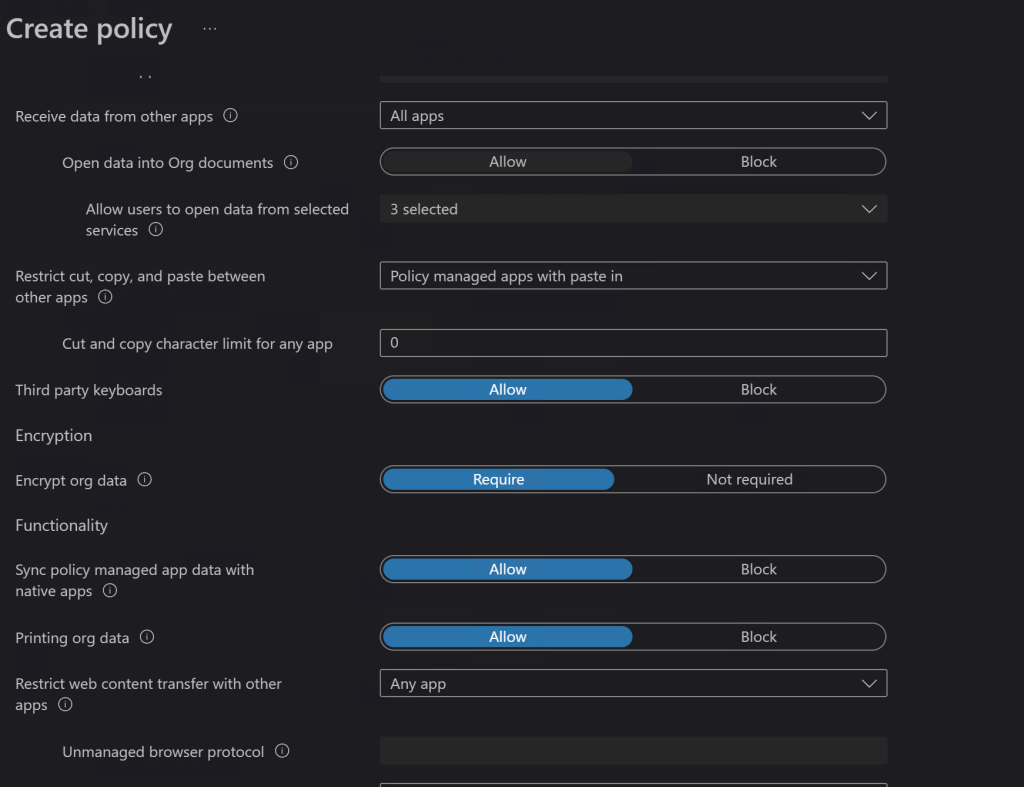
On the Data Protection screen you’ll choose the options that you feel best protect your corporate resources. Will you let them print from Outlook? Should the app encrypt the data on phone or tablet? What about copying and pasting between apps? There are lots of choices and combinations to choose from. Luckily the explanations are pretty straight forward. If you need more information the official Microsoft documentation is located here for iOS: iOS/iPadOS app protection policy settings – Microsoft Intune | Microsoft Docs and here for Android: iOS/iPadOS app protection policy settings – Microsoft Intune | Microsoft Docs.
Data connection options let you control how the device and its apps can interact with your cloud data.
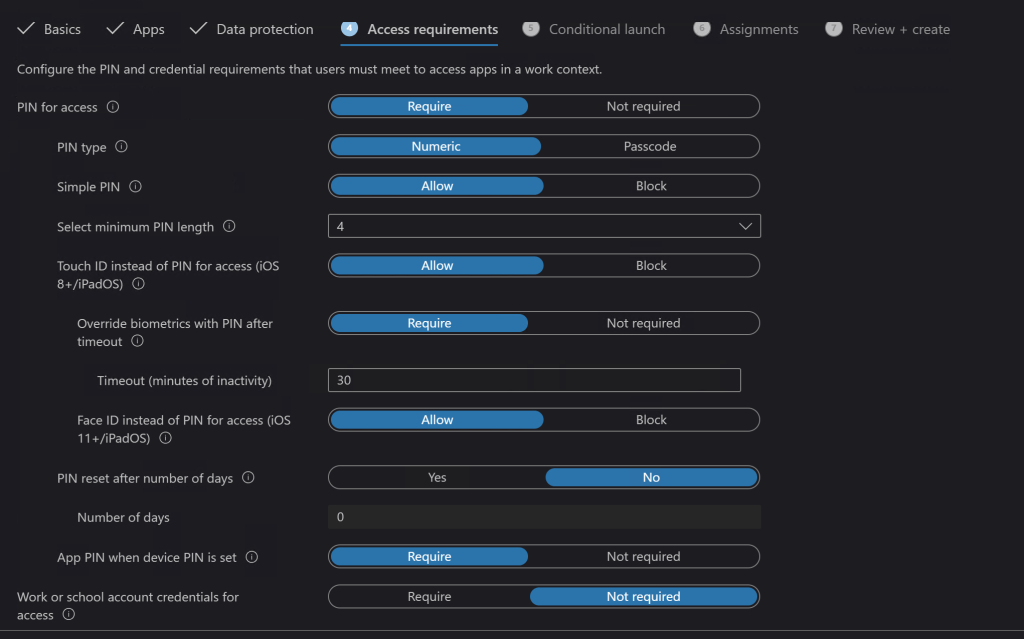
Next up are the access requirements where you will choose what hoops the devices have to jump through to access your data (Outlook). Do they need a device PIN? Should Outlook have its own PIN that prompts every time they open it? Are you going to allow the devices biometric features? There are a lot of choices in this section. I can tell you from experience that these choices are what will annoy your co-workers the most, so don’t be more aggressive than you need to.
You don’t want to go overboard on the access requirements.
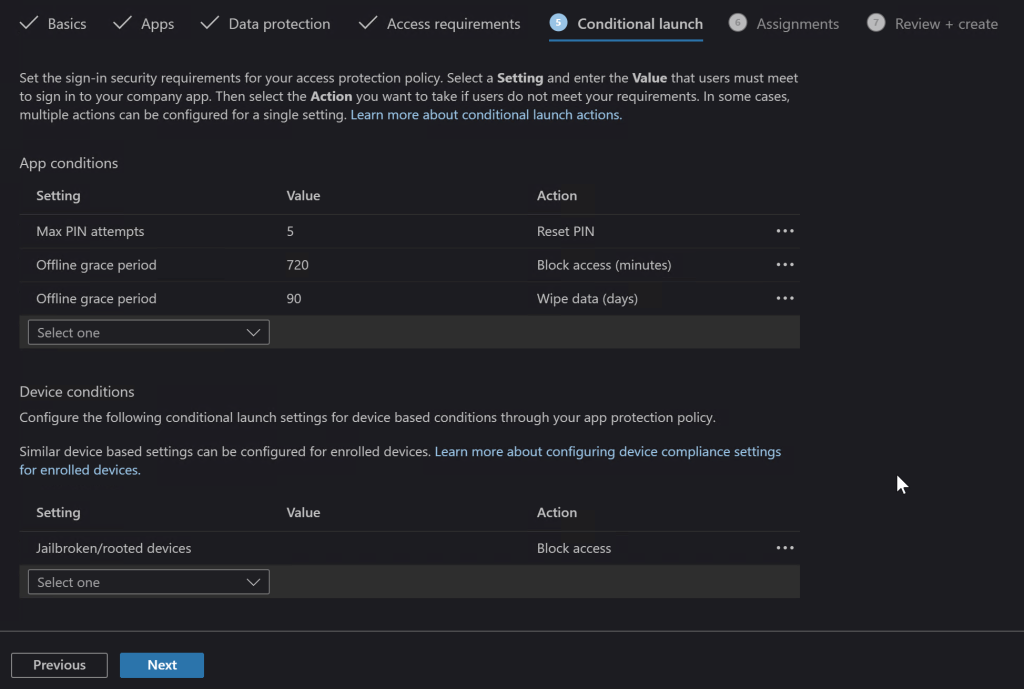
Launch conditions let you control certain aspects that are required for your user’s device to open the app (Outlook) in the first place. A popular choice is to block jailbroken or rooted devices since they are more likely to contain malware. You may also want to consider warning users when their devices are on old versions of their operating systems.
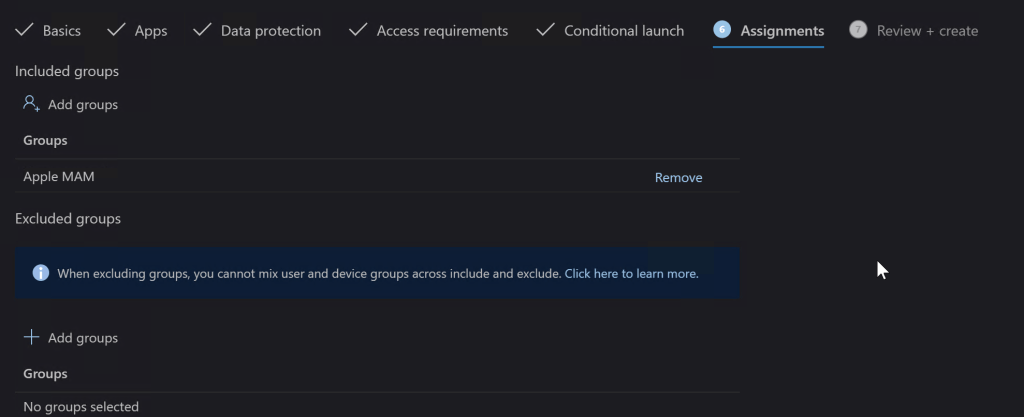
The Assignments tab is where you select the groups of users that the rule you made either applies to, or those that are excluded from it. I typically use the inclusive option and create a group that matches the rule name. If you don’t already have a group that will work you do not need to exit the Endpoint Manager session to make one, you’ll loose your progress and have to start over if you do. Just open another tab in your browser and go to Microsoft 365 admin center – Groups to create your group and add the users. Then switch back to the Endpoint Manager tab and add the group you’ve created.
On the last screen you be given a chance to review all the options you’ve selected and create the rule. It can take up to eight hours before Microsoft deploys the rule in your instance of Intune and up to eight more before the devices check in and get the policy applied, be patient. You can check on the status of your rules and devices by using the monitor. In the Endpoint Manager console go to Home -> Apps -> Monitor -> App Protection Status to see the available options.
In today’s world every business should take steps to protect their data. Until the age of ransomware, small businesses were largely exempt from the perils of hackers. Now they are prime targets, data doesn’t need to be valuable on the black market. It only needs to be worth something to you and your company. Often when we think about security we focus on computers and servers, but our mobile devices have just as much access and we don’t want to leave them vulnerable. If all of this proves a bit much to tackle on your own, don’t let that stop you. Reach out to a Microsoft 365 partner or Microsoft themselves and get your mobile endpoints protected.
I’ve have owned so many laptops that I’ve literally lost count. Some of those systems, like my Surface Book, are capable of playing games. However, none of them are, or were, dedicated game machines. I’ve helped my friends and family pick out their portable game machines and have spent plenty of hours playing on them. Their cost versus their life span was always prohibiting from my point of view. I could get more bang for my buck from a desktop rig and portability wasn’t a concern.
Now that top of the line GPU cards cost almost as much as an entire laptop, I have reconsidered my position. I wanted something that I could treat like a gaming console and hook up to my televisions. I also plan on it traveling with us some depending on the destination. It needed to have enough power to play AAA titles on decent settings, but I didn’t want to break the bank. The closer I could stay to $1500.00 the better. I figured I would pay at least that much to get a hold of an upgraded GPU for my desktop, if I could find one at all.
I started my shopping spree by doing a bunch of research. At the time the best gaming laptops still had RTX 2070 and 2080 cards in them. I just happened to be on BestBuy’s site when they put up the ASUS TUF system with an RTX 3070 for pre-order. I was a little concerned with pre-ordering a system that featured a brand new, untested card, but you can’t always play it safe. I wasn’t in a hurry and I knew I could return it if I didn’t like it, so I pulled the trigger. Waiting more than two months for it to get here was agonizing.
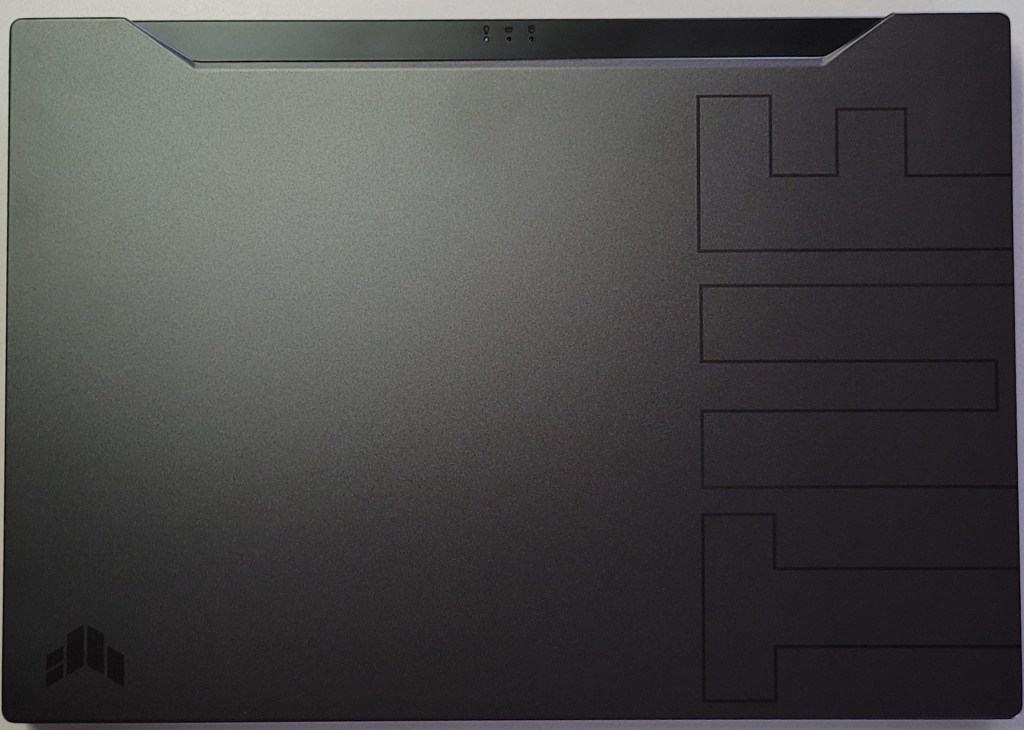
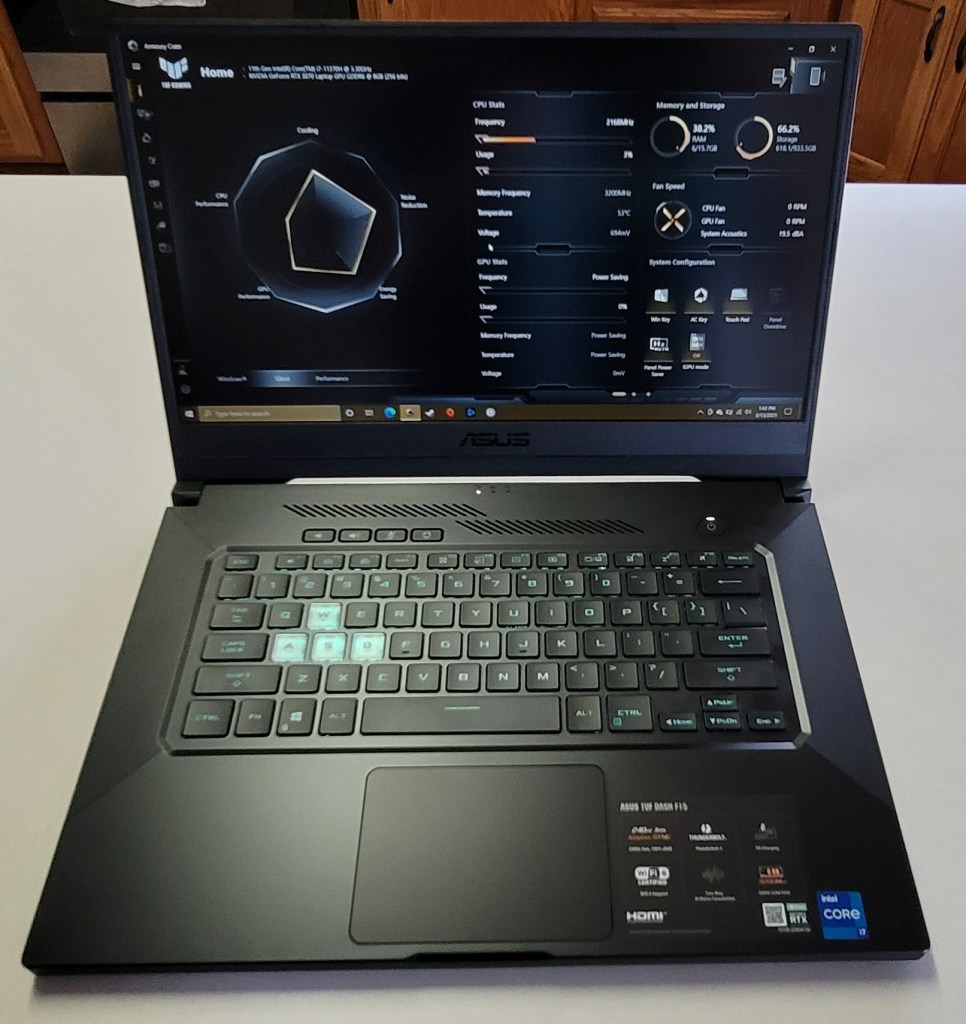
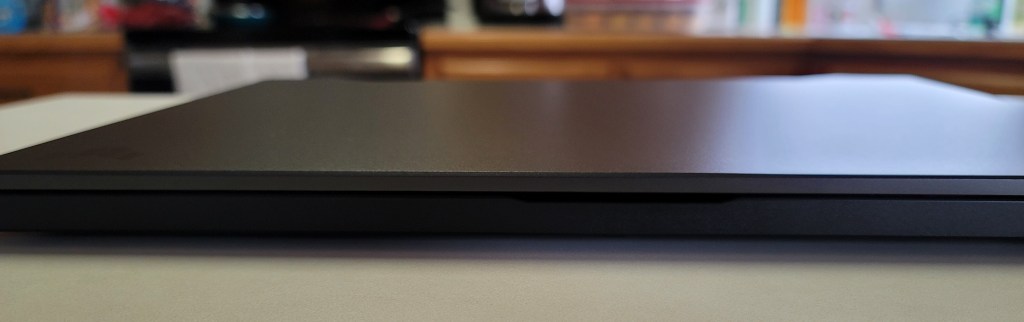
Of course it showed up in the middle of a work day so I couldn’t immediately tear into it. As soon as my shift was over, I carefully opened the box and was pleasantly surprised by the look and feel of the system. The nondescript case is metal, there are two color choices, I have the black one. Except for the lightly etched TUF and logo on the lid, it looks like any other high-end slim notebook you might see in a boardroom. It measures 14.17 x 9.92 x 0.78 inches (360 x 252 x 19.9mm) and weighs 4.41 pounds (2kg).
The 15.6 inch screen features thin bezels along the top and sides. There’s no built-in web cam and if you’re planning on this being a daily driver, that may be an issue in today’s video conference based world. The non-HDR screen is 1080P and can hit 240 frames per second witch is super smooth. You may wonder why I didn’t go for a 4k or 1440P screen. On a 15.6″ display the extra res doesn’t exactly equate to a better picture. It does however, require more of your GPU and battery to push. You’ll also spend more on the systems that have higher resolutions. I didn’t see any 3070 laptops with a 1440P+ screen for less than $2000.00.
The keyboard is backlit and the WASD caps are clear. It is only a single teal color but I like it. There’s a row of dedicated volume, mic, and management keys which I find myself using more than I thought I would. The keys themselves feel great, the caps are a little concave and there’s a decent snap from the membrane that lets you know you’ve completed the stroke. The trackpad is nice. It is offset from the spacebar, but centered under your thumbs where it should be. It’s responsive, but ignores my accidental brushes while typing.
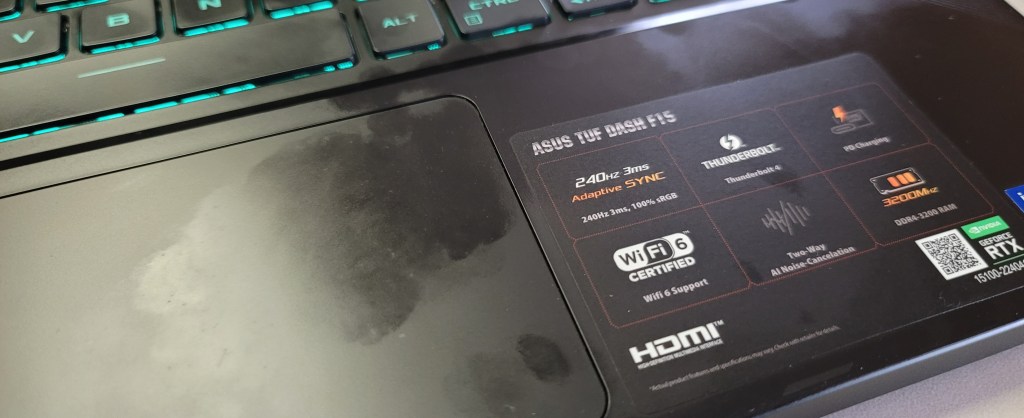
The deck and trackpad are fingerprint magnets.
The sound system is decent and has a trick that I didn’t expect to work. It has built-in noise canceling in the on-board mics. You know what? It totally works. I’ve played multiple on-line games of CoD, Apex, and Destiny without head phones and questioned my friends about how I sounded. I wanted to know if they could hear the fans, or the game echoing from the speakers and was pleasantly surprised to learn they didn’t. It’s really nice to be able to play without headphones once in a while.
You’ll find an HDMI 2.1 port to connect the system to your home theatre. I recommend that you get an HDMI 2.1 rated cable to go with it. Otherwise you will probably have issues hitting higher frame rates with HDR enabled. I did. When connected to my Q70t home theatre using an HDMI 1.4 cable, I could do 120 hertz or 60 hertz with HDR. A new $10.00 2.1 cable from Amazon solved the issue.
You will also find a Thunderbolt 1.4 port which will take care of docking stations, external GPUs, display port monitors and lots of other accessories including most USB-C devices. It also has an RJ-45 network jack, headphone/mic jack, and three USB 3.0 ports. The Intel AX201 is Wi-Fi 6 compatible and hits the 1200 MB/ps mark with ease. Bluetooth is built-in as well. I’ve connected my system to the afore mentioned home theatre with an external keyboard and mouse without needing another port.
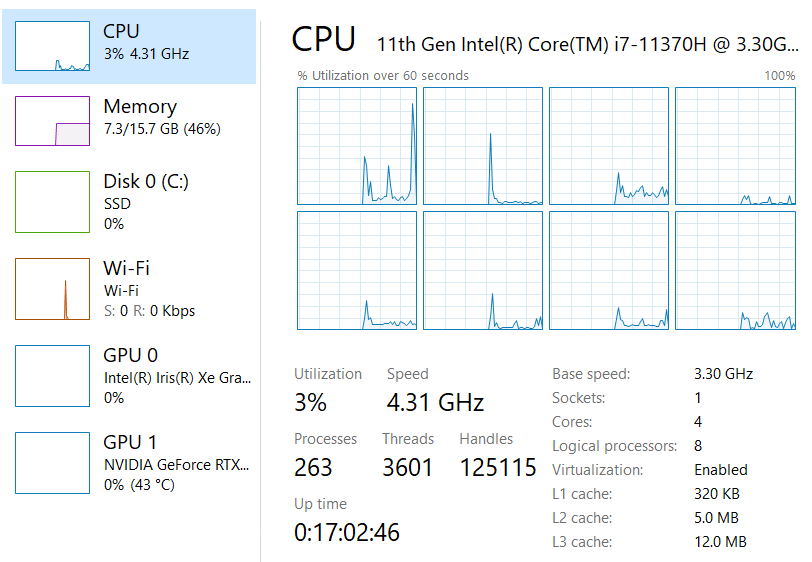
The one terabyte SSD is fast and large enough to hold the games I am currently playing. It came with 16GB of PC-3200 RAM, I will probably be taking advantage of the fact that it is user upgradable in the future but it does the job. The 11th gen 4 core i-7 11370H CPU is more than fast enough for anything I plan on doing.
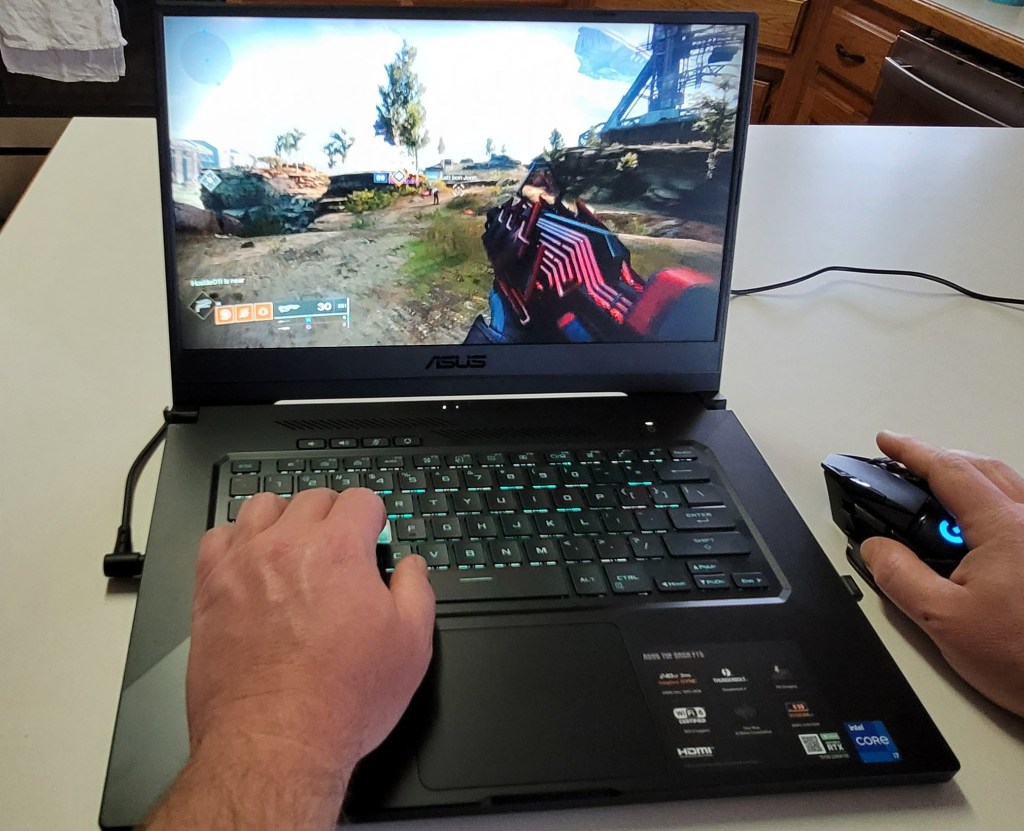
Right out of the box I was disappointed with the performance of the GPU. I spent an hour running updates, BIOS, firmware, Windows, drivers, and the management app all needed updates. It’s a good thing I bothered before packing it back up, it was like a totally different system. When playing CoD BlackOps, Destiny, Apex, Tomb Raider, and Doom Eternal on the built-in screen I was able set everything to ultra, including ray tracing, and still hit over 120 fps with the fans barely running.
When connected to my big screen I have a choice to make. I can run the games on high, or ultra at 1440P and still hit my TV’s 120 FPS limit with HDR on. Or, I can crank down some of the settings to medium and low and run at 4K with 60 – 90 FPS. Personally I prefer the lower resolution with more post processing, but the games look and play great either way. At 4K they look and play better than the same games on my PS4 Pro, or Xbox One X at the same resolution. If you want more out of your system make sure to get one that is not a Max-Q GPU design. Basically, the thin and light gaming systems use the Max-Q versions of GPUs which limit power to prevent overheating. The thicker, heavier systems tend to have the full power chips that preform better but are, well, huge.
Overall I’m really happy with the ASUS. It is a good balance of performance and cost. There are systems with the same GPU that have features like a web cam and RGB lighting, but they’re all much closer to the $2000.00 price point. I’ve had the DASH F15 for a couple of weeks and have spent a lot of hours sitting in my easy chair with it on my lap and connected to my TV. It’s a keeper.
Normally I would not write a post about something so mundane as configuring a remote for a TV, but this was difficult to figure out. There appear to be quite a few people searching and posting on the Xfinity and Samsung forums, Reddit, and other places, but I wasn’t able to find the actual answer anywhere. Once I figured it out, I thought it would be nice to share how it is done.
The newer Xfinity cable boxes have the X1 voice remote and these controllers are radio frequency (RF) based rather than IR (Infra-red). Most of the various models of Xfinity cable boxes do still have traditional IR ports, but the target window is extremely small and hard to hit. If your model has one, it is located in the bottom right hand corner. Even if you do have an IR port, the functionality isn’t very good. Your Samsung smart TV’s hub and universal guide will struggle to control the X1 media options. Many of the proposed solutions on-line involved purchasing an IR relay, but you don’t need to.
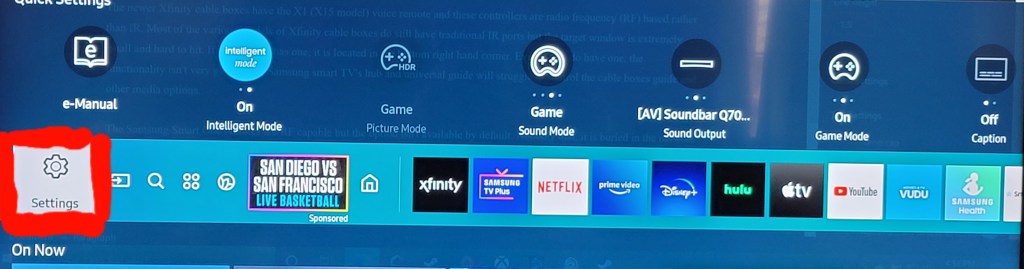
The Samsung Smart One remotes are RF capable. The option isn’t enabled and doesn’t show up in any of the menus by default. Not only that, the setting is buried in the network menu for your TV of all places. To get there turn on your TV and hit the Home button on your Samsung remote. Scroll all the way to the left and select Settings.
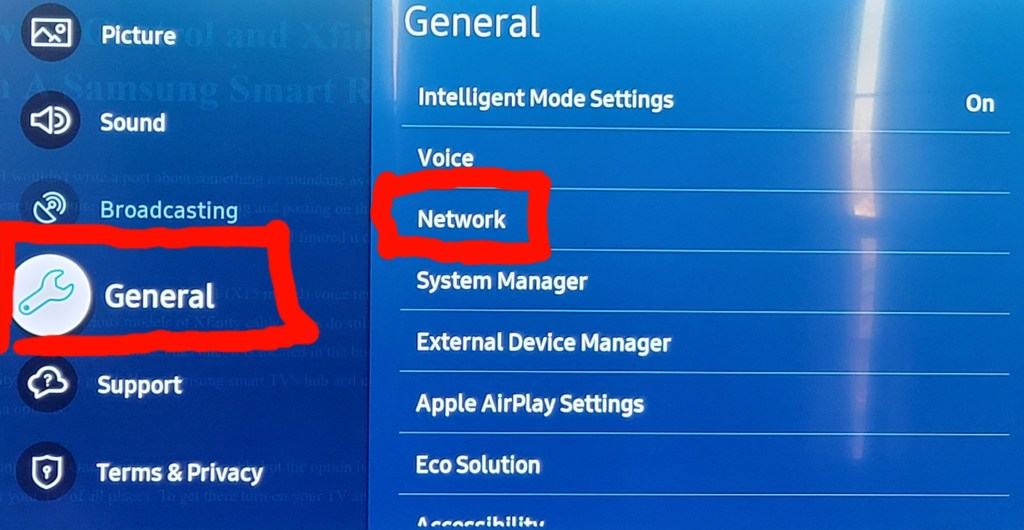
Go to General, then pick Network.
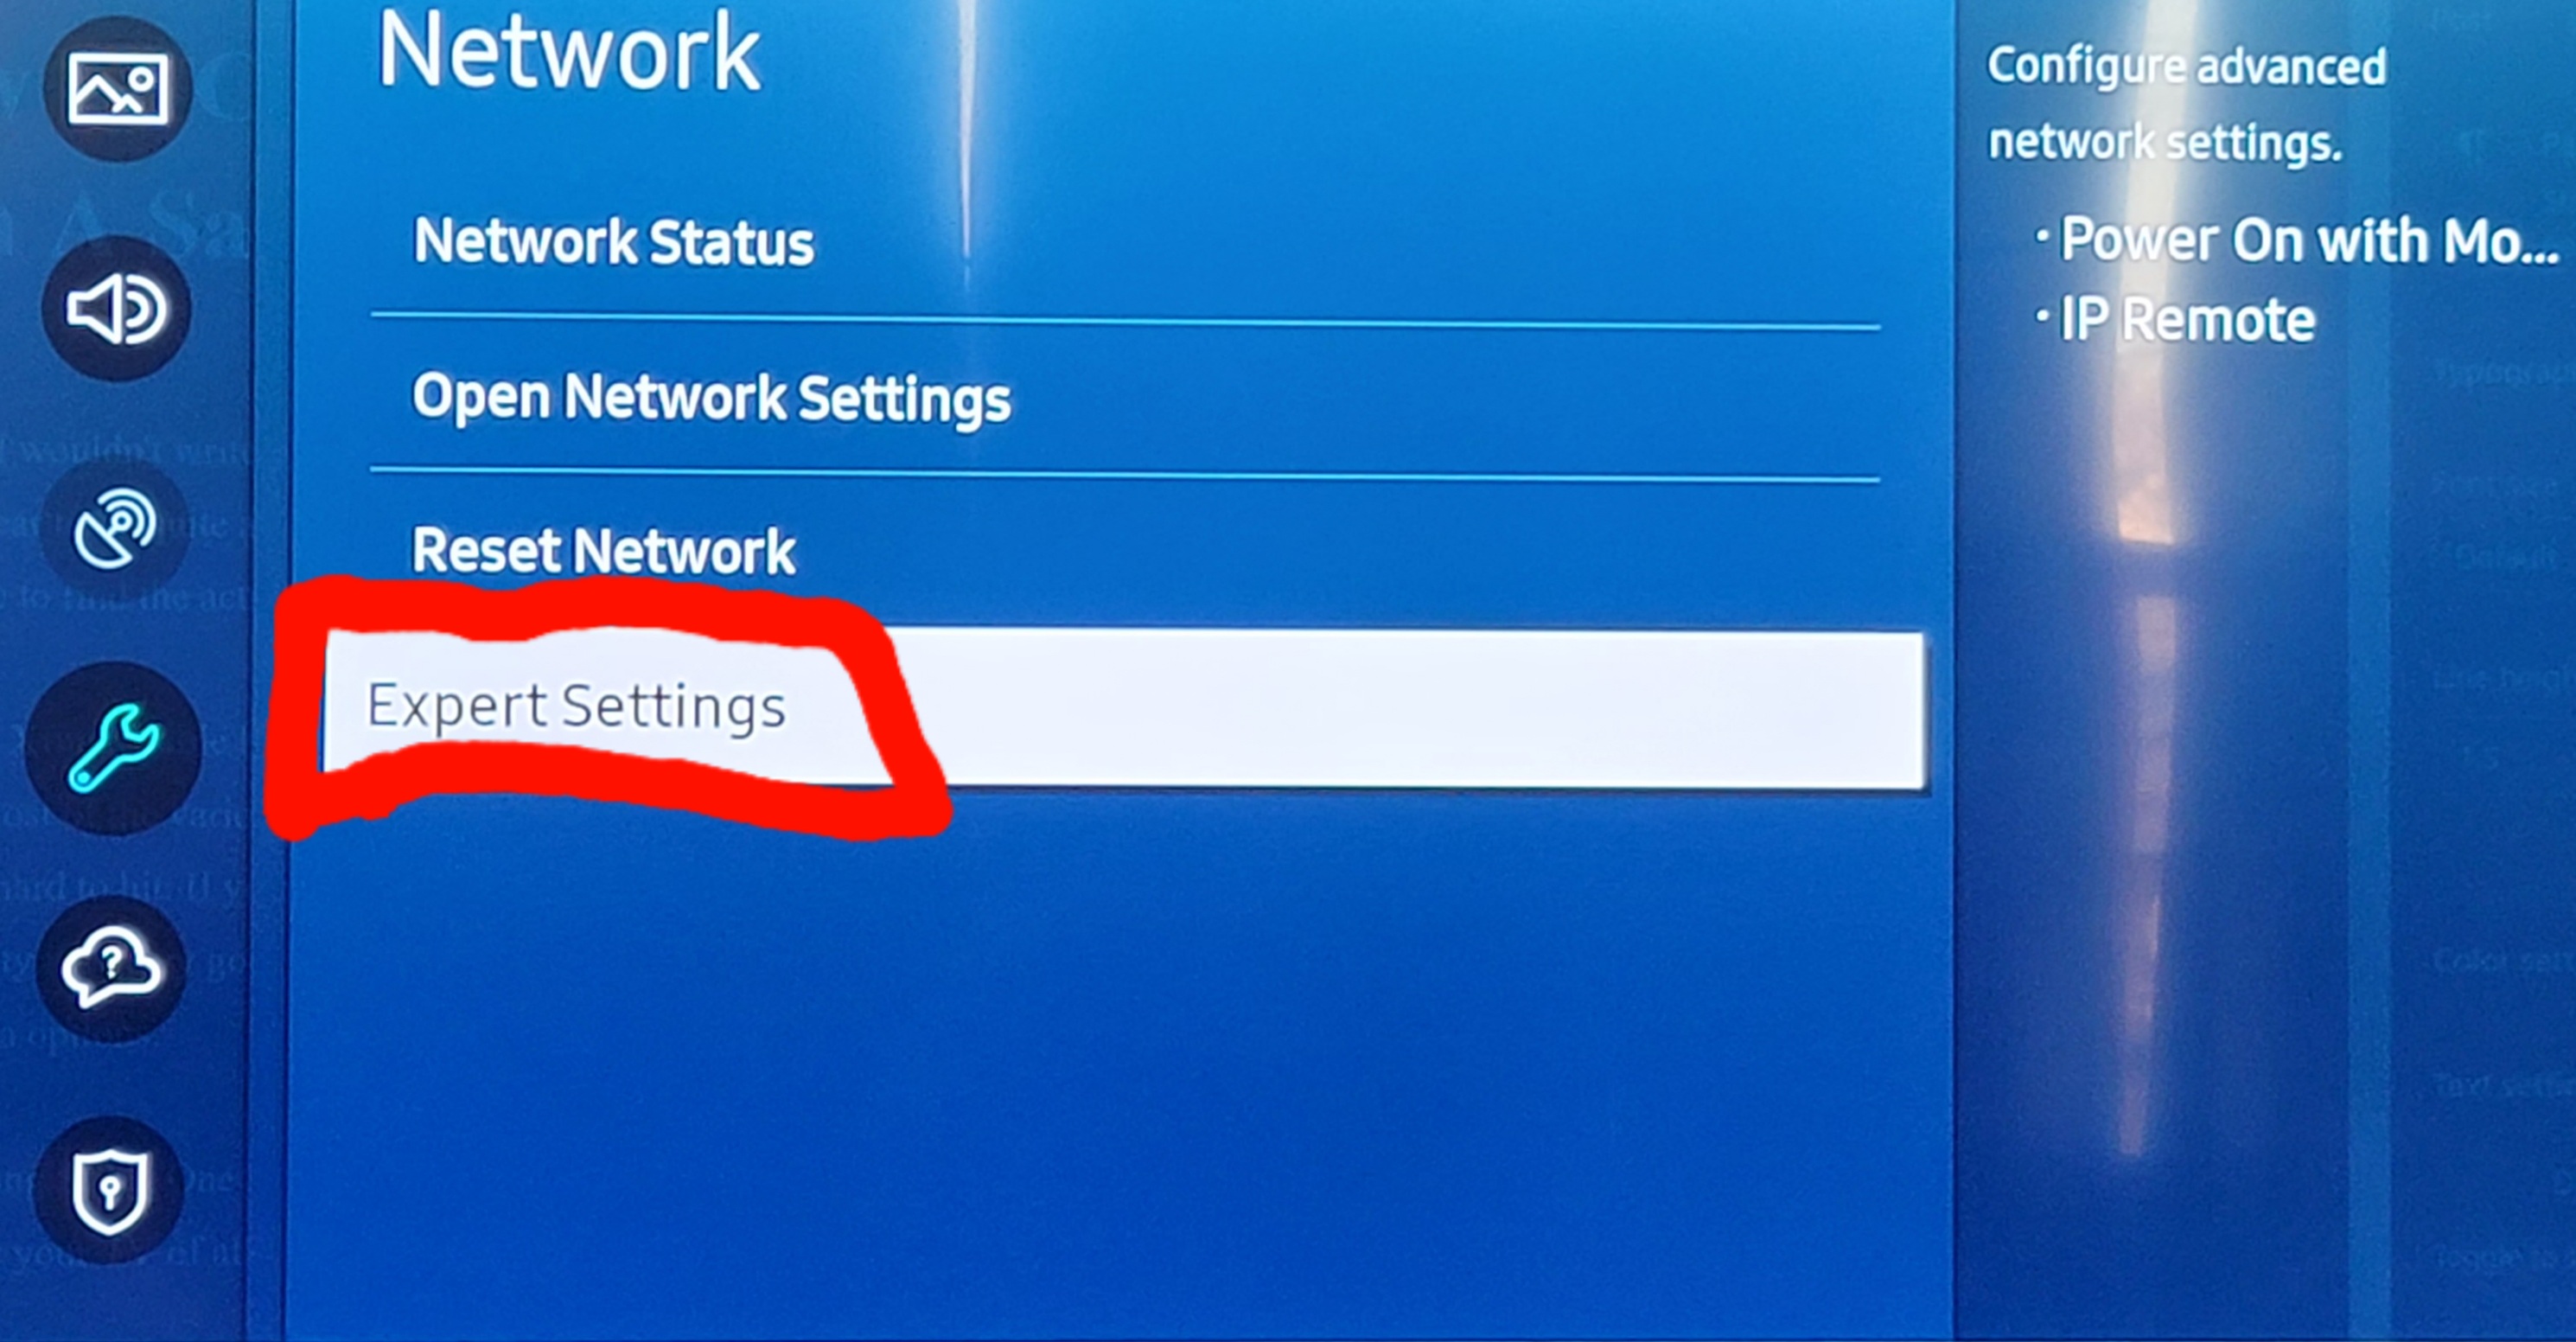
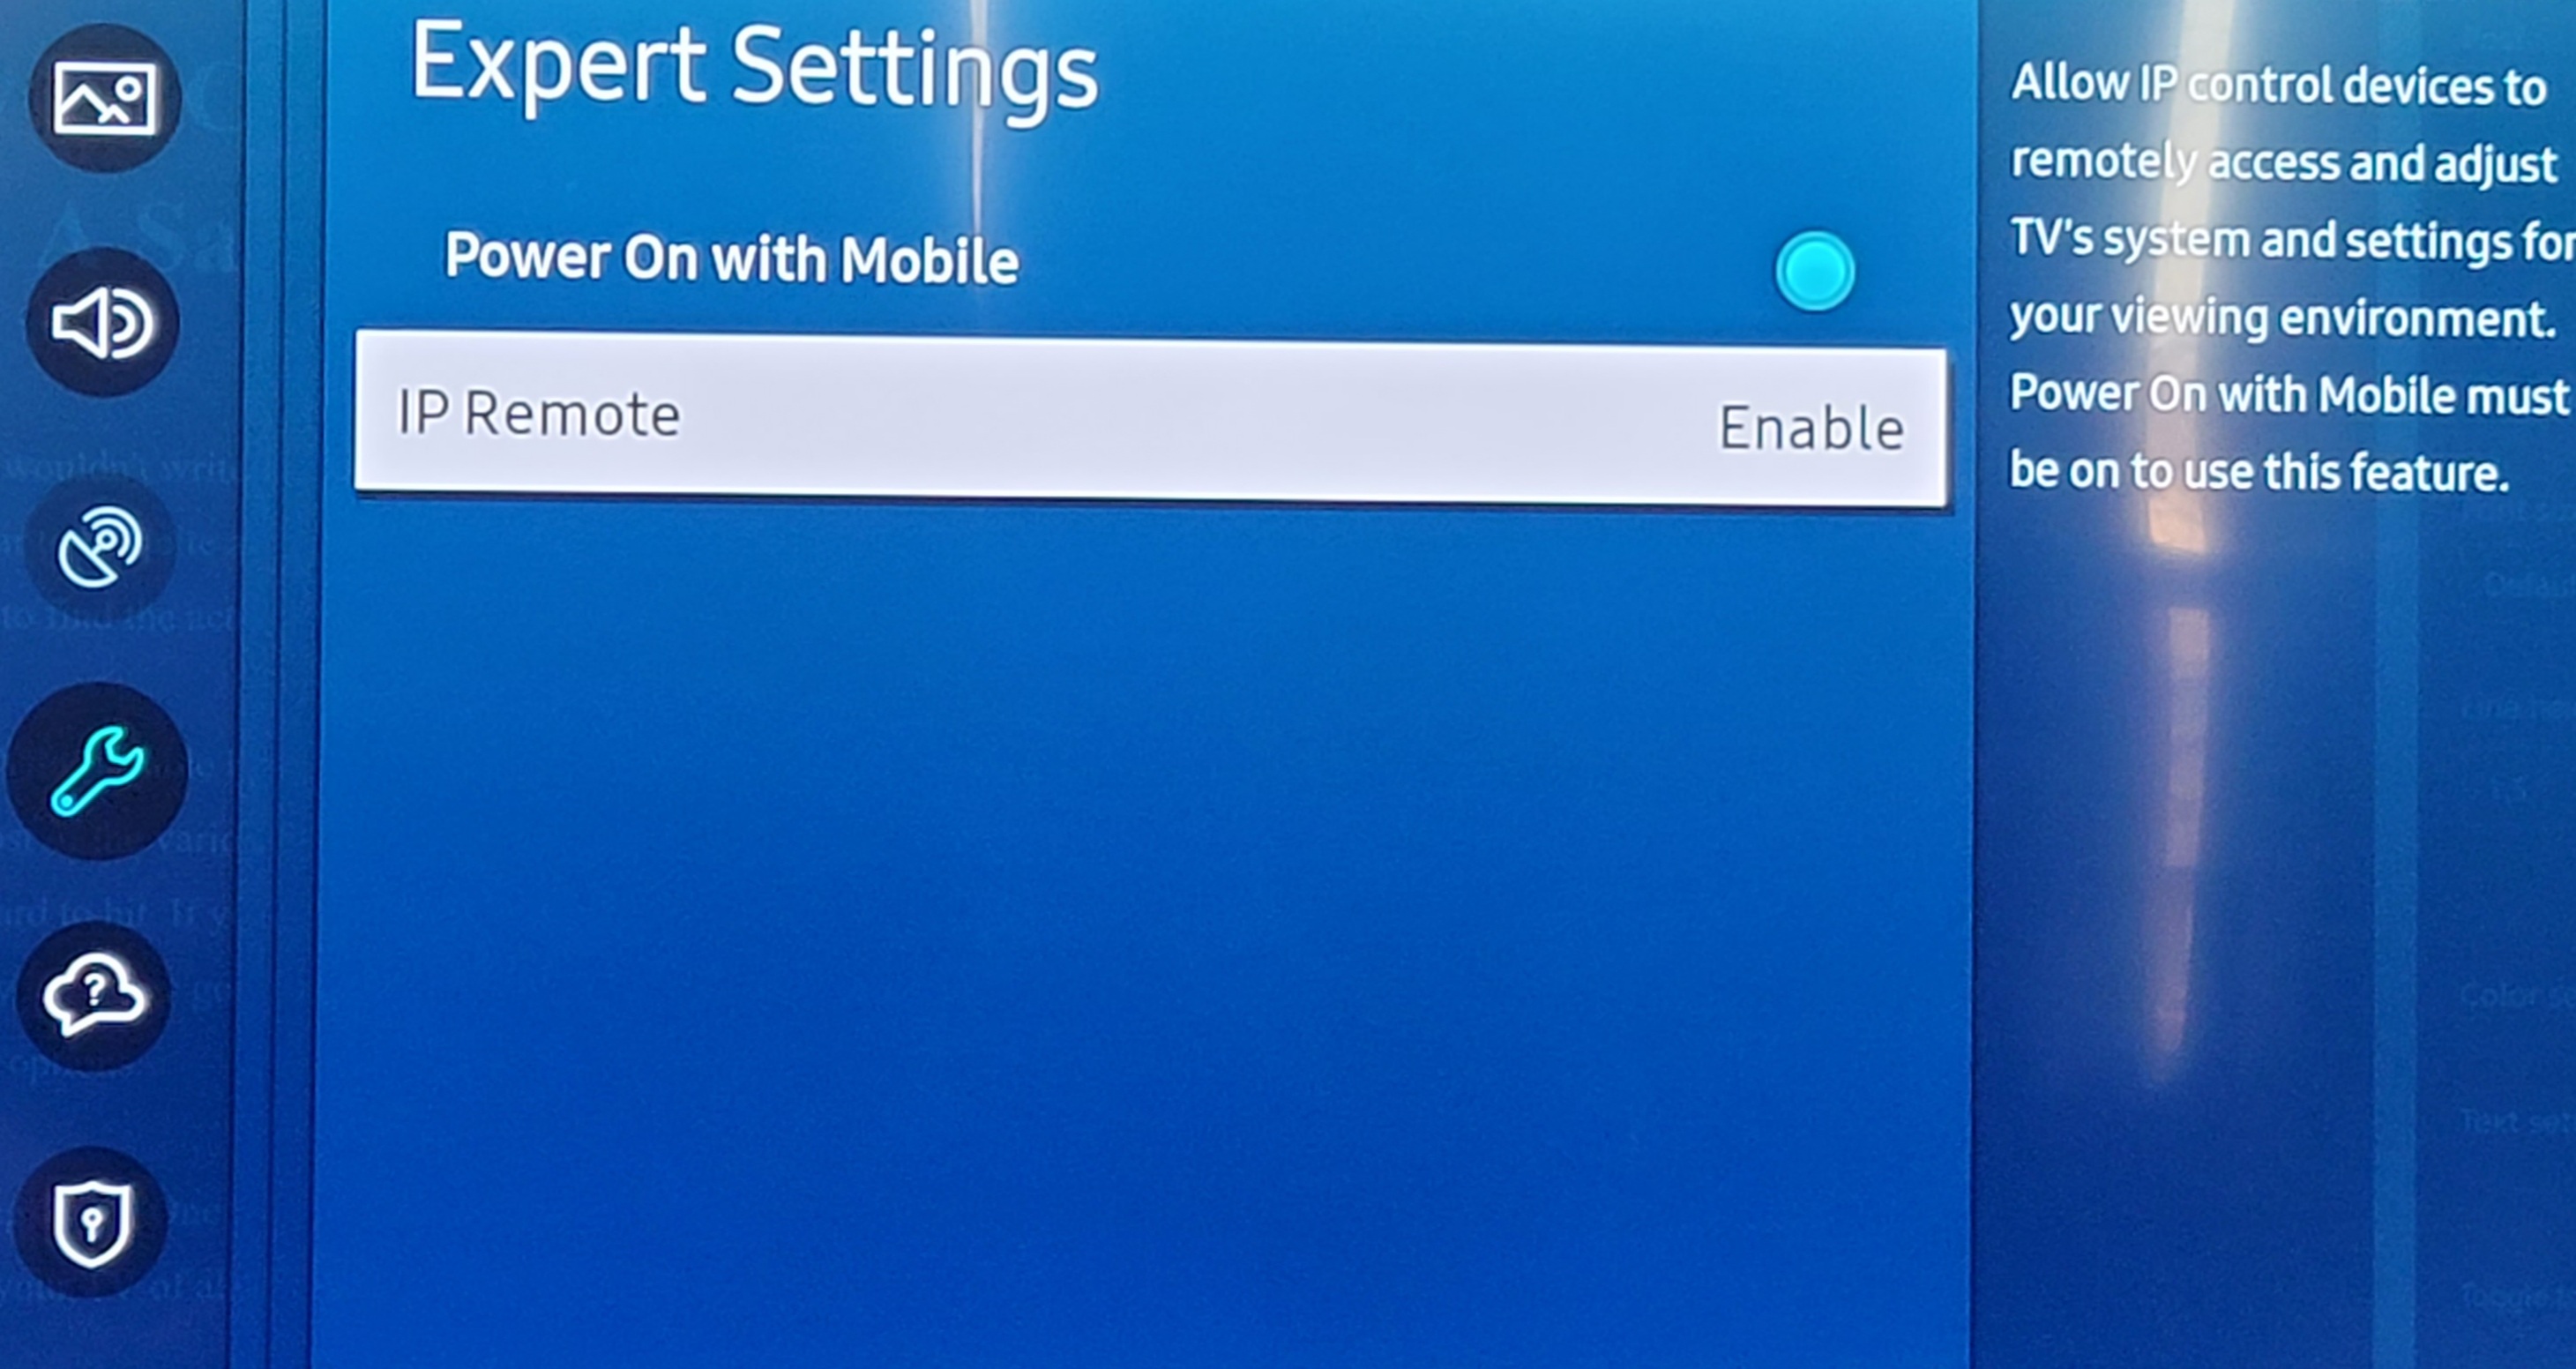
Finally, click on the Expert Settings option and enable Power On with Mobile and IP Remotes.
Assuming that you’ve already got your cable box plugged in and setup as a device, use the back button on your remote to return to your home screen. Now hit the home button on your remote again to bring up the menu. Scroll to the left until you get to Source and go up to that menu. Scroll all the way to the right until you get to Universal Remote and select it. Select your Comcast device and at the top of it’s menu you will see an option to Enable RF Remote now. Click it and follow the instructions to pair your remote.
If you haven’t already configured your Comcast Xfinity cable box as a device, follow the same path except click the New Device option in the last menu to start a wizard that helps you choose your provider, enter your zip code, pick your HDMI input and so on. Skip the channel test. Say OK on the first option even if the channel doesn’t change. Then use the Universal Remote menu again (as described above) to get to the Enable RF Remote option.
Once you have it setup the Samsung One Remote should be able to control all of the functions of your Xfinity X1 device. You can even setup Google or Alexa and use it to operate your cable TV system instead of the voice remote itself.