If you can’t tell from my most recent articles, I’ve got an ASUS ROG Ally. While setting it up and evaluating its capability, I randomly decided to install Halo Infinite. I thought a few rounds of Team Slayer would be a fun way to put the little machine through its paces.
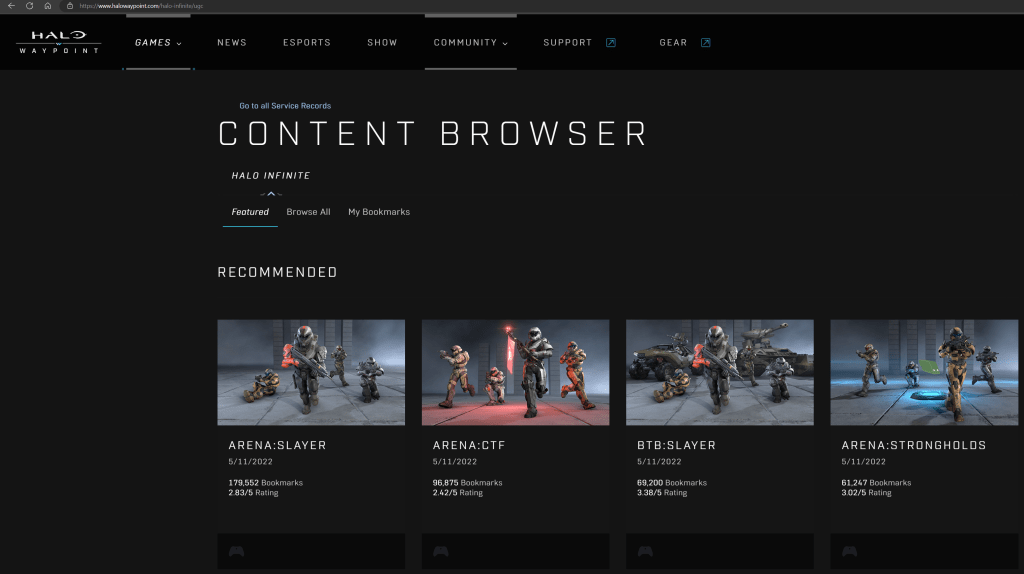
The first match I joined was on a map I had never previously encountered. So were the second and third round’s maps. Like a lot of people, I hadn’t played much Halo for the last few months. They added a lot of new content while I was away. Check out the news section of Halo’s Waypoint site for all the latest info.
Halo Waypoint’s Content Browser is the place to see all the content without installing the game.
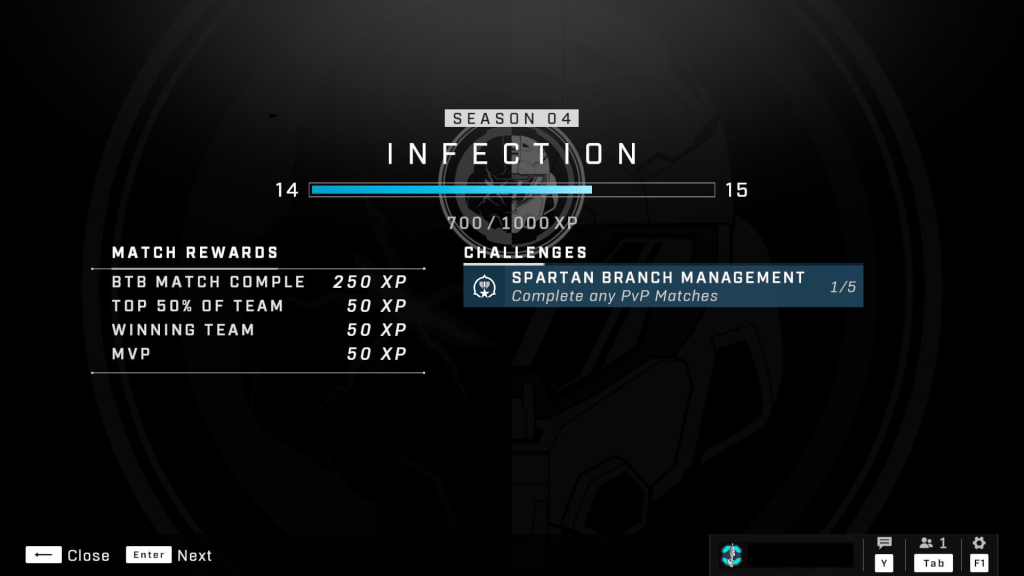
In addition to interesting new map content, customizations seem to be unlocking faster than when I last played. The slow rolling of play-based unlocks has long been a complaint against 343’s stewardship of the iconic franchise. This time around, I was able to unlock several armor pieces, weapon charms, and color packs in a four-hour session without purchasing the premium battle pass.
Custom armor unlocks are much faster in season 4.
It took me a while to find my rhythm and get my head to play Halo instead of Call of Duty. Halo’s time to kill is longer. Emptying a full clip without getting a kill is not a rare occurrence in this game. Multi-kills almost always require reloading in between targets. Shields, agility, and speed, mean that your opponent has a fifty-fifty chance of escape, or a reverse attack after you have opened fire. This type of play encourages extended one-on-one battles that can be intense, especially if both combatants are skilled Halo enthusiasts.
I think a lot of the negative vibes you see on-line stem from players whose FPS experience is rooted in other titles. They dominate at their preferred games and are expecting to drop into Halo and win, but the time to kill throws their rhythm off. They fire what would be an appropriate amount to frag their target in most FPS games and move to the next, only to have their efforts reversed.
The top of the scoreboard is challenging to reach after being away. Be patient with yourself if you have taken a long break.
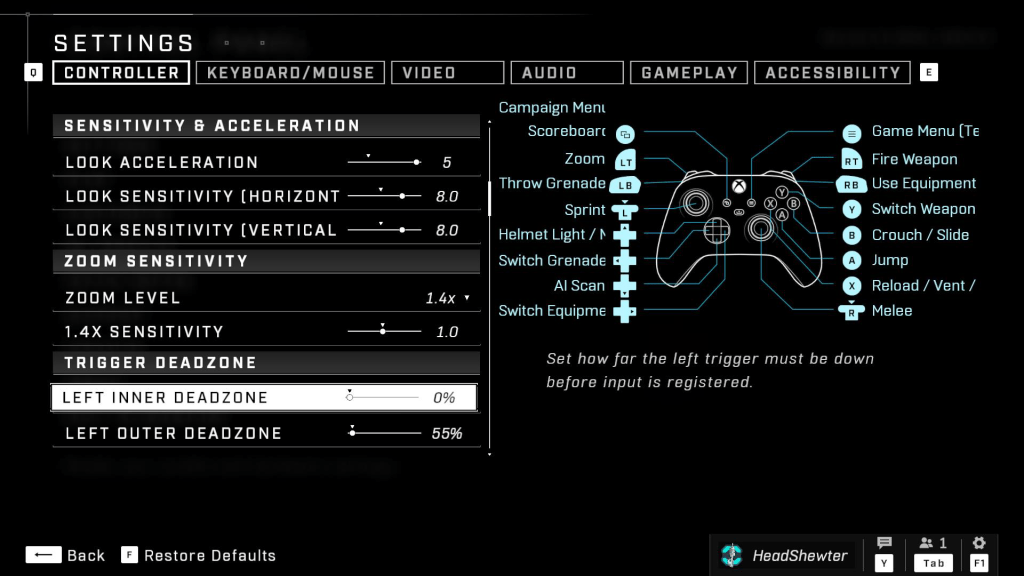
Some tips for those playing on an Ally. I set both joystick dead zones to zero. I also turn up all the look sensitivities to the middle of their scales. I make these changes in Halo’s settings menu. In the Ally’s controller profiles menu (auto-mode), I map the rear buttons to sprint and melee.
Adjusting the deadzones smoothed out the Ally’s controls.
I am impressed with how the ASUS ROG Ally handles the game’s demanding graphics. Plugged-in, set to max performance mode, with Halo at 1080P-low settings, the Ally held a steady 94 fps. The smaller screen translates to a high DPI for that resolution, and the game looks great. The Ally is a marvelous machine for playing on the couch, or in the car, or anywhere.
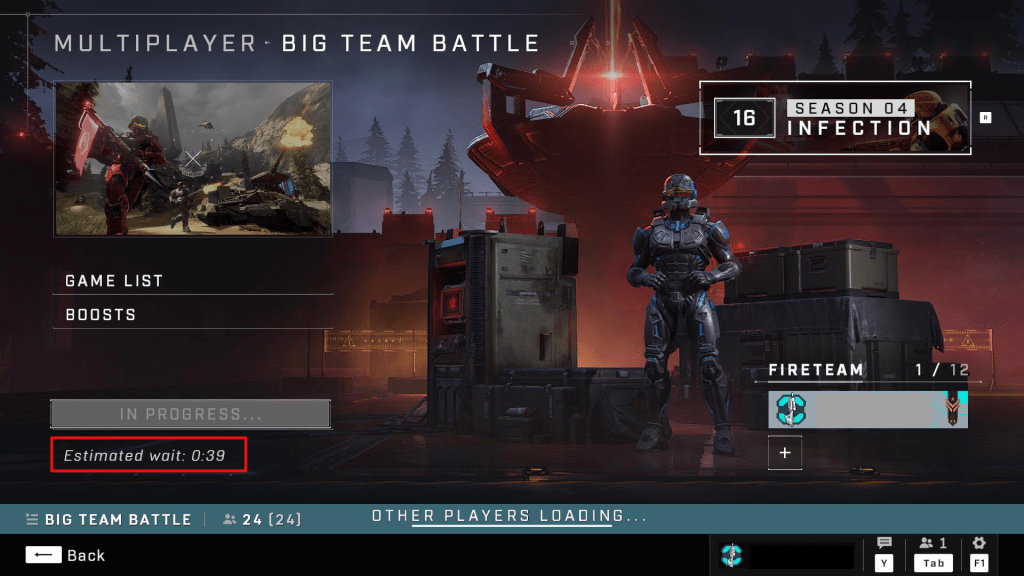
Snagging an S7 sniper rifle off the map’s spawn point and decimating the other team with it is still one of my favorite feels in all of gaming. The complex new maps provide plenty of ambush and crossfire zones. The new armor customizations and updates seem to have pulled people back into the matchmaking queues. Getting into a game is taking less than a minute on average.
Time between matches is shorter than ever thanks to the new content drawing in players.
343 has also introduced a new play list. Squad Battles features some of Halo 3’s most popular maps that have been completely remastered for modern graphics and sound. In addition to the maps the new playlist also returns 8v8 matchmaking.
Classic Big Team Battles can be found in the new Squad Battles playlist.
I personally feel that Halo Infinite is one of the best Halo titles to date. The variety of game types, graphics that run on most systems, free-to-play unlocks, and new content make it one of the top FPS titles available on the market today. If you haven’t played, or stepped away for a while, consider giving Season 4 a chance.
The Xreal Air augmented reality glasses have been superb since the day I got them. I continue to use them in unexpected ways because they are quick and simple to connect to almost anything. To their credit, the company has remained steadfastly committed to the success of the product. Even suffering a re-name didn’t slow them down.
Recently, Xreal released the beta edition of their Nebula app for Windows. The update lets Windows users experience two-wide, three-wide, and ultrawide monitor setups without any actual screens. They’ve also released several VR apps in their Nebula store. The last firmware update added the ability to consume traditional side-by-side 3-D video.
The newest firmware release adds support for video refresh rates up to 120 hertz. The update is simple to acquire, just upgrade your Android or Mac Nebula app to the latest edition and connect the glasses, accept the update when prompted.
If you don’t use the Nebula app, connect your glasses to a computer with the Edge or Chrome web browser installed. Then visit this page: https://ota.xreal.com/en/air-update.html and follow the instructions to download and install the new firmware. There are reports on Reddit that the web page (over the air) upgrade isn’t functioning properly.
Once you have completed the firmware update, press and hold the brightness + button until you hear two beeps. The first beep is side-by-side 3D mode, the second is 120 hertz. The glasses remain in 120hz mode until you disconnect them. At the moment, the faster refresh rate has to be engaged in this manner every time.
When designed and implemented correctly, Windows failover clusters can be one of the most resilient server architectures available for your datacenter. Unfortunately, this does not translate into their never having issues. When they do suffer some type of trouble; diagnostics and recovery can be challenging due to the complexity of clusters resources.
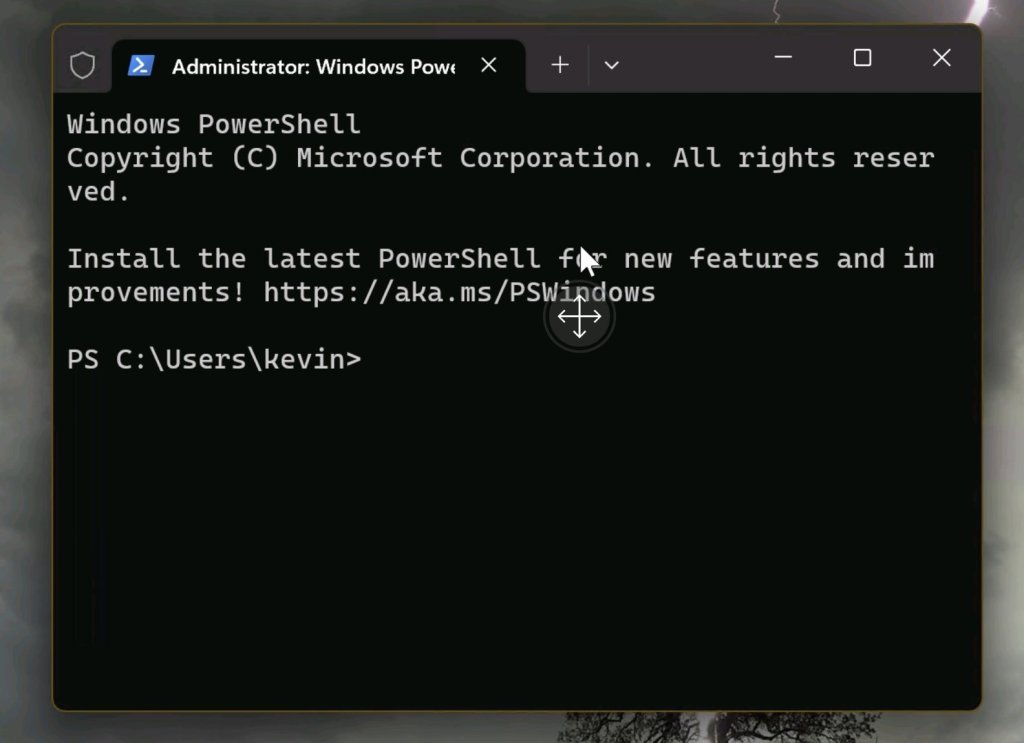
I generally start the troubleshooting process by having Windows test and report the status of all the components. Generating the report is much faster than logging into each component individually and the report frequently points directly to the cause of an outage. To get started, open an elevated PowerShell console on any of the cluster node servers and run the following.
Get-Cluster | Test-Cluster
The one-liner should start a cluster validation report. The default CVR process is not invasive, no systems will be rebooted or otherwise heavily impacted. Invasive disk tests are skipped in the default report (at the time of this writing). If you didn’t redirect the output, the results will be located @ %SystemRoot%\Cluster\Reports. Three files are generated in the folder.
Please check official Microsoft documentation yourself. Microsoft has been known to change a PowerShell cmdlet’s default functions as a result of updates and upgrades, link below.
Open the .htm file in a web browser and look for items that do not report success. Click their links to see more information about the alert. Resolve any issues and reboot the cluster nodes or affected hardware, if you know it is safe to do so.
Rebooting a cluster node or other components can cause, or make a cluster failure worse. Hardware failure, data loss, and/or the interruption of services from multiple IT assets and business IT processes can, and does, occur. If you are not comfortable with, or are not authorized for these types decisions; stop-here and find someone that is.
To make this decision you should be fully confident in all aspects of the underpinning network, data-storage platforms, machine-level hardware, the operating systems of all involved equipment and their configurations and interactions. You should also know how to restore the cluster, and anything hosted on it, from backups.
Any action you take, is of course at your own risk. The idea of this article is to get you pointed in the right direction. Things like deciding what to do, and the results of any action, or inaction, are on you!
Standard cluster events populate the event viewer and you should review them. One of the easiest ways, is to open the failover cluster management console and look for cluster events on the dashboard.
Those that mention any malfunction of the Failover Cluster Database, but do not have a corresponding all clear message further down the log stream, are one indication of a possible cluster failure.
In addition to the Cluster Validation Report and events, Windows clusters also include node-level logging facilities. To generate them we need to switch back over to an elevated PowerShell console.
Get-ClusterLog
Running the cmdlet will export the running log for each of the nodes to a file. These reports can take much longer to compile than the CVR did, the reason for checking them, is that these logs will often compile even when the cluster, or its components, have suffered a major failure. The files created by the cmdlet will also be located @ C:\Windows\Cluster\Reports, assuming you did not specify a destination.
If you run Get-ClusterLog without specifying a time span, the resulting files can be very large. Hundreds of megabytes, or hundreds of gigabytes are not uncommon, depending on the cluster’s number of nodes, number of roles, and logging level configuration. You may actually struggle to open the files depending on your computer and its available software options.
Get-ClusterLog -Timespan 5 would pull logs for the last 5 minutes.
As for what to do with the files. Alas, that too is out of scope for a blog post. A good place to start is by searching them for key words like “error”. If you’ve gotten this far and haven’t found a solution, you might consider contacting a professional with Hyper-V Cluster experience, or opening a support ticket with Microsoft’s Hyper-V support team.
This may also be a good point to restore the host’s Windows session state backups or the hosts themselves. Either restoration option should let you restore the cluster to a working state. The catch is that restoration itself, is an expert-level decision and action. A decision with whole separate sets of requirements and consequences that you need to fully understand before deciding on.
If you don’t have backups, or the restore didn’t work, you’re going to want to stay tuned for my next post in this series.
I like my ROG Ally so much that I filled its 512GB SSD in a matter of days. Today’s games are huge, many titles are over the 100GB mark, some even pass 200 GB. Lucky for me ASUS fully supports the end user swapping out the disk, they even provide a step by step guide on their website. Of course as with any guide you see on-line you are proceeding at your own risk.
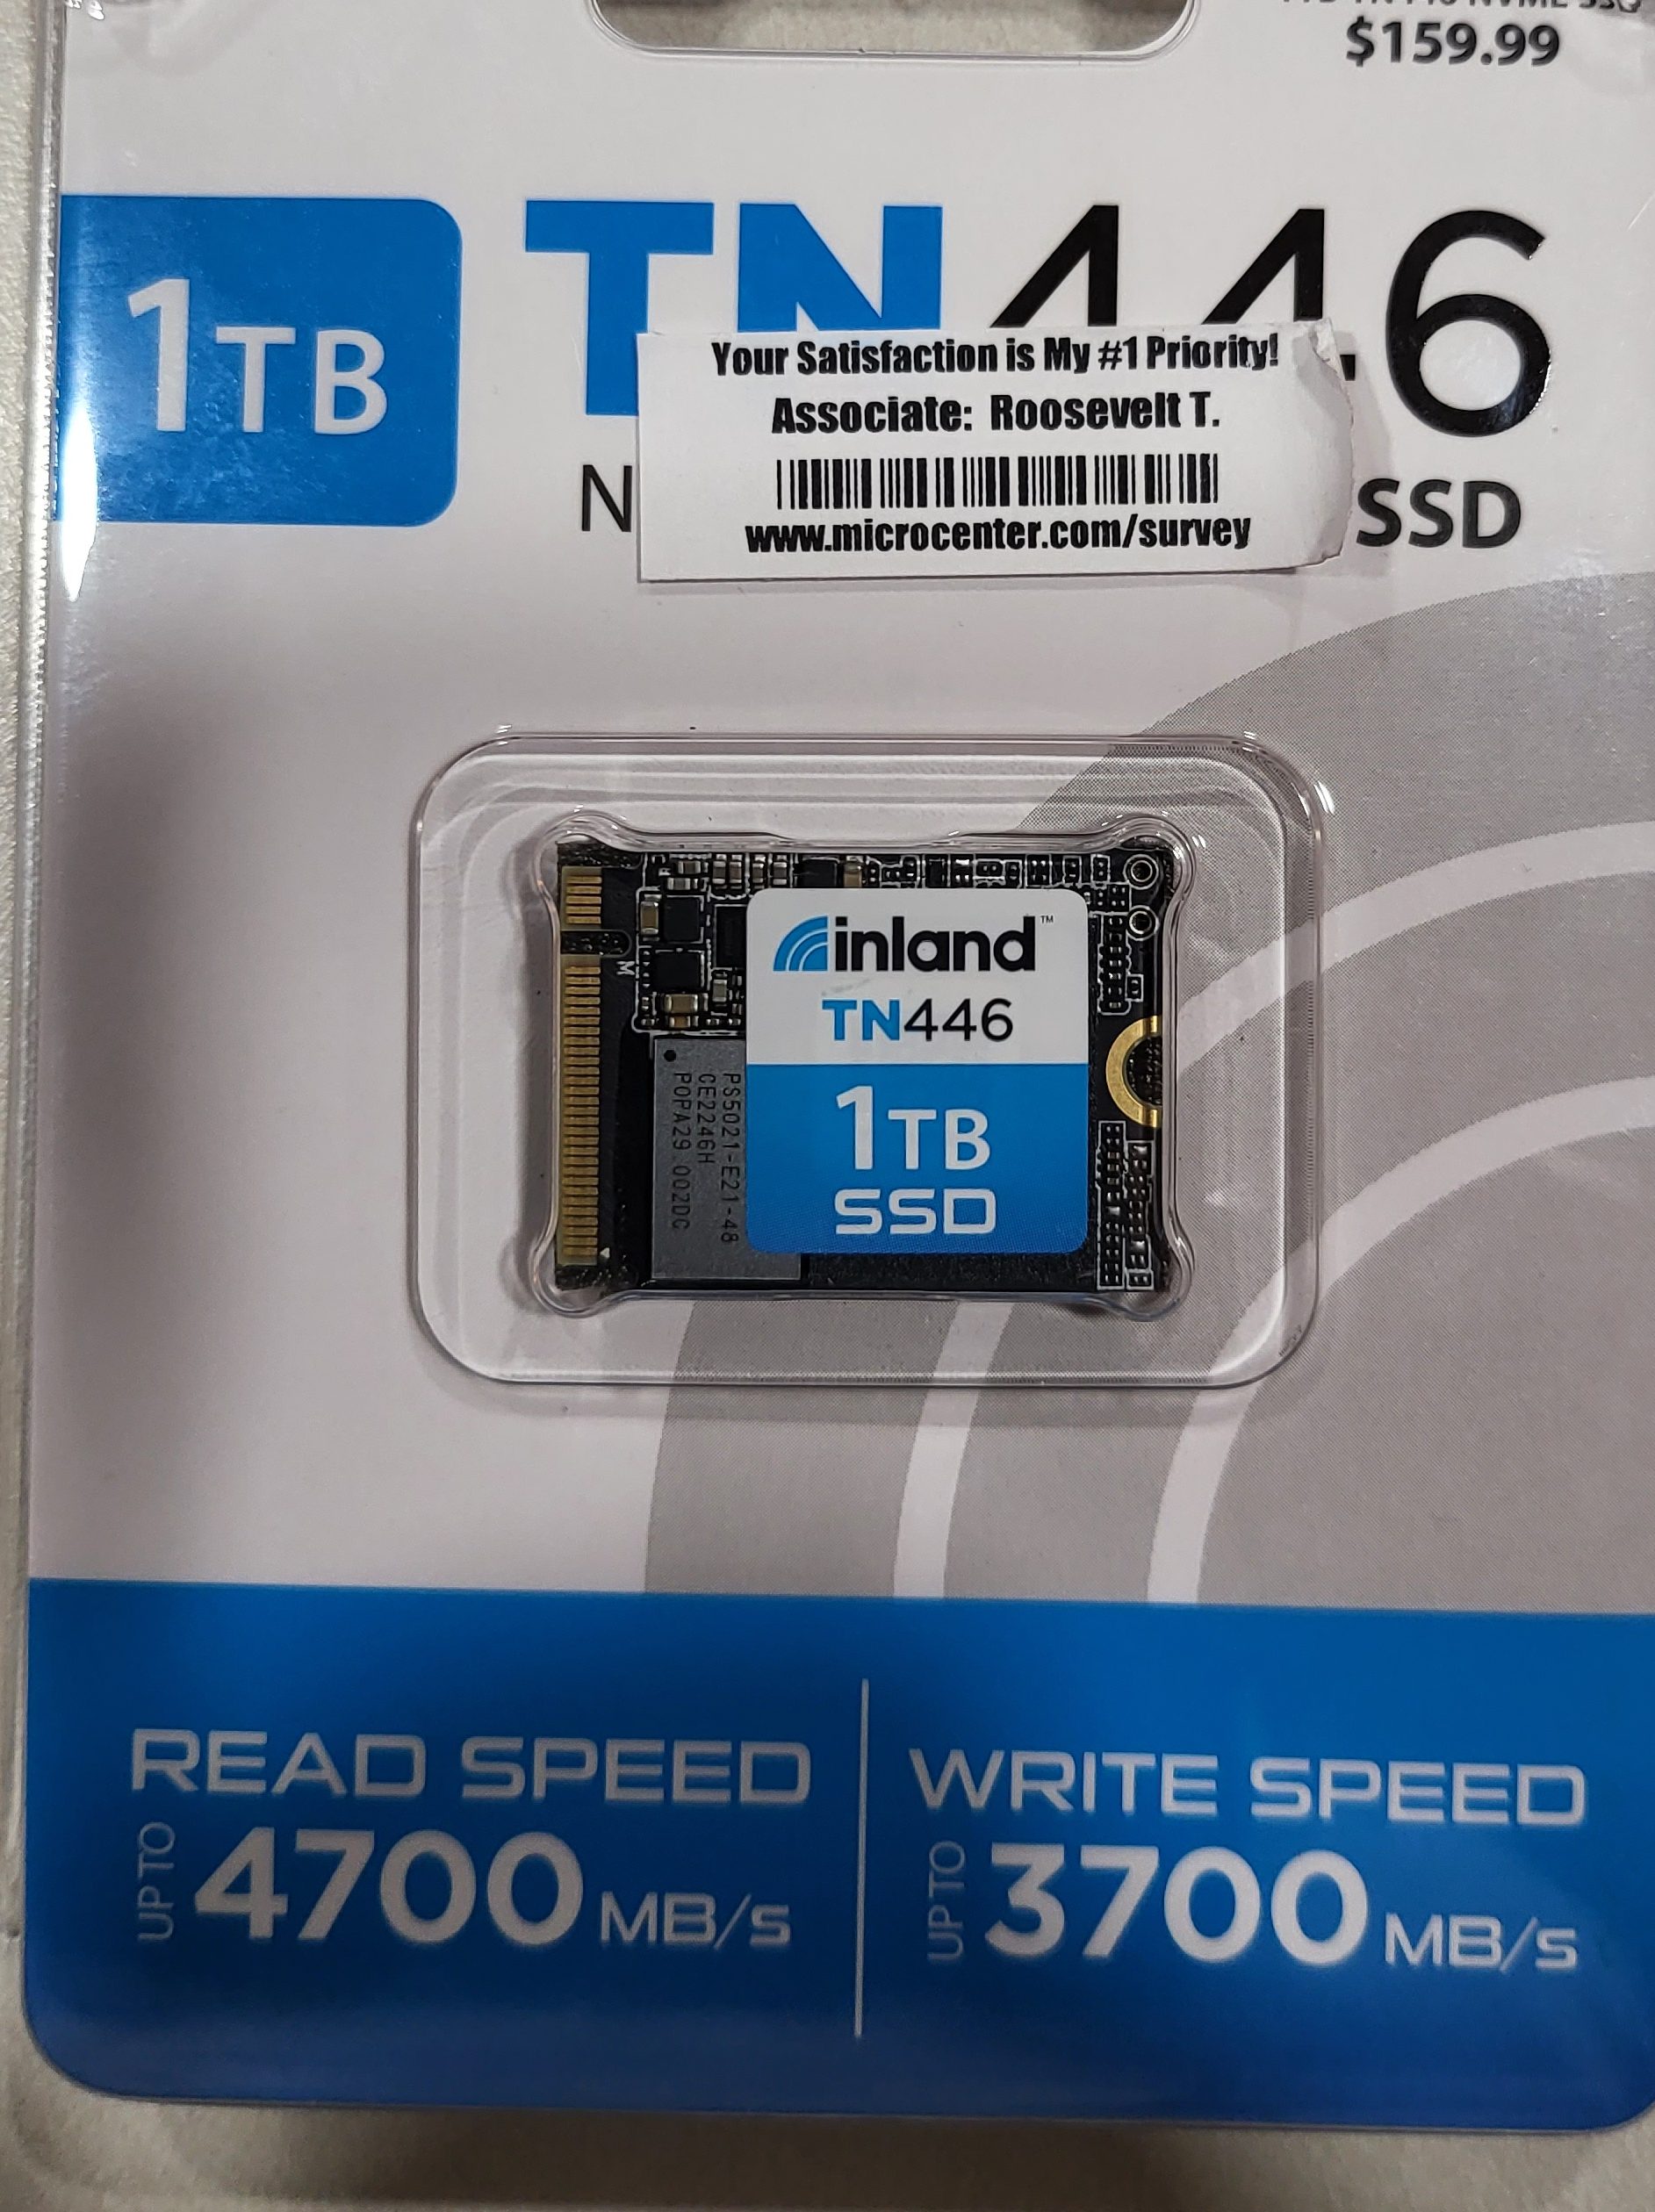
I picked up an Inland 1TB M.2 2230 SSD at my local Microcenter store for $109.00 on sale. I would have preferred to go with 2 TB but those are hard to find and I didn’t want to wait any longer. If you are not familiar, the 2230 designates the length (short in this case) of the disk. Make sure you are getting the compact size SSD, regular or long disks will not fit in the case.
Only the compact nVME disks will fit.
I just followed the ASUS guide carefully. I suggest that you watch the embedded YouTube video. One of their technicians goes through the entire process step by step. With the Ally lying face down, top edge of the device (exhaust ports) away from your body, on a soft surface in front of you, the middle screw in the bottom row is captive. It will not fully unscrew from the case. Instead, it will make a clicking sound and assist in splitting the case halves apart when it is fully unscrewed. The other five screws are all fully removable.
The highlighted screw does not come all the way out.
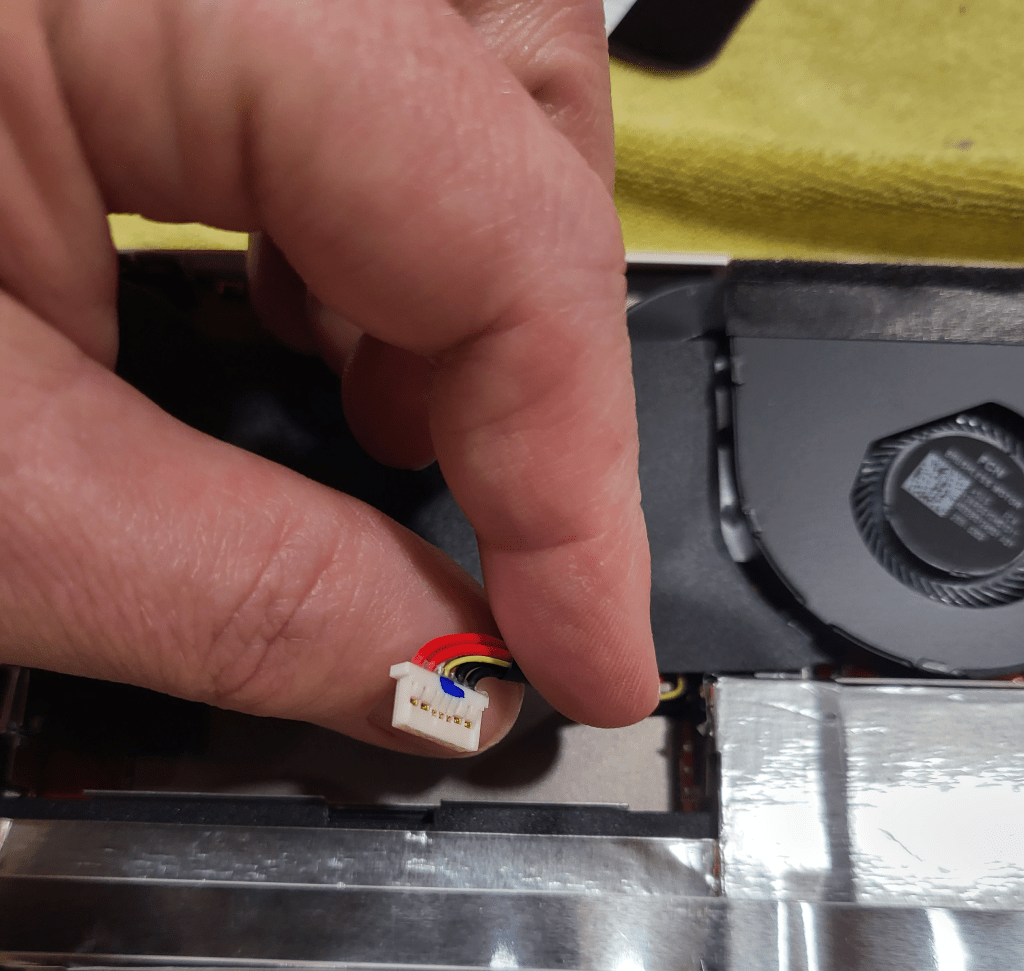
Once you have removed the screws and un-screwed the captive screw to its limit, use a guitar pick or other plastic pry tool (old credit card, old driver’s license) to slide between the halves of the shell and pop the clips. Go slow and undo one clip at a time to avoid breakage. Once the shell is open, disconnect the battery by removing its connector lead.
Remove the battery’s lead to prevent accidental discharge from frying you components.
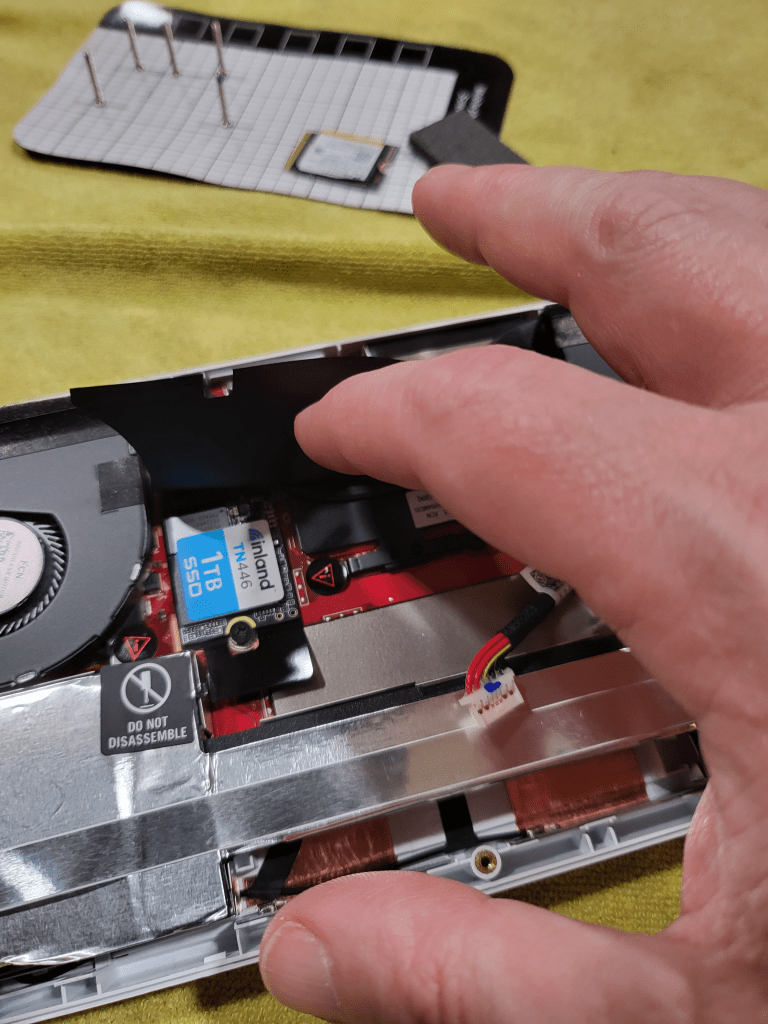
Carefully lift the large rectangular black plastic flap to reveal the SSD slot and drive. Remove the SSD retaining screw and gently slide the disk toward you. If you have trouble breaking the SSD loose, gently lift up on the plastic tab underneath the drive slot. Install the new disk, being careful to replace the screw and battery connector. Re-assemble the case by aligning the two halves and snapping them back together. Finally, screw everything back together by returning each screw to its original location.
The drive is under a protective flap.
Now comes the tricky part, booting into the BIOS. This isn’t tricky because the process is difficult, it’s actually very easy. Just press the volume down and power buttons at the same time. The tricky part is that there’s some mysterious timing required to get the BIOS to load and I can’t describe it. I think you need to let go of the Power button and keep the volume button down as soon as you see the screen light up, but I can’t promise that was it. In any case keep pressing these two buttons until you see the normal start up screen followed by the UEFI BIOS.
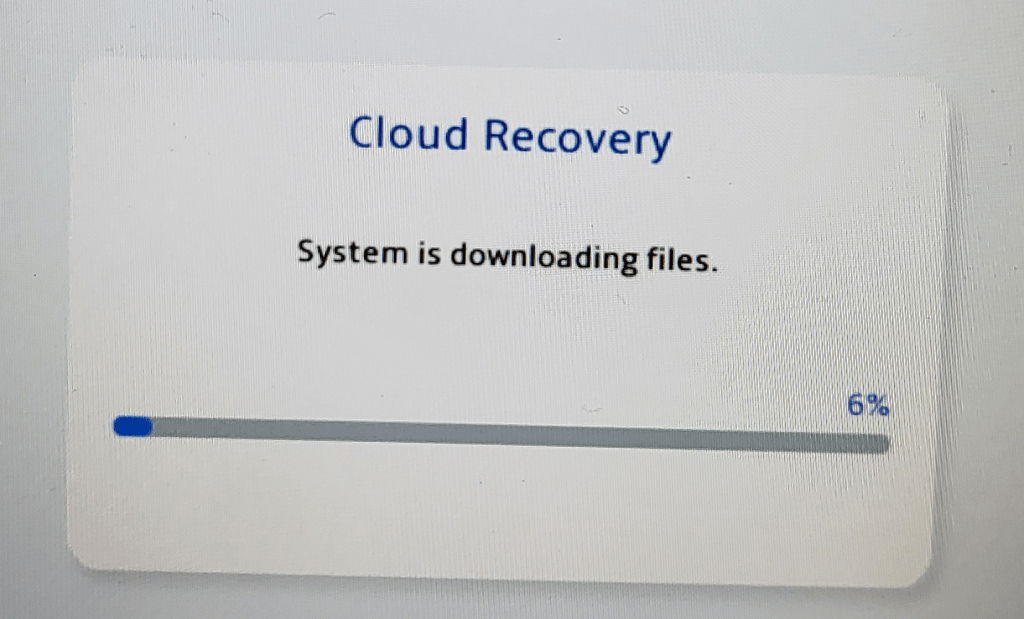
Once you get the BIOS to load, hit the Y button to enter advance mode and use the D-pad to navigate to advanced. Hit A to start the first option (ASUS Cloud Recovery). Read and agree to the EULAs for ASUS and Windows, then connect to your WiFi and download the files. I had to do this twice for the download to actually start.
If you don’t see this screen you didn’t complete all the steps to start the download, try again. I had to boot to the BIOS and tell it to download twice before it worked.
The system will now automatically download and install Windows 11, Armory Crate, and all the drivers and software that came on it out of the box. It will reboot several times. Mine took about 3.75 hours from the time I started until Windows was fully loaded and I had installed all the latest updates for everything.
I cannot stress how important it is that you update everything, not just Windows updates. Many of the tools and software like Armory Crate, My ASUS, the Microsoft Store, any of your game launchers, etc. will all have their own updates. Open the application and look in the help menu if it isn’t immediately obvious where to download updates. This system offers a much better playing experience when it is fully updated than it does when you first unpack it.
I’ve been a fan of handheld electronic and video games for as long as I can remember. Over the years I’ve had lots of LCD Games, GameBoys, Game Gears, Vitas, and various Android based gaming devices. Heck, there’s even a Steam Deck in my household that’s been here since launch day.
I pre-ordered the ASUS ROG Ally right after the first reviews were released. My spouse has the Steam Deck and I’ve spent a lot of time with it. Most recently, I spent the better part of a weekend getting the EA edition of SIMS4 running on it after EA ended support for their Origin launcher. That experience led me to think that Windows may ultimately be an easier path for gaming overall.
Publishers are loathe to unify their frameworks and launchers. How many of them are there now, anyway? EA Desktop, Steam, BattleNet, Ubisoft Connect, Xbox, Epic Games, COG Galaxy, the list goes on and on. The studios and publishers seem to believe that their particular launcher gives them some kind of edge in the market. Sure, they’ll release some of their stuff on other launchers as a form of advertisement. The premium titles often remain locked.
The Steam Deck’s Linux-based operating system does not run most of these launchers natively. There can be a lot of setup to get them running in the Proton emulation layer. In addition, there are several games that use various anti-cheat mechanisms like Ricochet and Easy Anti-Cheat that simply do not function properly on the Linux OS (yet).
Enter the Ally. ASUS’s handheld features a similar form as the famous Steam Deck, but packs in even more power. The Ally can process data at up to 8.6 teraflops compared to the Steam Deck’s 1.6. The performance that the diminutive PC is capable of is frankly astonishing. The Ally runs AAA titles like Halo Infinite, Destiny 2, The Witcher 3, and Call of Duty Modern Warfare II at 1080P on low, at nearly 100 frames per second.
ASUS also wisely chose Microsoft’s Windows 11 and some clever add-ons for it’s operating system. This choice ensures maximum compatibility with all of your titles no matter which launcher they require.
Windows 11 is not customized for the Ally like Steam OS has been for the Steam Deck, but it effectively does not matter in my opinion. Steam OS is limited to playing games that have been specifically written for it, or those that work with its Proton emulation layer.
Those limitations can be extremely frustrating to deal with if you aren’t into engineering tech workarounds. The amount of work that went into getting SIMS4 to run properly on the Deck was immense.
It took less than 15 minutes to install SIMS4 on my Ally. No modifications of any kind were needed. The game just worked. I might recommend a Steam Deck to some of my engineering minded co-workers, but I’ll point my normal friends and family to the Ally every time. After my experiences with both, I can honestly say “Windows is the way”.
In this day and age, your digital identity can be as important as your real life persona. Just as you use fashion to convey your desired public image, usernames, email addresses, and the like can influence how people view your on-line identity. For the longest time, everyone just used one of the big free identity pools like gmail.com, outlook.com, or their ISP’s domain.
Recently I discovered that the family and personal editions of Microsoft 365 will allow custom domain names. That got me thinking, what about the Apple side of tech? It turns out that paid iCloud accounts will also host your custom email domain.
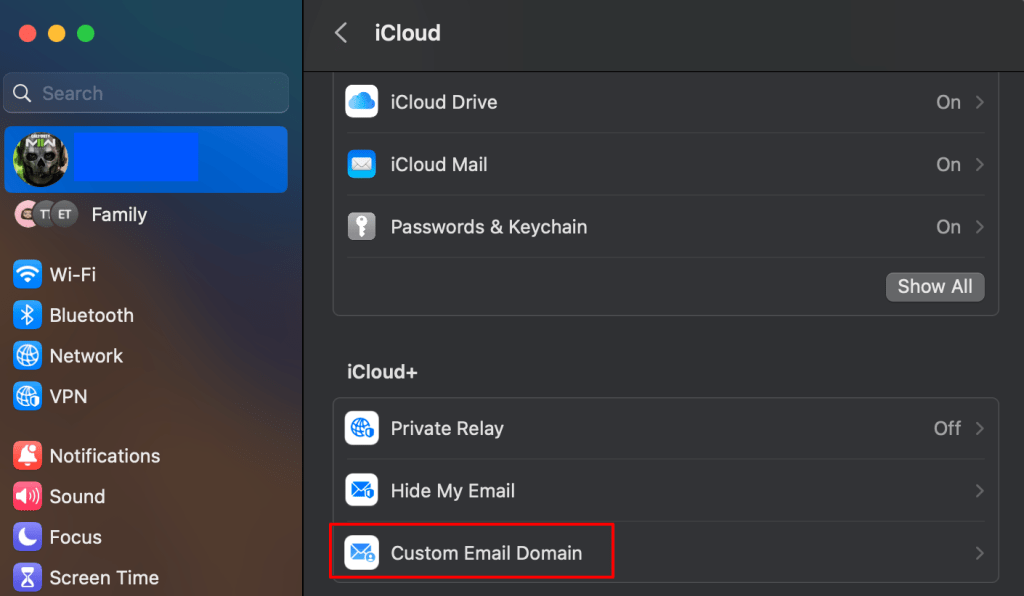
On a iPad, iPhone, or MacBook, open settings then click on your account in the menu on the left. Click on iCloud and scroll down to tap “Custom domain name”. You should also be able to go straight to the iCloud page in Safari https://www.icloud.com/icloudplus/customdomain. If you visit the site from a non-Apple device you will face some authentication hurdles, but I’m told it can still be done.
The easiest way to get started is from the settings app on your Apple Device.
Sign into iCloud when prompted and the setup process will start. The first thing you’ll need to decide is whether to use a domain you already own, or purchase a new one. Click the appropriate button and follow the instructions. I’m using a domain I already own in these instructions.
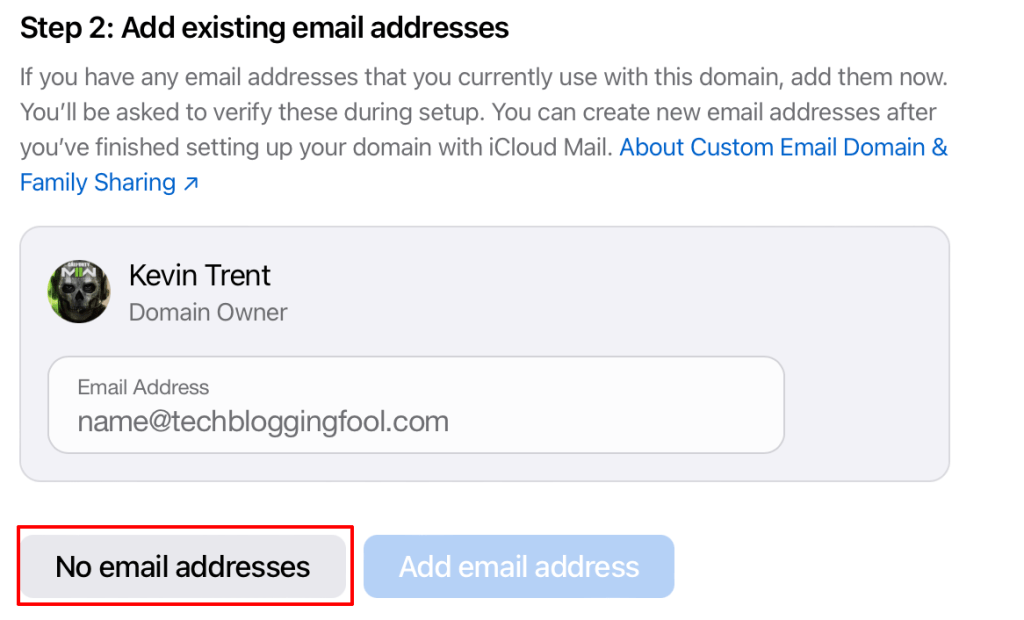
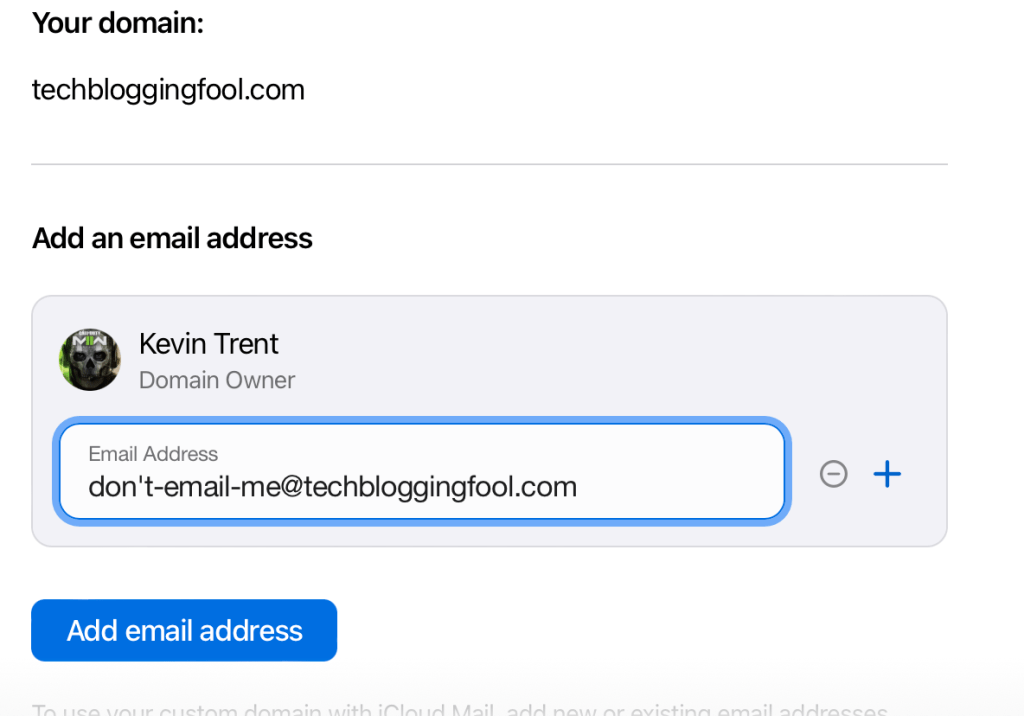
When you reach the step regarding existing email addresses, pay close attention. This is not where you setup up new addresses. If you are not moving email hosting from another service to iCloud, you should click the “No email addresses” button. If you try to add existing addresses, apple will send a verification email and you will be stuck. If you get stuck, use the back button to go to step one and remove the domain to start over.
Adding existing addresses from this screen sends verification emails to them. Use the “No email addresses” option unless you are migrating from another SMTP host.
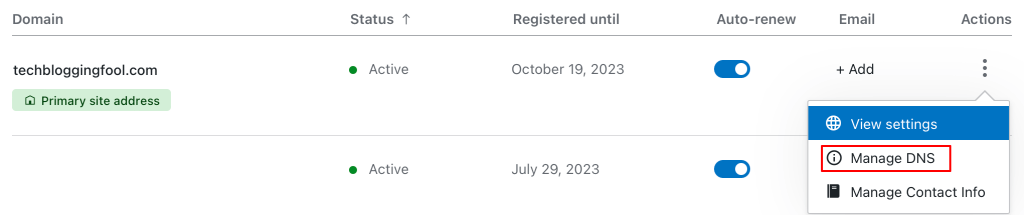
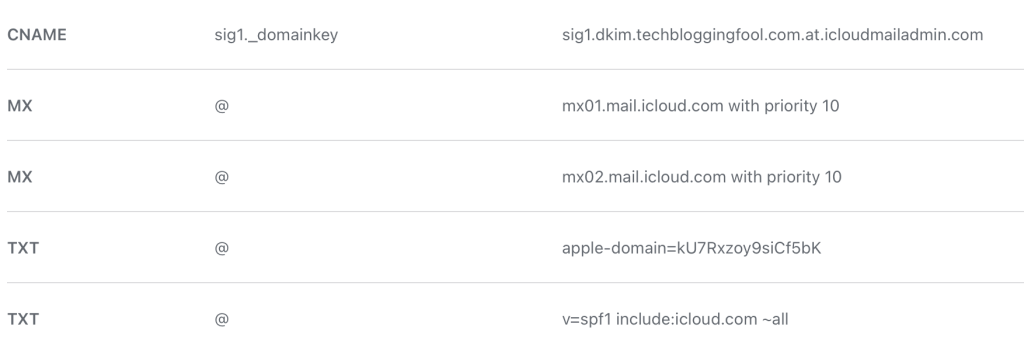
If you have chosen to use a domain that you already own, there are some DNS records that you will need to create. This is typically done on the domain registrar site that you purchased the name from. Logon to their control panel and find the Manage DNS (will vary in name and location) option. Create the records exactly as they appear in the setup portal (View button). Apple also emailed you the records to your iCloud address when you reached this step (look in the Apple Mail app).
Most domain registrars also host your DNS.
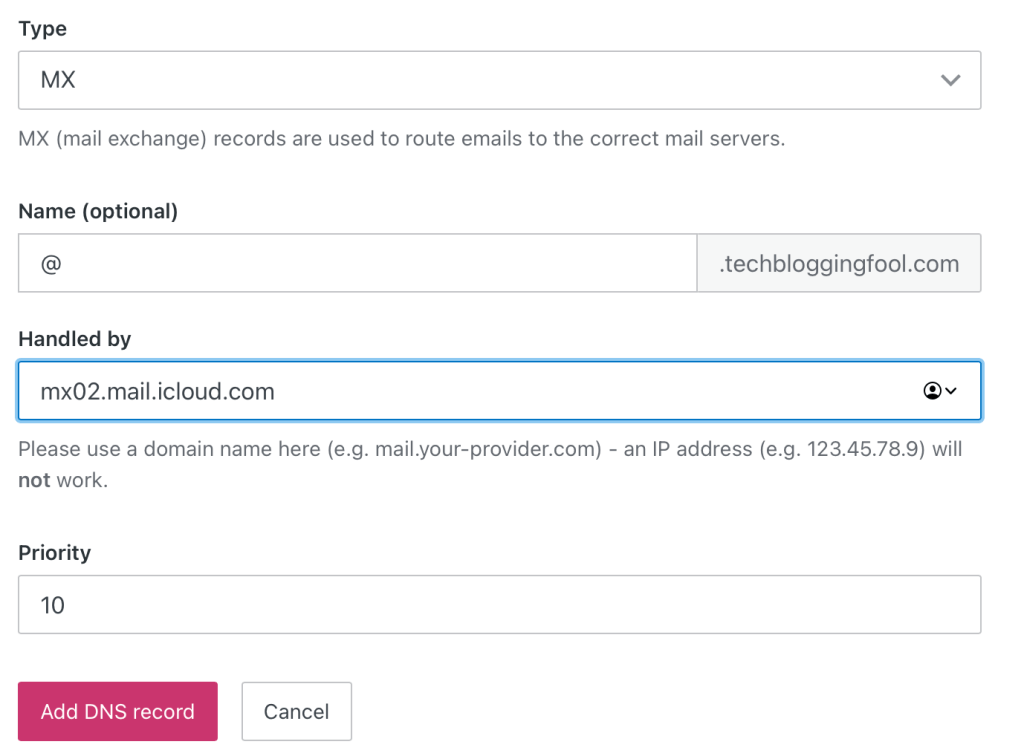
Note: The screen that shows the records you need to create includes a trailing period after some of the values. However, most DNS servers cannot accommodate a trailing period in their fields. If your DNS server will not accept the pasted copy, remove the period.
Create each record, remove trailing periods in the values if they keep you from proceeding.
In all you should have created four DNS records. They should look similar to mine below. The data is different for each domain so do not use the values from my screenshot.
Back on the iCloud setup screen click Finish. Then click Confirm and Apple will verify that you have setup the records correctly. On the next screen you will add your email address(s). You can add up to 5 addresses to your own account or to iCloud family members.
Use the – and + buttons on the right to remove and add addresses to your account.
That’s it, you are all setup to use your custom domain. It can take up to 48 hours for the email addresses you created to become fully useable on the internet. You can manage your email settings by access the Custom domain option in the settings app as described above or by visiting https://www.icloud.com/icloudplus/customdomain in your browser. Enjoy.
If you work in IT long enough, you will eventually need to create or edit public DNS records for something. This means you need to find the public DNS servers first. Whols is the online database that contains the information you are after.
The good news is that WhoIs is publicly accessible via a number of websites. The bad news is that most of them require you to accept tracking cookies or run a gauntlet of captcha tests. Some make you suffer through Ad hell to get the information you need.
My usual whois site. https://www.whois.com/whois is relatively painless, but the CLI is still faster and easier, in my opinion.
Microsoft’s Terminal application for Windows 10 and 11 is extremely versatile. 10 users need to get Microsoft’s Windows TerminaI app from the Microsoft Store. It’s the default Terminal in 11. Much like the famous Putty, it allows for custom saved connection profiles. It also rus multiple CLI consoles like SSH, PowerShell, Telnet, and CMD in tabs that make flipping through open sessions easy.
Windows Terminal is a Tab based multi-protocol text terminal that features customization.
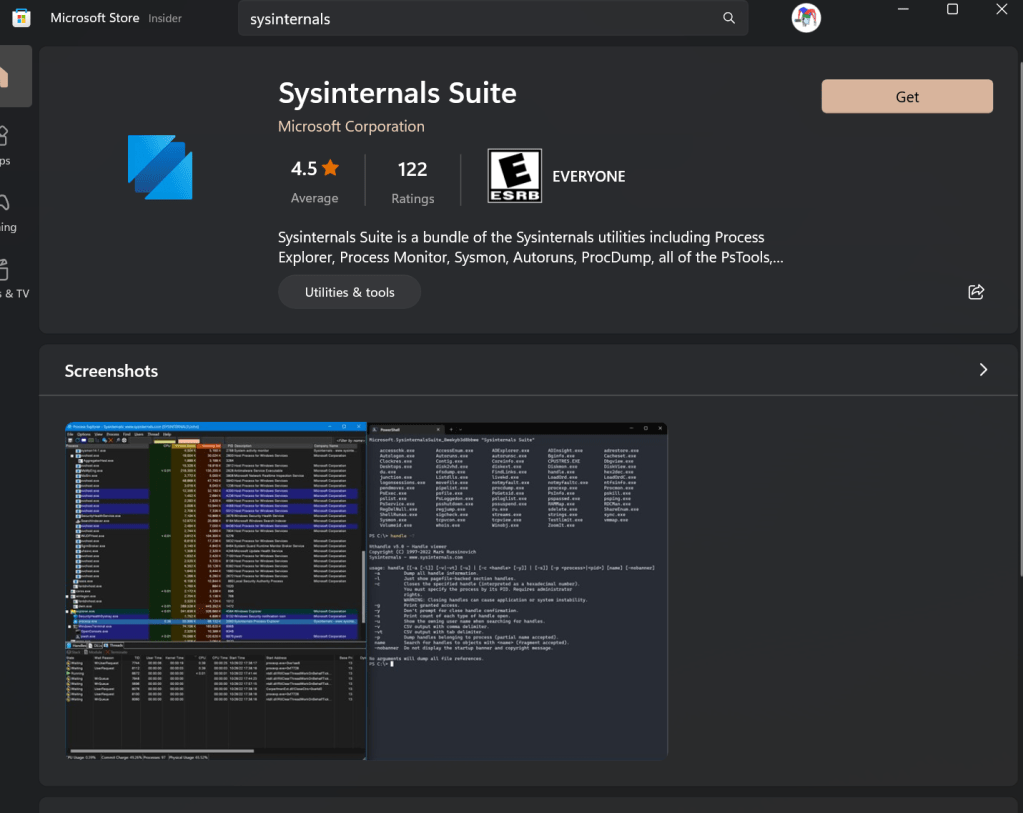
SysInternals has provided a CMD based WhoIs client for years. You can install the free SystInternels suite from the Microsft App Store. It is also possible to download and install each individual tool. There are even Linux versions for some of them. See the Sysinternals section of Microsoft’s site for all the options.
They’ve been essential tools to debug Windows for decades.
It’s easy to combine the two and create a time-saving WhoIS CLI that is faster and easier to use than a website. More or less, the process is to create a CMD profile that points to the folder that Sysinternals installs into. To get started, make sure both the Sysinternals Suite and Windows Terminal are installed. Click the Get button in their respective links above.
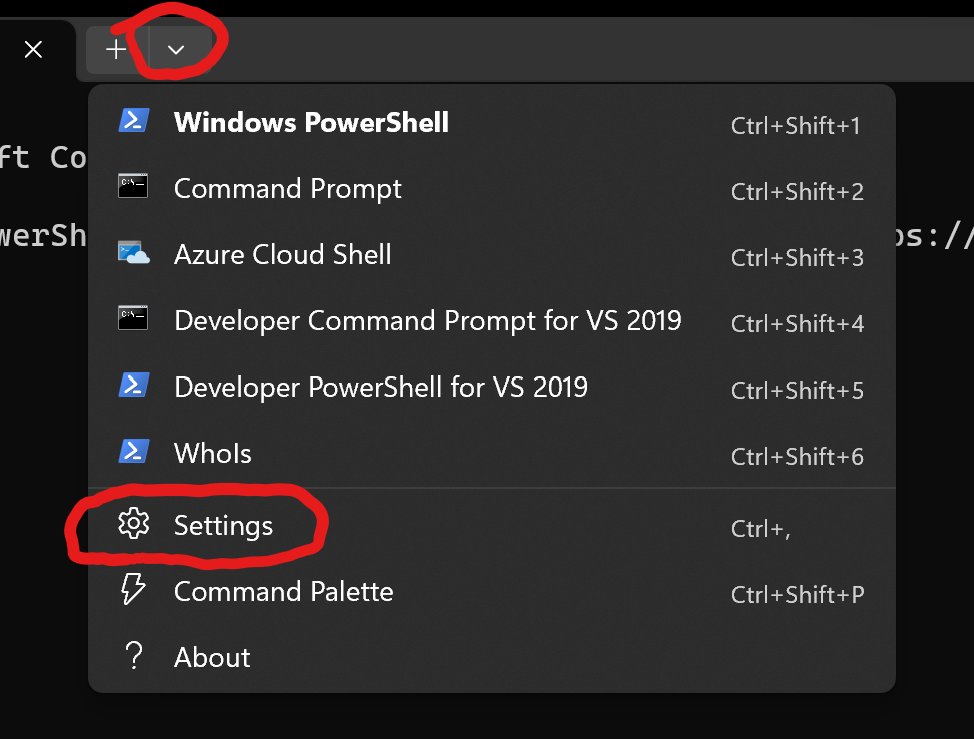
Now open Windows Terminal and click the drop down to the right of the last tab. Go to settings.
Add new connections and customize your experience from settings.
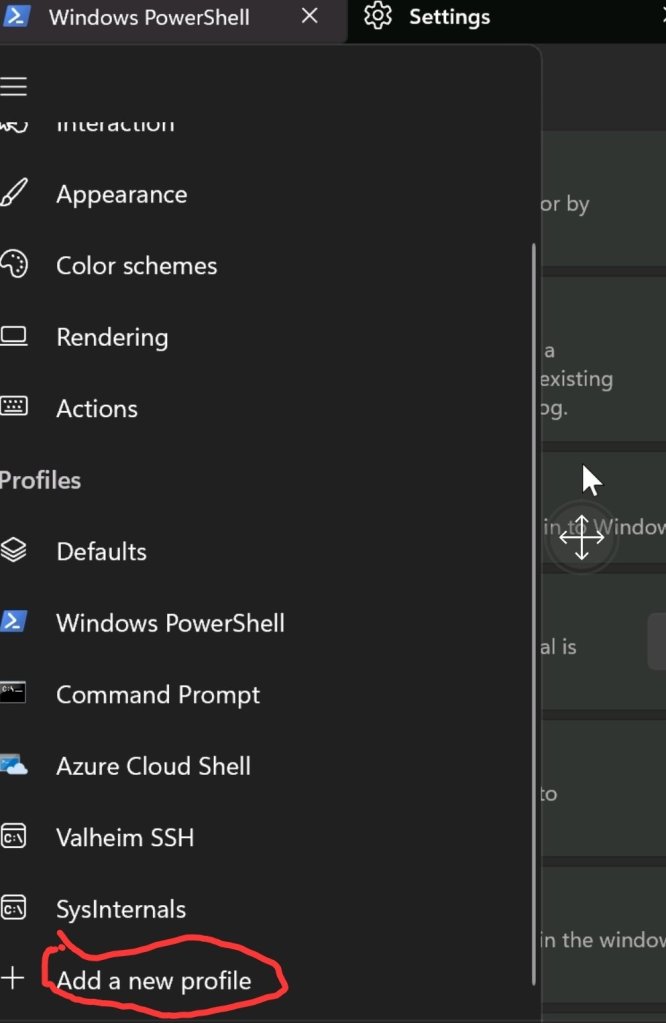
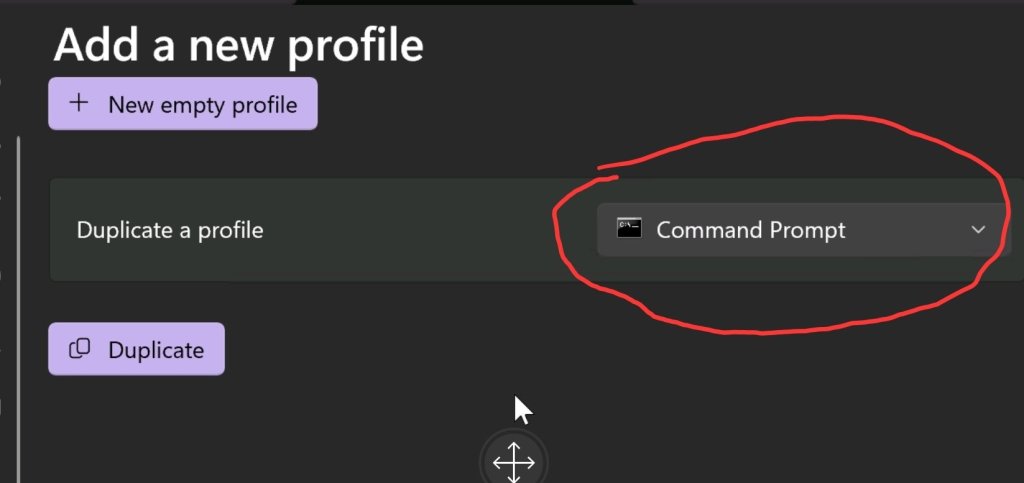
Add a new profile by the clicking menu button followed by the ” add new profile” button. Pick the option to copy a current profile and select CMD from the drop-down.
Hamburger buttonAdd new profile button. CMD based profile
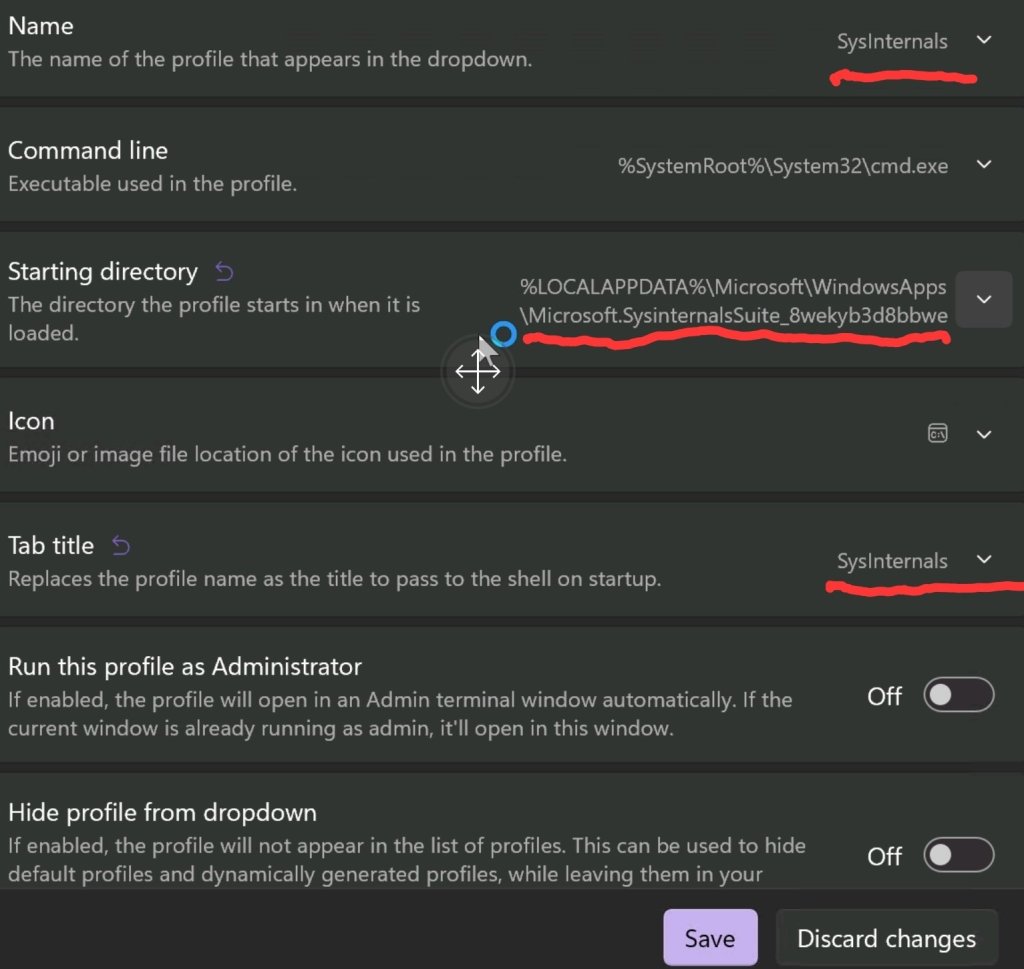
Adjust the fields outlined in red to match the picture below. Use the drop-down at the end of each attribute. If you installed Windows Terminal from the app, the path should be: %LOCALAPPDATA%\Microsoft\WindowsApps\Microsoft.SysinternalsSuite_8wekyb3d8bbwe. Otherwise, you created the path during installation.
Change the underlined options.
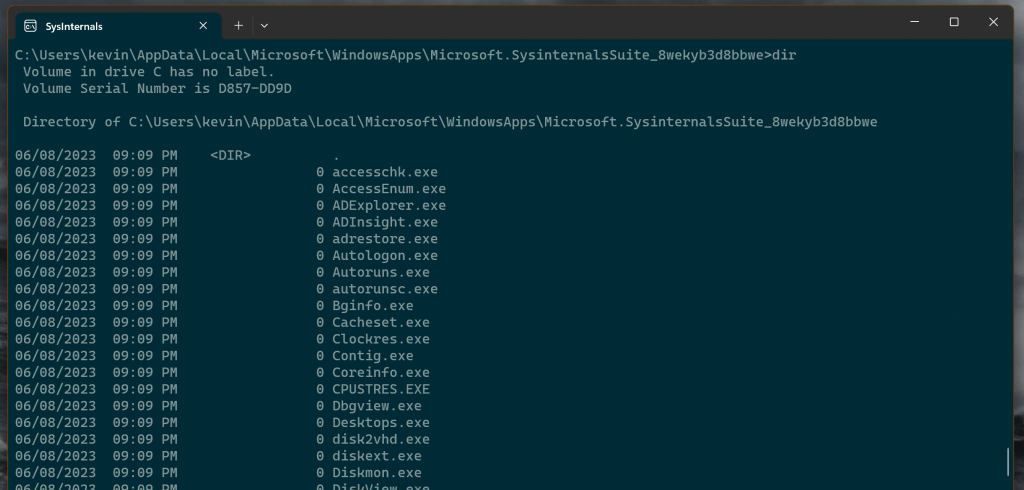
Save your changes and exit the menus. Now you should have a “SysInternals” tab available in the tab drop down menu. Open it and type whois followed by the domain name or IP address you are attempting to identify. All the other CLI tools in the SysInternals Suite work in the same manner (assuming you installed them). Type the name of the command followed by any attributes. List them by running a dir cmd, enjoy.
DIR will list all the Sysinternals tools that are available.
For as long as I have been using the Moonlight app to stream games from my PC to various screens, it has exhibited an annoying issue. Occasionally, the stream freezes on the client device but continues playing on the host. I usually end up having to restart both systems to reconnect.
The problem was worse in some games than in others. Hogwarts Leagacy really triggered the issue on my setup a lot. Destiny 2 suffered from the drop as well. There were no error messages in any log file that I was able to locate. It happened often enough that I mentioned the problem in my first article about Moonlight. Not often enough for me to give up on samestream technology.
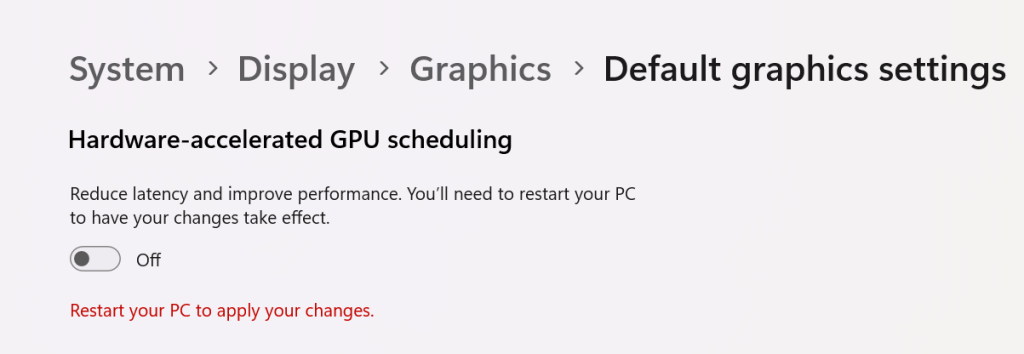
Searching online led me to this Redditt Moonlight Freezes Up. The answer to my issue was in the comments. I turned off the hardware GPU scheduling feature found in Windows 10 and Windows 11 on the host system and on any Windows PC clients. Disabling this feature configures the operating system and CPU to manage VRAM. When the feature is turned on, the task is offloaded to your graphics card. Which can boost overall system performance if you have the free cores.
Go to Settings -> System -> Display -> Graphics and click Change Default Graphics Settings. Then disable Hardware-accelerated GPU scheduling by sliding the toggle to the off position. You will need to restart your computer for the change to take effect.
Disable HAGS
The other possible solution is to use the famous Display Driver Uninstaller utility to uninstall your current driver completely. Then, download and install what many consider to be NVIDIA’S best driver release ever, version 472.12.
Once upon a time, I had an idea for home entertainment nirvana. I would purchase the same brand of smart TV for each screen in my home. I reasoned that it would simplify the cable-cutting experience for the whole family.
For the most part, it worked. I ended up going with various models of Samsung smart TVs. They all used the same operating system and had very similar remotes. They could also synchronize favorites, apps, and settings if you logged on to a Samsung cloud account. It was very convenient, nobody missed cable at all.
Fast forward several years, and it was time to replace one of the screens. I really liked OLED, and the best bang for my buck was an LG. The LG features a remote that resembles a Wii controller. LG’s WebOS is vastly different than Samsung’s Tizen. Not too long after, we also eventually ended up with an Amazon Fire-TV based screen in the kitchen area.
Remotes that come with the screen control the it well, but can struggle with all the connected gear and apps.
There went my master-plan. Now, we were using three different operating systems and three vastly different and uniquely ackward remotes. Adjusting to different functionality and layout of the remotes and in the streaming apps themselves, was fun to a tech-head like me. Not so much for the family. I started thinking along the lines of getting the same universal remote for each system to at least lessen the confusion.
The Sony Remote Commander was one remote to rule them all back in the day. Mine would even operate the garage door.
A few minutes of research online nixed that idea. Universal remotes are not as robust as they used to be. Most of them do not support modern radio frequency based televisions. Of those that did, I couldn’t locate one that would do everything else I wanted. I really prefer to have one remote that controls everything. The fewer buttons, the better, but I don’t want to have to look at the remote for every function either.
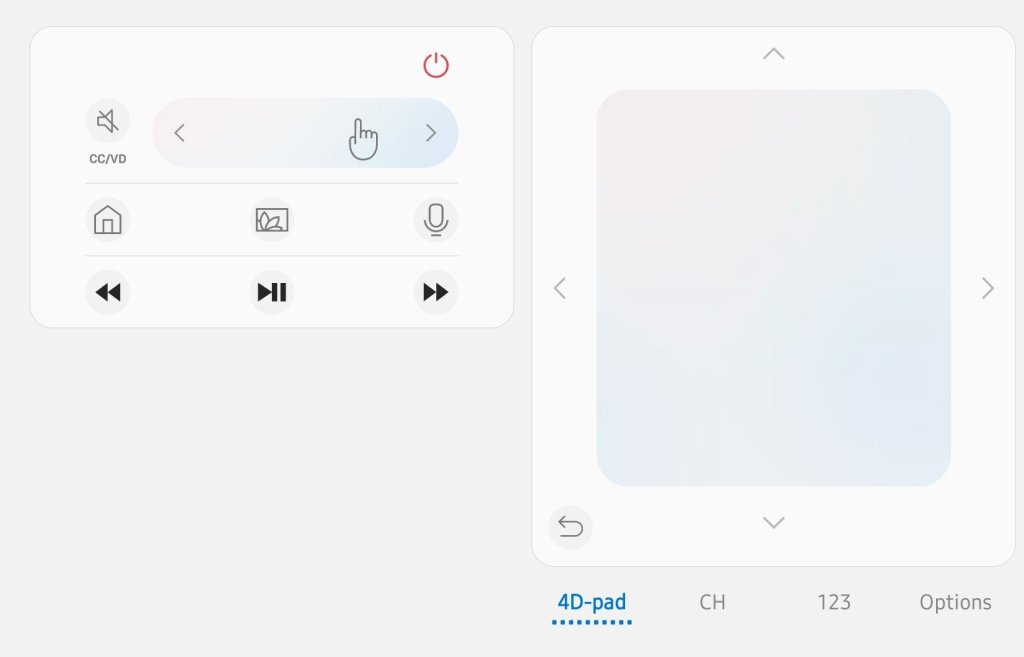
I tried using the smartphone apps, and they work but are also vastly different between Apple and Android versions. The three different apps for each TV have very unique interfaces and functionality. The lack of tactile feedback makes the touchscreen apps difficult to use. You have to look at (and sometimes unlock) your smartphone every time you change the channel, adjust the volume, fast forward, etc. It’s a lot of looking and switching between active apps. There’s more of a “works in a pinch” feel overall.
Phone apps feel unintuitive.
While discussing the remote situation with my partner, she casually said something along the lines of “almost makes you miss the good ole’ days of cable boxes.” My brain jumped from her remark to “Why not use a streaming box to do the same job?”
I started my little project by hooking up a Roku to the living room TV. It worked fine, but if truth be told, it was clunkier to use than Samsung’s SmartTV OS. It also seemed a little under-powerd. Switching between the streaming apps was annoyingly slow, so was flipping channels in any of the live-TV apps. To be fair, it was a low- level Roku that I had won in a raffle. It’s my understanding that the higher-end models do not suffer the same performance problems.
I learned several things from the Roku. First, it convinced me that the idea of using streaming boxes to get a consistent experience across the screens was going to work. Second, it convinced me that a minimalist remote control backed by the right software would be able to control my screens, audio systems, and streaming apps. Lastly, I had decided that it would be worth purchasing wired network boxes for less chance of issues and better overall streaming performance.
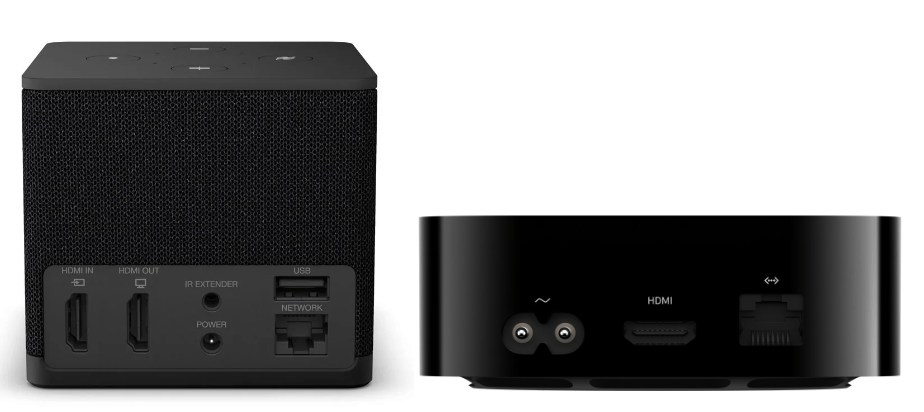
Over the next few weeks, I contemplated and researched the options. In the and, it came down to an Amazon cube, or Apple TV. They’re both high-performance devices with multi-core processors, plenty of RAM, gaming capable graphics, and gigabit wired ethernet.
Amazon Fire-TV Cube and Apple TV Wi-Fi + Ethernet are both high-powered streaming boxes.
The Amazon Fire-TV operating system is based on Android. However, like all Fire based devices, they don’t have access to the Google Play store (without extra work). The Amazon shop has most of the apps people are looking for, but not all. The UI is a little frustrating at times. Unexpectedly most of the annoyances seem to be caused by a lack of notification.
For example, after certain updates, the Amazon Fire OS needs to reboot. There’s no on-screen notification that you need to initiate a full restart from the advanced options menu buried in the control panel. The way many Fire-TV owners discover the situation is by searching online for troubleshooting instructions after noticing that apps are not working properly.
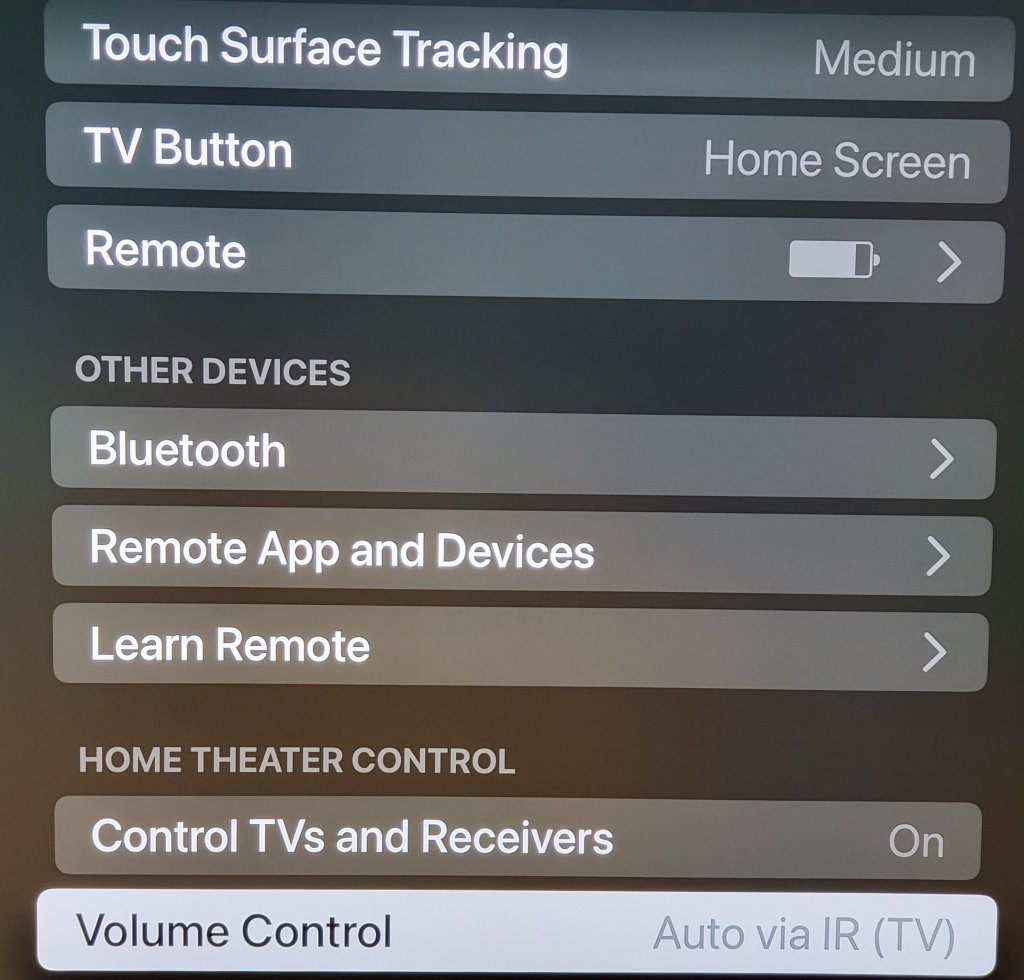
The Apple TV hasn’t had any type of technical issue in all the months I’ve been using it. I have it connected to the LG OLED screen and wired to the network. My cheap Visio surround sound bar is connected to the TV via an optical cable. The Apple TV detected and configured everything on its own as soon as it booted up and finished its “hello world” routine. I was impressed.
My hardware was automatically detected even though it was infrared only.
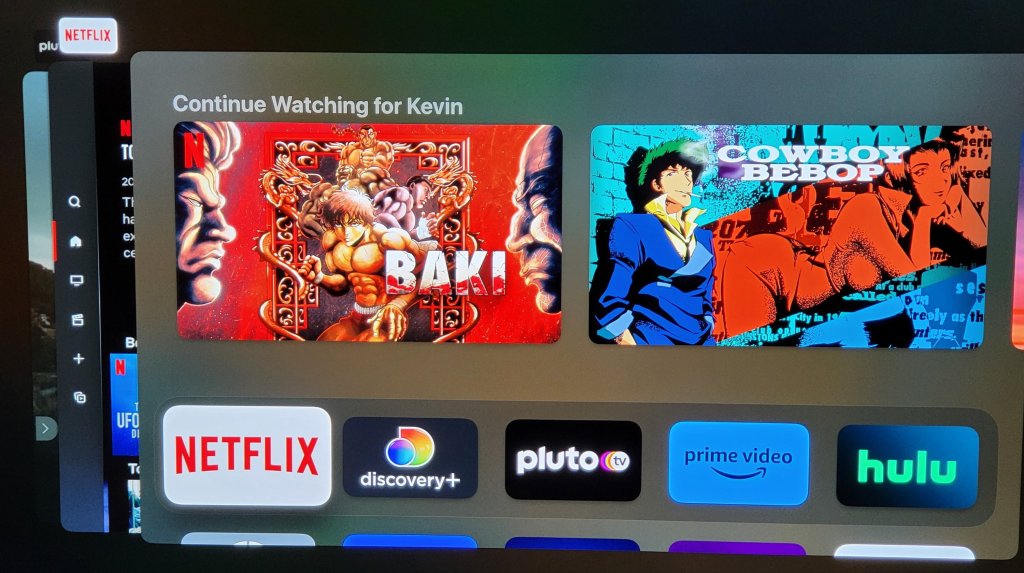
I find the Apple TV remote to be the best overall media controller I’ve ever used. It’s small, light, made of cool metal, and rounded in all the right places. The main interface is a large depression that your thumb naturally gravitates toward. Clicking in is the Ok or action button, and sliding your finger over the surface moves the cursor like a laptop’s touch pad. Each cardinal edge of the circle can be clicked in to activate a D-Pad function. I find myself holding a nd fidgeting with the remote even when I’m not changing the channel.
It is a fantastic remote for app, device, and media control.
Like all things Apple, it is the little things and attention to detail that helps the Apple TV stand out in the crowd. Double-click the home button, and a card deck of all your open apps makes getting back to your previous activities a breeze. Hold the same button down for a couple of seconds and a quick access menu appears to change users or adjust common settings. Click the same button once to wake up the screen, audio system, and automatically switch everything to the correct inputs and outputs.
The app deck works the same as your iPhone you can select or dismiss previously open apps with ease.
Eventually I installed the Moonlight streaming app on the Apple TV and paired a Bluetooth Xbox controller to it. The game streaming experience is great, but the Apple TV had an unexpected surprise that I use as a result. When you have paired a gamepad you can also fully control the apps and TV with it. I also noticed the my iPhone and iPad both immediately detected the Apple TV units and allowed me to fully control it without doing anything, no app, no setup, just pull down the quick menu and there’s my TV.
I’ve had a PlayStation Vita (2000 model) sitting in my junk drawer collecting dust for a long time. I had just completed a post on setting up Moonlight game streaming a few weeks ago. While doing the research for that post, I discovered that the online gaming community had created a custom port of the Moonlight software that runs on a jailbroken PS Vita.
Generally, I don’t tend to jailbreak my stuff. However, Sony has absolutely abandoned the Vita line of devices, which means there’s nothing to lose. The last time I went through the jailbreaking process, it was extremely technical and required some advanced knowledge to accomplish. To my surprise, it was very easy to accomplish this time around. Anyone with patience and the right guide should be able to pull it off.
Retro Game Corp’s guide got me through the process.
I’m not going to write a full step-by-step guide. There’s plenty of them out there already. This is the one I used, and I commend the author for including all the steps. If you are thinking about jailbreaking your Vita, you should consider the process permanent. You should also be aware that occasionally, the process fails and can brick your device.
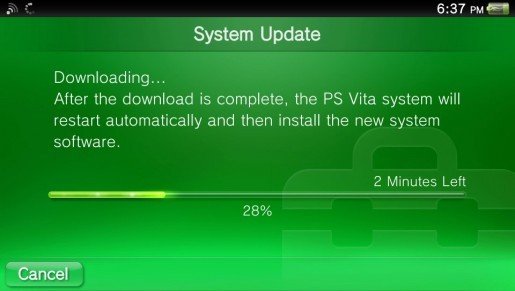
More or less, you need to upgrade the firmware to version 3.74. Next, you’ll want to factory reset the Vita (look in Settings -> System -> Format). Then, you connect to Wi-Fi and sign in or create a temporary PSN account.
Update the Vita’s Firmware before jailbreaking.
The easy part is the hack itself. Just visit jailbreak.psp2.dev in the Vita’s web browser and click the button to proceed. Follow the on-screen instructions and reboot when prompted. Eventually you will end up installing a custom hacked copy of the 3.65 firmware via an automated process that takes care of everything for you.
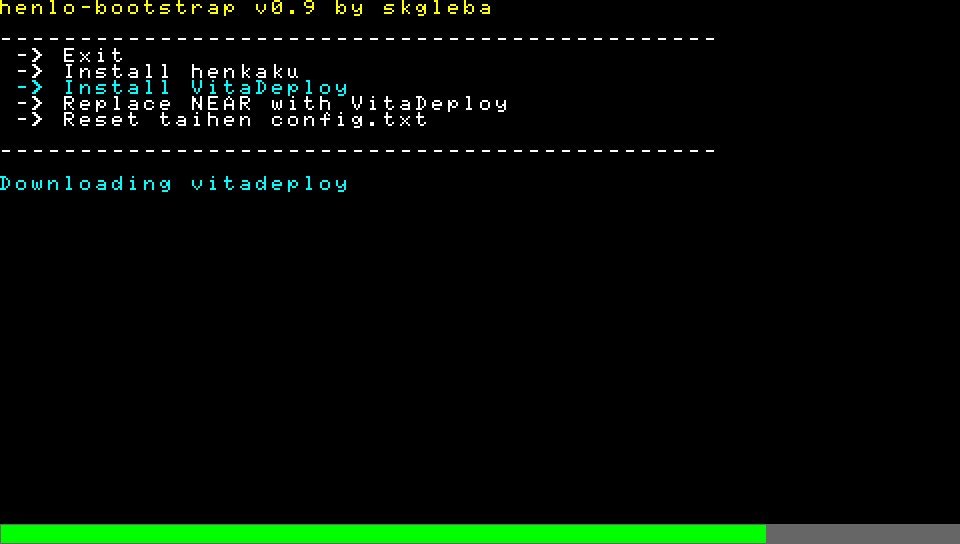
Emulators to play backups of your old game cartridges are in VitaDeploy.
Once you’ve completed the custom firmware replacement and installed the software mentioned in the guide, adding emulators for GameBoy, GameBoy Advanced, NES, SNES, PS1, PS2, and more is as easy as browsing an Appstore and picking them. Again, this is all covered in the guide I linked to above. You’ll need your own ROM files and, in some cases, will need to locate the BIOS of the various consoles in order to play emulated games.
Vita Deploy is an app store for homebrew.
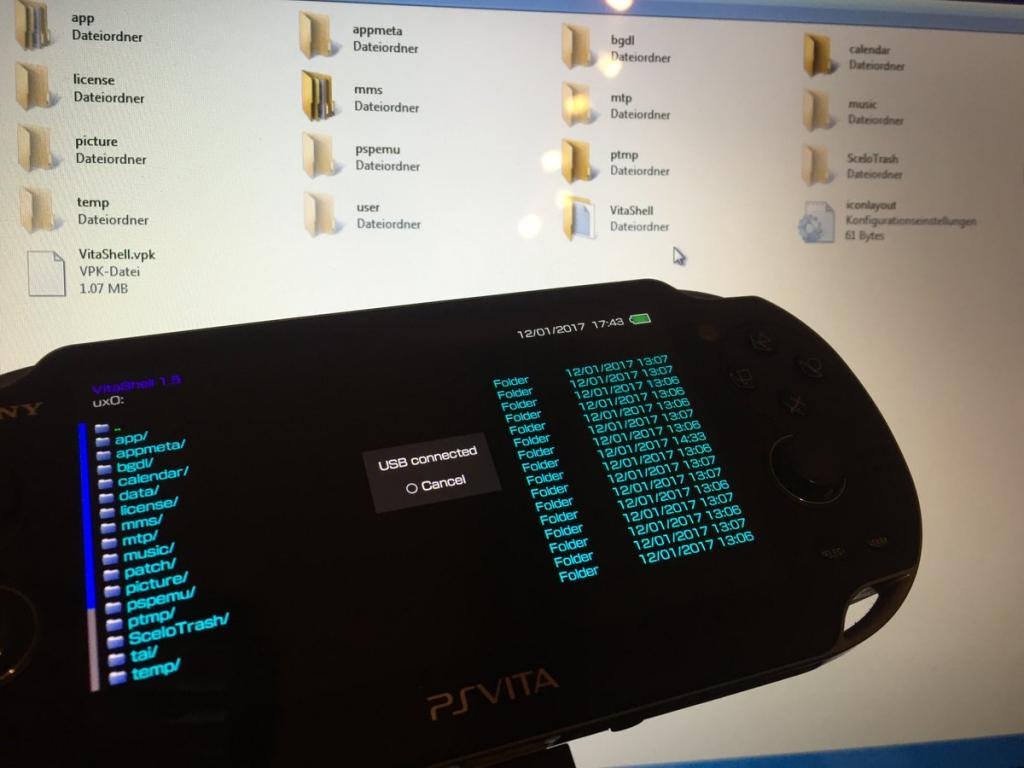
When it comes time to move files from your PC to the Vita, don’t spend time trying to get the old Content Manager software working. It doesn’t work on modern operating systems. Open the VitaShell app and connect the Vita to your PC via USB. Then click the select button to enable your PC to use the Vita as a USB drive.
Pressing select in the Vitashell app starts USB mode to mount the Vita as a drive in Windows Explorer.
The version of Moonlight currently in VitaDeploy is .92 and has an issue pairing with the Gamestream host. Download version .93 from github @ https://github.com/xyzz/vita-moonlight/releases/download/0.9.3/moonlight.vpk . Use VitaShell, Windows Explorer, and a USB cable to move it to your device. Then, find the .vpk file in VitaShell and open it to install the software. Aftwards, it works like any other moonlight client. The menus are text only and navigated with the D-pad.
The Vita doesn’t have clickable sticks, so you will need to be creative mapping controls in the games that you stream from your PC. I move aim and fire to the RB and LB (Vita’s shoulder buttons), and the controls that were previously RB and LB to the LT and RT which are default mapped to the Vita’s back touchpad. This works for most games like Destiny 2 and Cyberpunk 2077.
The client software is not without issue. Occasionally, it locks up or crashes for no apparent reason. Sometimes, the screen seems to be over saturated with white. When bad stuff happens, you can usually end and resume the session to recover and continue playing. Generally, it happens to me at the start of a session if it happens at all. Other than that, games look and perform well.
I’ll leave you with some hard-won tips for using the Moonlight app itself. Holding the select button and tapping up or down on the D-pad will cycle through various telemetry screens. Tapping the upper left corner of the Vita’s touchscreen will open the menu for pausing, quiting, or changing the game.
Way back in 1998 I saw Lost in Space (the movie) and was fascinated by their portrayal of augmented reality. It wasn’t the first time AR was presented as technology that would be common in our future, but it was done in a way that made it seem fairly realistic. I remember hoping the fictional system would become reality in my time. Fast forward twenty-five years and AR is on the verge of becoming a real thing.
In my line of work, I can end up working in cramped spaces like server rooms (aka closets), IDFs (aka also closets), or a stolen sliver of someone else’s desk. I’ve been using the “sidecar” technique of turning whatever tablet I have handy into a second monitor since the idea was invented. There isn’t always room to setup like that where I need to work. I’ve been waiting for a hi fidelity, lightweight, hands-free display. Keep my goals in mind while reading my thoughts on the Nreal Air Glasses. I bought them for a very specific reason, to use them as a hands and desk-space free external monitor for various devices. Anything else they do is gravy.
I’ve tried a few display goggles and smart glasses over the years. Until now, they’ve always left me extremley disappointed. Most often because they were uncomfortable. There have also been some severe battery limitations, connectivity challenges, and other fundamental flaws that kept the previous contenders from being useful. More than one set had low resolution and suffered from blurry text when used as a computer display.
Enter the Nreal Air. Essentially a pair of OLED micro-screens mounted in slightly oversized sunglass frames with clever prisms to control the light you see. The screens are combined with speakers and microphones in the earpieces. There is a USB-C connector on the back of one ear. You’ll find tiny buttons for on/off and brightness control on the bottom edge of the other. That’s it. No batteries, no setup, plug in one cable and go. Connect them into anything that can output video and audio through USB-C, or Thunderbolt (aka Alt-DP Mode) and they work. Most Windows, Macs, Linux, many Android devices, even the Steam Deck, will automatically recognize the glasses as an external 1080P 60 Hertz/FPS display.
The embedded screens bounce light off the prisms straight into your eyes.
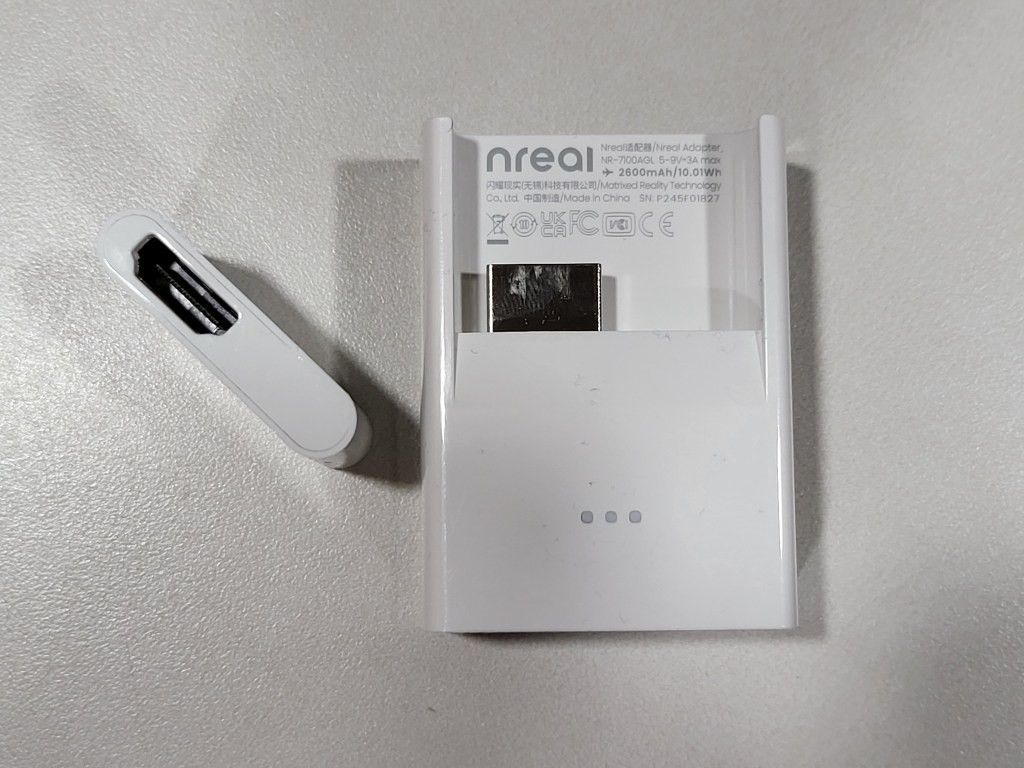
If you want to use them with an iPhone or other systems that need HDMI, you are going to need some adapters. Nreal makes a USB-C to HDMI adapter that is available for purchase separately, or as a bundle. The sixty-dollar adapter is powered by a built-in rechargeable battery to run the glasses since HDMI doesn’t typically include power distribution. I’ve used the adapter to connect the Airs to my iPhone, iPad, Switch, Xbox, and PlayStation without issue. The adapter is designed specifically to work with Apple’s Lightning to HDMI adapter, which you’ll also need to purchase separately.
The adapter provides power and connectivity to any almost any HDMI device. The Apple Lightning to HDMI adapter fits in the slot perfectly.
The Air glasses feel a tad heavier than my normal reading pair when wearing them. The bridge of the glasses’ frame is considerably thicker than standard eye-glass frames. It makes sense, there are two computer screens and a bunch of electronics in there. For me, this thickness makes positioning the nose piece at the bridge of my nose challenging. I spent some time flexing and bending the metal nose piece support to get a good fit. I was eventually able to get them to rest in a comfortable position. The adjustable angles provided by the ear pieces really help.
The AR glasses frames are thicker in every way, but still smaller than I expected.
The Airs connect with a single lightweight cable for both signal and power. They don’t need any headphones or earbuds, all though it is easy to use them to improve the soundstage. They stay in position on my face. The lightweight glasses are comfortable for long periods, I’ve worn them for entire eight-hour work days. They’re always ready and don’t get hot because their power comes from the device.
There are bigger and more awkward looking fashion frames in the world. Counting on the look to be the excuse against purchasing tech gadgets isn’t as reliable as it used to be. These look and feel like the oversized glasses you get after an eye exam. I’ve had the Airs on in the grocery store, while walking the dog, and even at an old-fashioned IRL conference. No one has given me a second glance, that I noticed anyway. P.S. They were a lifesaver for combating boredom while waiting in line at the conference.
They are very similar in appearance to my reading glasses, just slightly larger.
My co-workers spotted them pretty quickly when I wore them at my desk. Several tried them on and I think they were shocked at how good the displays actually are. The biggest drawback has nothing to do with the design or capabilities. People seem to think the four-hundred-dollar base price is too steep.
Most face-worn displays are opaque googles, but you can see through these lenses. There are some obstructions from the prisms if you look for them, but they are generally not in the way. Transparency of the image is controlled by changing the brightness. When turned up to full, the image can be seen outside, but in bright sunlight it helps to face something that provides background contrast. Turning down the brightness allows you to float your display over the real world in a very pleasing way. This trick works best in darker indoor environments, but they work even in our super-bright office without trouble.
For a more private or immersive experience, there is a snap on shield that makes the front view completely opaque. I find that I use them equally in “see-though” and “private” modes. The “see-though” mode is what impresses people most when trying the Air glasses for the first time. This mode is also why they tend to be classified as augmented reality glasses.
I use them more often than I had expected to when I first decided to purchase them. I have them hooked up to my MacBook Air writing this post right now. No matter how my head is positioned, the screen I’m working on is centered in my vision. The ergonomic and comfort advantages of the glasses over a traditional screen are significant. You don’t have to tip your chin down to see the screen while lying in bed, or are fully reclined in the easy chair.
When connected to a MacBook, the glasses can emulate three wrap-around monitors that float in space. I’m using the Nebula app right now and have this post on the center “screen”, the Nreal website on my right monitor, and a Netflix show playing on the left one. I can still see my family members going about their day and my dog begging for a bite of the pop-tart from the table next to me. I can even watch the living-room TV though the floating computer monitors. The experience is surreal.
If you have a Windows PC, you can use them as a stand-alone, duplicated, or extended screen just like any other monitor. NReal has released the beta version of the Windows Nebula app. It supports the same three-monitor trick that the Mac software does. It also allows for a single ultra-wide curved screen to float in your vision too. There are some hoops to jump through to gain access to the Windows Beta see this reddit post for the details: https://www.reddit.com/r/nreal/comments/1306xqs/nebula_for_windows_test_has_finally_begun_join_us/
Walking while wearing the Airs takes some practice, but it’s easy enough and didn’t make me feel queasy. Once you have mastered it, walking the dog will never be the same. I watched an episode of “Drive to Survive” on Netflix while walking the around the neighborhood with my pooch last evening. I ran the cable down my back, under my shirt, and kept the phone in my pocket.
I’ve used them while cooking and grilling. It is super useful to keep the recipe and video instructions you are following hovering above the food while you prepare it. Never having to look away cuts down on the burnt and overcooked results. Watching a show while literally keeping an eye on the burgers is backyard life at its best.
Any mind-numbing task that I normally put off to watch Netflix, can now be done while watching Netflix. Cleaning the house is a whole different experience when you’ve got Farzar floating above the floor you’re vacuuming. Doing the laundry, folding clothes, and doing the dishes (careful with this one, they are not water resistant) are all a little less dreary.
Watching the YouTube video instructions for fixing a broken shifter cable in my car while actually doing it, cemented the glasses’ usefulness for me. I only needed to look at the same area in my vehicle to overlay the mechanic’s video on to my broken part. The repair was much easier to follow along with. The project was also finished in less time since I didn’t have to keep going back and forth between my work and the video.
On family game nights, I have a big screen all my own. The same goes for work, having the glasses to function as a portable three-monitor stack has been extremely helpful. When I am in the field, they function as an instant private workspace and give me the screen real-estate to spread my work out. Even in a small network closet while diagnosing switch gear, I have a full desk’s worth of screens at my disposal. I can’t overstate how huge this is for field engineers.
Most of the people I know that have tried them imagine they will replace desk monitors in the very near future. The glasses themselves are very refined and feel like a fully developed product. The Nebula software can be challenging to work with in the current beta editions. Since the app isn’t absolutely required to use them, it is less of a hinderance than it might otherwise be. If you are the type of person that likes to be an early adopter and doesn’t mind some tinkering, they are fantastic right now. Mine have already earned a full time spot in my bag.
When it rains, it pours in software development. Nreal has made progress with their Nebula app on a couple of fronts this week. First, the bug that prevented multiple monitors in MacOS 13.3 or higher has been patched. Just connect your glasses and launch the software, it will prompt you to install the update.
If you have held off updating MacOS past 13.2 like I did, I recommend that you install the Nebula update and then update your operating system. Once everything was fully updated the software worked just as it did before. There are no new features or functions that I could find, it looks and works exactly the same.
The other, and perhaps more exciting, news is that the Nebula App for Windows is available in a semi-open beta. Semi-open meaning that anyone can get it, but you have to sign up. They’re giving away a Steam Deck handheld console to the person that tests the software on the most qualified systems. To get started visit their Reddit post at: https://www.reddit.com/r/nreal/comments/1306xqs/nebula_for_windows_test_has_finally_begun_join_us/
Downloading the software requires a Discord account. It also requires some pretty beefy hardware at the moment. They are suggesting Nvidia 1650 or higher GPUs. I installed it on my gaming laptop (3070) and it ran without too many issues.
You need admin access to install the virtual monitor driver. The driver is signed with a certificate from a public CA but most of the properties are in Chinese so it is difficult to read. The software is not “installed”, you launch the exe from the folder you extracted the compressed download to. It is an RAR download so you will need 3rd party software to decompress it in Windows (7-Zip, WinRAR, WinZip, etc.).
Once you have it up and running you’ll be able to choose from one, two, three, or a single ultra-wide monitor setup. It has crashed a couple of times on me while trying to play games, other than that it seems to work well on my hardware. You’ll want to carefully arrange all of your monitors once you have made your choice and have the app running. The mouse layout can be odd until you do.
Speaking of games, the refresh rate is 60 FPS and you should enable V-Sync. You cannot set the glasses as your main display so you’ll need to move the game to your glasses after it starts the first time. This can be tricky depending on the game itself, look for a “Windowed” mode in the game’s settings. This should get you a title bar to drag it by.
It is “beta” software in every sense of the term. If you are not used to testing mostly finished software, there’s a good chance you won’t enjoy the current state of this app. As I mentioned, it has crashed a few times, the layout needs to manually adjusted, and there’s an issue where the screen can stop responding to clicks that requires a restart. Happy testing.
A colleague got me involved in an interesting case recently. When one Microsoft 365 user emailed another, the message was automatically forwarded to the recipient’s Junk folder. Both mailboxes were in the same tenant and had primary email addresses in the same domain. Since the messages were from an internal sender to an internal recipient, none of the email perimeter protection mechanisms should have been engaged.
I verified nothing was flagging or scoring the messages. Exchange’s message trace system showed the email being delivered to the recipient’s inbox. There were no flags or indicators of re-direction in the message’s header. To me this indicates the issue was happening after the message reached the recipient’s mailbox.
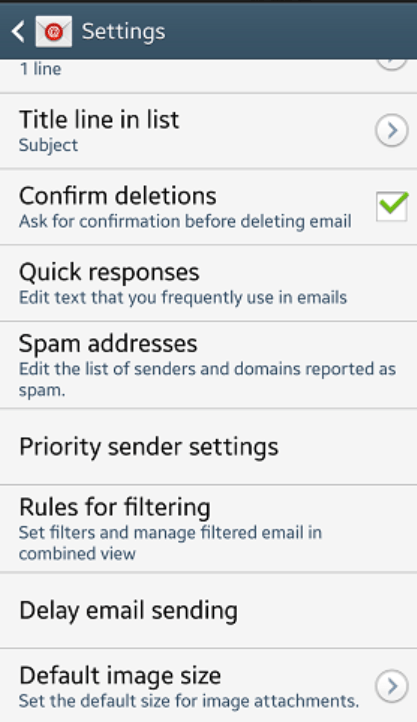
To make a long story short, I opened OneNote and jotted down a list of everything I could think of that had the ability to direct a message to the junk folder. On that list I included “native phone apps”. I decided this was the next thing to check. I logged on to the Microsoft 365 Azure Active Directory Admin Console and checked the sign-in logs for the user. Sure enough, I could see that the Samsung Mail App was authenticating on a regular basis.
The Samsung Email app has its own SPAM and rules engine just like Outlook does. Open the app, click the menu button, then settings, scroll down and you will find SPAM settings. Lo-and-behold, the sender’s email address was in the blocked list.
If you’re struggling to understand how your messages are moving around when there are no rules in Outlook and your security systems aren’t interfering, check for native phone apps. There are more of these out there than you might think. Smartwatches, phones, tablets, even smart cars have native email apps capable of their own rules and settings. These application’s actions are not always immediately evident in message logs and tracing.
If things go according to plan, SpaceX will launch “Starship” on its first test flight. SpaceX is planning on going for it around 9 a.m., but the schedule is “dynamic and likely to change”. If it does go off, you can stream it live on multiple YouTube space related channels. The official one is @: https://youtu.be/L5QXreqOrTA . The Rocket is being built to send people back to the moon and eventually on to Mars.
I jumped on the 2080 Ti soon after it launched. Like everyone who purchased one in those early days, I paid more than I should have for the then cutting-edge hardware. Surprisingly, it lived up to the hype. At more than four years old, the 2080 Ti is still a strong card.
The limitations of its HDMI 2.0 connector prevent it from fully utilizing the newer models of 120 Hertz, 4K TVs. Of course, this only matters if you are using a HDMI 2.1 enabled TV in the first place. The HDMI 2.0 spec holds 4k performance to sixty frames per second and doesn’t work all that well with variable refresh rates either.
HDMI SPEC
Max Throughput (Gigabits per second)
1.0
4.95 Gbps
1.3
10.2 Gbps
2.0
18.0 Gpbs
2.1
48.0 Gpbs
I decided to try a DisplayPort to HDMI adapter to allow the 2080 TI to push my screen to its full 120 frames per second. I picked up a UPTab adapter for fifty bucks on Amazon. There are less expensive models available, but I’ve had good luck with UPTab in the past and decided to stick with them.
The adapter works great except for two minor issues. The first is that it gets very hot. To the point that it suffers from performance issues. To correct the problem, I point a fan at it. The other issue is that, at least in my case, it does not support variable refresh rates. So, I leave v-sync enabled to compensate.
Outside of those two issues, the adapter lets my 2080 Ti run at 4K 120 FPS with HDR enabled. I imagine the fifty dollars I spent on the adapter will get me at least another year or two of use from this GPU. Other adapters with the same function may produce better results, but I am happy with this one. https://www.amazon.com/gp/product/B01B6ZOMIS/ref=ppx_yo_dt_b_search_asin_image?ie=UTF8&psc=1
If you use the Nebula software with your Air glasses to emulate free floating monitors, you should be aware that the latest MacOS update is not compatible. The glasses will connect and work as a single display. Launching the software results in a black screen.
Recently, I encountered a situation in which a Microsoft 365 account had been deleted. Then, a new account with the same name was created and synchronized from the local domain. The user’s local profile and other software were linked to the new account and everything was working. The only issue was the mailbox missing all of its content.
Believe it or not, this isn’t an uncommon situation in my line of work. I looked online for a script and found lots of examples. Much to my surprise, I struggled to get any of them to work. Rather than try to troubleshoot and fix one , I opted to write my own. While writing it, I believe I discovered the issue. Exchange Online does not except the ExchangeGUID as a name/value pair. It has to be plain text.
Below is what I came up with. You will need to have the Exchange Online PowerShell Module installed on your computer. Open an Admin PowerShell Session and run the one-liner below to install it. You may also be prompted to update PowerShell itself if your computer has fallen behind in updates.
Install-Module ExchangeOnlineManagement
Save and run the script below. First, it will prompt for the tenant’s modern authentication global admin credentials. Next, it will prompt you for the account your are working with’s identity. You should be able to use the first and last name, UPN, or alias address. The script will use that data to locate the Exchange GUID for the source and target mailboxes. Finally, it will create and run a mailbox restore request and show the status.
# Restore Soft Deleted Mailbox to a new Matching Account in Exchange Online
# Assumes the Alias for both accounts is the same

#Sign in to Microsoft 365 Exchange.
#Requires Microsoft Exchang Online PowerShell
$GlobalAdminUPN = Read-Host "Enter Global Admin UPN account"
Connect-ExchangeOnline -UserPrincipalName $GlobalAdminUPN

#Aquire the ExchangeGUID attribute for the source and target mailboxes
$UserAlisas = Read-Host "Enter mailbox identifier"
$SourceMailboxGuid = [string](Get-Mailbox -SoftDeletedMailbox $UserAlisas).ExchangeGuid
$TargetMailboxGuid = [string](Get-Mailbox -Identity $UserAlisas).ExchangeGuid

#Restore Softdeleted mailbox over the new Account's mailbox

New-MailboxRestoreRequest -SourceMailbox $SourceMailboxGuid -TargetMailbox $TargetMailboxGuid -AllowLegacyDNMismatch

#Check the restore job status
Get-MailboxRestoreRequest | Get-MailboxRestoreRequestStatistics
Security firms Crowdstrike, Sophos, and SentinelOne have warned that a digitally signed version of the soft phone has been turned into a trojan. The compromised software has been installed on both Windows and Mac based computers.
So far the most common symptoms are beaconing (reaching out) to the perpetrator’s infrastructure and spawning live command shells. The attack is on-going and state level involvement is suspected. In some cases hands on keyboard remote activity has apparently been observed.
Valve’s Steam Deck has been evolving at a rapid pace. At launch, there were just a handful of games that were certified for the Linux-based system. Proton, the software bridge that runs Windows titles on the device’s Linux operating system, worked for some games. Not so much for others.
Fast forward and we now see numerous titles certified to run on the Steam Deck. Proton has been updated and improved in countless ways over the last few months. More games are auto recognized and run without issue or complex setup. There are still struggles with games that feature anti-cheat solutions like Destiny 2. As in, most competative multiplayer games require that you abandon SteamOS and install Windows.
The Story
The problem that kicked this post off for me was EA recently ending support for the Origin game launcher. Steam Deck players with EA’s games (like SIMS4, the $1000 + monster I can’t afford to re-purchase) were using the Origin launcher running in Proton to access EA’s catalog. It was a clunky install process, but it worked. The key was that you downloaded and used a controller template. The magical template mapped the Deck’s sticks, trackpads, and buttons to the keyboard and mouse inputs the game needs. Without this functionality, you would need an external keyboard and mouse to play.
I started up the Origin launcher and was presented with a forced update to EA’s Desktop App (their new launcher). I clicked ok and was surprised to see the update install and the game launch. It even played and saved. Stuff went south when I exited. When I tried to open the game again, nothing worked.
I edited the Orgin shortcut in Steam to point at the new EA Desktop (EADESKTOP.EXE) and forced it to the Proton Experimental mode. This let the game start up far enough to sign-in to the new EA desktop app but when you tried to open SIMS 4 it errored out saying that it was “missing services”.
Next I tried installing the new EA Desktop separately, as an app in Steam and got it running. I attempted to copy that installations’s files (including the services folder) over the same directory in the recently upgraded SIMS 4’s location. I had hopes that I could avoid re-installing and dealing with the saved games.
It was close, but no joy. The game wouldn’t get out of the startup screen, the green diamond spins forever. I’m used to dealing with SIMS4 and tried all the tricks. I even cleared the options.ini and deleted the Proton files. Nothing helped.
Eventually, I re-installed SIMS 4 using a pristine, working installation of EA Desktop. I opened SIMS 4 and played through long enough to save. I overwrote that save location with the save folder structure from the failed upgrade’s save folder. All of this lets the game play in Desktop mode. Without the fancy controller template that makes it possible to play the game on the go. If you open the game from Game mode it never fully launches, displays various errors about your video card, etc.
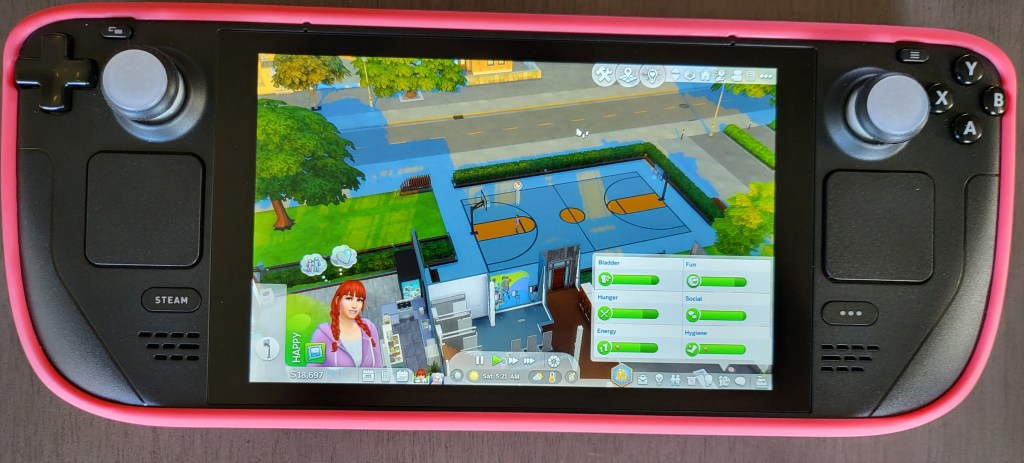
Eventually, I was able to get the game to run in Desktop mode with the controller template from the previously working Origin install. Read on for step by step instructions. Other wise, this tale has a happy ending. The game plays using the controls built into the Steam Deck. There’s no extra interpretive layer like Lutris slowing it down or breaking on-line functionality (item downloads).
Runs like a champ but is an uphill climb to get there.
Step By Step
Warning: This process is complex, tedious, and requires interacting with data that may not be backed up. Variations in software may result in your experience and results being different than mine. Proceed at your own risk.
Step one is to install all updates in both game mode and Desktop mode. I highly recommend connecting an external mouse, keyboard, and monitor if possible. If not, pressing the Steam button + X opens the on-screen keyboard in Desktop Mode. To visit desktop mode; Steam button-> Power-> Switch to Desktop-> Wait for the initialization.
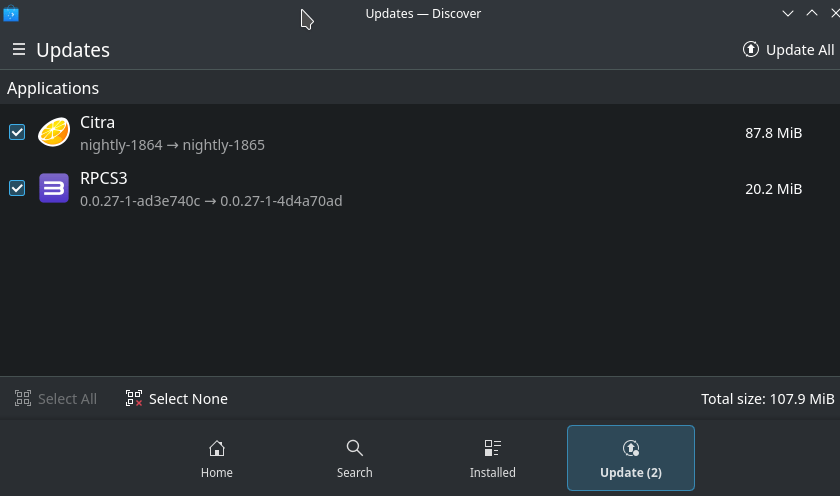
When desktop mode (a full KDE Linux GUI Shell) loads, open the Discover application from the icon that looks like a blue shopping bag, then click the updates button. Use the Update All button in the upper right. Reboot the Steam Deck then check for updates again. Continue until there are none left. Always check for updates is the golden rule of PC gaming.
Desktop mode can be configured to update automatically. Look in the Settings application in the start menu.
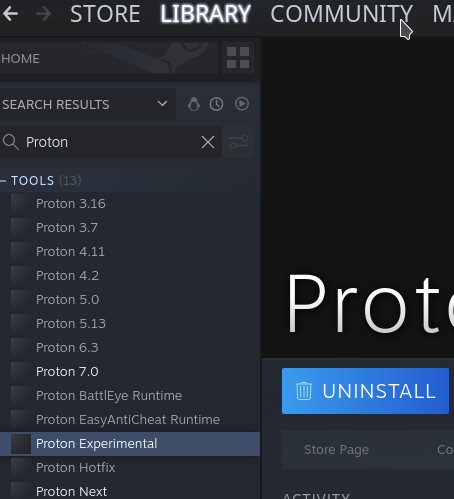
In Desktop mode, open Steam (usually running in task tray) and go to the Library. Make sure you are showing all software and search for “Proton”, install Proton Experimental if it isn’t already.
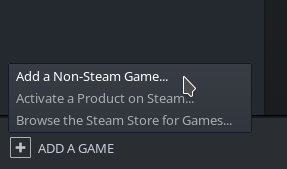
Open the web browser and visit EA’s site to download the new EA Desktop installer (for Windows). https://www.ea.com/ea-app. Once that download completes, return to the Steam Library. Use the menu at the bottom to Add A Game and choose Add a Non-Steam Game from the menu.
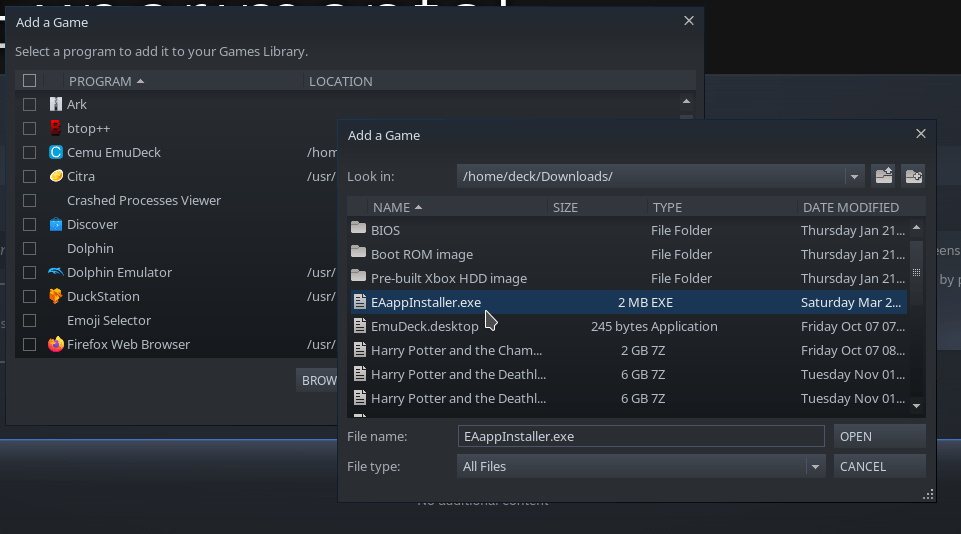
Browse to the /home/deck/downloads folder, set the file type selector to All Files and click the file EAappInstaller.exe
Choose Open, then on the next screen verify the EAAPPINSTALLER.EXE is still selected and click the Add Selected Programs button.
Now back in the Steam Library, find the app you just added in the list of software (check filters if you don’t see it) and select it once. Click the COG icon on the right of the title screen and go to Properties. Rename the shortcut to EA Desktop (do not change the paths yet).
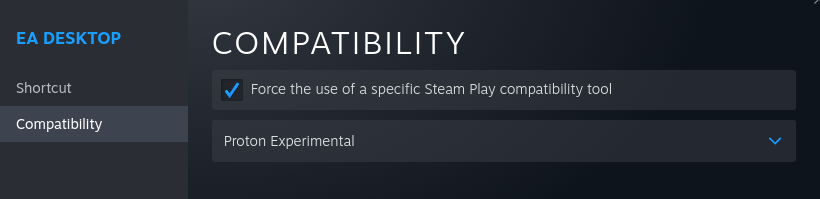
Go to the Compatibility menu and check the box to Force the use of a specific Steam Play compatibility tool and set the drop down to Proton Experimental.
Click the small X in the right hand corner of the Properties screen to close it and click the Play button in Steam on your EA Desktop shortcut. It should open and begin the installation of EA Desktop. Take the default settings and Next, Next, Finish your way to the end. When it opens, sign-in with your EA account user name and password.
Wait for the EA Desktop App to fully install and sign-in. Be sure that it is operating normally (touch-screen controls mouse if pads don’t) then close it. Make sure you click the stop button in Steam to fully exit the application. You should not see the Red EA App icon next to your clock. If you do, the app is still running. Reboot your Deck to force it to close.
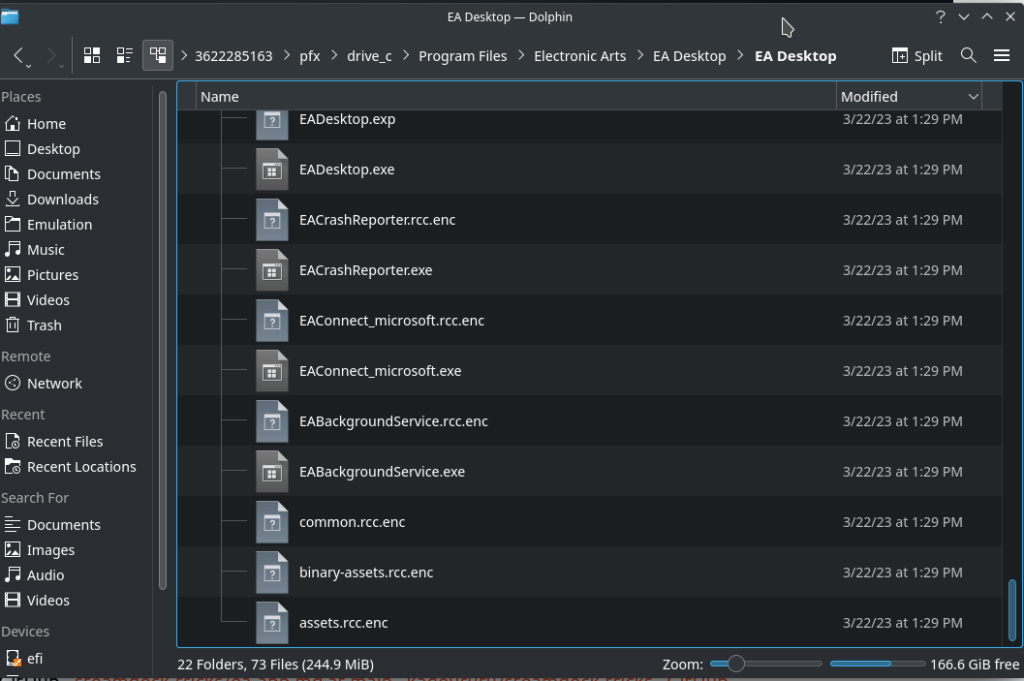
Next we will be altering the path of the shortcut to point at the EA Desktop App instead of the installer. I recommend locating the file in the Dolphin Explorer before trying to edit Steam. Open it from the Folder icon on the task bar or look in the Start Menu. Browse to /home/deck/.local/share/Steam/steamapps/compatdata and sort the files by Modified date. Go into the newest folder, it should be your EA Desktop App install. The folder name will be a long series of numbers mine is 3622285163, but I think they are randomly generated (screen shot below).
Open the newest number folder and continue to pfx/drive_c/Program Files/Electronic Arts/EA Desktop/EA Desktop/EADesktop.exe do not open the file, just verify that its there and note your app ID number. Copy the path if you are able to (external keyboard and mouse).
Now still in Desktop Mode, open Steam and go to the Properties of the EA Desktop App again. Use the browse button and make your way to the EADesktop.exe we located above. Selecting the exe should automatically update the Start In folder, if not set it to the same folder.
Now close the Shortcut screen with the X in the right corner and Play the EA Desktop App from Steam. The EA Desktop App (not the installer) should open and sign-in (assuming you saved your username and password). Use the EA App to Install SIMS 4 just like you would on any other system.
Even if your are upgrading from Origin and already have the SIMS 4 installed, you still need to re-install it from this working version of the EA Desktop App. I tried multiple ways to get the system to recognize the already installed game without success (see story section above). I got a little further each time and could probably make it work, but I would be concerned about stability and future updates or modifications.
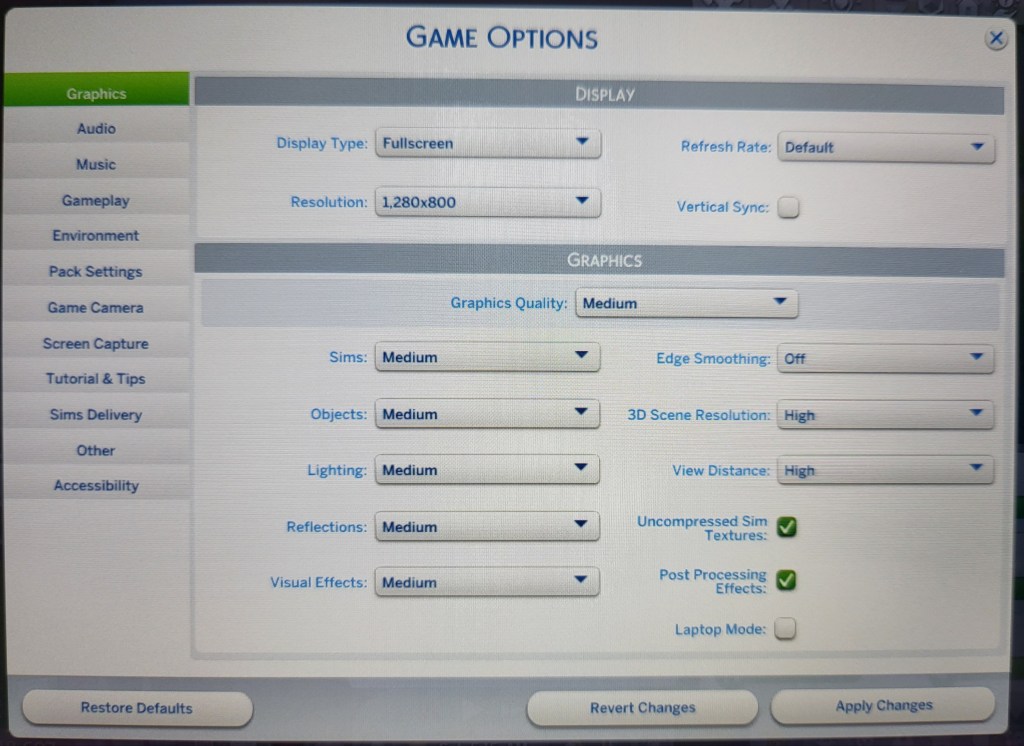
When the download and install finishes, open/play SIMS 4 from inside the EA Desktop App. You need to play the game through basic character creation and picking your first house before you can save which we need to do once. Again, I am assuming that you have connected an external mouse and keyboard. We don’t have a template loaded for the Deck’s controls yet. Once you get far enough to save the game hit escape and open the options menu. Set the graphics options to your liking close that window, then and save the game (this creates the folder structure we need, do not skip).
Medium settings seem to work well.
Close SIMS 4.
If you are using this guide to install EA Desktop and SIMS 4 for the first time you can skip down to configuring the controller template.
If you are upgrading from a failed forced update we have some file work to do. Make sure the EA Desktop App is fully closed (should not see app tray EA icon). Open Dolphin Explorer and find your original install folder ID.
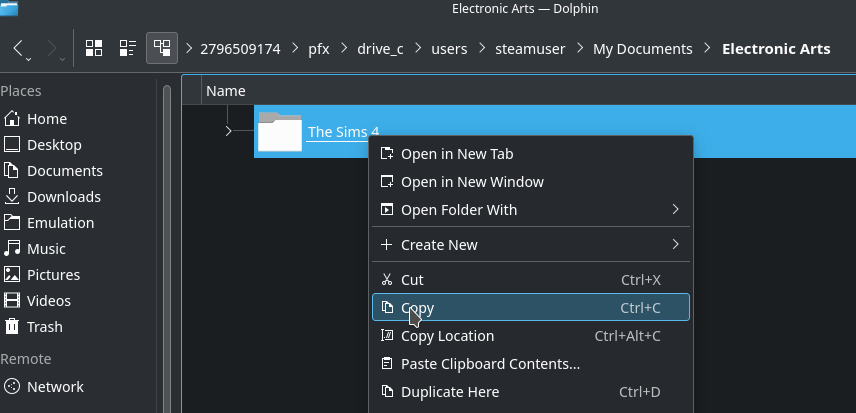
If you still have the Origin shortcut in Steam, go to its properties and copy the path to the folder ID number (/home/deck/.local/share/Steam/steamapps/compatdata/2796509174/), you can paste it in Dolphin’s address bar and go straight to the location. If the paste trick gives you trouble just note the folder ID number and browse to it. Then continue on to pfx/drive_c/users/steamuser/My Documents/Electronic Arts/ you should see a SIMS 4 folder. That is where your saved game and downloaded items are located. Right click on the SIMS 4 folder and copy it.
Paste the folder into the corresponding location for your new working SIMS 4 installation. I like to rename the existing SIMS 4 folder to (blank install) and keep it just in-case I need a base line later. Open the EA Desktop App from Steam and start the game. You should be able to resume playing where you left off.
At this point you should have a fully functioning install of SIMS 4 and the same technique should allow you install basically any other EA Game. You will always use the shortcut to open EA Desktop and start the game from there.
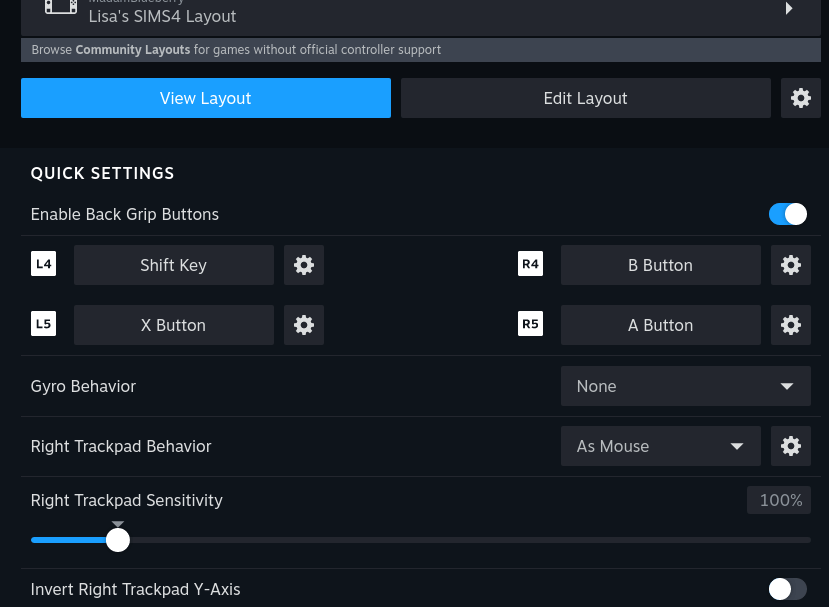
Desktop Controller Template:
To setup the controls in Desktop mode is relatively easy. In Desktop Mode, Open Steam and click the COG for EA Desktop App. Go to Manage -> Controller Layout. Use the menu to Edit your layout. This can be very, very tedious to do manually due to the sheer number of controls used by SIMS and PC games like it. Fortunately there are plenty of community templates to get you started.
This layout will be used by all EA Games. Keep that in mind while choosing or creating it.
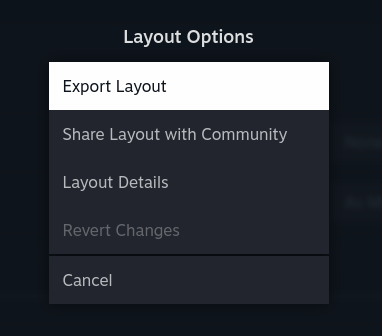
If you are coming from a previously working Origin installation, you can export those controls you loved, as a template. From there you can import them to the new EA Desktop App. Use the COG next to Edit Layout to access the Export function they’ll show up in the search menu for other games after you’ve saved them.
Delete the old failed install folder using Dolphin to free up several gigabytes of space after you have verified your save games are working from new location. That’s as far as I have taken the project. The game runs, and my thousand plus hours of save files are there. If you enter cheat codes in SIMS 4, keep a Bluetooth keyboard handy when you first start the game. I have not found a workaround for this. The on-screen keyboard is not able to enter text into the game’s cheat box. If you know of a fix please hit me up in the comments.
I suspect it is possible to create some type of shortcut directly to the games themselves and use the launch options to ensure EA is running but I haven’t gotten that far. Hopefully the fancy things in Proton Experimental that let this technique work will make their way to the Game Mode run times in the near future. Even if they don’t, the game is fully playable and portable this way.
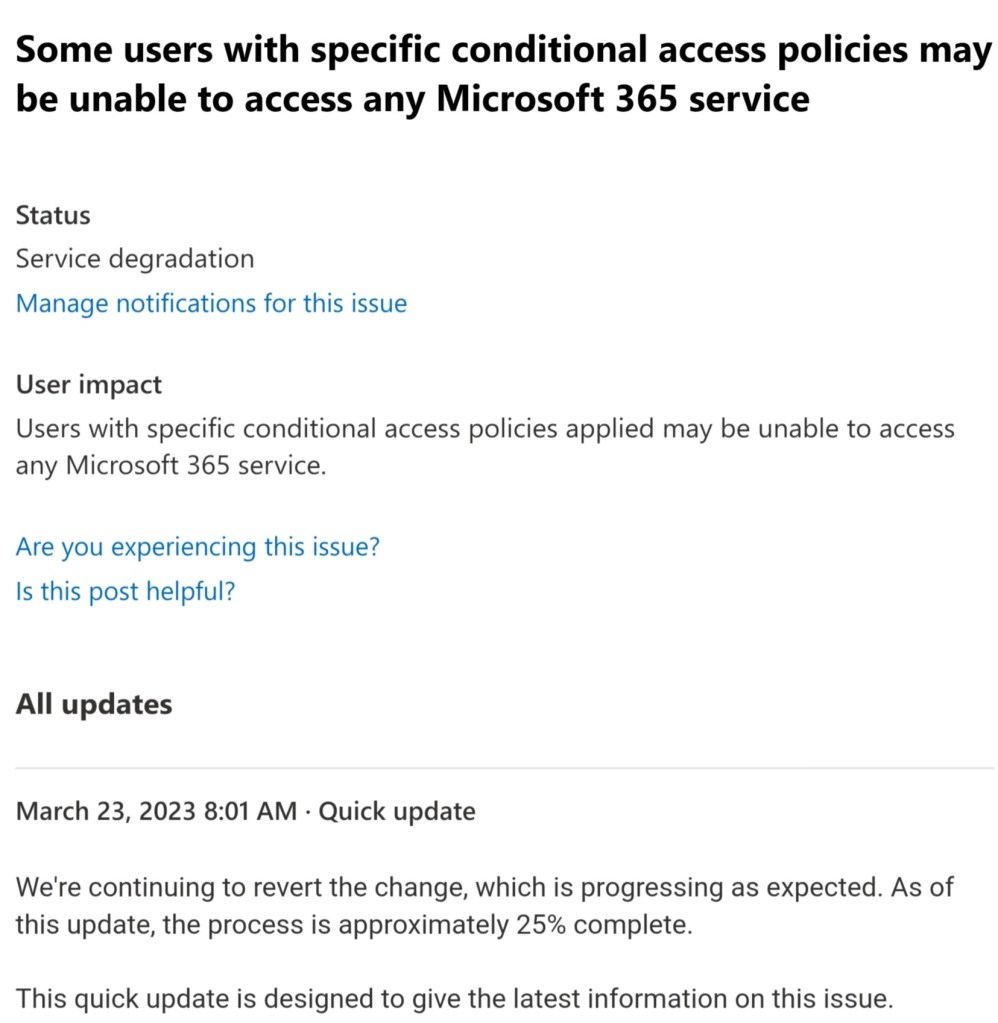
If your organization utilizes conditional access rules (aka Geo-fencing), you may be experiencing issues accessing the platform this morning. If you suspect this outage is impacting your productivity, contact your IT support.
At the time of this post, Microsoft was estimating that the recovery process is 25% completed. You can access status reports by visiting the Health section of your Microsoft 365 admin portal.