In a previous article I wrote about the first phase of being able to synchronize the Samsung notes from your phone with OneNote. It worked, but was a little clunky, mostly because you could only view the items in Outlook Web Access.
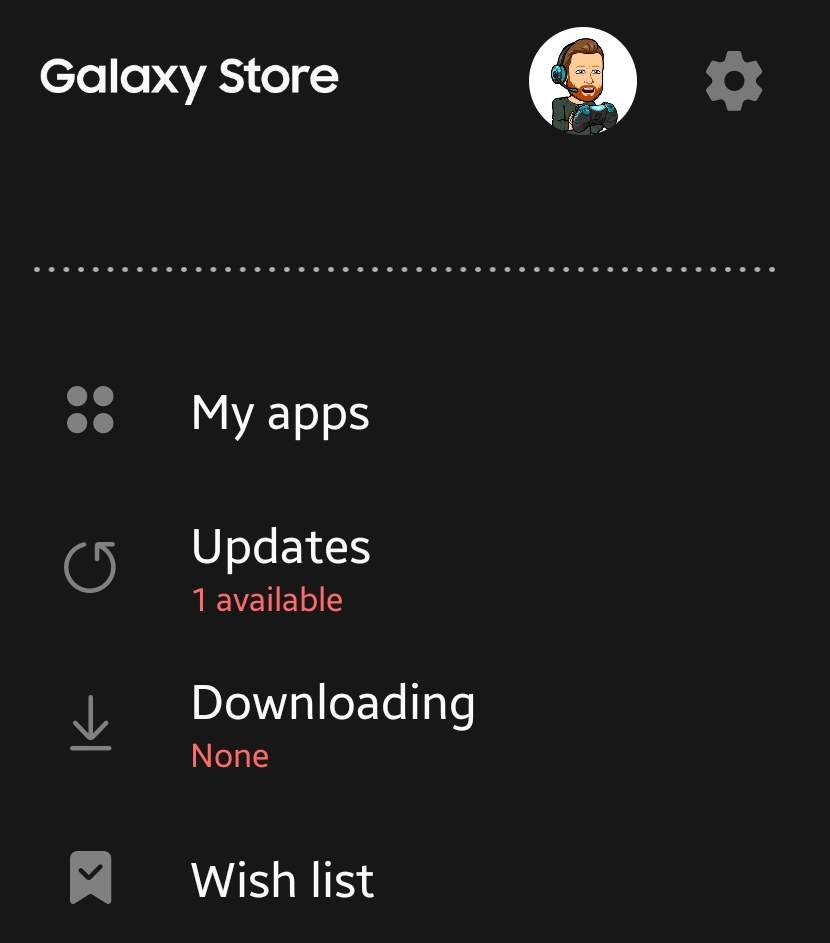
I’m happy to report the synchronized notes feed is now viewable in the Windows 10 OneNote app. To get started update the apps on your phone and Windows system. Open the Samsung Galaxy Store, tap the hamburger menu button then tap updates and install them all.
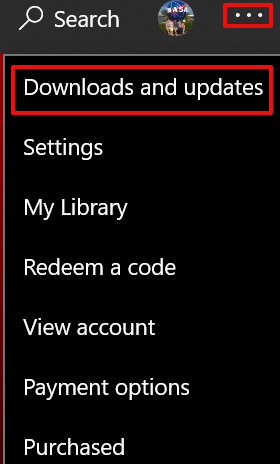
On your Windows machine, open the Microsoft Store app. Click the three dots menu in the upper right, then click downloads and updates. Click the “Get Updates” button and install them all. Depending on your update settings you may need to do this multiple times to get them all.
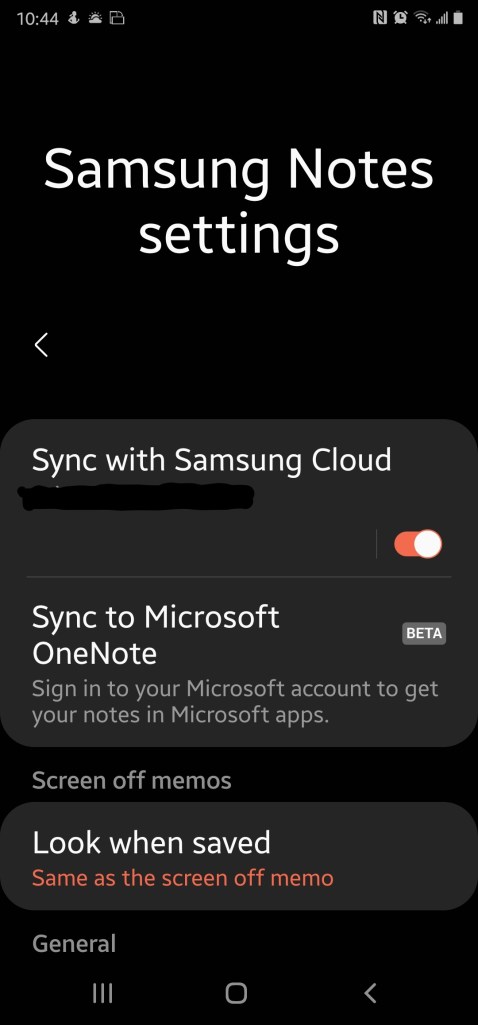
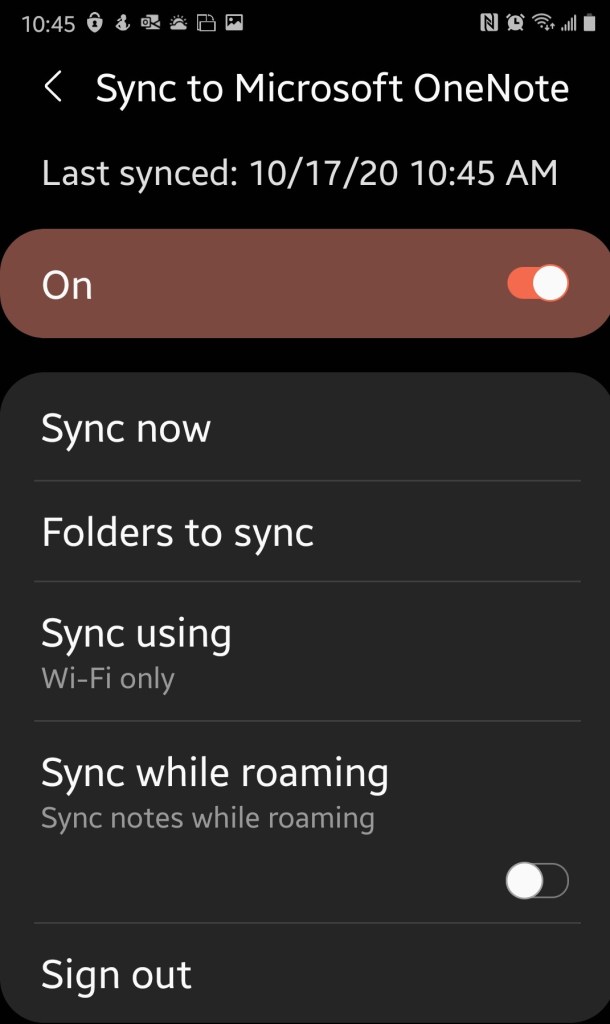
Configure the Samsung Notes app on your mobile device. Open it and hit the options icon. You should see “Sync to Microsoft OneNote Beta”, toggle it on and sign in with the Microsoft Account you want to share notes with. You’ll also need to select the folders who’s notes you want to sync. I recommend tapping the sync now button just for good measure.
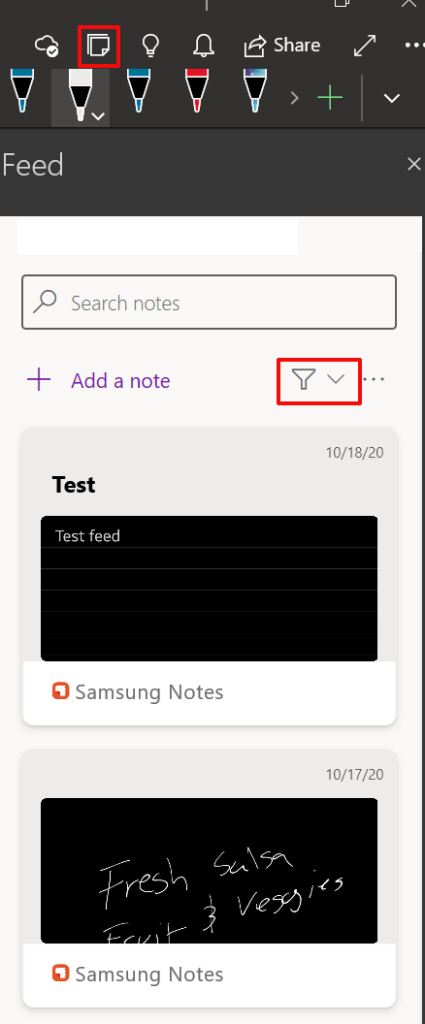
Now open the OneNote app on your Windows computer and select the “Open Feed” button on the right side of the tool bar. Depending on your security settings, you may be prompted to sign in. Use the same Microsoft account that you set up in the Samsung Notes app. If you don’t see your Samsung notes, click the down arrow next to the filter symbol and select “All-Notes” or “Samsung Notes”.
Click a note to see the entire entry. You will also be able to copy the item to your clipboard. The synchronization of Samsung notes is one-way. When you copy them to your clipboard they paste as an image. I noticed some trouble with the copy / paste function when holding my Windows tablet in portrait mode. This isn’t what I would consider to be true synchronization, but it is serviceable and a step in the right direction. At least we can see the Samsung notes in OneNote now.
In a previous article I explained how to use PulseAudio with XRDP to allow your Ubuntu Hyper-V VM to pass audio through your host machine’s sound system. It has been brought to my attention that the instructions do not work for everyone.
I believe most of the people that have issues are choosing the 20.04 version of Ubuntu when deploying their Hyper-V VM. The 20.04 edition of Ubuntu is not running XRDP (Linux RDP Server) by default. When you connect to it from the Hyper-V manager you are directly viewing the machine’s console. PulseAudio requires an enhanced XRDP session to work.
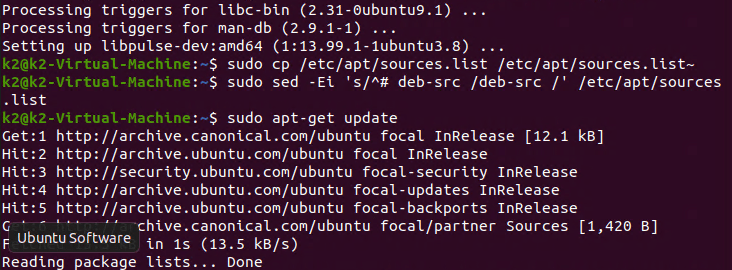
I’ve spent a lot of time getting pass-through sound working in 20.04. Deploy the VM as outlined in the original document choosing the 20.04 version instead. Once you have completed the operating system installation, run the software updater (in the apps menu) until everything is patched to the newest version.
Please Note: These instructions will not work if your VM is configured for auto logon. PulseAudio runs in the user space and requires active logon to work. It would be possible to convert the daemon to a service, but that is beyond the scope of this post.
Use Hyper-V quick create to deploy a VM
Once Ubuntu is installed and up to date we’ll need to manually configure it for an enhanced session. Open a terminal and run this command to download the configuration script:
You will be prompted to logon to your VM with XRDP, but it will not work until you reboot. Use the button in the tool bar to return to the basic session and power off the VM.
The highlighted button will return you to a basic session so you can shutdown the VM.
Open PowerShell on your host system and run the command below, where the name of your particular VM is between the quote marks.
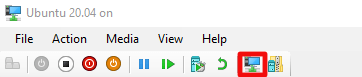
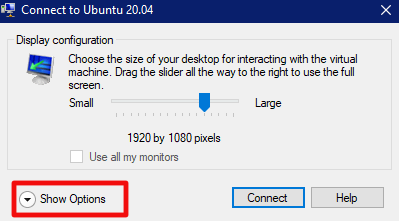
Power on the VM and you will be prompted by the RDP client to select your monitor size. Logon to XRDP with your Linux credentials and the desktop will load. Now that we have installed and configured XRDP we can proceed to install and configure PulseAudio.
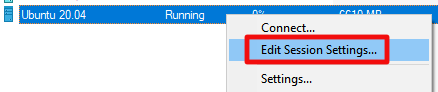
Occasionally you may stop being prompted to change your monitor size, etc. by the RDP client when you connect to your VM. There is a check box that can accidently be selected that stores your current settings for all future connections. To get the controls back, right click on your VM in the Hyper-V manager and then click Edit Session Settings.
Open a terminal.
Install the pre-requisite libraries with this command:
Now we need to get the source code for pulse audio and compile it. Run the following command groups one after the other. Each will take some time to complete.
sudo apt build-dep pulseaudio -y
cd /tmp
sudo apt source pulseaudio
pulsever=$(pulseaudio --version | awk '{print $2}')
cd /tmp/pulseaudio-$pulsever
sudo ./configure
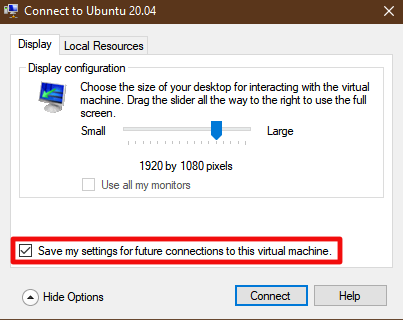
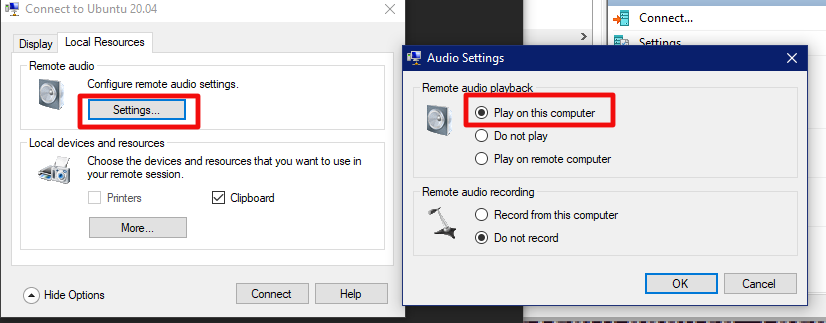
Power off your VM and wait until the snapshot merge in Hyper-V completes then power it back on. When you connect to it this time, use the “Show Options” down arrow and then click the “Local Resources” tab. Click the settings button and then choose the option to play back audio on this device.
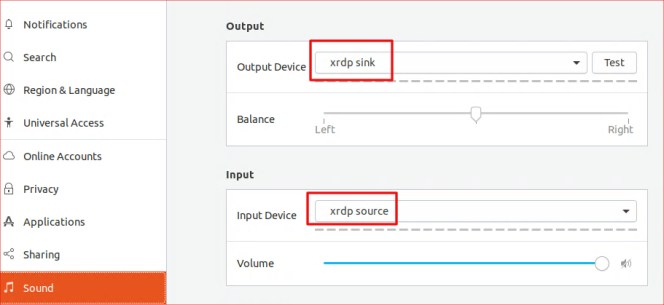
Now open the setting applet on your Ubuntu VM and go to sound. Use the drop down to select xrdp-sink as the audio device. Sometimes the option will be missing. Generally, if you wait some random amount of time the daemon will start on its own, I’m not sure what causes the inconsistency.
If the option never appears or you get tired of waiting. Close the Settings applet and open a terminal. Run: pulseaudio -k to start the daemon yourself. Then use settings to adjust the output device again.
The year 2020 has been a rough one for so many reasons. Pandemics, economic disasters, political division, and natural disasters have made it one of the darkest years in memory. If there is a silver lining, for me it was all the great technology that made its way to market this year. Before we discuss graphics cards, headsets, and laptops we should all recognize that the best technology of 2020 is without a doubt the Covid-19 vaccines that are beginning to be distributed. A big round of applause for the companies, scientists, doctors, technicians, nurses, and support personnel that have made them a reality. What a relief to society they will be.
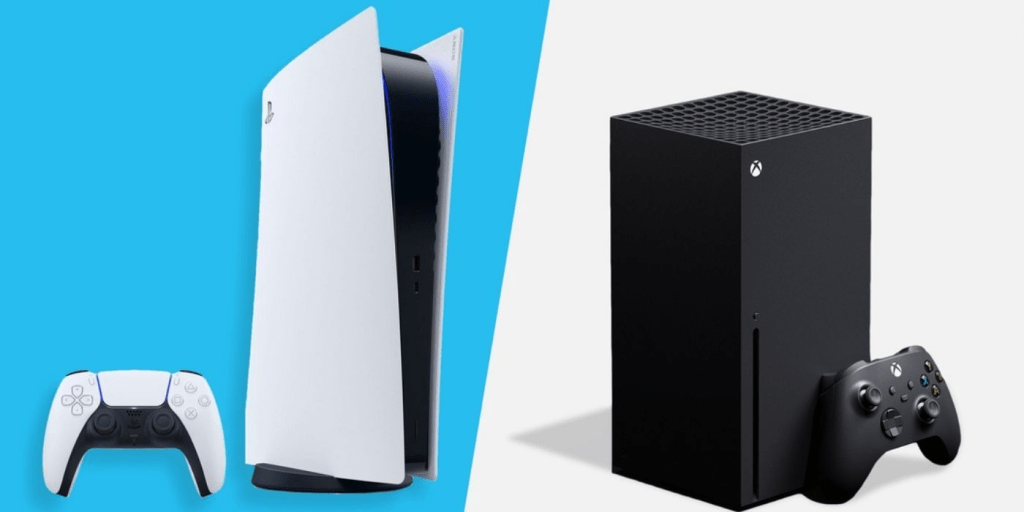
Excluding protection against one of the deadliest pandemics of the last century, there was some great gear and software released this year. Microsoft and Sony let their next-gen consoles out of the gate and man can those ponies run. If you were lucky enough to get your hands on one, you can revel in the knowledge that you’re using one of the most powerful personal computing devices ever created.
The PlayStation 5 and Xbox Series X are super-consoles
In June of 2006 the ASCI Red supercomputer was disassembled. ASCI Red was the first system to breach the teraflop speed barrier. Before ASCI Red was built, it was widely believed that a trillion calculations per second was an unreachable goal. It was ultimately achieved by linking thousands of processer and memory assemblies called compute nodes into a volleyball court sized system. That $500.00 wonder-box sitting under your TV can process your game at more than twelve teraflops.
The next-gen consoles get their supercomputer power from the advanced graphics processing units (GPUs) that use the same technique, thousands of cores linked together. Instead of a room, the cores of a GPU fit in one piece of silicone. Both AMD and Nvidia have released their most powerful GPU’s ever. Changes to the architecture of both manufactures allow for 8K graphics, ray tracing, extreme frame rates, and both will push the envelope of what is possible in the near future. Unfortunately, supply is not keeping up with demand at the moment and the cards are very difficult to get your hands on.
AMD and Nvidia have both released their most powerful graphics cards this year.
Samsung and Apple gave us the most powerful smartphones created to date. With twelve gigabytes of RAM, an eight core CPU, and at least one-hundred and twenty-eight gigabytes of storage the Galaxy Note 20 Ultra is more powerful than many of today’s laptops. Likewise, Apple’s iPhone 12 is the ultimate in mobile technology. Both devices sport an array of sensors and cameras that would make Spock jealous. They’re truly marvels of the modern world.
The Smartest Phones Made Yet
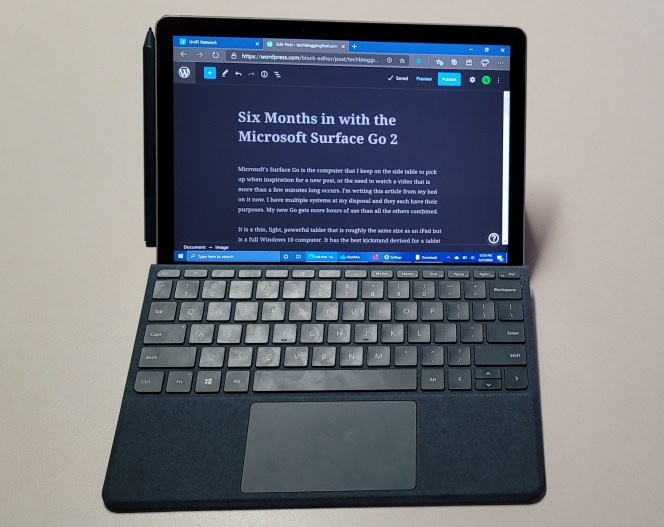
Microsoft created my favorite 2-N-1 system of all time. The Microsoft Surface Go 2 is a miniaturized edition of the wildly popular Surface Pro. With a 10.5 inch display, pen support, and that fantastic kickstand, the Go is made for couch time. I’m writing this article on one now. Fast, light, and running Windows 10 they’re an almost perfect machine for IT workers, college students, and anyone else that needs a computer that is roughly the same size as an iPad.
Mine goes everywhere with me.
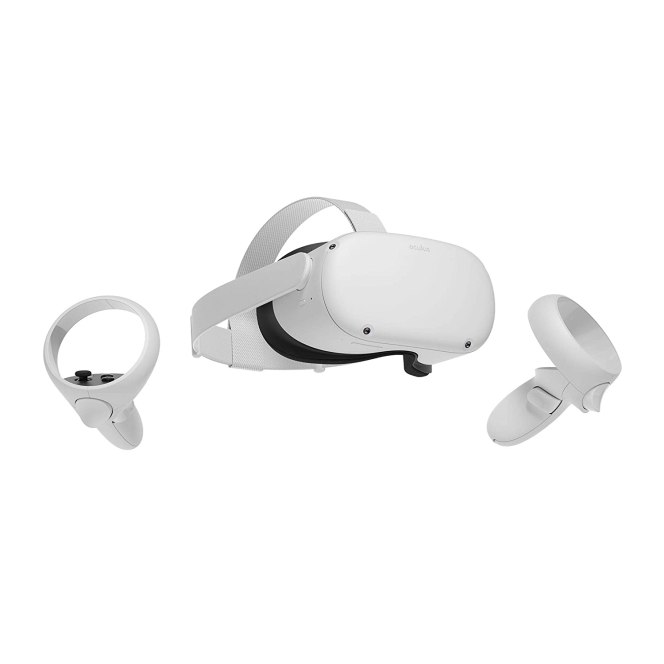
My absolute favorite piece of gear from 2020 is the Oculus Quest 2 VR headset. It is simply amazing, powerful, easy to use, world altering, technology for less than $500.00. VR is so much more than games. It is the ability to visit new places and have new experiences that aren’t easily attenable or even possible in the real world. Having a Quest 2 has made this quarantine infinitely more tolerable for me. Like some of the other items on this list the Quest 2 is difficult to find, but keep trying it is worth the trouble.
Escape quarantine
These lists are always subjective. If you look back through all of the technology from this year there is an astounding amount. Sony released a great OLED TV, Tesla gave us the Model Y, and Apple produced the M1 all of which will have an impact on our way of life. I get the impression that technology manufactures intended for 2020 to be a pinnacle year. Their plans were overshadowed in the end. Tell us what your favorite 2020 tech was in the comments.
Every once in a while I find myself needing to review or edit code on my mobile. It never fails, I’ll be out with my family and the solution to some problem I have been struggling with will pop into my head seemingly from nowhere. The other common scenario I experience is somebody emailing me a script to review, or fix when I’m not near a computer.
I’ve tried various solutions over the years. Until recently my go to option was to RDP into my desktop and launch Visual Studio. VS more or less works fine via RDP, but even the screen on my Galaxy Note feels too small to be fully effective. I have to zoom in and out on sections of code constantly and the syntax can be hard to follow.
I set out to find a code editor that would run on Android. If you’re considering the same there are a few things you should know. Android editors are not full integrated development environments, they lack a console for testing and debugging code. They also lack compiling facilities. They are editors in the strictest sense. There are a few apps in the Google Play store that claim to have a console and or compiling, but the ones I tried could only “debug” or “compile” HTML.
Mobile code editors do have a couple of major advantages over straight up text editors. The most important one is syntax support. The feature allows you to select your language and then the app will monitor for the correct use and highlight mistakes. File association and Search/Replace are also very handy.
File association makes opening your scripts and apps simple.
I tested several of the code editing apps in the Play store and only really liked one of them. Rhythm Software’s Code Editor is ad supported (free), but a $2.99 in-app-purchase removes them. It supports more than a hundred languages including PowerShell. I assumed that the auto-complete would be fairly limited, but it is very useful.
The auto-complete library is immense.
Code Editor has built-in support for cloud services like OneDrive, Dropbox, and GitHub. Sign in with your credentials and the service will appear in the open and save dialogs. It will also be added as a shortcut in the main menu.
Flexible storage support is nice.
Tab support let’s you easily work on multiple files. The highlighting and theme options let you customize your experience to the Nth degree.
Themes, tabs, and high-lighting make the job easier.
For my needs the app is just about perfect. It isn’t going to be replacing Visual Studio, but when I have needed to edit a few lines while on the move it has been a lifesaver.
SolarWinds is an Austin Texas based company that makes a lot of tools used by IT departments the world over. Their all-in-one monitoring suite known as Orion has been the victim of a supply chain attack. In what experts are calling a Nation State funded hack, updates to the software over the last several months were spiked with malicious code.
If your organization is running an infected edition, external entities may be able to gain full administrative access to your systems remotely. As with any event of this type, certain environmental conditions must be true for the access to be allowed. SolarWinds is recommending an immediate upgrade to the newest version and are aiming to release an additional hotfix on Tuesday December 15th. Review the SolarWinds page on the subject for new announcements, updates, and instructions. Security Advisory | SolarWinds.
Check your versions and spread the word. SolarWinds reportedly has as many as 300,000 Orion customers. FireEye, the security firm that discovered the hack, as a well as SolarWinds themselves, and several government agencies are attempting to notify as many as possible.
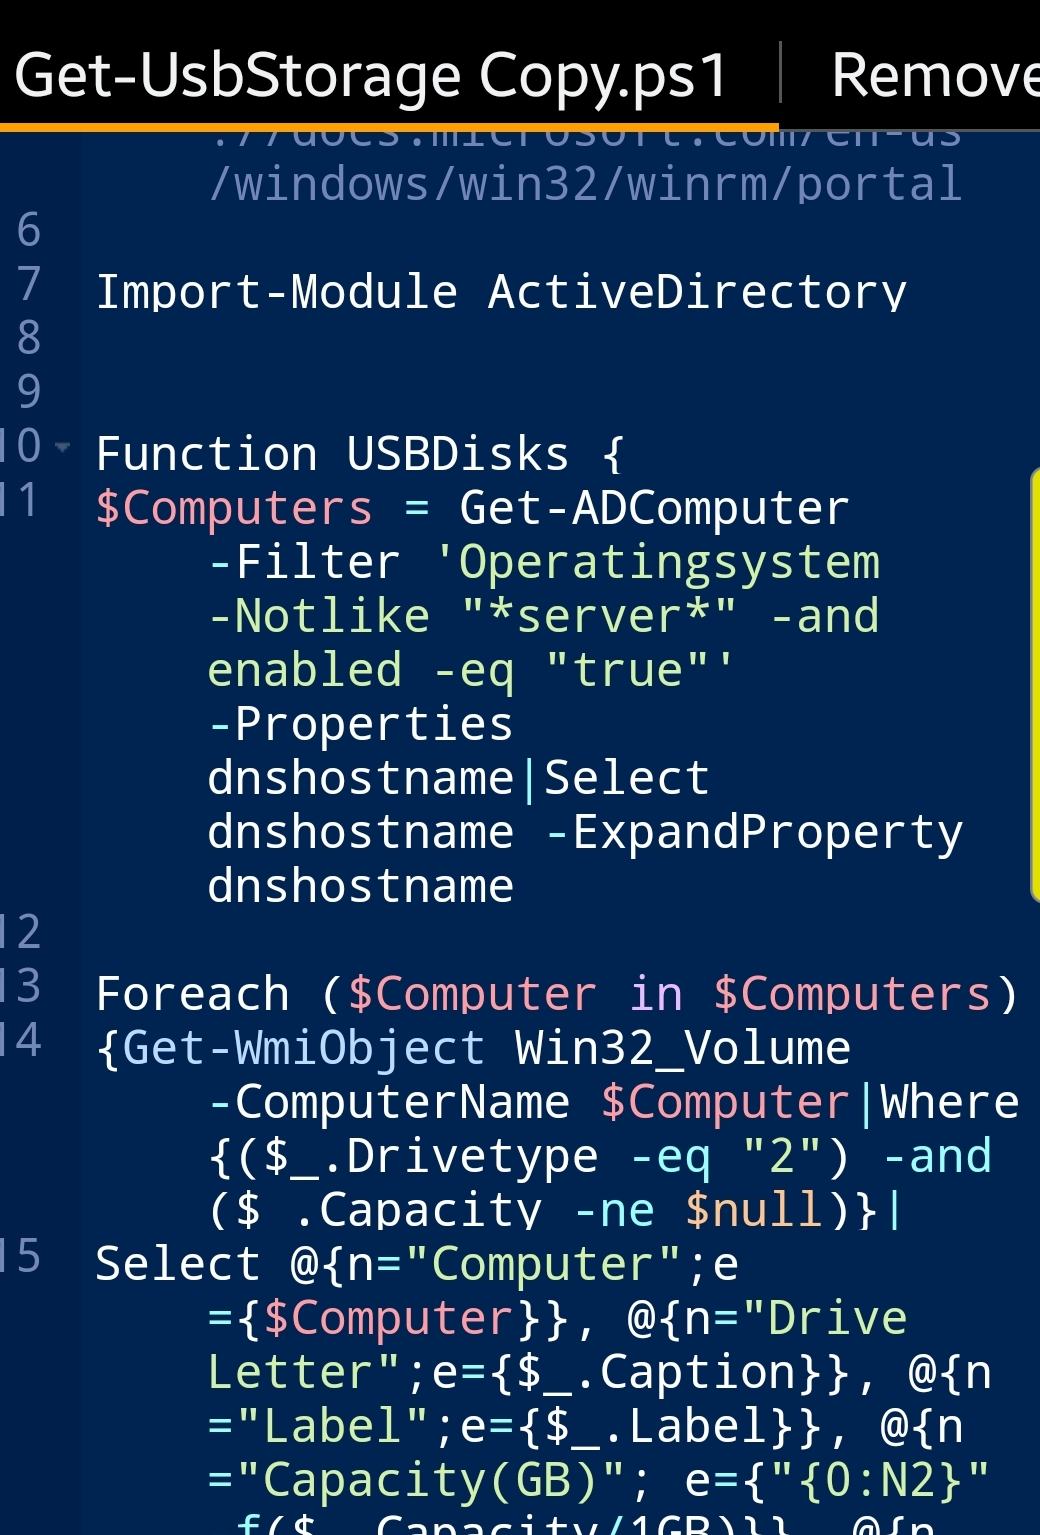
Most Administrators know that you can use a GPO to disable the ability to use USB storage devices on Windows computers. So you look up the instructions and implement the policy, but how do you know if it’s working?
I’m sure you made a test OU while you were working out the best option for your situation, but if you are disabling access for security reasons you’ll need a report. There are a few ways that you could go about getting the data. I like PowerShell. The code below will search your domain computers for USB storage. You should aware that savy users can use online tools to fool detection. As always, use at your own risk.
Have you every met a person who has invested in a four-wheel-drive vehicle and became a poor driver because of it? An acquaintance was taking me for a drive in his new SUV on a snowy day and was driving quite dangerously. “Don’t worry, it’s four-wheel drive”, he told me. I was thinking, “yeah, but 4WD doesn’t help you stop.” He assumed that the added traction and driver assist systems in his new ride meant that he could drive like a maniac in inclement conditions. He was confident that the technology would overcome his mistakes. His vehicle was in the body shop before then end of the first month.
I have observed MFA (Multi-Factor Authentication) causing a similar false sense of security. StuxNet jumped an air gap, Heartbleed crippled the world’s routers, and Specter attacked CPUs themselves, any single security measure can be subverted. There are more weaknesses than there are people or man-hours to fix them. Security works best when it is applied in layers, relying on a single solution is likely to land your network at the business end of a security event.
There are several methods that can be employed to beat MFA, just Google, “Defeat MFA.” One of the most effective is the good ol` man-in-the-middle. Evilginx2, who’s logo graces the top of this article, is a standalone pre-packaged MITM proxy server complete with instructions. Of course, Evilginx was designed to be a demonstration and to help security experts understand how these attacks work, but it is fully functional and could be used for evil (see what I did there).
Multi-Factor-Authentication is a tool that can be added to your security strategy, not an all encompassing security solution. The tendency to let your guard down after deploying a new security measure like MFA can be a costly mistake. I wouldn’t ease up on the password requirements just yet.
So you have downloaded, installed, and configured an evaluation edition of Windows Server 2019. You’ve installed your software and been cruising along with everything working fine. The decision has been made to keep the machine permanently, so you get procurement to purchase a volume license and figure you’ll activate the server with the new keys once the financial transactions are all squared away. Piece of cake.
Purchasing tells you the new keys are in the VLSC. You logon and retrieve them, open up the system properties, paste in the new key and blamo! It won’t activate. Fine you think, I’ll switch over and use the CLI, it always works. Open an elevated console, type in slmgr /ipk XXXX-XXXX-XXXX-XXXX-XXXX (your key) and hit enter. Huh, that didn’t work either?
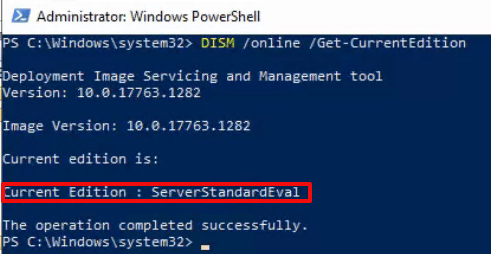
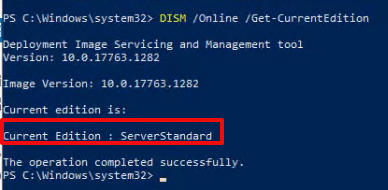
Here’s the deal, you can not apply a VLSC MAK Key to an evaluation edition because they are not the same version. The “Evaluation Edition” is considered to be a standalone edition of Windows. You can see this by opening an administrative PowerShell console and running: DISM /Online /Get-CurrentEdition
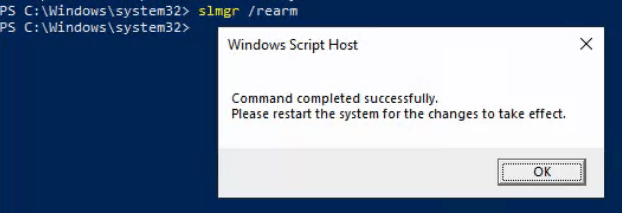
Contrary to some of the posts that I read when I ran into this snafu, the server can be upgraded to a full edition and your key can be applied without re-installing the server’s OS. It’s just a more circuitous route than you would probably like. If you are running low on time, you can extend the evaluation license for another 180 days by re-arming it. In the same administrative PowerShell console run: slmgr /rearm. You will be prompted to reboot.
You can re-arm the Evaluation Edition of Windows Server up to 5 times every 180 days.
Now that you have bought yourself some time. You will need to convert the evaluation edition of Windows to a production version using a General Volume License Key (GVLK), which are used when setting up KMS clients. Microsoft publishes a list of those keys here. I suggest that you make a backup or snapshot of the server before attempting a conversion.
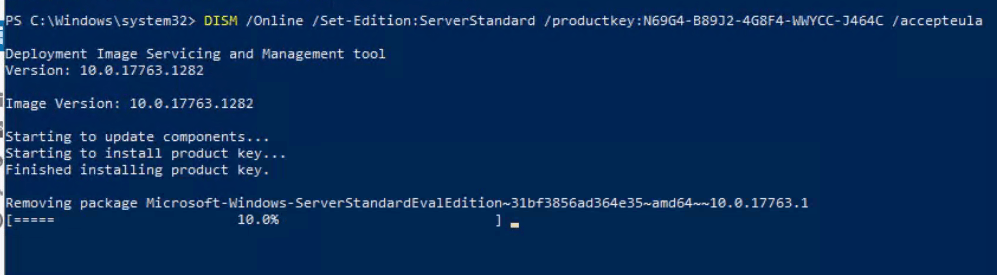
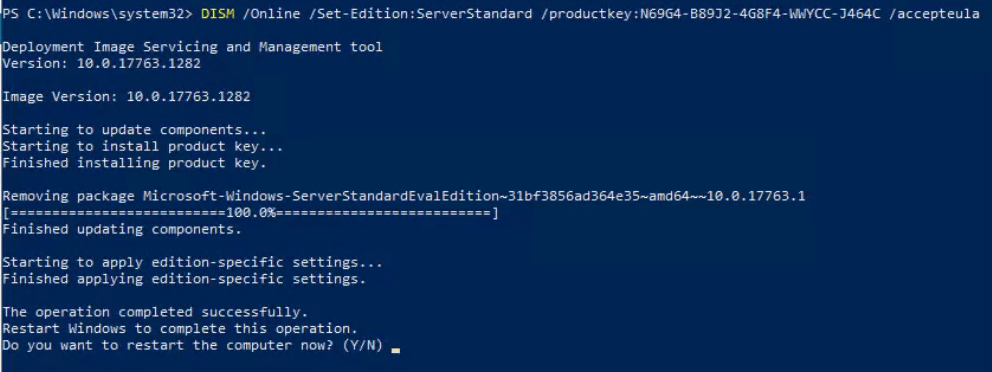
Open an administrative PowerShell prompt and run: DISM /Online /Set-Edition:ServerStandard /productkey:N69G4-B89J2-4G8F4-WWYCC-J464C /accepteula. Match the product key to the edition you want to end up on, listed in the Microsoft link above. The conversion can take hours to complete. I recommend that you reboot when the process is finished, even if you are not prompted to do so.
It is normal for the tool to look like it is hung at 10%. Be patient, it can take a long time to move.
Verify everything worked by opening an administrative PowerShell console and running: DISM /Online /Get-CurrentEdition again. This time the version should match the GLVK key that you used.
In the same PowerShell console run: slmgr /ipk XXXX-XXXX-XXXX-XXXX-XXXX (your key) and hit enter. This time you should get a pop-up saying the product key was installed successfully. Click the OK button. Now run slmgr /ato, you should get another pop-up that says Activating Windows XXXXXXX edition Product activated successfully. Click the OK button. You’re done.