
I’ve written several posts on creating Hyper-V virtual machines on Windows 10. One of my most popular covers how to create a Linux VM with sound. Inevitably, somebody will follow up with a question along the lines of, “How do I access XRDP (Linux RDP Server) from other machines on my network?”
One might be tempted to think the answer to this question is just a simple firewall rule. It isn’t. After the Windows 10 1607 update, Hyper-V started including a default virtual switch that uses NAT to allow your virtual machines access to the same network resources that your host machine can reach. This default switch makes the Quick Create function extremely useful. With a couple of button clicks, you can deploy a VM that has full outbound (Internet) network access. No network chops required.

Your newly deployed VM will be running on its own network segment that uses NAT to reach the host network’s resources. It is fantastic when you are trying to go from your VM out to the world. Getting traffic to go in from your host network(s) to your VM is another matter. Since the VM is running in its own network, there’s no path for traffic to reach it. The NAT is handled on your Windows host system so your router won’t be much help either.
Like all technical problems there are multiple ways to address this challenge. For example, if all the machines you intend to access the VM from are running Windows 10 Pro +, or Windows Server 2012 + you could configure the Hyper-V manager to access the host remotely. I’ve written those instructions here. You could also create an external virtual switch that would allow your VMs to use the same network your host system is attached to. In this post I’ll create a new NAT virtual switch and forward the traffic to the VMs.
Windows 10 has built-in port forwarding and NAT mapping. Normally you would need a few lines of PowerShell to forward the packets to your VM, but there’s a problem. The Hyper-V default switch’s NAT is not exposed to the OS. If you open PowerShell and run Get-NetNat you will probably see no return (assuming you haven’t configured other NAT mappings). We need to create a virtual switch that uses NAT and allows us to control it. Microsoft has not included this functionality in the GUI, but it can be done.
First we need to create a new Hyper-V switch. In an elevated PowerShell console run:
New-VMSwitch –SwitchName “HyperVNAT” –SwitchType Internal
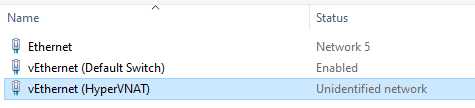
If you look in the Windows network adapter console, or list them with PowerShell (Get-NetAdapter), you will see that a new NIC has been created with the name you specified between the “” marks in the command above. It can’t access anything because it isn’t configured. First we need to give the switch adapter an IP address. This address will be the gateway for all the VMs that are attached to this virtual switch.
New-NetIPAddress –IPAddress 172.16.41.1 -PrefixLength 24 -InterfaceAlias "vEthernet (HyperVNAT)"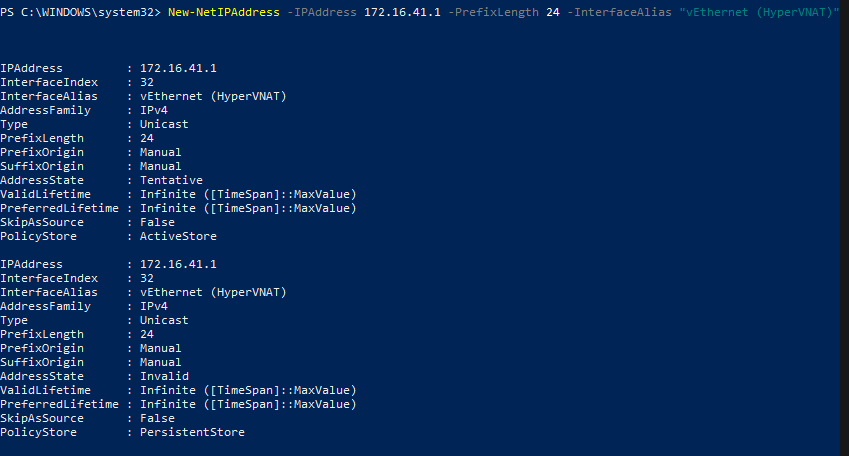
Now we need to create a NAT rule for our new network:
New-NetNat –Name HyperVNATNetwork –InternalIPInterfaceAddressPrefix 172.16.41.0/24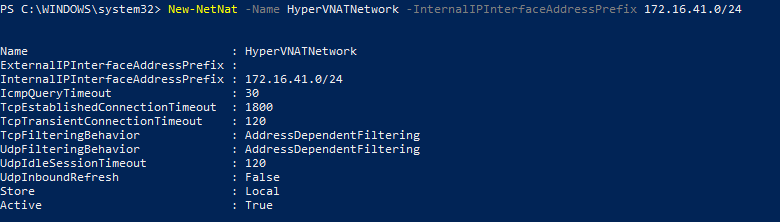
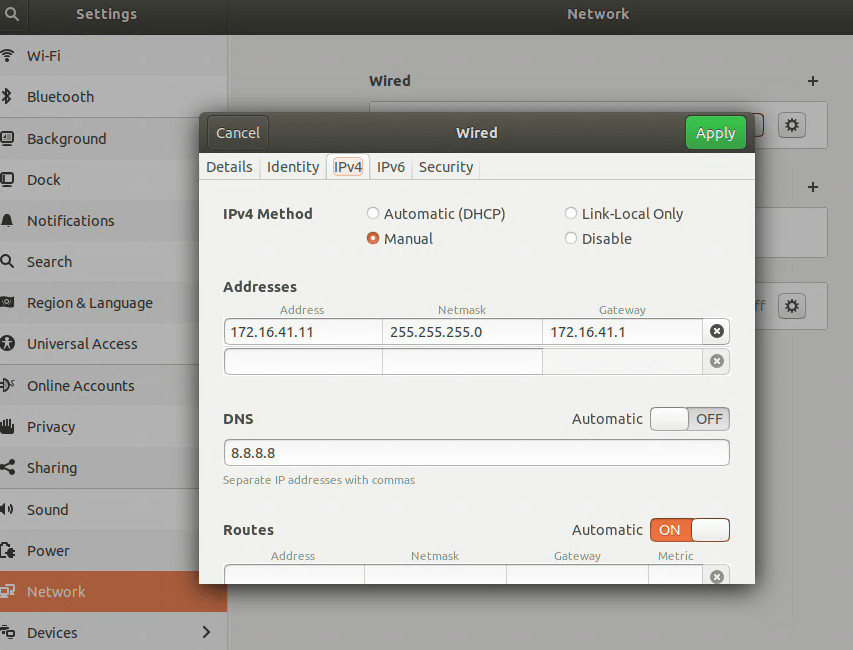
The built-in default virtual switch includes a DHCP function that automatically assigns IP addresses to the attached VMs. Our new virtual switch does not. You will need to manually assign your VM an IP address in the same subnet. If you followed my example, the useable addresses are 172.16.41.2 – 172.16.41.254 the subnet is 255.255.255.0, and the gateway is 172.16.41.1. You’ll also need to configure DNS if you plan on surfing the web or accessing named resources, 8.8.8.8 is Google’s public DNS server.
There are numerous ways to configure the IP information for a computer. They all differ according to the operating system. Generally, somewhere in the settings of your OS should be the network options. Set the IPv4 interface to manual (not automatic or DHCP) and enter the correct numbers for each. Below I’ve configured an Ubuntu Linux machine for the network we’re creating in this post.
Now the VM should be able to use our new virtual switch to access the outside world. Also, when we run Get-NetNat on the host in PowerShell you’ll see information returned. You should be able to open a web browser on your VM and hit your favorite sites or check your email. We’ve done all of this and basically ended up where we started LOL. The key difference is that the NAT rules can be controlled now.

The problem we started out to solve was to allow XRDP access to a Linux VM on our Windows 10 host from other computers on our network. Add a NAT mapping to forward a custom port (3391) from our host to our VM as XRDP (3389) by using the PowerShell command below. Note: Do not forward 3389 to 3389 unless you do not use RDP on your host system.
Add-NetNatStaticMapping -NatName "HyperVNATNetwork" -Protocol TCP -ExternalIPAddress 0.0.0.0/24 -ExternalPort 3391 -InternalIPAddress 172.16.41.11 -InternalPort 3389If your Windows Firewall is enabled (should be) you’ll need to create a rule to allow the forwarding port, 3391.
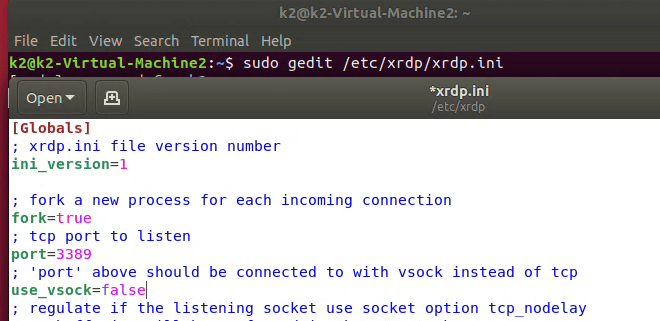
New-NetFirewallRule -DisplayName "HyperVRDPNat" -Direction Inbound -LocalPort 3391 -Protocol TCP -Action AllowDepending on how XRDP was installed and configured on your Linux machine, you may also have to edit the XRDP.INI file. If XRDP is configured for vsock, it is not listening on the traditional RDP port. Vsock is only accessible via the Hyper-V management console’s enhanced session function.
sudo gedit /etc/xrdp/xrdp.iniDepending on the distro, you may need to use nano or vim to make sudo changes to the xrdp.ini file. Change the line use_vsock=true to use_vsock=false. Make sure there is a port=3389 line that is not commented out (;) and save the file. Reboot the VM.
Note: chaining this setting will mean that to connect to an enhanced session, you will always need to manually open an RDP connection. Right clicking on the VM in the Hyper-V Management console and choosing connect will only open a basic session if vsock is disabled.
You should now be able to connect to RDP via the Windows 10 host’s IP (not the VM’s) address to port 3391 (X.X.X.X:3391) from any machine that is able to reach your Windows 10 host computer. If you want to access the VM from the Internet you would need to forward the custom port (3391) from your external firewall to your Windows 10 host system.
This technique was demonstrated in Windows 10, but it would work for Windows Server and a Windows Docker Container as well. You can find more details about the NAT abilities built into Windows at Set up a NAT network | Microsoft Docs .

Kevin, love your articles. You should do one one configuring a VM as a node on the LAN (with the host). I found this config useful for mobile app development where the webserver was on the VM and I needed to connect to it with a mobile device on the same LAN. Could not find any good articles on this.
I added a separate usb wifi interface to the host that could only be used by VM (it was configured a bridge device on the host). The host had its own dedicated wifi interface.
LikeLike
Kevin – How do I add Add-NetNatStaticMapping for more than one VM? The way it is currently I’ll need to Remove-NetNatStaticMapping and Add for each VM i want to RDP to
LikeLike
My apologies, I missed this question. You can add more by using a different port for each VM.
LikeLike