Free Exchange Distribution List Memebers Reporting Tool

As and Exchange Architect, I often get asked to report on who belongs to a particular distribution list. It is easy enough to open Outlook or ADUC and find the DL group and view the DL members. If your organization has Skype for Business you can also use it to view the membership of a DL. However, exporting information from these tools can be tricky.

PowerShell makes the export task easier if you know how to use it. A quick run of the get-distributiongroup cmdlet with a pipe to out-file, will get you what you want in a hurry. The problem is that we have few employees that are able to use PowerShell from the console but, there are requests to generate this type of report multiple times per day.

What we need is a graphical tool that anybody with enough AD permissions can use to get the data they need. Sure I could write something in C# but I don’t have the time to develop a full app. I know PowerShell already has everything I need to make the report because that’s what I use every time I get asked for it. What if I add a simple graphical interface to a PowerShell script so that my non PS coworkers can easily use it? In the words of Tim Allen; “It’s Tool Time”.

The script below uses the Grid View to display a list of all the Distribution Lists in your Exchange DL OU (you’ll need to input the correct OU path). The user then uses the grid view to sort, filter, or search for the DL they need data from. When they select it, an Excel Spreadsheet will pop up on the screen with the data.

Modern versions of Exchange Server store their DLs in AD as groups so there’s no need to install or load the Exchange PowerShell module to get the data we’re after. This also means we don’t need to give the people who use our tool any special permissions. We will be using the Active Directory module so you may need to install the RSAT depending on the version of Windows.

Import-Module ActiveDirectory
$groups = Get-ADGroup -Filter * -Searchbase "OU=Distribution Lists,OU=Exchange,DC=yourdomain,DC=com"|
Select @{n="Distribution Group"; e={$_.Name}}, DistinguishedName |Sort "Distribution Group"|
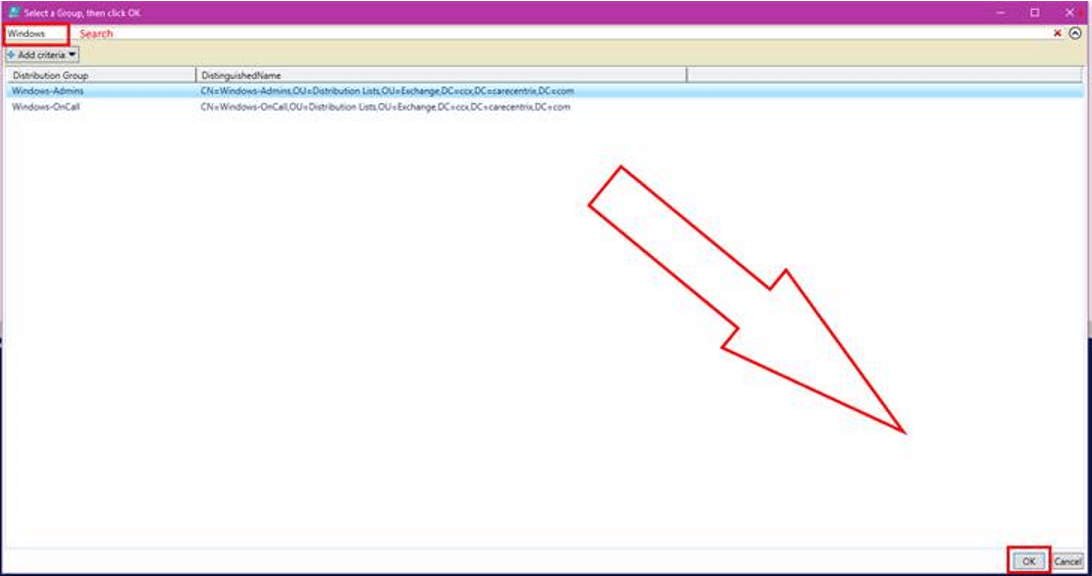
Out-GridView -Title "Select a Group, then click OK"  -PassThru
$accounts = Foreach ($group in $groups) {Get-ADGroupMember -Identity $group.DistinguishedName}
$report = Foreach ($account in $accounts) {Get-ADUser -Identity $account -Properties *|
select DisplayName, EmailAddress, TelephoneNumber, Department, City}
$report|Export-Csv -LiteralPath $env:userprofile\documents\dlgroupmemebers.csv -notypeinformation
Invoke-Item $env:userprofile\documents\dlgroupmemebers.csv

Make sure that you replace the Searchbase path with the Active Directory location for your Exchange distribution lists. After that, the instructions are easy. Save the file as a .ps1 and place it on the user’s hard drive.

The person using the tool will need to follow these directions:

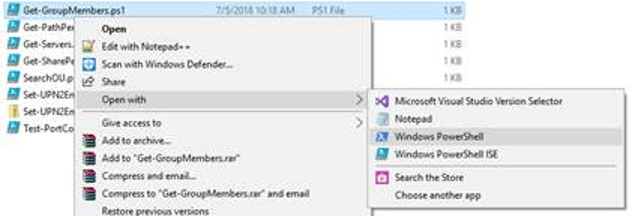
  • Right click on the script  –> Open With -> Windows PowerShell

open with powershell

  • Search for or scroll through and click the group or groups (to pick more than one use CTRL + Click).
  • Click the OK button at the bottom of the list.

Grid_View_Select.png

  • A file named groupmembers.csv will be created in the user’s default documents folder and will automatically open with the application associated to that file type (usually Excel).

From the point of view of the person running it, this is a once use app. In reality, its a simple PowerShell script. It wouldn’t take very much effort to convert this report to HTML, use it to cross-referrence mailboxes and other accounts, find the memebers managers, or anything esle you may need. Enjoy.

PowerShell – Exchange Storage Report

Most Exchange administrators have probably experienced the nightmare that is caused when the storage for the transaction logs or a DB runs out of room. By some hidden law of corporate IT the problem will undoubtedly occur just after you fall asleep and right when the CEO is trying to conclude a multimillion dollar transaction that requires a confirmation email.  There are plenty of articles out there that will help you get the problem resolved; one of the most common tricks is to run a “fake” backup to truncate the transaction logs and free up some room. Another easy trick is to compress the log drive (an option in Windows Explorer). I’ll trust that you can search for these options and decide whether to use them or not on your own (they both have drawbacks). There are some more advanced ways and I plan on writing about a couple of them in the future.

This post is more about helping you stay out of the “no space” pickle in the first place. In larger organizations Exchange can be spread across multiple servers in multiple sites with multiple storage systems in play. Relying on the storage teams to give you head up is risky. Windows applications that use distributed storage models like Exchange DAGs can be tricky for monitoring tools to cope with. My current employer’s Exchange footprint is a worldwide stretched DAG solution and each location uses different hardware, different storage platforms, etc. I created this report to compensate for what the tools weren’t showing the administrators. We haven’t had a storage problem since.

First we’ll need to get a list of all our Exchange servers, which we can do with Get-ExchangeServer cmdlet. We need the FQDN of each server but if you do Get-ExchangeServer|Select FQDN you will get a list of servers in a column with FQDN at the top and that’s no good for our next command. We just need to expand the column property to remove the column name.

$Servers = Get-ExchangeServer|Select fqdn -ExpandProperty fqdn

Next we’ll run that list of servers though a loop and ask WMI to get the drive information we’re after. If we didn’t do any formatting we’d get back the data in bytes; it isn’t very easy to read that way. We’ll use hash tables to do calculate Gigabytes and percentages.

$report = ForEach ($server in $servers)
{
 Get-WmiObject Win32_Volume -Filter "DriveType = 3" -ComputerName $server|`
 Where-Object {"Label -ne 'System Reserved'"}|Sort-Object Freespace|`
 FT -Property @{Name="Mount Point";Expression={$_.Caption}},`
 @{Name="Capacity(GB)";Expression={[math]::Round(($_.Capacity/1GB),2)}},`
 @{Name="FreeSpace(GB)";Expression={[math]::Round(($_.Freespace/1GB),2)}},`
 @{Name="% Available";Expression={[math]::Round(($_.Freespace/$_.Capacity)`
* 100)}} -GroupBy SystemName -AutoSize
}

I’ve noticed that when running this script that some older version of Powershell on Exchange 2007 / 2010 don’t like the ` marks which just mean to continue to the next line. If this happens to you just remove the backtiks and paste the command in a single line. I only have them here because it looks nicer on the page.

I choose to email the report to all the Exchange Admins as a text attachment because it works on everything; you could easily output it to HTML, Excel, or whatever format you like. To email an attachment you need a file to attach; we’ll use the out-file command to send our $report to a text file.

$report|out-file C:\Path\To\File.txt`​
Send-MailMessage -SmtpServer nameofyourexchangeserver`
-To recipient@mydomain.com -From sender@mydomain.com`
-Subject "Exchange Storage Report" -Body "Please see the attached file"`
-Attachments C:\path\to\file.txt

You’ll want to run this from an Exchange server using the task scheduler. This way , the task scheduler will handle authentication , accessing the Exchange Management Shell, and the actual scheduling itself. You can do all of this in PowerShell itself of course, I just find it to be more work that way. Scheduling a task for Exchange is a little different than others. You set the time and credentials as normal but the action is different. You’ll need to specify the path to Powershell and in the arguments call EMS and pass it your script. like this (change the paths to match your environment):

C:\Windows\System32\WindowsPowerShell\v1.0\powershell.exe
-command “. ‘D:\Program Files\Microsoft\Exchange Server\V14\bin\RemoteExchange.ps1’; Connect-ExchangeServer -auto; C:\scripts\Exchange-Storage.ps1”

Task Scheduler
The punctuation is very important.

Once you have it all working your report will look like this:

Exchange_Storage