7.1 Surround Sound with Any Headset in Windows 10

If you’ve updated your Windows 10 computer with the creators update you can enable virtual surround sound for any headset. It doesn’t matter if you’re using a 3.5 mm jack or a USB headset the setting works on all of them. Movies and games benefit from the effect most; music is normally only recorded in stereo.

  1. Plug in your headset
  2. Type “Sound” in the search bar and press enter
  3. Click the Sound Control Panel icon
  4. SoundSearch
  5. In the Sound control panel select your headphones and click the Properties button
  6. headphoneproperties
  7. Click the Spatial Sound tab
    • If the tab is missing you don’t have all the required updates. Type Updates in the search bar and open Check for updates to get them installed.
  8. Use the drop down to select Windows Sonic for Headphones
  9. Spatial Sound
  10. Selecting it should automatically check the box to turn on 7.1 virtual surround sound.
  11. Click Apply and OK

You also notice that Dolby Atmos is an available selection; this software may work slightly better, but it isn’t free. After the demo period you have to purchase it in the store for $15.00.

Congratulations, you should be able to hear angular sound in your games and movies. This feature is essentially the same functionality games pay big bucks for in surround sound headphones. Now you can do it for free with any old headset you have lying around.

Network Speed Boost Part 2; Wi-Fi

If you’ve read Part 1 of this series you’ll know that I don’t advocate for investing in upgrading your Wi-Fi until you’ve addressed the cable network that feeds it. There’s no point in spending hundreds to get Gigabit wireless when your cabled network only runs at 100mb/s, your router is too slow to keep collisions and congestion at a minimum, and your ISP only provides 10mb/s. In my opinion, your money and time is better spent on upgrading the core infrastructure of your network first.

Once you’ve gotten your cabled network up to spec you’ll probably want to address your wireless network. In my home, wireless devices far outnumber the cabled ones. All of my family members have tablets, smartphones, portable game systems, and they all connect to Wi-Fi. At last count there were 51 devices logged on to my SSID. That’s more than a lot of small businesses. You’d think they would all be lagging like crazy, but that isn’t the case. In this article we’ll talk about how I’m able to do that.

The secret is in understanding how wireless network signals are broadcast. They leave the antenna in your wireless router like ripples through a pond. The antenna on your device only picks up a fraction of the waves being transmitted. Think about a toy boat floating in those pond ripples; only a small fraction of the waves actually touch the boat. Now think about something in between your toy boat and the source of the ripples an even smaller fraction of the waves will hit your boat. This is the more or less the same thing that happens to Wi-Fi in your home or office. The fewer Wi-Fi waves that hit your device, the less data those waves can transfer to and from it. This translates into lagging connections, slow web pages, and a bad experience.  Just like those waves in a pond, the further you get away from the rock that made them, the smaller and weaker they become.

2017-10-28  14:09:06.jpg

So what do we do? There are quite a few things you can do to increase the amount of signal waves that reach your device. One of the most important is to place your Wi-Fi access point in an optimum position. The ceiling is a great place if it’s an option for you but generally the higher, the better. Remove as many obstructions as possible; walls, furniture, and other electronic devices all degrade the signal as it travels through space. Sources of magnetic interference like microwave ovens are notorious for disrupting wireless access. Contrary to popular belief, setting your Wi-Fi access point right next to your device does not result in a better signal. Again, picture those ripples in the pond, there’s always a blank space or eye right around where the rock hit, right?  You need your devices to be 4 or 5 feet away at a minimum.

If you have a large area to cover with Wi-Fi or if your neighborhood is crowded with a lot of signals (there are 17 networks in range of my home) you’ll want to tune your system. Usually, this involves logging on to the console with your web browser and accessing the available menus. You can adjust the channel your Wi-Fi uses (there are 14) and pick the least crowded; most systems will show you how many networks are on each channel. You can also adjust the amount of power pumped into the radio on some devices. Google will be your friend here. Basically just ask the question and read the anwser.

GoogleWiFichannel

If your wi-fi access point doesn’t have advanced options like upping the power, you may be able to replace it’s software with something that allows you to access those functions. DD-WRT and Tomato are two of the most popular firmware replacements. Both are far more advanced than what comes on stock devices and let you crank up the power. In certain cases, they even let you overclock (run faster than normal) the memory and CPU. Just be aware that this often leads to a shorter lifespan; more electricity equals more heat and that kills electronics faster. Once you gain access to the advanced options another thing to adjust is the channel width; a bigger number is better for Wi-Fi but will cause interference with things like bluetooth (they both use the same size waves).

That covers most of what you can do without spending money. If you’re willing to part with some cash to get a better experience, you can do a lot more. We’ll look at some options ranked from least expensive to most.

  1. Upgrade your antennas. Contingent on the brand and type of Wi-Fi access point you own, it may be possible to upgrade your antennas. If your antenna is external and screws into your access point, you can replace it with something like this.
  2. Replace your mediocre device with something more advanced. If you’re running the all-in-one Modem/Router/Wi-Fi device your cable company gave you, the experience you’re getting is the same as comparing a Toyota Camry with a Corvette. If you want to stay under the $200 price point I highly recommend the ASUS RT-3200.
  3. If you’ve got the funds and want the Ferrari instead of the Vette; go mesh. Mesh networks use multiple access points, all sending the same signal to your devices. They can divide your devices up between themselves to split the load, over-ride rogue signals from other networks, hand off to each other as you move through a large space, and essentially make your Wi-Fi run like cables. If you work in a large office you’ll notice they have a lot of smoke detector looking things up on the ceiling, those are mesh Wi-Fi access points. You can cover an unlimited distance with them (whole towns even). Mesh is the ultimate Wi-Fi experience but it comes with a big price tag and requires some expert knowledge to get working.

Mesh Wi-Fi

2017-10-29  01:15:56.jpg

If we take our ripples in the pond example, Mesh would be the equivalent of multiple people tossing rocks and causing ripples all over the place. The boat is bound to be saturated with them. In terms of wireless access that means plenty of signal to transfer data with, fewer dark spots, and the ability to cover your entire building or home. Until recently, mesh networks were the domain of corporate class equipment and priced out of range for homes and smaller businesses. Now that demand for better Wi-Fi has taken off, most manufacturers offer a mesh system. Google, ASUS, Linksys and some companies you’ve probably never heard of are all jumping in the mesh pool. PCMAG.com has an excellent comparison of the most popular models.

Personally, I use equipment made by Ubiquity. They were one of the first companies to make an affordable mesh system (I’m always an early adopter). They offer some features that other manufactures don’t; outdoor access points, roaming, guest wi-fi with banner support (think coffee shop or hotel), and their system is infinitely expandable. Their devices are POE (power over ethernet, means you don’t need an electrical outlet close by) and support wireless uplinking (they can talk to each other without cables). The software has had more time to mature than the competition and as a result offers more intuitive reporting, problem resolution, and control of specific wireless devices. The system is commercial class, but costs the same or less than some of the more popular residential solutions. If you’re in the market I highly recommend them. https://unifi-sdn.ubnt.com/

Exchange & Outlook Custom Form Room Reservations; Retain Invitations

As I mentioned in my article Exchange & Outlook Custom Room Reservations, Guide & Template , the trouble with using custom forms for room reservations in Microsoft Exchange is that you have to retrain your users to open the room’s calendar directly. This is because the default room invitation process never displays a form at all. It only shows an EWS (Exchange Web Service) generated list of available rooms and their free / busy information. When the user selects one, the room’s mailbox is sent an invitation email which is processed by the attendant service or the room’s moderator. The reserver never gets a chance to see your custom form or complete any of the extra data fields you’ve painstakingly created.

Re-training your employees to open the room’s calendar isn’t too difficult if you’re setting up the service for a small organization. If you work for a company with hundreds or thousands of employees you’ll likely end up frustrated and so will your users. There are quite a few 3rd party add-ons for Exchange that claim to fix this limitation. You don’t need them. In this article we’ll explore using a few lines of HTML, JavaScript, PowerShell, and Outlook to allow the normal invitation process, while still compelling your users to complete the custom form.

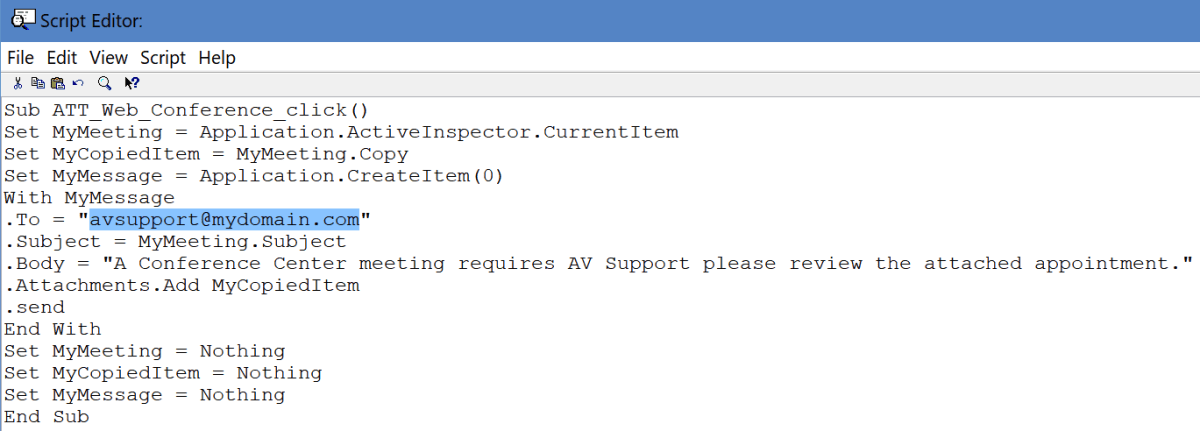
My solution involves 4 basic components that, when executed correctly, allows the room’s mailbox to send an email back to the user requesting they complete your custom form. The auto response message will include a link that directly opens the room’s calendar showing their appointment. We’ll use PowerShell to alter the appointments created by the invitation so that they use our custom form.

  • Enable automated processing for the room invitations
  • Alter the message class of the tentative appointments
  • Create web pages that open each room
  • Create an invitation auto response with a link to the web pages

Enable Invitation Auto-update

In order for my technique to work, the room’s invitation must be processed from an email to a tentative appointment before the user receives the automated response. To accommodate this requirement we need to tell Exchange to automatically update the invitation on receipt (it can wait for hours otherwise).

  1. Create a txt file that contains only your room’s (assuming more than one) email addresses (you can see them in the EMC).
  2. Open the Exchange Management Shell or import an Exchange session in to your PowerShell.
  3. Run the following script (change the path to match the location of your text file)
    $ccrooms = Get-Content -path "C:\Users\MyUserName\Documents\ccroom.txt"
    Foreach ($ccroom in $ccrooms) {Set-CalendarProcessing -identity $ccroom -AutomateProcessing Autoupdate}
    
  4. If you ever add more rooms you’ll need to update them as well.

Alter the Message Class of the tentative appointments

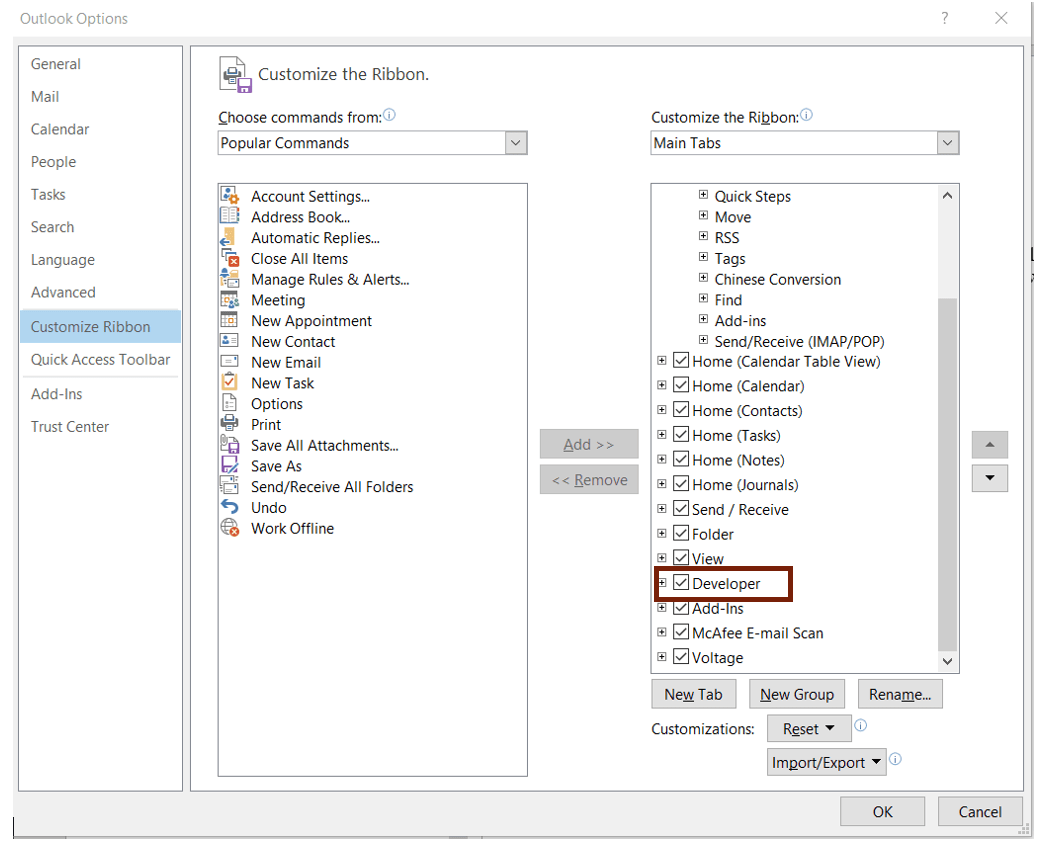
Which form Exchange uses to open a message is determined by an attribute stored in Active Directory called the message class; it gets added when you alter the schema for the installation of Exchange. We want to alter all of the room’s tentative appointments so that they use our custom form. For this to work you’ll need to set up a few things ahead of time.

  1. A machine with Outlook installed (I use a VM). You could also use CDO on an Exchange 2013 or older server but you will need to alter the COM object in the script.
    • I haven’t been succesful in changing the attribute via EWS. You can set the default message class for a mailbox but not for each individual appointment; which is what we need for this solution to work.  If you know how to do this in EWS leave a comment, I’d really appreciate it.
  2. The AD account you logon to the machine with must have full permissions to all the room’s mailboxes.
  3. Create an Outlook profile for each room’s mailbox on the machine (individually); you probably think that you know better and can just open the mailboxes from one profile but you don’t / can’t. Just trust me.

Now that you have everything staged, we’re going to execute a PowerShell script that runs in a loop every 30 seconds and changes all the appointment’s message class attributes to our custom form.

Here’s the code:

Function Change-Class
{
$mbxs = Get-Content -path "C:\Users\Myusername\Documents\ccroom.txt"
Foreach ($ccroom in $ccrooms)
{
$outlook = new-object -com Outlook.Application
$namespace = $outlook.GetNamespace("MAPI")
$room = $namespace.CreateRecipient("$ccroom")
$room.Resolve()
$roomcal = $outlook.Session.GetSharedDefaultFolder($room, 9)
$appointments = $roomcal.items

Foreach ($appointment in $appointments)
   {
     If ($appointment.messageclass -eq "IPM.Appointment")
     {
      $appointment.messageclass = "IPM.Appointment.Conference Center"
      $appointment.save()
     }
   }
}
}
While ($true)
{
Change-Class
Sleep -Seconds 30
}

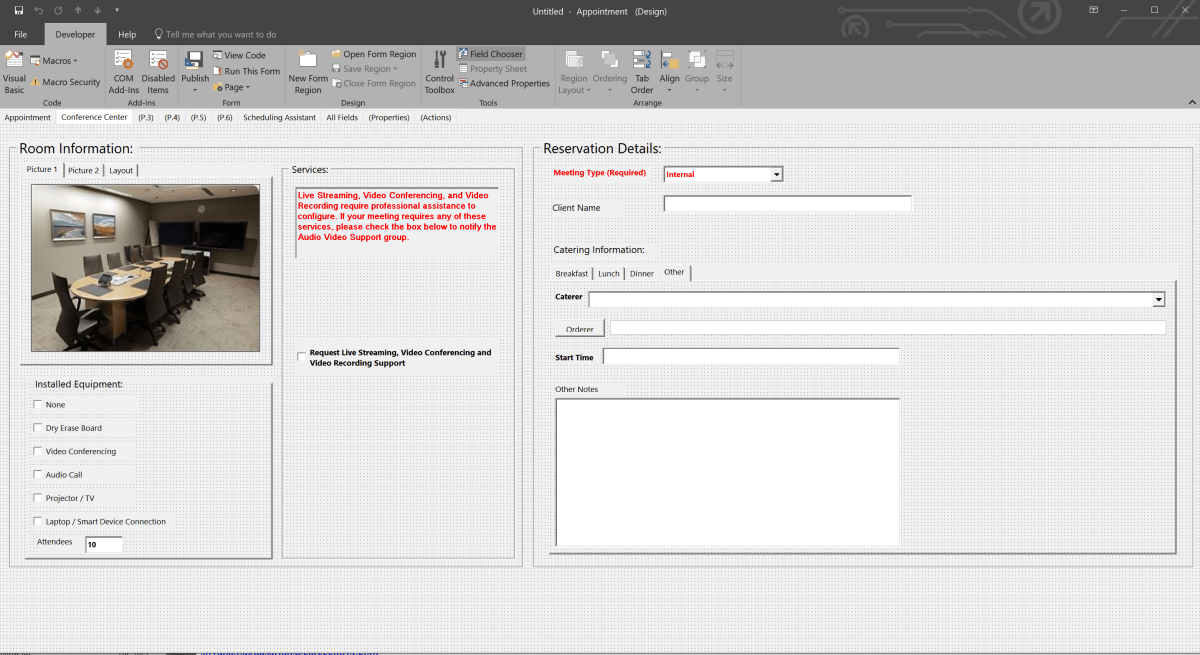
Notice that we’re using the same list of the room’s email addresses; don’t forget to change the path to match the location you’ve stored the file in. You’ll also need to alter the name of the form on the line $appointment.messageclass = “IPM.Appointment.Conference Center” to match the name of your published custom form. You must publish your form to each room with the same name or alter the script accordingly.

Create Web Pages that Open each room from a hyperlink

We’ll setup an auto responce to room invites in the next step. We’ll want to include a hyperlink in that auto-responce that opens the room’s calendar in Outlook for the user. This makes the process appear more seamless. You could accomplish this same goal in other ways, but I found this approach to be effective and simple.

You’ll need an IIS instance to host the pages on. Since we’re talking about Exchange you’ll have OWA and EWS installed, the IIS instance that hosts those services will do just fine here. Just create a new file based site and place the pages you create into the folder. I’m not including full instructions for this, but if you get stuck leave a comment.

ConferenceCenterRoomLinkPages

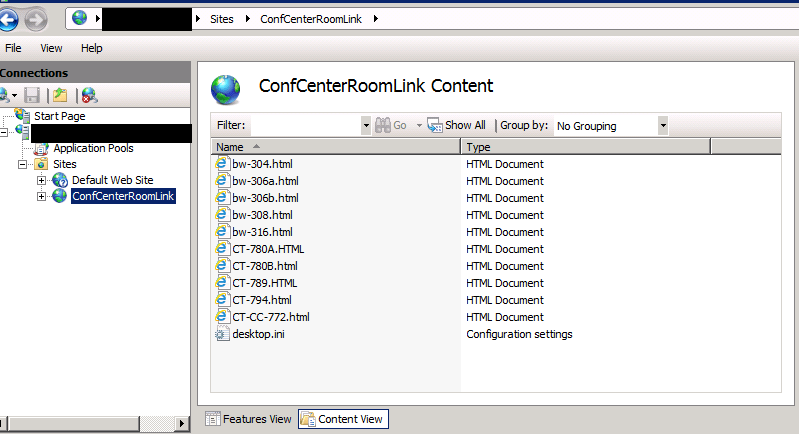
Now we need to create one page for each room. You be using the email address of the room to identify it. Paste the code below (change the email address) into notepad and save it with the HTML extension.

<!DOCTYPE html>
<html>
<head>

function OpenConferenceCenter()
{
var outlookApp = new ActiveXObject(‘Outlook.Application’);
var pmapi = outlookApp.getNameSpace(“MAPI”);
var recipient = pmapi.CreateRecipient(“room@mydomain.com”);
recipient.Resolve();
var calendar = pmapi.GetSharedDefaultFolder(recipient, 9)
calendar.display ()
}

</head>
<body onload =”OpenConferenceCenter ()” ;>
</body>
</html>

As you can see, we are creating an Active X object in the web pages to open Outlook and then the room’s calendar, which means this only works in Internet Explorer.

Create an invitation auto response with a link to the web pages

Now is when those Outlook profiles we setup earlier will come into play. We want to use Outlook to create a rule to repsond to calendar inviations in each room’s mailbox. This rule is not visible in Outlook for shared mailboxes, hence the profiles.

For each room:

  • Open the Room’s mailbox in an Outlook profile
  • Click on the Rules button in the ribbon and then select Manage Rules and Alerts.
  • Click the New Rule button
  • Select Apply rule on messages I receive
  • Check which is a meeting invitation or update
  • Click Next
  • Check; Have the server reply using a specific message.
  • In the bottom pane click underlined words “a specific message” and enter your message. I reccomend something like the text below(change the hyperlink location).

Your tentative reservation request has been received. Approval of your reservation request is based on receipt of the meeting information form. Please use the link below to locate your appointment, open it, and complete the Conference Center form by clicking its icon in the Ribbon.

CustomFormButton

The web link below only works in Internet Explorer. If your default browser is set to something else, you’ll need to right click and copy the they hyperlink below. Then paste it into Internet Explorer.

Click here to open the room’s calendar and adjust your appointment.

  • Click Save and Close on the Message
  • Finish the Rule

You should be ready to test now. If everything has gone according to plan the user’s experience should go like this:

  1. The meeting’s organizer selects a room from the default appointment form in the Outlook.
  2. Once they submit the invitation the room’s mailbox will reply with our message to finish the form.
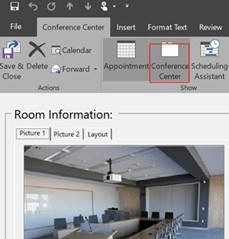
  3. When the click the link embedded in the message the room’s calendar will open, they should double-click the appointment they just made to open it.
  4. All that is left is to click the form’s button to display it, complete it and save it.

This seems complicated but I’ve implemented it in an environment with 15,000 + users without any training and encountered very few issues. If you end up using this method in your own business I’d appreciate you leaving a comment.

PowerShell; Use COM to interact with other applications

If we want to move beyond the abilities afforded to PowerShell via its module system; we’ll eventually need to interact with other applications in our own code. For example; have you ever tried to load the “Outlook” module for PowerShell? There isn’t one, but does that mean we can’t interact with the software? Of course not. PowerShell can interact with applications in a myriad of ways, you’ve heard all the buzz words; “REST API”, “SOAP API”, “COM” but how do we use these tools? What are they really? In simplest terms they’re what us old school techs call “hooks”, built-in ways for applications to interact and exchange data. PowerShell is capable of using all of the popular methods including REST with JSON but in this episode we’ll discuss COM.

The Component Objet Model (COM) was introduced by Microsoft in 1993 as a non language specific standard for inter-process communication. It serves as the basis for some of Microsoft’s most popular technology; OLE, Active X, Direct X, and the Windows Runtime are all directly based on it. Using COM can be both extremely simple and frustratingly complex depending on what you are trying to accomplish but since nobody is going to read a 200 page blog post we’ll start with the easy stuff. If you would like a more detailed explanation of COM refer to https://msdn.microsoft.com/en-us/library/windows/desktop/ms680573(v=vs.85).aspx.

All of the examples and code that follows interacts with Outlook, I am an email admin after all, the techniques work with pretty much any application that runs on Windows. First we need to create an object to hold our application in memory while we work with it. How do you hold something in memory? With a variable of course, $outlook = new-object -com outlook.applicationwill essentially open a hidden copy of Outlook and store it in the $outlook variable so that we can send commands and exchange data with it (Get it? Outlook, Exchange data, I’m so funny). How does one find out what commands you can send to a COM object? You might be tempted to try help and that’s a good instinct but we’ve actually switched to C# here (called encapsulation) so PowerShell’s help won’t know anything about Outlook. We need to ask PowerShell to ask the Outlook COM object what commands (methods) it has available. We use the Get-Member command to do that; new-object -com outlook.application|gm will return a list of all the options at our disposal. Note that we had to create the object before we can get its member methods.

 I always try to keep these posts short enough to read and obviously we could spend the next year just going over all the different options in Outlook alone so lets look at a specific scenario. We’re writing a script/application and want our user’s Outlook contacts to pop-up on the screen.

$outlook = new-object -com outlook.application
$contacts = $outlook.session.GetDefaultFolder(10)
$contacts.display()

In the short script above we have loaded our application into memory, then selected the contacts folder. I just happen to know that each Outlook folder type (calendar, inbox, contacts, appointments, etc.) has an assigned number, GetDefaultFolder is saying get the top folder of this type and the display method is opening the selected item on the user’s screen.

Just for fun, lets create an Excel spreadsheet. Just to prove we can.

$Excel = New-Object -com Excel.Application
$Excel.Visible =$True
$Workbook = $Excel.workbooks.add()

Life with the Nintendo Switch. 7 months and counting

I’ve had the Gameboy (all of them), 3DS (both), GameGear, the PSP (both), and the Vita (both). I used mobile games to quit smoking. Instead of taking a smoke break, I’d go for a walk and play a game for 10 minutes. Instead of smoking after a meal, I took Mario or Sonic out of my pocket and played until the urge passed. It worked, gave my hands something to do and my anxiety somewhere to go.  For better or worse, I traded a smoking addiction for a mobile gaming habit. Almost any day on my lunch break you can still find me in the break room playing a game. One could say mobile gaming is important to me.

My family and I got the chance to see the Nintendo Switch at Pax South before it launched. I could already tell it was going to be a hit. A full power console that could go with you was something I’d been dreaming of since I was a kid. So had everyone else apparently, the line for the demo was 3-4 hours. Nintendo’s claim looked legit, so we pre-ordered one.

Amazon dropped off our new console March 3rd and we immediately set it up and my wife started playing Breath of the Wild. We were stunned, the game looked gorgeous and played perfectly while the switch was in the dock.  Now for the moment of truth. I pulled it out of the dock, slipped the joycons into their channels and handed it back to her. The game didn’t glitch a single bit, it just kept playing as if nothing had happened.  The holy grail of gaming had been delivered. Who would have thought Nintendo, the “games don’t need power” people would beat the likes of Sony to the punch?

Don’t get me wrong, the Vita and 3DS are great portable systems and there are several games I will be playing on them in the future. I still haven’t played Majora’s Mask and I want to complete all the tracks on Wipeout but as for a comparison between the portable systems, the clear winner is the Switch. I can only play on the smaller portables for about 45 minutes to an hour before my hands cramp and my eyes burn. The controls and screens are just too small. The Switch hits the sweet spot for me. I’ve played several multi-hour sessions on it with no adverse effects. The device is still small enough to fit in my jacket pocket if I detach the joycons (a simple process).

PortableSystems
Comparison of the 3DS XL, Switch Splatoon Edition, and the Vita Slim

The newest update for the Switch system adds some much-needed features. The most important to me is the ability to transfer save games to external storage. Nothing is more frustrating to a gamer than loosing a save game they’ve spent 50+ hours on. It also adds a 30-second screen clip recording (it always had screenshots) and the ablity to save those to a card as well.

Anytime a new system launches there’s always the question of developer support. Who will make games for it and how many? It’s a deciding factor in a system’s success. One of the major downfalls for the Wii U was a very limited catalog of 3rd party games. The switch has been popular enough to get attention from the likes of Bethesda who will be releasing Skyrim and Doom on the device by the end of the year. Several other big name studios have also pledged support, Sony and EA have both released games and there’s a rumor that even Microsoft might port some titles to it. The Shop app was pretty barren on day one but now there are a decent number of titles available. Rocket League and Skyrim are the two my family are most looking forward to.

Speaking of family, my kids and wife hogged the Switch so much that I decided to plunk down the cash to get one of my very own. I opted for the Splatoon 2 Edition with its neon pink and green controllers. It isn’t out of the ordinary for my tribe to have more than one of a console. To a lot of people this will sound ridiculous but it’s how my family spends time together. We don’t go to professional sports games and don’t have motorcycles or jet skis, gaming is our hobby.

Switches
The Splatoon Edition Switch vs. the Standard Edition

My wife and I just had an excellent date night and when we got home we busted out the Switches and fired up Splatoon 2. We had a blast playing together. She’s a better player at this particular game than I am but we frequently came in the top two spots on the winning team. If you’ve never played, Splatoon is a unique game. It’s a shooter that doesn’t require spectacular reflexes and precision aiming. Anyone can play it and feel successful. You play as a Squid that shoots ink from various weapons to cover as much of the world’s surface as possible in your color. It’s one of the best times a couple can have together; take my word for it. The game has the right balance of putting your loved one on a team with you and then putting them on the opposition team, just to keep it interesting.

Lots of people complain about the battery life, but lets face it, battery technology is what it is. If they put a much larger battery in the system it would be too big and heavy. With the plethora of charging options in the world it really isn’t a big deal. I haven’t killed it yet and I play more than your average kid. I always have a portable external battery on me. What tech geek doesn’t? I get around 2.5 hours of Mario Kart or Splatoon 2 before the battery needs a recharge.

If your gaming hobby isn’t allowed to consume all of your fun budget and you need to pick just one console to purchase. I’d say get the Switch and this is advise from a person that owns and plays every console and portable since the Atari 2600. You really can’t beat it. I imagine it will go on to be one of the best-selling systems of all time.


Exchange & Outlook Custom Room Reservations, Guide & Template

Exchange has a decent built-in room reservation system. It has some nice features like Free/Busy information, a robust address book, advanced room lists, automatic time selection, and an excellent invitation and approval system. However, it leaves a lot to be desired when it comes to information about the rooms themselves. It doesn’t track the information required by managed conference centers at all. There’s no layout or seating information, no pictures or directions, no way to alert IT staff or room managers that custom setup is required and no catering tracking.

At the heart of Microsoft’s Exchange Server software is a series of databases. These databases can be modified to store both the fields you see and use in Outlook as well as custom data. Outlook itself provides the tools we need to add our required fields but it also will allow us to create custom forms to input and access the new data with. Many Exchange admins and Outlook power users are already familiar with Outlook’s custom forms trick. There are a lot of articles and excellent information on-line about using them. I like Outlookcode.com and have learned much from reading the site. Microsoft also publishes several TechNet articles on the subject. Using custom forms, Outlook transforms from a CRM and PIM tool to full database application solution.

Create a Room Mailbox

A room mailbox is pre-configured to handle meeting requests and approvals. A room mailbox must exist before publishing and testing the form. More information about resource mailboxes is available @ https://technet.microsoft.com/en-us/library/bb124374(v=exchg.141).aspx

To create room:

  • Open the Exchange Management Console or Exchange Web Console
  • Navigate to Recipient Configuration ->Mailbox
  • Right click on Mailbox and choose New Mailbox

New Mailbox

  • In the New Mailbox wizard select Room Mailbox then click Next

New Room Mailbox.png

  • On the User Type screen select New User then click Next
    • Please note: this option will create an Active Directory account for this mailbox and then disable it once permissions are set, automatically. You should not delete the disabled account the process leaves behind but it is wise to move them to an OU in AD that is protected against accidental deletion. 
  • On the User Information screen, select the check box for Specify the organizational……..
  • Click the Browse button
  • Navigate to the OU that your room mailboxes occupy
  • In the Name Field enter the room’s name as you would like it to appear
  • Enter a username in the User Logon name field (name of temporary AD account)
  • Verify that the Alias field is populated with the room name or some variation of it
  • Select the database location and any applicable policies
  • Click Next

RoomAliasDatabase

  • Click the New button on the next page
  • Click Finish
  • Your new room mailbox will be visible in the EMC after enough time for replication has occurred

Room Mailbox Options

Options for room mailboxes include things like: who are the room administrators, should requests be processed automatically, and who can override the default settings. The options below are a good place start, but you will need to customise them to fit your specific requirements.

  • Locate the conference room you wish to configure in the EMC. 
  • Right click on it and select Properties
  • On the Resource General tab enter the Room’s capacity (this will be visible in the room finder)
  • On the Resource Policy tab enter delegates if this room is to be moderated by a human
  • Uncheck the Forward meeting requests to delegates box (this setting can be annoying)
  • On the Resource In-Policy Requests tab choose Selected Recipients for the first option and All Users for the second option This configuration will make sure your users follow the policies you set.
  • On the Address and Phone tab complete the location information fields
  • On the Resource Out-of-Policy Requests add the Room administrator, this will allow them to override a policy when required.

 Outlook Developer Mode

To create custom forms, fields, edit code, etc. you need to enable Outlook’s developer mode. Outlook in Developer Mode, functions as an IDE (Integrated Development Environment) and a pretty powerful one at that.

  • Open Outlook
  • Click on File
  • Click on Options
  • Select Customize Ribbon
  • Put a check mark in the box marked Developer
  • Click the OK button

Outlook Developer Mode

A new Developer Tab will be visible in Outlook’s ribbon, from this tab you can design and publish forms, edit Visual Basic Scripts (VBS) and Visual Basic for application (VBA) add-ins.

Download and Edit the Template

In this article we’ll walk through editing a template I’ve already made, you’ll see how the tool works and be able to make your own with ease. Plus, it’s a good template even if I do say so my self, LOL. You can download it here: Conference Center Template. Unzip the file to your hard drive. Opening a form template in Outlook the first time can be a little confusing.

  • Open Outlook
  • Click the Developer Tab
  • Click the Design a Form button
  • Use the drop down to select User Templates in the File System
  • Click the Browse button and locate the file you saved

OutlookFormTempFileSys

The template will open in Edit mode. It opens to the default Appointment tab because this form is based on the built-in meeting maker. Click on the tab named Conference Center to see the customizations.

OutlookConferenceCenter

Change the Pictures

  • Right click on the picture (use tabs to select) and pick advanced properties
  • Select the Picture field and click the button in the upper right
  • Browse to the picture you wish to insert
  • Click Open

OutlookFormEditPic.png

  • After inserting an image, size it by selecting PictureSizeMode in the properties
  • Choose Stretch from the drop down at the top, this will cause your pic to fill the frame

OutlookFormPicSize

Edit the Equipment List

  • Right click the field you wish to edit and select Properties
  • Use the controls to adjust the field properties accordingly
    • You can choose whether the boxes are checked by default or not. Enter Yes for checked or No for not checked

OutlookFormEditEquip

Edit the VBS Code (AV Notification)

This template includes VBS code that emails a copy of the appointment when the “Request Live Streaming……” box is selected. You can remove this section of the form if you don’t need it. Otherwise, you’ll need to edit the email address or change the code to better suite your particular requirements.

  • In the Ribbon click the View Code button

OutlookFormVBS

  • Change the highlighted Email address or otherwise adopt the code for your purposes. There is no save option in the editor. Once you are finished close its window.

OutlookFormVBSCodeEdit

After you’ve completed all of your changes save the form. File -> Save.

Publish the form to the Room’s Mailbox

Your users cannot access the form until you publish it to the mailbox we created at the beginning of this article. Before proceeding you’ll need to open the room’s mailbox in Outlook. If you don’t, it’s path will not be available in the publishing dialog. I prefer to setup an Outlook profile just for working with the room’s calendar, but this is optional.

  • Select the drop-down chevron under the Publish button
  • Choose Publish Form As from the menu

OutlookFormsPublishAs.png

  • Select the room’s calendar from the Look In drop down
  • Provide the Display Name and Form Name
  • Click the Publish button

OutlookFormDisplayname.png

Make the New Form Default

To prevent users from having to manually open the form we’ll want to replace the default appointment form.

  • Open the room’s folder in your Outlook (you must be displaying the folder list)
  • Right click on the room’s calendar folder
  • Click Properties
  • In the When posting to this folder use drop down box select the form you published
  • Click Ok

OutlookFormDefault.png

Congratulations you’ve upgraded your room reservation system. After you’ve wowed all your co-workers with the results of your hard work and get around to fully testing everything, you will notice a usability flaw. The form only works if you open the room’s calendar directly in Outlook.

Most Outlook users create an appointment and then invite the room to it. This invitation is based on the Free/Busy system in Exchange which is a subset of the Exchange web services. EWS never presents a form at all. Just a list of rooms and their availability. When the user selects a room, an e-mail is sent to the room’s mailbox which is processed by the attendant and added to the calendar. You’re left with a couple of choices.

  1. Train your users to open the room’s calendar and book their appointments from there. This isn’t a bad option for smaller organizations, but if you have thousands of employees, retraining all them could be problematic.
  2. Read my next article about how to use a few lines of HTML, some PowerShell, and Outlook to allow the normal invitaiton process while still compelling your users to complete the custom form. Exchange & Outlook Custom Form Room Reservations; Retain Invitations


Pfsense OpenVPN Server and Mobile Client Setup Guide; Mobile Data Protection and Remote Access in One

Introduction

In today’s data centric world, everybody wants to know what you’re doing on-line. The free Wi-Fi at fast food restaurants and hotels allows them to mine your data usage habits for marketing purposes. The “Guest” Wi-Fi at your place of business can also be monitored. What’s a private person supposed to do? There are lots of articles on the Internet regarding VPN services but few of them are free and all result in the purveyor of the service being privy to all your data habits.

One solution is to route all your mobile traffic, personal device at work, phone/tablet connected to public Wi-Fi, etc. through your home network over a VPN. There are  several services on my home network that I’d like to access from anywhere; Remote Desktop to my family’s computers, in-home Wi-Fi console, my router / firewall dashboard, and my email server just to name a few. I prefer to not punch that many holes through my firewall. A personal VPN solves these challenges.

In today’s post I’ll walk you through setting up OpenVPN on Pfsense. OpenVPN is a popular open source VPN solution that is included on some firewalls and runs on most distributions of Linux. If your device includes it as an option the principal steps in this guide will apply but the screens and locations will vary.

Instructions

I will be posting a full setup guide for Pfsense at some point in the near future. If you’re not familiar with the software, it is a commercial class firewall and router package that you run on a PC. You can get a lot of information about it from their excellent website.

Create User Account(s)

You will need a user account to logon to your new VPN with. The software supports certificate based authentication. However, self-signed certificates (issued ourself vs. purchased) are difficult to work with on modern operating systems. For the purposes of this guide we’ll stick with a basic username and password.

  1. Open the web configuration
  2. Click System -> User Manager -> Add
  3. Complete the form
  4. Do not check the box to create a user certificate
  5. Click Save


You may be tempted to make a single account for everyone to share. However, I recommend creating a separate account for each person that may use the service. This makes troubleshooting easier and advances your security stance.

Install VPN Client Exporter Package

Once OpenVPN is up and running you’ll need to install and configure the client software on your mobile, laptop, etc. The easiest way to accomplish this is by sending yourself (email, Dropbox, etc.) a pre-packaged configuration file. To export the configuration file we’ll need to add some software to Pfsence.

  1. Open the web configurator
  2. System -> Package Manager -> Available Packages
  3. Search for openvpn-client-export
  4. Click the Install button

vpnclientexporterpackage

Create an Internal CA

OpenVPN’s private connections are built using TLS encryption; it’s not important that you understand the details but we need to set up Pfsence as a certificate authority so that it can issue the encryption certificates required to make this work.

Depending on how you installed Pfsence, you may find there is already a CA present in which case you can skip this section.

  1. Open the web configurator
  2. System -> Cert Manager -> CA -> ADD
  3. Complete the form and click Save

PfsenceCA

Issue Certificate

Now that we have a Certificate authority, we’ll need to issue the TLS server certificate the encrypts our data as it travels over the VPN.

  1. Open the web configurator
  2. System -> Cert Manager -> Certificates -> ADD
  3. Complete the form and click Save
  4. Be sure that you set the Certificate type to Server Certificate
  5. Add your public IP address as an alternative name
  6. Click Save

PfsenceServerCert.png

OpenVPN Wizard (Setup the service)

  1. Open the web configurator
  2. Click VPN
  3. Select OpenVPN
  4. Click the Wizards Tab
  5. Leave type of server as Local User Access
  6. NextOpenVPNWizard1
  7. Certificate Authority, select the CA you created
  8. Click Next
  9. In the certificate drop down, select the server certificate we issued from our CA
  10. Click Next
  11. The next form has a lot of options on it. Change the following:
    • Description, name your connection
    • Tunnel Network = CIDR network separate from your primary LAN subnet. For example; if your current primary network is 172.16.5.0/24 then you would want to put 172.16.6.0/24 here. Incoming VPN clients will receive addresses in this range.
    • Local Network = your primary LAN range. In the example, 172.16.5.0/24
    • Redirect Gateway = Select this option, it is the magic sauce that prevents the networks you connect to from snooping on your usage habits by sending all your network traffic through your home router instead of theirs.
    • Concurrent Connections = How many devices will you allow at once.
    • Select allow Inter-Client Communications
    • DNS Server 1 = IP address of your Pfsence firewall
    • Enable NetBIOS options
    • NetBIOS Node Type = b-node
    • Next

OpenVPNWizard2

The wizard will automatically add the required firewall rules and routes for us. However, it defaults to certificate based authentication and we want to change that (see create accounts).

  1. Click System-> VPN -> OpenVPN
  2. Select the pencil icon to edit the settings
  3. In the drop-down for server mode, choose Remote Access ( User Auth)

At this point our VPN server configuration should be complete. To use it we will need to install and setup the client software on our mobile device. There are a lot of client applications that support OpenVPN my personal favorite is OpenVPN CONNNECT. It is available on both the iOS Itunes App Store and Google Play for Android. The software works the same way on both mobile operating systems.

Google Play download (Android)
Itunes download (Apple iOS)

Export the Configuration File

OpenVPNExport

  1. Open the web configurator
  2. Select the VPN menu
  3. Click OpenVPN
  4. Click Client Export
  5. Scroll down to the OpenVPN Clients section and click the button labeled OpenVPN Connect (iOS/Android)
  6. Save the file to your disk
  7. Send the file to an email address that you can access from your mobile or place it in your cloud storage. (You could also connect your device and side load it)

Configure the client application

  1.  For Apple devices,
    • Open the configuration file from your device
    • Select OpenVPN CONNECT as the application to open the file with
    • Choose YES to import the profile
  2. For Android devices,
    • Save the file to your device from your email or cloud app
    • Launch the OpenVPN CONNECT application
    • Tap the three dots button in the upper right
    • Tap Import
    • Tap Import Profile from SD Card 
    • Browse to the Downloads folder (default save location) on either your internal storage or SD card
    • Tap the file you saved
    • Tap the Select button
  3. Enter the correct username and password (choosing save is optional)
  4. Click the Connect button.

Screenshot_20171011-151545.jpg

Validate your setup

Obtain your mobile public IP address by opening your device’s browser and going to http://www.ipchicken.com (not connected to VPN). Then connect to your VPN and open the page again. Your IP when connected to the VPN should be the same as a computer on your home network. If it is, everything is working. If not, try looking in the OpenVPN connect client logs and in the logs of Pfsense for clues.

Galaxy Note 8 Tips and Tricks; Air Command Shortcuts

Samsung’s Galaxy Note 8 is the most productive portable device I’ve ever used right out of the box, but you haven’t seen anything until you spend some time customising it. 

Samsung gets a lot of grief for pre-installing their software on all of the phones they make, but I find several of the apps very useful. One example; Air Command, is a mini launcher that activates when you remove the S-Pen from it’s slot.

By default when you tap its icon with the stylus you’re presented with a wheel of pen related applications. S-note, Smart select, and several others are pre-populated. What you may not realize is that the list can be customised to display shortcuts to any 10 apps you like. I use Onenote instead of S-note so I swapped the icons in the launcher. The short clip below will show you how.