
I’m an early adopter of most technology. I’ve been running IPv6 (dual stack) since the day my ISP (Comcast) made it available and learning how it works as I go. It has changed drastically from the early days with new protocols like DHCP6 being added to overcome challenges. Most of my devices now prefer IPv6. I vote we get rid of the v and just call them IP4 and IP6 who agrees?
The Problem:
I’ve seen plenty of posts in forums about people struggling to get this working, especially on Android devices. I like to help people with tech, so this article is all about how to make this work. Here’s the deal, Android’s makers have decided not to support DHCPv6 which is how a lot of routers are configured to hand out addresses for IPv6 networks. You can read about that here if the reasoning matters to you; https://www.techrepublic.com/article/androids-lack-of-dhcpv6-support-poses-security-and-ipv6-deployment-issues/
This decision actually causes a lot of trouble if you have IPv6 turned on but not configured correctly. Some of the most common symptoms are slow or failed web page loading, Facebook comments not loading, the Youtube app is slow, etc. If you’re on a mobile phone you can turn Wi-Fi off and everything will work over LTE just fine. In a nutshell, the issue is that you’re trying to go to web services that are IPv6 enabled but your device isn’t using it correctly. You end up having to wait until IPv6 times out and falls back to IPv4 before everything works. This can take a long time.
A lot of posts out there on the intertubes say to disable IPv6; the trouble is you really can’t. IPv6 is baked in to your devices now, you can’t just turn it off. At best, you can block it at your firewall or stop it at your network card, but that won’t stop all of the problems because a lot of the apps you use (even the OS itself) expects IPv6 to be there. Not to mention, the whole world is going to IPv6 right now. Turning it off is the equivalent of saying you want to go back to the horse and buggy until they get those car things figured out.
The Solution:
Router manufacturers have started including or updating firmware to allow an RA mode (Router Advertisement) of “Assisted” meaning it will use SLAAC and DHCP6 in parallel. This gives you the best of both worlds, and is what we need to do so your Android devices can use IPv6 on your network. SLAAC is a process that allows the device to pick its own IPv6 address from a range of addresses provided by your ISP vs. being assigned one from your personal router (DHCP6).
The following information and instructions are based on Whatyouknow.com’s lab which consists of a Comcast Xfinity modem in bridge mode connected to a Pfsense 2.4.2 firewall. The terminology and locations may be a little different for your case, but Bing or Google should be able to help you figure out the exact settings for your equipment.
First, you need to know what prefix delegation your ISP is passing out. Sometimes you can retrieve this info from your cable modem’s admin page, generally under connection status (usually the admin page will be https://10.0.0.1 or https:// 192.168.0.1). If you can’t access your cable modem then try looking it up (Google, Xfinity Prefix Delegation). If you can’t find it on-line then try:
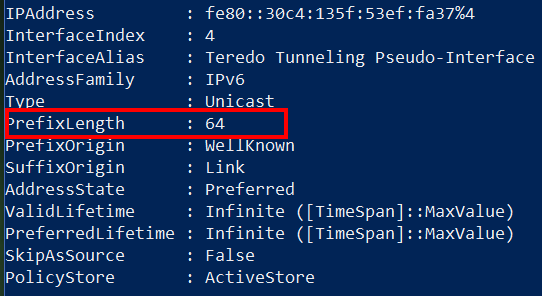
- Plug an IPv6 capable computer (must be turned on in your network settings) straight into your cable modem.
- Open PowerShell and type Get-IPNetAddress (on Linux or Mac use Terminal to run ifconfig)
- Find your IPv6 Address and look for the PrefixLength field
-
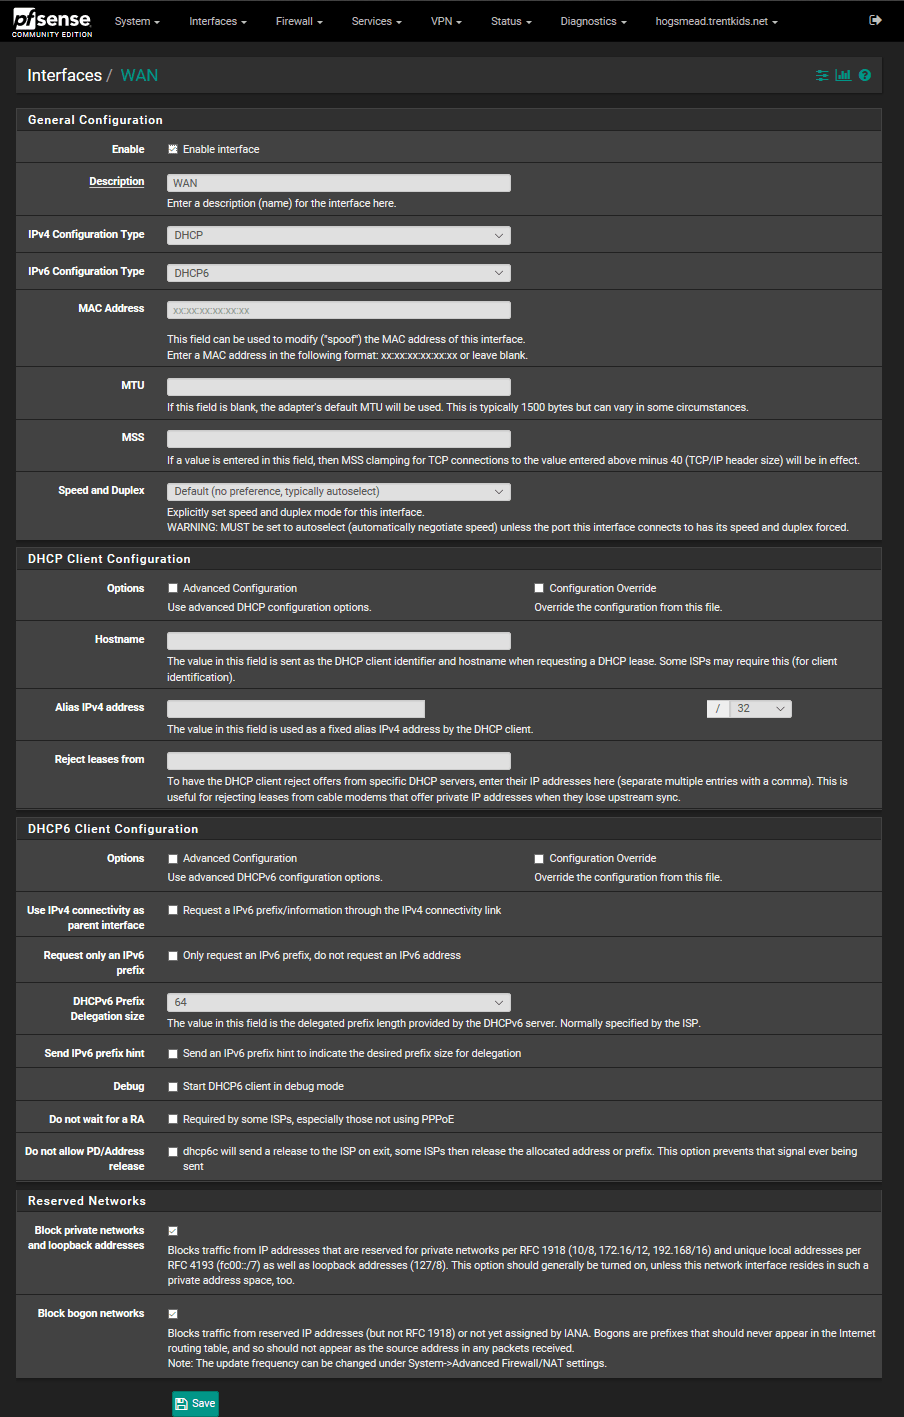
Now that you have the prefix delegation, logon to your firewall and configure your WAN interface to use DHCP6 (for Comcast), and set the Prefix Delegation size to 64. You can probably leave all the other settings alone. Here’s what it should look like in PFSense.
Now we need to configure the LAN interface to get is IPv6 address from your ISP connection. Go to Interfaces, LAN, select Track interface in the IPv6 drop down, then select WAN for the interface to track.


After you have saved and applied these changes, you should be able to go to your dashboard (connection status page if you’re not using PFsense) and see IPv6 addresses listed for both your WAN and LAN interfaces. If you don’t, try rebooting your cable modem and your firewall. If you still don’t see them, then you missed a step in the setup. Start Over.
Now for the Android Magic sauce: we need to configure the distribution of IPv6 to other devices on your network. As I mentioned before, Android is expecting a SLAAC address assignment, depending on the rest of your network equipment it may eventually get one in the current configuration, but setting your RA to “Assisted” will help it along.
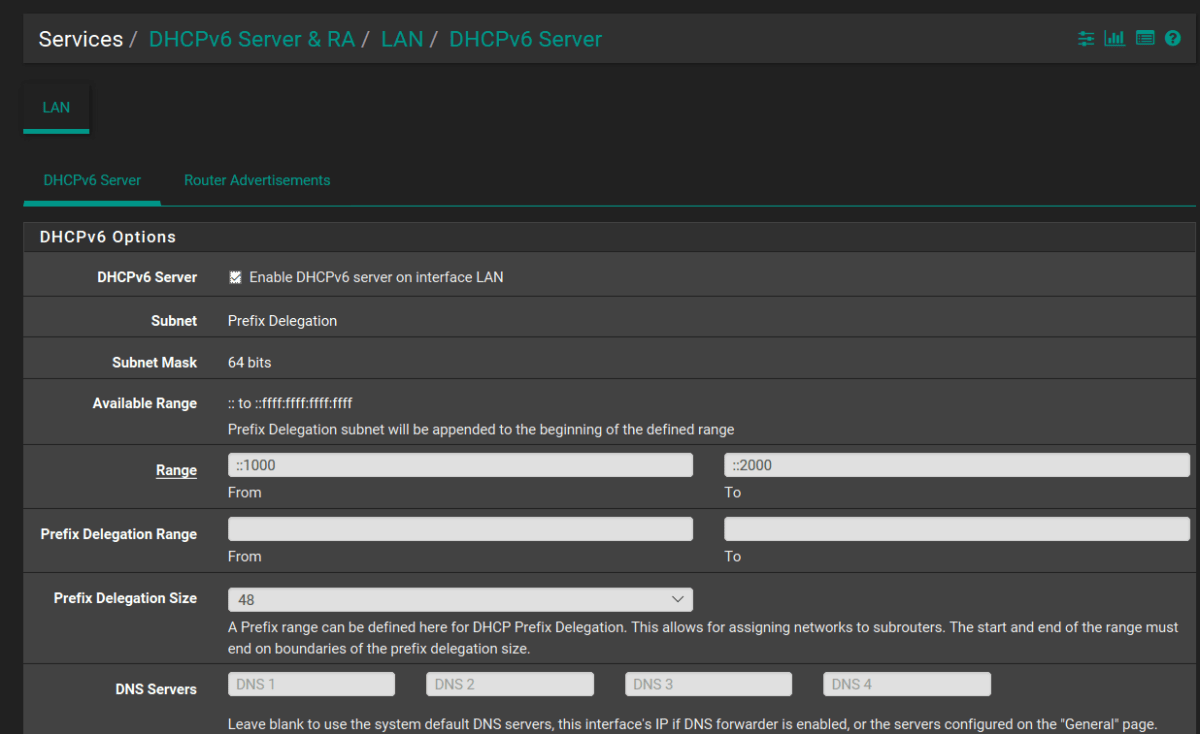
Go to Services, DHCPv6 Server & RA and check the box to enable DHCPv6, save and apply. You shouldn’t need to change any other settings.
Now click on the Router Advertisement tab and in the Router Mode dropdown select Assisted RA. This is the magic sauce that will help your Android devices use IPv6 effectively. After you save and apply these settings, I highly recommend that your restart your cable modem and router.
Still Not Working?
While adjusting the settings on our lab equipment to get the screenshots for this article, I noticed something peculiar. I could setup the firewall just as I’ve described above and my Android device still wouldn’t use IPv6. I was still getting the time-out problem when connected to the lab’s WiFi. Our production system was working just fine with these same settings.
I dug into the logs and found that IPv6 wasn’t binding correctly to the LAN interface even though the status page showed that it had an address. I had just upgraded to 2.4.2 to write this article on the latest version and I suspect something got corrupted during the upgrade process. I looked on the PFsense Bug tracker and found a few other posts that matched what I was seeing.
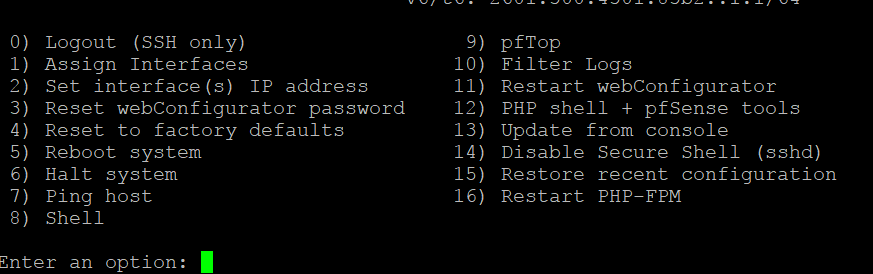
I installed an App named IPv6 and More from the play store on my device and sure enough, I wasn’t getting an IPv6 address at all. I was able to correct this by disabling DHCPv6 (uncheck the box), and turning off IPv6 on both WAN and LAN interfaces. I then rebooted and performed the steps above again and bingo, IPv6 was working. I’m not sure if this is an actual bug or just a glitch for a few of us but if you’re having trouble you might try it. You can also use Putty to connect via SSH (assuming you haven’t turned it off) and pick option 4 from the admin menu to reset everything in the Firewall back to defaults. A word of warning, it does what it says, the IP addresses of your interfaces will be set back to defaults, all of your rules and routes will be gone, all of your preferences and add-on packages will be removed. Make sure you’re in for setting everything up from scratch before going nuclear. Making a backup of your configuration before engaging this option would be a very good idea.
Once you think everything is working open a browser on your Android device and head over to http://test-ipv6.com/ you’ll be able to tell in just a few seconds if everything is up and running.
Update 5/01/18
Since writing this article I have discovered that my Wi-Fi access point’s bandwidth must be set to 40 MHz for IPv6 to function on my Android devices. If the bandwidth is set to 20 MHz or Auto the Android device will obtain an IPv6 address but will be unable to utilize it. I have tested this with ASUS, Linksys, and Ubiquity access points. As of yet, I do not have a satisfactory explanation for the situation

I have tried all the above and can not get IPv6 on my Pixel 6a or Chromecasts, only difference I have is that I am on a latest stable version of pfSense.
Is this still working for you?
LikeLike
Sorry, I don’t have Comcast or PFsence any longer. PFsence has some docs on the subject that might help, https://docs.netgate.com/pfsense/en/latest/network/ipv6/index.html
LikeLike