
As I have stated numerous times throughout my blog, I am a gamer. I have custom-built my gaming PC and I’m pretty proud of it. One of the things I like best about Elder-Wand is it’s RGB LED lights that are controlled by my MSI motherboard’s “Mystic Light” feature. As long as the lights that I install are RGB, the motherboard’s controller and app can change them all to the same color with an app on the rig or from my mobile. It even controls my Razer Chroma Keyboard, Mouse, and Headset. This is a fairly common feature among high-end gaming systems now, but they usually don’t go the same extreme.
When I built Elder-Wand, I put most of my fun money into the running components: motherboard, CPU, GPU, M2 SSD, and Vengeance RAM. I skimped on the case, fancy fans, got a no name CPU cooler, etc. figuring I would update those components later. I have stuck with that goal, updating components as my budget allows. I’ve put everything in a nice new case, upgraded all the fans to LED 120 mm PWM, upgraded the power supply and more.
While I was moving everything into the new case, I broke one of the plastic mounting tabs for my CPU cooler. It still worked, but it wasn’t attached in all four corners as it should be so I decided to replace the cooler over the Christmas break from work. This is where my tale begins.
I started my project the same way that I always do, with a ton of reasearch. I wanted something that worked well but it also had to look great. I considered converting to liquid cooling but I don’t need to overclock my system right now, so I settled on copper tube based designs, there are a lot of them out there. One of the most popular units is the Cool Master Hyper 212 it’s been around a while and has great reviews. It looks nice, but I wanted something with a little more flair. The Noctua Dual Tower looked big enough to chill my living room but was overkill for my requirements. In the end, I chose the Deepcool Gammaxx GT, I thought it would be a good balance of performance and looks.
I had planned on this taking an hour or so, boy was I wrong.

I used a thermal paste kit that I purchased on-line to remove the grey goop from my CPU and prep its surface for the new paste.


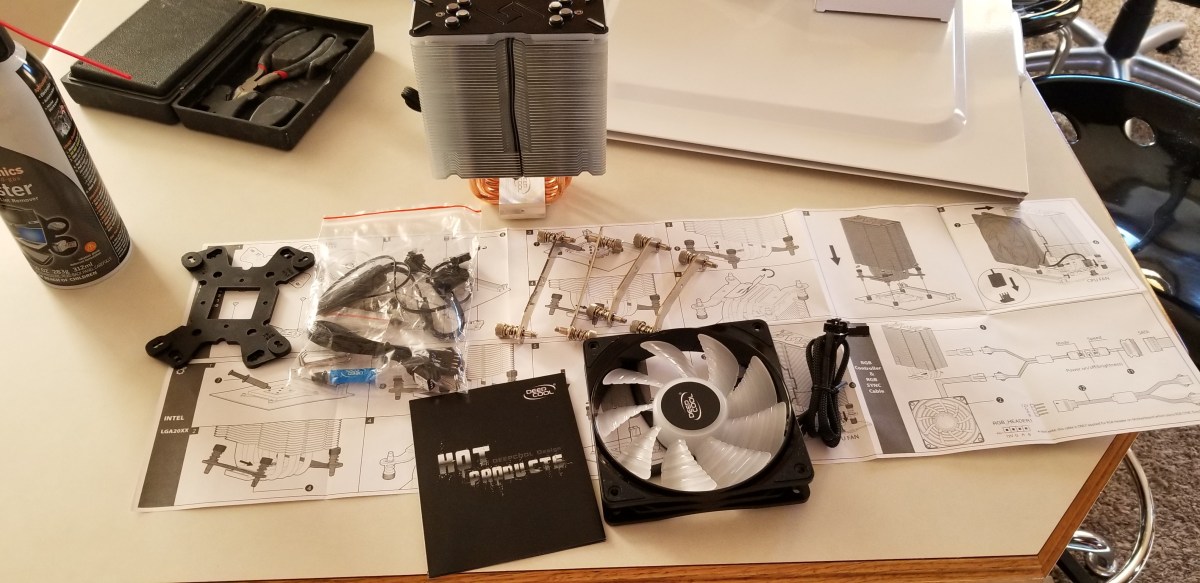
I followed the instructions to insert the nuts into the bracket, mount the brackets, and mount the rails.


The instructions with new cooler said to place 5 pea size dots of thermal paste on the CPU. I used the paste that came with my kit, Arctic Silver is supposed to be the best you can get and I’ve used it for years.

I installed the cooler, connected the cables, installed my GPU and double checked everything.

When I booted up my PC, I was concerned to see it shutting down almost as soon as it powered up. The fans and board lights would come on for a second or two but then turn off before the BIOS post even started. My first assumption was that I had a partially connected cable somewhere so I took the case back off and re-seated my components along with re-plugging all the connectors.
No go. Still blinking on and then back off. My next guess was that something was amiss with the thermal paste. I took the case back apart, removed the GPU, pulled off the CPU cooler and sure enough, the paste was not evenly distributed. The fan screws in to the mounting bracket and unless you have a 4 screw driver rig of some sort, there’s no way to apply pressure evenly (yes, I did opposite corners a few turns at a time). I decided to clean the CPU and cooler base and try again. This time I applied the thermal paste in an X pattern (what I’ve always used in the past).


I got everything back together, booted up and I almost lost it!!! My system was still blinking on and then back off. I decided to remove the BIOS battery to reset everything. Of course on my board, the battery is underneath the GPU so I had to take everything back apart again. Bye now I am around 4 hours in to this project and my nerves are starting to fray. I got the battery out then re-assembled and tried booting. Yes! Elder-Wand booted up, the BIOS config screen loaded. I set the clock and boot options then saved and exited the BIOS. A quick reboot and my Windows logon screen loaded.
After I got logged on I decided to load my hardware monitoring app and see how the new fan performed while I played a game of Overwatch. Just about the time my match was starting my PC shutdown hard. When I tried to boot it back up I got the blinks back *%^! That was it; I’d had all I could take. I had to work in the morning so I decied to leave my system down and deal with it on the weekend.
Over the next couple of days my mind was turning over all the things that could be causing my issue. I knew the i-7 CPU had built-in thermal protection and so did my board so I was reasonably sure I hadn’t fried anything. I closely examined the pictures above and decided that the thermal paste would work better if I spread it like peanut butter. So I took my system apart, cleaned everything and used a silicone spatula to evenly apply a nice thin coating to the processor. Put it all back together and it booted again. Time to test. This time I made it through a couple of games before it shutdown. I had data though, there was a temperature spike on the processor.
I thought about it for a bit and looked at the pictures some more. I noticed the ridges in the copper cooling plate had gaps that were not being filled by the paste. I decided the paste was too thick to get down in there and was just smooshing out to the sides. I went and dug around in the box my new cooler had come with and found the paste that came with it. So I proceeded to dis-assemble, clean, and re-apply the manufactures paste. Then I put everything back together and booted. After 3 matches of Overwatch and an hour or so of Destiny 2 I felt I was in the clear. My system has been running fine for more than a week now. The new cooler works great and keeps the temp around 5 degrees lower than my previous one did. It looks nice too. The moral of this story is, “Don’t think you know better than the people who made your hardware”. If you have a system that won’t stay up after a CPU cooler swap; you might try thinner thermal paste.


