Digging for Overwatch Gold. An adult’s guide to playing or watching the game.

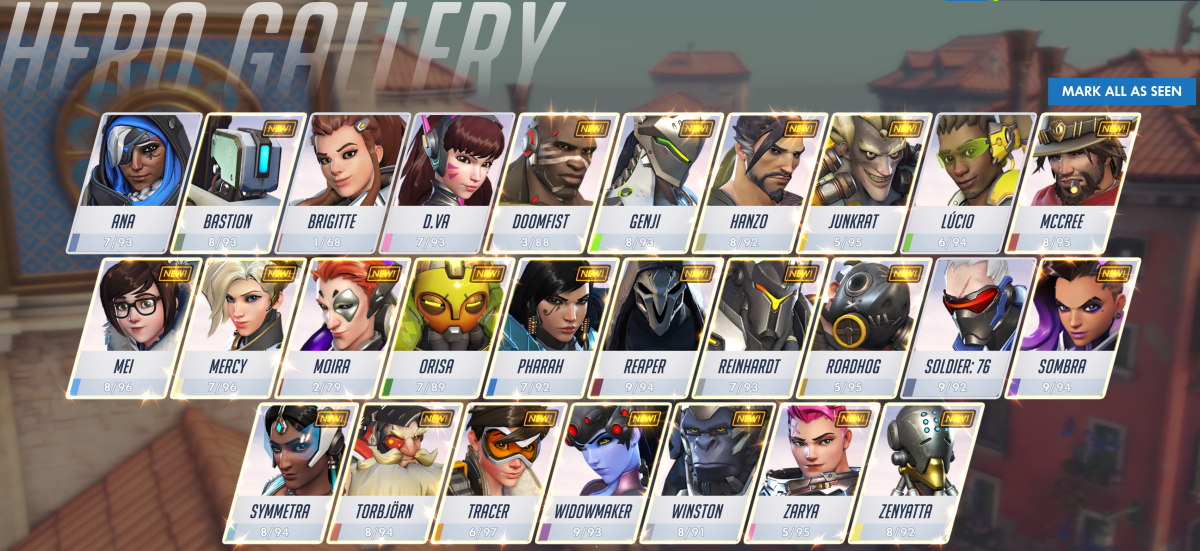
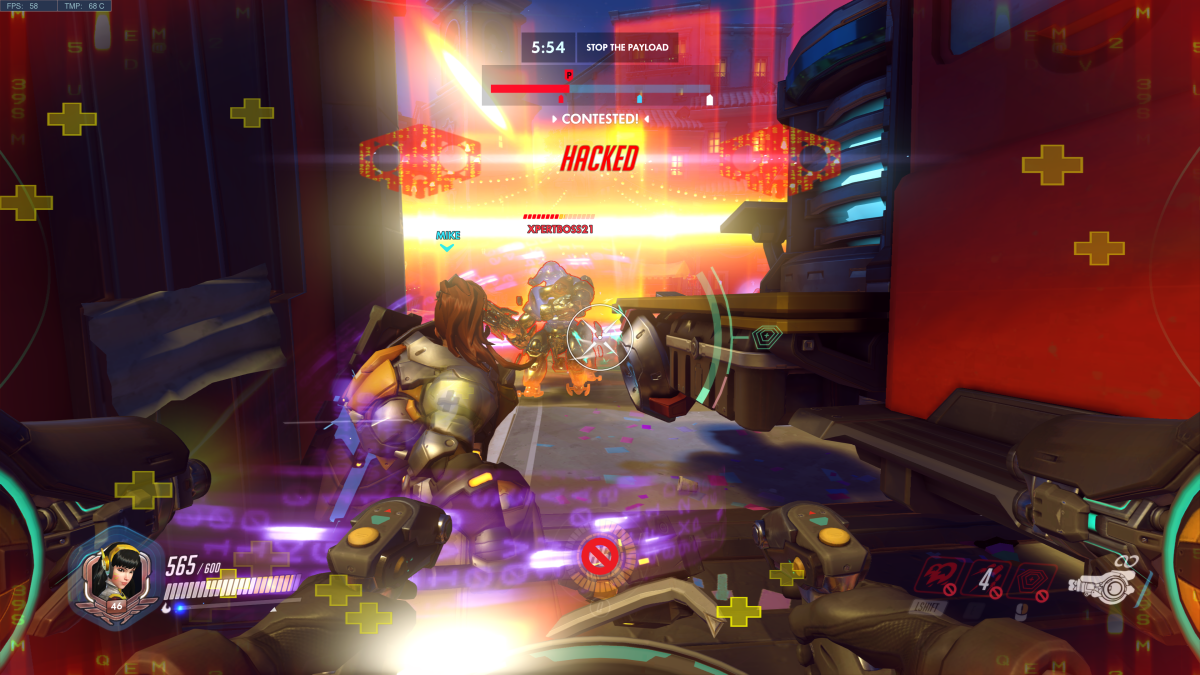
For those who don’t know (where have you been hiding), Overwatch is a shooter that is oriented around team play. Two teams of six on-line players choose from a roster of 27 characters spread across four roles: attack, defense, tank, and support. The team must work together to accomplish group goals in one of several game modes: Payload (move the item to points on the map), Point Capture (capture the flag), Point Capture and Payload Hybrid, or Control (king of the hill). The game modes ensure that the only way to win is to function as a unit. Lone wolf play results in a loss nearly every time.

Overwatch hero gallery

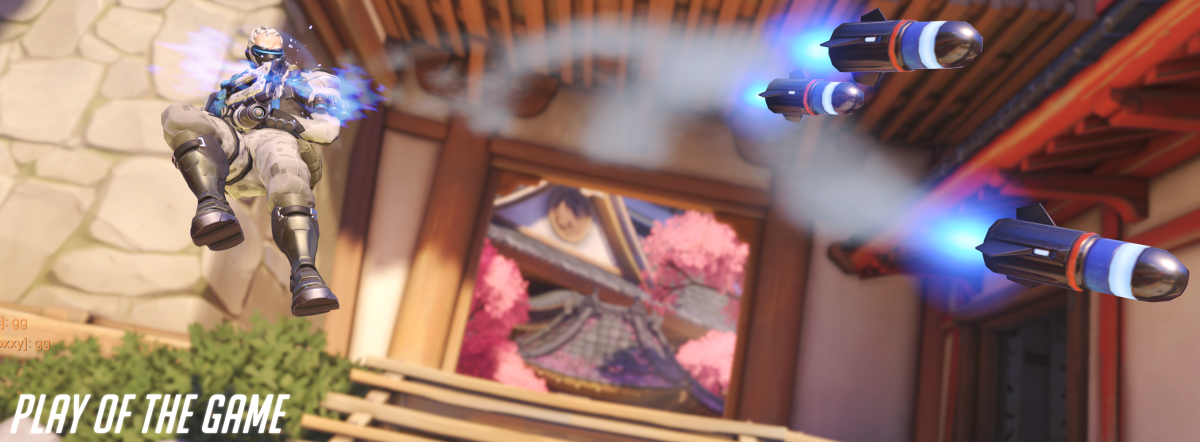
Like most team sports, there are plenty of occasions for individual glory. The game highlights those moments with “Play of the Game” recaps, individual performance medals, and an MVP vote at the end of every match. In Call of Duty, Doom, or Halo a single talented player can rack up enough kills in a team death-match round to virtually win by themselves. In Overwatch, you can’t win without the support of your teammates, period. Sure you can get oodles of eliminations, but you can’t make progress on the match’s goal. This group effort introduces all sorts of complex strategies and forces relationships between the players that are more akin to American Football than they are to most on-line shooters.

Overwatch play of the game

For example, several of the Battlefield games feature support roles in which the player can toss out health packs to heal injured team members. Call of Duty sometimes features a perk in which you can heal an injured player and these roles make a difference in the game’s outcome, but in Overwatch the support or “healer” class is critical. The match goals ensure that all of the characters, or heroes as they are called in-game, focus their firepower in a small area. Without a support person constantly bolstering everyone’s health points, players are zapped out faster than they can make it back into the battle. It is possible to win without a support member, but it’s a rare occurrence. When a group thinks they can go without a support player, it is fairly amusing to be on the opposing team in an overpowered, “bow before my might” sort of way. Guess what happens when the better armed players don’t protect the support players? When a character is killed in the game it is often quite a long trek to make it back to the goal. Loosing a healer can mean an entire team gets wiped.

As you can tell from the paragraph above, a team’s hero composition matters almost as much as the skill of human pilots. Some pairs of heroes can form an almost unstoppable combination, a good Reinhardt and Diva with a decent Lucio backing them up can move a payload almost on their own; leaving the attack and defense players free to do damage behind the line of scrimmage. The high value placed on proper team selection can cause some interesting interactions due to human nature.

2018-06-15 (11)

Many gamers like to master a single character or weapon system in any given game. I know people who started Call of Duty with the first assault rifle and have literally never tried anything else. Veterans of Overwatch know this mentality results in team weakness. You need to be flexible; if your team is getting wiped (all members killed) too fast to be effective, an attack player may need to switch to a healer to bolster the tanks for a while. Inflexibility in character choice can often lead to a loss. To make matters even more obvious, the game itself tells the group where it is week before a match begins. It prompts with messages like “No Healer, Only One Tank. and Low Team damage” in an attempt to help, but if the players don’t adapt a team can be doomed before the game even starts.

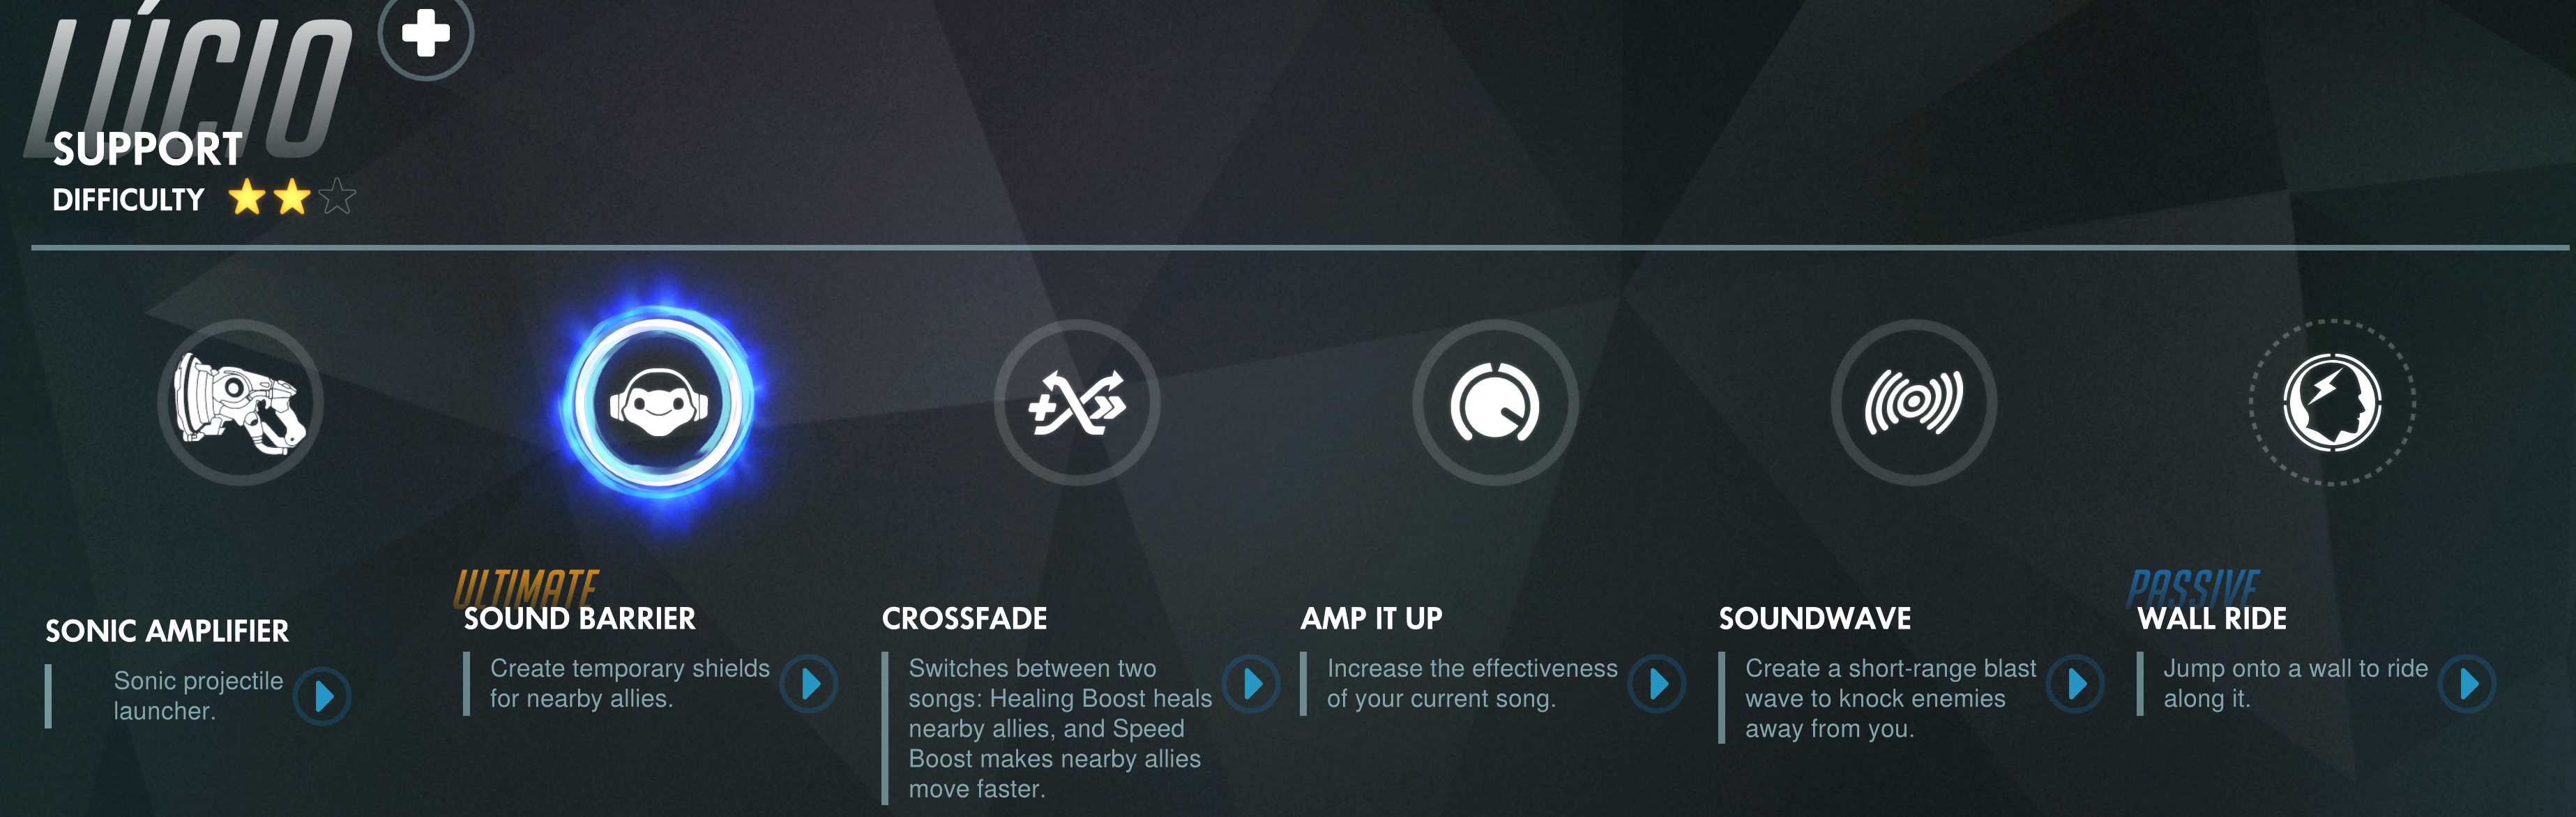
Each hero has a unique set of abilities, weapons, modes of locomotion, and a special power called an ultimate. Many of the weapons and special abilities operate on timers and the ultimate is charged by doing damage or healing team members. Team strategy and player success revolves around knowing when and where to activate these functions. For example, Diva’s ultimate makes her mech explode taking out any one in the vicinity. Everyone knows this which makes her a prime target; holding on to a charged ultimate is a waste if the player is eliminated, but so is deploying it to little or no effect. It’s also important to consider strategy; should the ultimate be deployed offensively or to clear an area? Characters with shields can set up pick plays with attack class players.

Each hero has a natural counter but that doesn’t mean the opposing team will select them at the start. That human nature I mentioned, to want to play your favorite (main) character gets in the way. Phara can fly which makes her a hard target to hit. Soldier 76’s automatic rifle is ideal for shooting her down but if your team doesn’t have one you’re not out of luck. Part of the game is the ability to change to a different character each time you are fragged. It’s actually a critical part of play and if players are not willing to swap to a more effective character, their team and therefore their rank, will suffer.

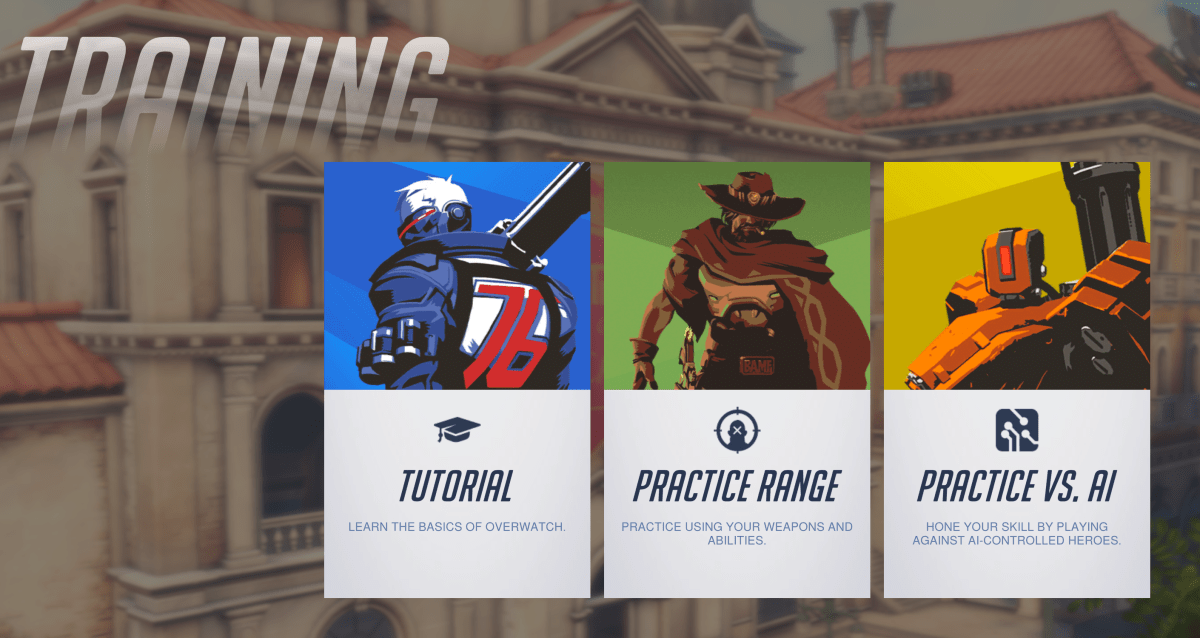
In addition to play aimed at teams, Overwatch has a tiered play path that lines up with real-world sports more than traditional video-games. New players start out in the training levels where teams of humans are pitted against teams of AI controlled heroes. There are 3 levels of difficulty in the AI modes and it is suggested that newbies remain in training until they can best the hardest most of the time.

Training

Once a player has mastered playing against AI, the next step is Quickplay. Their team will be matched against another group of human controlled characters to battle for the win. Quickplay is largely for fun and players occasionally get put on teams where the composition makes no sence (6 Hanzo’s). In this mode nothing is supposed to be on the line everyone is supposed to be here to have a good time; like recreational softball teams.

play

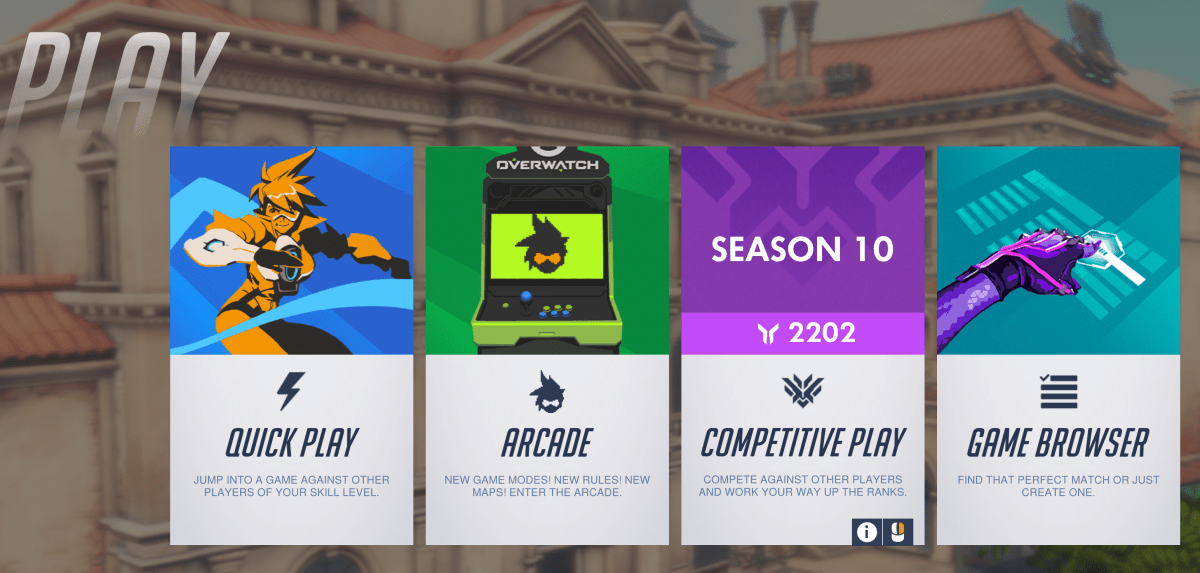
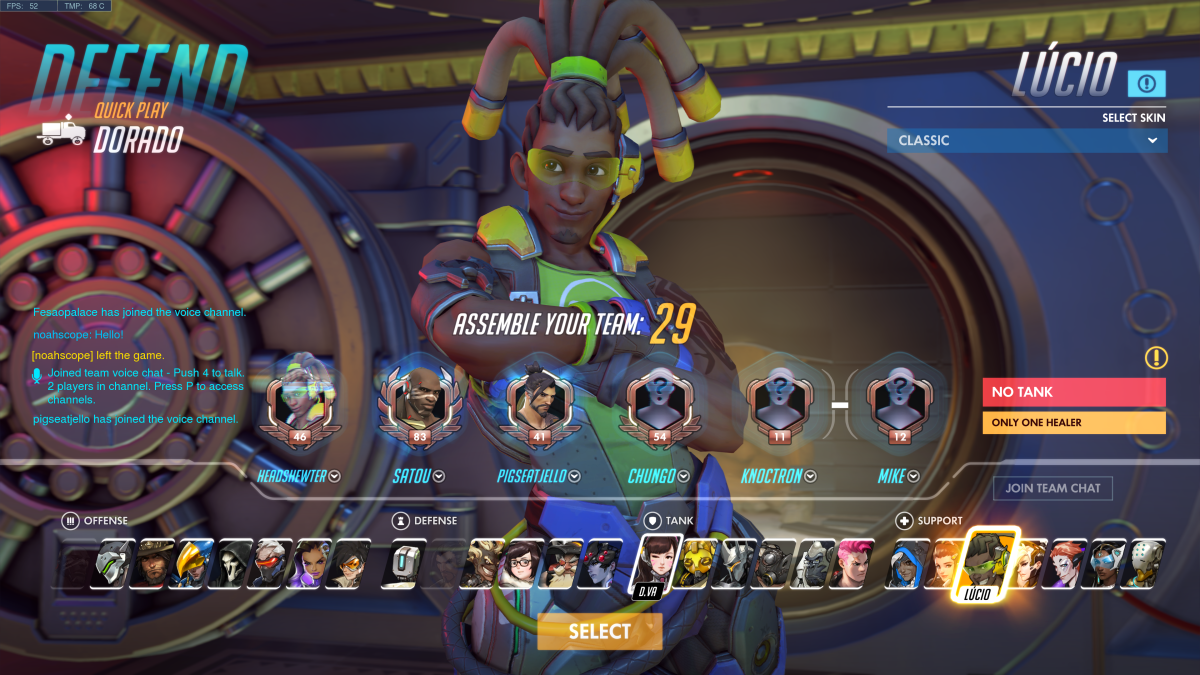
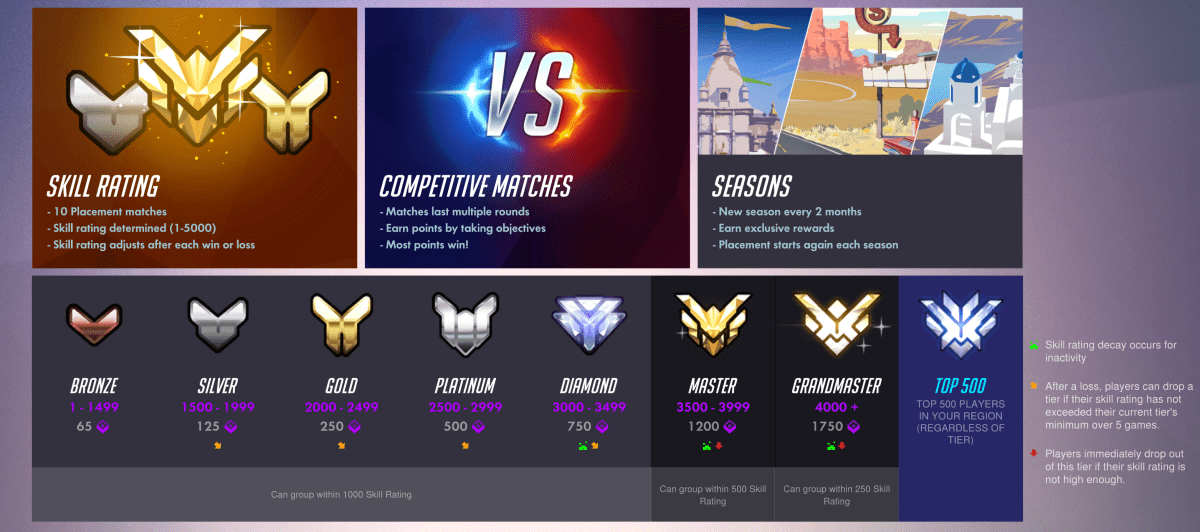
After cutting their teeth playing against humans in quickplay and the need to step up the challenge arises; many will jump in to competitive mode. In competitive mode, it’s play to win, stats are tracked and skill is ranked. The mode starts with 10 placement matches which will determine the starting skill rank: Bronze, Silver, Gold, Platinum, Diamond, Masters, Grandmasters, and top 500 are the levels to be placed into. The rank received is based both individual play and the number of matches won or lost. After ranking, the system will attempt to make teams of evenly matched players for future competative matches. When it can’t, an underdog bonus kicks in if the weaker team pulls off a win. In competative mode players are expected to communicate with each other and be willing to choose heroes that fit the team rather than just personal favorites.

Overwatch_Ranks

To place Gold in competitive mode I spent 35 hours in AI and Quickplay and reached a level of 41 before I attempted the placement matches. I mastered a character from each class (Soldier 76 , Bastion, Diva, and Lucieo) and was familiar with at least one extra hero in each category (Phara, Widomaker, Reinhardt,  and Anna) so that I could fill a spot on any given team with confidence. I also set my audio options to automatically join teamchat and enabled push to talk which I mapped to a button on my mouse. This setup works much like a walkie-talkie ensuring my teammates don’t have to listen to my frustration and only useful call-outs like enemy locations, weapons status, strategic plays, and requests for backup.

Gold isn’t what it used to be LOL but I’m pretty happy with my first attempt. To place above bronze you will need to be a “team player”. If you choose a support character, you need to fulfill that role. Playing Zenyatta and running on side paths to ambush, while satisfying, is not helping your raise team’s health points and will therefore result in a lower skill rank. Likewise, choosing an attack hero such as Soldier 76 and then hiding out behind your tank’s shield for most of the match will not meet the expectations of “Attack”. If your team’s support players are being taken out too fast your rank will suffer; you should be protecting them. Again, play your role.

Players coming from traditional shooters where the K/D ratio is rewarded above all else often struggle with the team dynamics at first (I did). If you prefer Free-for-all and Team-Death-Match play, those modes are available under the arcade menu as are several others, some arcade types support competitive ranking and some do not. Competitive Free-For-All is interesting to say the least. Tanks like Diva with shields, missiles, dual shotguns and 600 health points are facing off against snipers with 150 health points and grappling hooks.

Arcade_Mode

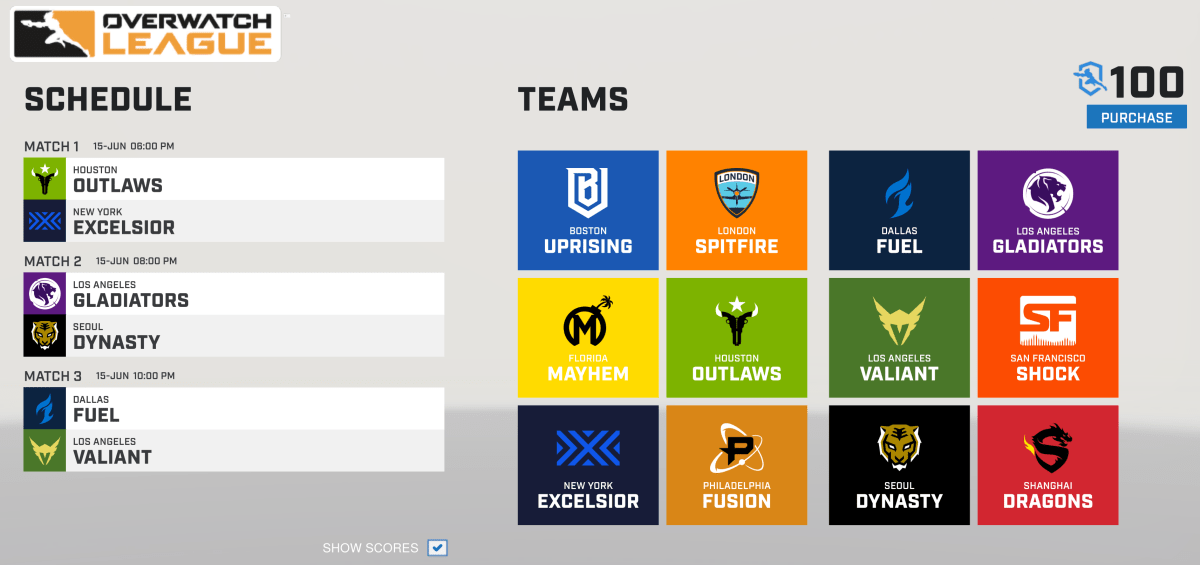
Besides the competitive game modes, Overwatch also offers a full E-Sports league in which city based teams of professional players, each of which earns a minimum of $50,000.00 per year, battle it out all they way to grand finals championship. The games take place in physical venues (you can purchase tickets), are televised and broadcasted on Twitch and in the Blizzard and Overwatch apps, have full announcer support and more. Visit https://overwatchleague.com/en-us/ for more information.

Each year there’s also a World Cup championship in which teams from around the world compete for fame and glory in the BlizCon stadium. There are also various other tournaments at conventions like PAX that are exciting to watch or participate in. To go with all the pro game-play is swag out the wazoo. Shirts, hoodies, art-work, cups, mugs, hats, pins, purses, jackets, and everything else you can think of are available both on-line and in many stores.

Teams

Wether you want to be a player or a fan or both, there’s a lot more going on in Overwatch than just shooting. If you’re a traditional sports fan wondering what all the hub-bub around e-sports is about, Overwatch is a great place to start. If you’re a gamer that’s played one too many deathmatches, this game might provide some new challenges. I’ve enjoyed playing and look forward to aiming for a platinum rank in the next season.

2018-06-15 (13)

Creative Journaling with the iPad: Part 3, Getting started with Microsoft OneNote

As I concluded in the previous article in this series, my preferred application for notes, brain-dumps, sketches, and even password management is OneNote. Microsoft has been perfecting it’s OneNote software for almost 15 years, and it shows. As a user of all compute devices, I appreciate that they make a version for Apple (iOS and Mac OSX), Android, Windows and the web. Even better, my notebooks will sync across all of them so I can work on whatever device is handy.

Goodnotes is oriented toward being a straight up digital replacement for spiral notebook(s) you create a new notebook for each topic. OneNote uses a hierarchical organization system. Notebooks -> Section Groups (not available in iOS) -> Sections -> Pages -> Sub-Pages is the grouping order. You can (and should) have multiple notebooks but if you’re careful with your  Sections you can easily fit everything into one.

As of late, Microsoft has realized that creative types want the freedom of artistic expression to be a main feature of their journals. OneNote has always had drawing tools, lasso select, auto-shapes and more but now those features are up front and they’ve been enhanced with stickers, straight edge tools, a picture gallery and more.  Just look under the Draw tab for a ton of great features including glitter, star and wood grain inks, custom pens, and more. One of my favorites is the Ink to Shapes feature. Click the button and draw a standard sloppy circle. It will magically become a perfect circle.

InkOptions

Another recent edition is enhanced palm rejection. This means you can rest your hand on the screen while using the stylus, in the same way you would rest your hand on paper when drawing with a pencil. If you have an Apple pencil this feature is activated automatically. For those of us using capacitive (non-active) styluses, access the Drawing Mode menu and enable the feature along with selecting the way you hold your writing instrument.


Tip: It is important to be sure your hand is resting on the screen before you touch it with the stylus tip. 

Under the insert tab you’ll find options for adding pictures, files, audio recordings, math equations (yes, you read that right), and even stickers. For the most part, these options are how you get data from other software into OneNote on the iPad; some apps will also allow you to share data (photos for example).

Insert

The view tab has tools that let you add grids and rule lines to your pages; you can also change the background color here. One of the most useful functions on this page is password protection. Create a section for passwords and then put a password on that section. Make a page for each of your various accounts and you’ll have made a password manager that works on all of your devices for free. I also use the feature when sharing notebooks with people to keep them out of specific stuff.

Passwordprotection

Assuming that you want to get started with a notebook for your job, I suggest creating the following sections. You will of course need to add items for your specific profession, but these should apply to generic business.

  • Passwords – Password protect this section and then add a page for each of your accounts. Don’t forget to include links to the sites, documents, etc. and a good description so you can find them by searching. OneNote supports the iPad fingerprint reader.
  • People – Here you’ll keep tabs on the people who you interact with. People you manage, co-workers, vendors, contractors, and bosses; you’ll want to record details about them all in this section. What they like and don’t, personality traits, and information they provide about their lives can all be valuable later. Tip: insert hyperlinks to these “people pages” on pages in the other sections for quick reference.
  • Projects – Make a page for each project you’re involved with so that you don’t loose track.
  • Meetings – If everyone took good notes in meetings we could probably have a lot fewer of them.
  • Tasks – This is where I track all the little actions I have to do that are not part of a project. I need to pull a report on sever storage once a quarter and I’ve detailed how to do it along with the script I use in this section.
  • Instructions – Manuals, written instructions, and even videos off YouTube get posted in this section. Onenote will index all of this stuff (even the dialog from video and text in pics). This means that the next time you search for ” use postage” the manual will pop-up.
  • Ideas – Self explanatory, everybody gets ideas about how to do something better, easier, or faster; the trick is in remembering them at an appropriate time.
  • Issues – If you want to solve problems or have one you need help solving, track them here to ensure you don’t waste time repeating fixes or worse yet forget all together.
  • Work Log –  I insert a table with the following columns: Date, Description, Reason, Requested By, Attachments, and Notes. At the end of everyday I spend 10 minutes jotting down what I spent my time on.

Whether you use OneNote, Goodnotes, or one of the hundreds of other note taking apps available for the iPad, what’s important is that you use something. Like I’ve said in other articles, next to exercising, organizing your life and work is one of the most stress relieveing things you can do.  Once you have a system working it only takes a few minutes a day to stay on top of everything.

PowerShell: Find Windows File Shares

Quite a few businesses have server networks that were grown over time with servers being added to meet some demand or another – a’ la carte – rather than a designed network in which an architect planned the distribution of every platform and it’s associated servers. The organic distribution of systems often results in nobody knowing what’s out there in total. Sure, the admins know what’s on the systems that they take care of but who has the big picture?

Recently, I was asked how many windows file shares were on a network that I help support. As it turns out, the answer was that nobody knew. None of our existing tools had a mechanism that would help us investigate quickly and easily. I’m glad I paid attention in PowerShell class.

The code below will connect to a domain controller and locate all of the Windows Server computers. Then, it will scan each one for file shares using WMI (excluding admin and IPC shares) and report the results in a csv.

Import-Module ActiveDirectory

$servers = Get-ADComputer -Properties * -Filter {(OperatingSystem -like "*Windows Server*")}|Select DNSHostName -ExpandProperty DNSHostName

$filter = "Type = 0 And Description != 'Default Share' And " +
"Name != 'ADMIN$' And Name != 'IPC$'"

$servers |
ForEach-Object { Get-WmiObject -Computer $_ -Class Win32_Share -Filter $filter } |Select-Object @{n='Computer';e={$_.__SERVER}}, Name, Path, Description |
Export-Csv -Path $env:userprofile\documents\server_shares.csv -NoTypeInformation

Finding an affordable unlocked smartphone. Our winner is the Sony Xperia XA2.

Now that the days of carrier subsidized smartphones have largely come to a close, many of us are considering purchasing our mobile devices outright. Shelling out nearly a thousand dollars for the latest flagship hardware is a tough pill to swallow. Spending $35.00 a month on the financing plan can also leave a nasty taste in your mouth, especially if you need multiple devices. What other options are out there?

Several manufacturers have responded by producing some decent hardware for between two and three hundred dollars. My teen son’s hand me down gave up the ghost this week so I suddenly found myself with a reason to take a hard look at the options in this price range. I started where I always do; with a ton of research.

There are a surprising number of entrants in our price range but as always, a good list of requirements will help narrow them down. Besides all the standard WiFi, Bluetooth, etc. smart phone stuff. We also needed LTE support, a fast processor (teens = games), the newest version of Android with a proven update track record, and a decent camera. Optionally, we also wanted biometric security, because typing in a password sucks, and NFC is nice, too.

The requirement that really narrows down the field in a hurry is the Android version. From my research I deduced that one of the ways these mid-tier devices are being differentiated from the top-tier devices is that many of them are running outdated operating system versions with no upgrade path. A lot of the devices I looked at were still on 6.x or 7.x and had no listed date for an Oreo (8.0) update. Several of the “off brand” makers appear to never update their devices. You’re stuck with whatever was on it when it shipped, unless you have the skills to root it and install a custom ROM. For a lot of us this won’t matter much, but if you like to play games and run many apps, it’s a concern. Developers eventually stop supporting the older OS versions because they have too.

The next most limiting category is the processor. Current flagship level devices have Octa-core (8 processing units on the chip) monsters that push almost 3 Gigahertz on each core. The closer you are to this spec the better your device will perform with the newest apps. Again, many of the lower-tier devices cut corners here by going with only quad-core 1.X Ghz chips. If you mostly send texts, take calls, and browse the web these lower end CPUs are fine but don’t expect Facebook and Twitter to scroll fast and you’ll also be left out in the cold when it comes to intense games.

Keeping our requirements in mind, I narrowed down the list to three contenders, rather than filling this page with their specs I’ve just linked to them so you can look for yourself.

The Moto X doesn’t have Android 8.0 on it out of the box but the update for it is already available. Motorola used to be a major player in the smart phone market. Their Droid series was top of the line, but after being bought and sold several times in the last few years, the brand has been somewhat tarnished. The phone itself was fine, but the styling was pretty bland and we didn’t like the launcher very much.

Nokia has recently separated from Microsoft and is trying to establish itself in an already crowded market. The specs and styling on this one look good and it’s getting some positive on-line reviews but we couldn’t find one in a store to get hands on with it.

In the end we chose the Sony. For my teen, one of its biggest selling points was the styling; it is a sharp-looking mobile that is available in four different color schemes. The next most important stand-out to him was the audio equalizer and amp, a feature that is lacking in most devices at this price point. I liked that it had Android Oreo on it right out of the box and that it’s predecessor the XA1, had also been updated.


We purchased the Sony at Bestbuy for $319.00. It’s a good value at this price. The phone has a nice screen, great audio, the latest version of Android, a snappy octa-core processor, 3 Gigabytes of RAM, 32 Gigabytes of onboard storage and it can take a memory card. It also has a 23 megapixel back camera, and 8 megapixel front camera, a fingerprint scanner, and an FM radio.

Both cameras work well enough in well lit rooms and outside but get poorer results in low light. There are multiple reports of issues with call quality in other on-line reviews but ours doesn’t have this issue at all. I’ve also seen reviews that say the WiFi randomly turns off but again, this issue hasn’t afflicted our unit.

Overall my son and I have been very happy with the XA2. A word of warning, there are not very many cases specfically made for this device. There are some, but you’ll probably have to order them on-line (we did).

Digital Security. Why maintain the illusion of privacy?

In the age of the Internet, social media, robot vacuums, and computerized record keeping in almost every industry, is anything truly private or are we just kidding ourselves? Can you live in a connected society and still maintain a modicum of privacy? I don’t think you can. More importantly, I’m not sure you should try.

In my career I have often been employed by various healthcare and financial companies. Until the HIPAA act of 1996, these types of institutions did not have data security departments for the most part. Effectivley meaning that somebody getting ahold of your personal records was no big deal. What changed to make the protection of this and other seemingly private information worthy of a multi-billion dollar industry of its own?

The world has been bamboozled into thinking that the “privacy” of your digital identity somehow matters. Account credentials aside, your personal preferences, medical records, shopping history, and web-site preferences have no intrinsic value.  I liken this phenomenon to the marketing campaigns that have resulted in crystalized carbon (diamonds) escalating to ridiculous values. A series of commercials in the 1950s made the substance a “must have” for any couple thinking about marriage. Diamonds are not a girls best friend, they are literally made from one of the most common substances in the known universe. A diamond’s value is determined solely by the mislead perception of the masses and so too, is the value of privacy and thus the value of personal data.

There is no such thing as digital privacy, there never has been and there never will be. How does one privately share something? The notion that its possible to do so is entirely nonsensical. It was difficult to privately communicate in the analog world; everyone has witnessed a teacher intercepting a note. It’s impossible in the digital realm. Everything you do or have done on every computerized device you have ever touched is logged by the systems you were interacting with at the time. The systems and their interconnected software cannot function without the data you provide them. If you authenticated (logged on) to the device or a service with some type of account then the logs can be correlated to you personally.

Facebook cannot post your latest witty comment if you don’t type it into their app’s box. The email you send to your BFF cannot be delivered without traveling through countless routers, switches, appliances, and computers each one of which learns your email address, your IP address, what type of system you are using and more. The photo application on your smartphone cannot organize your pictures by the location you took them in if it didn’t know where you were when you snapped them. You cannot connect to Xbox live and play a game with other users anonymously. In all of these cases, the purveyor of the services you’ve connected to is able to find out exactly who and where you are if they are willing to invest the time and effort to do so.

You can obscure your digital trail from service providers by using man in the middle services like VPNs and TOR, but you’ve only shifted the burden of identification to those service providers instead. You may feel or have read that TOR, or the encryption your VPN uses, is unbeatable but that information has been proven to be false multiple times. At best, it makes you more difficult to track. At worst using these technologies flags you as someone worthy of extra attention.

HIPPA, FISMA, and GPDR are regulatory laws that have been enacted in the United States and Europe to ensure organizations take steps to safeguard your personally identifiable data. They accomplish this goal by applying expensive fines to companies that are determined to have lost private data. There are all kinds of loopholes and exceptions in the regulations, of course, but that isn’t the main issue in my opinion.

HIPPA violations can warrant fines of up to $250,000 per infraction. These fines impart a value on the data. It makes good business sense to invest in personnel and solutions that drastically reduce the chances of the information being accessed in an unauthorized manner, as long as the cost is less than the fines. The same is true for your personal information on your own computer. It’s value is determined by what you would pay to have it kept private. Thus, the computer security industry was born.

What if we didn’t care? How much financial value would personal data have if we all stopped pretending that it was private in the first place? Assuming we could get over ourselves and de-value privacy, who would invest time and resources into obtaining worthless information?  Our own misconceptions about the number of people and companies that have access to every bit of your supposedly private information from your social security number to your bank card info, has been leveraged to build a booming empire around making something public feel private.

Creative Journaling with the iPad: Part 2, Getting started with Goodnotes

In the same way that computerized word processing displaced type-writers; many people are making the switch from paper journals and diaries to digital ones. Computer based journaling offers several key benefits over paper: backups, sharing, multimedia, and security options are all easily accessible options in an application but difficult to achieve in paper.

Apple’s tablets and phones have a multitude of applications dedicated to the art of journaling and notetaking. One of the mot popular options is Goodnotes. The software has quickly become a favorite among creative types and for good reason. It features support for multiple smart styluses including: the Apple Pencil, Wacom’s Bamboo Finetip, and Pencil 53 to name a few. The app also has advanced palm detection and PDF markup. Your data can be automatically backed up to one of several cloud storage providers and synchronization between multiple Apple devices is facilitated by iCloud.

Goodnotes works well as an everyday note taking app. You can easily create a personalized notebook with it’s many built-in Notebook covers and page styles. Unlike other note taking programs, Goodnotes does not use a sectioning layout. You’ll just add a new notebook for every subject. The brushes and pencils are great and the lasso tool is epic. You can lasso and move almost any object.

Where Goodnotes really shines is in it’s ability to import notebook templates. Etsy is full of templates that have been created by some very talented people. Many of them come with stickers, banners, and other premade flair that you lasso and drop onto a page. Lots of the templates have hyperlinked facades that replicate actual paper journals down to the bindings and cover stitching.

The information you enter into your notebooks will be indexed and searchable. Even the items you enter in handwriting will show up in most cases. You can also export pages from your notebooks to either PDF or image files for easy sharing.

To get started in Goodnote; download the app from the Apple Store. I suggest restarting your device before launching the software. If you’ve purchased a template you’ll want to follow the instructions that came with it, most of them utilize the import function to get going. Otherwise open the software and watch the introduction. When it’s finished click the + button in the upper left corner and choose “Create Notebook”

covers

Tap the cover thumbnail to choose the cover you like best and then do the same for the paper. You’ll be able to easily change both options later so don’t strain your brain on this step. Tap and hold on your notebook’s label and select text to give it a name. You can also use the writing tools in the top menu for the name tag.

20180510_040425000_iOS

After you have the label sorted, swipe to the left with two fingers to open the first page. The tool icons in the top menu are self explanatory. Tap on an icon twice to open that tool’s menu for more options.

20180510_042504000_iOS

The action menu icon in the upper right corner will allow you to change things like the page type (under more options) and allow you to export or import information. You can also print your pages from here.

20180510_043728000_iOS

Overall I find Goodnotes to be more creative and decorative than either Evernote or Onenote are, especially if you have an Apple Pencil or one of the other supported styluses. It doesn’t offer the structure or integration options available in the other packages. As a business oriented professional, I appreciate Goodnotes’ design and it’s templating solutions but I struggle to come up with a reason to use it over OneNote.

If you have to choose between them I think the decision is similar to choosing between an Apple device or a PC. Goodnotes looks better and one could argue that it’s easier to use but OneNote is more flexible and integrated into lots of other Office software. Lucky for me; I have both.

PowerShell; Start Automatic Services and Report Status

Many environments have patching processes or other updates that reboot large numbers of systems. Occasionally, when those systems boot up, some of their services fail to start. It takes too long to logon to each server and manually check and start failed services. PowerShell can do the job for us.

The code below will import a list of server names (text file with only the hostnames) and scan each server in the list for services that are set to automatic. If any of the servers’ automatic services are discovered to be stopped it will try to restart them.

The script will then report on all of the automatic services except those that stopped normally.

$servers = Get-Content C:\servers.txt
$report = @()
Foreach ($Server in $Servers) {
Get-WMIObject win32_service -ComputerName $server -Filter "startmode = 'auto' AND state != 'running'" | Invoke-WmiMethod -Name StartService
$wmi = Get-wmiobject win32_service -Filter "startmode = 'auto' AND Exitcode =0" -ComputerName $server
$report += $wmi | select-object @{n="ServerName";e={Get-WmiObject win32_computersystem -ComputerName $server|select name -ExpandProperty name}}, @{n="ServiceName";e={$_.name}},@{n="Status";e={$_.state}},@{n="Start Account";e={$_.startname}}
}
$report|export-csv C:\Services-Report.csv -NoTypeInformation

You can make this operation more dynamic by replacing the $servers variable with code to find all of the $servers on your network. It would also be easy to output the $report to an email message or HTML dashboard.

Enjoy.

Samsung’s Galaxy Book 10.6. My new main squeeze.

For the last four years my daily driver has been a Surface Pro 3. It’s been my favorite mobile PC of all time. I have produced more digital work on it than on any other single system. In part because it’s physical design allows it to be used comfortably almost anywhere and it’s power allows it to do most anything. Put it on a desk and it can give any Ultrabook a run for it’s money. Dock it with external monitors, keyboard, and mouse and it makes a powerful workstation. Strip off it’s keyboard and pick up the stylus and it’s a good tablet.

Notice I said “good” tablet. From my prospective, the Surface Pro 3 is a little too heavy to be a great tablet. I can hold it in one hand, resting on my upraised knee and write on the screen for a while but that is basically the only position that works for me. I get tired fairly quickly and have to take a break. Its also a little too big for couch surfing. Size issues aside I’ve been able to make it work all these years.

I’ve been on the look-out for a smaller tablet that was still powerful enough to be my main system. I have to run PhotoShop, Illustrator, Visual Studio, write documents, run multiple apps, and I’m not a fan of waiting. My task demands tend to rule out systems that use the Atom processors. I’ve tried them a few times, I like my Dell Venue 8 Pro, but it just isn’t quite fast enough and lives most of it’s life in my desk drawer.

I’ve had my eye on Samsung’s Galaxy Book since it launched. The combination of Intel’s m-series processor and the small 10.6″ footprint caught my attention. There are mixed reviews of the tablet out on the intertubes. They run the gambit from best tablet ever to POS. I’ve had good experiences with other Samsung equipment so I decided to give it a shot. Originally I had purchased the tablet for my spouse, to replace her aging iPad mini but although she liked the tablet itself, she didn’t enjoy Windows. She ended up with a new iPad and I inherited the Galaxy Book. Neither of us could be happier.

The Galaxy Book comes in two sizes 10.6″ and 12″. For my use the 10.6″ is the ideal size. It’s essentially the same size as the smaller iPad Pro. The larger system is roughly the same dimensions as my Surface Pro 3 and so doesn’t solve my one-handed couch surfing problems. I’m also not sure that any 12″ tablet is going to beat Microsoft’s. None of the units that I’ve tried so far have managed to pull it off.

I think the best way to describe the device’s physicality is to say that holding it feels similar to holding an iPad. It’s thin, light, and made of premium materials. The screen is vibrant and just the right size. The speakers sound surprisingly good but they are side facing which causes me to turn up the volume. There’s no rear camera, just a front facing one for video calls.

The front camera is not compatible with Windows Hello and there’s no onboard fingerprint scanner. If you own a Samsung phone you can use a service called Samsung Flow to pair your phone’s security devices to the tablet. I can use either the Fingerprint or Iris scanner on my Note 8 to logon to my tablet. It was a little clunky to get running but it works surprisingly well once your get the hang of it. Flow also sends all of your phone’s notification messages to your tablet and let’s you reply to them.

The device ships with a case that contains a keyboard and touchpad combo. The keys are small but I have no trouble touch typing at full speed. The keyboard isn’t backlit and that’s a bummer, but I didn’t have to shell out an extra hundred bucks for it so I won’t cry too much. The touchpad is fine, it gets the job done and has a lot of options for gestures which I like. The case looks nice and doubles as a multi-angle stand. It has two positions for typing, a couple for vid watching, and one specifically for drawing or writing.

That brings us to my favorite piece. The S-Pen is great. It has pressure sensitivity and tilt support. The ERM (Wacom) digitizer is accurate and doesn’t suffer from parallax issues. The shape of the S-Pen basically requires that you hold it the same way every time that you pick it up. The clip and button location force the situation but luckily it is fairly comfortable. The tips are replaceable and it comes with two different styles

Spen

.

If you’re not in love with the Pen itself there are several other options. There are a few different Wacom styluses that will work, the S-Pen from a Note phone will work, and there are several third party ERM compatible devices available like those made for the Surface 1 and 2.

Samsung teamed up with STAEDLTER to make a truly epic digital pencil. It’s an exact replica of the classic Noris #2 pencil down to the freshly sharpened tip. You can find them on Amazon for less than $30.00 if you catch a sale. It’s my favorite stylus ever, period. That’s saying something considering that I’ve owned and used almost every type of digital writing instrument ever made. Yes, I have an Apple Pencil, and the Studio Pen, and a Wacom Intous, and an XP-Pen and a Dell, and . . . . . . .

When it comes to performance, I’m impressed. I’ve been using it as my main system for a few weeks and haven’t experienced any wait-rage yet. I’m not one for elaborate benchmarking. I find that the results of such testing are often irrelevant. All that matters is the ability of a device to do it’s tasks in a satisfactory manner. That being said, web pages are snappy to load and Outlook runs well. Photoshop and Illustrator both run fine and there’s no lag when drawing. I’m even able to play some games; Sims 4 and Skyrim both play well as does Fruit Ninja and several others from the Windows Store. Multi-tasking is no issue either.

The same USB C dock that enables DEX mode on my Note 8 works on this tablet to connect an external monitor, keyboard, and mouse. When “docked” the system makes a decent workstation although I rarely use it as one. Most nights you can find me on the couch writing on the Galaxy Book in tablet mode just like I’m doing now.

tablet write

Oculus Rift No HDMI Cable Connected, AMD GPU

My PC recently downloaded the Windows 10 April 2018 update. The installation of the feature update went fine. After my system booted up I started verifying everything was working and noticed that I could no longer access the Radeon Settings software for my GPU.

No problem, there was a new version out anyway so I installed 18.4.1 and bob’s your uncle, it fixed the problem. I went on about my day.  Later that evening one of my children reported that they couldn’t get the Oculus Rift to work. I checked it out and found that the Oculus software showed “No HDMI cable connected”. I check all the cables; I went so far as to disconnect all of them and reconnect them one at a time. All the USB cables were detected but no HDMI.

I unplugged the cable from the Rift itself. You gently pull back on the foam insert and the HDMI cable will disconnect. Be gentle though, if you break this cable you’ll be up a creek. It didn’t work. I figured maybe the software got corrupted during the update so I uninstalled it and then downloaded and installed the newest version. Still no go.

The only thing in the event viewer or any of the Oculus log files that I could find was a reference to OCVRLauncher not having a user session. I started suspecting the AMD driver was at fault so I uninstalled it and tried the headset using the built-in Windows driver. It worked.

After testing every version of the driver I had on my hard drive I found that the newest version of the Radeon Adrenalin software that I can run and still use my Rift is 18.2.1. Even 18.2.2 will not work. I cannot say if the Windows 10 April 2018 update has anything to do with this problem or not. To be honest I’m not sure what version of Radeon I had installed before my system was updated and I’m not willing to roll back the Windows update because I don’t have the time. If you’re having a similar issue with your Oculus Rift and AMD GPU combo, you can get the driver version 18.2.1 here.

UPDATE: 

I evenentually had to update my drivers past 18.2.1, some of my software required it. I was able to permantley resolve the issue by doing the following:

  1. Uninstall all AMD software (add/remove programs)
  2. Delete all AMD folders from the C drive
  3. Run the AMD driver clean up utility 
  4. Download and install the newest AMD driver.

Powershell; Dynamic System Uptime Report for Windows Servers and or Workstations

After you’ve cranked out a few reports in PowerShell, either you or your boss will eventually wonder if it can be used to create an uptime report. A quick search of the Internet will return lots of options for calculating the uptime by subtracting the lastboottime, obtained via WMI, from the current date. This technique works well but few if any of the articles suggest how you go about creating a report that shows the information for all of your Windows Servers.

I tried a handful of the scripts I found on-line and didn’t like the results so I decided to write my own. The code below will scan your window’s domains and locate a domain controller in each. It will contact those domain controllers and scan for computer objects whose operating system contains the words “Windows Server”. Next it will connect to each of those computers and use WMI to calculate the uptime. Finally it will create a report showing each server’s Name, Operating System, and Up Time.

It would be simple to have the report scan workstations instead. Just change the word “Server” to “Workstation”, you could also add an and statement to do both. Emailing the report would be cinch as well (Search for PowerShell SendMail) and the script already written in a manner that would support running it as a scheduled task.

Enjoy.

Import-Module ActiveDirectory
$domains = (Get-ADForest).domains
$dcs = Foreach ($domain in $domains) {Get-ADDomainController -DomainName $domain -Discover -Service PrimaryDC}
$servers = Foreach ($dc in $dcs) {
Get-ADComputer -Properties * -Filter {(OperatingSystem -like "*Windows Server*")}|Select DNSHostName -ExpandProperty DNSHostName
}

$report = @()

Foreach ($Server in $Servers) {
$wmi = Get-WMIObject -Class Win32_OperatingSystem -ComputerName $Server
$lastboottime = $wmi.ConvertToDateTime($wmi.LastBootUpTime)
$sysuptime = (Get-Date) - $lastboottime
$uptime = "$($sysuptime.days) Days, $($sysuptime.hours) Hours, $($sysuptime.minutes) Minutes, $($sysuptime.seconds) Seconds"
$Report += $wmi | select @{n="Server";e={$_.CSName}}, @{n="Operating System";e={$_.Caption}}, @{n="System Uptime";e={$uptime}}
}
$Report|Export-CSV $env:userprofile\documents\Windows_Server_Uptime_Report.csv -notypeinformation

Creative Journaling with the iPad: Part 1, Review of the 2018 iPad and Apple Pencil

In this series we’ll be investigating the options for digital journaling on the iPad. We’ll take a look at the available software along with various techniques  for bullet journaling in a digital format. First we’ll say hello to the new iPad 9.7 with Apple Pencil support. This series has a twin based on Windows Tablets: Part 1, Part 2, and Part 3 that you may also enjoy.

Until now, if you desired to use an instrument for writing or drawing on your iPad, other than your finger, there were only a couple of options. None of which were particularly grand.

The first thing most of us try is a capacitive stylus; a mesh tipped stick that works for tapping but is too wide for precision marking. Next up are the 3rd party active pens like Fifty-three’s Pencil. These these types of tools use various electronics to send more data about your strokes to the tablet, usually over bluetooth. They work better, but not great, and have some severe limitations; chiefly, they only work in the app that comes with them more often than not.

Your other option was to shell out some serious cash for the iPad Pro and the Apple Pencil. I’ve enjoyed being teased by the wealthy Apple fans of the world that could drop close to $1000.00 so they could draw with precise results on their tablets.

Lucky for me (and my wife) Apple has decided to grace the rest of us poor sobs with a non-pro tablet that works with the treasured stylus. The new iPad has pencil support and pricing starts at $329.00. Of course, the pencil itself is just shy of $100.00. I was able to find the 128GB iPad for $399.00 and decided that model was the winner.

ipadcolor

So, what’s it like you may be wondering? It’s both amazing and frustrating. Allow me to explain. The pencil itself is well-balanced, totally round, the same lenght as a #2 pencil, and pleasant to hold in your hand. The iPad supports pressure sensitivity, tilt (used for shading), and it tracks well. It’s fantastic when using it in one of the supported apps.

Lisa'sdrawing
A fine line trace done in Autodesk’s Sketchbook

Unlike Windows Ink or Samsung’s S-Pen, Apple’s Pencil only works in designated apps. You can use it to tap on the screen anywhere but there’s no handwriting recognition, you can’t just draw and scribble on any screen, it’s not a general system input tool. It also lacks the hover mode (think mouse pointer) that is typical for most active writing tools. For someone who writes with a digital pen most of the time (doing it now) this is a big let down. Apple is still fairly new to the digital pencil club, so hopefully future editions of iOS will add handwriting support. There are a few apps that have built-in handwriting recognition like Writepad that are a step in the right direction but using them to write WordPress and Facebook posts is clunky.

Fire up your favorite drawing app and you’ll soon forget all about the handwriting thing. Personally I like Autodesk’s Sketchbook, it has most of the pro level tools but is far less complicated than Photoshop. There’s not much resistance between the pencil’s tip and the iPad’s screen. Some artists may not like the slide. Personally, I’ve grown to prefer less resistance; drawing on paper feels slow and awkward to me now. Especially when coloring and shading. The pencil is responsive and the tilt and pressure sensitivity work well in apps that support the features.

Lisa's cone
An original freehand done in Autodesk’s Sketchbook

The new iPad is fast, really fast. It runs on Apple’s new A10 brain chip and it sings. Now that iOS supports multiple (2 + a video) windows and has the horsepower to run them, it’s capable of replacing a traditional computer for general use. The 9.7 inch screen looks great. The rest of it is what you’ve come to expect from the latest generation of Apple’s tech. It feels great to hold in your hand and because it shares a footprint with the previous 9.7 there are a plethora of accessories already available for it.

Some reviewers and owners complain about the screen bezel on this and other tablet devices. I see not having a bezel causing another issue. Without it there would be nowhere to put your thumb(s) when holding the device that didn’t interfere with the view.

Overall I really like the new iPad and am thrilled that Apple added pencil support to the base model. For me, the lack of handwriting input and hovering will keep me using Windows or Android based pen tablets. Alas, I didn’t purchase it for my use. My wife absolutely loves it. If you’ve followed my blog for long, you’ll know that I was trying to convert her to a Galaxy Book. She learned to use it but never truly enjoyed Windows. That’s ok, it means the Galaxy tablet is mine now. Look for a review of it soon.

Creative Journaling with Windows Tablets Part 3; Microsoft Onenote

If you’ve been following along with this series, you’ll know that I am hip deep in the process of converting my spouse from an iPad to a Windows tablet and from paper to digital journaling. So far, we’ve chosen the perfect tablet and set up the best windows profile for pen enabled machines. Now it’s time to dig into journaling and note taking.

A quick search of the Microsoft Store will return an overwhelming number of applications dedicated to taking and organizing notes. We’ll examine a few of them in detail with future posts in this series. The patron saint of notes, doodles, and mind-dumps in Microsoft’s world is OneNote and that’s what we’re focusing on this time around.

note apps

As a long time fan, I consider OneNote to be one of Microsoft’s greatest achievements and a core contributor to my success. I have thousands of pages of memory augmenting documentation from every job or project I’ve ever been involved with. Every computer problem that I’ve ever encountered, all of the code and scripts I’ve written along with plans, meeting notes, article ideas, book ideas, things I am planning on building or buying, manuals for the stuff I already have; it’s all in OneNote. All searchable in a moment from any of my computers, my phone, or even my watch.

It is difficult to explain the full value of having all of this data available on-tap but a couple of situational examples might help. How many times have you sweated it out trying to remember what you did all year for your review at work? This never happens to me. In IT work, running in to the same problem months or even years apart is common. Can you remember what you did to fix that IIS app pool last summer? Get yourself organized and documented people! Next to exercising it’s the most stress relieving thing you can do. My boss thinks that I have a photographic memory but I can barely remember my own birthday.

Enough evangelizing, on to the good stuff. Microsoft publishes OneNote in three different versions. There’s the desktop edition that comes with Office; it’s icon name matches the version of Microsoft Office that you have installed, in my case OneNote 2016. The tablet/mobile version named OneNote, is free and can be found in your device’s app store; including the Microsoft Store for Windows 10. Finally, if you subscribe to Office 365 or have SharePoint at your workplace you can access a web edition that runs entirely in your browser. All three versions can share data and have the same core feature set but there are slight differneces between them. Through out the rest of this article when you see (DE) I am referring to something that can only be accomplished in the Desktop Edition. Microsoft will be phasing out the desktop edition after 2016. They are concentrating their efforts on the UWP (Universal Windows Platform) AKA the App Store version. Already they’ve added features to the UWP version that are unique to it. When you see (UWP) I am referring to something that is available only in the Universal Windows Platform (app store) verion of OneNote.

OneNote uses a hierarchical organization system that imitates your high school trapper-keeper. Notebooks -> Section Groups -> Sections -> Pages -> Sub-Pages is how the train flows. You can (and should) have multiple notebooks; personally I have one for Work, one for Home, and one for Writing. In a notebook you create sections and occasionally it makes sense to group several sections together. For example; in my Work Notebook I organize major categories like Software, Networking, Troubleshooting, etc. as section groups. Inside the software section group you might find sections named Windows, Exchange, Lync, and so on.

The first time you open OneNote it will create a notebook for you. The pages of this first notebook are actually a tutorial on how to use the software. The instructions are well thought out and more than good enough to explain how the software works; do yourself a favor and spend a few minutes reviewing them. This post is not about how to use OneNote , that is easy enough to figure out and there are already plenty of How To guides on-line. Being successful with any note taking system requires a lot of forethought and setup. As with most projects of this type, the hard part is figuring out how to get started. In this post we’re going to step through creating a OneNote notebook for tracking a typical office worker’s responsibilites but with a creative flair. Nothing will inspire you to use your notebook more than making it visually appealing. Like your living room, you want it be a comfortable place to be.

Step One – How To

Read the afore mentioned tutorial notebook pages so that you are able to follow along. In most cases I will not be explaining every action in minute detail. You can also get some excellent instructions via Microsoft’s quick start guides, they include one page cheat sheets for both the UWP and DE versions.

Step Two – New Notebook

Make a new notebook named for your job. I always name mine after the company I am working for. In DE Goto File -> New. In UWP Goto the +Notebook button at the bottom of the notebooks section.

Onenote new workbook

Step Three – Organize

Now we’ll create the basic structure of your notebook. You’ll want to make a section for every major function of your profession. There are a few that are ubuiquitos among office jobs so we’ll start with those but you’ll want add any that are unique to your position. Create the following sections to start with:

  • People – Here you’ll keep tabs on the people that you interact with. People you manage, co-workers, vendors, contractors, and bosses; you’ll want to record details about them all in this section. What they like and don’t, personality traits, and information they provide about their lives can all be valuable later. Tip: insert hyperlinks to these “people pages” on pages in the other sections for quick reference.
  • Projects – I like to make Projects a section group and then create sections for each project that I’m involved in under it. To do this just click tap and hold or right click in the navigation pane and choose new section group from the pop-up.
  • Meetings – If everyone took good notes in meetings we could probably have a lot fewer of them.
  • Tasks – This is where I track all the little actions I have to do that are not part of a project. I need to pull a report on sever storage once a quarter and I’ve detailed how to do it along with the script I use in this section.
  • Instructions – Manuals, written instructions, and even videos off Youtube get posted in this section. Onenote will index all of this stuff (even the dialog from video and text in pics). This means that the next time you search for ” use postage” the manual will pop-up.
  • Ideas – Self explanatory, everybody gets ideas about how to do something better, easier, or faster; the trick is in remembering them at an appropriate time.
  • Issues – If you want to solve problems or have one you need help solving, track them here to ensure you don’t waste time repeating fixes or worse yet forget all together.
  • Work Log –  In the lead-in I mentioned that I never freak-out come review time. This section is why. I make a page for each year and on them I insert a table with the following columns: Date, Description, Reason, Requested By, Attachments, and Notes. At the end of everyday I spend 10 minutes jotting down what I spent my time on.
My company notebook
What your notebook should look like when finished. Be sure to doodle in the margins.

Step Four – Create

Now that we’ve got a notebook up and running, we can dive into the creative part of journaling with OneNote. Drawing and doodling in OneNote is a cinch; just select the draw tab in the ribbon, pick a tool and color and knock yourself out. It works best on a system with an active stylus but capacitive pens and even your finger will get the job done.

Draw

The draw options available in the ribbon offer a lot more than just your standard pen and marker choices. Poke around and you’ll find premade shape tools, and in the UWP edition there’s a straight-edge as well as ink-shapes that turn the sloppy circles that you usually make into to perfect ones. There are also highlighter markers (which I use often) and a lasso select tool that will help you move stuff around no matter the shape.

View

Under the view tab in the ribbon you can add lines and grids to your pages. You can also change the background color of your pages from this tab. The DE version will allow you to set a picture as the background for a page. Right-click (tap-hold) any picture that you’ve inserted and pick save as background. Tip: for the best effect edit your photo in paint or Photoshop first and turn down the opacity or turn up the transparency before setting the image as your background.

Insert

The insert tab presents a lot of possibilities. You can of course insert photos but also, videos, files of all types, audio recordings, and more. OneNote will attempt to index the audio from multimedia files and the text from images to make them searchable. It will also index the text from any files you embed on a page.

There are two options here that don’t get mentioned much; one is on-line pictures, the other is stickers. Both let you search for and insert an unlimited amount of artistic flair even if your best drawing is of a stick figure. In fact it is these two options that allow OneNote to compete with the likes of Goodnotes in the creative journaling market.

All Together

Of course you’ll get the best results if you combine all of the options available in the ribbon. If you’re using the DE versions you can get your page just right and then save it as a template so it can be used over and over. Look for the Page Templates button on the insert tab. Need some inspiration? Try an image search for OneNote Art to see what people are doing with this tool.

meeting notes

Smartwatch Shootout; Apple Watch vs. Wear OS vs. Tizen

My Tech Monkey and lack of brand loyalty have compelled me to end up with all of the major smartwatch operating systems. From the first gen Gear S1, Sony Android Wear, and Apple watch to the current equipment; I’ve had them all and witnessed their evolution. How do they stack up in the real world? I’ve worn them in every conceivable situation: work, work-outs, hikes, vacations, date night and everything in between.

I’ll start by declaring that I like them all. For my lifestyle there’s a best fit, but they’re all useful pieces of gear. Second, I must say that I’ve always enjoyed gadget watches. Calculator watch? Check. TV remote control watch? Got it. Casio Databank? I have two. I also had the Timex DataLink. I mention this because it causes a bias in my overall opinion when comparing smartwatches and standard time pieces.

My grandfather sparked my interest in time pieces at an early age. He was an antique watch trader and often took me to watch shows, pigeon swaps, and other various gatherings to obtain some of most beautiful pocket watches and clocks you can imagine. Railroad pocket watches with cases of multi-colored gold and jeweled internal mechanics were his specialty. Some of them were able to show the time, date, and phase of the moon with nothing more than spring powered gears.

Why wear a smartwatch in the first place? They don’t do anything that your phone can’t already do better. This is what more than a few members of my social group think. The valuation is accurate. They really don’t do anything that your smartphone won’t. But isn’t that true for lots of tech? What does your iPad do that your iPhone or laptop can’t? For me, the point of a smartwatch is not to provide unique functionality but to augment your other devices and to look cool while doing it. Seriously, the best feature of smartwatches from my point of view is the ability to change the watch face at will. I often match my watch to my clothing on any given day just because I can.

I use my watch to primarily do the following (no particular order):

  • Fitness Tracking – Specifically I need to track my heart rate, distance, and ideally my location.
  • Notifications – Text, email, and calendar alerts are the biggies here, but Facebook, Xbox Live, PSN, Skype and Instagrahm are appreciated.
  • Directions – I spend a lot of time navigating various downtown areas and have found glancing at my wrist for the next turn to be safer than having my phone up in my face.
  • Tell the time – This would include all of your basic watch functions; stopwatch, timer, alarm, ect.

All three of the major operating systems can perform these functions as can most of the secondary vendors like Fitbit, Garmin, and Pebble (if you can still find one). So what ends up setting the devices apart are the looks and secondary features that are most helpful to you. I’m not going to spend much time discussing specifications, there are countless articles on-line to enlighten you about the hardware options. In a nutshell Apple is square and Android is round, LOL. The watches themselves break down just like their phone counterparts.

Apple-Watch-3

The Apple Watch is the easiest to use right out of the box; strap it on your wrist and pair it with your phone. That’s it. Sure there are apps you can install for everything under the sun, but most people don’t need them and won’t use them. The design is elegant, but I’m not a fan of square wrist watches in general. The fit and finish on Apple’s wrist computer is second to none. The tolerances between components are minuscule and the case feels like a premium device. My biggest complaint about the Apple is that you’re stuck with the watch faces they give you. If it wasn’t for this limitation, it could have ended up being my favorite.

You can use the Apple Watch with an Android phone, albeit in a limited fashion. I wouldn’t recommend purchasing one specifically to pair with an Android device, but it’s a nice option for people who are moving between platforms. My wife is the Apple fan in our home, so the Apple Watch belongs to her. I borrow it from time to time just to see what Apple has changed on it . I really enjoy wearing it, but the lack of 3rd party watch faces is maddening to those who’ve grown accustomed to the ability.  It does everything else on my list of requirements exceptionally well. The Medical ID feature could prove invaluable to someone with drug allergies or other need-to-know health conditions.

android-wear

Android Wear, now renamed to just Wear OS, matches its phone counterpart. Rather than a hardware and software solution like the Apple Watch, Wear OS is an operating system that many manufactures use on their watches. Not all Wear OS devices are created equally! They can have drastically different features, functions, and shapes. Due to these differences, you need to be careful when choosing a device to be sure it has the hardware to support the functions you are after. For example; choosing a Wear watch that doesn’t have an integrated GPS receiver will prevent it from tracking your run locations unless you take your phone along.

Wear OS takes more work and know how to get up and running. You will be installing apps on both your phone and the watch before it is fully functional. It is more difficult to use but ultimately offers more functionality than the Apple Watch, assuming you got top-end hardware. Plus, you can load different watch faces to your heart’s content! Up until a few weeks ago my everyday watch was a Wear based Moto 360 Gen 2. It’s Google voice functionality is the best of the voice assistants and having the full Google maps was great. You can pair most Wear OS watches with an Apple phone but you’ll get less functionality if you choose to.

gear-s3_design_classic

Samsung wasn’t happy with Google’s Wear OS so, they created their own. Like Wear OS, Tizen is a Linux-based smartwatch operating system. Similar to Apple’s approach Samsung makes both the hardware and the operating system for the Gear S3 series of watches. If you are pairing it with a Samsung phone, the process is just as easy as Apple’s. No apps to install and configure, just pair the devices and go. Of course Samsung has their own app store full of apps for you to fiddle with, but most of the main features are controlled by the built-in software. The watch can be paired with any Android or even Apple phone.

I’ve just recently switched to a Gear S3 and for my lifestyle its the best choice of the three systems. It doesn’t have as many apps as Google’s Wear OS, and isn’t as simple as the Apple Watch; it sits comfortably in-between them. For me, the always online LTE connection and excellent fitness app (Samsung Health) are the best features. It offers some truly excellent watch faces (not as many as Wear) and looks nice. The LTE connection means I don’t need a phone at all when I head out for a run, I can stream music, track my run and heart, and even take calls and texts all from the watch. The bad news is that it requires a service plan from your carrier. I was also disappointed in the S Voice assistant and had to learn to use a new map provider.

Smartwatches aren’t for everybody but they can be a life saver if you rely on tech for your livelihood or are required to be in constant communication. They don’t do anything your phone already doesn’t, but they do extend your digital life to something that is always visible. I’ve stopped wearing out my pants pockets since I’ve started wearing them, LOL.

Traveling without a laptop for the first time in 15 years! Thanks to my Samsung Note 8.

I have been employed by the tech sector for my entire working life. Somehow I always wind up in positions that demand on-call service. As a result, I rarely leave my home or office without a laptop and it’s accessories in tow. I have never been on vacation or a business trip without one.

I’ve tried every Palmpilot, Pocket PC, Windows CE, Psion, tablet, and mobile ever made in an attempt to free myself from “The Bag”. Sometimes I feel like Lydia from Skrim ” … sworn to carry your burden”. Until now, the mobile devices always fell short for me to use them as anything other than companions. They lacked power, storage, input options, apps, something was always missing.

I’ve had my Note 8 since launch day and have been locally venturing away from base without “The Bag” for a while now. My company has a VDI infrastructure that I can easily connect to with my Note. The hover mode afforded by the S-Pen acts as a wireless mouse and the awesome handwriting recognition handles my input needs with ease. Openvpn on my home network means I can RDP to any of my personal equipment as well. The Google play store is fully fleshed out with engineering and development utilities along with any productivity software that you might require.

The Note 8 has one more brilliant trick up its sleeve that has allowed me to end up on this flight to San Antonio with nothing in the overhead bin but my jacket. The Dex dock in my luggage means I have access to a full PC experience should it be required on my journey. I only need to hook the dock to the hotel TV (HDMI) and connect my portable keyboard / touchpad to one of the USB ports and I’ll be in business. Many of my apps like Word, Excel, and Outlook will run in fullscreen or windows in Dex mode and if I need more power I only have to logon to the VPN and connect to my VDI or RDP to the system that needs attention.

The Dex dock also increases my entertainment options by letting me stream fullscreen video, browse the web, and even play games. Not all applications work with it but more than enough to get by do.

So I sit here on the plane writing this post and try to suppress a chuckle as my seat neighbor tries in vain to get his laptop to fit on the tray-table in a manner that allows him to comfortably type. All the while, reflecting on what a different experience airport security is without “The Bag”. OMG, I never knew how easy it could be!

PowerShell; Dynamic Reporting of Applications on Windows Systems across all Domains

It can be difficult to know what applications are installed on the machines in any given company. Not knowing what is installed where, can lead to all kinds of trouble when updates are pushed and changes are made. Enterprise class tools like System Center that can create a CMDB are expensive. So what’s an Admin supposed to do?

If your budget won’t allow you to purchase a tool or pay a DEV team to write you one; you’ll have to do it yourself. PowerShell is always my goto tool for this kind of thing on a Windows network. You could accomplish the same goal with VBS or even CMD batch files, but if you are running systems so old that you have to resort to those tools, you have bigger problems than worrying about what apps are installed.

If you’ve spent time researching this, you’ve probably seen several techniques to get the data that you’re after. I like connecting to the registry and searching the 32 bit and 64 bit uninstall keys because it is fast, accurate, and has a lot of info available. You could also use WMI/CMI, scan the Program Files directories for exe files, and more. As with everything in any kind of programming; the hard part isn’t getting the data, it’s out-putting it into something useable. Lucky for you I’ve included that feature in my script.

The code below will locate your AD Forests and find domain controllers in each of them. Next it will scan for objects that contain “Windows Server” in the Operating System description and add those object’s DNS host names to an array. It will ping each server in that array to see if they are real and on-line, because AD can have dead objects in it. Then it will add the systems that are up to another array and for each of those, the script will remotely access the registry keys that contain the uninstall data. The uninstall data will be used to create a CSV report that lists each application’s name, version, help link, and install date along with the name of the machine.


Import-Module ActiveDirectory
$domains = (Get-ADForest).domains
$dcs = Foreach ($domain in $domains) {Get-ADDomainController -DomainName $domain -Discover -Service PrimaryDC}
$servers = Foreach ($dc in $dcs) {
Get-ADComputer -Properties * -Filter {(OperatingSystem -like "*Windows Server*")}|Select DNSHostName -ExpandProperty DNSHostName
}

Foreach ($server in $servers){
$PingTest = Test-Connection -ComputerName $server -Count 1 -Quiet
If ($PingTest)
{
$servers += $server
}
Else
{Write-Warning "Failed to connect to server '$Server'."}
}

$report = @()
ForEach ($server in $servers) {
$report += Invoke-Command -ComputerName $server -Command {Get-ItemProperty HKLM:\Software\Wow6432Node\Microsoft\Windows\CurrentVersion\Uninstall\*, HKLM:\SOFTWARE\Microsoft\Windows\CurrentVersion\Uninstall\* | Select-Object @{n="Application"; e={$_.DisplayName}}, @{n="Version"; e={$_.DisplayVersion}}, HelpLink, Publisher, InstallDate | Sort-Object Application}
 }

$report | Format-Table -AutoSize
$report |select -Property * -ExcludeProperty RunspaceID, PSShowComputerName|Export-Csv -Path $env:userprofile\documents\windows_servers_cmdb.csv -NoTypeInformation

You’ll need to have the RSTAT tools installed or run the application from a Server that has them. To be successful you’ll also need enough privileges to scan the remote machines registry and your network can’t be blocking WinRM. Other than that, just save the code to a PS1 file and run it. The report will be in your Documents folder named windows_servers_cmdb.csv.

If you want to adjust to scan apps on workstations just change the filter keyword to “Windows Workstation”; you could also do both. To fully automate it just add a line at the bottom to email the attachment and schedule it to run as a task. If you want to get really creative convert the table into HTML and upload it to an IIS or Apache host every day. If you have SharePoint you can upload it to a custom list and then create some pretty killer reports. Views that filter for key words like “Exchange” or “SQL” are helpful for everyone.

Be sure to tell your boss it took you all week to do this LOL.


Skyrim VR on the Oculus Rift; Its AWESOME!!!

Bethesda graced all of the PC virtual reality adopters with one of the best RPG games every created. Skyrim arrived on the PC in all its VR glory on April 2nd. I had pre-ordered it and took the day off from my day job for the occasion. We patiently checked Steam every 5 minutes after the estimated launch time of 5:00 PM waiting for the game to unlock. I don’t think I’ve ever seen my son so excited. In true Steam fashion, it was late; the game unlocked at or around 6:00PM.

We have Skyrim for the Xbox 360, the Xbox One, the Switch, and the HD Edition for the PC. My wife, oldest daughter and son have more than 500 hours of play time in the world each. We’re a family of experienced players to say the least. We all agreed to let the youngest go first. He signed on to his profile and fired it up.

Before we get too far into discussing the game let’s talk a little about what I’m running it on. This title takes some serious power to run clean. I’ve got an i-7, 32 GB of 3000 SDRAM, a TB M2 disk, an MSI Gaming OC Edition RX-480 8GB, and a 1000 watt PS. The system and GPU are both overclocked (ask in the comments if you want the settings). I am able to run the game on high graphics with supersampling turned all the way up and still hit the 90 FPS all VR players are looking for.

When you first pop into the game world it looks pretty blurry. You need to go into the settings and turn up the supersampling if your system can handle it. This will drastically clear up the blurry textures and text. Besides the game’s supersampling, your video card drivers, as well as, the Oculus and Steam VR software also have settings for this function that might help you get the best picture possible. At some point I intend to write an advanced guide on configuring the Rift but for now: Google “Increase Oculus Pixel Density”, your ability to use supersampling is entirely dependant on your GPU. Cooling is going to be very important, I don’t recommend attempting this on a gaming laptop.

Once you’ve gotten the settings all sorted you’ll have to restart the game so I recommend getting them all squared away before you start the actual campaign.  The intro will have you set your mode of locomotion. You can choose between teleportation, ala Robo-Recall and Doom, or you can use smooth motion via the analog sticks. If you pick the analog option, a blinder effect will restrict your field of view when you move. This is to help prevent motion sickness. It works; I turned it off and was almost instantly dizzy but I’ve trained my brain to let it pass and after a few minutes I was fine. The setting is under the VR menu look for FOV limiter down near the bottom of the list. While you’re in there you might also want to turn off the cross-hairs and dialog captions because they ruin the immersion.

Back to the game; my son fired it up went through the settings and started the story. Wagon ride with the prisoners begin! Holy crap the people look real. Jeez, the scenery is amazing. Is that guys mouth taped shut? It was a non-stop love fest. The execution is exactly that; we all cringed during our respective turns. The dragon; I won’t ruin it for you but a full-scale fire-breathing 3D creature………

Talking to the NPC’s feels almost like a conversation with a real person. The blacksmith’s wife is actually pretty hot. If they can patch voice recognition into this thing I know several people who will probably live in Skyrim more than here. The world feels like somewhere you are going to rather than a game you are playing. Of all my family and friends I’m the only one that hasn’t played very much Skyrim. That is about to change.

Is the game perfect? Nope. Not even close. You can fight just by wagging your hand back and forth, the float bugs are still present, and the controls are tricky to master. Is this best VR adventure I’ve seen so far? Absolutely. Does it suck that they expect you pony up another $60.00 for a game you’ve probably already purchased more than once? Yes, but after having spent some time with it I would have paid double. Don’t nitpick it; just live it. Go for a swim (enable realistic swimming and sneaking), climb a mountain. try not to freak out the first time a frost spider charges you. Its one of the best entertainment experiences I’ve ever had and I’ve only spent a few hours with it. If you’re not on the VR train already you should think about jumping on. Its going to be a wild ride from here on out.

Nintendo Switch; One year old and still the bomb!

When I last wrote about the Nintendo Switch my family had two of them. Now we have five! Clearly we need to work on sharing in my tribe. We’re not in the habit of purchasing each family member their own console but the portability of the system demands it. How are we supposed to share a system that each person wants to take with them? We have Switch docks attached to the TV’s in our living room, basement, and bedroom so big screen gaming is an option for every one too.

Even when we’re all at home, having our own screen is great. You can find us chillin’ on the couch, each playing our own favorite several nights a week. We also play some games together, Splatoon 2 and Mario Kart are our favorite group games.  I’m still taking my system to work so I can play it at lunch almost every day and a few of my co-workers have them now as well.

The system is not without its issues; to me the biggest problem is that Nintendo still hasn’t provided a way to back up your save data. The fact that you can move your profile shows that a backup solution is possible; come on Nintendo get with the program. None of your customers want to lose their 200+ hour BoTW saved game data. Also, the kickstand just sucks.

Saved data issues aside, the Switch is still the most played system in our home and we have all the platforms. Our current favorites are the afore-mentioned Breath of the Wild, and Splatoon 2 along with Doom, Skyrim, Mario Oddessy, and Star Dew Valley. Games and updates are released for the console in an ever quickening pace and more developers are jumping on the platform every day.

There have been several firmware updates since my last post about the system and I’ve spent a lot of time playing. Below are a few tips and tricks that you may not have discovered.

  • USB Wireless headsets are supported – If your USB headset uses a wireless dongle there’s a good chance it will work with your switch now. Plug the dongle into the port on the front of your dock.
  • There are several cheap, small, USB-C port replicators that work as Switch docks. I have this one and it works great.
  • If you hold down the home button you’ll get a mini pop-up that lets you adjust your volume and screen brightness in-game.
  • If you have multiple switches in your home, consider buying games on cartridges. You’ll save money by being able to trade the games back and forth.


PowerShell; Manage AD, Exchange, and Lync/SfB in one console

I’ve gotten to the point where I manage most things in my day job with PowerShell. It’s a lot faster to type Unlock-Account kjtrent; than it is to launch ADUC and find the account. I also don’t like having to open one tool for AD, one for Exchange, and another for Lync/SfB. Furthermore, I have separate credentials for signing on to my workstation and managing servers.

I’ve created a simple little PowerShell script that will prompt for credentials and use them to open remote sessions (no need to install anything) to the servers. Copy the code below and save it in a PS1 file. Enter the FQDN of your servers in between the quotes for the appropriate variables. Then make a new desktop shortcut with the following path: C:\Windows\System32\WindowsPowerShell\v1.0\powershell.exe -NoExit “C:\Users\profile\Documents\AdminShell.ps1” and pin the shortcut to your start menu. When you double-click it you’ll be prompted for credentials and a PowerShell window will open with the remote sessions loaded. It will stay open until you close it.

#Enter the FQDN for your servers below between the "
$exchfqdn = "your exchange server fqdn"
$sfbfqdn = "your Skype for Business / Lync FE Server FQDN"
$adfqdn = "your DomainController FQDN"

$ErrorActionPreference = 'SilentlyContinue'
$WarningPreference = 'SilentlyContinue'
$UserCredential = Get-Credential -Message "Credentials are required to access AD, Exchange, and SfB; use the detected username or enter a differerent account" -UserName ($env:userdomain +'\'+ $env:USERNAME)
$ExSession = New-PSSession -ConfigurationName Microsoft.Exchange -ConnectionUri http://$exchfqdn/PowerShell/ -Authentication Kerberos -Credential $UserCredential
$SfBSession = New-PSSession -ConnectionUri https://$sfbfqdn/OCSPowerShell -Credential $UserCredential
$ADSession = New-PSSession -ComputerName $adfqdn -Credential $UserCredential
Import-PSSession $ExSession
Import-PSSession $SfBSession
Import-PSSession $ADSession

Creative Journaling with Windows Tablets Part 2; The Perfect Windows Profile

If you’ve read the first article in this series then you’ll know that I am in the process of helping my wife convert from a paper journaling system to a Windows tablet even though she usually prefers Apple devices. Obviously, I enjoy a good challenge.

In my opinion one of the biggest differences between Apple devices and Windows computers is that an Apple device is largely ready to use out of the box; basically, you just need to load your apps from the store, log on to your accounts, and go. Windows on the other hand is infinitely customizable. These customizations make the operating system more flexible for all kinds of people and uses, but can be source of frustration for those that just want to pick something up and go. Microsoft attempts to start you off with a basic profile that works for everyone, but it just doesn’t cut it for most people.

There are lots of guides about setting up Windows already out on the interwebs. Most of them show you where the settings are and what they do. From my experience in the IT industry, I’ve come to the realization that finding the settings isn’t the hard part. Especially when you can just ask Cortana “How do I turn off the WiFi?” or, “How do I setup a printer?” The hard part is getting your head around how best to organize a system and deciding what settings you should or should not use.

In this post I’m going to show you exactly how I setup a Windows profile to use with a Pen enabled system. It’s going to be a long post so I’ve broken it down into sections. I am assuming that you’ve completed the initial setup of Windows and created a user account. I’m also assuming that you know how to install apps from the app store and logon to your various accounts. If you want to try these settings but would prefer not to mess up your current profile I suggest creating a new user account. Select the Start button, then select Settings >Accounts > Family & other people > Add someone else to this PC. You can always delete it if you don’t like it or switch to it if it works better for you.

A word of warning, my philosophy around the best organization of an operating system is not predicated on reducing the number of mouse clicks/screen taps. I understand that this is important for some, but to me hunting for the thing to click is more annoying than being able to get to it in one. Also, I feel that the indexing provided by modern operating systems already allows for zero clicks with regards to launching applications making pleasing aesthetics and organization in the GUI more desirable than all out efficiency.

The Software

Everyone has specific needs for applications but people who are reading this may just be starting out with Windows 10, so I’m going to list out some applications you should consider installing. Installing software before arranging your start menu and adjusting other settings will make things a little easier in the long run.

Microsoft Store Apps

Windows 10 can operate as both a PC and a tablet (2-n-1) to facilitate this flexibility, it has two methods of installing applications. The Microsoft Store is essentially the same thing as Apple’s App store or Google’s Play store.

Somewhere in your start menu you should see a shopping bag icon. Click it and then search for and install the apps below. If you don’t already have an MS account you’ll need to create one now. Don’t complain, Apple and Google both require accounts, too, LOL. If you’d prefer to set up your account on the web rather than going through the wizard you can do that here.

  • Alarms and Clock – built-in if your version of Windows 10 is new enough.
  • Amazon – Amazon shopping, has voice recognition and bar code scanning
  • Amazon Music – Stream and download Amazon Prime music.
  • Audible – Audiobooks, this service requires a subscription but you can get two books for free.
  • AutoDesk SketchBook – A great drawing and sketching app that is easy to use.
  • CPlus for Craigslist – Lets you setup searches for Craigslist that notify you when those items become available.
  • Drawboard PDF – A PDF viewer that supports drawing and inking on/over the files. This app is free on some systems or $9.99 on others.
  • Facebook – I actually prefer the website but installing the app makes it show up as a sharing option in other applications.
  • Flipboard – The built-in news app is great, but I use Flipboard because it allows me to publish articles from my blog.
  • Flixster – Movie theatre show times & tickets, reviews, clips, etc.
  • Fresh Paint – Another great art app that is easy to use.
  • Google – Easy access to all of google’s services: Search, Gmail, YouTube, ect.
  • Instagram
  • Kindle – Book reading app
  • Messenger – Facebook Messenger app
  • Merriam Webster Dictionary
  • Microsoft Jigsaw – Puzzles on your computer
  • Microsoft Mahjong
  • Microsoft Minesweeper
  • Microsoft OneNote – Free tablet edition of the note taking app.
  • Microsoft Skype
  • Microsoft Solitaire
  • Microsoft Sudoku
  • Microsoft Translator
  • Nook – Barnes & Noble book reader
  • Netflix
  • Scan
  • Sence Clock – Great nightstand clock but also gives you live tile clock for your smart menu.
  • Skype
  • Sway – A new type of document that combines the features of a Powerpoint and a web page
  • Twitter

Desktop Software

Everybody has their prefered desktop software and programs they require for their profession but there are a few that are ubiquitous from my point of view. As I stated earlier, having the majority of your software already installed will make organizing your start menu (next step) easier.

  • 7zip – File compression utility
  • Acrobat Reader DC – there are still some PDF files that require Adobe to fully work. I do not make it the default.
  • Audacity – An audio editing tool
  • Battle.Net – Video Game Engine
  • Dophin – Gamecube / Wii emulator
  • Google Chrome
  • Google Earth Pro
  • Java
  • Office Software – If you don’t have Office 365 I recommend the free OpenOffice.
  • Origin- Video Game engine
  • Paint.Net – Free advanced graphics editing tool.
  • PS4 Remote Play – Stream games from your PS4
  • Steam – Video Game engine

The Settings

I find that one of the keys to enjoying the Windows 10 operating system revolves around spending some time to configure the user interface settings. These settings control what you see in the start menu along with how your system looks and works. We’ll also need to adjust the settings for how our pen works. There are hundreds, maybe even thousands of other settings you can tinker in Windows, but Microsoft does a good job of picking defaults and unless you have a specific reason to change things like the Power settings or the Update frequency I recommend that you leave them as is.

Start Menu

The Windows start menu has a starling number of configuration options most of which are available under the personalization heading in the settings app.

In your search bar type “Start Settings” and adjust the toggles to match the picture below.

startsettings

Now click the “Choose which folders appear on Start” link at the bottom of the start settings screen and adjust those toggles to match the following picture.

foldersonstart

These settings control which folders appear above the start button. They are handy shortcuts that I use often but having too many of them causes screen clutter.

startfolders

Themes

Themes are composed of background pictures, color schemes, icon packs, sounds and sometimes even screen savers. They do more to personalize the way your computer looks than almost anything else. There are built-in themes, themes in the app store for free and for pay along with countless web sites (google Windows 10 Themes) to get them from. Microsoft has a free library of all kinds of themes organized by subject categories here.

If you choose to download themes from a web-site, exercise caution. You have no idea what’s in the files you are downloading; get them from reputable sites and scan them with AV software (right-click on the downloaded file & choose scan with windows defender) before installing. You can also make your own themes; check out my article on how to turn your favorite pictures into one.

In the search box type “Themes” and click “Themes and related settings” in the results. You will find all the controls along with a link to find more themes in the app store. If you don’t have any downloaded and don’t want make your own I suggest selecting the built-in Windows 10 theme.

Themesettings.png

Lock Screen

The lock screen in Windows 10 works just like the lock screen on your smartphone. You can select an image or even play a slide show for the background. Some apps like the weather and calendar are able to display information when the lock screen is on. Just type Lock Screen in your search bar and click Lock screen settings in the results. Adjust the settings to match your preferences.Lockscreen

Galaxybookwithkeyboard
If you have a case or skin that you like, take a photo of it and use it for your lock screen.

Colors

If you’ve opted to use a theme, it likely set the colors of your Start Menu background, Task bar, and the borders of windows. However there are still some options you’ll want to adjust. Type color settings in your search bar and select it from the results. I reccomend the options show below.

colors
Choosing Dark as the default app mode will cause many applications to have a black background like the screenshots you see in this article.

Pen Settings

The point of this article is to configure your system for digital journaling, you will want to fine tune the way your pen/stylus operates so that you can get the best experience. Type Pen Settings into your search bar and select it from the results. I suggest the settings below. I also recommend that you click the “Get to know my handwriting” link, this will launch an application that fine tunes the handwriting recognition for even the sloppiest writers (like me). pen1 
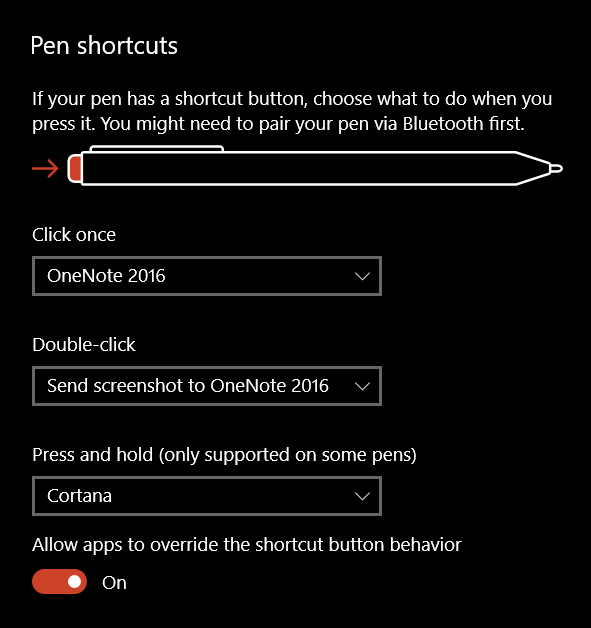
On the same screen you can control your Pen’s buttons.  pen2

There are some more pen settings in the classic control panel. Type control panel in the search bar and select it. Find the Pen and Touch icon. Here you can control the tap actions and enable the eraser function if your pen has one. You should also enable Flicks. Just keep in mind that they only work in Desktop Apps and not the Tablet apps (called Universal Apps) that you download from the store. You want to use the practice link at the bottom of the window if you’ve never experienced them before.


The Start Menu

Now we’re ready to organize our Start Menu. First go through your apps list and right-click on the icons for all the software that you use frequently. Choose the option to “Pin to Start”. Note, if you see “Unpin from Start” it means the icon/tile for that program is already in the start screen portion of your start menu.

pin2start1

I also like to pin my favorite web sites, like those for my bank, the on-line access to my TV, and Facebook to my start screen. To do this you’ll have to use the Edge browser. Just go to the URL of the site then click the action menu … icon and choose Pin this Page to Start. pin2startedge


Organization is Key

Now you have a mess of icons and tiles all over the place in your Start menu. How did this help? To get the most out of the windows start menu you need to organize your icons into sensible groups.

Tile Sizes

The icons in your start menu are called Live Tiles. Some have the ability to show updated information from the application that they represent. For instance the News tile will flip through headlines, the Photos tile will show your pictures, and the Facebook tile shows the latest posts on your timeline. To get the most out of live tiles you need to adjust their sizes so that they can display the information you want to see. Right click on a tile and go to resize to see its options. Many tiles change what they show in accordance with their size. For example, making the weather tile wide instead of medium will cause it to show the full weeks forcast instead of just the current weather conditions. Tileresize

Group Tiles

You can group tiles together in named categories. Microsoft usually gives you a group called Life at a Glance to start with. You can make new groups by dragging similar tiles close to each other. When you get two or more tiles next to each other, hover your mouse just above them and you see the option to name the group. I make the following groups on every computer that I use:

  • Life at a Glance = news, mail, calendar, Facebook, Instagram, Twitter, Messenger, photos, calculator, etc.
  • Media = Art, photo editing, video editing, audio editing
  • Office = Any application that I use for documents
  • Games
  • Dev Tools
  • Movies, books, and music (sometimes I name this group entertainment)

Nested Tiles

Besides groups you can also create nested tiles. This works in much the same way it does on a smart phone. Drag one icon on top of another and let go. Add more icons to the nest by dragging them in. When you nest tiles you are able to fit more of them in a much smaller space but you give up the “Live” functionality. They will not show updated information or notifications in most cases.

Nestedtiles
My Book Apps as a Nested Tile

Conclusion

If you’ve made it through all these steps you should have ended up with a great looking profile that shows your most important information every time that you click the start button. Your pen has been optimized, handwriting tuned, options for the on-screen input adjusted, lock screen and backgrounds set, and more. Once of the nicest features of Windows 10 is that once you do go through this on one computer; the results will replicate to every Windows 10 computer you use afterwards as long as you didn’t turn this option off. Thanks for reading and stay tuned for the next article in this series.

Creative Journaling with Windows Tablets. Part 1: An Apple fan transitions from Paper to a Windows Tablet

My wife has been looking at the iPad Pro devices for the last few months. She’s seen what I’m able to do with my Surface Pro and Galaxy Note pen enabled devices and has become interested in converting her coloring and more importantly her journaling to a digital format. She uses her Hobonichi Planner and a custom fountain pen I bought her to run our entire household, manage our children’s schooling, track our healthcare, and as a form of creative output. She prints pictures from the HP Sprocket and sticks them on various pages or diary entries about our activities. She colors, doodles, stickers, and even paints on some of the pages. You can see her custom leather journal cover from Chic Sparrow  inscribed with the now famous Zelda quote, “It’s dangerous to go alone, take this!” in the featured image above. People don’t go to that expense and trouble for something that isn’t important to them. Convincing her to go digital has been a long, long journey.

Her journal is a very effective tool and an art form in and of itself, but as our family becomes busier and we rely more and more on the information contained within it, the technologist in me can’t help but see several major flaws with the paper system. The biggest of which is that it’s a single copy of important data with no easy method of backing it up. The best I’ve come up with is taking pictures of some of the more important pages. Other problems crop up when we need to incorporate digital information into the system like sites and passwords. The Sprocket lets her add photos but other digital media is out of reach. There are also challenges when she needs to share the info with other family members. I’m concerned about security; if she leaves it at a restaurant whomever picks it up will have access to important personal information just by flipping through the pages.

Dinnerpage

She’s prefered Apple’s technology for quite some time now. I’ve lost count of how many iPads and iPhones she’s cycled through over the years. As I’ve said in other articles, I’m not a brand oriented technologist, I use whatever works best for the task at hand. For her, that’s been Apple devices, hence her interest in a new iPad with an Apple pencil.

However, I’ve noticed that she needs to borrow my PC to accomplish certain tasks more frequently than she realizes. She likes games like The Witcher 3 and Sims 4 that just don’t run on Apple’s stuff. The full Microsoft Office is required when doing anything complex. Our educational curriculum requires the use of web-sites that still employ Adobe Flash. When it comes to digital pen input, Microsoft and Samsung have had years to perfect their solutions and they work in the entire system across all apps, not just a select few. These reasons led me to convince her to convert to a Windows 10 tablet instead of an iPad with a pencil.

She had been using my Surface for some of the PC related tasks I mentioned above and liked it. To show her Windows was the way to go, I set her up a customized user profile and she played with it for a couple of weeks. She enjoyed it for the most part, but was nervous that the learning curve would cause a lot of frustration. I didn’t argue, just agreed that it might and promised that if the transition wasn’t worth it, we’d return or sell whatever device she ended up with and I’d get her an iPad with an Apple pencil no questions asked.

I think a big part of the attraction to iPads over Windows is the physical size. People assume that the Surface Pro is the only available system; nothing could be further from the truth. For her birthday I got her a Samsung Galaxy Book 10.6″ which is a Windows 10 tablet that is roughly the same size as the smallest iPad (10.5″) that you can use the Apple pencil with. I’ll be writing a full review of it just as soon as I can pry it out of her hands and spend some quality time with it. It really is an impressive piece of hardware and I’m more than a little jealous.

Galaxybookwithkeyboard

She spent several hours, a couple of days really, getting Windows tweaked and installing software. Things like Google services, Email, Instagram, Facebook, Flipboard, Spotify, Pinterest, Amazon, Nook, Kindle, Audbile, Office 365, Steam, etc. were all just as easy to setup on the PC as they were on the iPad (her words). 75% of the software including Office 2016 came pre-installed and the rest was just a matter of opening the Windows store and finding the apps. Most modern apps store their data in the cloud, so once you get them installed and have logged on with your account everything is just there. I helped with some of the advanced stuff  like: making a Windows theme out of her favorite pictures, arranging her Start Menu, enabling surround sound on her headphones, and exporting / importing data from her apple devices.  I gave her a quick lesson on how to manage bluetooth and Wi-Fi, where to find all the settings she might need, and how to create and pin shortcuts.

When I followed up with her a few days later she told me how well the transition had been going so far. In her opinion, Microsoft has really nailed it with Windows 10. Cortana kicks the crap out of Siri in every way, she bragged about how awesome it was to have a voice assistant that could actually assist. She loved the speed of her new system and how it could play her favorite full games or stream them from our Xbox, Playstation, or gaming PC. She’d figured out the hand-writing input; had used bluetooth to pair a Dualshock controller, an external mouse, and her Sprocket printer. She setup all of her network connections, synced her iPhone and more. I was impressed. For most of it she just asked Cortana, “How do I….?”.

The trouble started when she logged on to the Windows store to download the Goodnotes app she’d experimented with on her iPad mini. Unbeknownst to me, this specific app was a big part of the reason she was willing to attempt to convert from paper to digital journaling. The Goodnotes app is featured in many journaling groups on Facebook, Instagram, and twitter and has a lot of fan support on Youtube. It wasn’t there. Now what? She likes Windows 10 and doesn’t really want to change to an iPad, but the journaling portion of the project was the most important part to her. Was my plan busted before it really got started? To be continued…..