I love my Surface Go, I’ve written multiple articles about it. I also spend more time on the “Go” than I do any of my other computer systems. I rarely leave home without it. The only issue I have with tablet is that the graphics driver occasionally flakes out and looses the ability to control the brightness.
The problem seems to be worse when the system is resumed from sleep and is especially bad if the brightness is set to manual vs. automatic. The control is not completely broken on my unit. If I select a setting say, 75%, it will eventually get brighter but can take up to an hour before it does.
I’ve tried to manually install the generic Intel drivers but Windows Update just replaces them eventually. They didn’t fully work anyway. I’ve also made sure I’m on the latest updates from Microsoft, I have my system in the fast ring even. Still no luck.
I’ve finally found a fix that worked for me. Maybe it will work for you as well. I used the device manager to switch my drivers to the “Microsoft Basic Display Adapter” rebooted and then changed the driver back to the “Intel HD Graphics 615 driver” and rebooted again. Its been several days now and I am able to change my brightness instantly.
Here’s how to do it.
Right click on your start button and click Device Manager
Right click on the Intel HD Graphics Driver and pick Update Driver from the menu.
Click the second option “Browse my computer….”
Click the second option again “Let me pick…..”
Choose “Microsoft Basic Display Adapter” and click Next
Your screen will flicker and you may hear some beeps.
Click the close button.
Reboot your computer.
Repeat the process above but select the “Intel HD Graphics 615 driver”
I frequently take my tablet to a park, museum, or other public space to get inspiration for my work. When I’m out with my Surface Go, I rarely have the keyboard attached. The Surface Pen is my primary input and control tool. Occasionally, someone will notice and ask how I am able to fully use my computer with just the pen. “What about selecting, copying, right-clicking, and all the other things you need a mouse for?” is an inevitable question during these conversations. Generally a statement like, “I can’t stand the way it feels,” also makes its way into the discussion.
The first thing most people need to address in order to be comfortable using their stylus, is the “feeling” of writing on a screen. There’s far less friction between glass and silicone than there is between paper and graphite. Some of us actually prefer the slicker strokes, but most people do not care for it, in the beginning at least. If you don’t like the slide, there are a few things that help. If your stylus has different tips, try them. Some are softer and offer more drag. They also change the contact patch size which further alters the experience.
Most Windows 10 based tablets allow you to adjust the pressure sensitivity of your stylus, which in turn changes how hard you end up pressing on the pen tip to write or draw. Setting your system to require more pressure will cause you to press harder and feel more drag. On Microsoft Surface devices you use the Surface app to change the setting. Samsung tablets have a Samsung Book app, most manufacturers have some type of settings app; look in your start menu.
The last piece of advice I have to offer around the “feeling” of writing on your screen is to add a soft silicone screen protector. A significant part of the difference between drawing on a paper versus drawing on glass, is that the paper will slightly give way to the tip of your writing instrument. Silicone on silicone also results in more drag and lessens the likelihood of over-strokes occurring. Personally, I prefer the matte options because they also help reduce glare.
Once you have the physical issues addressed, you’ll need to spend some time with settings in both your operating system and applications. I suggest that you start off getting your windows profile all squared away. Lucky for you, I’ve written a detailed post about how to go about it. The 1809 update for Windows 10 caused me to change a few of my settings since writing that guide. You can see the updated configuration below.
Great, so we’ve taken care of the way it feels to write on your screen and adjusted Windows to operate with a pen, we’re done right? Ha, don’t you wish…. Unfortunately, most applications also have specific settings that improve the stylus experience. Quite a few of the Microsoft Office programs, Word, Excel, PowerPoint, etc., have a setting in their advanced options that allows the pen to automatically select text. The function is turned off by default and I cannot fathom why Microsoft doesn’t turn it on for everyone. Checking this box will drastically improve the pen experience in these apps.
This setting is in most MS Office apps. Go to File -> Options -> Advanced Options to find it.
Whether you use a pen or a mouse, customizing the quick access toolbar in Microsoft Office applications adds efficiency to your workflow by reducing the amount of time you spend hunting for commands. The quick access toolbar is different for each application but can literally save you thousands of clicks and taps if you spend a little time setting them up.
Add your most used commands to the quick access toolbar.
I wouldn’t want you to go away thinking that MS Office apps are the only ones that have specific pen settings that you may need to turn on or adjust. Of course purpose-built drawing and editing apps have all kinds of pen settings. I’ve even seen the options to use a pen show up in games. Take a few minutes to poke around in the menus of the software that you use, it’s almost always worth your time.
Each brush or tool in Photoshop has multiple pen settings
After we push out updates to Windows desktops we will inevitably end up with some that will no longer go to sleep. Occasionally they will sleep but their monitors won’t turn off. When this happens to one or two systems it’s an annoyance. If it happens to a lot of them, there can be a financial impact due to the extra power consumption.
Generally, the problem is caused by an incompatibility between one of the newly installed updates and a system driver. Sometimes it’s caused by the update itself. How are you supposed to figure out exactly what is causing the problem?
Microsoft has embedded a utility named “powercfg” in the operating system. This tool can diagnose and assist in the repair of most power related problems. The first step is to run a diagnostics report. You can do this from a command prompt on a single computer but you should be getting used to PowerShell by now and if you’ve got lots of systems you need to check, it will be your best bet anyway.
Open an elevated PowerShell console, the command is;
The command will create a nicely formatted report in your documents folder showing all the information you should need to determine the cause. Scroll through the user sessions and expand the Red menus to see the cause of your issue.
Below, you can see that in my case, OVRServer_x64.exe continued to request power after the system had tried to sleep. As you can probably tell from the file path, that EXE file is part of the Oculus Rift software package. Again, you can click the Red bar to gain more information.
Now that we know what’s causing the problem there are several things we can try to correct it. First, I always check to see if there’s an update for the application or driver. For many programs, in the help menu you’ll find a “Check for updates” option. If you need to visit the software or hardware vendor’s web site, updates are usually found under the “Support” section.
What if there is no update? Are you just out of luck? There are still options available that we need to investigate before giving up. PowerCfg can be used to override power requests from mis-behaving apps and drivers. The command differs depending on what’s causing the problem. Let’s check help to see what our options are.
Looks easy enough, to create an override for my trouble maker the command would be;
PowerCfg /RequestsOverRide PROCESS OVRServer_x64.exe DISPLAY
As the help suggests, to figure out the name and type of your issue you can run “PowerCfg /Requests” After creating the override you’ll need to wait for the sleep interval to occur to know if it worked or not. Most of the time it will.
If the override doesn’t solve your problem you are left with rolling back the update. You can either uninstall the update or use a system restore point. I also recommend waiting a few days and checking for updates from both Microsoft and the vendor again. Many times, once they become aware of the issue one of them will release a patch for the problem.
So how do we apply what we’ve learned to a lot of systems? We use a PowerShell script of course. Since PowerCfg is an exe embedded on each computer we’ll use invoke-command to activate it in a foreach loop. You’ll probably want to redirect the reports to a network share rather than connecting to each system to view them. That will mean naming the reports in a way that tells you where they came from.
The script above will generate the sleep diagnostics report for every workstation computer on your network and store the report in the share you specify with the computer’s name in appended to the report. The same invoke-command technique would let you create an override for each computer that has an issue.
WSUS is usually pretty straight forward. Install the service on a server and configure a GPO to point your server’s and workstation’s Windows Update clients at it. I like to use Server Side targeting and a series of scripts to get the most flexibility from it.
Every once in a while you’ll end up with machines that won’t connect to the WSUS server for various reasons. For the most part the only feedback you receive are some hex error codes. You can look them up on-line but they generally fall into either connectivity or software issues. Rather than spend a lot of time researching each individual code I follow my own troubleshooting steps until I get to the culprit.
Connectivity – Many of the problems I have run into were caused by the client and sever losing contact with each other.
Try to telnet from your client machine to your server’s ip address on port 8530 or 8531 if you’re encrypting traffic. If you see a blinking cursor the port is open, a failed to connect message means you should start checking firewalls.
If you don’t have telnet installed, try PowerShell’s Test-connection. Example: Test-NetConnection -Port 8530 -ComputerName WSUSSERVER
If the port is open but the page won’t load, open an admin console window and run: netsh winhttp reset proxy.
Software – If your client is able to talk to the server then your issue is with the software itself. Fear not, there are still several fixes you can employ.
Check the logs. On the client computer you’ll find the log @ C:\Windows\Windowsupdate.log there’s a bunch of data but use the find function of your app to search for error and failed. You may find the cause of your issue.
Windows update also writes some errors to the Application and System even logs.
If all else fails, start over. Occasionally the client and server disagree about what patches are installed or something has been corrupted. Follow the steps below to completely reset the problem machine.
Open the WSUS console, right click on the computer and delete it.
On the client computer:
Stop the Windows Update Service
Delete the contents of the C:\Windows\SoftwareDistribution folder
Open the registry and remove the contents of the HKLM\SOFTWARE\Policies\Microsoft\Windows\WindowsUpdate key
Open an Administrator CMD or PowerShell prompt and type: gpupdate /force
Start the Windows Update Service
In the Administrator CMD or PowerShell prompt type: wuauclt /detectnow
In part one of this series, we wrote a script that would get errors and warnings for the last hour for a list of servers and output the results to an HTML file in a simple table. In part two, we capture all services for a list of servers that are set to automatic but not currently running, and output that list to an HTML table. Part 3 describes how to use the Windows Server Status Monitor script available at GitHub and the PowerShellGallery to monitor Online status, CPU Load, Memory Load, and Disk Space. Part 4 dynamically generates the lists of servers that the first three scripts will need to run.
To make the monitoring system work, there are still a few things we need to do. First, we need to set up a server with IIS or some other web hosting engine. To be honest, I like SharePoint, the newest version isn’t available in a free edition, but if you have an Office 365 subscription it is included. If not, the last free version you can get is SharePoint 2013 Foundation. Speaking of SharePoint, you could add some additional code to the scripts to upload the results of our scans straight into a SharePoint library, but this isn’t as easy as it sounds. I prefer to add another IIS site to the SharePoint server and then proceed with the architecture out-lined below. After you’re done, you’ll use SharePoint’s content viewer web part to build cohesive system report pages which I’ll get into further on in this post.
I’m not going to go through all the steps needed to get a web server up and running here. You can search for the instructions easily enough and including them would make this article a book. In any modern version of Windows server, you add the web server role. If you’re going with SharePoint, when you run the installer it will guide you through the pre-requisites.
Once you have IIS up and running you need to add virtual directories for each group of servers that you want to monitor. Before you can add the VR directories you need to create the actual folders on whichever drive you want to store all of this data on. Make a folder for each environment that you’re going to monitor for example: development and production. Then, under each of those, create a folder for each group of servers: AD, Exchange, SQL, that you built lists for.
Folder Structure
Virtual Directories
The virtual directory alias is the path you will use to access the html files placed into the matching folders by the scripts. You’ll type http://www.webservername.com/vr_directory_alias/name_of_file.html to access the reports for each group of servers. To make a new virtual directory in IIS, right-click on the site that you are using and pick new virtual directory from the drop down menu. Then fill out the pop-up form.
Once you’ve gotten your directory structure and web host all squared away, it’s time to start scanning servers and creating the files that get dumped into the folders you’ve just made. If you followed the instructions in the preceding articles, there should be three scripts in the C:\Program Files\WindowsPowerShell\Scripts folder. We put them in this particular folder to make calling them with additional scripts easier.
We’re going to make another series of scripts that call our scanning tools with the lists we’ve made as input parameters and the folders we’ve made as output paths. Then, we’ll schedule our calling scripts as automated tasks that run every few minutes and wallah, a full system monitoring tool is born.
I like to add a timer and an alert email to my scanning task script so that I know how long each group takes to complete. You will need to change the paths, SMTP server and email addesses in the script below to match your environment. You will make one of these scripts for each group of servers you want to montior (match the folders you made above). Store them all somewhere that makes sense to you, placing them in the VR directory folders will work fine.
Once you’ve finsihed creating the scanning task scripts, we’ll need to schedule them as repeating tasks using the Windows task scheduler. Be sure the account that you choose to excute these scripts with has enough permssions to scan the servers and that WinRM is enabled on the systems you are collecting data from.
Add a folder for all the tasksThis task runs every 15 minutes, note the Daily and Repeat options.Powershell.exe goes in the program or script box. Enter the full path to your script between “” in the arguments.
When you save the task you’ll be prompted for the credentials to run it with. Running the scripts does consume resources from the server(s). Tune your schedule to be frequent enough to be useful, but not too taxing on the servers. Every 15 minutes works well in my environment.
If you have SharePoint, build a site for ServerStatus. Add a page for each group of servers (AD, Exchange, etc.) and on each page insert three content viewer web parts. Each content viewer web part will reference the output html page of one of the status scripts. Take your time and be sure to title the web parts appropriately. If you’re careful, you can end up with something that looks like a professional monitoring tool. SharePoint’s menu system will build the drop down menus that you see in the title image automatically.
If you don’t have SharePoint you can get a simliar effect by using iframes. You’ll need to create a master html page for each group. AD.HTML for example, then use an iframe to embed the output of each of the three scripts onto the page. The HTML to create an iframe is:
With a lot of work and time you can build a tool that keeps watch over your servers while you work on other things. There’s no limit to how far you can take a tool like this. Alerts for thresholds, reports, and more are just a few lines of code away.
All of the scripts that we’ve written for the monitoring system have been powered by lists of severs. Where do you get the lists from? You use a script to generate them of course! You could easily configure each of the monitoring scripts to run independently by filtering AD for a specific set of computers and storing them in a variable instead of using a file, but the list method has several advantages.
In our case we want to run multiple scripts against the same group of servers repeatedly. Searching AD over and over again for the same data isn’t very efficient. Especially when it’s a list of machine names that rarely change. That being said, servers do get added and removed. Typing them in a list and calling it a day is a recipe for crap cake surprise. The solution is to script the lists so that they are dynamic.
How you get the lists is going to be dependent on how your Active Directory is structured. I have a pretty strict naming convention in place, so I run filters against the names. You might need to search specific OUs or some other property (see code in box 3).
For example, all my production domain controllers are named PRODAD**** so to build a list of them:
Create lines like the one above, for each group of systems that you want to monitor. The output path must exist before you run the script or you’ll get errors. My example is C:\Sources\Prod\ so you need to make those folders on your C drive or change the path. I suggest that you create a group of folders on the IIS server you plan on running your monitoring from and storing the files there.
If you need multiple names for a filter just use -or and add as many as you need.
After you have code for all of your groups, you should consider adding a catch all at the bottom. This will add servers that don’t follow the standards to a file. We all have them LOL. In my environment I search the servers OU that a GPO drops our servers into and add every system that doesn’t match one of my previous groups to a Misc_servers.txt file. Note that the example below uses “-notlike” and “-and” versus the “-like” and “-or” we used above.
Once you’ve put it all together, run the script and you should end up with a text file for each group of servers in your Active Directory. Open the files and you should see the FQDN for each server that matched its filter, each on a separate line. You can use these lists as the input parameters for the monitoring scripts we’ve already written in PowerShell Monitoring Part 1, PowerShell Monitoring Part 2, and PowerShell Monitoring Part 3.
As you’ll see in a future article regarding remote systems management, these dynamically built lists of servers by type can be used for other useful projects as well. My production script ended up with 19 of the “type” filters plus the “catch all” so expect to spend some time getting this right on your network. Next in this series we’ll configure an IIS server to run all of these scripts as scheduled tasks and display the HTML files.
The scripts that we’ve written so far, use parameters to specify their file output paths and input of a list of servers to scan. Later in the series, these options will help us create logical groups of systems that make our monitoring system easy to use. For example; all Exchange servers, or all Active Directory servers will be grouped together on separate pages. One of the scripts that we will write, will create the lists of servers that belong in each group. Those groups in-turn will be used to feed the scripts that are collecting our data and creating the HTML reports. It sounds confusing and it is, that’s why I’m writing about it one part at a time. It will all come together in the end, though.
Connectivity, CPU load, memory and storage consumption, are the basic metrics required for any monitoring system worth its salt. I could sit here and bang out the code needed to get the data we’re after from WMI \ CMI and output it to HTML easily enough. One of the great things about PowerShell though, is that its ubiquitous and you don’t always have to invent the wheel yourself. In this case, somebody else has already cranked out 99% of the code we need, so we’ll just modify his.
Mike Galvin, Dan Price, and Bhavik Solanki have written a wonderful PowerShell script called Windows Server Status Monitor. It uses WMI to pull CPU, memory, storage, and online status information from a list of servers and can display the results as a color coded HTML file. It also contains an alerting feature, emailed results, and can run once or continuously. You can download the script from Mike’s Blog, GitHub, or the PowerShell Gallery.
My personal project required trending data. I need to see these performance metrics over time. Mike’s script can output a CSV file instead of HTML, but it deletes the files it creates each time it is run. With just a little tweak to the CSV output file we can ensure each file is unique and therefor not deleted. If you need trending as well, make ths change. Under the comment ## Setting the location of the report output; find $OutputFile and set the variable to something like:
This change will create a CSV file that includes the date, hour, and minute in the filename. You could also include seconds or even milliseconds if you’re going to run this in a continous loop. Please be aware that you’ll need to monitor the folders you are outputing these files to. If you’re running WinServ-Status in a 5 minute loop against 20 groups of systems you’ll be making 1200 CSV files per hour. The files are small but they’ll add up over-time.
When we put all of this together a few posts down the line, you’ll see that we run WinServ-Status.PS1 twice; once to create the HTML file and again to make a CSV. As with the other scripts in this series you’ll want to save them to C:\Program Files\WindowsPowerShell\Scripts\ to make them easier to run as a scheduled task or to call from any PowerShell session. If the “Scripts” folder isn’t in that path, just make it yourself. If you install the WinServ-Status script from the PowerShell gallery or from GitHub it will end up in that folder by default.
In the next article for this series we’ll build our lists of servers to run the data collection scripts against. After that, will be how to get IIS setup to host the HTML reports we are creating, followed by getting the scheduled tasks that run everything setup, and finally how to diplay all of this data in a sensible manner.
In the first article in this series I explained the goal. I want to help you create a server monitoring dashboard with nothing more than a few PowerShell scripts and a web server. Before we build the web site, we need to create the scripts that gather the information and create the HTML reports.
In an article a while back, I showed how to use PowerShell to list stopped automatic services and suggested that you might want to output the data to HTML. That is exactly what we’re going to do here.
The script above is written to use two parameters when called, -list should be the path to a text file containing the severs you want to scan. The -outputpath parameter is the location to save the HTML report.
You’ll notice the $_.name -notmatch section contains several service names. These services are set to automatic but do not keep running if they don’t have work to do. The regex pattern keeps these services from showing up in the report as false positives. You may need to add a few more for your environment, especially .Net versions.
There’s also an option to email a copy of the report. Just un-remark the line and populate the sever name and addresses. The HTML report will be embedded in the email, not attached.
In the next post for this series, we’ll generate a system status report to go along with the events and services, then we’ll put them all together in a dashboard.
After you have more than a handful of servers on your network, it can be challenging to catch small issues before they take something down and get noticed by users. What you need is a good monitoring tool; one that captures resource consumption, error events, installed software, shows patching status, and that generally helps you keep an eye on your systems.
If your place is like a lot of the businesses I’ve worked for, you probably have a bunch of emailed reports from various systems that amount to SPAM. You try to watch the emails and texts but they vomit so much useless data all over your inbox that its hard to make sence of it. Important notifications end up lost in the noise.
Purchasing a multi-thousand dollar monitoring tool is not always possible. The more nodes you have, the more expensive a monitoring tool will be. Math says that you won’t need a monitoring tool until you have a lot of stuff to watch, which almost guarantees that a commercial solution it isn’t going to be cheap. Spending money on something that doesn’t directly generate profitable returns can be a challenge for any company but outages hurt customer and worker confidence in your systems. This situation can leave technologists feeling trapped.
As system admins, engineers, or architects, we know that the operating system has and reports most, if not all, of the information that we require. We can connect the MMC Computer Management snap-in or the Server Administrator tool to almost any computer and see its event logs, service status, and more. The problem is, that the data isn’t correlated and filtered in a way that provides us with the up/down, big picture, view that we need to proactively correct small problems before they become big ones.
In this series we’ll examine how PowerShell can help gather all of the data we need from every windows system attached to our network. We’ll use it to generate HTML reports that, in the end, will be uploaded to a web hosting engine so that we can see our system’s status at a glance. The solution isn’t going to compete with System Center or Solarwinds but its better than 10,000 unread items in your inbox and it is entirely free (assuming that you have Windows CALS).
I have to break this down into component parts, or the post would be a book. Stick with me and I think that you’ll end up with a functioning monitoring tool. Feel free to take all the credit for yourself. Maybe your boss will give you a raise. Just read my blog once in a while without your ad-blocker turned on and we’ll be even.
First up is the Windows event logs. Microsoft, in all of their geniousnous; has been spitting out the classic Application, Security, Setup, and System event logs for as long as I can remember. The amount of data they collect is impressive. Typically, they are my first stop on any trouble shooting endeavor. We all know the drill; open the Computer Management MMC, right-click on the system name to connect to a remote PC, and then filter for errors and warnings. You can configure them to dump to a database for correlation / indexing but most of us never get that far. We end up logging on to a problem system and manually checking the logs for relevant messages one at time. Stop doing that, you’ll go blind!
PowerShell will get us the same information, a nice filtered for errors, view of the logs but it can do it in bulk.. The code below is written to be a module that you can call from a scheduled task or from another script. If you’re going to follow the whole series to build my tool you will want to run it as a module. Copy the code and save it as a Get-ServerEvents.ps1 file in the C:\Program Files\WindowsPowerShell\Scripts folder. If the scripts folder isn’t there; make it.
The script will gather the last 5 application and system event log errors and warnings that occurred in the last hour for a list of servers and output them into a basic HTML table.
To run the script, create a *.txt or *.csv file containing the hostnames of the systems you want to see events for and then call or run it with the -list and -outputpath parameters. For example; Get-ServerEvents.ps1 -list c:\users\myname\my documents\ad_serverts.txt -outputpath \\reports_server\myreports\ad_serverts.html
If you don’t want to mess with text files you could also use the OU structure in AD as the source of your computer names. Mine organizational units didn’t line up with the way I needed my reports to look hence the text file parameter. If you don’t have that problem try changing the $server variable.
When you run the report you’ll end up with a nice, neat, HTML file like the one below. It’s easy to attach to an email notification; just add a Send-Mailmessage command to the bottom of the script. If you follow the rest of this series we’ll end up publishing the report(s) to a website.
Every admin or engineer who has installed a Windows Server Update Services server (WSUS) on their network has had to choose between sever-side and client-side targeting. The choice between flexibility and automation can often be a difficult one to make. Maybe it doesn’t have to be? PowerShell allows us to access the internal workings of WSUS and customise them to our liking. Read-on to see the method I came up with for allowing the flexibility of server-side targeting with automated group assignment.
For those who are unfamiliar with WSUS targeting options, server-side targeting allows an administrator to add or remove systems to or from WSUS groups in the software’s management console. Many of the companies I have worked for like to periodically change-up their patching routines. This usually means modifying your update groups. For example; perhaps all the SQL servers are currently grouped / patched together but the new Director wants them patched with the applications that use their databases. These types of changes occur in real-time and are simple to manage in the GUI when you’re set up for server-side targeting. The drawback to this option is that someone has to sort all of the computers into the correct groups manually; if your network has a lot of nodes, the task can be daunting. Furthermore, admins will need to watch for the addition of new systems and sort those into the proper groups.
The other option is client-side targeting. In this configuration, you create GPOs that tell each OU they are linked to, what group those servers belong in. This automates the sorting process but is much less flexible. In the example above, to regroup our SQL servers we would need to create new GPOs for the OUs that contain them and remove the old ones. Then we’d need to wait for all the replication and registration to occur which can take a very long time on large networks.
With a little PowerShell know how, we can close the gap between the server-side setup that most admins would prefer to run (who doesn’t like flexibility) and the client-side config you almost feel forced to run on a large network. WSUS has had a dedicated PowerShell interface since the 2012 edition. You can use PowerShell on the older versions, but you need to manually load the assemblies and the command structure is slightly different (Google it).
If everything has worked out, all of the systems that we’re going to manage patching on will now be in the “Unassigned Computers” group. This is exactly where we need them be. Having them in this group means that our script can be much simpler. We won’t have to check for connectivity, SSL, RPC, and all that jazz because the systems wouldn’t show up in the “Unassigned Computers” group if that stuff wasn’t working. In fact, if you have systems that didn’t show up, you need to start checking those protocols and settings. You’ll also want to be sure that you didn’t miss an OU with the GPO that is configuring the update services to point at your WSUS server. If you opted to encrypt the traffic to and from WSUS, you’ll also want to make sure you CA and Root certs are trusted by the client systems.
Now you’ll need to configure all your Target Groups in WSUS. Until you get the hang of how this technique works, I suggest that you create a group for each of the system OUs in your Active Directory. This makes sorting easier to implemeant and explain. Once you understand how everything works, you’ll have no problem customizing things. It is important to keep in mind that because we’re using server-side targeting, computers can belong to more than one patching group, this will not cause any kind of conflict. WSUS only patches a computer once with any given patch so whichever group applies the update first wins.
Before proceeding, you’ll need to import the ActiveDirectory and WindowsUpdate PowerShell Modules (see the first two lines below). There are lots of ways to access WSUS through PowerShell (this is Windows after all) but one of the easiet is to call the connection every time that you want to use it. We can use this code to build a list of the computers in our Unassigend Group. Make sure you adjust the portnumber parameter to match your situation. The code below is referencing the default encrypted port for the manangment console.
#Import the modules we need:
Import-Module ActiveDirectory
Import-Module WindowsUpdate
#Build a list of the unassigned computers names:
$NewServersFull = Get-WsusServer
-Name WSUS_Server_Name -PortNumber 8530|
Get-WsusComputer -ComputerTargetGroups "Unassigned Computers"|
select Fulldomainname -ExpandProperty Fulldomainname
Notice that we assigned that list of computer names to a variable? We’re going to run these computers through the Get-ADComputer cmdlet to see if it belongs to a particular OU. The Get-ADComputer cmdlet tends not to like FQDNs as an identity parameter so we need to shorten our names to just the NETBIOS portion (strip off the domain name).
$NewServers = Foreach ($server in $newserversfull) {
$server.split(‘.’)[0]
}
Now $NewServers is an array containing our short server names. This list can be used as the identity parameter in a Get-ADComputer loop. That loop is going to check to see if a computer belongs in a given OU. I like to create functions for each system OU in my Active Directory and then loop the list of names through each. When a system matches the OU I’m coding for, I insert it into the correct WSUS target group. Here’s what one of those functions looks like.
The * on the end of the canonicalname is important, it allows the where statement match every system in that location. You could also use the filter and searchbase parameters to search the OU directly, instead of the canonicalname. I don’t because I had already generated a list of canonicalnames for all my OUs for another project and I’m lazy 🙂 . If you want to find the canonicalname for an OU, just pick a computer in the OU and run Get-ADComputer -Identity computername -Properties *|select CanonicalName or use ADUC.
Copy and paste a new function into your script for every OU that has computers you want to assign to a WSUS group. For each (man I type that a lot) function, you’ll need to change the Function Name (MY-OU-NAME), Variable Name (MY_OU_NAME), and the WSUS target group name (“MY – WSUS – GROUP”).
At the end of our script we can use a little logic to prevent the process from running if there aren’t any new computers in the unassiged group. We can also send a report showing the servers that were added. Or, we can notify someone that the script ran but there weren’t any new servers to add.
If ($newserversfull.count -gt 0 ) {
$body = $newserversfull|out-string
FunctionName
FunctionName
FunctionName
Send-MailMessage -SmtpServer my.email.server
-From report@wsus.mydomain.com
-to my-email@mydomain.com
-Subject "WSUS Servers Added"
-body $body
}
Else {
Send-MailMessage -SmtpServer my.email.server
-From report@wsus.mydomain.com
-to my-email@mydomain.com
-Subject "WSUS No New Servers this time -EOM"
}
$leftovers = Get-WsusServer -Name WSUS_Server_Name -PortNumber 8530|
Get-WsusComputer -ComputerTargetGroups "Unassigned Computers"|
select Fulldomainname -ExpandProperty Fulldomainname
If ($leftovers.count -gt 0) {
Send-MailMessage -SmtpServer my.email.server
-From report@wsus.mydomain.com
-to my-email@mydomain.com
-Subject "Systems that coudn't be grouped by WSUS"
-body $leftovers
}
That last little bit ($leftovers) runs the same code we started with. If our script has done its job, there shouldn’t be anything left in the unassigned computers group. If there are computers still in there, you’ll want to know so that you can manually intervene.
All that’s left is to schedule the script with task manager to run automatically with credentials that have enough permissions to manage WSUS. I set mine up to run twice a day; just create a new scheduled task and in the action set the comand to “powershell.exe” and in the arguments put “the\file\path\to\myscript.ps1” and set the trigger to your desired frequency. When you save the task it will prompt you for the credentials it should run with (be sure to check the box to run whether a user is logged in or not).
I call my little piece of magic “The_Sorting_Hat.ps1” (yes, I’m a Harry Potter fan). Its been a life saver. When I need to move a computer to a new group, I just launch the WSUS console and put it there. Since the system isn’t in the unassigned computers group the script has no effect on it. I can manually create new groups for adhoc needs and add systems to multiple groups, all while not worrying about new systems hanging around without being patched.
Quite a few businesses have server networks that were grown over time with servers being added to meet some demand or another – a’ la carte – rather than a designed network in which an architect planned the distribution of every platform and it’s associated servers. The organic distribution of systems often results in nobody knowing what’s out there in total. Sure, the admins know what’s on the systems that they take care of but who has the big picture?
Recently, I was asked how many windows file shares were on a network that I help support. As it turns out, the answer was that nobody knew. None of our existing tools had a mechanism that would help us investigate quickly and easily. I’m glad I paid attention in PowerShell class.
The code below will connect to a domain controller and locate all of the Windows Server computers. Then, it will scan each one for file shares using WMI (excluding admin and IPC shares) and report the results in a csv.
Many environments have patching processes or other updates that reboot large numbers of systems. Occasionally, when those systems boot up, some of their services fail to start. It takes too long to logon to each server and manually check and start failed services. PowerShell can do the job for us.
The code below will import a list of server names (text file with only the hostnames) and scan each server in the list for services that are set to automatic. If any of the servers’ automatic services are discovered to be stopped it will try to restart them.
The script will then report on all of the automatic services except those that stopped normally.
After you’ve cranked out a few reports in PowerShell, either you or your boss will eventually wonder if it can be used to create an uptime report. A quick search of the Internet will return lots of options for calculating the uptime by subtracting the lastboottime, obtained via WMI, from the current date. This technique works well but few if any of the articles suggest how you go about creating a report that shows the information for all of your Windows Servers.
I tried a handful of the scripts I found on-line and didn’t like the results so I decided to write my own. The code below will scan your window’s domains and locate a domain controller in each. It will contact those domain controllers and scan for computer objects whose operating system contains the words “Windows Server”. Next it will connect to each of those computers and use WMI to calculate the uptime. Finally it will create a report showing each server’s Name, Operating System, and Up Time.
It would be simple to have the report scan workstations instead. Just change the word “Server” to “Workstation”, you could also add an and statement to do both. Emailing the report would be cinch as well (Search for PowerShell SendMail) and the script already written in a manner that would support running it as a scheduled task.
If you’ve been following along with this series, you’ll know that I am hip deep in the process of converting my spouse from an iPad to a Windows tablet and from paper to digital journaling. So far, we’ve chosen the perfect tablet and set up the best windows profile for pen enabled machines. Now it’s time to dig into journaling and note taking.
A quick search of the Microsoft Store will return an overwhelming number of applications dedicated to taking and organizing notes. We’ll examine a few of them in detail with future posts in this series. The patron saint of notes, doodles, and mind-dumps in Microsoft’s world is OneNote and that’s what we’re focusing on this time around.
As a long time fan, I consider OneNote to be one of Microsoft’s greatest achievements and a core contributor to my success. I have thousands of pages of memory augmenting documentation from every job or project I’ve ever been involved with. Every computer problem that I’ve ever encountered, all of the code and scripts I’ve written along with plans, meeting notes, article ideas, book ideas, things I am planning on building or buying, manuals for the stuff I already have; it’s all in OneNote. All searchable in a moment from any of my computers, my phone, or even my watch.
It is difficult to explain the full value of having all of this data available on-tap but a couple of situational examples might help. How many times have you sweated it out trying to remember what you did all year for your review at work? This never happens to me. In IT work, running in to the same problem months or even years apart is common. Can you remember what you did to fix that IIS app pool last summer? Get yourself organized and documented people! Next to exercising it’s the most stress relieving thing you can do. My boss thinks that I have a photographic memory but I can barely remember my own birthday.
Enough evangelizing, on to the good stuff. Microsoft publishes OneNote in three different versions. There’s the desktop edition that comes with Office; it’s icon name matches the version of Microsoft Office that you have installed, in my case OneNote 2016. The tablet/mobile version named OneNote, is free and can be found in your device’s app store; including the Microsoft Store for Windows 10. Finally, if you subscribe to Office 365 or have SharePoint at your workplace you can access a web edition that runs entirely in your browser. All three versions can share data and have the same core feature set but there are slight differneces between them. Through out the rest of this article when you see (DE) I am referring to something that can only be accomplished in the Desktop Edition. Microsoft will be phasing out the desktop edition after 2016. They are concentrating their efforts on the UWP (Universal Windows Platform) AKA the App Store version. Already they’ve added features to the UWP version that are unique to it. When you see (UWP) I am referring to something that is available only in the Universal Windows Platform (app store) verion of OneNote.
OneNote uses a hierarchical organization system that imitates your high school trapper-keeper. Notebooks -> Section Groups -> Sections -> Pages -> Sub-Pages is how the train flows. You can (and should) have multiple notebooks; personally I have one for Work, one for Home, and one for Writing. In a notebook you create sections and occasionally it makes sense to group several sections together. For example; in my Work Notebook I organize major categories like Software, Networking, Troubleshooting, etc. as section groups. Inside the software section group you might find sections named Windows, Exchange, Lync, and so on.
The first time you open OneNote it will create a notebook for you. The pages of this first notebook are actually a tutorial on how to use the software. The instructions are well thought out and more than good enough to explain how the software works; do yourself a favor and spend a few minutes reviewing them. This post is not about how to use OneNote , that is easy enough to figure out and there are already plenty of How To guides on-line. Being successful with any note taking system requires a lot of forethought and setup. As with most projects of this type, the hard part is figuring out how to get started. In this post we’re going to step through creating a OneNote notebook for tracking a typical office worker’s responsibilites but with a creative flair. Nothing will inspire you to use your notebook more than making it visually appealing. Like your living room, you want it be a comfortable place to be.
Step One – How To
Read the afore mentioned tutorial notebook pages so that you are able to follow along. In most cases I will not be explaining every action in minute detail. You can also get some excellent instructions via Microsoft’s quick start guides, they include one page cheat sheets for both the UWP and DE versions.
Step Two – New Notebook
Make a new notebook named for your job. I always name mine after the company I am working for. In DE Goto File -> New. In UWP Goto the +Notebook button at the bottom of the notebooks section.
Step Three – Organize
Now we’ll create the basic structure of your notebook. You’ll want to make a section for every major function of your profession. There are a few that are ubuiquitos among office jobs so we’ll start with those but you’ll want add any that are unique to your position. Create the following sections to start with:
People – Here you’ll keep tabs on the people that you interact with. People you manage, co-workers, vendors, contractors, and bosses; you’ll want to record details about them all in this section. What they like and don’t, personality traits, and information they provide about their lives can all be valuable later. Tip: insert hyperlinks to these “people pages” on pages in the other sections for quick reference.
Projects – I like to make Projects a section group and then create sections for each project that I’m involved in under it. To do this just click tap and hold or right click in the navigation pane and choose new section group from the pop-up.
Meetings – If everyone took good notes in meetings we could probably have a lot fewer of them.
Tasks – This is where I track all the little actions I have to do that are not part of a project. I need to pull a report on sever storage once a quarter and I’ve detailed how to do it along with the script I use in this section.
Instructions – Manuals, written instructions, and even videos off Youtube get posted in this section. Onenote will index all of this stuff (even the dialog from video and text in pics). This means that the next time you search for ” use postage” the manual will pop-up.
Ideas – Self explanatory, everybody gets ideas about how to do something better, easier, or faster; the trick is in remembering them at an appropriate time.
Issues – If you want to solve problems or have one you need help solving, track them here to ensure you don’t waste time repeating fixes or worse yet forget all together.
Work Log – In the lead-in I mentioned that I never freak-out come review time. This section is why. I make a page for each year and on them I insert a table with the following columns: Date, Description, Reason, Requested By, Attachments, and Notes. At the end of everyday I spend 10 minutes jotting down what I spent my time on.
What your notebook should look like when finished. Be sure to doodle in the margins.
Step Four – Create
Now that we’ve got a notebook up and running, we can dive into the creative part of journaling with OneNote. Drawing and doodling in OneNote is a cinch; just select the draw tab in the ribbon, pick a tool and color and knock yourself out. It works best on a system with an active stylus but capacitive pens and even your finger will get the job done.
Draw
The draw options available in the ribbon offer a lot more than just your standard pen and marker choices. Poke around and you’ll find premade shape tools, and in the UWP edition there’s a straight-edge as well as ink-shapes that turn the sloppy circles that you usually make into to perfect ones. There are also highlighter markers (which I use often) and a lasso select tool that will help you move stuff around no matter the shape.
View
Under the view tab in the ribbon you can add lines and grids to your pages. You can also change the background color of your pages from this tab. The DE version will allow you to set a picture as the background for a page. Right-click (tap-hold) any picture that you’ve inserted and pick save as background. Tip: for the best effect edit your photo in paint or Photoshop first and turn down the opacity or turn up the transparency before setting the image as your background.
Insert
The insert tab presents a lot of possibilities. You can of course insert photos but also, videos, files of all types, audio recordings, and more. OneNote will attempt to index the audio from multimedia files and the text from images to make them searchable. It will also index the text from any files you embed on a page.
There are two options here that don’t get mentioned much; one is on-line pictures, the other is stickers. Both let you search for and insert an unlimited amount of artistic flair even if your best drawing is of a stick figure. In fact it is these two options that allow OneNote to compete with the likes of Goodnotes in the creative journaling market.
All Together
Of course you’ll get the best results if you combine all of the options available in the ribbon. If you’re using the DE versions you can get your page just right and then save it as a template so it can be used over and over. Look for the Page Templates button on the insert tab. Need some inspiration? Try an image search for OneNote Art to see what people are doing with this tool.
It can be difficult to know what applications are installed on the machines in any given company. Not knowing what is installed where, can lead to all kinds of trouble when updates are pushed and changes are made. Enterprise class tools like System Center that can create a CMDB are expensive. So what’s an Admin supposed to do?
If your budget won’t allow you to purchase a tool or pay a DEV team to write you one; you’ll have to do it yourself. PowerShell is always my goto tool for this kind of thing on a Windows network. You could accomplish the same goal with VBS or even CMD batch files, but if you are running systems so old that you have to resort to those tools, you have bigger problems than worrying about what apps are installed.
If you’ve spent time researching this, you’ve probably seen several techniques to get the data that you’re after. I like connecting to the registry and searching the 32 bit and 64 bit uninstall keys because it is fast, accurate, and has a lot of info available. You could also use WMI/CMI, scan the Program Files directories for exe files, and more. As with everything in any kind of programming; the hard part isn’t getting the data, it’s out-putting it into something useable. Lucky for you I’ve included that feature in my script.
The code below will locate your AD Forests and find domain controllers in each of them. Next it will scan for objects that contain “Windows Server” in the Operating System description and add those object’s DNS host names to an array. It will ping each server in that array to see if they are real and on-line, because AD can have dead objects in it. Then it will add the systems that are up to another array and for each of those, the script will remotely access the registry keys that contain the uninstall data. The uninstall data will be used to create a CSV report that lists each application’s name, version, help link, and install date along with the name of the machine.
You’ll need to have the RSTAT tools installed or run the application from a Server that has them. To be successful you’ll also need enough privileges to scan the remote machines registry and your network can’t be blocking WinRM. Other than that, just save the code to a PS1 file and run it. The report will be in your Documents folder named windows_servers_cmdb.csv.
If you want to adjust to scan apps on workstations just change the filter keyword to “Windows Workstation”; you could also do both. To fully automate it just add a line at the bottom to email the attachment and schedule it to run as a task. If you want to get really creative convert the table into HTML and upload it to an IIS or Apache host every day. If you have SharePoint you can upload it to a custom list and then create some pretty killer reports. Views that filter for key words like “Exchange” or “SQL” are helpful for everyone.
Be sure to tell your boss it took you all week to do this LOL.
I’ve gotten to the point where I manage most things in my day job with PowerShell. It’s a lot faster to type Unlock-Account kjtrent; than it is to launch ADUC and find the account. I also don’t like having to open one tool for AD, one for Exchange, and another for Lync/SfB. Furthermore, I have separate credentials for signing on to my workstation and managing servers.
I’ve created a simple little PowerShell script that will prompt for credentials and use them to open remote sessions (no need to install anything) to the servers. Copy the code below and save it in a PS1 file. Enter the FQDN of your servers in between the quotes for the appropriate variables. Then make a new desktop shortcut with the following path: C:\Windows\System32\WindowsPowerShell\v1.0\powershell.exe -NoExit “C:\Users\profile\Documents\AdminShell.ps1” and pin the shortcut to your start menu. When you double-click it you’ll be prompted for credentials and a PowerShell window will open with the remote sessions loaded. It will stay open until you close it.
#Enter the FQDN for your servers below between the "
$exchfqdn = "your exchange server fqdn"
$sfbfqdn = "your Skype for Business / Lync FE Server FQDN"
$adfqdn = "your DomainController FQDN"

$ErrorActionPreference = 'SilentlyContinue'
$WarningPreference = 'SilentlyContinue'
$UserCredential = Get-Credential -Message "Credentials are required to access AD, Exchange, and SfB; use the detected username or enter a differerent account" -UserName ($env:userdomain +'\'+ $env:USERNAME)
$ExSession = New-PSSession -ConfigurationName Microsoft.Exchange -ConnectionUri http://$exchfqdn/PowerShell/ -Authentication Kerberos -Credential $UserCredential
$SfBSession = New-PSSession -ConnectionUri https://$sfbfqdn/OCSPowerShell -Credential $UserCredential
$ADSession = New-PSSession -ComputerName $adfqdn -Credential $UserCredential
Import-PSSession $ExSession
Import-PSSession $SfBSession
Import-PSSession $ADSession
If you’ve read the first article in this series then you’ll know that I am in the process of helping my wife convert from a paper journaling system to a Windows tablet even though she usually prefers Apple devices. Obviously, I enjoy a good challenge.
In my opinion one of the biggest differences between Apple devices and Windows computers is that an Apple device is largely ready to use out of the box; basically, you just need to load your apps from the store, log on to your accounts, and go. Windows on the other hand is infinitely customizable. These customizations make the operating system more flexible for all kinds of people and uses, but can be source of frustration for those that just want to pick something up and go. Microsoft attempts to start you off with a basic profile that works for everyone, but it just doesn’t cut it for most people.
There are lots of guides about setting up Windows already out on the interwebs. Most of them show you where the settings are and what they do. From my experience in the IT industry, I’ve come to the realization that finding the settings isn’t the hard part. Especially when you can just ask Cortana “How do I turn off the WiFi?” or, “How do I setup a printer?” The hard part is getting your head around how best to organize a system and deciding what settings you should or should not use.
In this post I’m going to show you exactly how I setup a Windows profile to use with a Pen enabled system. It’s going to be a long post so I’ve broken it down into sections. I am assuming that you’ve completed the initial setup of Windows and created a user account. I’m also assuming that you know how to install apps from the app store and logon to your various accounts. If you want to try these settings but would prefer not to mess up your current profile I suggest creating a new user account. Select the Start button, then select Settings >Accounts > Family & other people > Add someone else to this PC. You can always delete it if you don’t like it or switch to it if it works better for you.
A word of warning, my philosophy around the best organization of an operating system is not predicated on reducing the number of mouse clicks/screen taps. I understand that this is important for some, but to me hunting for the thing to click is more annoying than being able to get to it in one. Also, I feel that the indexing provided by modern operating systems already allows for zero clicks with regards to launching applications making pleasing aesthetics and organization in the GUI more desirable than all out efficiency.
The Software
Everyone has specific needs for applications but people who are reading this may just be starting out with Windows 10, so I’m going to list out some applications you should consider installing. Installing software before arranging your start menu and adjusting other settings will make things a little easier in the long run.
Microsoft Store Apps
Windows 10 can operate as both a PC and a tablet (2-n-1) to facilitate this flexibility, it has two methods of installing applications. The Microsoft Store is essentially the same thing as Apple’s App store or Google’s Play store.
Somewhere in your start menu you should see a shopping bag icon. Click it and then search for and install the apps below. If you don’t already have an MS account you’ll need to create one now. Don’t complain, Apple and Google both require accounts, too, LOL. If you’d prefer to set up your account on the web rather than going through the wizard you can do that here.
Alarms and Clock – built-in if your version of Windows 10 is new enough.
Amazon – Amazon shopping, has voice recognition and bar code scanning
Amazon Music – Stream and download Amazon Prime music.
Audible – Audiobooks, this service requires a subscription but you can get two books for free.
AutoDesk SketchBook – A great drawing and sketching app that is easy to use.
CPlus for Craigslist – Lets you setup searches for Craigslist that notify you when those items become available.
Drawboard PDF – A PDF viewer that supports drawing and inking on/over the files. This app is free on some systems or $9.99 on others.
Facebook – I actually prefer the website but installing the app makes it show up as a sharing option in other applications.
Flipboard – The built-in news app is great, but I use Flipboard because it allows me to publish articles from my blog.
Flixster – Movie theatre show times & tickets, reviews, clips, etc.
Fresh Paint – Another great art app that is easy to use.
Google – Easy access to all of google’s services: Search, Gmail, YouTube, ect.
Instagram
Kindle – Book reading app
Messenger – Facebook Messenger app
Merriam Webster Dictionary
Microsoft Jigsaw – Puzzles on your computer
Microsoft Mahjong
Microsoft Minesweeper
Microsoft OneNote – Free tablet edition of the note taking app.
Microsoft Skype
Microsoft Solitaire
Microsoft Sudoku
Microsoft Translator
Nook – Barnes & Noble book reader
Netflix
Scan
Sence Clock – Great nightstand clock but also gives you live tile clock for your smart menu.
Skype
Sway – A new type of document that combines the features of a Powerpoint and a web page
Twitter
Desktop Software
Everybody has their prefered desktop software and programs they require for their profession but there are a few that are ubiquitous from my point of view. As I stated earlier, having the majority of your software already installed will make organizing your start menu (next step) easier.
7zip – File compression utility
Acrobat Reader DC – there are still some PDF files that require Adobe to fully work. I do not make it the default.
I find that one of the keys to enjoying the Windows 10 operating system revolves around spending some time to configure the user interface settings. These settings control what you see in the start menu along with how your system looks and works. We’ll also need to adjust the settings for how our pen works. There are hundreds, maybe even thousands of other settings you can tinker in Windows, but Microsoft does a good job of picking defaults and unless you have a specific reason to change things like the Power settings or the Update frequency I recommend that you leave them as is.
Start Menu
The Windows start menu has a starling number of configuration options most of which are available under the personalization heading in the settings app.
In your search bar type “Start Settings” and adjust the toggles to match the picture below.
Now click the “Choose which folders appear on Start” link at the bottom of the start settings screen and adjust those toggles to match the following picture.
These settings control which folders appear above the start button. They are handy shortcuts that I use often but having too many of them causes screen clutter.
Themes
Themes are composed of background pictures, color schemes, icon packs, sounds and sometimes even screen savers. They do more to personalize the way your computer looks than almost anything else. There are built-in themes, themes in the app store for free and for pay along with countless web sites (google Windows 10 Themes) to get them from. Microsoft has a free library of all kinds of themes organized by subject categories here.
If you choose to download themes from a web-site, exercise caution. You have no idea what’s in the files you are downloading; get them from reputable sites and scan them with AV software (right-click on the downloaded file & choose scan with windows defender) before installing. You can also make your own themes; check out my article on how to turn your favorite pictures into one.
In the search box type “Themes” and click “Themes and related settings” in the results. You will find all the controls along with a link to find more themes in the app store. If you don’t have any downloaded and don’t want make your own I suggest selecting the built-in Windows 10 theme.
Lock Screen
The lock screen in Windows 10 works just like the lock screen on your smartphone. You can select an image or even play a slide show for the background. Some apps like the weather and calendar are able to display information when the lock screen is on. Just type Lock Screen in your search bar and click Lock screen settings in the results. Adjust the settings to match your preferences.
If you have a case or skin that you like, take a photo of it and use it for your lock screen.
Colors
If you’ve opted to use a theme, it likely set the colors of your Start Menu background, Task bar, and the borders of windows. However there are still some options you’ll want to adjust. Type color settings in your search bar and select it from the results. I reccomend the options show below.
Choosing Dark as the default app mode will cause many applications to have a black background like the screenshots you see in this article.
Pen Settings
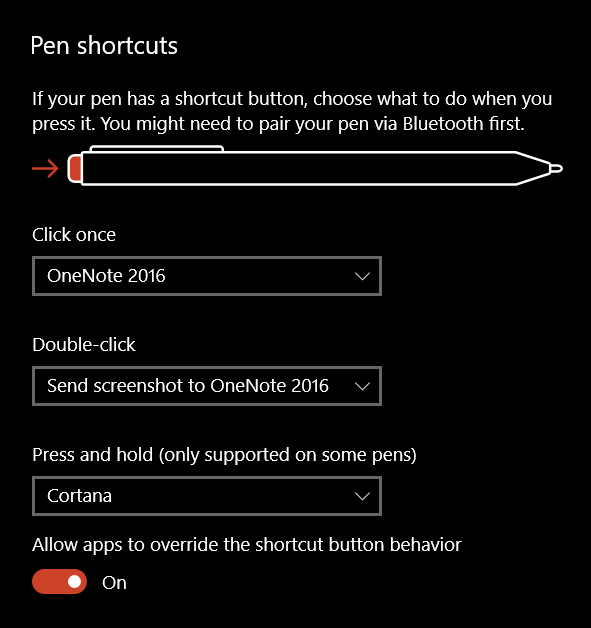
The point of this article is to configure your system for digital journaling, you will want to fine tune the way your pen/stylus operates so that you can get the best experience. Type Pen Settings into your search bar and select it from the results. I suggest the settings below. I also recommend that you click the “Get to know my handwriting” link, this will launch an application that fine tunes the handwriting recognition for even the sloppiest writers (like me). On the same screen you can control your Pen’s buttons.
There are some more pen settings in the classic control panel. Type control panel in the search bar and select it. Find the Pen and Touch icon. Here you can control the tap actions and enable the eraser function if your pen has one. You should also enable Flicks. Just keep in mind that they only work in Desktop Apps and not the Tablet apps (called Universal Apps) that you download from the store. You want to use the practice link at the bottom of the window if you’ve never experienced them before.
The Start Menu
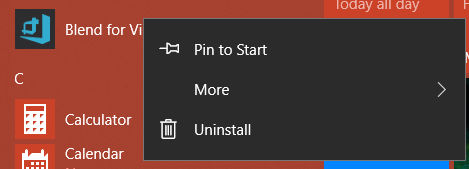
Now we’re ready to organize our Start Menu. First go through your apps list and right-click on the icons for all the software that you use frequently. Choose the option to “Pin to Start”. Note, if you see “Unpin from Start” it means the icon/tile for that program is already in the start screen portion of your start menu.
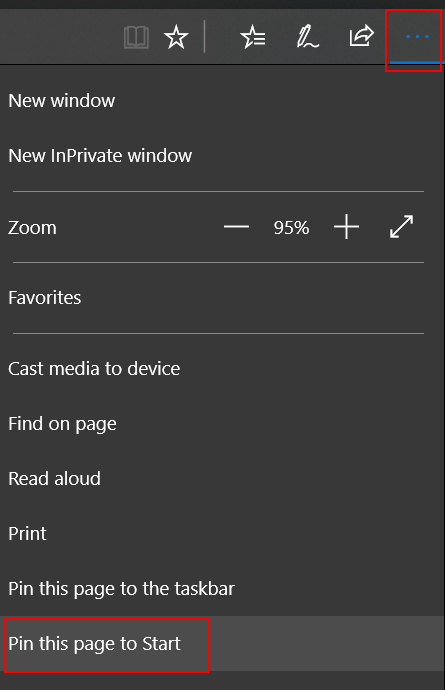
I also like to pin my favorite web sites, like those for my bank, the on-line access to my TV, and Facebook to my start screen. To do this you’ll have to use the Edge browser. Just go to the URL of the site then click the action menu … icon and choose Pin this Page to Start.
Organization is Key
Now you have a mess of icons and tiles all over the place in your Start menu. How did this help? To get the most out of the windows start menu you need to organize your icons into sensible groups.
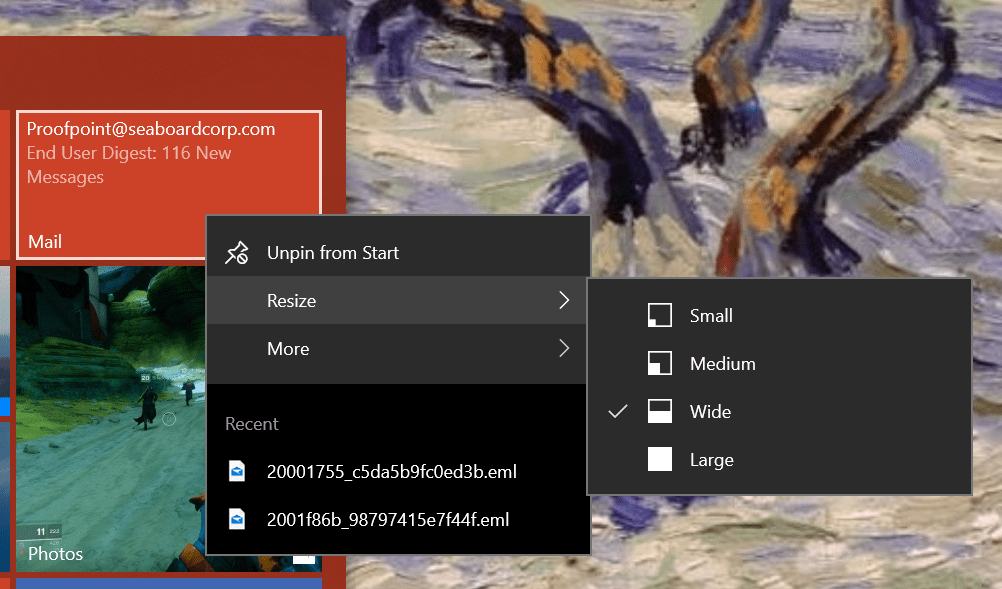
Tile Sizes
The icons in your start menu are called Live Tiles. Some have the ability to show updated information from the application that they represent. For instance the News tile will flip through headlines, the Photos tile will show your pictures, and the Facebook tile shows the latest posts on your timeline. To get the most out of live tiles you need to adjust their sizes so that they can display the information you want to see. Right click on a tile and go to resize to see its options. Many tiles change what they show in accordance with their size. For example, making the weather tile wide instead of medium will cause it to show the full weeks forcast instead of just the current weather conditions.
Group Tiles
You can group tiles together in named categories. Microsoft usually gives you a group called Life at a Glance to start with. You can make new groups by dragging similar tiles close to each other. When you get two or more tiles next to each other, hover your mouse just above them and you see the option to name the group. I make the following groups on every computer that I use:
Life at a Glance = news, mail, calendar, Facebook, Instagram, Twitter, Messenger, photos, calculator, etc.
Media = Art, photo editing, video editing, audio editing
Office = Any application that I use for documents
Games
Dev Tools
Movies, books, and music (sometimes I name this group entertainment)
Nested Tiles
Besides groups you can also create nested tiles. This works in much the same way it does on a smart phone. Drag one icon on top of another and let go. Add more icons to the nest by dragging them in. When you nest tiles you are able to fit more of them in a much smaller space but you give up the “Live” functionality. They will not show updated information or notifications in most cases.
My Book Apps as a Nested Tile
Conclusion
If you’ve made it through all these steps you should have ended up with a great looking profile that shows your most important information every time that you click the start button. Your pen has been optimized, handwriting tuned, options for the on-screen input adjusted, lock screen and backgrounds set, and more. Once of the nicest features of Windows 10 is that once you do go through this on one computer; the results will replicate to every Windows 10 computer you use afterwards as long as you didn’t turn this option off. Thanks for reading and stay tuned for the next article in this series.
If you’re in the process of migrating to or setting up a hybrid relationship with Office 365 SaaS offerings you probably want to simplify the login process for your users. There are a ton of articles and setup guides out there that explain how to set up Azure AD Connect and even AD FS if you need it but one thing that is more difficult to figure out is setting the UPN. The UPN is a logon in the format of an email address instead of the more common domain\username NTLM nomenclature. Office 365 prefers UPN logons and to be honest they’re easier in your on-premises Active Directory as well.
To prevent your users from needing to logon twice in hybrid environments and to make the UPN easier to remember in on-premises authentication it makes sence to set it to match the user’s email address. The script below assumes you have created a csv file of the user accounts that you want to modify. At least one column in that csv needs to be a qualified identity parameter (SamAccount, Distinguished Name, etc.). When you run the script it will ask for the file and then for the name of the column containing the ID parameter. After you’ve provided those, it will loop through the file and set each user’s UPN to match their current email address.
Import-Module ActiveDirectory
[System.Reflection.Assembly]::LoadWithPartialName('Microsoft.VisualBasic') | Out-Null
Start-Transcript -Path "$env.userprofile\documents\upnupdatelog.txt"

Function Get-FileName($initialDirectory)
{
 [System.Reflection.Assembly]::LoadWithPartialName("System.windows.forms") | Out-Null

$OpenFileDialog = New-Object System.Windows.Forms.OpenFileDialog
$OpenFileDialog.initialDirectory = $initialDirectory
$OpenFileDialog.filter = "CSV files (*.csv)| *.csv"
$OpenFileDialog.ShowDialog() | Out-Null
$OpenFileDialog.filename
} #end function Get-FileName

# *** Entry Point to Script ***

$userlist  = Get-FileName

$idcolumn = [Microsoft.VisualBasic.Interaction]::InputBox("Enter the case sensitive name of the column that contains the employee's account information:","SamAccountName, DN, CN or Name Column", "ID")

$usernames = Import-Csv -Path $userlist | select $idcolumn -ExpandProperty $idcolumn

Foreach ($user in $usernames)
{
    $address = Get-ADUser -Identity "$user" -Properties proxyAddresses | Select -Expand proxyAddresses | Where {$_ -clike "SMTP:*"}
    $newUPN = $address.SubString(5)
    Set-ADUser $user -UserPrincipalName $newUPN
}
User in a panic, “OMG! I need you to delete the email I accidentally sent to the wrong people.” Tech in a calm cool voice, “Who’d you send it to?”. Inevitably this conversation leads to you recieving a list of addresses that the user copy and pastes out of the To, CC, or BCC field of an Outlook object.
Unfortunatley, this data will not be in a useable format as far as bulk PowerShell operations are concerned. The Outlook name resolution feature will have changed the user’s names or email addresses to the format “First, Last <email@mycompany.com>;” The extra characters make using the data as the identity pararmeter in the Export-Mailbox or Search-Mailbox cmdlets impossible . Many people end up editing the list in Excel or Notepad to remove the extra text and get down to a list of just email addresses.
This PowerShell code uses RegEx pattern matching to turn your mess of a list into a useable list of email addresses. The split adds a carrige return after each semicolon and the RegEx pattern matches everthing between the < and > symbols. Incidentally, I searched all over the internet trying to find somebody else that was correctley using RegEx to copy the text between two symbols and never found anyone that did it correctly, so I’m pretty proud of myself for figuring this out.
You’ll need to paste your email dump into a text file and save it somewhere. Then alter the $path variable to point at it. When you execute the script it will output the email addresses to a file in your documents folder named emailaddresses.txt, but you could easily pipe it into your Search-Mailbox cmdlet instead.
Microsoft has really turned over a new leaf in regards to its view of the previously despised Linux operating systems. Satya Nadella has led the company through a complete 180. Not only have they stopped dissing Linux, Microsoft seemingly fully supports it. Previous CEO Steve Balmer tried to put Linux in a guillotine with its 59,000 strong, patent portfolio blade. He pushed companies into signing patent licensing deals; search Amdocs for the details on one such agreement.
With Nadella at the helm, the company now views Linux as an asset rather than a competitor. They may be on to something, Linux is a fantastic operating system that has propagated to data centers world-wide. It usually far outnumbers Windows nodes in those same dcs. However, a lot of the software available for Linux is sub-par in many a users’ eye. Kolab is able to ape some of the best features of Microsoft Exchange, but lacks the polish and scalability features. Libre Office Writer 5 is good for free software, but I write all my documents in Microsoft Word.
The ablity to run Microsoft’s flagship software on Linux machines could greatly expand Microsoft’s user base, both in the Enterprise and by individuals. Last year MS released an edition of its SQL 2016 Server that runs on Linux and enabled Bash (the Linux terminal for my Windows readers) in Windows 10. It fully supports Linux virtual machines in its Azure cloud and Unbuntu on Windows is available in the Microsoft store. Its latest offering is the ubiquitous PowerShell and .Net core. The old lines in the sand are starting to become awfully blurry. The official Microsoft announcement is here if you’d like to read it.
Speculation could lead one to ponder what else will run on Linux now that it has the next-gen .Net framework easily available. Rumors abound that everything from Microsoft Exchange to Microsoft Office is on the way. Only the future will tell for sure, but I can’t imagine that MS went to all this trouble just to let Windows admins run their PowerShell scripts on the Linux team’s VMs. Python isn’t that big of a leap for those of us that are proficient at PowerShell, there’d be no reason for this type of overture unless they have plans to do something more with it.
So how do we get PowerShell on to Linux and what can you do with it after you do? Let’s find out! If you don’t have an old system lying around that you can toss your favorite Linux distro on, I suggest building a VM on your Windows machine. You can use Hyper-V if you have Windows 10 Pro or Server, and VirtualBox if you don’t. See my article about building a VM on windows for more info.
I’m using Ubuntu 17.10 and I’m going to add the Microsoft repository to my package manager so that my install stays up to date with my regular update procedure. If you’re doing this on a MAC you’ll want to grab one of the OS X packages from the GitHub Repository. The Macintosh operating system has an unknown developer lock on it just like your phone does. You’ll need to CTRL + Click on the PKG file that you downloaded and then pick Open to bypass the security feature. Follow the Wizard to complete the installation.
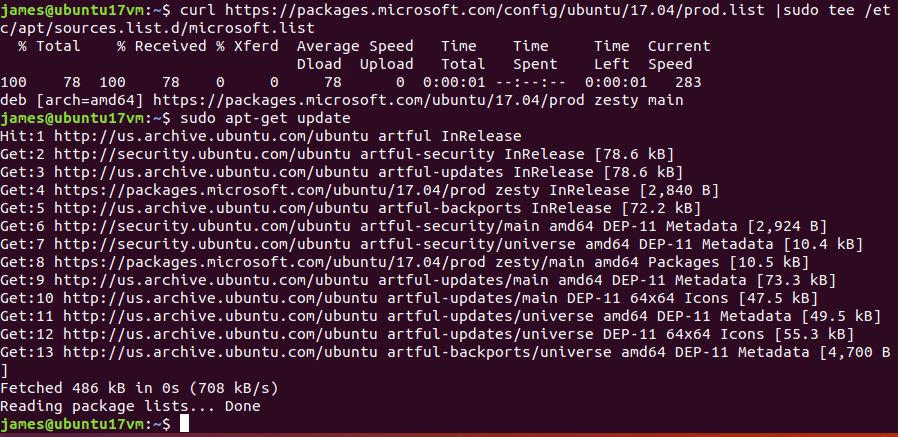
In Ubuntu, open a terminal and follow the instructions below.
We need to add the curl program unless you’ve already had to for some other task.
Type: sudo apt install curl and press enter.
Now we’re going to import the repository GPG keys.
That’s it, you’ve installed PowerShell on Linux. To those of us that have been in tech for more than a few years, that is a very odd sentence to type. Now what? Well, first you’ll need to launch it. Open your terminal and depending on the version of Linux/Mac OS X and the package you’ll need to type either powershell or pwsh to access it.
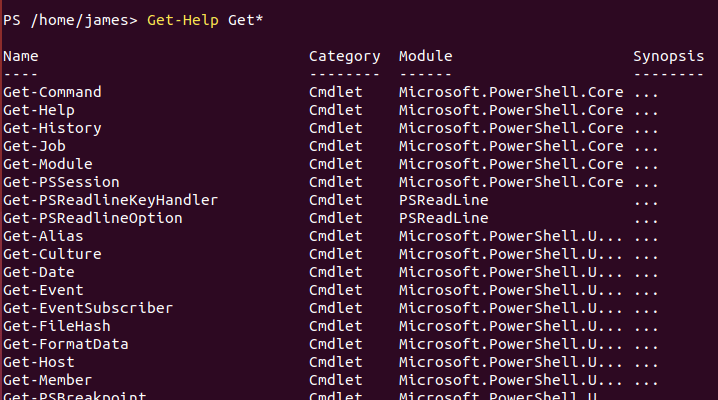
Once you’re in, it works exactly like it does on Windows. A good way to see what you can do is to list out the commands and modules available. Try Get-Help Get* for a list of get commands and Get-Help Set* for the settings you can alter. Get-Module -list is also handy.
There are a lot of commands available but some of my favorites are missing. Get-NetAdapterConfiguration and Test-Connection are nowhere to be seen but the trusty Get-ChildItem and Get-Process are both fully functional. You’ll have to check for your favorites. One would assume cmdlets will be added with future updates as there were in the evolution of PowerShell on Windows.
As I’ve stated in numerous posts before, I like and use all technology. I see the new trend of intergration as an extreme advantage for the future of computing in general. I sincerely hope it continues.


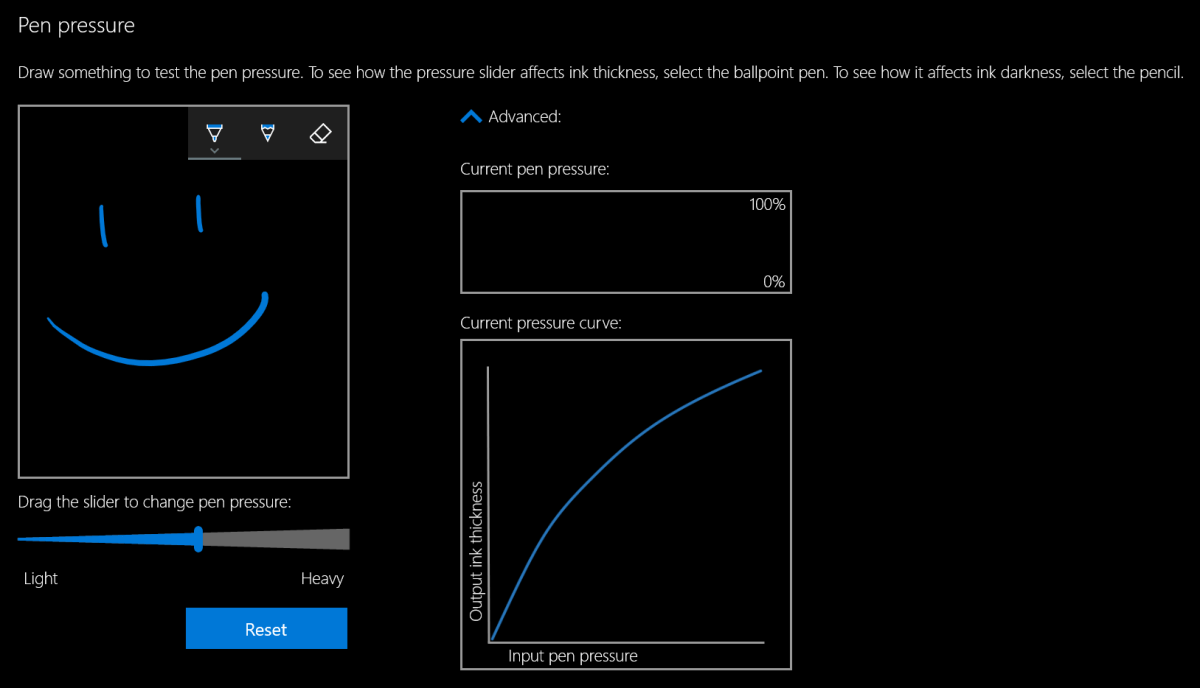

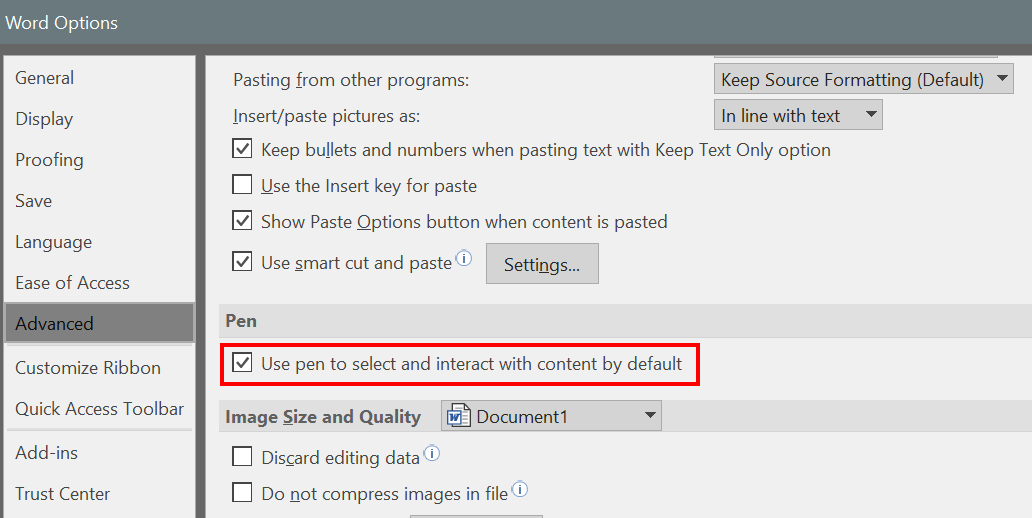
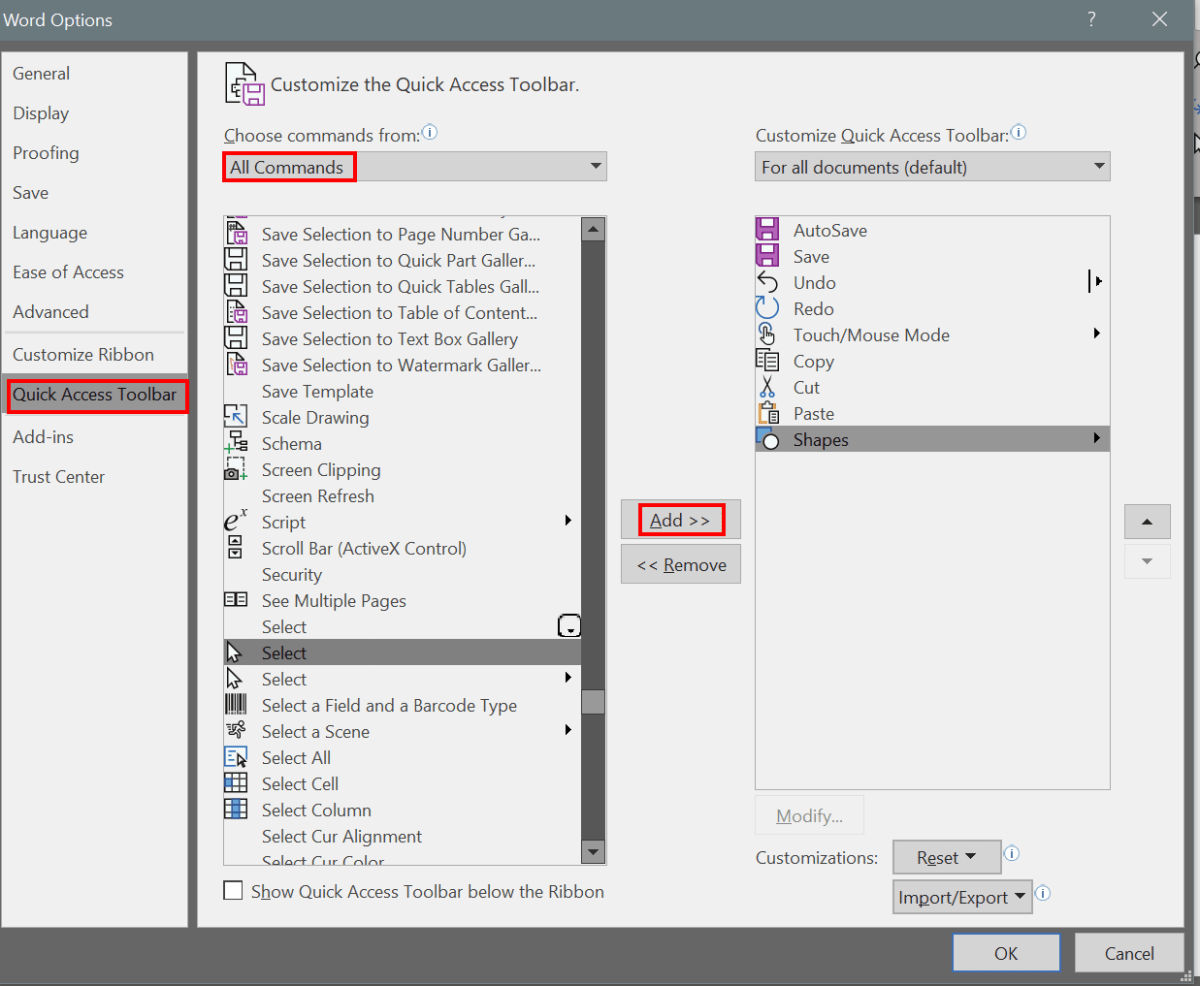

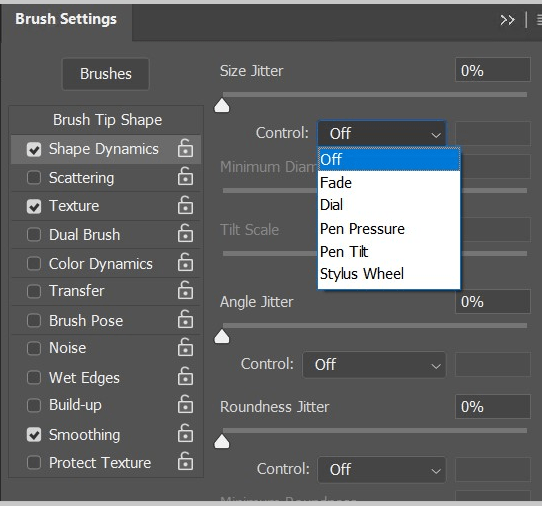

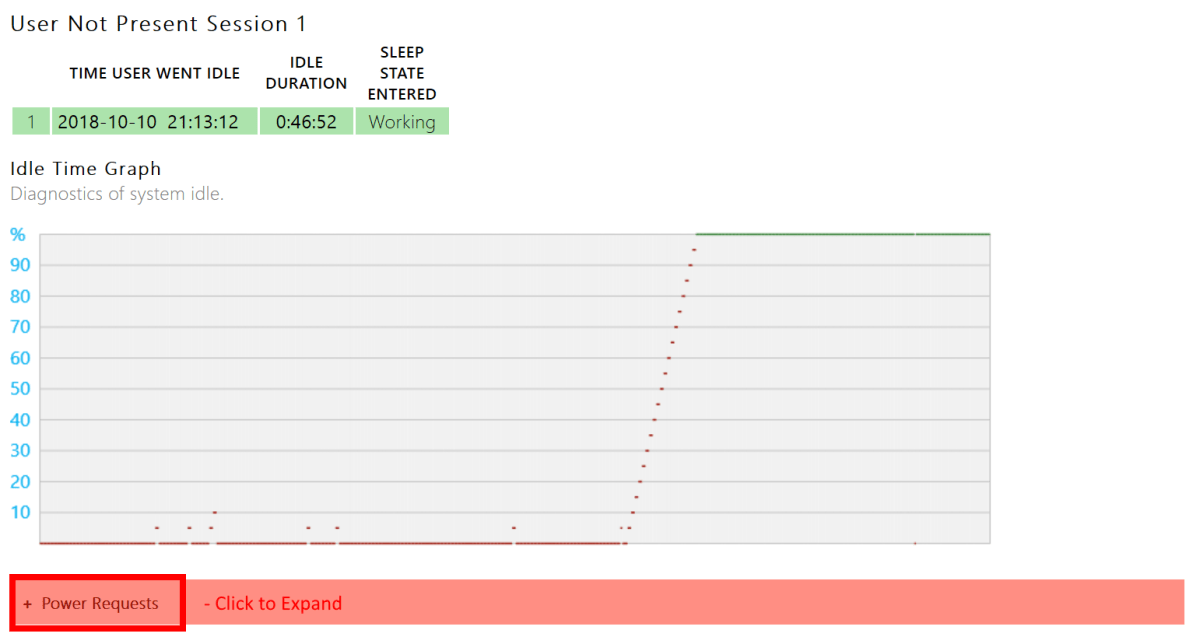

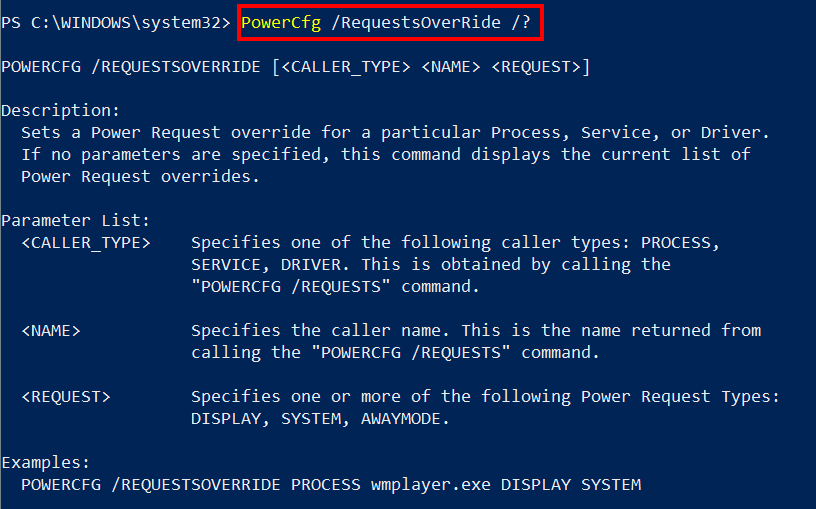


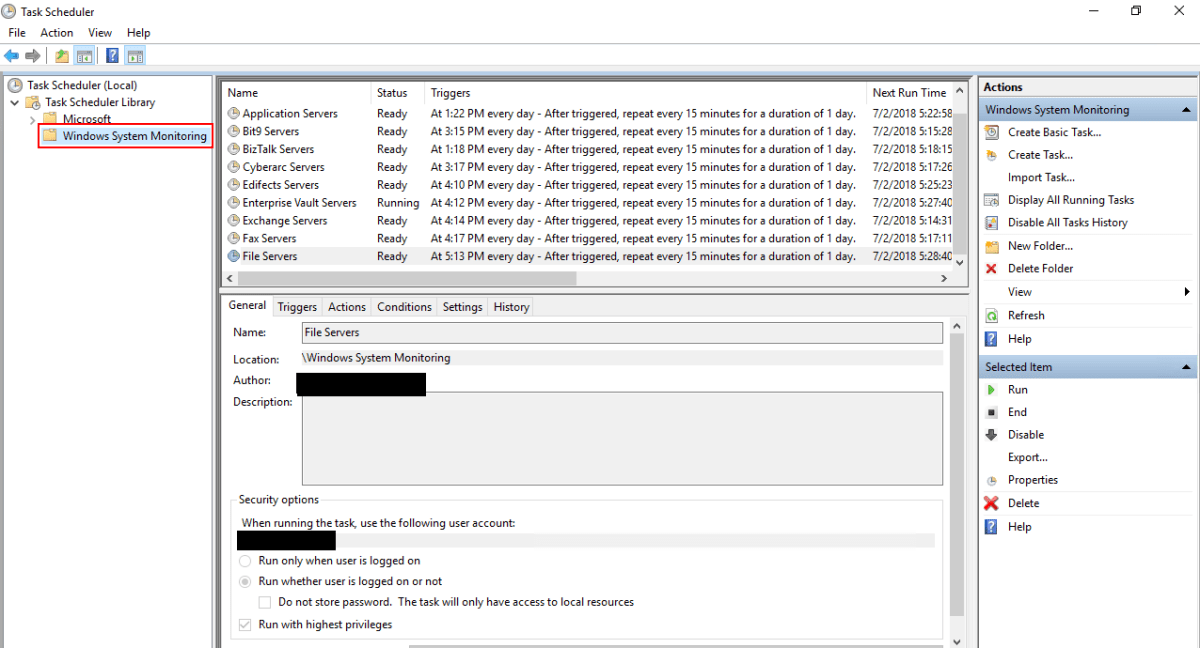

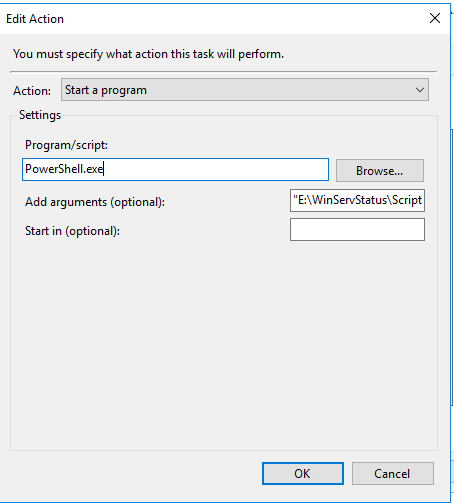
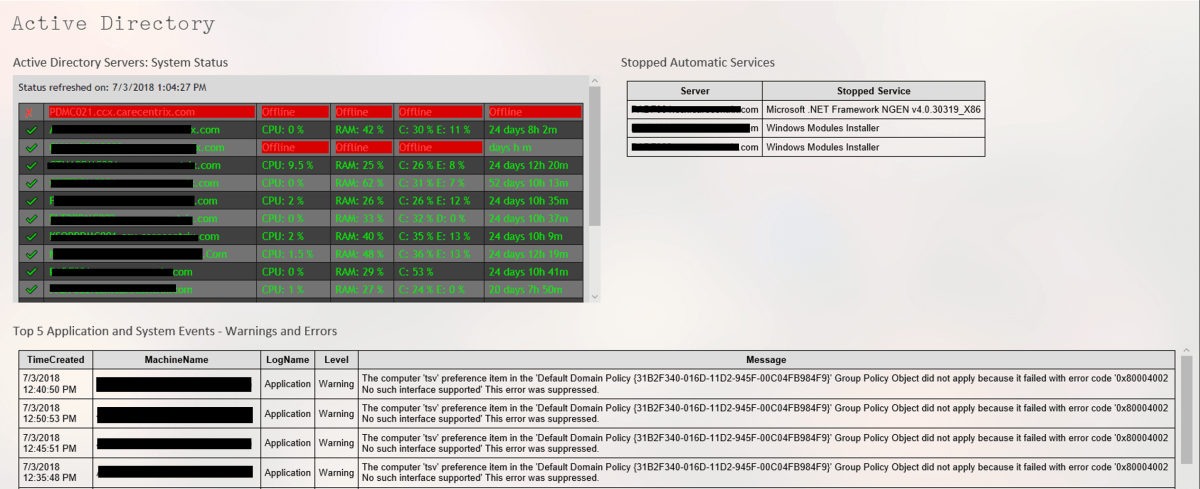

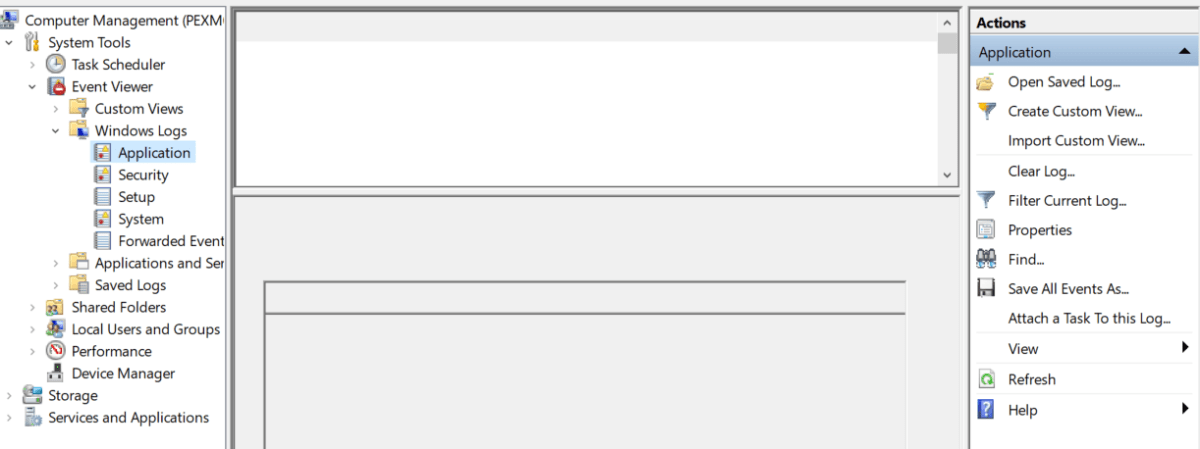

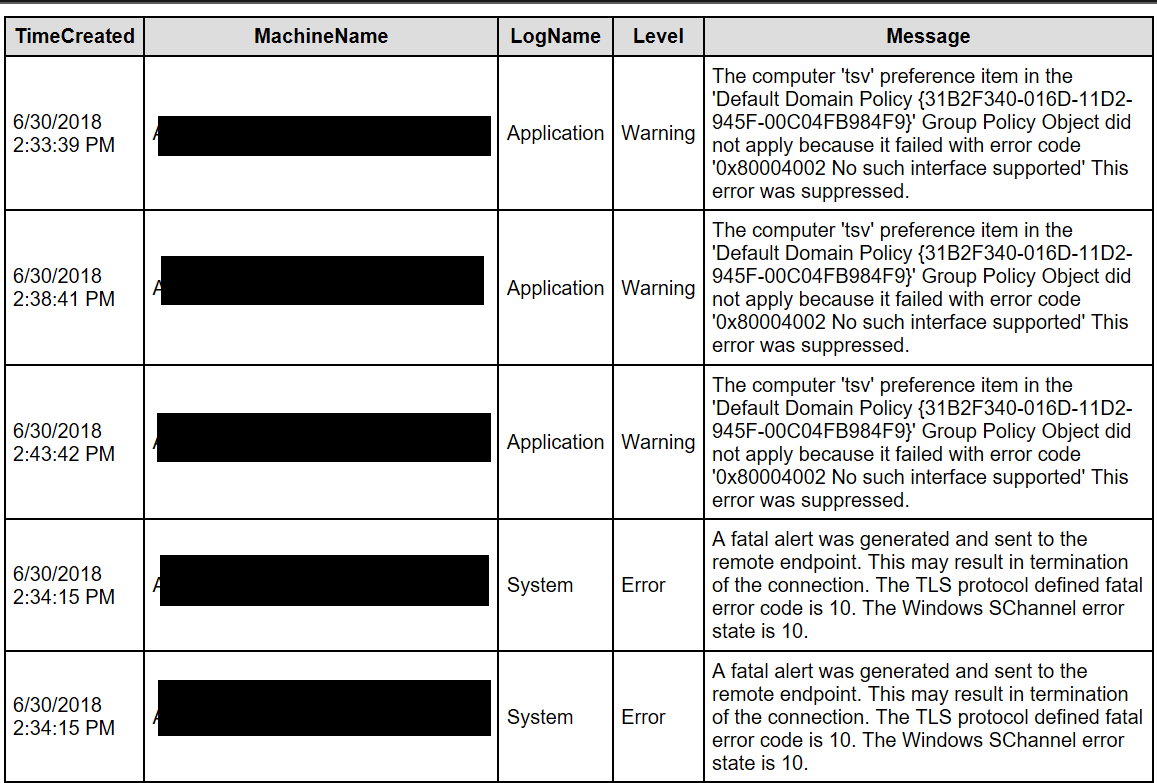


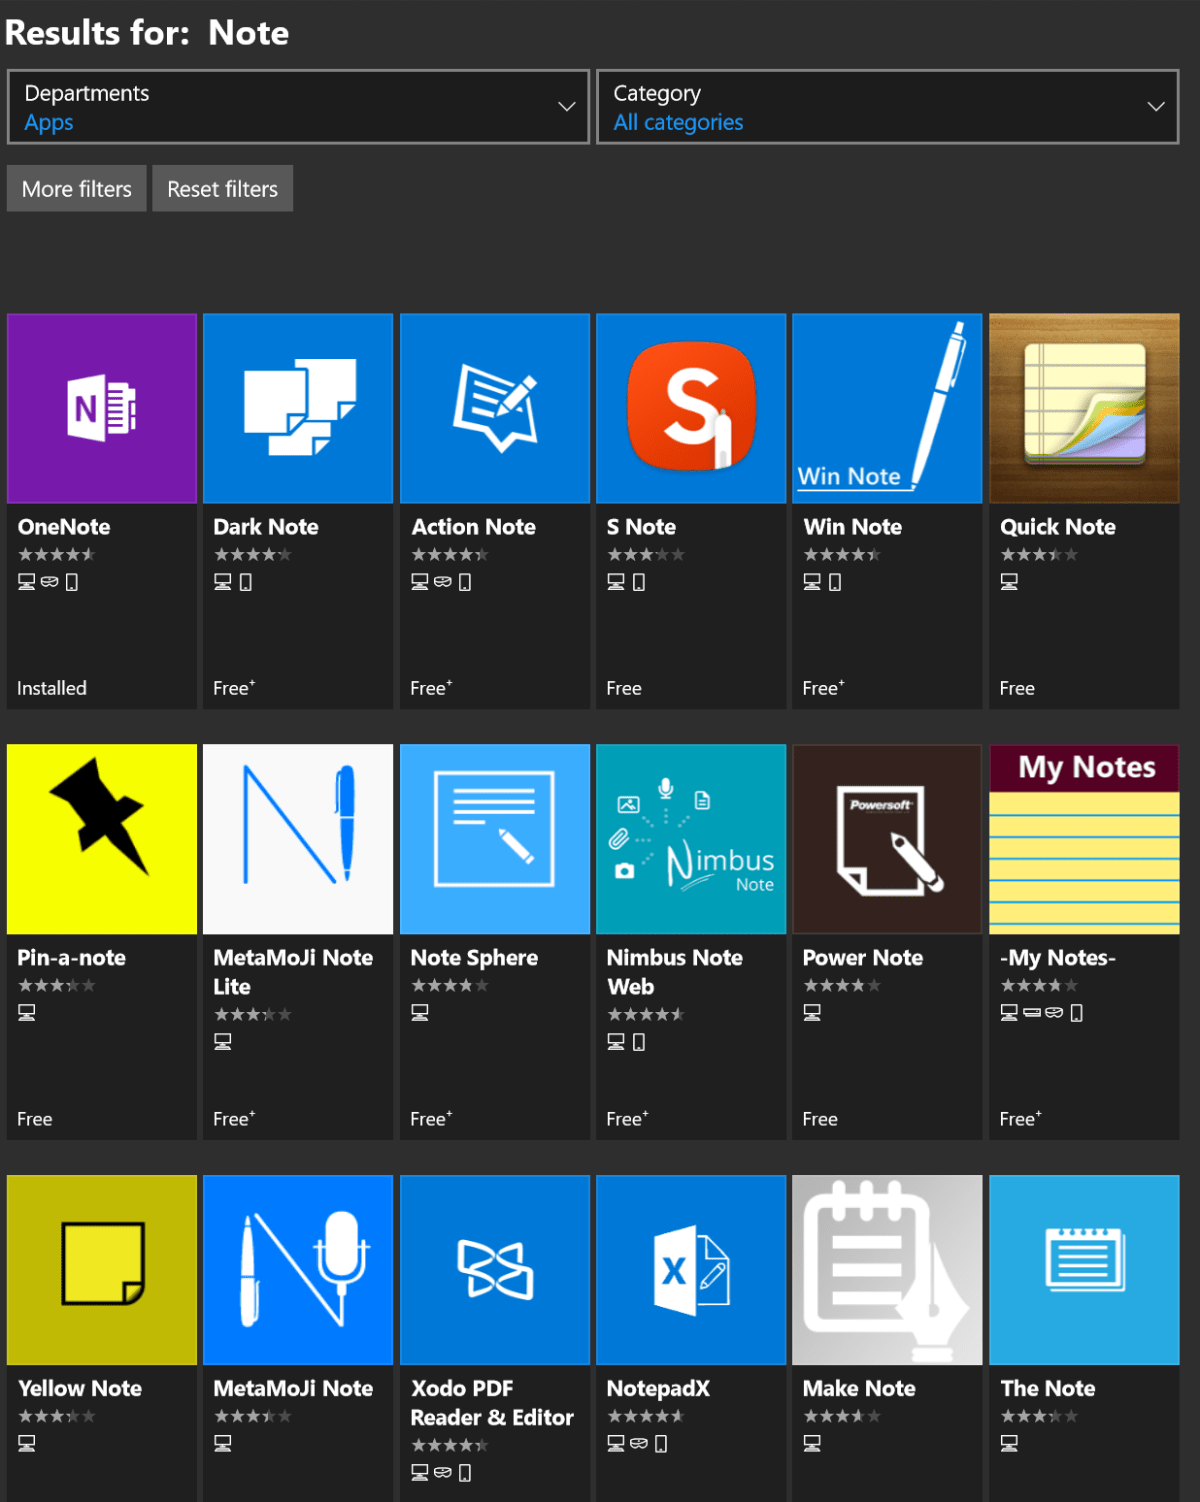

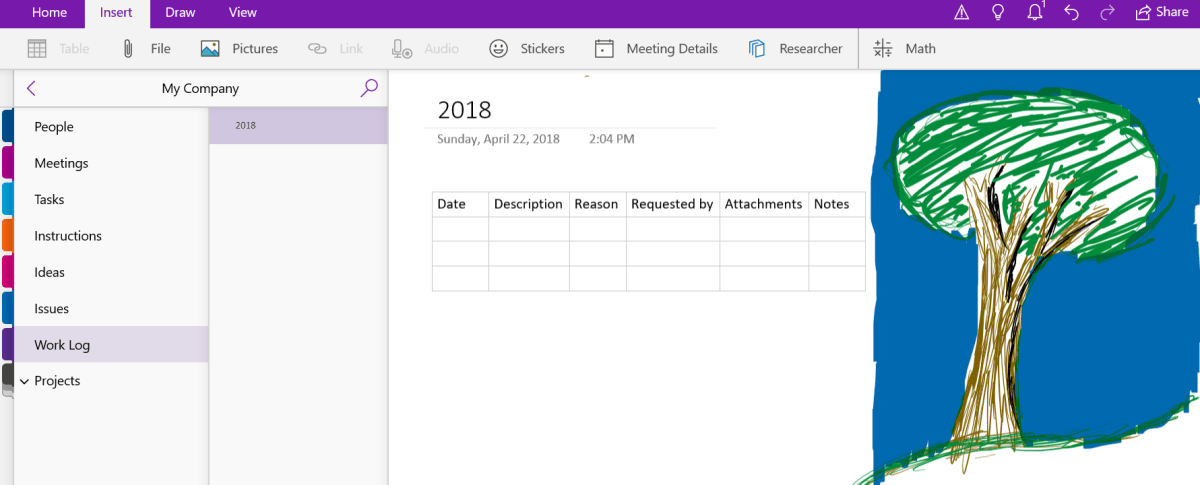
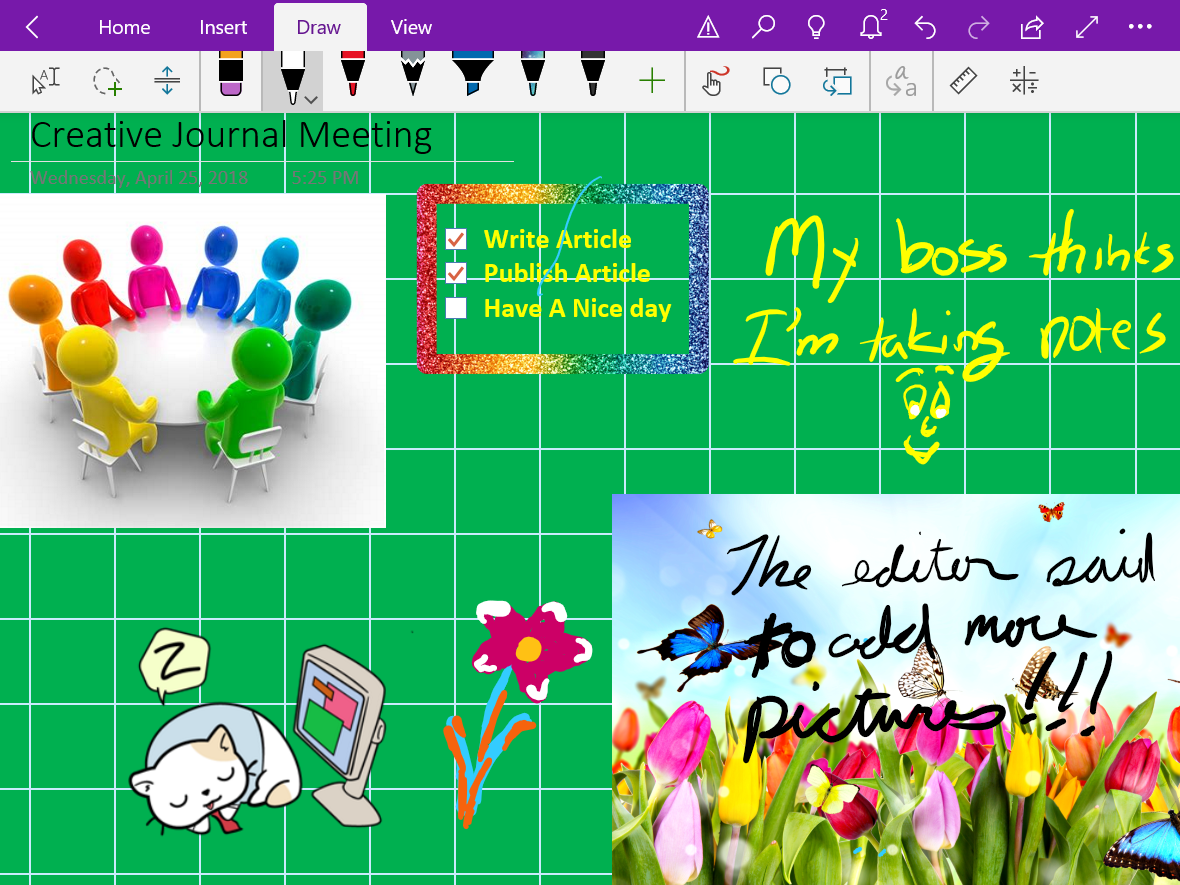

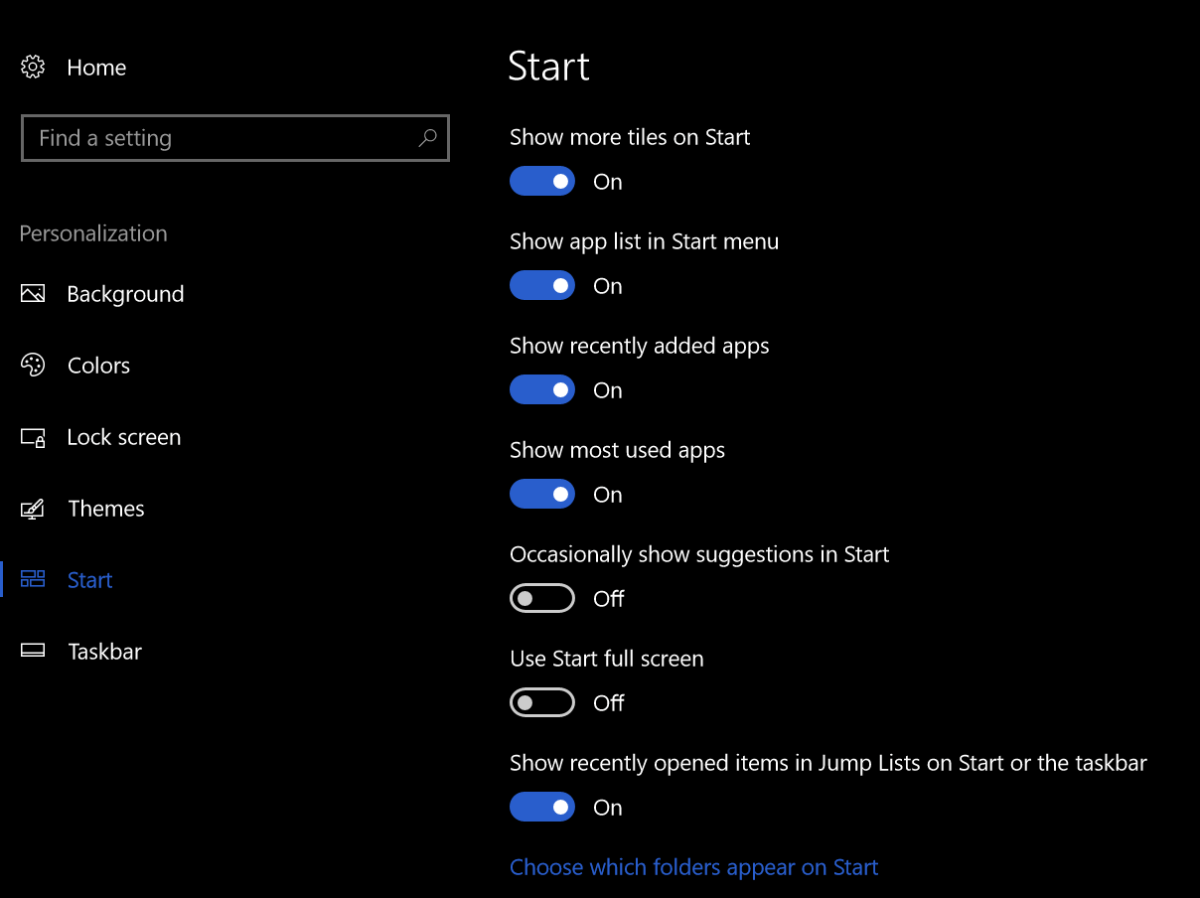


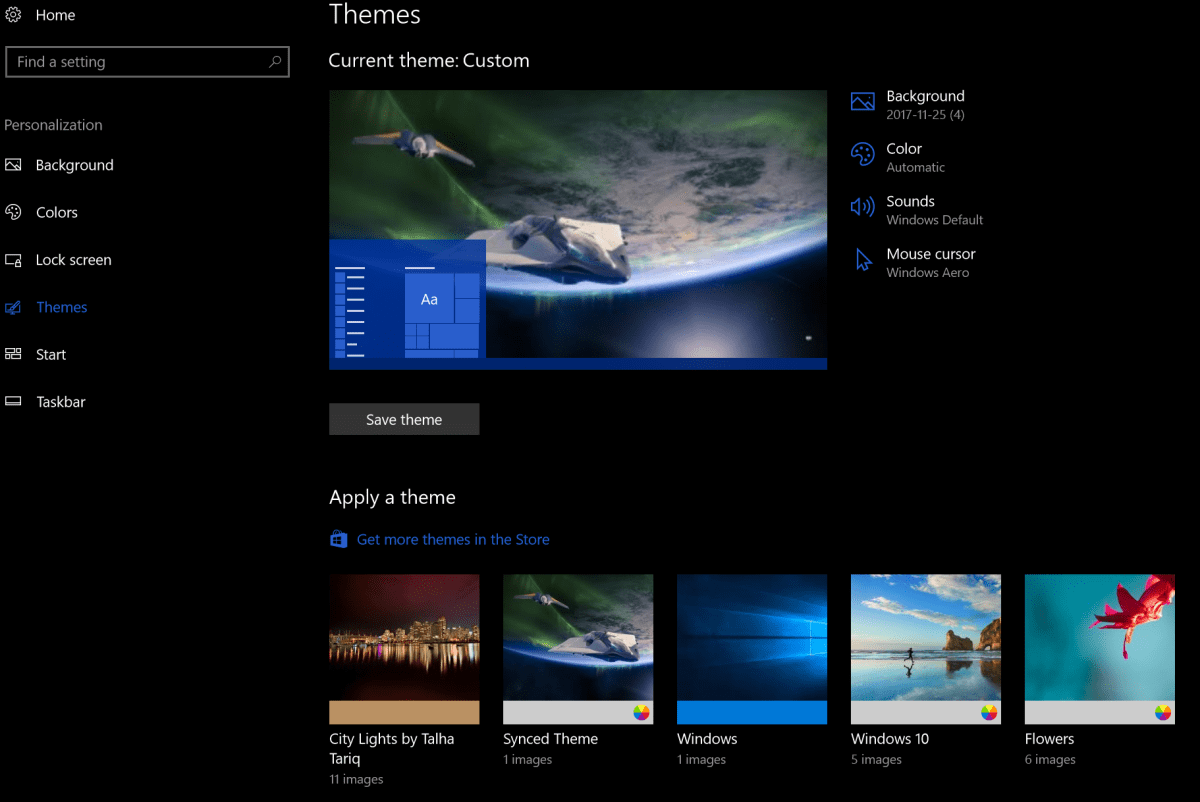
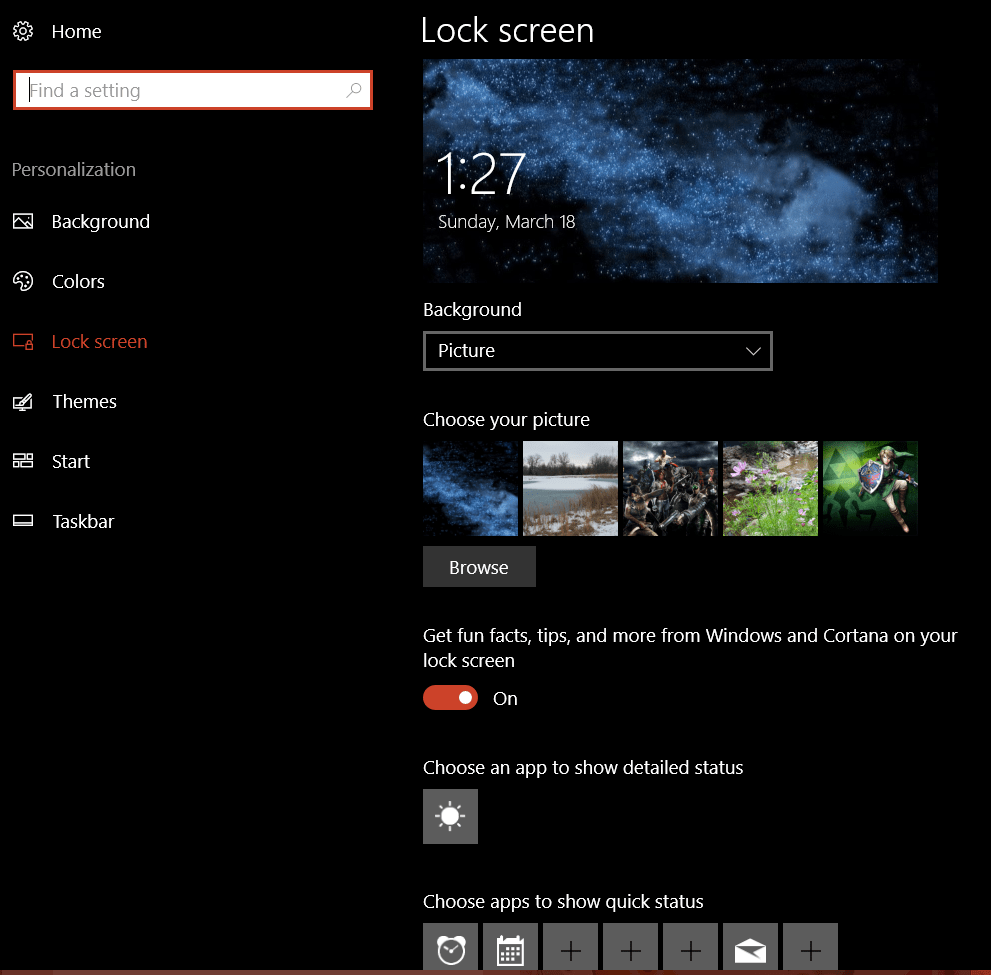

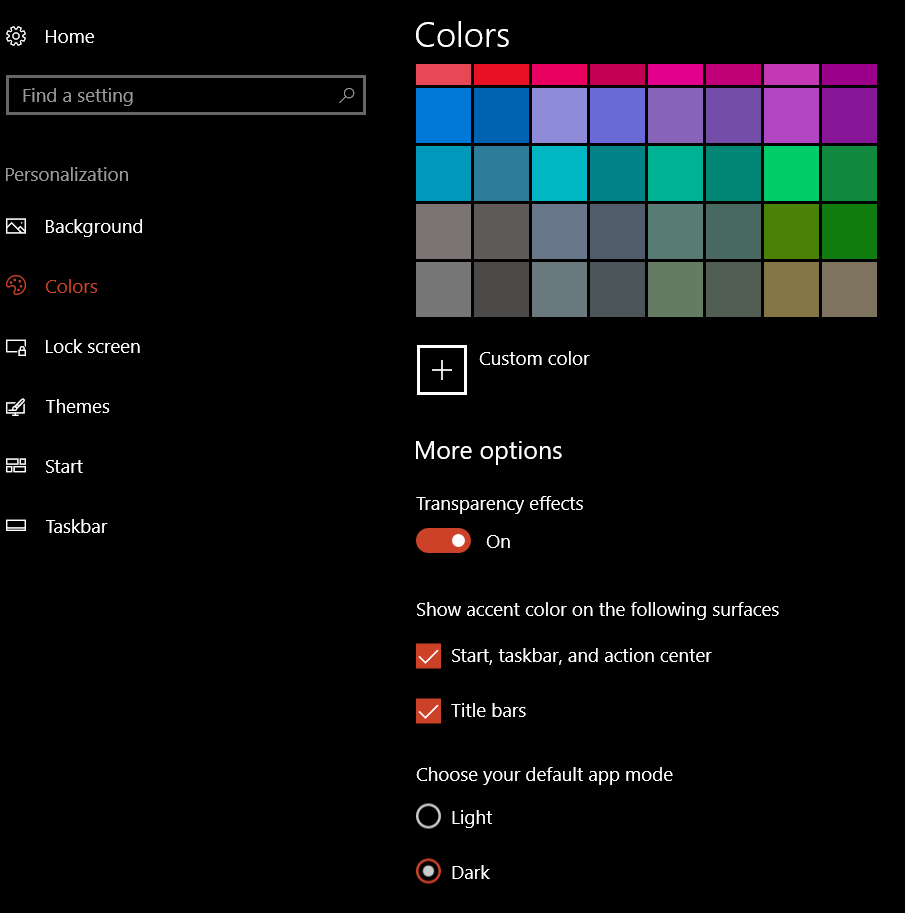
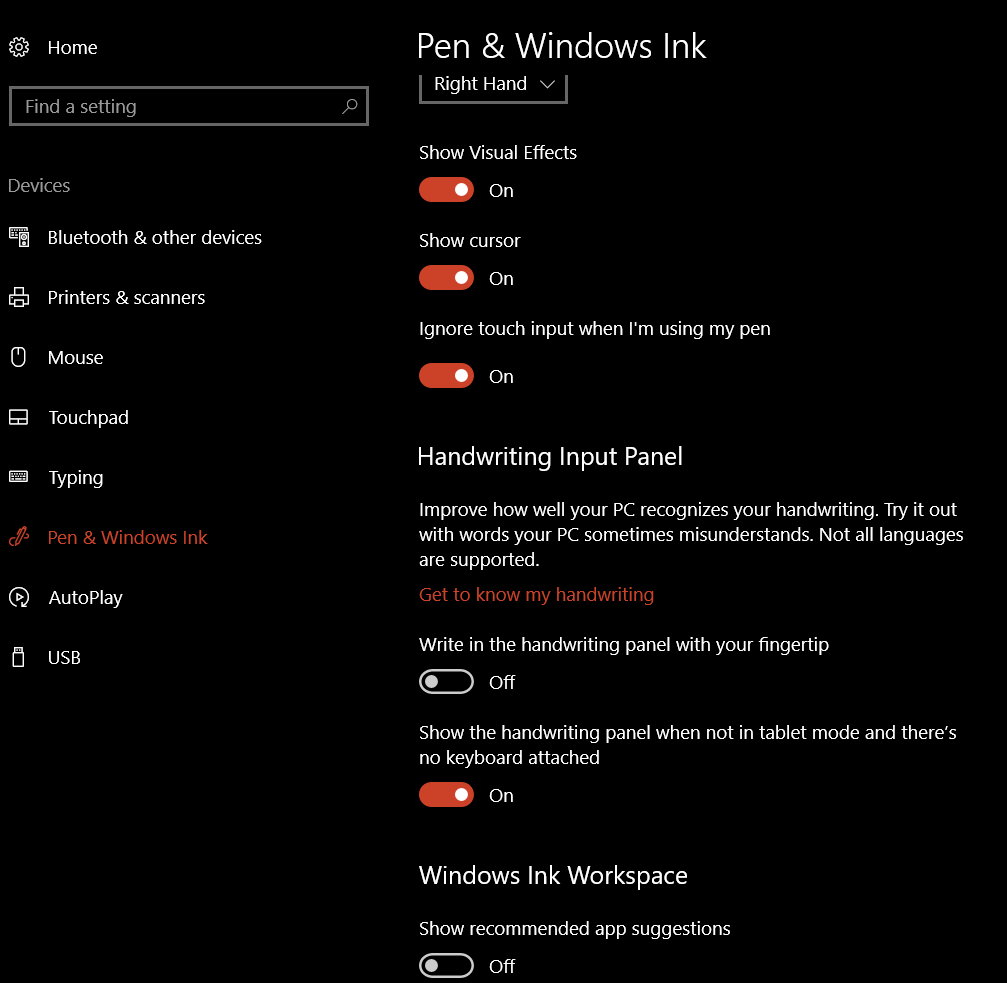 On the same screen you can control your Pen’s buttons.