I have always been sensitive to light. Ironically, I have spent a large portion of the last thirty years looking at bright white rectangles. Is it bad that I still see them when I close my eyes?
I am the person that wears sunglasses indoors. I turn the backlight on all of my screens as low as I can, anything to stop the eyeball frying white-out. Don’t get me started on the sea of over saturated light that most office spaces subject you to. Are they trying to give us all a free tan? You can imagine my elation when dark mode hit the scene a couple of years ago. It has a major problem though.
Even after all this time, Dark Mode isn’t available everywhere. Opening some of the most frequently used applications on my phone is like looking into the headlights of an on-coming car. Maybe Zuckerberg secretly wants us to stop spending so much time on Facebook?
Dark app and page backgrounds are about more than comfort. Forcing modern OLED screens to light all of those white pixels burns through your battery faster. Lucky for us, Android 10 has a hidden trick that enables Dark Mode for apps that don’t support it on their own yet.
The option to Force Dark Mode is in the hidden Developer Options menu. There’s a secret process to enable this menu. I promise I am not making this up. Open the settings menu and then go to About Phone. Look for Build Number, if you don’t see it then look under Software Information. Once you find Build Number tap on it (the words) seven times. After the first few taps a countdown will appear. When you complete all seven taps, exit settings.
Now close all of your open apps and open the settings menu again. Scroll all the way to the bottom and tap Developer Options. Scroll down until you see Force Dark Mode and tap it to enable the option. Open Facebook, Linked In, Amazon Shopping, or any other app that used to have a white background and embrace the darkness. This is an experimental feature and you are using it at your own risk. I haven’t had any issues with it yet on my Galaxy Note 20, if you do post the problem you ran into in the comments.
When you work in an office you go to meetings, visit clients, go to lunch and commute. Your laptop gets undocked or unplugged and runs on its battery for at least a few of these events. This is the normal cycle that the batteries in your device are designed for.
Now many of us are working from home and leaving our laptops connected to power all of the time. Don’t worry the batteries won’t overcharge, but their useful lifespan can be shortened. The modern lithium battery in your device degrades a little each time that it is charged to its maximum voltage. When you run off a power cord all day you are continually reaching the 100% mark.
So what should you do? If your computer has a removable battery, take it out and put it in your bag. Your machine will run fine without it, but you will want to connect and charge it once a week. Completely discharged batteries can brick. If your battery isn’t removable there may be a software option that prevents a continual full voltage charge cycle.
On Dell systems look in the Command app. Lenovo’s Vantage app control’s their battery threshold. The Microsoft Surface line has an option in the boot config section of its UEFI. Hold down the volume up and power keys, let go of the power button when you see the Window Flag. HP laptops are usually controlled from their BIOS, accessing it is a different process throughout their product lines. Newer MacBooks have the option enabled by default.
Search the web or call your tech support if you don’t know how to change the setting on your particular device. If all else fails, just un-plug and run on your battery once in a while.
If you flip through the pages of my blog it won’t take long for you to conclude that I am rather fond of pen computing. I’ve written thousands of pages and produced countless works of digital art on nearly every type of pen enabled device made in the last twenty years. In my experience working with these machines, I have developed a strong affinity for two series. The Microsoft Surface and Galaxy Note lines of products are my favorites by far.
I love my Galaxy Note 10 Plus. I had planned on keeping it for several years. So when AT&T offered me a killer deal to trade it in, my initial reaction was, “no thanks”. My wife overheard the conversation and pointed out that I was in- fact, out of my mind. So with some concern that the new one wouldn’t be as good, I called them back and ordered the 20.
It arrived here a few days before the retail launch. I used Samsung’s Smart Switch feature to get moved in quickly and have been living on it for the last three days. I’m writing this post on what is already my new favorite phone. The Note series has always been Samsung’s “kitchen sink”, the device they throw everything into. I’m happy to report that the new one has not strayed from the path.
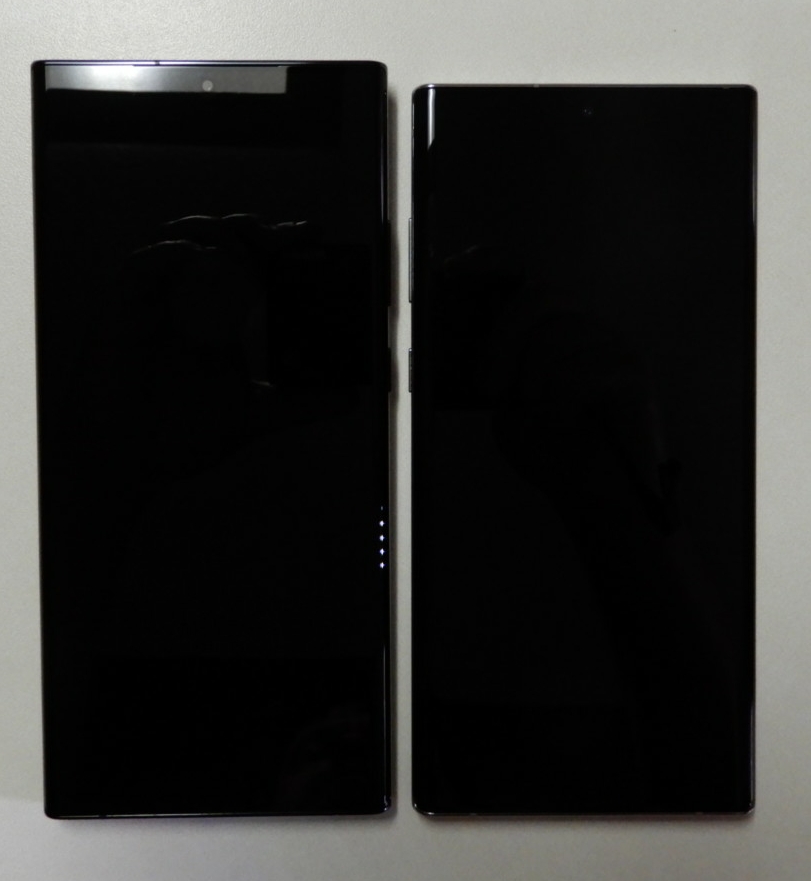
In terms of physical differences, the 20 is marginally bigger than the 10 Plus. Somehow it feels both larger and the same size. There is noticeably more screen real estate, but it doesn’t take much more room in your hand or pocket.
The 20 Ultra is a little larger.
They’ve relocated the buttons to the right edge and the stylus to the bottom left. These changes have messed with my muscle memory a few times, but I’ll get used to them soon enough. Everything else is more or less in the same spot.
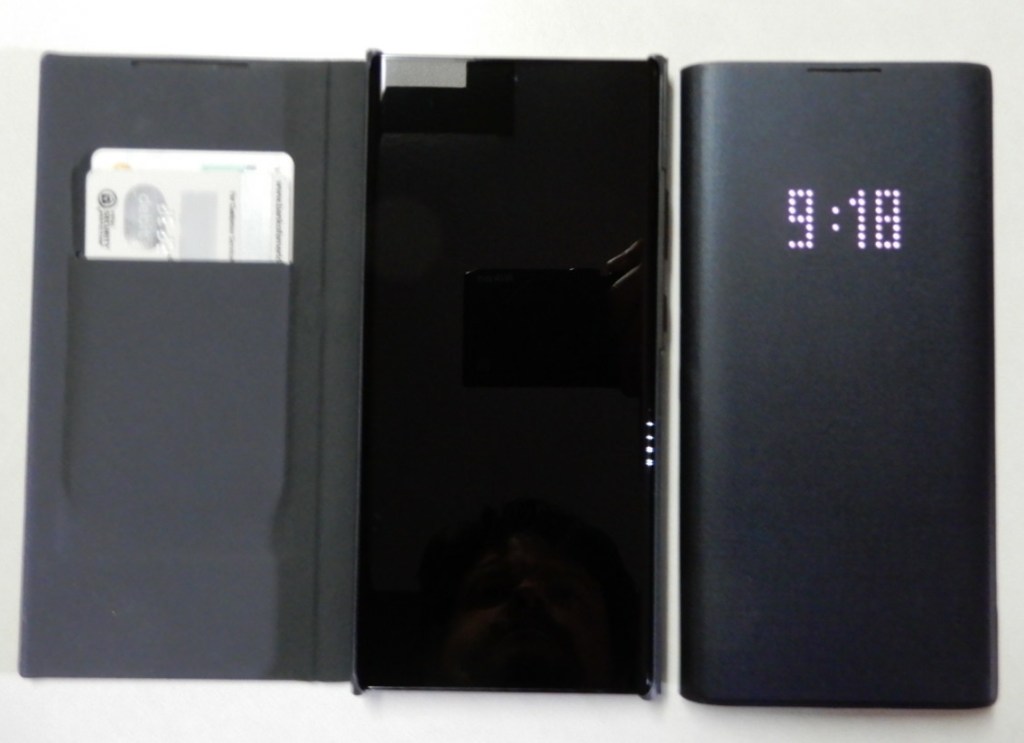
I was happy to see that the same LED Wallet Cover is available for the 20. It is an excellent addition to the Note line. I’ve been using them since the Note 8. They hold a couple of cards and show basic notifications on the cover. Between Samsung Pay, a backup debit card, and my driver’s license it’s the only thing I need to carry.
The LED Wallet Cover is my favorite.
In terms of performance, the Note 20 Ultra is noticably faster at everyday tasks. Both systems are more powerful than they actually need to be. The Note 20 outpaces most of the laptops I have used recently. Where I really notice the speed boost is while using the S Pen in handwriting recognition mode. The delay before it decodes my chicken scratch is much shorter.
Samsung has reduced the lag on stylus input in the new model. I don’t notice the difference all that much while writing or pointing. Shading in my favorite drawing app is another story. There are also some new gestures. If you are a OneNote fan turn on it’s specific app gestures in the S-Pen settings menu. The S-Pens themselves are physically identical and feel the same to hold and write with.
The screen is phenomenal and a major improvement over the Note 10 Plus. One of the first things I did with the new one was to fire up Call of Duty Mobile and crank the graphics to their max. The 120 FPS is immediately evident. Whoever thought that we would see variable refresh rate technology in a phone? Just a short while ago only the most expensive gaming monitors could adjust to match the content. It isn’t just games that are able to benefit from the advancement. Scrolling though Instagram, Facebook, or other feeds is much smoother too.
I didn’t have the 5G edition of the Note 10 so I can’t compare it. I can say that 5G is awesome. Having mobile data that runs as fast as my home service is fantastic. With my mobile hotspot, I’ll never need to worry about crappy hotel Wi-Fi again.
Battery life seems better than the 10. I’ve been using the Note 20 all day, writing this post, taken several pics, played some TDM, listening to Spotify, and I’ve got 59% left. I haven’t run any official tests yet. I assume the ability of the screen to drop down to 10 FPS is having a positive effect. The Note 10 ran at 60 FPS regardless of what you were using it for.
That brings us to the camera. The Note 10 Plus has a great camera system. The three lense options and excellent software made it one of my favorite portable cameras of all time. The Note 20 Ultra’s camera package blows the 10’s out of the water. 5x optical zoom is an important milestone in mainstreame mobile devices. The 50x digital zoom should probably have been cutoff at 30 but that is the only fault I’ve noticed so far. The wide angle shots are jaw dropping when you show them on a 4k big-screen. Speaking of 4k, 60 FPS video is a great upgrade.
Wide-Angle
5X Optical
25X (5 Optical, 20 Digital )
Shots of the same target from the same spot.
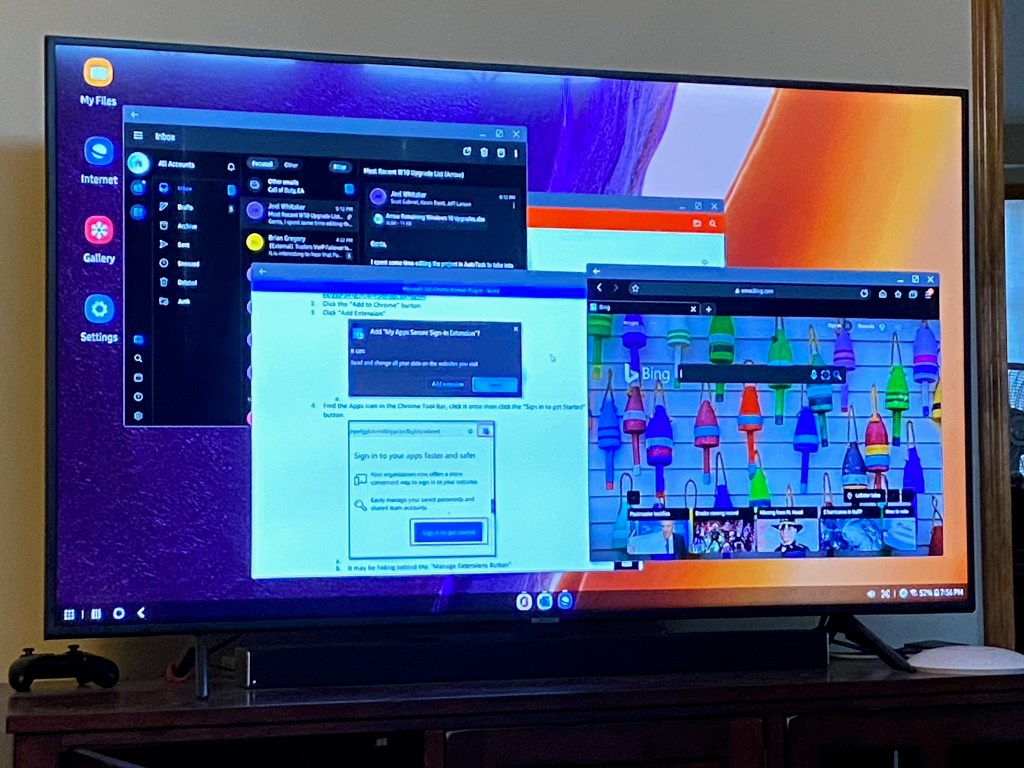
The Note 10 has Dex mode and I used it quite a bit. If you haven’t had the pleasure, Dex lets your phone become a computer. Your apps run in Windows on a full monitor with keyboard and mouse support. It’s one of the most underrated features on Samsung devices. The Note 20 takes Dex to the next level. Instead of having to plug-in to a screen with a compatible cable or dock, the Note 20 can run Dex on any wireless screen in range. This is huge. It could mean the end of carrying a laptop for me.
Wireless DeX Mode is fantastic.
Look for a more detailed review of my Note Ultra 20 after I’ve had it for at least a month. So far it has proven to be a great addition to the Note line and a worthy upgrade.
To most of us SSO (Single-Sign-On) means that we only need to enter our username and password one time to access our company’s services and applications. It sounds simple enough but is quite complex. As we have migrated to working remotely many of us have switched to using our personal computing systems for various reasons.
Many organizations have transitioned their server-based services (Web, Email, VoIP, Chat, etc.) to Microsoft’s 365 cloud platform. During this process software is installed on systems in the company datacenter that allow SSO to occur from company computers and accounts to the cloud resources. People expect this seamless process to work from their personal computers as well. Many are disappointed to find that it often does not.
Their thinking is along the lines of, “If I am accessing Outlook, Teams, and SharePoint in the cloud then my username and password aren’t going through the company network anyway.” Unfortunately, that is generally not the case. The confusion is compounded by the “used to work” factor. Cloud computing environments have greatly increased their security postures and as a result, saving a password in your browser, and other “SSO” techniques no longer work as they once did.
There are methods that allow you to emulate the SSO experience from a personal device. Keep in mind that any or all these solutions may be blocked by your company. Also be aware that you are undertaking these methods at your own risk. Your personal computer systems are not usually covered by your employer’s technical support. Some of the methods result in your company gaining access to your equipment.
Microsoft 365 Chrome Browser Plug-In
Microsoft publishes a Google Chrome extension that stores and submits your Microsoft 365 username and password from the Chrome Browser. Follow the instructions below to install and configure the extension.
Please note that installing this extension does not mean that you will never need to enter your password again. It will reduce the frequency of requests, but cloud computing environments like Microsoft 365, Amazon Web Services, or Google Docs will always require re-authentication at various points.
Find the App’s icon in the Chrome tool bar (sometimes behind the “Manage Extensions Button”), click it once then click the “Sign in to get Started” button.
Enter your Microsoft 365 email address and password when prompted to sign In.
Check the box for “Don’t show this again” and click the “Yes” button.
Add Your Work Account
Windows 10 computers have an included feature that permanently links your personal system to your company’s Microsoft 365 Tenant. It requires a supported version of Windows 10. This method is not always 100% successful depending on several factors of your home computing environment and security policies enforced by your employer.
Use the notifications slide out to access “All Setting” on your computer.
In the Windows Settings screen click on Accounts.
In the window that opens click on Access work or School then click Connect.
Enter your work email address when prompted and click Next. Enter your work account password and click Next. You may be asked to accept various security policies; do so or the account addition process will fail.
Once you have completed this process try accessing your company resources. From time to time you will be prompted to enter your username and password or PIN, but for the most part SSO should function.
Microsoft 365 Sign-In Assistant
The Microsoft 365 Sign-In Assistant is what the name implies, a piece of software that was intended to make signing into Microsoft’s cloud services more seamless. It is not required on Windows 10 computers, but if you are using an older version of Windows this tool can be effective. Download it from Microsoft.
Azure AD Join
The ultimate method to ensure that SSO is possible from your personal systems is to Azure AD Join them. The process is similar to adding a work account. Once completed, SSO is automatic because the system literally becomes a part of your organization’s Microsoft 365 subscription.
Note: Not all Microsoft 365 licenses support Azure AD Domain Joining. This procedure will result in your company’s Microsoft 365 Administrators having control over your personal computers.
Use the notifications slide out to access “All Setting” on your computer.
In the Windows Settings screen click on Accounts.
In the window that opens click on Access work or School then click Connect.
On the next screen select the Join this device to Azure Active Directory link.
You will be prompted to enter your work email address and your passwords. You will also be prompted to allow your employer’s administrators to have control over your system.
In my previous post, I explained how to run a report in OneDrive that lists all of the data you have shared and who you have shared it with. These shares build up over time and it is easy to forget who has access to what. So you’ve run the report and found some data you would like to stop sharing, but how do you?
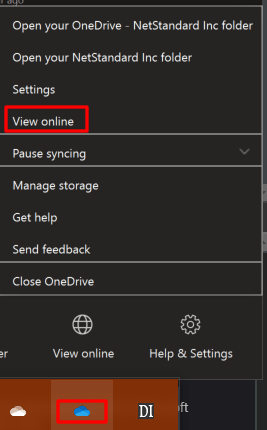
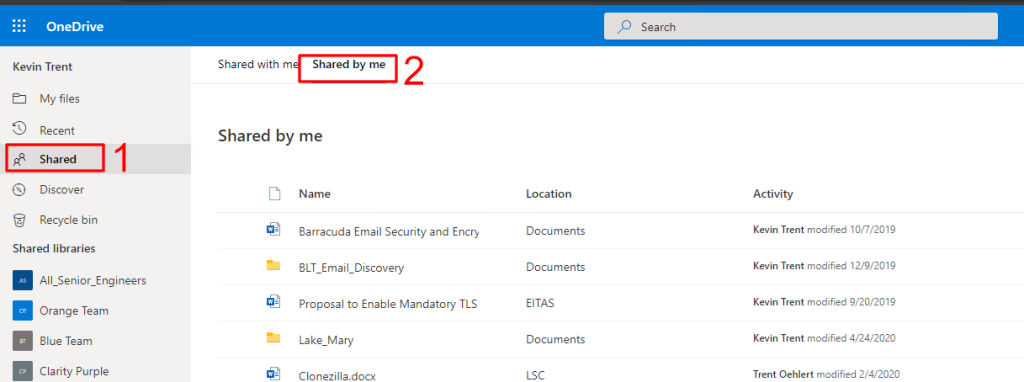
Find the OneDrive icon in your system tray (next to clock) right-click on the icon and then select View Online from the menu.
OneDrive will launch in your default web browser. ClickShared in the menu on the left. Then clickShared by me in the menu on top.
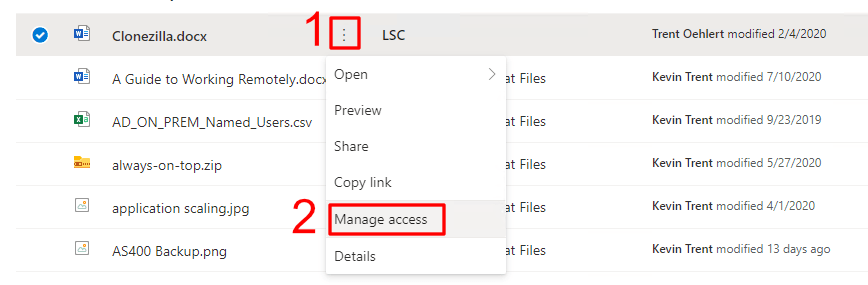
Click the icon at the end of the file that you want to stop sharing. Then click on Manage Access from the menu that appears.
In the menu that opens, click Stop Sharing or use the other controls to adjust the permissions to your liking. The advanced link in the lower left will help you remove links you have sent to others via email or text message. If you have trouble see this Microsoft support document for more information.
Over time you can end up sharing lots of files with people via OneDrive. It is easy to forget who has access. Microsoft has included a report utility in OneDrive Online that will export a list of all the shared files and who has access to them.
Find the OneDrive icon in your system tray (next to clock) right click on the icon and then select View Online from the menu.
OneDrive will launch in your default web browser.
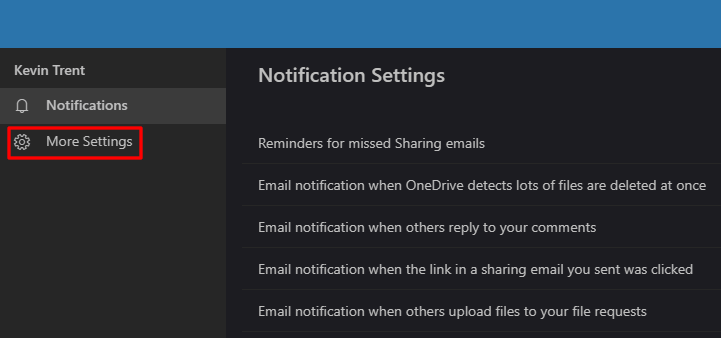
In the OneDrive Title Bar click the settings icon (gear on the left)
Click OneDrive Settings in the menu.
Click More Settings in the menu on the left.
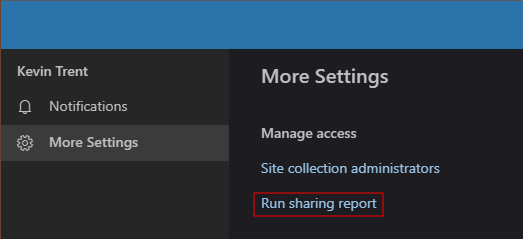
Click Run Sharing Report in the menu on the right.
Choose or create a folder to save the report in.
The report will be in a CSV format that will open in Excel. You will receive an email notification when the report is ready to view.
We are a house divided, the females are all Apple everything. The males are Android and Windows. The newest edition of the iPad mini is almost good enough to change that balance. It’s everything a tech geek wants in a tablet. Light, powerful, thin, with stylus support, and an excellent display.
A lot of people dismiss the Mini with a ” same as my phone” shrug. They’re missing out. There are lots of times between working and being out that call for an in-between screen. Sitting on the couch surfing, writing with a stylus, and reading in bed are examples of times when an iPad is too big and a phone is too small.
The iPad Mini provides far more screen space than the iPhone 11
The newest Mini is 8.0 inches (203.2 mm) tall, 5.3 inches (134.8 mm) wide, 0.24 inch (6.1 mm) thick, and weighs 0.68 pound (308.2 grams). There’s something about eight inch devices that makes them the perfect size to read on. Maybe its because they’re the same size as an average paperback book?
As a dedicated Windows user, I wish Microsoft’s OS would scale well on an eight inch system. I have a Dell Venue 8 Pro and while the operating system and many Microsoft apps shrink to fit, most third-party software doesn’t. Apple has a leg up on Microsoft or even Google in this regard. Their tight control of the App Store means that they are able to ensure usability for all of their form factors. Every app that I have tried so far looks great on the 2048-by-1536 resolution at 326 pixels per inch screen.
The fifth generation iPad Mini is fast, really fast. The A12 Bionic chip means pages load in the blink of an eye. Multitasking is a breeze. I like to play Netflix or YouTube on the side while I write or browse in the larger section. Even the most taxing games like Call of Duty Mobile run stutter free. At everyday tasks like checking email, or reading the news it is faster than an average laptop.
The Mini is more than powerful enough for multitasking
As always, my biggest gripe with the Apple tablets is that there is no native support for handwriting. At least now there are some really well done third party apps that fill the gap. See my review of Selvy PenScript for an excellent example. You can also pair a Bluetooth keyboard for input duties, Logitech makes one specifically for the Mini.
If you are in Apple’s ecosystem and spend much of your time in the digital world the new iPad Mini will be a welcome addition to your compute devices. It is just the right size for kicking back in your favorite chair and doing whatever on.
Microsoft 365 provides a lot of well conceived admin tools via its on-line portal. Their user tool is fantastic for creating and editing user accounts, but getting reports from it can be challenging. Lucky for us Microsoft 365 can also be accessed through PowerShell.
This script will prompt for credentials and the org name. Then it will retrieve all of the licensed users’ display names, primary smtp addresses from Exchange, user principle names, and the licenses currently applied to the account. The CSV report will be saved in your documents library.
One question that frequently arises during remote work transitions is “What do we do about the physical mail?” One of my go to solutions has been to email enable SharePoint document library folders and point our scanner’s email function at those addresses. Unfortunately, SharePoint On-line lacks the ability to email enable folders.
If you are starting down this path and do not have a scanner, you should know there are devices on the market that can scan directly to SharePoint. You will most certainly have a better experience with these machines than will be achievable via any workaround method. Devices like the HP M577 series and the Plustek eScan SharePoint A250 are able to logon to SharePoint On-line via their built-in software.
If your current hardware lacks the direct to SharePoint functionality and a replacement isn’t an option, there are two methods that may work. Before we get started you should be aware that any of the following options will require that somebody logon to SharePoint from the system running the solution a minimum of every five days. SharePoint On-line sessions expire; refer to Microsoft’s documentation.
Method 1 – Scan to Synchronized Folder
First be sure that Microsoft OneDrive is installed and setup on the computer you will send the scans to. Make sure the account that you are logging on to the computer with is licensed for OneDrive and SharePoint access in your Office 365 admin portal.
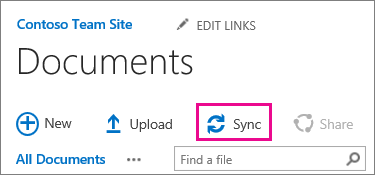
Logon to SharePoint and create a folder in the appropriate document library for your scans. Assign permissions for access, auditing, versioning, etc. open the folder from the computer and account that will run the process we are creating. While in the folder, use the Sync button in the SharePoint toolbar to synchronize the folder to your computer with OneDrive.
The Sync button tells OneDrive to store a copy of the folder on your local computer and to upload / download files as they are manipulated.
Once you’ve created your SharePoint folder and set it to sync, open Windows Explorer and you should see the SharePoint document library listed in the menu on the left. Right click on it and go to the properties to see the folder path. If OneDrive’s default settings were not altered the path should be something like: C:\users\yourname\yourcompany\sharepoint – yourfolder. If you’re having trouble getting the SharePoint sync to work review this Microsoft video.
It’s pretty common to try and get your scanner to use the local location (C:\users\yourname\yourcompany\sharepoint – yourfolder) as a target, but you will soon discover that it doesn’t work. This folder has special attributes that keep you from writing to it with most devices. We need to work around this limitation so that your scanner can write files to this synchronized folder.
Open a CMD prompt and run: subst s: “C:\users\yourname\yourcompany\sharepoint – yourfolder” using the actual folder’s path. When you press enter a new hard drive will appear in Windows Explorer with the drive letter S. This is a virtual drive that is similar to a mapped network drive but connected to a folder on the local computer rather than a network share. The virtual drive will not honor the attributes, thus allowing our scanner to write files that are synchronized.
Right click on the S drive and share it. Configure your scanner to send its files to the S drive share. This process is different on every type of device, check your manual or Google it. Generally you logon to the web control interface and configure an address book entry. Scans sent to this destination will end up on SharePoint. With some scripting and/ or scheduled tasks you could automate all kinds of functions with the files.
Method 2 – Scan to Shared Mailbox and Move to SharePoint
Microsoft 365 includes the ability to create shared mailboxes without consuming a license. Use the admin portal to create one following these instructions . Configure your scanner’s scan to email function to target the shared mailbox email address. Again, Microsoft provides excellent instructions.