I have a high-end Dell XPS laptop that I love. Recently, I ran into an issue where the Intel Killer Performance Suite would no longer update. The Killer Performance Suite is a package of advanced network control software and drivers. It’s frequently used in gaming and high-performance computers to boost network speed and reliability.
The failing update wasn’t worth a lot of time or energy. I’m not using this system for anything that requires extraordinary network performance. So, I did what any computer savvy person would and uninstalled the app. Problem solved.
Or so I thought. Uninstalling the software caused a really annoying error to start popping up. Every so often my system would popup an error dialog saying that that it couldn’t find the “killernetworkmanagerlauncher link”. It wasn’t the worst thing in the world, but after a while it got on my nerves.
I installed and removed the software again. I searched through the startup apps and start folder in Windows for any references to the Killer software. I even searched for and deleted quite a few registry keys left over by the program. None of it helped. I found a knowledge base article on Intel’s site, there were no solutions mentioned on it at the time either.
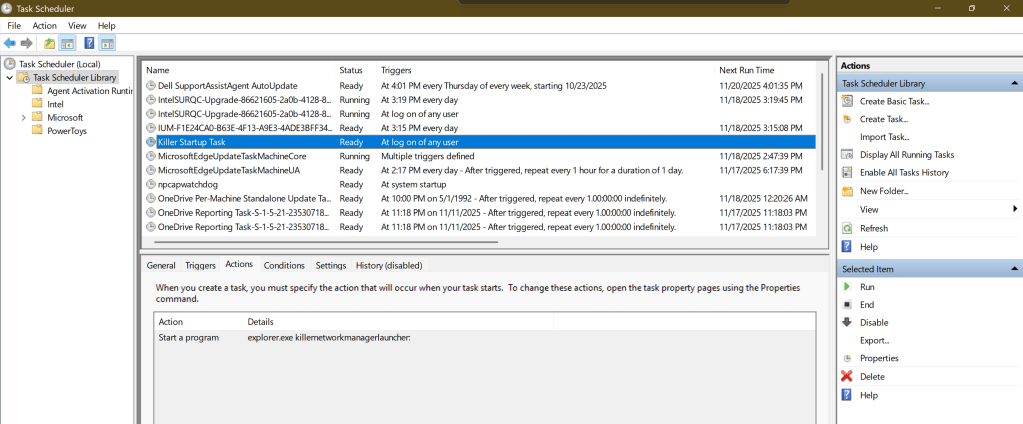
Tonight, I booted up my laptop and got the prompt again. That was it, I was going to fix it or re-install Windows. I stopped looking for answers and decided to solve it myself. I thought about it the problem rationally. Start-up items launch from just a handful of places. The registry, start-up folder, via a service, and the task scheduler are about it. Guess which one I didn’t check?
If you are also suffering from this repeated nag, delete the “Killer Start Up” task. Open the Windows Task Scheduler application, find the task below right click on it and delete it. Then reboot.
A few days back I was browsing the Microsoft App store on my laptop. I wasn’t looking for anything specific. I was just filling the time between meetings. I had searched the store for “Microsoft”, I like to keep tabs on any new software they release. That’s when I noticed it.
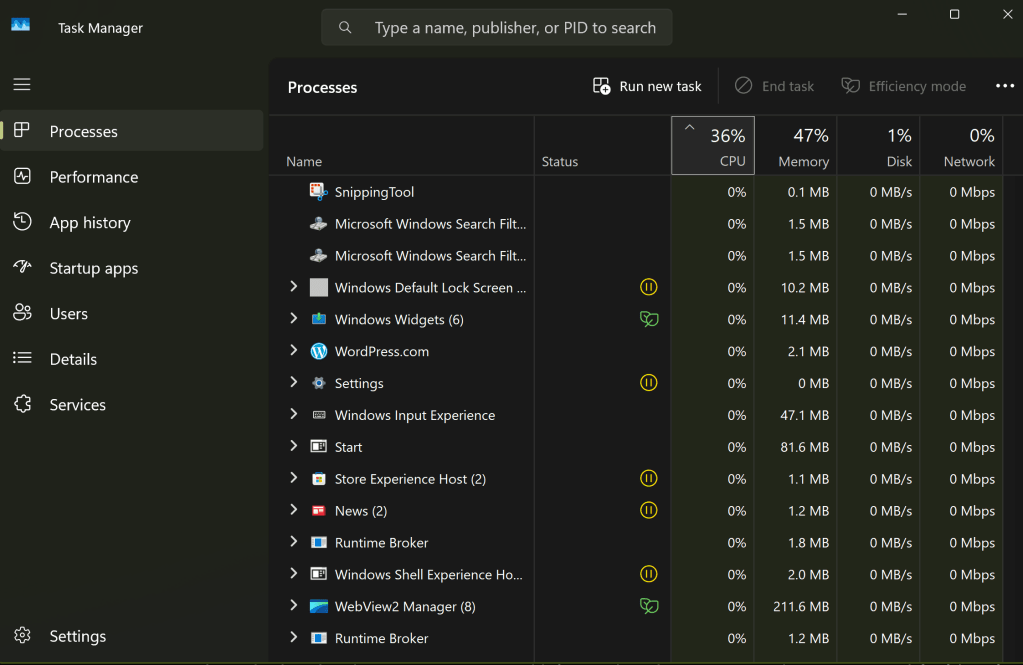
A new app named PC Manager was in the list. The description was interesting. Microsoft has created an app to make monitoring and managing your computer easier. The Windows Settings and Task Manager apps are notoriously confusing for folks that don’t live and breathe IT work. This had all the hallmarks of a better solution.
Task Manager has been the default Windows system utility app since 1996.
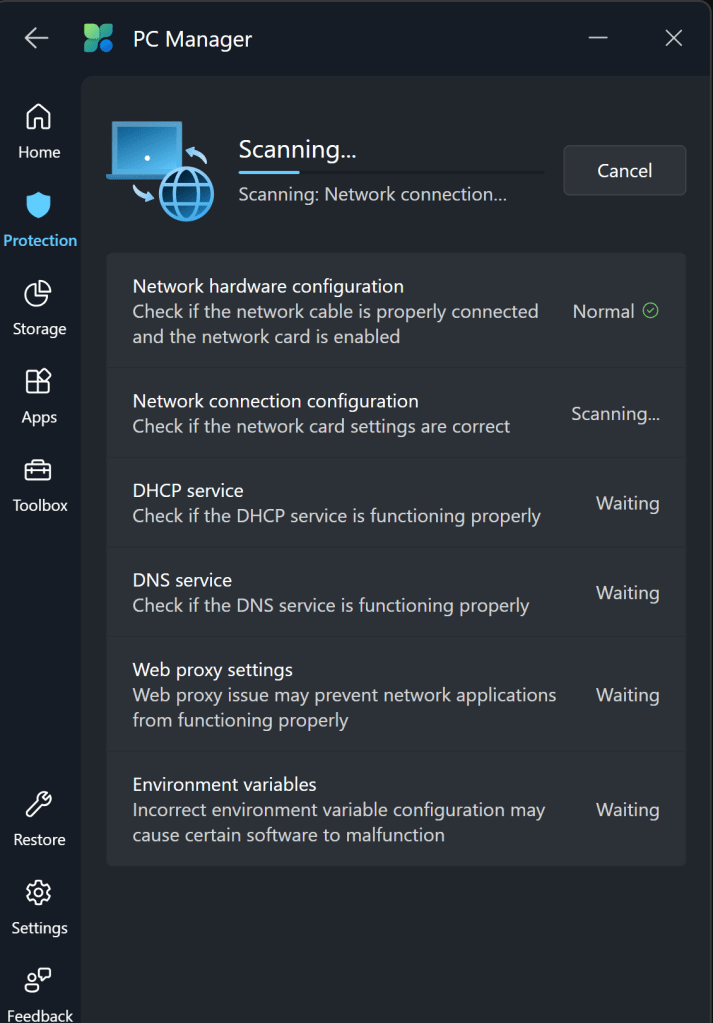
From my point of view, PC Manager delivers. It has quick links to things like take a screen shot, and the calculator app. You can easily see and manage the running apps and processes on your system. It can automatically clean up your hard drive by removing temp files from the OS and apps. The network test shows you everything about your system connectivity in one place.
The toolbar is a fantastic edition to my Windows desktop. The feature isn’t turned on by default. If you want to try it, look in the Toolbox and flip the toggle to on. If you drag the toolbar to an edge of your screen, it will attach to that spot and auto-hide itself. The toolbar shows your total memory use, Wi-Fi signal stats, 4 shortcuts, and a search bar.
Snap the PC Manager toolbar to a screen edge and it will auto-hide. You can choose your own shortcuts and quick links.
There aren’t any new abilities or information; all of this stuff is available in Windows via other methods. IT workers don’t always appreciate Microsoft adding another way to do stuff. It adds to their already full workloads. That being said, this particular tool seems useful. I like the toolbar, and it simplifies maintenance tasks. It’s free, give it a try and see what you think.
Troubleshooting Windows update can be a fruitless waste of time. The update service is complicated and often intertwined with third-party management tools. Thanks to supply chain attacks, updates get super scrutinized by security tools. That extra level can cause interference issues. In short, the Windows update process breaks a lot for a lot of reasons.
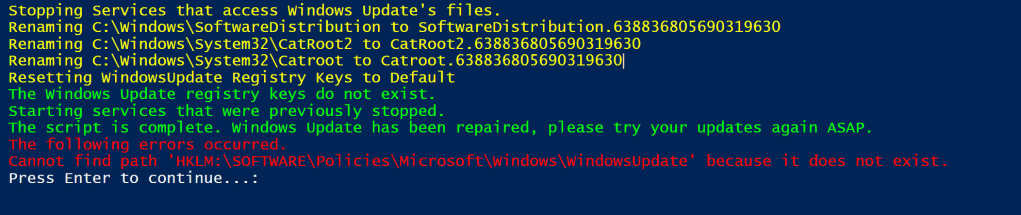
From my point of view, the best way to fix Windows update in many cases is to reset it. To do that, we need to stop the services so that the files are not in use. Then we’ll need to delete them. We also need to delete all of the Windows update settings from the registry.
In organizations that are audited it is ideal to make backups before altering settings or files. This script makes copies of all the files and settings before any changes are made. The backup copies are named with a date value known as ticks which generates a new number on every run. This makes the script an easy one to schedule as a repeating task using various methods.
# This script executes the following actions:
# 1. Stops the Windows Services that access files in the SoftwareDistribution and CatRoot2 folders.
# 2. Appends the SoftwareDistribution and CatRoot2 folder names with a date stamp.
#       The SoftwareDistribution folder contains the cache for downloaded and installed updates.
#       The CatRoot2 folder contains the cache for downloaded and installed updates.
#       These folder contain the cache for downloaded and installed updates. Refreshing them often clears
#       patching issues.
# 3. Backs up, then removes the registry records under the key HKLM\SOFTWARE\Policies\Microsoft\Windows\WindowsUpdate\*
#       The records will automatically repopulate when Windows Update is run or on the next GPO cycle.
# 4. Starts the services that were stopped.
# If at all possible you should immediately run Windows update on a system after executing this script.
# Before the next GPO cycle runs and the changes are reverted.
# This script backs up the SoftwareDistribution and CatRoot2 folders by renaming them with a date stamp.
# This script is intended to be run as a local administrator on the system that needs repaired.
$DateStamp = Get-Date |Select-Object Ticks -ExpandProperty Ticks
Write-Host -ForegroundColor Yellow "Stopping Services that access Windows Update's files."
    Stop-Service "Windows Update" -Force -Confirm:$false
    Stop-Service "Background Intelligent Transfer Service"
    Stop-Service "Cryptographic Services"
    Stop-Service "Windows Installer" -Force -Confirm:$false
Write-Host  -ForegroundColor Yellow "Renaming C:\Windows\SoftwareDistribution to SoftwareDistribution.$DateStamp"
    Rename-Item -Path "C:\Windows\SoftwareDistribution" -NewName "SoftwareDistribution.$DateStamp" -Force -ErrorAction SilentlyContinue
Write-Host  -ForegroundColor Yellow "Renaming C:\Windows\System32\CatRoot2 to CatRoot2.$DateStamp"
    Rename-Item -Path "C:\Windows\System32\CatRoot2" -NewName "CatRoot2.$DateStamp" -Force -ErrorAction SilentlyContinue
Write-Host  -ForegroundColor Yellow "Renaming C:\Windows\System32\Catroot to Catroot.$DateStamp"
Write-Host  -ForegroundColor Yellow "Resetting WindowsUpdate Registry Keys to Default"
    # The registry keys will be recreated when Widows Update is run or on the next GPO cycle.
    If (Get-ItemProperty -Path "HKLM:\SOFTWARE\Policies\Microsoft\Windows\WindowsUpdate" -ErrorAction SilentlyContinue) {
        Write-Host -ForegroundColor Yellow "Backing up the Windows Update registry keys to $env:USERPROFILE\Downloads\widowsupdateregistrykeys.$DateStamp.txt"
        Get-ItemProperty -Path "HKLM:\SOFTWARE\Policies\Microsoft\Windows\WindowsUpdate" | Out-File -FilePath $env:USERPROFILE\Downloads\widowsupdateregistrykeys.$DateStamp.txt
        Remove-Item -Path "HKLM:\SOFTWARE\Policies\Microsoft\Windows\WindowsUpdate" -Recurse -Force
        Write-Host -ForegroundColor Green "The Windows Update registry keys have been removed."
     } Else {
        Write-Host -ForegroundColor Green "The Windows Update registry keys do not exist."
    }
Write-Host -ForegroundColor Green "Starting services that were previously stopped."
    Start-Service "Windows Update"
    Start-Service "Background Intelligent Transfer Service"
    Start-Service "Cryptographic Services"
    Start-Service "Windows Installer"
Write-Host -ForegroundColor Green "The script is complete. Windows Update has been repaired, please try your updates again ASAP."
Write-Host -ForegroundColor Red "The following errors occurred."
Write-Host -ForegroundColor Red $error
Pause
Exit
I tried to include some good feedback. Errors are displayed at the end.
I have relied on this script for a while. In its current form, it is intended to be run interactively in an admin PowerShell session. If you remove the write-host lines, the rest of the code makes a good function to add to the beginning of your patching processes.
There are more IT shops using Microsoft’s Hyper-V than ever before. Thanks in part to Broadcom’s shenanigans with the licensing after they purchased VMware, more are considering making the change every day. One challenge that causes organizations to pause when considering Hyper-V is the apparent lack of centralized host management.
It’s true, Hyper-V doesn’t include a direct vCenter equivalent without purchasing System Center’s Virtual Machine Manager module. vSphere isn’t free either, but that’s a different subject. The Hyper-V Manager MMC works well enough. Most of us have figured out how to connect the console to any host. One host at a time, is slow and ineffective when the pressure is on.
At first glance, there does not seem to be a way to save the connections you make to those remote hosts. There’s no save option in the MMC itself. However, unbeknownst to most there is a file that you can manipulate to pre-configure the remote hosts that you manage. Follow the instructions below to setup your Hyper-V Manager console to manage all the servers in your environment at once.
Preconfiguring all of your hosts in the Hyper-V MMC makes managing them much easier.
Add the Hyper-V role to your computer or logon to the server you are going to manage Hyper-V from (Hyper-V Management Tools are the minimum requirements).
Open the Hyper-V console and connect to a Hyper-V server at least once (builds the profile paths).
Close the Hyper-V console (can’t make changes to the file with it open).
Search for Notepad or use the start menu to locate it. Right click on it and choose to “Run as Administrator” enter your admin level credentials.
In Notepad’s menu go to File, then Open, browse to: C:\Users\adminaccountname\AppData\Roaming\Microsoft\Windows\Hyper-V\Client\1.0\ (where adminaccountname = the admin level account you use to access Hyper-V systems)
Open the file named virtmgmt.VMBrowser.txt
Under the tag for “BrowserComputerNames” enter the names of the Hyper-V servers that you connect to between <value> and </value>. Each name should be separated by a semi-colon.
Example: <setting name = “BrowserComputerNames” type=”System.String”> <value>ServerName1.domain.com; ServerName2.domain.com; ServerName3.domain.com</value>
Save the virtmgmt.VMBrowser.txt file (you will not be able to save the changes if Notepad isn’t running with admin credentials).
Important TIPs: Each time that you open the Hyper-V management console, it tests the connection to all the servers stored in the file via WMI. This connectivity test can take a while, especially if the device isn’t responding for some reason. If you interrupt the test before it completes, or if anything goes wrong it will stop. The console will remove any of the servers past the point of failure. Keep a copy of the file after you get it all configured or keep these instructions handy.
The instructions above assume that your Hyper-V hosts are member servers in Active Directory. If they are not, the process requires extra steps to handle authentication from the remote Hyper-V Manager console. See this post for those instructions.
For the last several months I’ve noticed that my Ethernet (wired) network connection will drop unexpectedly. Of course, it does this at the most inconvenient times. It dropped in one of the best Halo matches I’ve had in a while. One minute I was slaying with the Ghost on my way to a Killtrocity, and a Steaktacular team win. Next thing I know, I was staring at the “You’ve been disconnected” banner.
I’ve been meaning to dig in and see what could be done about the issue for a while now. Unfortunately, I’ve been distracted due to dealing with my CPU issues. You can read about that saga in Intel i-9 CPU Issues: From Failures to Fixes , good times. Getting booted out of that Halo match was the last straw though.
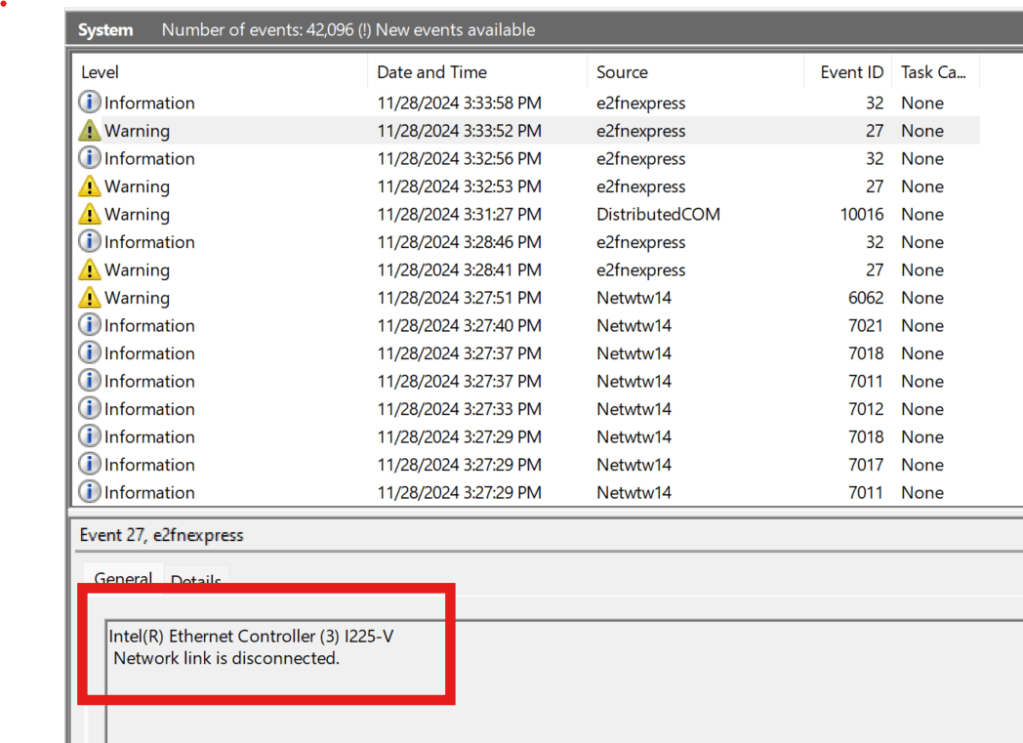
The first diagnostics tool I looked at was the Windows System Event Log. If you are having similar issues and are trying to follow along type “Event” into your Windows search bar. Open the app it finds and look under Windows Logs, then System to see the section I am referring to.
The Windows System Event Log is a great place to start when you think hardware might be causing your problem.
After I found the event 27 and read its description, “Network link is disconnected” I considered the situation. I had not unplugged my network cable, and I know my network is pretty solid. So rather than go down the network troubleshooting route, I decided to try a clean install of the driver.
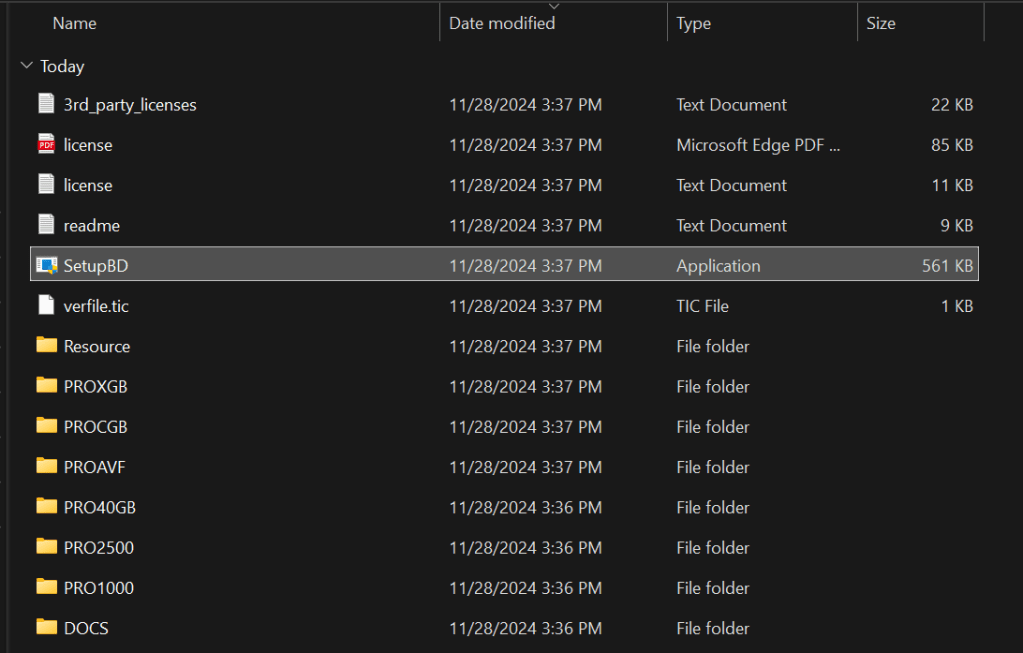
Once the zip file downloads, extract its contents (right click and choose extract). Then open the extracted folder and double click SetupBD.exe (image above) to start the new driver installation. Make sure that you have followed the Intel instructions to remove the old driver first. Click yes if you are prompted for administrator rights. Then click the OK button to start the installation.
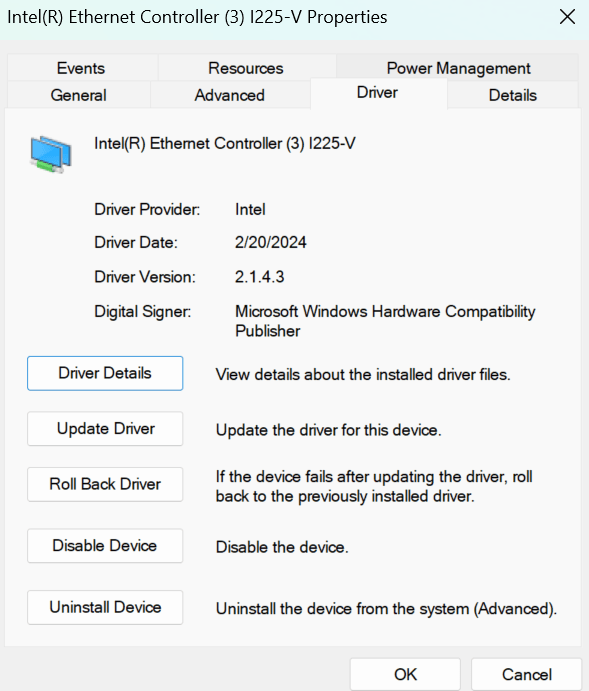
The drivers only take a second to install. I suggest that you reboot your computer even though the installation doesn’t require it. I noticed that my original driver from 10/08/2023 stayed loaded in the device manager until I rebooted. The date changes to 2/20/24.
What I find most interesting is that I run the Intel Driver Support Assistant agent on my machine. It checks for Intel updates continuously. I also run MSI Center at startup and have it configured to install all updates. Windows Update is set to check for and install driver updates too. At no time did any of these tools recommend or install an updated driver for the wired network card.
Anyway, this probably isn’t a universal fix for all the network problems people have with this particular card. The Intel support document in the link above has several more “workarounds” for other various issues. So far, the clean install of the new driver seems to have fixed my issue. I haven’t randomly dropped since I completed the procedure and rebooted. It’s too early to call it 100%, I’ll update the post if it happens again.
I’ve been caught by an automatic service not starting after system reboots from things like patching. I’ve written several versions of the script below over the years. This is my most recent edition. You’ll need the Active Directory module installed on the system that executes the script.
The code will scan your entire AD for member systems with a Windows Server operating system. It will present you with a list to choose from. It will then test RPC (135) connectivity and scan the automatic services on those that are reachable. The script will report any servers that do not have a status of “running” along with any that were not reachable.
   <#
        .SYNOPSIS
        Checks Acitive Directory Memeber Servers for Automatic Serices that are not currently running.
        .DESCRIPTION
        Dynamically generates list of Active Directory Servers.
        Uses WMI to examine the status of all services set to automatically start on selected servers.
        Filters common automatic services that do not stay started by default: mapsbroker, cdpsvc, gupdate, remoteregistry, sppsvc, wbiosrvc,
        iphlpsvc, tiledatamodelsvc, clr_optimization, and Microsoft Edge Update are currently excluded from the report.
        .INPUTS
        Get-ServerAutoSerivcesStatus displays a gridview of selectable Active Directory memeber servers.
        Shift+ and CTRL+ select are enabled.
        CTRL+A to select all.
        Criteria to filter.
        .OUTPUTS
        System.String. / Gridview Get-ServerAutoSerivcesStatus returns a string showing all status on selected servers running,
        or a gridview of the servers and services that are not.
        Get-ServerAutoSerivcesStatus also displays a string listing servers that did not respond on TCP 135 (RPC).
        .EXAMPLE
        PS> Get-ServerAutoSerivcesStatus.ps1
    #>
$ErrorActionPreference = "SilentlyContinue"
$Servers = Get-ADComputer -Filter 'Operatingsystem -Like "*server*"' -Properties dnshostname|
    Select-Object dnshostname -ExpandProperty dnshostname|
    Out-GridView -Title "Select Servers To Enumerate AutoServices. CTRL+A to Select All" -PassThru
$Report = @()
$ErrorLog = @()
$ServersOnline = @()
Write-Host -ForegroundColor Yellow "Please wait, testing connectivity to selected servers....."
Foreach ($Server in $Servers) {
    If ((Test-NetConnection -WarningAction SilentlyContinue -ComputerName $Server -Port 135).tcptestsucceeded){$Serversonline += $Server}
    Else {$Errorlog += $Server}
    }
ForEach ($Server in $ServersOnline) {
    $Wmi = Get-WMIObject win32_service -ComputerName $Server -Filter 'State != "Running" AND StartMode = "Auto"'|
        Select-Object @{n="ServerName"; e={$server}}, @{n="ServiceName";e={$_.name}},@{n="Status";e={$_.state}},@{n="Start Account";e={$_.startname}}
    $Report += $Wmi | Write-Host
    }
$Report | Where-Object {($_.ServiceName -notlike "mapsbroker") -and ($_.ServiceName -notlike "cdpsvc") -and ($_.ServiceName -notlike "gupdate") -and
    ($_.ServiceName -notlike "remoteregistry") -and ($_.ServiceName -notlike "sppsvc") -and ($_.ServiceName -notlike "wbiosrvc") -and ($_.ServiceName -notlike "iphlpsvc") -and
    ($_.ServiceName -notlike "tiledatamodelsvc") -and ($_.ServiceName -notlike "*clr_optimization*") -and ($_.ServiceName -notlike "Microsoft Edge Update") |
    Select-Object @{n="Server";e={$server}}, @{n="Stopped Service";e={$_.displayname}
        }
    }
If ($Rerport -ne $null) {$Report | Out-GridView -Title "These automatic serivces are not running"}
    Else {Write-Host -ForegroundColor Green "All Automatic Services on $($Serversonline.count) reachable servers are started."}
If ($ErrorLog -ne $null) {Write-Host -ForegroundColor Red "These $($ErrorLog.count) servers were not reachable via RPC (port 135)`n `n" ($ErrorLog -join ",`n")}
    Else {Write-Host "No connection issues to selected servers detected."}
Pause
Exit
Remote Desktop Servers have a way of multiplying themselves like some kind of organic creature. Most administrators know how to deploy RDS and it is a good to solution for a variety of issues. The simple script below scans domain servers for the installed features.
Recently I encountered an error while trying to join a brand-new laptop to an Azure AD domain. Generally, the process is straight forward. Open Settings, go to Accounts, Add A Work or School account and choose the option to Join this Computer to Azure Active Directory.
The error (screenshot below) was “Invalid_Client” which made no sense. How could a Windows Pro laptop be an invalid client for Azure AD? Why was the error mentioning MDM? We didn’t enable MDM. After some research and testing, the problem was traced down to the Intune MDM registration URLs being populated.
The clue that points to the cause is the top paragraph in the error message rather than the error itself.
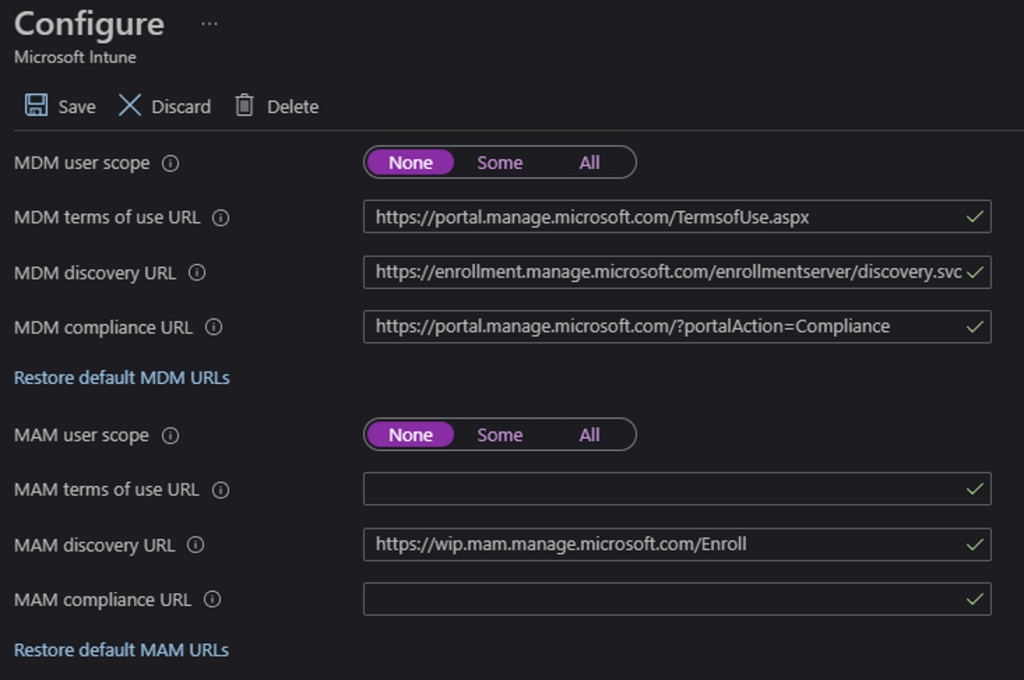
I am still not sure how the registration URLs became activated. It is possible that another administrator enabled the feature, but I suspect it was done by Microsoft. Probably the result of some mass action script that hit some customers it was not supposed to. The Endpoint Manager and Intune blades aren’t visible in your admin center if you haven’t subscribed to Intune, which makes discovering this setting more difficult.
Login to your Azure AD portal and go to this URL: https://portal.azure.com/#blade/Microsoft_AAD_IAM/ActiveDirectoryMenuBlade/Mobility select Intune from the menu. Then set both control options to None and click Save. You’ll need to wait 15 – 30 minutes for the change to take effect after which you should be able to join systems to your Azure Active Directory again.
These URLS work like Exchange Autodiscover and allow new systems to enroll in MDM automatically.
I frequently take my tablet to a park, museum, or other public space to get inspiration for my work. When I’m out with my Surface Go, I rarely have the keyboard attached. The Surface Pen is my primary input and control tool. Occasionally, someone will notice and ask how I am able to fully use my computer with just the pen. “What about selecting, copying, right-clicking, and all the other things you need a mouse for?” is an inevitable question during these conversations. Generally a statement like, “I can’t stand the way it feels,” also makes its way into the discussion.
The first thing most people need to address in order to be comfortable using their stylus, is the “feeling” of writing on a screen. There’s far less friction between glass and silicone than there is between paper and graphite. Some of us actually prefer the slicker strokes, but most people do not care for it, in the beginning at least. If you don’t like the slide, there are a few things that help. If your stylus has different tips, try them. Some are softer and offer more drag. They also change the contact patch size which further alters the experience.
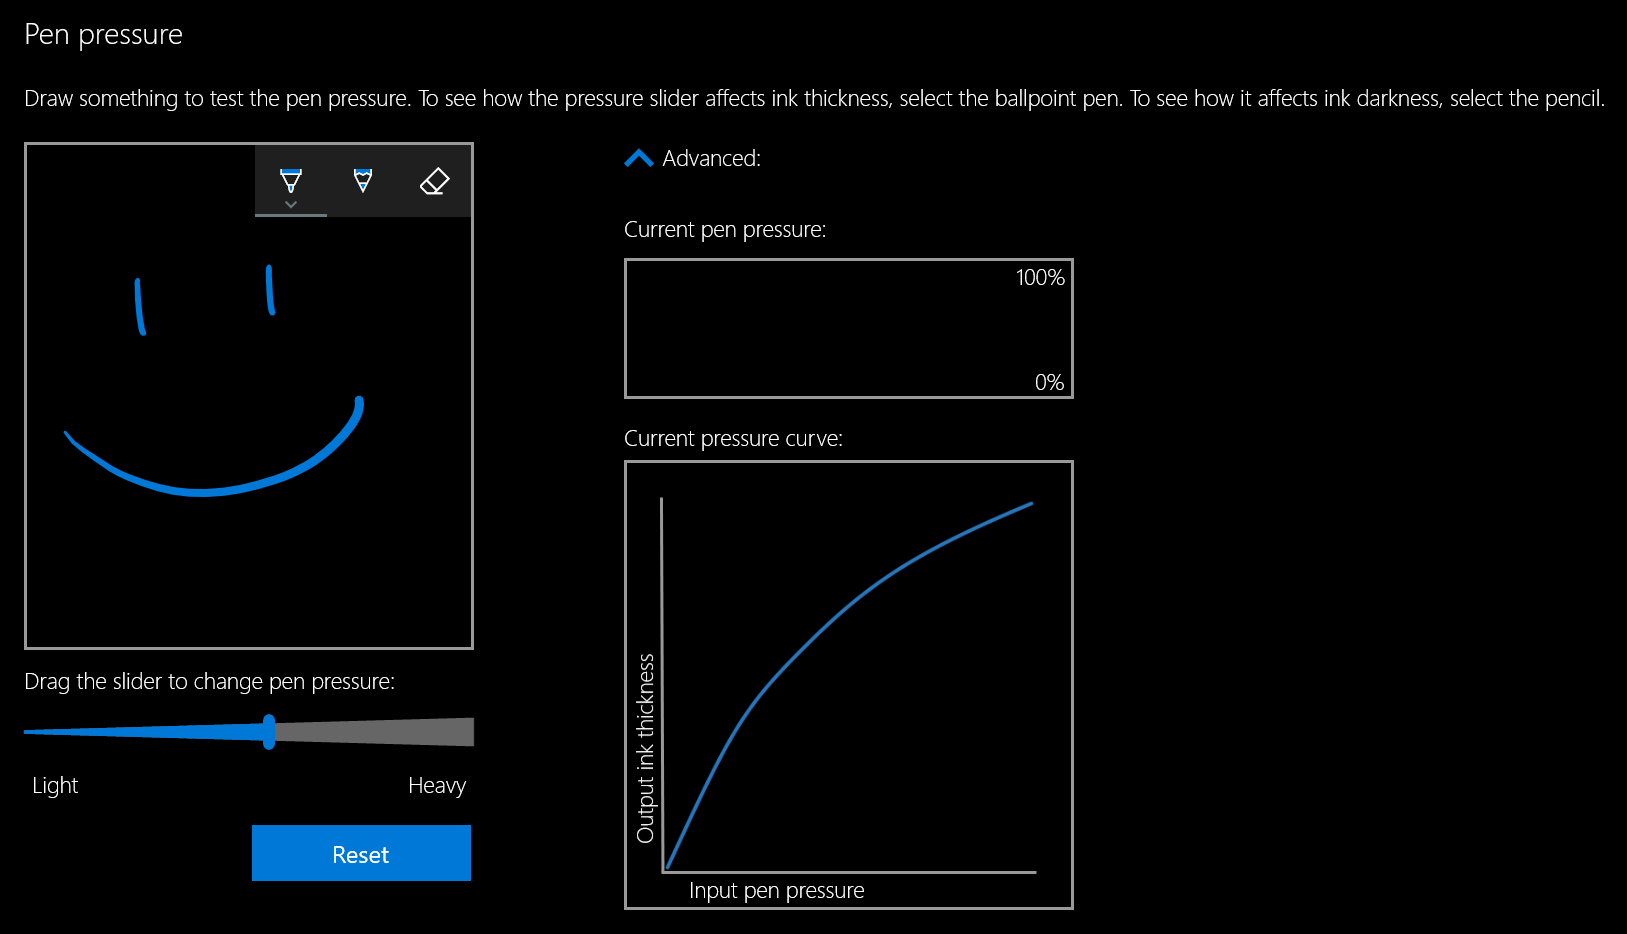
Most Windows 10 based tablets allow you to adjust the pressure sensitivity of your stylus, which in turn changes how hard you end up pressing on the pen tip to write or draw. Setting your system to require more pressure will cause you to press harder and feel more drag. On Microsoft Surface devices you use the Surface app to change the setting. Samsung tablets have a Samsung Book app, most manufacturers have some type of settings app; look in your start menu.
The last piece of advice I have to offer around the “feeling” of writing on your screen is to add a soft silicone screen protector. A significant part of the difference between drawing on a paper versus drawing on glass, is that the paper will slightly give way to the tip of your writing instrument. Silicone on silicone also results in more drag and lessens the likelihood of over-strokes occurring. Personally, I prefer the matte options because they also help reduce glare.
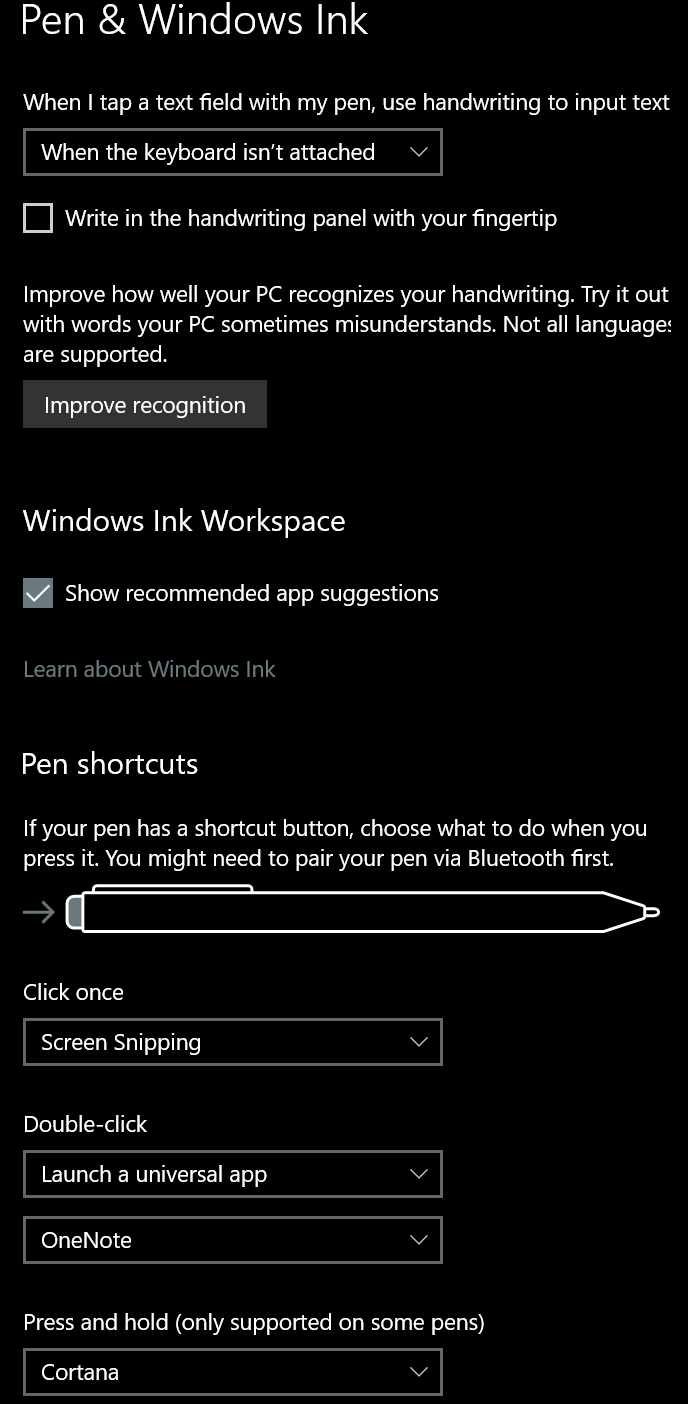
Once you have the physical issues addressed, you’ll need to spend some time with settings in both your operating system and applications. I suggest that you start off getting your windows profile all squared away. Lucky for you, I’ve written a detailed post about how to go about it. The 1809 update for Windows 10 caused me to change a few of my settings since writing that guide. You can see the updated configuration below.
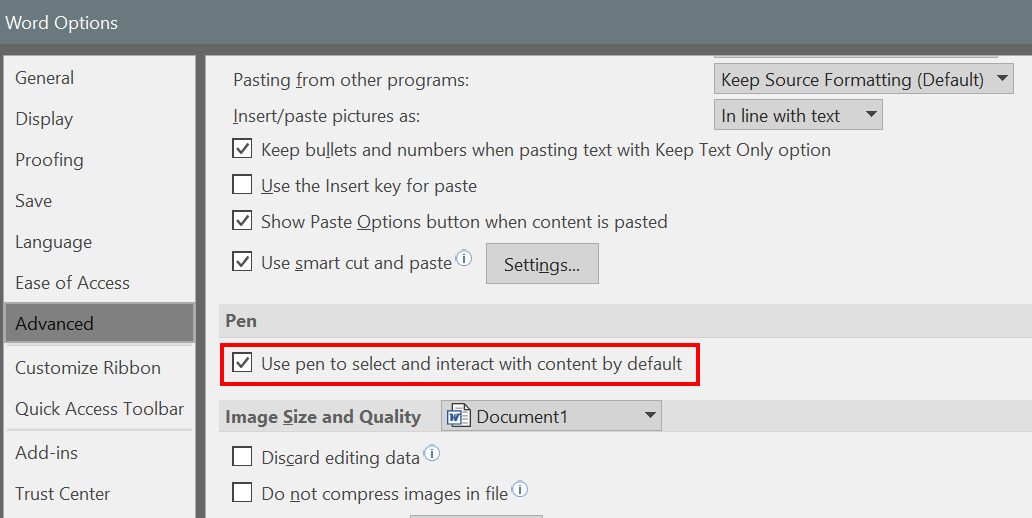
Great, so we’ve taken care of the way it feels to write on your screen and adjusted Windows to operate with a pen, we’re done right? Ha, don’t you wish…. Unfortunately, most applications also have specific settings that improve the stylus experience. Quite a few of the Microsoft Office programs, Word, Excel, PowerPoint, etc., have a setting in their advanced options that allows the pen to automatically select text. The function is turned off by default and I cannot fathom why Microsoft doesn’t turn it on for everyone. Checking this box will drastically improve the pen experience in these apps.
This setting is in most MS Office apps. Go to File -> Options -> Advanced Options to find it.
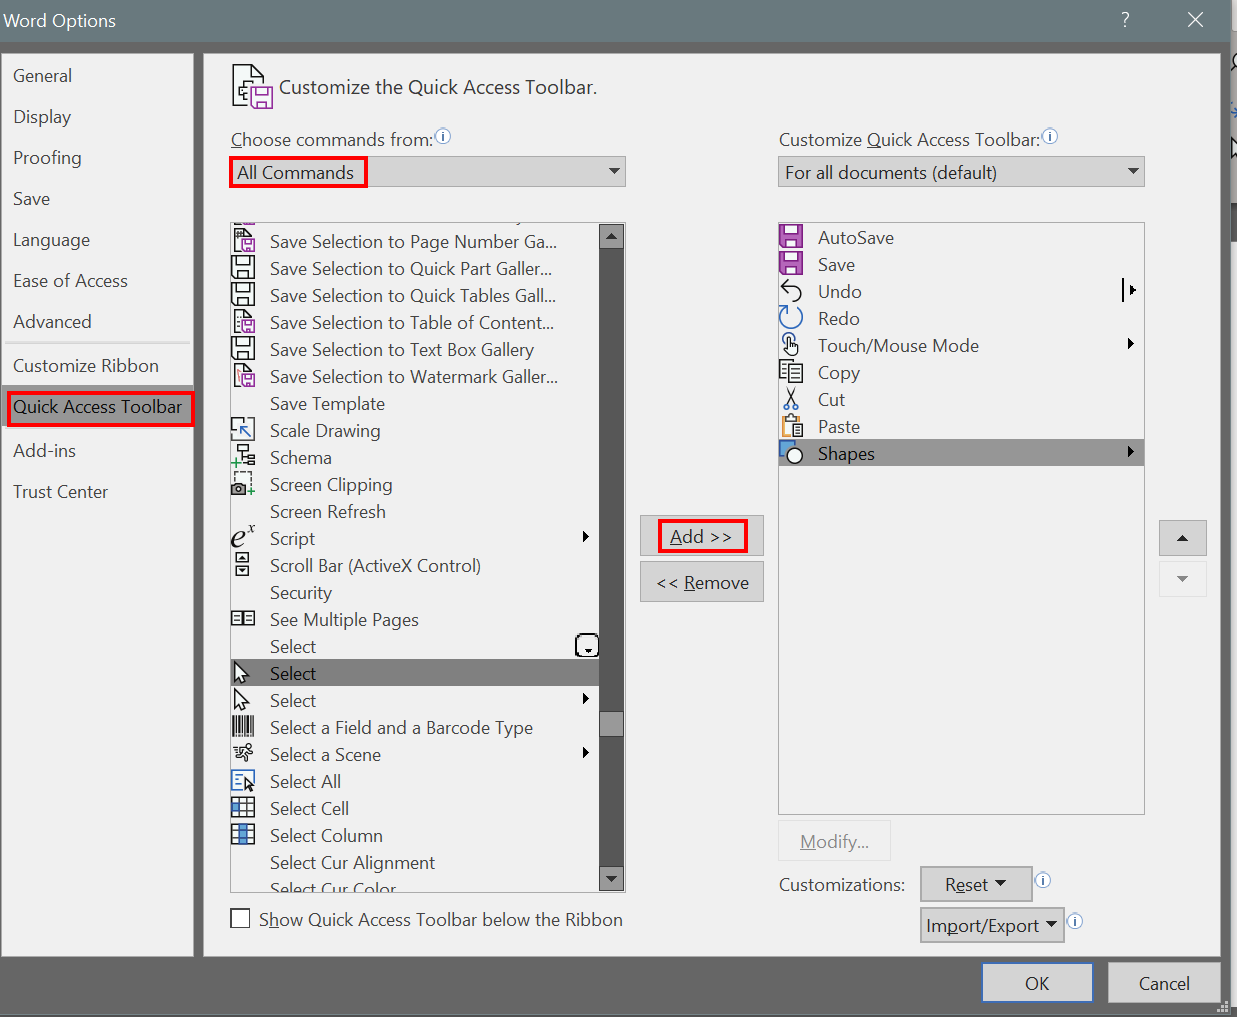
Whether you use a pen or a mouse, customizing the quick access toolbar in Microsoft Office applications adds efficiency to your workflow by reducing the amount of time you spend hunting for commands. The quick access toolbar is different for each application but can literally save you thousands of clicks and taps if you spend a little time setting them up.
Add your most used commands to the quick access toolbar.
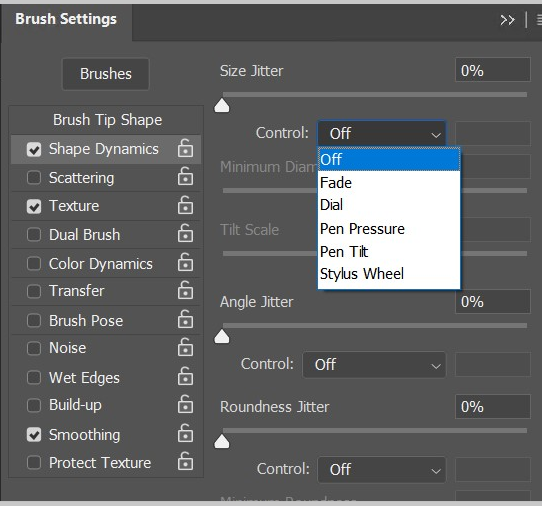
I wouldn’t want you to go away thinking that MS Office apps are the only ones that have specific pen settings that you may need to turn on or adjust. Of course purpose-built drawing and editing apps have all kinds of pen settings. I’ve even seen the options to use a pen show up in games. Take a few minutes to poke around in the menus of the software that you use, it’s almost always worth your time.
Each brush or tool in Photoshop has multiple pen settings
After we push out updates to Windows desktops we will inevitably end up with some that will no longer go to sleep. Occasionally they will sleep but their monitors won’t turn off. When this happens to one or two systems it’s an annoyance. If it happens to a lot of them, there can be a financial impact due to the extra power consumption.
Generally, the problem is caused by an incompatibility between one of the newly installed updates and a system driver. Sometimes it’s caused by the update itself. How are you supposed to figure out exactly what is causing the problem?
Microsoft has embedded a utility named “powercfg” in the operating system. This tool can diagnose and assist in the repair of most power related problems. The first step is to run a diagnostics report. You can do this from a command prompt on a single computer but you should be getting used to PowerShell by now and if you’ve got lots of systems you need to check, it will be your best bet anyway.
Open an elevated PowerShell console, the command is;
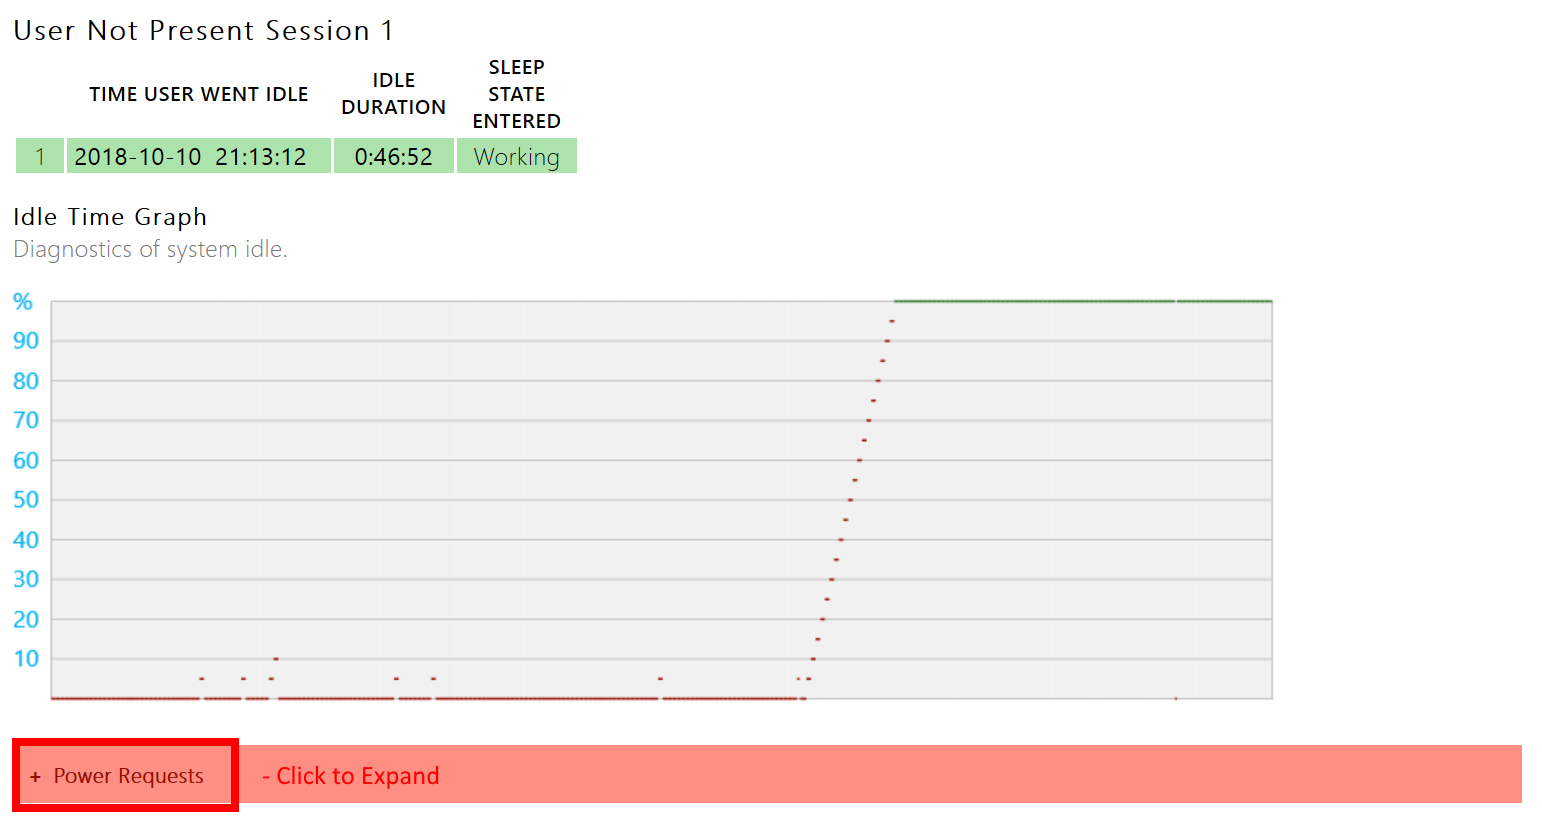
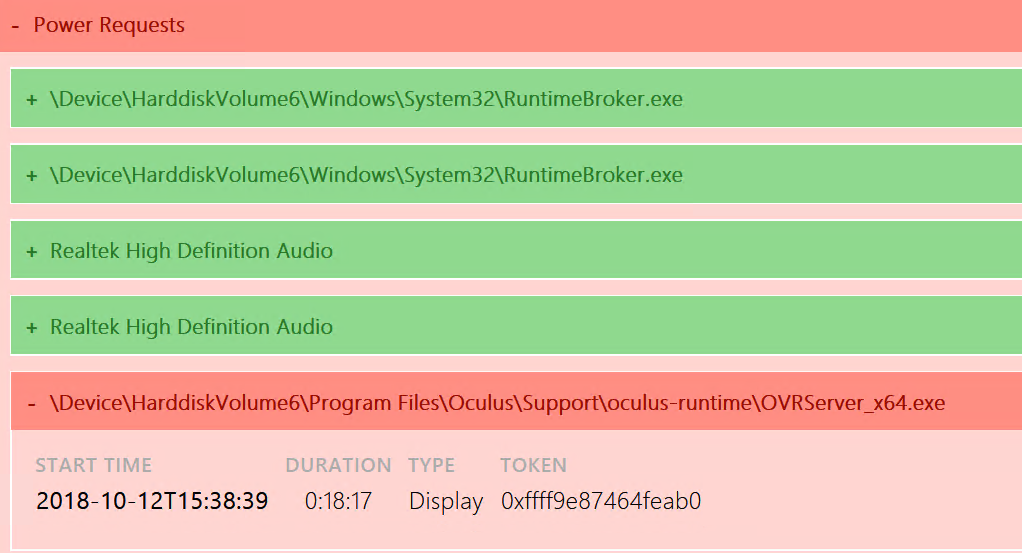
The command will create a nicely formatted report in your documents folder showing all the information you should need to determine the cause. Scroll through the user sessions and expand the Red menus to see the cause of your issue.
Below, you can see that in my case, OVRServer_x64.exe continued to request power after the system had tried to sleep. As you can probably tell from the file path, that EXE file is part of the Oculus Rift software package. Again, you can click the Red bar to gain more information.
Now that we know what’s causing the problem there are several things we can try to correct it. First, I always check to see if there’s an update for the application or driver. For many programs, in the help menu you’ll find a “Check for updates” option. If you need to visit the software or hardware vendor’s web site, updates are usually found under the “Support” section.
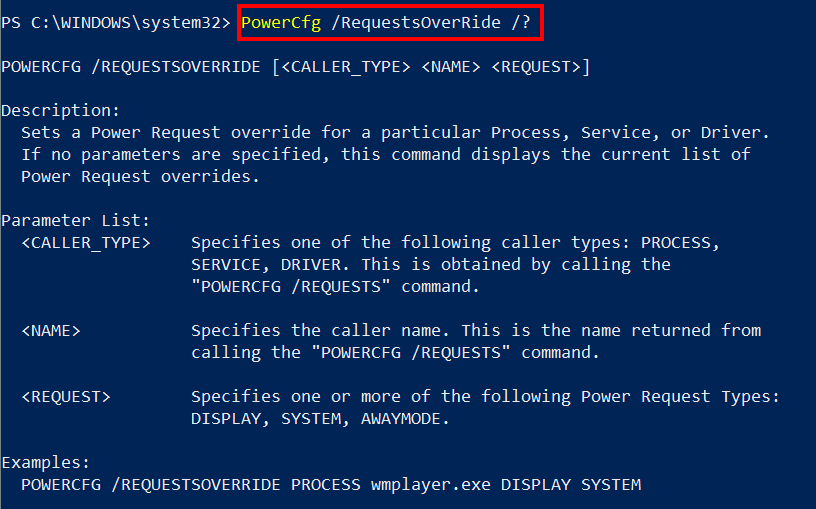
What if there is no update? Are you just out of luck? There are still options available that we need to investigate before giving up. PowerCfg can be used to override power requests from mis-behaving apps and drivers. The command differs depending on what’s causing the problem. Let’s check help to see what our options are.
Looks easy enough, to create an override for my trouble maker the command would be;
PowerCfg /RequestsOverRide PROCESS OVRServer_x64.exe DISPLAY
As the help suggests, to figure out the name and type of your issue you can run “PowerCfg /Requests” After creating the override you’ll need to wait for the sleep interval to occur to know if it worked or not. Most of the time it will.
If the override doesn’t solve your problem you are left with rolling back the update. You can either uninstall the update or use a system restore point. I also recommend waiting a few days and checking for updates from both Microsoft and the vendor again. Many times, once they become aware of the issue one of them will release a patch for the problem.
So how do we apply what we’ve learned to a lot of systems? We use a PowerShell script of course. Since PowerCfg is an exe embedded on each computer we’ll use invoke-command to activate it in a foreach loop. You’ll probably want to redirect the reports to a network share rather than connecting to each system to view them. That will mean naming the reports in a way that tells you where they came from.
The script above will generate the sleep diagnostics report for every workstation computer on your network and store the report in the share you specify with the computer’s name in appended to the report. The same invoke-command technique would let you create an override for each computer that has an issue.
So you’re the proud owner of a shiny new Surface Go, now what? Besides checking your email and surfing the web, what else can you do with the little powerhouse? Of course, you can install the ubiquitous PC applications, MS Office, Photoshop, and what have you. This article is more about doing things you may not know about or considered.
Have you ever wished there was a font that matched your handwriting? Mine is atrocious, I’m always surprised that a computer can read it. My spouse’s on the other hand, is quite elegant. If you write nicely like she does, Microsoft has just the app for you. Download the Microsoft Font maker from the Microsoft store and with a few simple steps your handwritings will be digitized and turned into a font that you can use anywhere.
It’s time to unleash your inner artist. The Surface pen is one of the most sophisticated digital marking instruments you can purchase. It works incredibly well on this tablet. I have several digital art systems, but the Surface Go is my current favorite. It’s light weight, responsiveness, and accuracy are ideal for drawing and painting anywhere. There are a plethora of different artistic apps in the store. If you’re just starting out I recommend Sketchbook. It’s a good balance of power and ease of use.
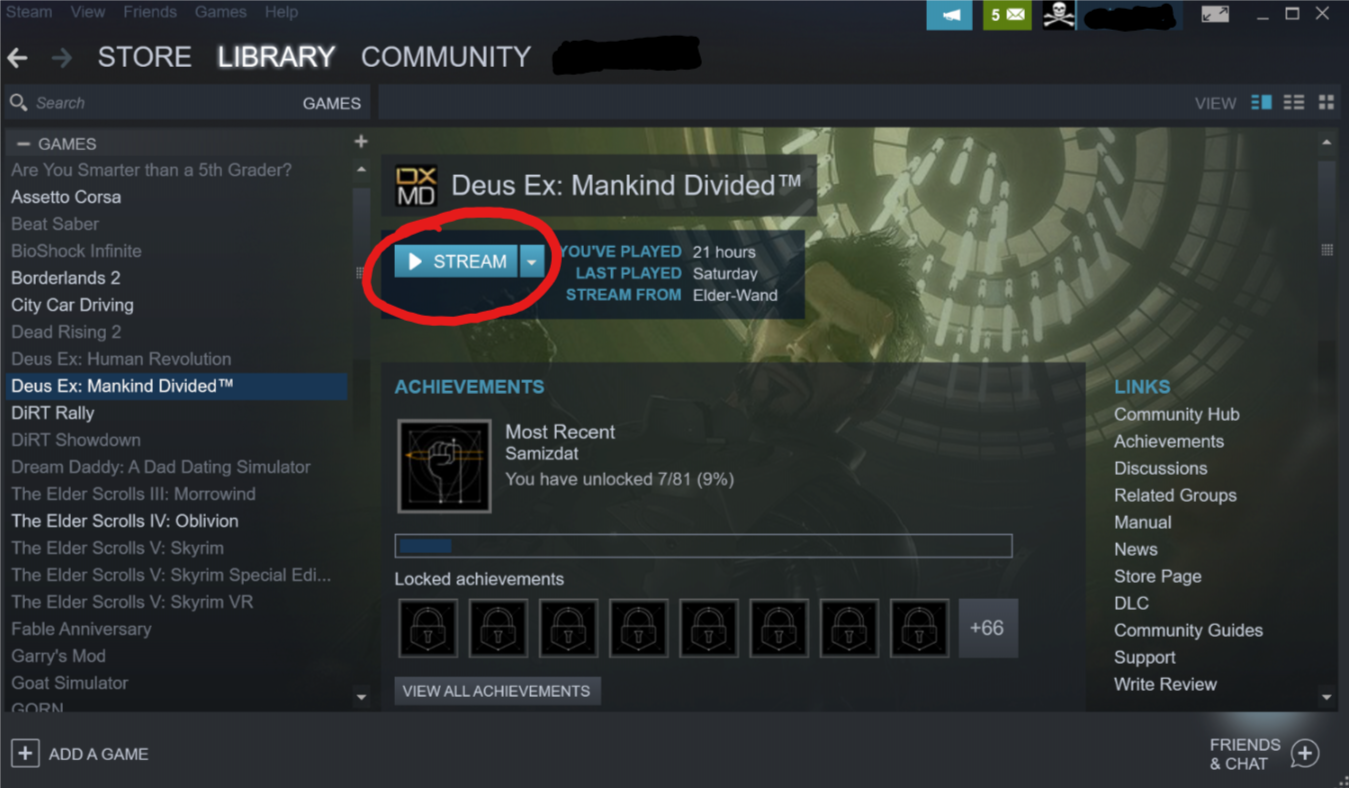
It seems like every time that I sit down to get my game on, one of my family members wants to watch a movie or something on the home entertainment system. You can use your Surface to play your Steam, Xbox, or Playstation games through their respective streaming services. For Playstation or Xbox games you’ll need to pair a Bluetooth controller. The Xbox app is pre-installed, open it and click the icon on the right hand menu that looks like an Xbox. Follow the prompts to get the service running. If you have a Playstation, download the Remote Play app and follow the on-screen instructions. To stream Steam games from your gaming rig, just install the Steam client app on your Surface and login with the same account. Select a game in your library and pick stream.
Most of the whiteboards in my office are old crusty things with the shadows of meetings past bleeding through. Skip the dying markers and eraser arm, use Microsoft’s Whiteboard app instead. Download it from the store and you’ll be collaborating in no time. Features like ink to shapes and ink to tables, help ensure that your art skills don’t derail your ideas. The “invite people” option works when you’re all in the same room or in different countries.
Hopefully I’ve given you some ideas to think about. The device’s diminutive size and power make it an excellent tool for data consumption and productivity. The Microsoft Store is full of applications that are useful, but don’t forget that if you convert from S mode, all windows software becomes available.
As most of my readers know, I am a fan of tablet computers. Especially those that have a pen input option. I first became interested in them after seeing Bill Gates show off a Windows XP tablet edition device on Good Morning America. I like technology and I also enjoy writing, but some part of my brain does the latter better with a pen or pencil in hand. A system that combined the two was just the thing for me.
I spent countless hours mastering the specialized Graffiti input on my Palm Pilot PDA but it just wasn’t the same as scribbling something on paper. What Mr. Gates demonstrated on that show was true handwriting recognition. I convinced my boss at the time to get me one of the first devices and I haven’t looked back since. I have owned and used nearly every pen enabled computer since then.
This weekend, I picked up the Surface Go. I’m writing this article with it. The last Surface system I bought was one of my favorite computers of all time. Why get a Go if I already own a Pro? In-short, size and weight are a pen writers biggest enemies with this type of tech. Until recently it has been difficult to find devices that are small enough to comfortably hold in a single hand but powerful enough to run real-time handwriting recognition. Most of the tablet devices are large enough to require a table or knee to lean on. The Galaxy Note phones were some of the first devices to allow handheld writing and I still love mine. The Galaxy Book 10.6 was among the first tablets light enough to hold and write but powerful enough to be useful. It’s a great device but the Surface Go has some district advantages that drew me to it.
Foremost in my mind is the integrated kickstand. There’s just nothing else that competes with it, even with HP and Asus trying to copy it. The other manufacturer’s versions don’t stand-up. The Surface Go keyboard has the same fold and attach ability that its big brother does which makes the keyboard more rigid on your lap. It’s one of the few 2-in-1 designs that works well on your lap, on a table, and on the arm of your chair.
Midna chillin’ on my lap while I write this article.
Next on are the size and weight. The Surface Go weighs 1.15 pounds and feels the same as holding a 9.7″ iPad. It’s light and has a small foot print. The Go is just the right size to slip in your day pack or a purse but still big enough to be worth carrying the extra device. Even as a long time Galaxy Note fan, I find myself tossing this thing in my bag for the extra screen space. It’s comfortable to hold in one hand and write with the other. Every ounce less that a tablet weighs, improves its usability in this regard. The Go is light enough that I find myself reading books on it which is not something I have normally used a tablet for.
Some of the reviews that I had read before purchasing the Go indicated that the processor was weak. I’m not a huge fan of benchmark testing, I find that it is largely irrelevant in the real world. In my very un-scientific testing the Surface Go opens some popular everyday apps like the browser, Facebook, Instagram, and Twitter, a fraction of a second slower than it takes the current iPad to launch the same software. However, Apple has spent considerable time and capital optimizing the iPad for those specific tasks. If we switch our testing to apps like Word, Excel, Onenote, and WordPress, the Surface Go is much faster at launching these programs in some cases several seconds faster. The Surface Go was faster at launching every “Productivity” app that we tested: Sketchbook, Photoshop, Evernote, and Homebudget, all opened faster on it. Full disclosure, my testing method consisted of my wife grabbing her iPad and us launching the same app after a 3-2-1 countdown. In my opinion, this is the only kind of speed test that matters for these types of devices.
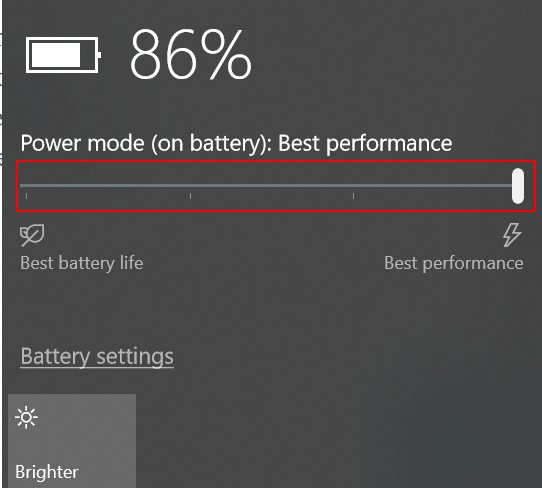
To get the best performance, tell Windows to favor it over battery life by tapping the battery icon.
For me, one of the true tests of a system’s power is to load up a game and see how it plays. The system easily handles “App Store” games like Candy Crush, Modern Combat, and Fruit Ninja so I decided to throw something harder at it. I installed Steam and downloaded Borderlands 2. I let the game auto-dected the resolution and graphics settings (1152 X 854) and was floored by how well it played. It looked good, and was fully playable. I actually enjoyed playing on it and was also able to play Sims 4 (on high at 1080P) along with Stardew Valley. Don’t get me wrong, it’s not a gaming system. It couldn’t play Destiny 2 at all and you won’t be hooking up a VR headset to it, but for a college person or to play on your lunch break at work, it’s surprisingly good.
Microsoft says that the battery can last up to nine hours. I’ve been using it all day for the last three days doing everything from writing and surfing to playing and drawing and I haven’t needed to plug-in except for its nightly charge. I also have the 2018 iPad and the battery life seems comparable in real-world use. I am enabling battery saver mode when reading or doing other low demand tasks.
Overall I’m very happy with this system. It would be nice if it were a little less expensive, but it’s an incredibly good small computer and you’re always going to pay a premium for that. The 128 GB iPad comes in at $429.00 and the 128GB Go is $549.00, for the extra $120 you get a full Windows operating system that can run the full versions of software like Office in a similarly sized package. I’ve already installed Visual Studio, written a PowerShell script, loaded PhotoShop and edited a picture, written countless emails and a few Word documents.
The keyboard is fantastic but I disagree with a lot of the tech blogs that say it is required. If you plan to use this system for “tablet” tasks, it’s on-screen keyboard is leagues above Apple’s. It has multiple sizes and modes that allow it to fit almost any situation. The predictive text is spectacular. If you want to type 100 WPM then you’re going to need a keyboard. If you want to take that keyboard with you, I recommend the one that Microsoft made but you can use any with bluetooth or a USB C adapter. The purpose made keyaboard is nearly perfect as far as small keyboards go. I’ve never used one that was better.
I already owned the new Surface Pen and have written an article about it. It works really well on this tablet. If I had to choose between the keyboard and the Pen I would have picked the Pen! I still think the Norris pencil for the Samsung Galaxy Note is the best stylus I’ve ever used, but this one is a close second and it’s more functional.
I’m very happy with the Surface Go and think that if you mostly use a high-end desktop or big-laptop and need something more portable, this tablet is a great fit. If you’re a college student, home user that doesn’t edit video/play AAA games, or 95% of office workers, you could likley use this as your only computer system with a dock. Microsoft will be releasing a business edition and an LTE equipped version in the near future. I expect this device will be quite popular over its lifetime.
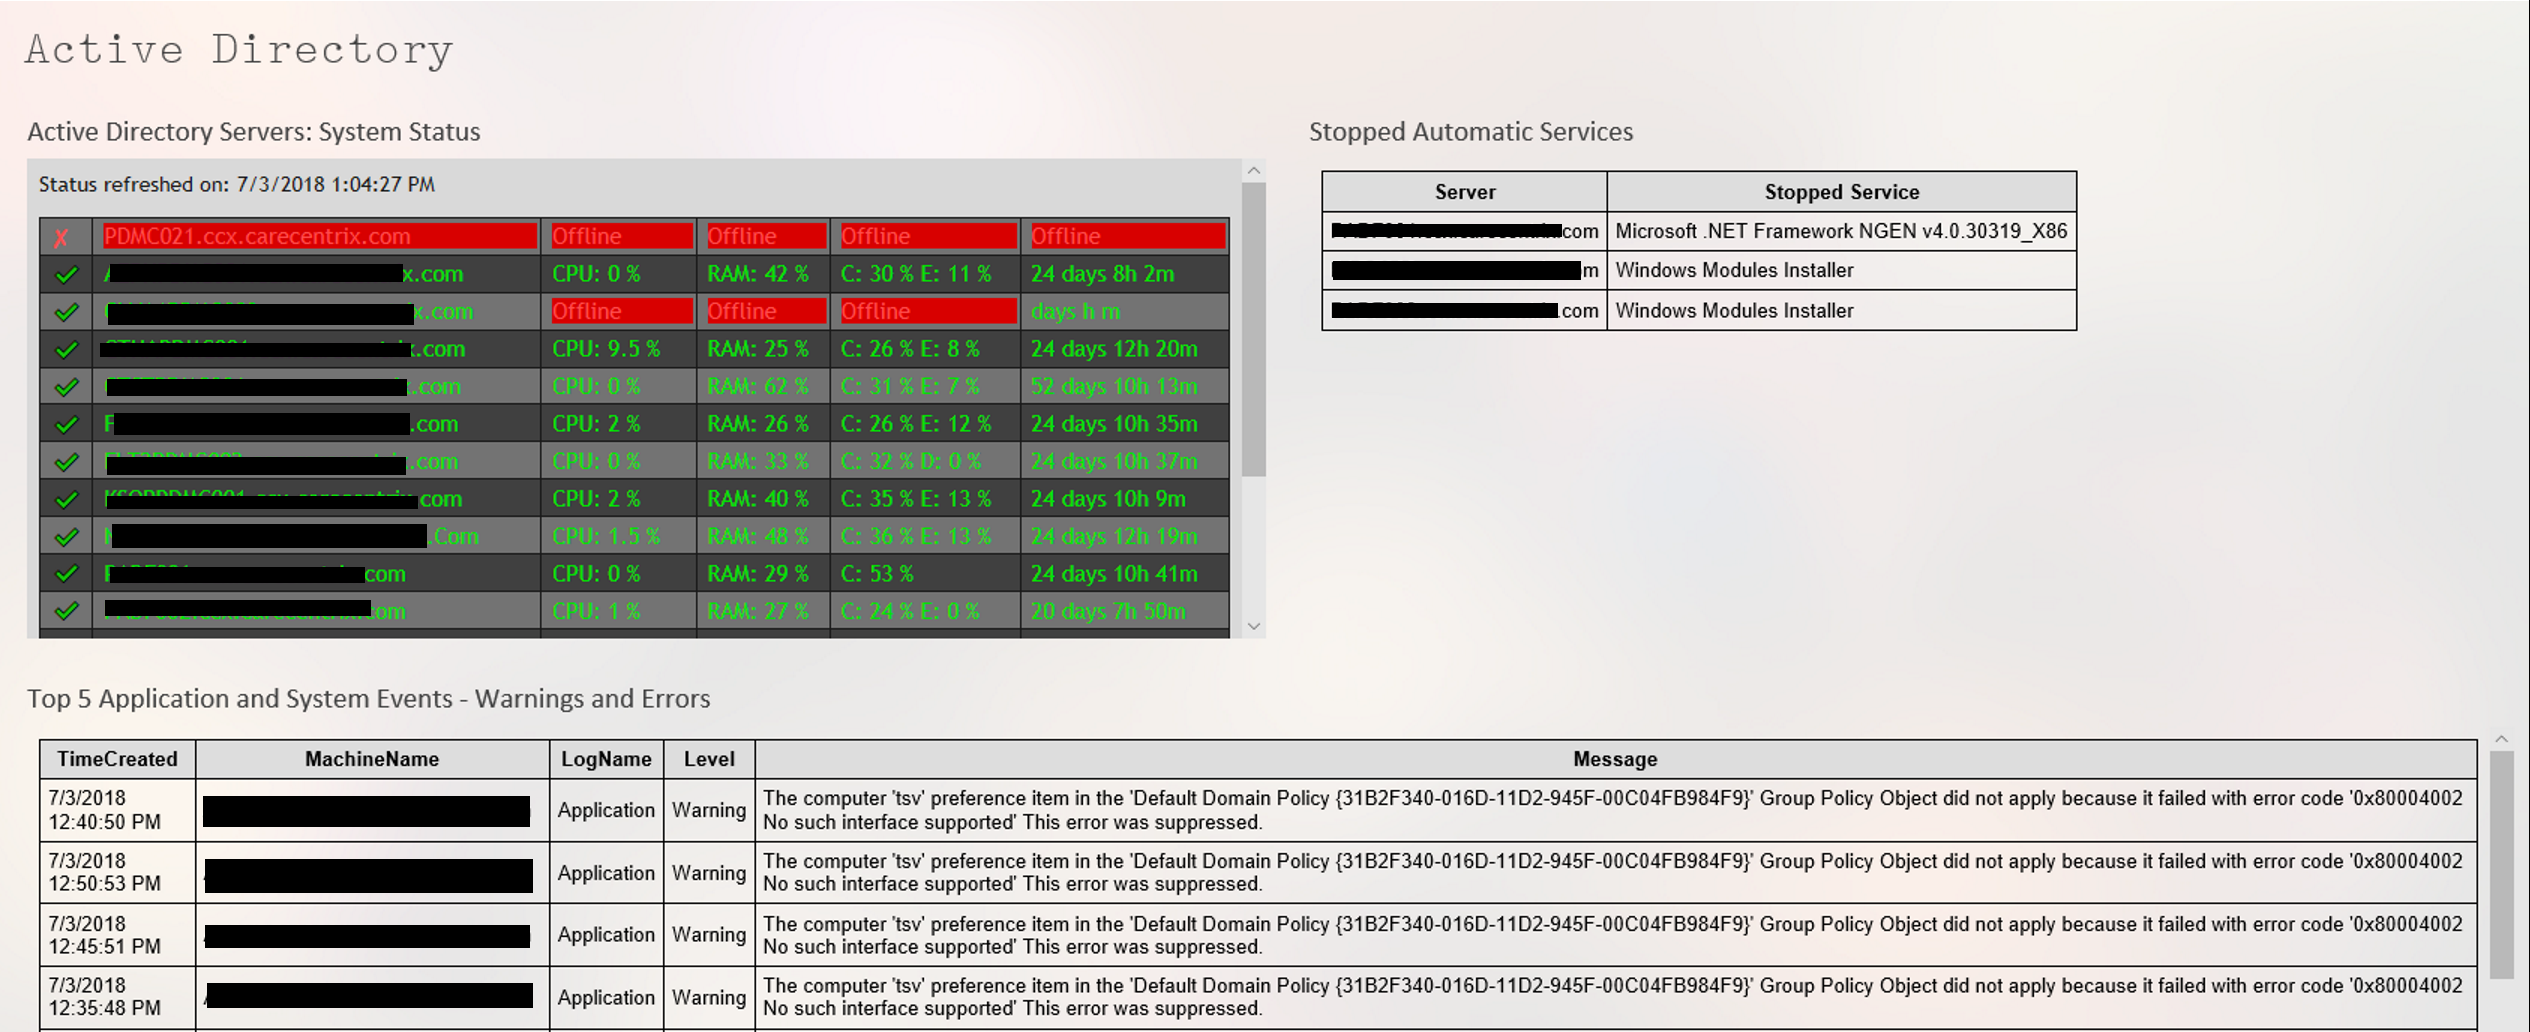
In part one of this series, we wrote a script that would get errors and warnings for the last hour for a list of servers and output the results to an HTML file in a simple table. In part two, we capture all services for a list of servers that are set to automatic but not currently running, and output that list to an HTML table. Part 3 describes how to use the Windows Server Status Monitor script available at GitHub and the PowerShellGallery to monitor Online status, CPU Load, Memory Load, and Disk Space. Part 4 dynamically generates the lists of servers that the first three scripts will need to run.
To make the monitoring system work, there are still a few things we need to do. First, we need to set up a server with IIS or some other web hosting engine. To be honest, I like SharePoint, the newest version isn’t available in a free edition, but if you have an Office 365 subscription it is included. If not, the last free version you can get is SharePoint 2013 Foundation. Speaking of SharePoint, you could add some additional code to the scripts to upload the results of our scans straight into a SharePoint library, but this isn’t as easy as it sounds. I prefer to add another IIS site to the SharePoint server and then proceed with the architecture out-lined below. After you’re done, you’ll use SharePoint’s content viewer web part to build cohesive system report pages which I’ll get into further on in this post.
I’m not going to go through all the steps needed to get a web server up and running here. You can search for the instructions easily enough and including them would make this article a book. In any modern version of Windows server, you add the web server role. If you’re going with SharePoint, when you run the installer it will guide you through the pre-requisites.
Once you have IIS up and running you need to add virtual directories for each group of servers that you want to monitor. Before you can add the VR directories you need to create the actual folders on whichever drive you want to store all of this data on. Make a folder for each environment that you’re going to monitor for example: development and production. Then, under each of those, create a folder for each group of servers: AD, Exchange, SQL, that you built lists for.
Folder Structure
Virtual Directories
The virtual directory alias is the path you will use to access the html files placed into the matching folders by the scripts. You’ll type http://www.webservername.com/vr_directory_alias/name_of_file.html to access the reports for each group of servers. To make a new virtual directory in IIS, right-click on the site that you are using and pick new virtual directory from the drop down menu. Then fill out the pop-up form.
Once you’ve gotten your directory structure and web host all squared away, it’s time to start scanning servers and creating the files that get dumped into the folders you’ve just made. If you followed the instructions in the preceding articles, there should be three scripts in the C:\Program Files\WindowsPowerShell\Scripts folder. We put them in this particular folder to make calling them with additional scripts easier.
We’re going to make another series of scripts that call our scanning tools with the lists we’ve made as input parameters and the folders we’ve made as output paths. Then, we’ll schedule our calling scripts as automated tasks that run every few minutes and wallah, a full system monitoring tool is born.
I like to add a timer and an alert email to my scanning task script so that I know how long each group takes to complete. You will need to change the paths, SMTP server and email addesses in the script below to match your environment. You will make one of these scripts for each group of servers you want to montior (match the folders you made above). Store them all somewhere that makes sense to you, placing them in the VR directory folders will work fine.
Once you’ve finsihed creating the scanning task scripts, we’ll need to schedule them as repeating tasks using the Windows task scheduler. Be sure the account that you choose to excute these scripts with has enough permssions to scan the servers and that WinRM is enabled on the systems you are collecting data from.
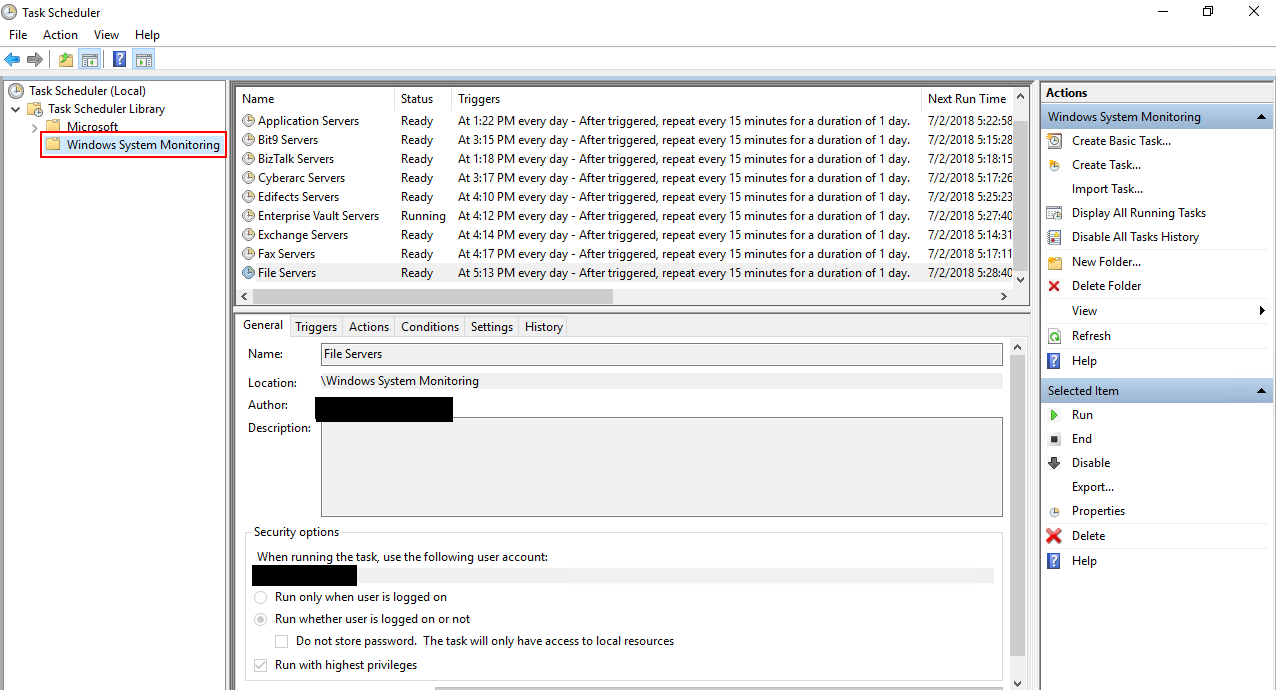
Add a folder for all the tasks
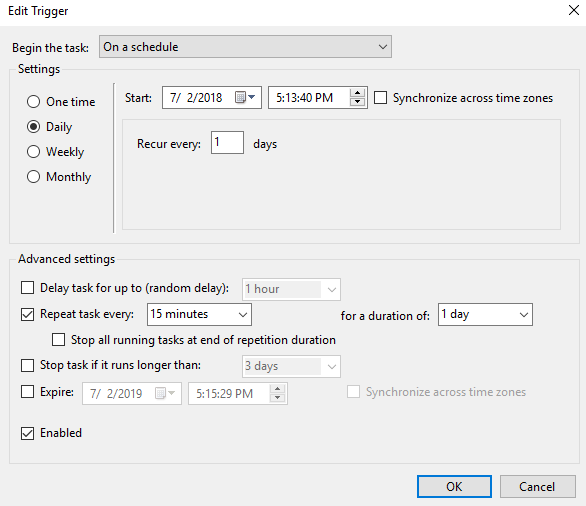
This task runs every 15 minutes, note the Daily and Repeat options.
Powershell.exe goes in the program or script box. Enter the full path to your script between “” in the arguments.
When you save the task you’ll be prompted for the credentials to run it with. Running the scripts does consume resources from the server(s). Tune your schedule to be frequent enough to be useful, but not too taxing on the servers. Every 15 minutes works well in my environment.
If you have SharePoint, build a site for ServerStatus. Add a page for each group of servers (AD, Exchange, etc.) and on each page insert three content viewer web parts. Each content viewer web part will reference the output html page of one of the status scripts. Take your time and be sure to title the web parts appropriately. If you’re careful, you can end up with something that looks like a professional monitoring tool. SharePoint’s menu system will build the drop down menus that you see in the title image automatically.
If you don’t have SharePoint you can get a simliar effect by using iframes. You’ll need to create a master html page for each group. AD.HTML for example, then use an iframe to embed the output of each of the three scripts onto the page. The HTML to create an iframe is:
With a lot of work and time you can build a tool that keeps watch over your servers while you work on other things. There’s no limit to how far you can take a tool like this. Alerts for thresholds, reports, and more are just a few lines of code away.