We are a house divided, the females are all Apple everything. The males are Android and Windows. The newest edition of the iPad mini is almost good enough to change that balance. It’s everything a tech geek wants in a tablet. Light, powerful, thin, with stylus support, and an excellent display.
A lot of people dismiss the Mini with a ” same as my phone” shrug. They’re missing out. There are lots of times between working and being out that call for an in-between screen. Sitting on the couch surfing, writing with a stylus, and reading in bed are examples of times when an iPad is too big and a phone is too small.
The iPad Mini provides far more screen space than the iPhone 11
The newest Mini is 8.0 inches (203.2 mm) tall, 5.3 inches (134.8 mm) wide, 0.24 inch (6.1 mm) thick, and weighs 0.68 pound (308.2 grams). There’s something about eight inch devices that makes them the perfect size to read on. Maybe its because they’re the same size as an average paperback book?
As a dedicated Windows user, I wish Microsoft’s OS would scale well on an eight inch system. I have a Dell Venue 8 Pro and while the operating system and many Microsoft apps shrink to fit, most third-party software doesn’t. Apple has a leg up on Microsoft or even Google in this regard. Their tight control of the App Store means that they are able to ensure usability for all of their form factors. Every app that I have tried so far looks great on the 2048-by-1536 resolution at 326 pixels per inch screen.
The fifth generation iPad Mini is fast, really fast. The A12 Bionic chip means pages load in the blink of an eye. Multitasking is a breeze. I like to play Netflix or YouTube on the side while I write or browse in the larger section. Even the most taxing games like Call of Duty Mobile run stutter free. At everyday tasks like checking email, or reading the news it is faster than an average laptop.
The Mini is more than powerful enough for multitasking
As always, my biggest gripe with the Apple tablets is that there is no native support for handwriting. At least now there are some really well done third party apps that fill the gap. See my review of Selvy PenScript for an excellent example. You can also pair a Bluetooth keyboard for input duties, Logitech makes one specifically for the Mini.
If you are in Apple’s ecosystem and spend much of your time in the digital world the new iPad Mini will be a welcome addition to your compute devices. It is just the right size for kicking back in your favorite chair and doing whatever on.
Microsoft 365 provides a lot of well conceived admin tools via its on-line portal. Their user tool is fantastic for creating and editing user accounts, but getting reports from it can be challenging. Lucky for us Microsoft 365 can also be accessed through PowerShell.
This script will prompt for credentials and the org name. Then it will retrieve all of the licensed users’ display names, primary smtp addresses from Exchange, user principle names, and the licenses currently applied to the account. The CSV report will be saved in your documents library.
One question that frequently arises during remote work transitions is “What do we do about the physical mail?” One of my go to solutions has been to email enable SharePoint document library folders and point our scanner’s email function at those addresses. Unfortunately, SharePoint On-line lacks the ability to email enable folders.
If you are starting down this path and do not have a scanner, you should know there are devices on the market that can scan directly to SharePoint. You will most certainly have a better experience with these machines than will be achievable via any workaround method. Devices like the HP M577 series and the Plustek eScan SharePoint A250 are able to logon to SharePoint On-line via their built-in software.
If your current hardware lacks the direct to SharePoint functionality and a replacement isn’t an option, there are two methods that may work. Before we get started you should be aware that any of the following options will require that somebody logon to SharePoint from the system running the solution a minimum of every five days. SharePoint On-line sessions expire; refer to Microsoft’s documentation.
Method 1 – Scan to Synchronized Folder
First be sure that Microsoft OneDrive is installed and setup on the computer you will send the scans to. Make sure the account that you are logging on to the computer with is licensed for OneDrive and SharePoint access in your Office 365 admin portal.
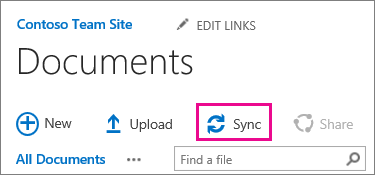
Logon to SharePoint and create a folder in the appropriate document library for your scans. Assign permissions for access, auditing, versioning, etc. open the folder from the computer and account that will run the process we are creating. While in the folder, use the Sync button in the SharePoint toolbar to synchronize the folder to your computer with OneDrive.
The Sync button tells OneDrive to store a copy of the folder on your local computer and to upload / download files as they are manipulated.
Once you’ve created your SharePoint folder and set it to sync, open Windows Explorer and you should see the SharePoint document library listed in the menu on the left. Right click on it and go to the properties to see the folder path. If OneDrive’s default settings were not altered the path should be something like: C:\users\yourname\yourcompany\sharepoint – yourfolder. If you’re having trouble getting the SharePoint sync to work review this Microsoft video.
It’s pretty common to try and get your scanner to use the local location (C:\users\yourname\yourcompany\sharepoint – yourfolder) as a target, but you will soon discover that it doesn’t work. This folder has special attributes that keep you from writing to it with most devices. We need to work around this limitation so that your scanner can write files to this synchronized folder.
Open a CMD prompt and run: subst s: “C:\users\yourname\yourcompany\sharepoint – yourfolder” using the actual folder’s path. When you press enter a new hard drive will appear in Windows Explorer with the drive letter S. This is a virtual drive that is similar to a mapped network drive but connected to a folder on the local computer rather than a network share. The virtual drive will not honor the attributes, thus allowing our scanner to write files that are synchronized.
Right click on the S drive and share it. Configure your scanner to send its files to the S drive share. This process is different on every type of device, check your manual or Google it. Generally you logon to the web control interface and configure an address book entry. Scans sent to this destination will end up on SharePoint. With some scripting and/ or scheduled tasks you could automate all kinds of functions with the files.
Method 2 – Scan to Shared Mailbox and Move to SharePoint
Microsoft 365 includes the ability to create shared mailboxes without consuming a license. Use the admin portal to create one following these instructions . Configure your scanner’s scan to email function to target the shared mailbox email address. Again, Microsoft provides excellent instructions.
In part 1 of this series we discussed what equipment you would need to purchase to install a modern advanced network in your home. In part 2 we learned how to assemble network cables. Now we’re going to use our new-found skills to install the equipment.
Place a switch and access point on each floor of your home. One needs to be relatively close to your ISP’s modem or jack and an exterior wall. The other switches need to be as close as possible to exterior walls. The plan is to drill small holes using our extra-long 3/8th inch bit through the closest exterior wall of your home so that the cables between each switch can be run on the outside.
Drill from the inside wall to the outside wall with a 3/8th in extra long bit.
Be careful to avoid unseen components hidden inside the wall.
Think of the switch that is closest to your Internet Service Provider’s modem as the “main” switch and the others as floor extensions. We want to run a cable from each floor extension to the main switch. Your switches should be unboxed and connected to power before beginning.
You are drilling holes at your own risk. You need to be aware of the wall’s composition, drilling through brick or stone is more complicated than drilling through sheet rock and siding. Avoid studs, electric wires, and pipes that may be hidden in your walls. A stud finding device is a good idea.
A Stud Finder with Electrical Detection is a Good Tool to have when drilling holes in walls.
Once you’ve drilled your first hole, place the box of network cable on the interior side. Thread the cable though the grommet in the box. Get your string and pass it through the eye in your drill bit. If your drill bit doesn’t have an eye, remove the bit from the drill and use a small piece of tape to attach the string to it. Pass the bit and the sting through the hole. If you are using wall plates to hide the cables, you will want to pass the bit and string though it before pulling any cable.
Cut off the end of the string and attach it to your network cable. Some people are able to tie it. I always use tape. Go to the exterior side of the hole and pull your network cable through, using the string.
Your box of cable has a built-in dispersal method.
Use string to pull cable though the drilled hole.
Now repeat the drilling process where the main switch is located. If you are running several cables to the main switch make the hole large enough to pass all of them through. Use the same drill bit and string trick to pass the cable you are pulling from the exterior to the interior as close to your main switch as is possible. Always leave a few feet of extra slack in your cable pulls as insurance.
Once you’ve pulled the cables from your floor extension switches to the main switch, use the lessons from article 2 to put RJ-45 ends on them. Plug both ends into switches. You should see the port lights turn on if the connection is good. If you have cable tester, follow its instructions to test your cables before connecting them.
Use the patch cables we made in article 2 to connect one wireless access point to each of your switches. If your WAP can support PoE be sure to connect it to a PoE port on the switch. You should see connection lights as the WAP powers up. Try not to place each WAP directly over the one on the adjacent floor. This will help ensure that strong signals are available through-out your entire home and cut down on any interference.
Use the cable hangers mentioned in the equipment list to attach the outdoor portions of your cables to the exterior surfaces of your home. I try to use the ridges in siding, overhangs, and existing linear features to hide the runs from view whenever possible. When there isn’t an available hide keep the run as straight as possible.
You will want to seal the exit and entry holes with silicone or spray foam. The cable we’ve run is not specifically rated for outdoor use but if it is kept off the ground it will last for years. In the next post in this series we will work to configure your newly installed network and connect it to the Internet.
Many Americans are working from home for a much longer stretch than anyone expected. For some, it has become a permanent change. For others, it is a temporary situation with no end in sight. The other night my spouse and I sat down to review and modify our various service plans to better fit our current lifestyle.
We’re both home and paying for unlimited mobile data when our phones hardly leave Wi-Fi didn’t make sense. We contacted our mobile provider and they helped us make some changes that saved more than $100.00 a month. They even threw in a free year of HBO MAX.
The changes weren’t limited to our mobile plan. Working from home being on VPNs, video calls, and accessing our company’s cloud data was causing us to go over the data cap from our ISP. We dropped the movie channels that we never watched and boosted the data plan to a faster connection with unlimited use. The monthly bill was a wash, the savings will come from not getting hit by the overage fees.
If your family is working from home for an extended period, take a look at the services you pay for. Chances are the way that you use them has changed. Don’t limit your investigations to digital services. Everything from your car insurance to your electric bill was based around your being out of the house most of the time.
Recently I was tasked with helping a company build out a solution for remote training classes. We chose Microsoft’s Remote Desktop Services as the platform. I needed to develop a method to create bulk accounts for the students and place those accounts into the AD security group that granted access to the remote app.
Most admins have probably come across the New-AdUser cmdlet at some point. Combining it with a For-Each loop and a sequential digit was easy enough. The most difficult piece to figure out was adding each newly minted user to the security group that allowed access to the remote application.
The secret sauce is the passthru switch. Using it prevented me from having to code some elaborate process to find each account and add them separately. Make sure you update the variables to match your environment and the script will need to be run on a domain controller or system with the AD management tools installed.
If you wanted to configure the script to be run by an end user to setup a new class, change the script’s variables to use read-host which will prompt the for the values. For example; $Password = Read-Host “Enter Password”.
#Must be run from DC or system with AD Admin Tools installed and joined to domain
#Creates sequencial bulk users with the same password
#Adds those users to the group specified in $group use the DN
#Change the Path to the OU you want the accounts to be created in
#Edit the ChangePasswordAtLogon switch as appropriate, $true forces users to update password and $false does not
Import-Module ActiveDirectory

#Variables
$OUPath = "OU=Training,OU=Users,DC=Domain,DC=local"
$BaseUsername = "Training"
$Password = "NewStudent!"
$Number = "20"
$ADGroup = "CN=RDS Training Class,OU=Training,DC=Domain,DC=local"
$Incremeant = 1..$number
foreach ($i in $Incremeant){
	$NewUser = New-AdUser -Name $BaseUsername$i -Path $OUPath -Enabled $True -ChangePasswordAtLogon $true
	-AccountPassword (ConvertTo-SecureString "$Password" -AsPlainText -force) -passThru
	Add-ADGroupMember -Identity "$ADGroup" -Members $NewUser
}
We’ve had an old fashioned white scale on our bathroom floor for as long as I can remember. You know the kind, tap it to turn it on and wait for it to zero out. Then step on and read the number. No body fat percentage, no BMI, just your weight.
I had looked at smart scales a while back, but didn’t think they were worth the couple of hundred dollars most of them cost back then. Scales aren’t something I think about much, so this is a rare example of technology that slipped my mind. I never gave it another thought, until recently, that is.
I have been making an effort to get in better shape as of late. Part of that endeavor is tracking my calorie intake and weight. One morning while keying in the numbers yet again, my sleepy brain wondered if there was a scale that would sync up with my phone.
A cup of coffee and a few web searches later I was pleased to learn that smart scales were far more affordable and that some would sync with my health app. Not only that, but they could measure a lot more than just your weight thanks to electrical impedance.
The various structures and tissues in your body all pass electricity through them at different rates. Body Fat impedes, or slows the electron stream more than bone for example. Smart scales pass a series of small electrical currents up through one foot and out through the other. The software on the linked mobile devices analyses the times the pules took and calculates your body’s composition. This process is known as BIA Bioelectrical Impedance Analysis.
The current is small and generally harmless. Most of us don’t notice it at all. However, if you have a pacemaker, defibrillator, or other sensitive electronic implant you should avoid smart scales. Most of the manufactures also warn against using the devices if you are pregnant.
I had some specific requirements that I hoped to fulfill when I started looking for a smart scale. For it to be useful it needed to sync with both the Samsung and Apple Health apps. We needed it to easily connect to multiple Android and Apple devices. Quick and accurate measurements were also important.
After some research, I ended up ordering the FITINDEX Bluetooth Body Fat Scale from Amazon. It’s $29.99 on Prime and on paper does everything I was after and then some. Some of the comments lead me to think device switching might be problematic. Other purchasers seemed to be having trouble with the batteries.
We’ve had the unit for a couple of weeks now and I’m impressed. Install and setup the FITINDEX app from your device’s app store, turn on Bluetooth and step on the scale. It’s that easy. As long as the person using the scale has the app open and Bluetooth on when they mount up, user switching is a seamless experience even between Android and Apple. I’ve put both standard and rechargeable batteries in ours without issues.
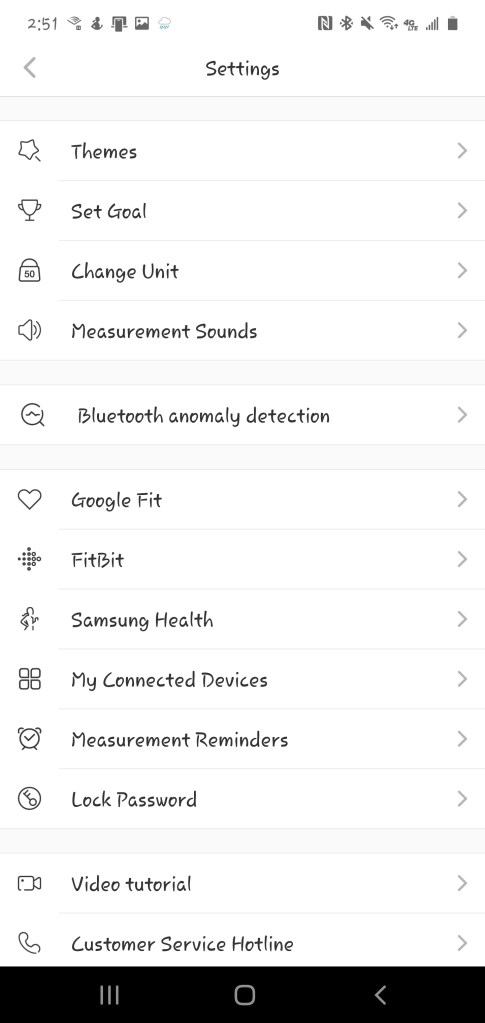
I compared the numbers this device provided against my last check-up from my doctor’s office and some from a friend’s smart-scale. The FITINDEX was accurate according to the comparisons. It calculates: weight, BMI, body fat percentage, water percentage, bone mass, muscle mass, and several other compositional components. The data can be synchronized with the Fitbit, Google Fit, Samsung Health, or Apple Health apps automatically, by selecting the appropriate option in the FITINDEX app’s settings.
The FITINDEX app itself is superb. It tracks trends and goals, supports themes, and is generally pleasant to use. It color codes your results in red, yellow, green for easy interpretation. This usability surprised me more than any other aspect of my new scale. My experience has usually been that in-expensive hardware comes with atrocious software.
If you’re still rocking an old-fashioned scale that only shows your weight, or you’re getting on the fitness train, the FITINDEX is an exceptional piece of equipment given its price.
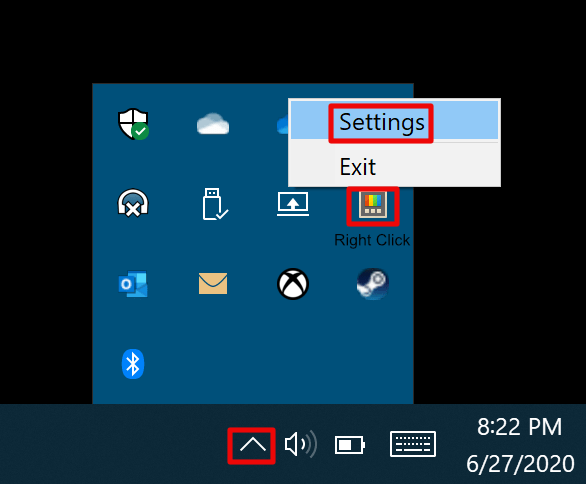
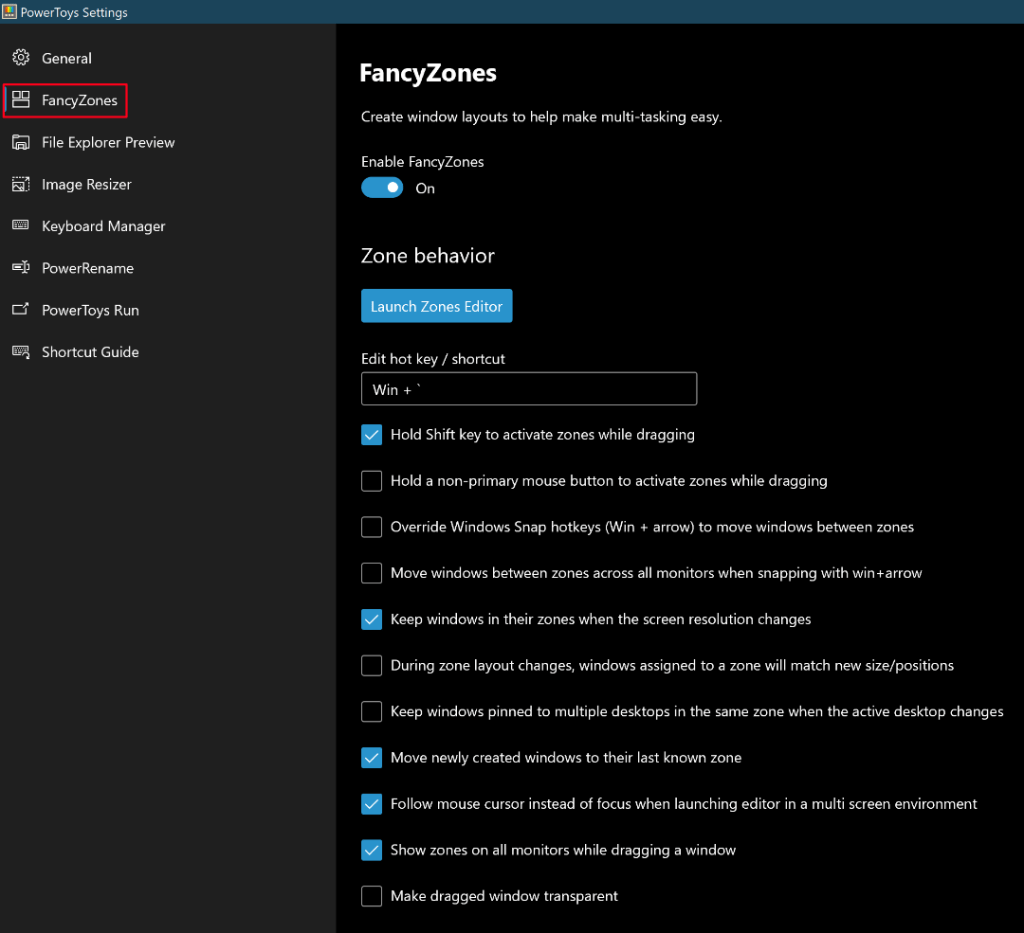
Hold down the Windows + Arrow key and you can snap a particular application to the edges of your screen and split it in half vertically or horizontally. Snap Zones is a useful feature, but it has some problems that keep it from being more popular. You can’t control the size of the split, it is half and half. Getting new windows from an app to open in the same zone is next to impossible.
Once you have the app open, the FancyZones section controls its settings. I split my screen into a Grid of 4 and have each app open further windows in the same zone. This makes my workflow simpler, all my windows for a particular application are in one zone, so I don’t struggle to find them. My Outlook is in one zone, my Teams and Zoom are in another. My company’s app has its own zone and so does my web browser. The effect is like each app having its own monitor.
My main monitor is divided into 4 snap zones but you can have as few or as many as you like.
FancyZones isn’t limited to grids, you can cascade the zones, have irregularly shaped zones, there are a bunch of pre-configured layouts or you can design your own. If you have multiple monitors and want to apply custom zones to them, click the blank area of a screen once to focus on it then press the Windows + ` keys at the same time. Choose the layout you want for that monitor. Repeat the process for each screen you want to use FancyZones on.
The FancyZone settings I find most useful.
When you hold down the shift key and drag a window by it’s title bar, the available zones will highlight. Drop your window into the preferred zone and it will stay/open there until you move it. With Web Apps, you may need to move the tab for pop ups to the correct zone and close / re-open them once.
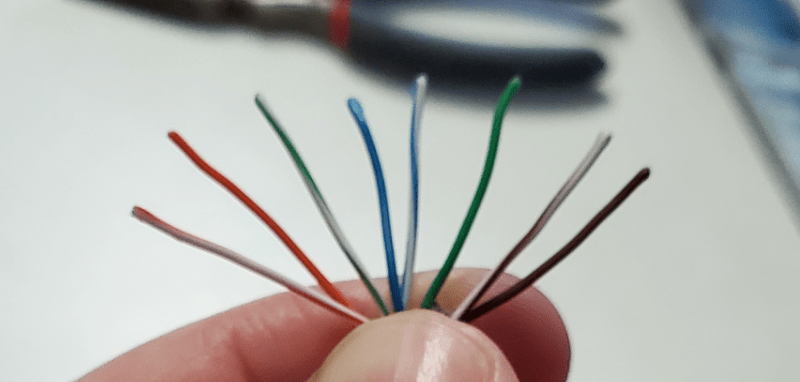
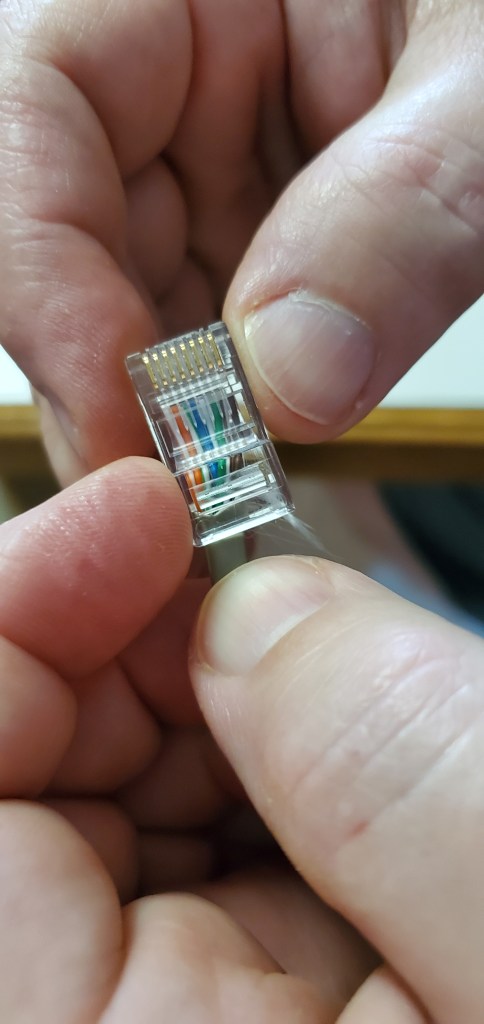
Sing it with me everyone, “orange-white, orange, green-white, blue, blue-white, green, brown-white, brown”. I like the “Twinkle Twinkle Little Star” tune, but use whatever suits your fancy. The point is to be able to easily remember the order that you arrange the individual strands of a Cat5 cable in.
If you have read Part 1 of this series you already know that we need to run some cables between the switches placed throughout our home. We don’t want to drill holes that are large enough to pass cables with the ends already on them. It would be a lot of work to deal with holes that big. So we’ll learn to put the ends on after we run each cable through a much smaller hole, barley larger than the cable itself.
If you’re new to network cabling, the best place to start is to make a few patch cables. That is what we call the cables that run from your switch to your devices (computers, consoles, access points, etc.). I suggest making four 10 foot long cables and four 20 footers as well. Before you go hunting for your tape measure to figure out how long ten feet is, look closely at your cable. It has a bunch of writing on it and one of the numbers is how many feet of cable you’ve pulled from the roll. Now go grab your crimpers, ends, a pair of scissors, needle nose pliers, and your glasses if you need them.
Use the cutter on your crimpers to cut your length of cable. Notice that inside the plastic sheath there are several other cables that match the colors in our song. There’s also some string peeking out. It’s that string that we want to get to. Take your scissors and snip a little bit of the outer covering so that you can grab a hold of the string. I use needle nose pliers for this. Pull the string down through the outer sheath a couple of inches. Just like slicing cheese with a wire cutter isn’t it? Use your scissors to cut away the outer covering that you’ve peeled back.
Once you’ve exposed the interior cables we’ll need to arrange them for our ends. There are four pairs of strands twisted around each other. Hold the end of the cable just under the end of the cut you made in your non-dominant hand. Then use your dominant hand to untwist and straighten each individual wire. Just like undoing bread ties right? Pinch your thumb and forefinger together tightly and run each strand through the vise to straighten them.
Arrange your strands in the order of song, then grip them just above the outside cover. Make sure they are still in order and squeezed tightly together. Cust the strands in a straight even line so that approximately a half inch of strands are left. Do not let go of the strands, keep them pinched together tightly. With your other hand, pick up an end and orient its opening toward the strands with the clip facing down. Slide the strands into end.
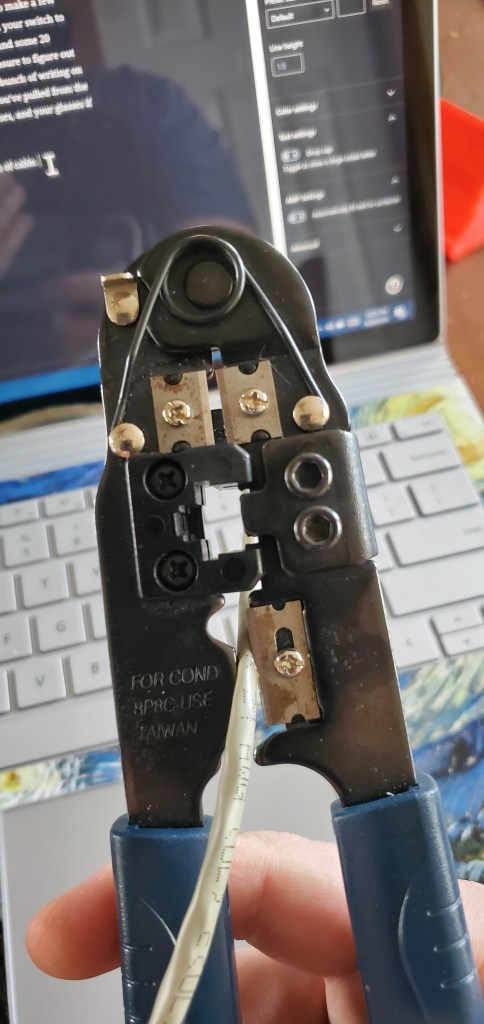
Watch closely and you should see each strand slide into its own channel inside the end. Be sure they stay in their proper order. If they get out of order you may find it easier to pull more of the sheath away and start over. Once the cables are in their channels push the cable as tight as you are able into the end. Now keep the assembly held together with your non-dominant hand and pick up your crimpers with the other.
Slide your cable assembly into the crimpers. Some of these tools have multiple slots for different types of ends. You’re looking for the one labeled RJ-45, or network. Press the entire assembly into the crimper as hard as you can with your non-dominant hand and squeeze the crimpers closed with your dominant. On top of each channel is a small golden connector. The crimpers push each connector down into the strand underneath it. Look at the blunt end of your cable and you should be able to see if all connectors have been pushed down evenly. If not, cut the end off and start over.
Congratulations, you’ve managed to attach one cable end, only fifteen more to go! This is one of those things that gets much faster with practice. By the time you’ve finished the first four cables you’ll be much faster. If you learn better by watching than reading, search YouTube, there are a lot of videos showing this process.
If you have a cable tester, read its instructions and test each cable that you make. Most of them are two parts, you insert each end into a part and then press the on button. If you do not have a tester, plug one end of your cable into a switch and the other end into your laptop/desktop you should see orange and green “link” lights on both devices.
Stay tuned for the next article in the series. We’ll tackle running cables between the switches throughout your home.
The future demands that a reliable high-speed network be available in your home. Video conferencing, cloud computing, work from home, and on-line entertainment have shifted from secondary services we all had, to necessities we can’t live without. The days when you could plop the Modem/Router/Wi-Fi combo unit that your ISP gave you behind the TV and call it good, are gone.
This series will guide you through deploying a small scale version of the network technology that is used in many businesses. Don’t worry, today’s software driven equipment makes the learning curve much shallower than it used to be. If you are handy with basic tools and can follow directions you should be able to achieve success. This guide is based around Ubiquiti’s Unifi platform because that is what I personally use. The design, concepts, and basic instructions should work for any brand of SDN equipment.
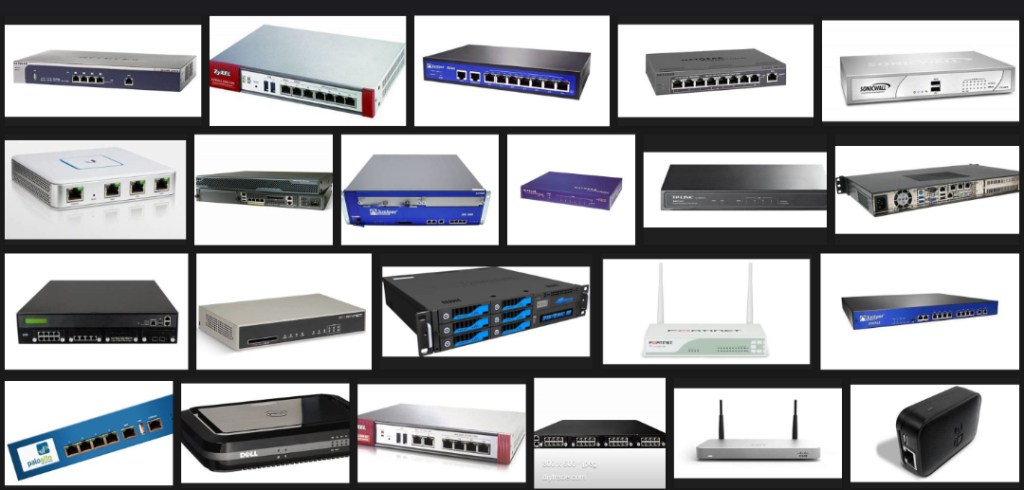
Software Defined Network equipment is produced by multiple manufactures; Aruba, Meraki, Fortinet, and Ubiquiti are some of the more popular brands. Regardless of whose equipment you choose to work with, the components are basically the same. There is a controller of some sort that is the brains, switches that connect the cabled pieces, access points for wireless devices, and a network edge device to control your interaction with the Internet. These devices work together to from a network that operates as a single dynamic structure that is able to change to fit your needs.
After you have chosen who’s equipment you want to work with, the next step is determining how many of each component you will need. The first piece of equipment is the controller. Most of the manufactures offer multiple ways to obtain a controller. Ubiquiti offers it’s controller as a piece of software that you can run on your computer, as a dedicated piece of hardware known as a Cloud Key, and as part of an all in one device named The Dream Machine. The software is the most economical option, but the Dream Machine is the simplest to setup. Depending on the size of your home and number of devices it may be all that you need. The other manufacturers have similar offerings.
In order to determine how many switches and access points you’ll need, you first need to plan the layout, or topology, for your home. Many people are under the impression that a cable should be run from each location to a central point where the switch is located. Running cables through finished walls is difficult, so the “Home Run” topology can be challenging.
For most residences, an easier option is to use multiple switches placed in key locations and to link them together with a cable between each. The linked switches form a contiguous network that operates in the same manner as large single switch. The cables can be run on the outside of your home, by drilling small holes though walls. Don’t worry, the holes are small. You’ll use wall plates to hide them on the interior and silicone to seal them. They can be hidden under eaves or along siding gaps. In some cases you may be able to use existing holes from your air conditioner, cable TV, or electricity services.
A good rule of thumb is to place one switch and one access point on each floor of the home. I happen to have a lot of networked devices with my line of work so I run two switches and access points on the main floor of my home and one additional pair in the downstairs office. The switches are capable of power over ethernet (PoE) which means that the access points only need a network cable, no power plugs, or cords are required.
Below is a comprehensive list of the equipment and resources that you will need to install a network in your place of residence. You can order all of it on Amazon. The links are for Ubiquiti equipment, but again any brand should work. The next article in this series will cover making and running the cables throughout your home.
Starting from Scratch – I recommend the Unifi Dream Machine. It has the controller, a wireless access point, a USG firewall, and a 4-port switch built-in to a single unit. It can act as the starting point for a more expansive network. For small residences, it will be the only equipment you need.
Controller – If the Dream Machine (or Ubiquiti products in general) isn’t your preferred option, You will need the controller that matches your equipment.
Firewall / Router – You will need the firewall that matches your equipment. In the case of the Unifi platform this is a USG.
Switches – You will need the appropriate number of PoE switches for your home. One per floor is a good place to start. In the Unifi line of products I recommend the 8 Port 60 watt PoE switch.
Access Points– One access point per floor. In the Unifi line of products I recommend the AC Lite version.
Network Cable – Cat-5e cable is recommended, purchasing it in bulk at your local hardware or electronics store can be less expensive than ordering it due to weight. Measure or estimate the distances between your switches and add 25% to the total.
Network Cable Crimpers / Tool Kit – Crimpers are a type of plier that squeezes the network cable ends on to the cables. If you don’t own a pair already, it is more economical to purchase them as part of a kit that include the tool, a wire stripper, and cable tester.
Network Cable Tester (Optional) – you can also test cables well enough for home use by plugging one end into a switch and the other into a device. Link lights, indicate the cable is “good enough”.
Drill – A standard cordless or electric drill
Drill Bit – A 3/8-Inch by 18-Inch drill bit, preferably with an eye.
I once worked with an individual that printed and filed his emails. All of them, even the SPAM. This person wore out a LaserJet printer about once per year. I asked about the endeavor while installing yet another new printer. It was a form of hoarding pure and simple, the printed copies were “in case the server crashed”. Even explaining the redundancy of the email platform, multiple distributed servers, RAID, backups, etc. wasn’t enough to deter them.
Printing has become an enormously wasteful habit propagated by people and businesses that refuse to modernize their routines. I recently stopped to get fuel at a major convenience store chain. The clerk asked if I needed a receipt, I replied that I did not. His cash register spit out two copies which he crumpled and tossed in a can under the counter.
I picked my car up from being serviced to find three full sheets of paper on the passenger seat. I asked the service manager if I needed to keep them. “Not really, all of your vehicle’s service records are in our system. You can get them anytime from the app on your mobile,” he answered. As my phone notified me of my emailed receipt, a clothing store cashier asked me to wait while she changed out the resister’s tape. One waitress explained that nearly half of their nightly trash dumps were comprised of receipts left on the tables.
They were all slaves to their software. POS (also stands for Point of Sale) applications that automatically vomit up streams of paper for each transaction. Hardly anyone wants or needs the paper trail anymore. Transactions are recorded by the vendor’s software and your bank, both of which can be accessed at any time. So what happens to all of these seemingly important pieces of paper? They fill trash cans, cabinets, and musty records rooms that nobody looks in.
Recently, I attended a business meeting where each of the twenty attendees were given a full-color copy of a thirty page report on the topic of trimming operating expenses. Not a single person used the paper version. They all read on their laptops, tablets, and phones. I brought up the irony and was rebuked; “what if someone forgot their device?”, asked the presenter standing in front of a wall-sized screen.
How many mountains worth of paper is printed each year by US companies? Twenty-six tons, not including magazines, news papers, or other printing based businesses. It’s not just the paper. Some forty percent of world-wide logging efforts are consumed by the industry. Printers are electrically and thermally inefficient. Ink and toner are made in toxic factories the world over. Telling people that their operating procedure needs to change, results in push-back and not much else. A defensive posture to protect our ego against feelings of wrong doing displaces rational thought for many of us. Soul crushing statistics seem to harden the armor rather than penetrate to the logic centers of people’s minds.
I like to find the silver linings in life. The Covid-19 pandemic is horrible beyond words. The amount of suffering and death it has caused are incomprehensible. Even still, if you look hard, there are positive outcomes to be had. I’ve been able to spend an unprecedented amount of time with my family while working from home. People and companies are learning that business is adaptable and there are alternatives to rush hour and high rises.
It is my hope that separating workers from their printers combined with the new stigma associated with handing objects to people will have an impact on printing. If you’ve been able to conduct your business without installing printers in your work force’s homes during the lock-down, you didn’t need to print that stuff in the first place.
When we return to our office buildings and places of business, take a good look at your printing practices. Does your POS software have an option to skip printing the receipt, is there an update that adds the feature? How are people using the paper trails they are generating, do they need to be printing those documents? Do your people know how to create and share a PDF of their work? It’s easy to do and has been free for a long time now.
When discussing the subject I often hear, “we have to print x”. So many times X turns out to be some antiquated process that nobody his examined in the last ten years. “We have to print checks”, have you looked in to digital banking services lately? In the rare cases where they can’t submit your payment as a digital transaction, the bank will print and send a check for you.
Did you have a printer company do the last cost analysis of printing in your company? LOL. Get an IT person that doesn’t like printers or an accountant that hates waste to tell you how much it really costs. It’s like eating out for lunch every day; we all know that it costs more than the ten dollars we budget for. I did a true analysis for an employer and showed them when including electricity, consumables, lost support time, and the lost productivity of physically dealing with paper, printing cost them almost two and a half million dollars per year. Furthermore, less than nineteen percent of that paper was still in existence at the end of each year.
Consolidate your printers, make them inconvenient to access and people will only use them when they absolutely have to. Get rid of all individual printers. Do not make exceptions. There is no such thing as a secure print, once a file exists in the physical world you have lost control of it. Investigate the situations that require printing a little more thoroughly. Times have changed and a lot of that stuff can be taken care of electronically now.
Shifting all vehicles to electric and stopping our use of plastic are noble environmental goals. Both will take years and cost vast amounts of capital to accomplish. Drastically reducing how much your organization prints is something we can do right now and it increases your profit margin. Have your people look into how much less you have used your printers during the lock down and challenge your company to make that change permanent.
In today’s cloud-based world it is easy to accidentally end up with files that are split across different locations. For example, if your company has files in SharePoint and SharePoint encounters an issue, your file editor (Word, Excel, etc.) may prompt you to “Save a Local Copy” as a precaution. If you save a local copy to your OneDrive or hard drive, the file you are working with now exists in two distinctly separate places. The problem can be compounded if multiple people have received the prompt to save a local copy.
Sometimes split data can occur when a worker wants to access a file from another system. They may email a copy of the shared file to themselves or use some other method that makes a distinct copy. Both SharePoint and OneDrive are accessible from any computer connected to the Internet. Typically all that is required is to open a browser and go to https://sharepoint.mycompany.com or https://onedrive.mycompany.com to access your files.
This situation can be very confusing in shared environments. If you and/or others continue to work on the file after it was saved to personal locations the edits will not be reflected in the shared version. Furthermore, if the file is closed and then re-opened from one of the many “Recent Files” lists available in Office applications, it may be inadvertently opened from the non-shared version again.
Tip:
In Microsoft’s cloud environment (Microsoft 365 / Office 365), it can be helpful to think of the names as being literal. “SharePoint” is where “shared” files belong. “OneDrive” is for “one” person and where your personal data belongs. That is not to say files in your OneDrive cannot be shared with others or that files in SharePoint cannot be locked to one person, both are possible, but not the main function of the software. For comparison, you can drive your commuter car on a racetrack, but you won’t be winning any races that way.
Resolution
There is no automatic way to correct files that have been split across multiple paths. It is up to the editor to understand where their data is being saved and make decisions accordingly. There are many strategies that could be employed to re-combine the separated data into a single shared file, one of the most effective is outlined below.
Stop making changes to the shared or individual files; have everyone close them.
Locate all the versions. Each person that has worked on the file after it was fractured should be contacted to see if they also have an individual version. If SharePoint encountered a technical problem and prompted to save a local copy, it likely prompted everyone that was in the file at that time. If a file was emailed to multiple recipients, each may have an individual copy they have worked on.
Make a folder in the shared location named “Recovery Collection” and place a copy of each person’s file in that folder with their name appended to the title.
Also place a copy of the original shared file in the Recovery Collection folder
Merge the data from the individual file copies into the shared file copy. The operation chosen to merge the data will depend on the type of file, type of data, and how many changes have occurred.
Copy / Paste – in many cases the simplest method is to open each file, copy what is different about it and paste that into the shared file copy.
Application Based Merge – Most of the Office Applications include a merge function. If there are lots of changes in multiple places that make copy/paste difficult, the merge function may be your best option.
Rename the original shared file. Be sure that nobody is currently editing the original shared file and rename it (I suggest putting -old after the files name) then copy your updated shared file into the correct location so that people may begin using it instead of the original.
Once you are certain the new shared file is correct and that everyone can use it, delete the recovery collection folder and the old copy of the shared file to reduce disk usage and future confusion. You should also instruct each person to delete their individual copies of the file(s) to prevent further confusion
In our new normal, one of the complaints that I hear most often is how bored people are when there’s nowhere to go. Shops, stores, movie theatres, and restaurants are all closed. Baseball and most other sports are on hold for who knows how long? A lot of our free time was spent “going”. Now that you have all of that time on your hands, what do you do with it?
This is the perfect time to find a hobby. For years one of my favorite pastimes has been racing. While I have been lucky enough to own and drive some fantastic cars, I am not referring to racing real vehicles. I’m talking about digital racing, not in the form of Mario Kart or any other button masher, but racing simulations.
Racing isn’t about mashing the gas as hard as you can and hoping for the best. It’s an exercise of surgical precision, superb timing, and a personal relationship with Newton’s laws of motion. Driving is a ubiquitous skill for Americans, so perfecting it has a smaller learning curve than other simulated experiences. Racing simulations are available on nearly every type of computing device. Below are some of my favorites (pics link to the web sites).
Real Racing 3 is an excellent simulation for Apple, Android, and Amazon mobile systems. I highly recommend the in-car view and tilt controls to get the most realistic experience. People have been burning up the track in Sony’s PlayStation exclusive Gran Turismo since 1997. Always a leader in innovation, GT was the first console game to support 3-D. With cars so detailed you can almost smell the gasoline, the Forza series is the premiere Xbox exclusive racer. Get your race on anywhere with Grid AutoSport on the Nintendo Switch
Racing games have been in development for nearly fifty years . Gran Trak 10 was released by Atari in 1974 and featured a steering wheel and pedals control interface. It wasn’t much to look at but was entertaining. People flocked to it in the arcades and bowling alleys of the time. This encouraged the investment and development we are able to experience today.
Gran Trak 10 is the Granddaddy of Racing Simulators. The arcade cabinet had a real wood steering wheel and pedal controls.
When you flip on ESPN and see a vehicle race during the Covid pandemic you are most likely watching an iRacing event. iRacing is a subscription based virtual experience that is renowned for its ability to accurately portray the minutia of racing a car or truck. From Trophy Trucks to F1, every type of race and track is available. Tire wear, fuel consumption, track degradation and weather conditions all occur as they would in the real world.
Race with the pros on iRacing.
iRacing supports Virtual Reality, motion simulators, advanced control kits, and nearly every other type of advanced equipment the sport has to offer. Make no bones about it, this is a sport; people spend thousands of hours practicing and honing their skills here. Spend the $6.50 for a one-month membership and see how you stack up.
Project Cars 2 is the game I spend most of my time playing right now. It features almost every type of car and track laser modeled to the most exquisite detail. Day and night driving in the sun, rain, snow, and ice are all represented. There are pro events, on-line matchmaking, and everything in between. It’s available on the Xbox and PlayStation but really shines on a PC with a high end GPU.
Project Cars 2 has nailed PC racing simulation
No article about racing simulations would be complete without mentioning the astounding amount of hardware designed to push the experience from something you see and hear, to something you feel as well. Most people start their rigs with a wheel and pedal set. From inexpensive spring loaded wheels to servo controlled force feedback sets, there’s an option for almost everyone. You can get gear shifters, hand brakes, gauge clusters, eye trackers, cockpit stands, and even full motion systems to take your racing to next level.
For me, nothing beats a force feedback wheel. Using small electric motors in combination with gears, or belts these wheels go far beyond the buzzing you get from gamepads. Pushing back on your hands in corners, the slip of traction loss, bumps in the road, a lot of driving is done through your sense of touch. A good kit to start with is the Thrustmaster TS150, designed for the PlayStation it is a little known fact that this wheel works great for PCs too; there’s a switch on the back and drivers available on their web site.
An excellent add-on for any driving kit, is a gear shift. Most of the wheel combos sold today come with a 3-pedal setup but don’t include a manual gear shift. You can add one from Logitech or Thrustmaster in a snap and be rowing your way through 6 gears in no time.
You can try to clamp your wheel and shifter to a desk and put the pedals underneath. They usually include clamps made for this purpose. You’ll have a hard time getting everything to line up where it would in a real car’s cockpit. Most of us end up getting a purpose made wheel stand. There are lots of makes and models, search Amazon to get an idea. The best ones let you mount the shifter on either side. When you run European races you can make your setup match the car.
You might be tempted to think that after you’ve got a wheel, stand, pedals, a shifter, a seat, and a cockpit that you’ve reached the end of racing simulation hardware. Nope, you’re just in the beginning phases of the addiction. After you’ve had a the stand for a while, a lot of people make the jump to a full cockpit. If you’re going to dedicate that much space and money to your setup, you might as well go all in and get the motion simulation too.
With prices ranging from $800 to $10,000, or more, full motion cockpits are the apex of racing simulation. Working in conjunction with your force feedback wheel and VR headset the seat will lean and pitch to make you feel the torque of acceleration, throw you forward on hard braking, and push you to the sides in the corners. I haven’t purchased one of these yet, rest assured that if I do you’ll be able to read about it here. Now I that I’m done writing, I think I’ll go run a few laps.
I recently decided that it was time to transition from using a forty-inch TV to an actual monitor. For the most part, I wanted to move past the sixty frames per second limitation that most TV based screens are stuck with. I would have loved to picked up a 4K Predator but couldn’t justify the two-thousand dollar price tag. I had a max budget of five-hundred dollars and hoped to spend less.
As with all of my technology purchases, I started by doing a ton of research. There are a lot of terms and specs wrapped around computer screens these days and I wanted to understand their meanings before making my choice. I’ve provided an overview of a few of the more important terms below.
HDR stands for high dynamic range and is a feature that provides better contrast and colors to the content on your screen. Contrary to popular belief, it is not the same thing as the HDR that you find on cameras. CNET has an excellent write up on how the technology works. This particular feature can have a dramatic effect on how things look, but the media and screen must both support it. It’s great for games and videos, but doesn’t do anything for documents.
FPS is frames per second. Moving video is created just like those old flip books you drew in grade-school. Still images called frames are flashed on your screen so quickly they appear to be moving. The faster the frames flash by, the smoother the movements appear to be. Security cameras tend to run around 15 FPS, TV around 30 FPS, 60 FPS is the minimum most gamers shoot for, 120 is ideal for action video and games, 240 FPS is found only on high-end gaming monitors.
Resolution is an indication of how finely detailed a displayed image can be. Each frame of a video is composed from colored dots of light. Squeezing more dots onto the screen results in more detail being available. Resolution is measured in the number of dots aka pixels, that are available horizontally and vertically. 1080P is 1920 pixels wide by 1080 pixels tall and is comprised of 2,073,600 individual dots of light.
There is a never-ending debate around which is more important for gaming resolution, or frames per second. The choice is a personal one, but if you play competitive on-line games, higher FPS means you are less likely to loose track of your target. At 30 frames per second, a 180 degree flick-turn looks like you magically appear to be facing the opposite direction from the moment of execution. This happens because the movement is over with quicker than the next frame can be displayed. At 120 FPS you actually see your surroundings during a flick-turn. This can also be observed by quickly moving your mouse across your monitor; on lower FPS screens the mouse appears to blink as it moves.
There are of course many more terms, like response times (how fast the dots change color), contrast ratios, OSD (on screen display), etc. but my intent is not to write a book on monitor specifications. NewEgg has a glossary of these terms if you’d like to learn more: https://www.newegg.com/insider/guide-monitors-terms-need-know/.
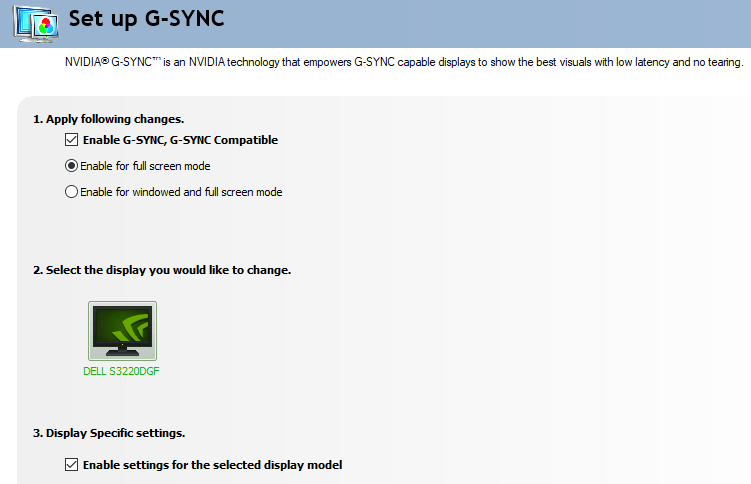
After all my research, talking to the industry people I know, and wandering around the local computer stores was complete, I ended up purchasing Dell’s S3220DGF. The 32 inch, curved, HDR screen is superb. I’ve never owned, or even used a better looking monitor. The colors are great and the blacks are fantastic. The screen is the perfect size to fill my entire field of vision when gaming. Text is easy to read when sitting a little farther back. My system is primarily used in a dark room so the non-bleeding edges are a big plus too.
The height, swivel, and tilt adjustable stand makes putting the screen in the perfect position a snap. The integrated USB 3.0 hub is a convenient place to plug-in my desktop accessories without having to drape cables down the back of my desk. I was also pleasantly surprised to find that all of the cables I needed including a display port and HDMI cable were in the box.
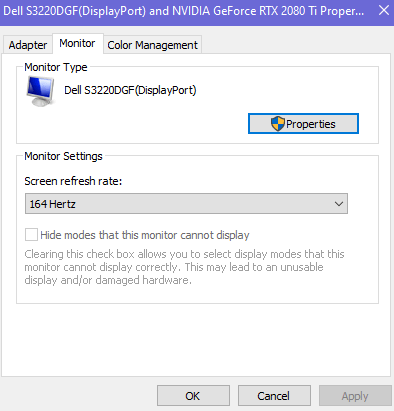
The monitor’s resolution is 2560 x 1440 aka 1440P and its fastest refresh rate is 165 FPS. This combination makes games like Destiny and Call of Duty look fantastic and run buttery smooth. In addition it supports AMD’s FreeSync technology which allows the refresh rate to dynamically match the media being displayed. If your game hits a particularly graphic intensive spot and the frames slow, your monitor will lower its refresh rate to match. This prevents tearing and choppy video. Despite the name, Nvidia GPU’s can use the FreeSync feature with this monitor.
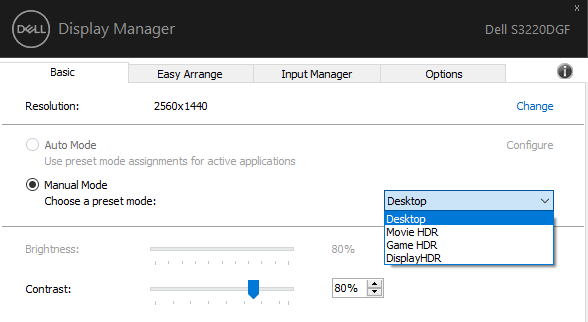
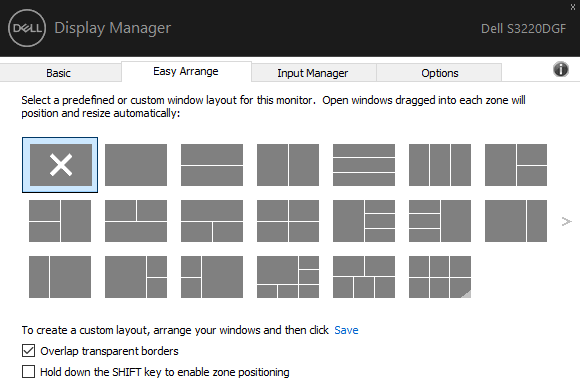
The OSD (on screen display) controls are easy to figure out, some of the other monitors that I tested had a joypad or touch interface which I preferred to the Dell’s individual buttons, but it obviously wasn’t a deal breaker. Besides the OSD and button controls, this monitor can be controlled by Dell’s Display Manager Software. In addition to editing settings like the brightness and contrast, the app lets you control and customize Window’s Snap Zones.
Modern Windows operating systems let you grab the title bar of an application’s window and drag it quickly against the side of your monitor to split the screen in half and select a window for the free side. Snapping windows is incredibly useful for multitasking and is a feature I use frequently. You can also snap a window by pressing the Windows key and an arrow key at the same time. My only gripe with snapping is that I wish there were more layouts.
The Display Manager software addresses my complaint by providing countless pre-configured layouts that are easily selectable. Besides the pre-made layouts you can also make your own. You don’t have to buy an expensive new screen to get this functionality. Microsoft’s Power Toys includes a feature named FancyZones that is similar, but not quite as easy to use and suffers from a few bugs.
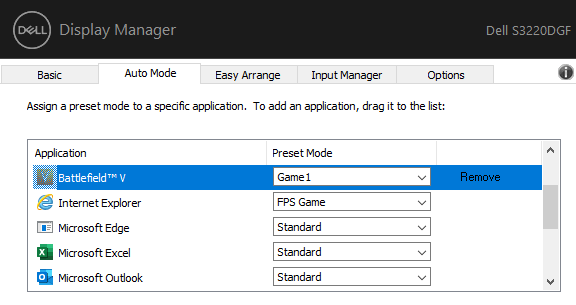
The monitor’s memory will store several different presets of brightness, contrast, color, black mode, refresh rates, and other settings which you can name. The Display Manager application will allow you map specific applications to those stored presets. This allows you to easily customize the screen for whatever you happen to be doing. I wasn’t aware the monitor was capable of this when I bought it, but it is a feature I use quite often.
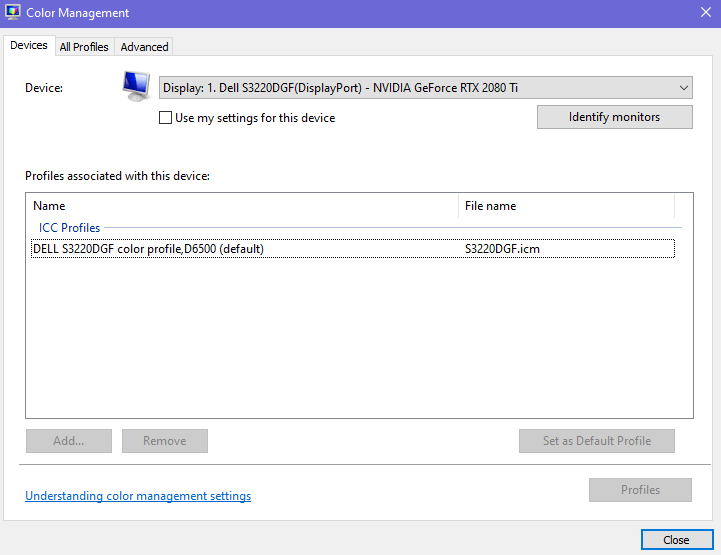
Most monitors that are connected to a Windows PC use the built-in generic driver and color profile. This works fine for 80% of use cases. However, if you edit photos or video having a tuned color profile and purpose made driver can help colors and contrast appear more realistic. This Dell S3220DGF comes with both.
I’ve owned the monitor for a couple of months and am very happy with my purchase. I found it on sale at Best Buy for $399.00 but it’s normal price is $449.00. I was concerned that I would miss 4k but the FPS is more important to me overall. I barley notice the difference in resolution. I also debated a flat screen versus a curved one. The curve really makes a difference on a screen this size that is only a few feet from my eyes. If you’re in the market for a new monitor, I recommend you take a look at the S3220DGF. That name just rolls of the tongue doesn’t it?
If you have a 3D printer, an interest in augmented reality, are a film maker, or game developer, chances are that at some point you have wanted to scan a real world object into your work. There are many systems and tools on the market to do exactly that. Solutions like the Go!Scan range in price from a few hundred, to thousands of dollars.
These uber-tech devices are so close to Star Trek that you can almost hear the warp core humming in the background when you pick one up. Point it at any person or thing, pull the trigger, move around for even coverage, and your target will be transported into your CAD package as a fully detailed mesh. No dilutetium chamber required.
Even if I had enough funds to purchase a 3D scanner, I couldn’t justify the expense. I wouldn’t get enough use out of it. I am sure that somebody rents them, but I didn’t come up with an option close enough to my location. So how is an enterprising tech head supposed to get his hands on one?
To continue our Star-Trek themed post, just use your tricorder. Most newer smart-phones are able to act as an object scanner through a process known as photogrammetry. Software helps you take multiple photographs of an object while tracking the angle and exact position of the camera during each snap.
The app will stitch all of the photos together along their X, Y, and Z plot points. Presto, a three dimensional representation of your subject is rendered on your two dimensional screen. You’ll be able to rotate and twist it to see every nook and cranny. Many of the apps support drawing lines between each point in the cloud, which results in a wireframe mesh.
The best apps like Display.Land will allow you to export that mesh to a file that can be imported into your favorite CAD package. I use the open source Blender software and Display.Land has published an end-to-end instructional video for it and several other solutions. Once you’ve imported your object’s scanned mesh into your CAD software, you’ll be able to manipulate it to your heart’s content.
Blender for all has published an excellent three part video series on using Blender with Cura to generate STL files for a 3D printer. I am attempting to use this process to create an adapter that will allow my friend’s gaming headset to fit over his hearing-aid. We’ll scan his headset and his head, then use both wireframes to design an adapter that fits between them. Keep an eye out for more posts on the project.
Network Edge Devices act as the brains for a computer network. They combine functions like Routing, Firewall, VPN hosting, Network Load Balancing, DNS, DHCP, Intrusion Detection & Prevention, and Data Classification into a single device. Network edge systems offer a single pane of glass to monitor and control your entire network from.
Throughout my IT career, I have encountered countless models of these devices. From Enterprise equipment like Cisco, NetScaler, and Fortinet, to SOHO grade systems like Netgear, Linksys, and ASUS; I’ve worked with them all. Overall, they provide the same basic functionality. From the point of view of a small business or home administrator, their biggest differences lie in how much technical expertise is required to configure them.
The majority of edge devices take a two prong approach to management by providing a graphical “easy mode” interface and an advanced command line for the more experienced. Unfortunately, there are major gaps in the intuitive operation of these systems, especially if the manufacturer was first involved in the enterprise market. They tend to do things like providing a button to set up a VPN that does not configure the firewall rules or authentication systems that are required for a VPN to work.
Out of all the edge devices that I’ve worked with, Ubiquiti’s Unified Security Gateway is my favorite. The unit is the perfect balance between ease of use and robust functionality. Ubiquiti’s Unifi series of products are the very definition of software defined networking. The entire line is managed by a single piece of software. Install the controller on your Windows, Mac, or Linux PC, or run it on a cloud key, go through an automated adoption process and you will immediately understand your network topology like never before.
Setup is simple and guided by the software. Once you have the system up and running you can forget about it. I have an advanced network in my home. My previous network edge struggled to deal with multiple Xbox, PlayStation, and Switch on-line gaming sessions. I had to constantly futz with it to keep things running. Other than to review usage reports, I haven’t needed to touch my USG since they day I installed it.
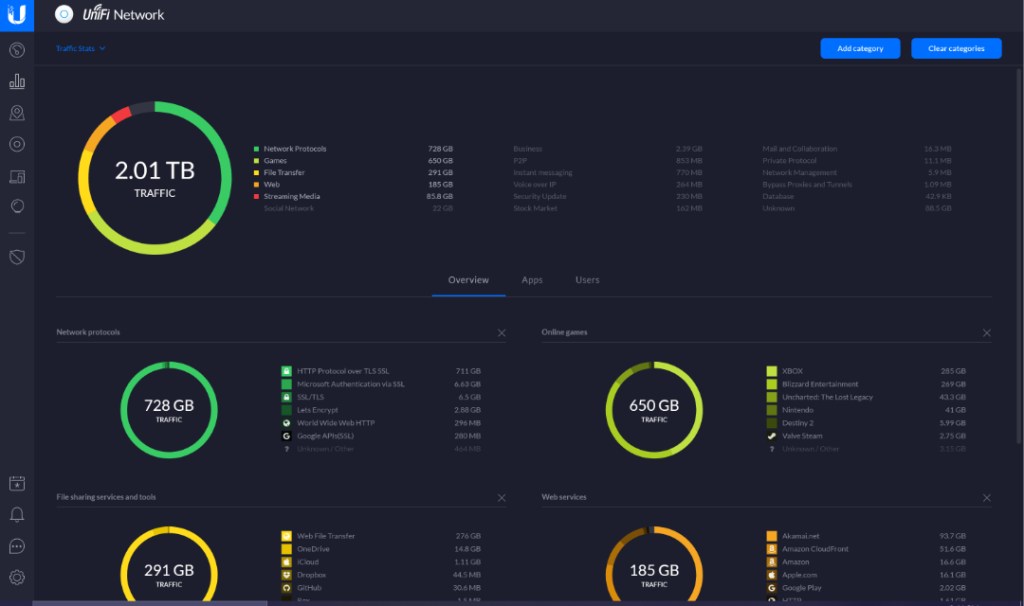
Speaking of usage reports, they are fantastic. Check the box to enable DPI and the USG will automatically classify all of your internet traffic and present it on an easy to read dashboard. Beyond the dashboard you can easily schedule emailed reports.
Easy to use reports show how your data is being used.
Drill down in each category to see specific details
Sign up for a free cloud account and you will be able to securely mange your network from your mobile with the Unify App or from any computer with a web browser. With the mobile app and cloud account configured you can also have your controller push notifications to you.
With extremely advanced options like the ability to support dual internet connections, host your own VPN, and Intrusion detection it is hard to believe the USG retails for $130.00, lifetime updates and tech support included. I’ve been extremely impressed by the unit and have recommended it to all my friends, family, and colleagues.
Nefarious characters are using the pandemic as a weapon. They’re sending emails to your employees with subjects and content that make them think it is important news or instructions. If your email is hosted by Office 365 the following script will permanently delete a message by subject from all mailboxes.
Paste the text below into your favorite text editor and save it with the .ps1 extension. When you are ready to run it, right click on the file and choose “Run with PowerShell”. Enter your Office 365 credentials and the subject of the message when prompted.
# RemoveMessage-Office365Mailboxes
#
Write-Host "This script will permanently delete a message from all Office 365 mailboxes. Use with caution!"
Pause
$MessageSubject = Read-Host "Enter Subject of the Message to be Deleted"
$UserCredential = Get-Credential
	$ExchangeOnline = New-PSSession -ConfigurationName Microsoft.Exchange -ConnectionUri https://outlook.office365.com/powershell-liveid/ -Credential $UserCredential -Authentication Basic -AllowRedirection
	Import-PSSession $ExchangeOnline
$mailboxusers = Get-Mailbox -ResultSize Unlimited

Foreach ($user in $mailboxusers)
	{
		Search-Mailbox -Identity $user.alias -SearchQuery 'Subject:$MessageSubject' -DeleteContent -Force
	}
Earlier today I installed the newest driver update for my Nvidia 2080 Ti. Not long after, I decided it was time to play some Skyrim VR. When I slid the headset down over my face, I was concerned to see that the colors were off.
Everything was dull and washed out, like the contrast was turned down too low. I’ve run into similar issues with HDMI only monitors before with this GPU. TV screens typically operated with at limited color range. Nvidia GPUs tend to detect everything that connects via HDMI as a television and restrict the colors that are rendered on the display.
There’s a setting in the Nvidia control panel that will allow you to force a full color spectrum on an HDMI connected device. Seems simple, we’ll just open the control panel and, oh no the Oculus does not show up as a display. to apply the setting to. Now what?
There are all kinds of methods to deal with this issue posted on-line. One of the more common is to get a HDMI display and connect it to the same port you use to connect your Oculus. Then use the control panel to force the color setting. The idea is that setting will stick on that port. Personally I was not able to get this method to work. Every time I plugged in my headset the setting was changed back to restricted.
In the end, I found that some kindly sole has written a utility that searches through your registry and sets all of the HDMI devices to full color. It worked perfectly for me and the next time I update my driver, I’ll just need to run it again. You can download the Nvidia Full Color Toggle utility here. Keep in mind downloading and running anything off the Internet can be dangerous and that you are doing so at your own risk.
By default you can not pass sound through to your host Windows system’s audio devices from a Linux virtual machine. I struggled finding reliable instructions for getting this to work and ended up using a third party solution called PulseAudio.
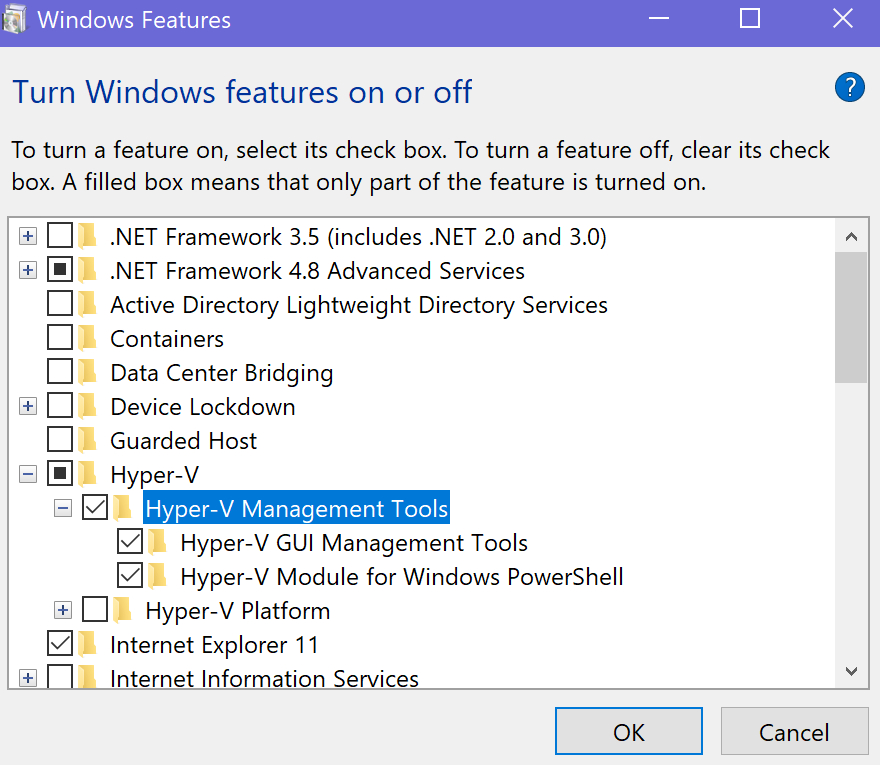
To get started, you’ll need an Ubuntu VM to work with and we’ll need to install Hyper-V if you haven’t already. Open PowerShell as an Administrator and install the Hyper-V components. Run: Enable-WindowsOptionalFeature -Online -FeatureName Microsoft-Hyper-V -All
Hyper-V can also be installed using the GUI. Go to the Control Panel -> Programs and Features > Turn Windows Features on or off and choose it from the menu (both boxes).
Once you have the Hyper-V tools installed, launch the Hyper-V Manager and use the Quick Create feature to automatically install and configure and Ubuntu Linux VM.
After the creation of your new VM has finished, right click on it in the Hyper-V Manager and start the virtual machine. Right click on it again to connect to the console.
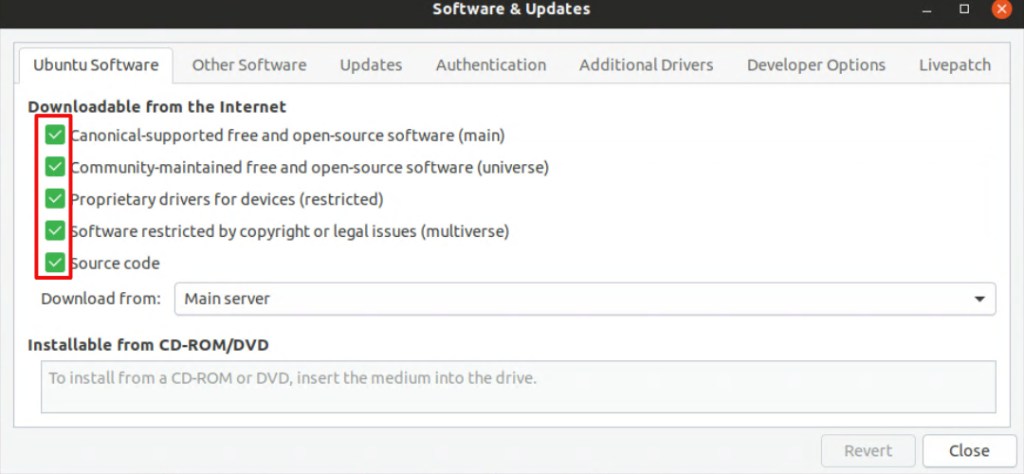
After you get logged on to your new Linux machine, the first thing we need to do is to configured the repos so that you can download the PulseAudio software we will be using to enable your VM’s sound. In the show Applications menu, open Software and Updates. Go to the Ubuntu Software tab and select all of the boxes.
Now, open a terminal from the Show Applications menu and run the following lines to install and configure PulseAudio. Reboot the Linux VM when you are finished.
cd /tmp
sudo apt source pulseaudio
cd /tmp/pulseaudio*
sudo ./configure
cd /usr/src/xrdp-pulseaudio-installer
sudo make PULSE_DIR="/tmp/pulseaudio-11.1"
sudo install -t "/var/lib/xrdp-pulseaudio-installer" -D -m 644 *.so
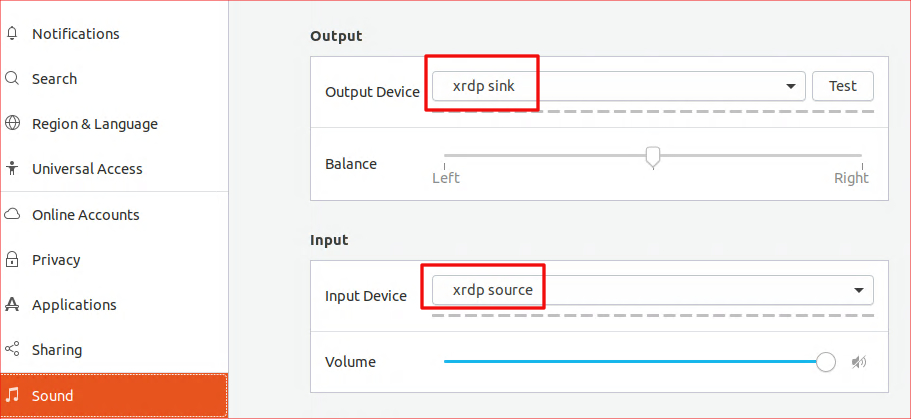
When the system comes back on line, connect again and use the Show Applications menu to open Settings. Go to the sound section and set the Output device to xrdp sink. Set the Input Device to xrdp source. That’s it. If everything went according to plan, your Ubuntu VM should be able to pass sound through to your Windows Host.
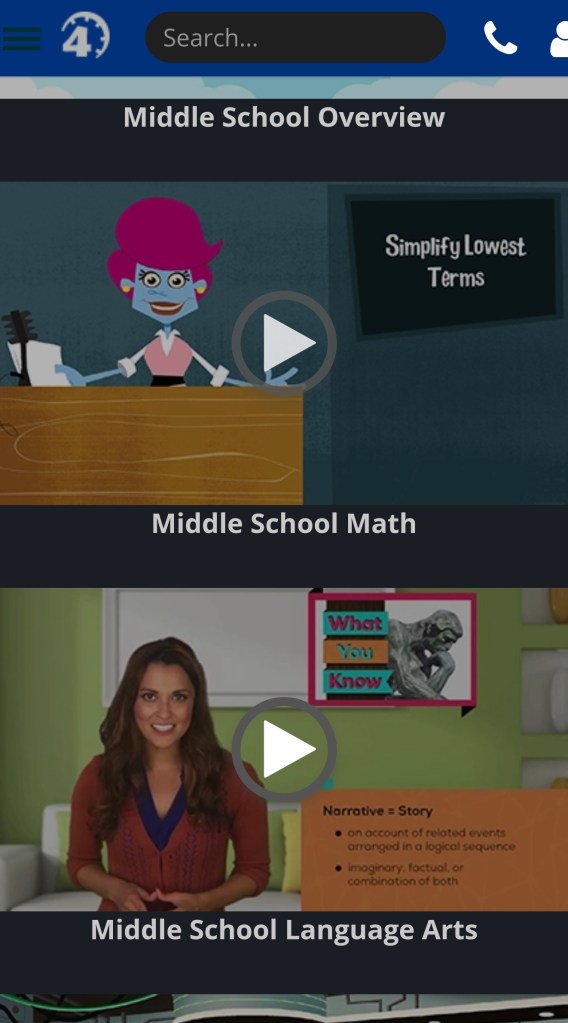
Schools around the world are closing early or stopping classes for an extended period of time due to the Covid-19 mitigation efforts. Many school children and their parents are used to having breaks during the summer. A few trips to the pool, some video games, a vacation, and the time is up. This time we’re looking down the barrel of a five month stretch depending on the source. That’s a lot of time to fill and a lot of lessons left uncompleted or forgotten. Read on to lean about some of the on-line resources available to keep your kids engaged.
BrainPOP is an extremely well produced educational platform based on short-form videos. The videos follow Tim and his robot friend Moby as they explore every subject under the sun. From basic grade school lessons to engineering, you will be amazed at the depth exhibited in this easy to use and free system.
Shmoop is complete on-line curriculum for every level of student. From Kindergarten through SAT/ACT prep, the system is designed to replace traditional school entirely. Both video and interactive lessons are featured in a, “School On-line” method of teaching. While the entire Shmoop solution is not free, the company is offering several of its resources for no cost during the crisis.
Schoolastic is offering daily projects to keep kids engaged with learning throughout the extended break. Lessons for K-9 are free and new exercises are being added weekly.
Time4Learningwas developed as an online program for homeschool families. The system features built-in lesson plans and automatic grading. Core subjects from kindergarten through twelth grade are covered. The lessons flow from one to another in a logical order and student achievements are automatically recorded. The system isn’t free, but there are plenty of demonstrations to help you decide if it is a good fit for your family.
If you’re lucky enough to own an Oculus Quest or Rift, you can find virtual trips to famous destinations all over the world in the Oculus TV App. Take a tour of the Pyramids or Cairo museum , visit the International Space Station, Dive the Great Barrier Reef, and more.
There are thousands of Podcasts from experts and Ivy league colleges that cover every subject under the sun. Some are broadcasts of actual classes. Others are discussions between multiple experts in any given field. Just browse the Educational section of your favorite Podcast app. Don’t forget, both Spotify and iTunes have Podcast support built-in.
Maybe you don’t need to take over teaching entirely? Lots of teachers are assigning plenty of homework for the duration of the crisis. What happens when your child needs help factoring polynomial prime numbers? Do you even remember what a prime number is? Lucky for you, you don’t need to there are plenty of homework helpers on-line these days. WolframAlpha, Microsoft Math Solver, and Virtual Nerd are just some of of the fantastic resources available.
People make the mistake of thinking that children (and adults) are happiest when they are free to do nothing. For most of us, that just isn’t the case, we lack the self-motivation to use our time creatively and end up spending all of it consuming other people’s work. Binge watching Netflix, YouTube, TV, pointlessly scrolling Facebook, Instagram, or TikTok are acts of consumption. If we don’t balance consumption with productivity we end up, well, unbalanced. Keep your children’s minds engaged by actively learning and producing, they’ll be much happier for it.