I’ve had my ASUS Dash FI5 3070-based laptop and my LG OLED TV for almost two years. In all that time, I have never managed to use them together. Anytime that I connect the laptop’s HDMI port to the TV and start any Direct X game, the computer reboots.
You read that right. The computer immediately reboots itself. There are no events logged in the event viewer, no pop-up errors, not even a sound, just a cold restart. I’ve flashed the BIOS and every piece of firmware. I have updated every driver and re-installed Windows. I’ve also taken the case off and re-seated everything. All to no avail.
If I connect the same laptop to my Samsung QLED TV, it works beautifully. When I carried my 3080Ti-based desktop in and hooked it up to the LG screen, the experience was fantastic. So the laptop and the TV worked separately. It didn’t seem to be a Nvidia bug either, both were using the same current Nvidia driver and application set.
Research online strongly suggested my problem could be caused by a low quality HDMI cable. I was already using an 8K HDMI certified cable from a reputable brand, but I went ahead and ordered several others to test. Not even a top-shelf, one-hundred dollar, super-cable, stopped the reboot. Here’s the link if you’re curious; https://www.bestbuy.com/site/audioquest-sky-5-4k-8k-10k-48gbps-hdmi-cable-blue-black/6428209.p?skuId=6428209.
Eventually, I gave up trying to use my laptop for gaming on the OLED screen. Until I ran across a little gadget I hoped might be the fix. A twenty dollar Thunderbolt to HDMI adapter that I picked up from Amazon completely solved the problem. Games start up at 4K, 120 FPS, HDR without issue.
There are several manufacturers making quite a few models of Thunderbolt to HDMI adapters. This is a link to the one I purchased: https://www.amazon.com/dp/B0B72B3V8L?psc=1&ref=ppx_yo2ov_dt_b_product_details. If you’re having a similar issue with your laptop connecting to a particular screen, perhaps a similar device might help? USB-C is not always Thunderbolt, but Thunderbolt can always use USB-C (I think). Both types of ports come in various versions, so do your research and good luck.
If you have a 1080 or newer Nvidia GPU (Graphics Card) in your Windows gaming PC, you can play your desktop’s games on almost any screen in the house that you can pair a controller to. Modern Nvidia graphics cards are designed to support streaming video games to the Nvidia Shield series of devices. Unlike typical remote desktop options, the Shield console protocol known as “Gamestream” offers high performance remote play of games over high-speed Wi-Fi.
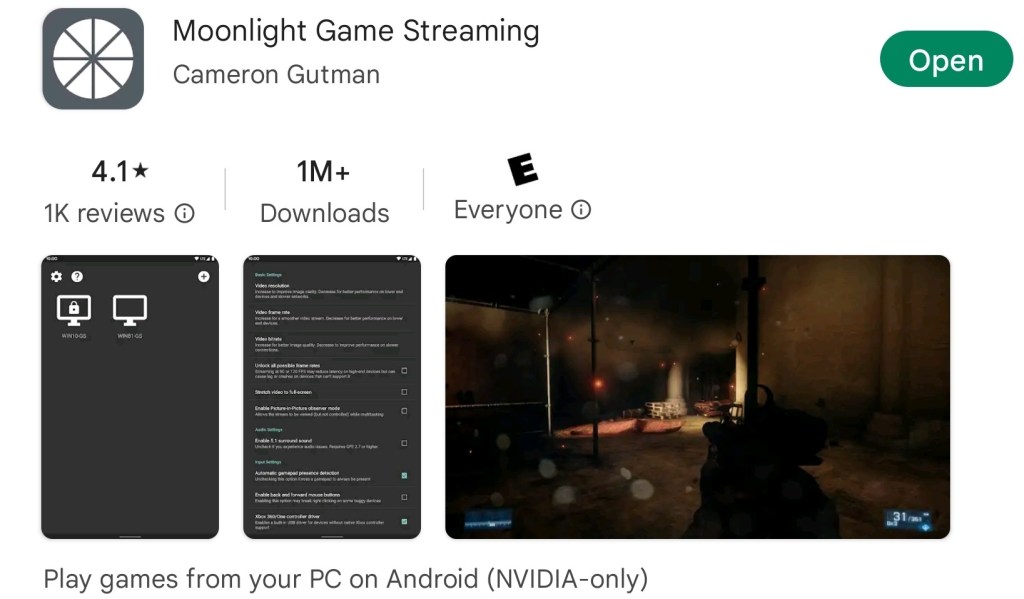
A group of developers have written a universal Gamestream client app named Moonlight. The free software will let you stream your desktop games to numerous tablets, phones, consoles, and computers. The latency is low enough that I am able to play on-line multiplayer games with my equipment. The performance you experience will vary widely depending on the host system specs, client device capabilities, and the network underpinning it all.
The NVIDIA GeForce Experience App has the streaming technology built in.
If you are considering a Moonlight / Gamestream setup, be aware that Nvidia has announced they are removing Gamestream from Shield devices. Not discontinuing, but actively removing. I haven’t seen an official answer on if the protocol will be removed from their GeForce Experience software on the PC.
Removing the streaming option from the GeForce Experience software would stop Moonlight from working. If that happens, or if your GPU is another brand, you can use software named Sunshine to host your stream. See their GitHub at https://github.com/LizardByte/Sunshine for the downloads and instructions. The difference between using Gamestream or Sunshine versus something like Steam Link is that the Gamestream options supports any game from any store, rather than just Steam.
To get started with the NVIDIA solution (easiest) you will need to download and install the newest version of GeForce Experience that matches your video card from Nvidia’s download site. I highly recommend reading though Moonlight’s excellent documentation and setup guide @ https://github.com/moonlight-stream/moonlight-docs/wiki/Setup-Guide. It will step you though the entire setup and device pairing process.
Look for the Moonlight app in your device’s store.
The Moonlight application for your device(s) should be available in it’s associated app store. If you have one of the rare devices that does not feature the app in its store, check the Moonlight download page at https://github.com/moonlight-stream/moonlight-qt#downloads.
Download, install, and run Moonlight’s Internet Hosting Software to automatically configure the Windows defender firewall on your gaming PC. The tool will also attempt configure your network’s firewall to allow Gamestream access to your computer from the Internet. For the Internet part to work, your Internet firewall must allow the UPNP protocol, or be running IPv6.
Warning: Some IT Experts consider UPNP to a be a security risk. To manually configure your network for Internet streaming allow the following network ports: TCP 47984, 47989, 48010 and UDP 47998, 47999, 48000, 48002, 48010 between the server and client devices. All of the network setup, including manual firewall setup tips are documented @ https://github.com/moonlight-stream/moonlight-docs/wiki/Setup-Guide#streaming-over-the-internet
If you have programable network equipment and are familiar with it, enable Multicast DNS on your network. It allows your network devices to communicate by name instead of IP addresses when you do not have a local DNS server. While you are in there, enable IGMP Snooping, it lets your switches forward packets to groups of devices more efficiently, which frees up those resources for other duties.
These settings are required for proper streaming if you have multiple access points in your Wi-Fi network.
In some cases, the activation of the rumble effect causes the client app to crash at the moment the buzz should be activated by the in-game action. I disable the rumble feature as a result. I also frequently disable HDR support. You can see the difference it makes in the graphics, but it also causes instability (dropped frames and lagged controls) on my setup.
If you are experiencing issues, try adjusting the client application settings to compensate. Generally speaking, you can improve stability by lowering the resource demands of the software. Done by turning off toggles and lowering numbers in the app’s graphics settings menu.
Adjust settings in the app for a balance between performance and appearance.
I frequently experience an issue with some on-line games in which the client abruptly returns to the home screen within a few minutes of starting a match. I am usually able to reselect the game from the Moonlight Menu and resume the same game session. I have not discovered the cause, or precise pattern of occurrence for this issue yet.
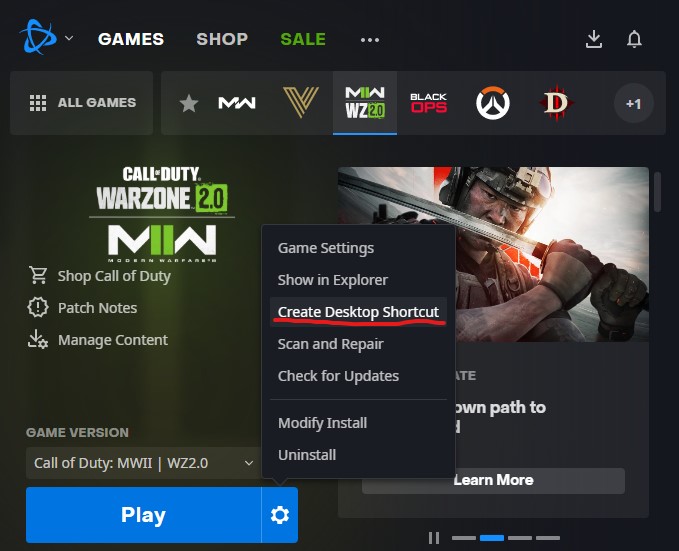
The process for adding games is well documented in the Moonlight setup guide linked to above. Experience has taught me to publish shortcuts created from the game’s launcher, rather than the game’s direct exe file. Multiplayer authentication and anti-cheat systems stay happy that way. In most of the launcher apps like Steam, Xbox, and EA Desktop you can create a shortcut for a game by right-clicking on it in the app’s library.
Use the target of game launcher shortcuts to add games for the best results.
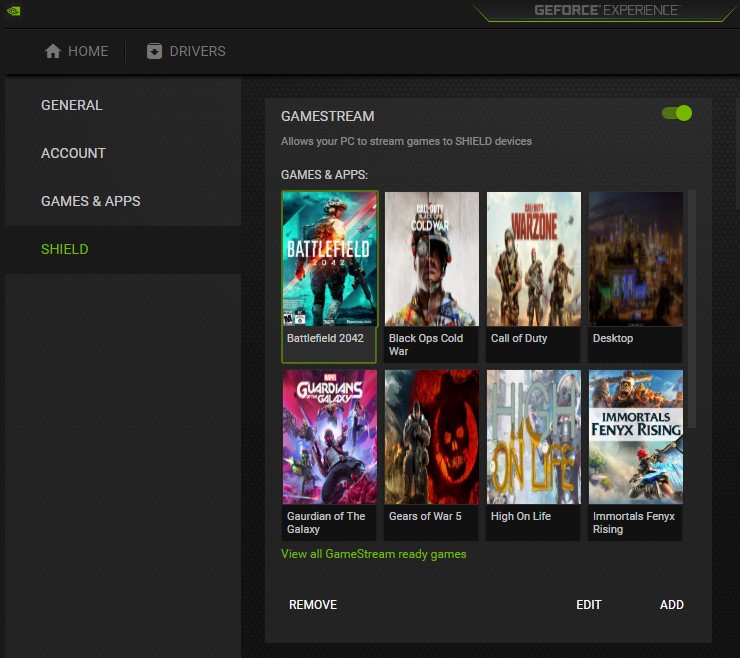
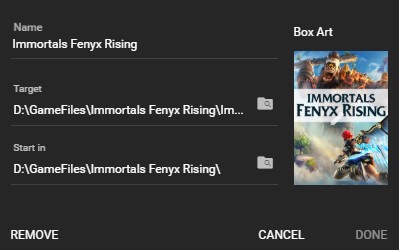
To keep the client game carousel looking clean, I use image search and my device’s screen clipping feature to grab a sample of each game’s cover art which I save as a .PNG. I put the images in a folder, each named for the corresponding game. Then on my PC, in the GeForce Experience App, I assign the appropriate image to each game by selecting the Edit Button under Settings -> Shield -> Games & Apps. Click the Box Art space for the game and browse to the folder I saved the box art snips in. While I am in this location, I edit the name to something short to prevent messy line-wrapping on my Moonlight device’s screen.
Use the edit option to clean up game titles and add box art.
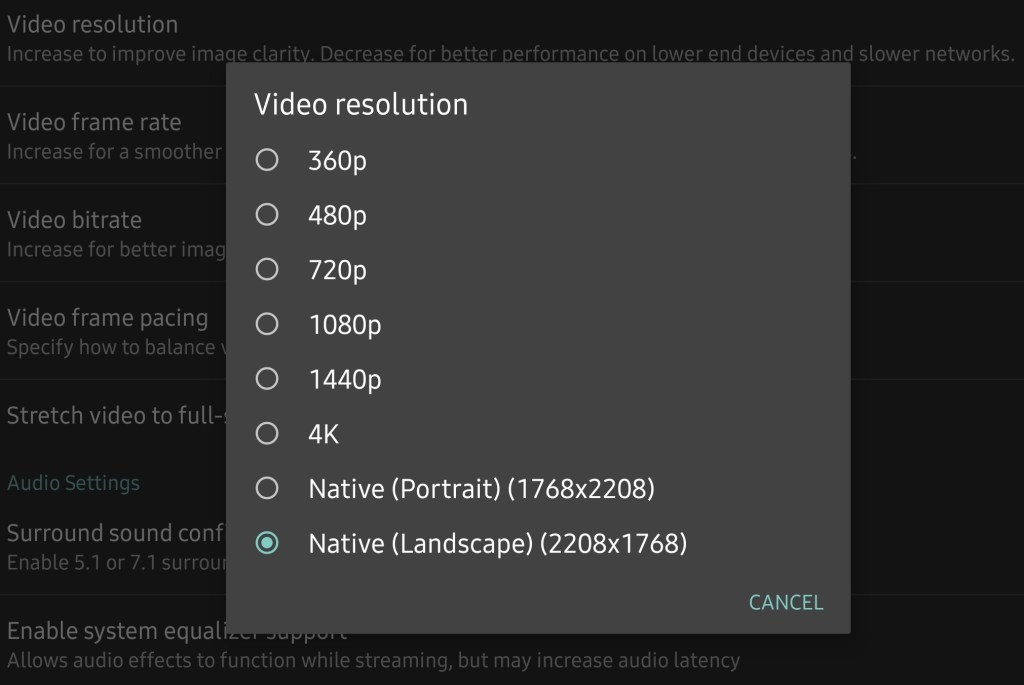
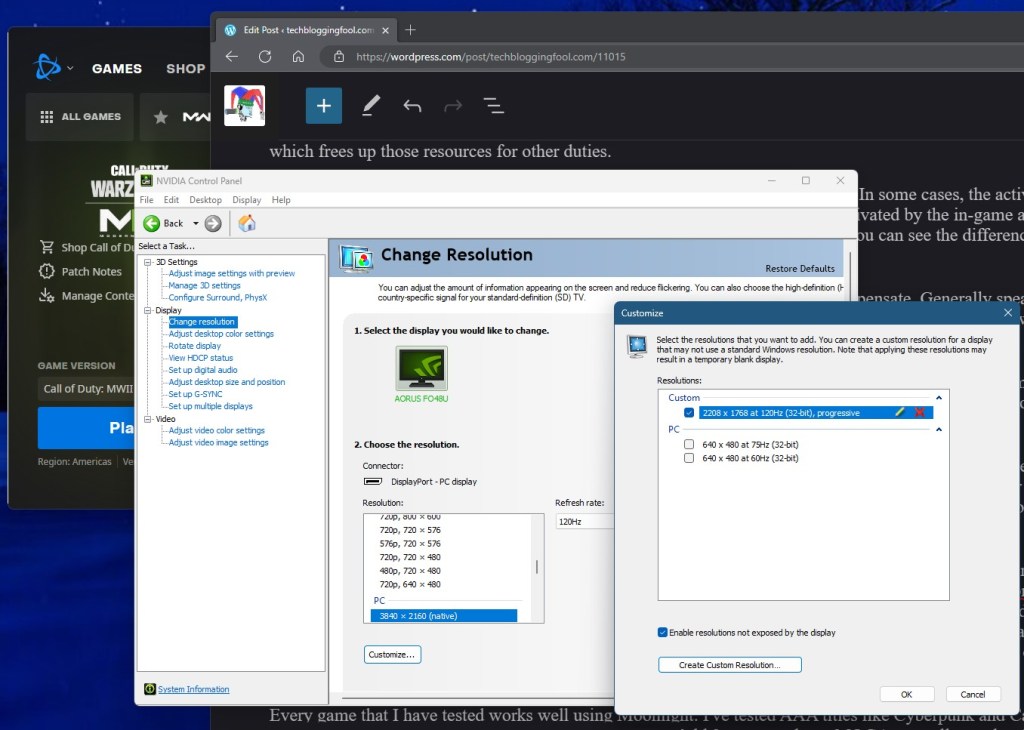
To use your devices native screen resolution in games you’ll need to create it on your desktop first. The Moonlight client app tells you as much when you enable the feature in its menus. To create a custom resolution, use the GeForce Control Panel. You should fully understand the risks to your monitor before proceeding and are doing so at your own risk.
TIP: You can use the NVIDIA Control Panel to create a custom resolution that matches the device you stream to.
Every game that I have tested so far works well using Moonlight. I’ve played AAA titles like Cyberpunk and Call of Duty, along with emulators like Dolphin. Gamepass PC games, Steam games, EA Desktop games, and even Ubisoft games, all work. You can play either with a controller, or with a mouse and keyboard connected to the client device. I find the freedom to play my games from any location in my home to be worth the trouble of getting it all working. It takes between one and four hours depending on your experience and the speed of your systems and connections, good luck.
If you want to get ahead of the download storm, check Steam. I was able to pre-download the game starting at 7:00 PM Central Time. I’m not able to launch it, but it is ready to go for tomorrow.
I’m not sure that I ever knew the Home/Family version of Microsoft 365 supported custom domain names. I was changing some settings in Outlook and ran into a notification. It was a warning that the ability to add custom domain name to your Priemium Microsoft account would expire on November 30th of 2023. Not one to miss out on features I am paying for, I decided to dig a little deeper. You can review the notification message yourself here. https://support.microsoft.com/en-us/office/changes-to-microsoft-365-email-features-and-storage-e888d746-61e5-49e3-9bd1-94b88e9be988
If you reading about this feature for the first time like I did, here’s what to know. If you have, or are willing to buy, a custom domain name from GoDaddy.com you can use it for email with your Microsoft 365 subscription. According to the official instructions, public DNS records for the domain must be hosted with GoDaddy.
I already had a domain name from GoDaddy and was able to use it without issue. The process was more complicated than it would have been if had I purchased a brand new domain name from GoDaddy through Outlook. I had to manipulate DNS records manually to make my domain work. It is my understanding that part of the process is automated if you purchase the name though Outlook.com.
Whether you already own a domain or are purchasing one, the setup starts with logging into what is commonly called OWA (Outlook Web Access) aka your Outlook.com account https://outlook.live.com will get you there.
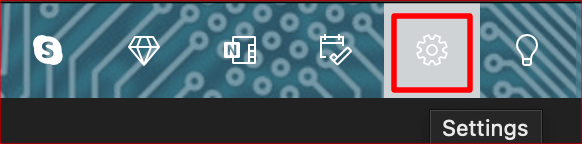
Click on the Gear icon (settings) in the upper right hand corner.
In the pane that opens click View all Outlook Settings at the bottom.
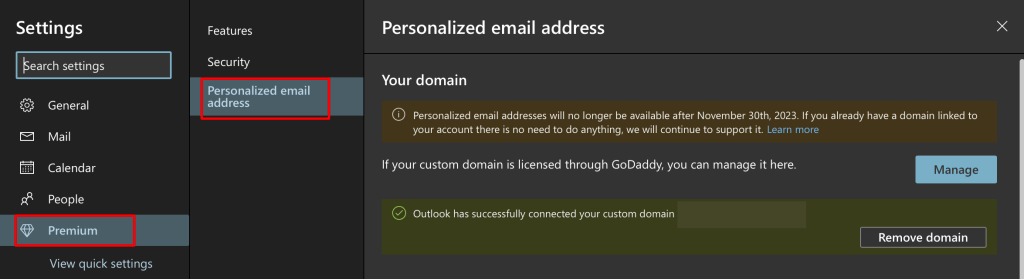
Now click Premium, then Personalized email address.
You can read the notification, use the Manage button to sign-in to your GoDaddy account, or set one up if you don’t already have it. Microsoft’s own documentation on the setup, questions, and troubleshooting is where you should turn for the rest of the configuration. They’ve made the process fairly simple, it took me about forty-five minutes to get my custom email addresses fully working on the Internet. If you complete the setup process before the deadline, your custom email address will not stop working.
I have always been a big fan of racing games. I started with the classics like Pole Position and Outrun and have been playing them ever since. I almost always have a racing game installed on my smartphone. There have been plenty of excellent options over the years. The Real Racing and Asphalt franchises have been some of my favorites.
Recently, I stumbled across Grid Autosport in the Google Play store. I had played a few of the Grid titles on my XBOX so I opted to give it a shot. The game was $10.00. It seemed to be a high price when comparing options in the store, but it has no micro transactions after the initial buy which I prefer. The $10.00 fee also includes texture, track, and car pack downloads that were available the first time I started the game.
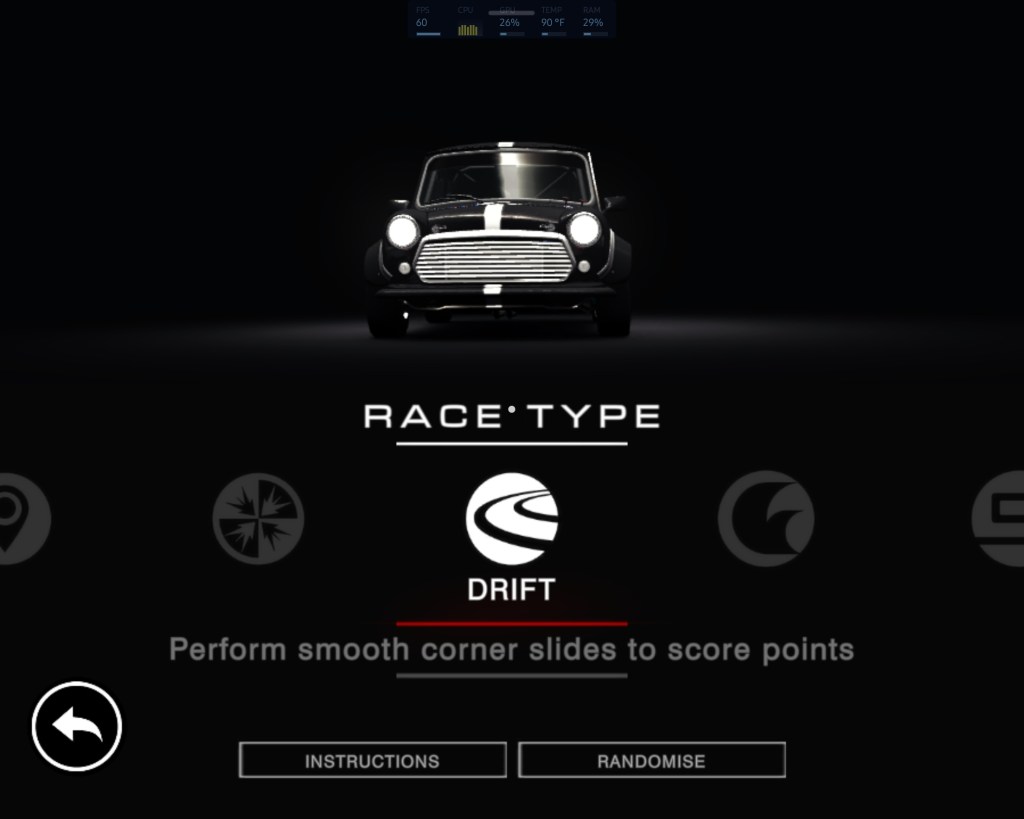
It turns out that ten bucks is a steal given how good Grid Autosport is. The game’s career mode follows the well established class based, earn your garage path, made famous by the likes of Gran Turismo and Forza. What helps set Grid Autosport apart is the number of racing types available beyond that traditional career mode. Everything from Drag racing to Demolition Derby and Drifting are available modes. I’ve had the game for weeks and haven’t managed to try them all yet. Sadly, there’s no multiplayer option.
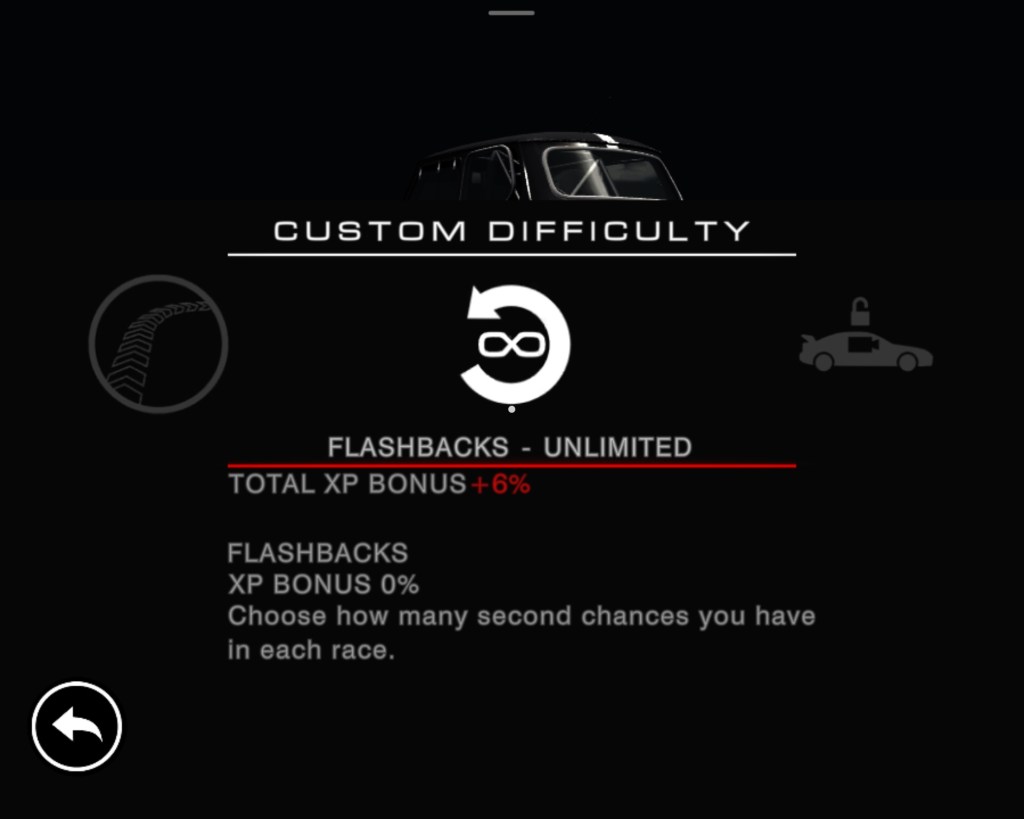
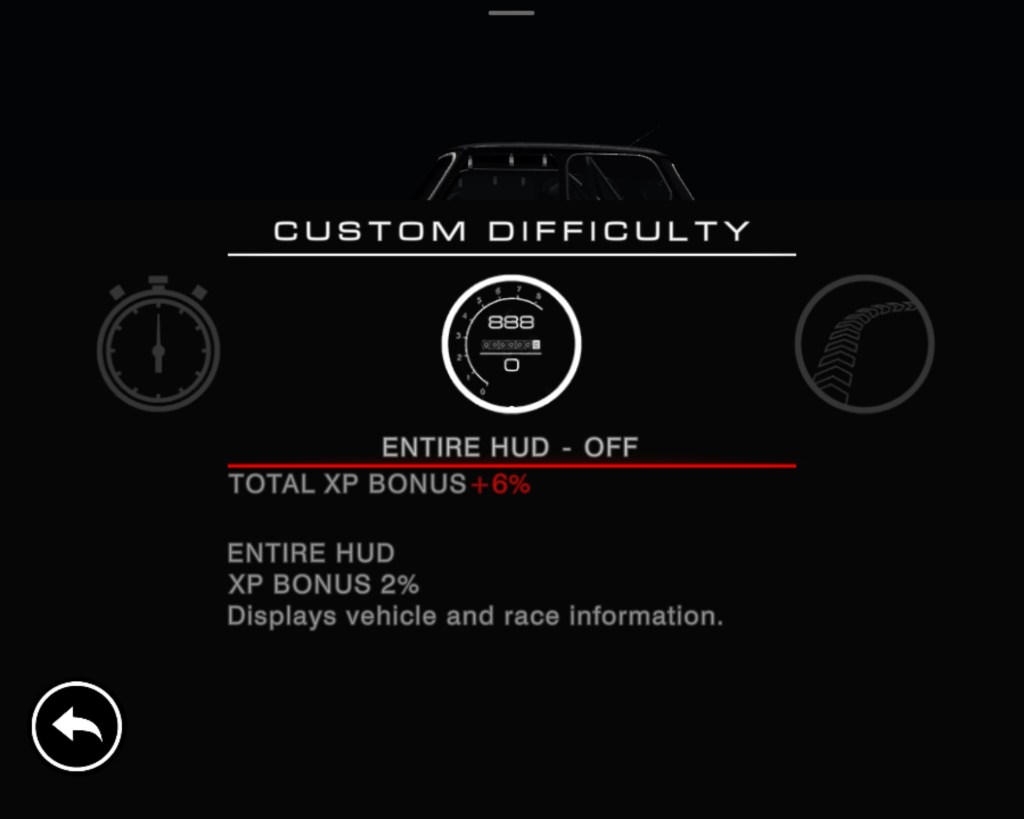
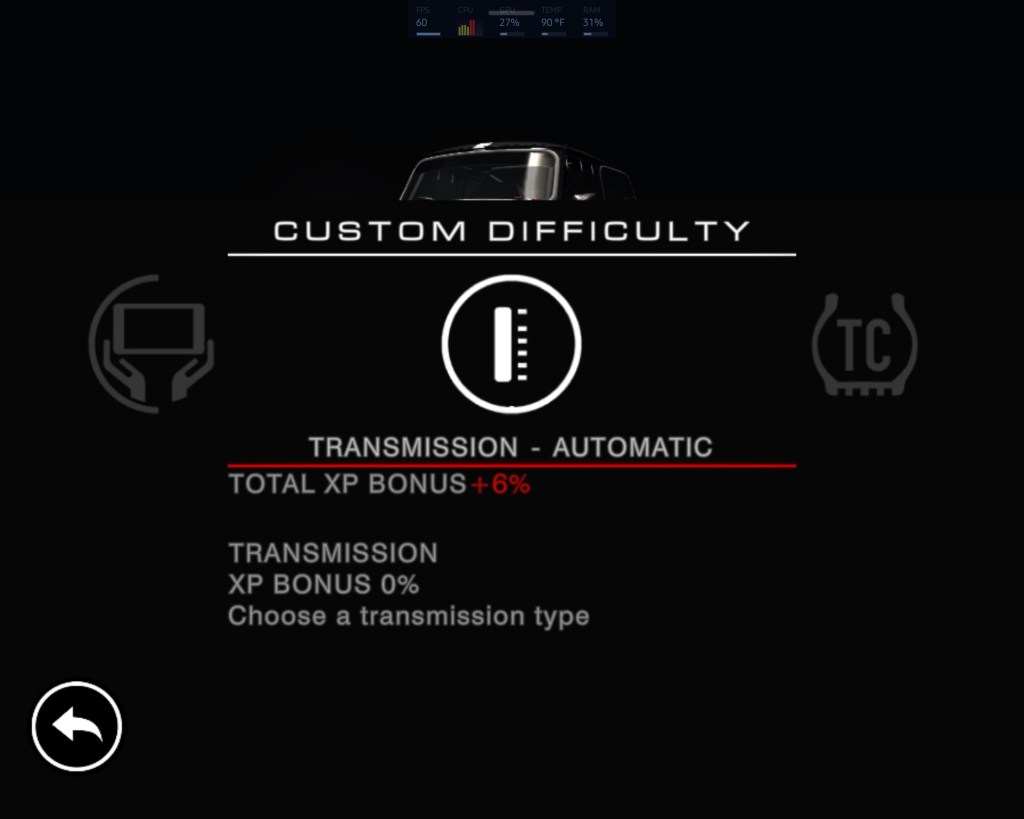
The difficulty options make it easy to tune for your style of driving and skill level. I like to aim for a challenge in which winning appears possible but not probable. There are options for disabling the hud and locking the camera to in-car modes along with turning ideal lines, braking assist, traction control, and others. Besides adjusting how much the game is helping your driving, the AI competition also has its own difficulty levels. When tuning the driving experience, you are increasing or decreasing the XP bonus received for completing the run.
The tilt controls, vibration, and unique touchscreen-sliding throttle combine to deliver a satisfactory level of car control immersion. Twisting the phone in space like a wheel feels more like driving than using a gamepad to me, but the later is fully supported via Bluetooth or cable. The motion controls in Grid are exceptionally accurate, drifting around corners at high-speed feels risky but can be accomplished. The haptic feed back manages to provide some sense of road feel, especially when you encroach on the edge of the track or while traversing surfaces like cobblestone.
The graphics are good enough to justify hooking my phone up to a bigger screen and playing with a controller. I’ve used Android’s wireless streaming option to play on my living-room screen more than once. The experience is on-par with an Nintendo-Switch running in docked mode. On my Galaxy Fold 3, turning the graphics to their maximum, drops my FPS from sixty to thirty. I tend to run the game on the mid-settings because of this. Smooth is better than pretty and the expression of speed is more defined, for me.
There are 100 realistic tracks based on real-world venues and locations. The scenery and environments are exceptional in all the ones I have raced on so far. There are a wide variety of track surfaces and weather elements. NPC fans fill the stadiums and city streets to cheer you on, mountains are majestic, and coast lines glimmer. Sun glare, grime on the windshield, and other touches lend themselves to the realistic environmental experiences the developers were clearly aiming for.
There are also 100 cars in Grid. Multiple driving disciplines like touring, super-car, or open wheeled mean there’s always something new to get into. There’s even a class of racing UTEs, the El Camino style of truck-car you hardly see anymore. The detail in each machine’s exterior is exquisite. I chose to download the optional HD texture pack. The sheetmetal and paint jobs are photo-realistic after you install the add-on. Vehicle interiors are accurately scaled but otherwise lackluster.
The physics feel great. Cornering speeds match my expectations for the type of car being slung around the track. Collisions with other drivers have appropriate levels of mass reaction and damage. The driving impact of that damage is another option that can be toggled on and off in the menus. I keep one driver profile configured for the type of “racing” that takes focus and a light touch to avoid over-driving and sliding into the grass. I have another for casual play where traction control and steering assist make distracted/Netflix driving easier.
As you can tell, I’ve been impressed by Grid Autosport. It would be a great racing game on any platform. The fact that it is always in my pocket is icing on the cake. I often find myself playing it while watching Netflix, or while waiting for things like my turn at the barber-shop.
There are plenty of online guides that explain how to configure Exchange Online to allow external mail forwarding. This isn’t another one, try Microsoft’s own guide if that is what you are looking for. We’re talking about a situation I recently encountered in which mail forwarding was correctly configured (via the linked doc), but still not working.
The problem turned out to be a guest account that contained an email address that matched the forwarding target’s address. I deleted the guest account and replaced it with a mail contact. Everything worked normally afterward.
You may be wondering why I didn’t just configure forwarding to point at the guest account instead of deleting it. That is because there’s no option to do so as far as I can tell. Exchange Online’s people picker does not seem to recognize guest accounts.
The existence of the guest account prevented me from creating a mail contact because another Azure AD object contained the same address. You can’t have multiple objects with the same SMTP address in the same tenant space. Except when you manually enter and SMTP address in the forwarding target of a mailbox?
I recently started using a MacBook Air as my primary laptop. In my line of work, I interact with Microsoft 365 and Azure AD through PowerShell on a regular basis. Modern authentication protocols require that the management modules be installed locally. I found the process of getting the MS365 PowerShell modules running on my MacBook Air to be a little more complicated than doing the same on Windows, but it wasn’t difficult.
The first step is to install PowerShell itself. The direct method is simple, but you can also use Brew after we install it for OpenSSL in the next step. For the direct route, download the latest (not pre-release) edition as a package from GitHub at https://github.com/PowerShell/PowerShell/releases Once the file finishes downloading, right click on it and chose “Open With” then pick the installer. Follow the on-screen prompts to complete the installation.
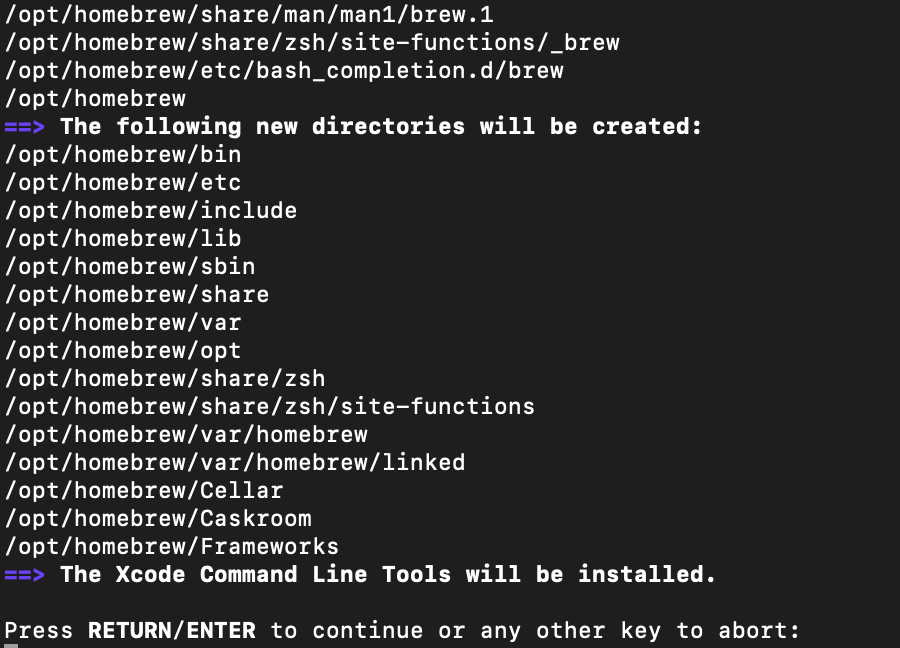
The admin modules we want to run require OpenSSL. It is used to facilitate PowerShell remoting. Getting it installed is the next step. The easiest method to install OpenSSL is to use the Homebrew package manager. Follow the instructions on their web site and run the newest version of the installation script in the Terminal app on your MacBook. You can use Brew to install PowerShell as well if you like (Bing/Google it).
Follow the scripts prompts to complete the Brew install, be sure to follow the steps at the end to add Brew to your path.
Once you have Brew installed run the following commands (one line at a time, enter after each) to update Brew, install OpenSSL, and add it to your path.
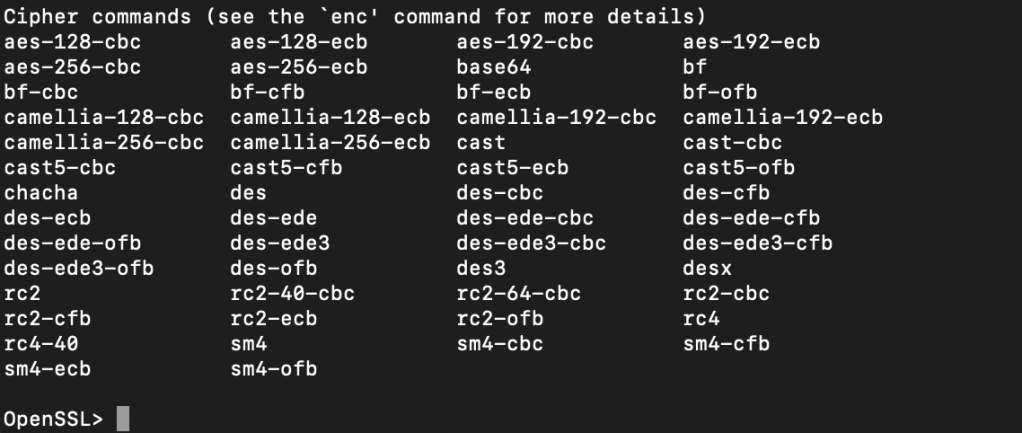
To test the results type “OpenSSL” in the terminal and it should open to a OpenSSL> prompt. Type Help and press enter at that prompt to see a list of OpenSSL commands. Type exit and press enter to leave the OpenSSL session and return to your user prompt.
Now we can install the Web Services for Management (PSWSMan) modules for PowerShell. Again this is to enable PowerShell remoting so that our MacBook can exchange commands with the remote Exchange Online server(s). Open the Terminal and run the following commands, pressing enter after each line. Ignore the REM lines (being with #).
sudo pwsh
#Enter your password when prompted
Install-Module -Name PSWSMan
Exit
sudo pwsh
#Enter your password when prompted
Install-WSMan
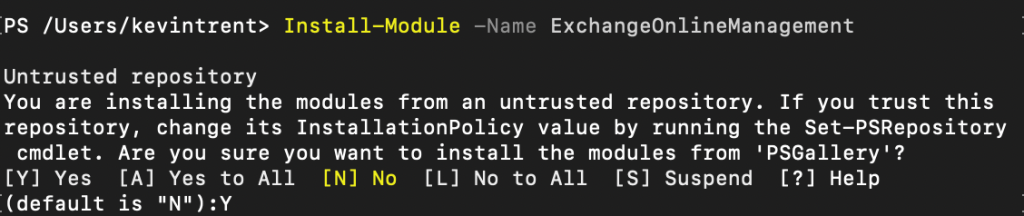
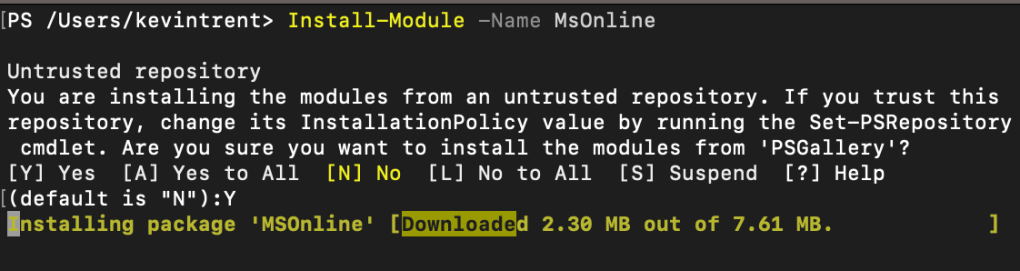
Now we’re ready to install the admin modules themselves. In the same PowerShell console run the line below. Hit Y when prompted.
Install-Module -Name ExchangeOnlineManagement
You can verify that it, or any of the other modules installed with an easy one-liner. Run after each install, change the name to match each time. The command will list information like the version and path so you know it is installed and available.
To manage, report on, and incorporate Azure AD objects in your other code, install the MsOnline module with the line below. Again, you’ll need to enter Y when prompted.
Next up is SharePoint. I admit that I don’t use it for much, but it does come in handy for migrations. You know the drill, the line is below.
There are a few more modules available but these are the ones I use enough to warrant pre-installing them. You see how easy it is to add more on-demand. Any that you install will need to be updated to function optimally, that process is out scope for this post but generally the command Upgrade-Module -Name ***** does the job. For information about maintenance and tips on how to use the modules you’ve just installed, see the source documents from the vendors below.
MacBooks are gaining lots of ground in business deployments. Now that mainstream workers are using them as their only computer, providing support requires a deeper understanding of Apple’s products. I need to install obscure software, control them en masse, connect them to various peripheral devices, and troubleshoot advanced issues quickly and effciently.
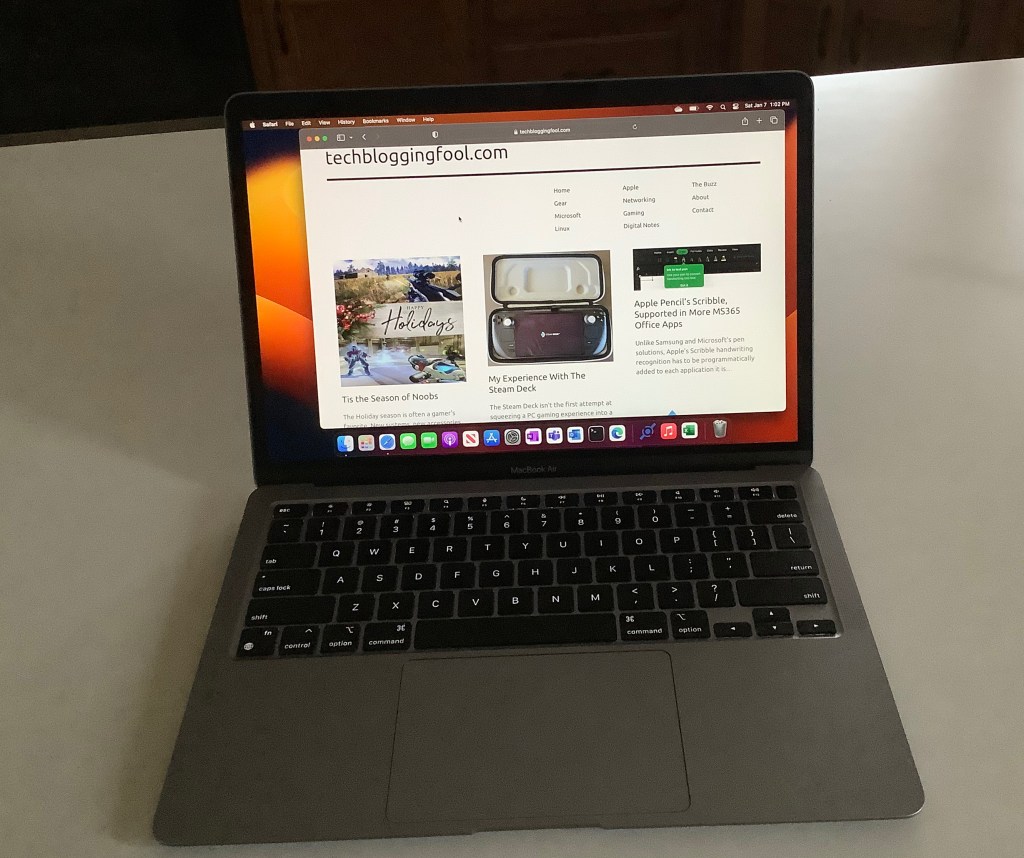
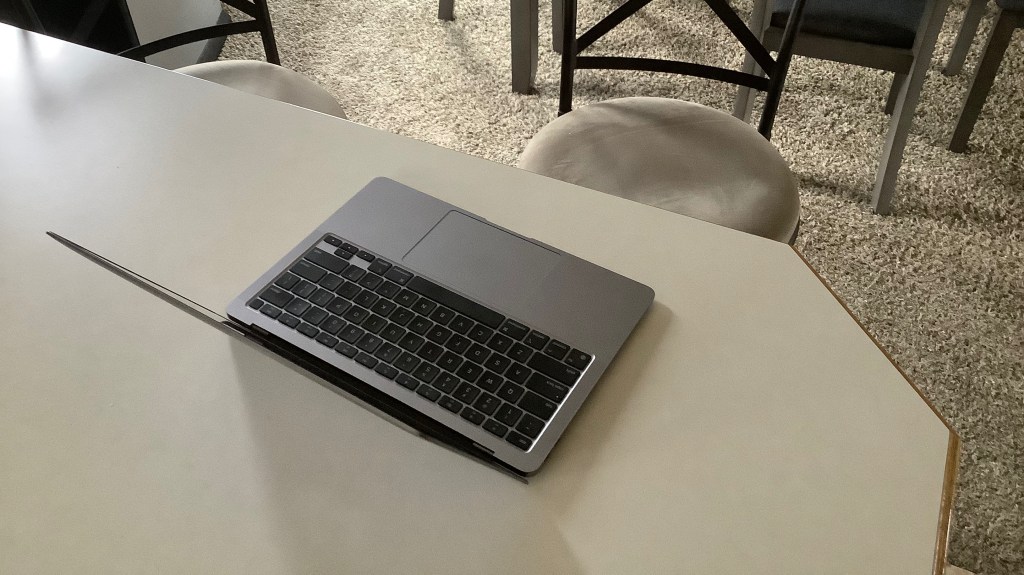
In my opinion, there’s no better way to learn a system, than by using it everyday. I decided to take advantage of the holiday shopping season to purchase a M1 MacBook Air from BestBuy. At $799 it was the least expensive way to get an Apple silicon based computer. $200 off the normal bill.
I’ve had the unit for a few weeks. I am thoroughly impressed. The fit and finish of the hardware is fantastic and the operating system has facilitated easy adoption. I purchased it intending to use it primarily on my lap. The size and weight of the Air make it ideal for that role.
The retina screen looks just as phenomenal on my new laptop as it is does on an iPhone. Bright, clear, and crisp are words that come to mind. The text is so razor sharp that it seems to defy the abilities of a screen with these specs. It almost appears to float above the background of this post as I type.
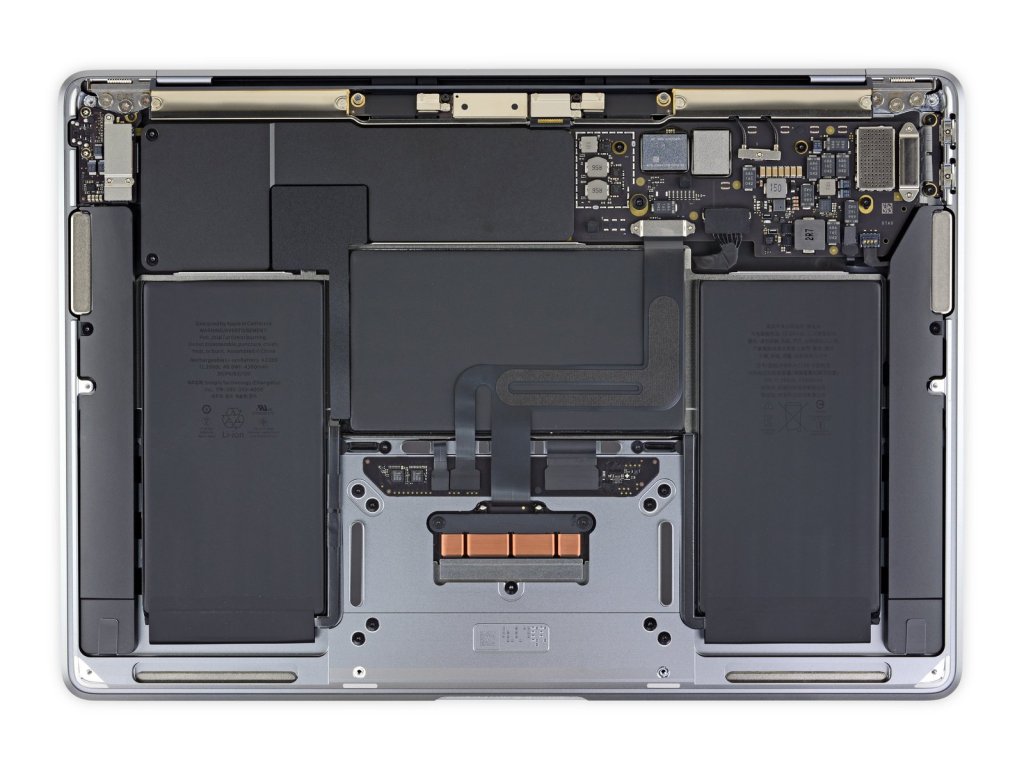
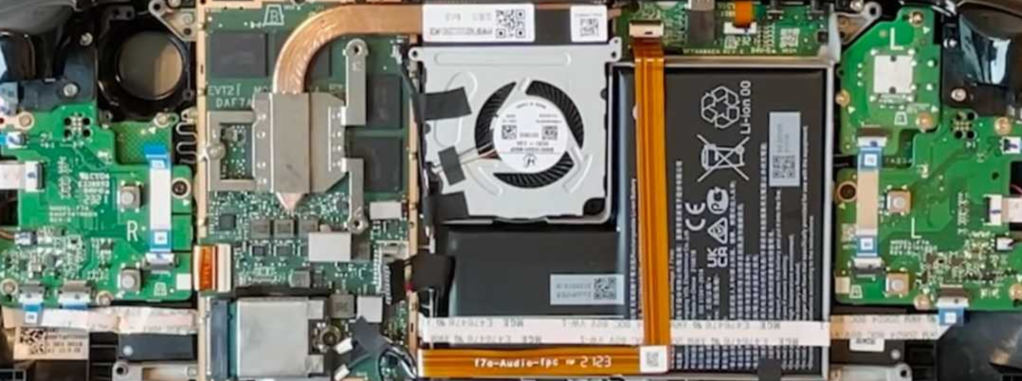
The laptop is totally silent. There are no cooling fans in an M1 Air. I cannot over exaggerate how amazing of a feat this really is. Previous fan-less options traded performance for silence. The Air doesn’t make similar concessions, it runs at impressive speed without overheating.
The battery life is astonishing. I have only charged up twice in the last 8 days and I’ve been using it pretty hard. I’m half convinced there’s some type of Sci-Fi space generator hidden inside. There aren’t many systems that come close to matching the 14 plus hours of runtime that the M1 air is capable of.
Thanks to iFixit.com we can see the internal design is as fantastic as the outside, there isn’t a cooling fan in sight.
Switching between platforms has never been easier, there’s no technical skill involved. Most of it comes down to knowing where your stuff is. All of my data is in the cloud and remains fully usable by all of my computers. I’ve just added another one to the collection, lol. The most tedious task was having to look up a ton of usernames and passwords.
It took me about four hours to get the laptop configured to be my main computer which is pretty average for setting up one of my systems. The most difficult install was the driver/control software for my Logitech MX Anywhere 2S mouse. It took a surprising amount of effort to get my forward and back buttons working properly. I got there eventually, but I’m still not exactly sure how.
My work life requires living in Microsoft’s world no matter whose hardware I’m riding on. To that end, installing the Edge browser was a good move. Microsoft Office and Onedrive were next. I also installed Visual Studio Code and the PowerShell extension for it. All of which already had Apple Silicon compatible editions ready to go.
I was able to easily find the apps, or equivalents for all of the software that I use. All but one program worked natively with the M1’s ARM based architecture. Rosetta mark 2 installed automatically when the app that didn’t required translation from the Intel Mac to the Apple Mac. The Rosetta utility worked perfectly for it.
Microsoft and Other Vendors make it easy to work from a MacBook
Tip: I noticed that some of the software packages would only install if I right-clicked on them and used the Open With option to start the installer.
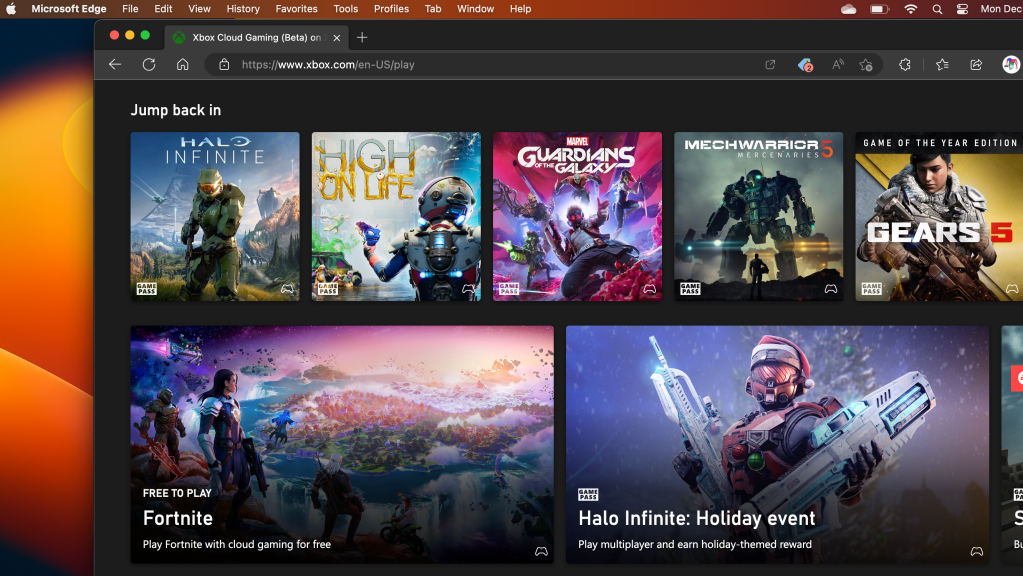
Apple’s computers are generally not considered gaming machines. So, I was pleasantly surprised at the number of familiar titles I found in Apple’s on-line store. Most iPad software will also install and run on the M1 and M2 MacBooks, and that includes some games.
I used the “Install App” feature of Microsoft’s Edge browser to “install” my GamePass Ultimate Subscription as an app. Saving my creds and creating a shortcut makes starting up a game a seamless experience. I also found Steam Link in the App Store which let me stream some of my favorites from my Gaming PC.
Xbox GamePass Ultimate is My Favorite Subscription Service
I expected the learning curve to be steepest while configuring the operating system and software, but that isn’t what threw me for a loop. The adoption challenges have come from the little things. A good example; screen snipping is built-in to both operating systems but activated with a slightly different set of key presses in each.
One of the most troublesome changes has been the lack of interoperability between the new laptop and my phone. I did not realize how fantastic Windows Phone Link really is, or how much I used it until it was no longer available. I know that if I swap to an iPhone I could get the integration features back.
Should my computer manufacturer choose my phone for me? I’m not saying it will never happen but, Apple doesn’t make a mobile with an expandable screen. I did setup a 5th gen iPad mini to experience the tight integration Apple is famous for. I really like the sidecar function.
I have enjoyed my re-introduction to Apple computers. The MacBook Air is perfect for working on the couch and taking on the go. It makes me wonder what the M2 MacBook Pro must be capable of….
The Holiday season is often a gamer’s favorite. New systems, new accessories, and new games are given and received all over the world. Depending on where you live, the weather is voting against your venturing outside, and there’s a good chance that you are off work for at least one extra day.
Many an online community got an infusion of fresh players over the last few days. Are you a gracious welcoming committee, or do you rain destruction on the fields of innocents?
If you are an established player, try to keep in mind what it was like to get started. Maybe don’t go full “pro mode” in the casual queues. Or at least not in every match. Your beloved game will fade to black if new players are unable to gain a foothold and feel like they are progressing.
If you are one of the beginners, brace for repeaded loss. It is a normal part of your initiation. Veterans have memorized the maps, ranked up their weapons, and have full armor. Grinding for all those hours has honed their skills to a razor’s edge. You will be an easy target until you rank up.
You can minimize the noob phase with study. I start with the single-player campaign to learn the ropes. Some story modes reward you with XP to boost your stats online. Most will run you through the various offensive and defensive tools along with the general gameplay scenarios. Many titles have a test range, which also helps.
If your new game supports spectating, it can also be a shortcut to getting up to speed. Watching on Youtube and Twitch are good ways to get an edge. For some of the more popular games, professionally led lessons are available.
I often find that the experienced players are less aggressive in their style of play. Preferring to wait for group pushes rather than rushing in alone is a trait often observed in veteran players. Knowing when to cut and run from a one-on-one engagement rather than pursuing is another.
There are often weapon and armor sets that are advantageous for people who are just getting started. In class-based titles, playing the medic can be a fast way to gain XP and to learn the nuance of team play. Playing your role can be key to gaining rank and moving up the leaderboards. Snipers are typically backline suppression, assault players should be mixing it up in the middle ground, and shot guns are good in CQB.
The Steam Deck isn’t the first attempt at squeezing a PC gaming experience into a small form factor. There have been gaming oriented laptops since the beginning. Other companies have prototyped and released handheld gaming computers in small batches over the years.Valve’s Steam Deck is considered to be the first attempt at a triple-A handheld gaming PC.
The custom designed AMD APU (Accelerated Processing Unit – CPU/GPU combo chip) is the proverbial bat that knocks the performance ball out of the park. It’s capable of 1.6 TFLOPS of processing throughput. To put that in perspective, an Xbox One S hits about 1.4 TFLOPS and a Switch struggles to make 1.0 TFLOPS.
TFLOPS is an acronym for a Billion Floating Point Operation Per Second and is a measurement that can provide a general idea of a system’s potential performance. Given that an Xbox One S is capable of playing modern titles like the new Modern Warfare 2, albeit on very low settings and slower frame rates, you can get a general idea of how powerful the Deck is.
Valve Supports Self-Repair of the Steam Deck.
Getting games and services running on the diminutive computer can be tricky. The Steam Deck’s operating system is a customized distribution of Linux. Games that are certified by Steam to run on the Deck are simple installations from the store, not unlike your phone. Everything else requires knowing your way around a computer. This is not vastly different than the knowledge usually needed for PC gaming anyway, but may be unexpected for those coming to the device from a console only experience.
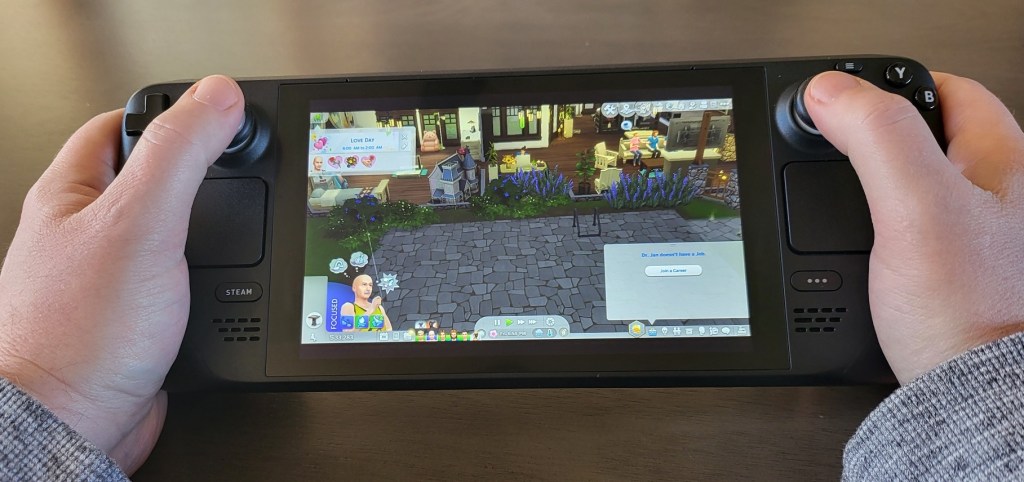
My partner wanted to run The SIMS 4 on her Steam Deck. She had purchased the expansive game and most of the add-ons from the EA store well before the Steam Deck ever existed. The SIMS 4 and its DLC packages are more expensive than the Steam Deck itself. Purchasing all of it again from the Steam store was not an option for us. Getting the game to run from the EA Desktop launcher involved following several complicated videos and written tutorials and multiple attempts.
The project was extensive and required knowledge beyond the average computer user’s. I personally enjoyed the process but many people may find it frustrating. There are plenty of online guides available and I like to feel that I have a good idea of what I’m doing. However, anytime you enter SUDO level BASH commands that you don’t fully understand, you are accepting risk to your system and to the identities registered on it.
The handheld is marketed as a gaming PC, not a Steam console. Yet, stepping outside of the curated experience provided by Steam is often met with a steep learning curve. The built-in Proton solution for playing Windows games on Linux works well, once you get to know the ins and outs. For example; learning to create shortcuts to launchers rather than directly to games was a trial and error adventure, all by itself.
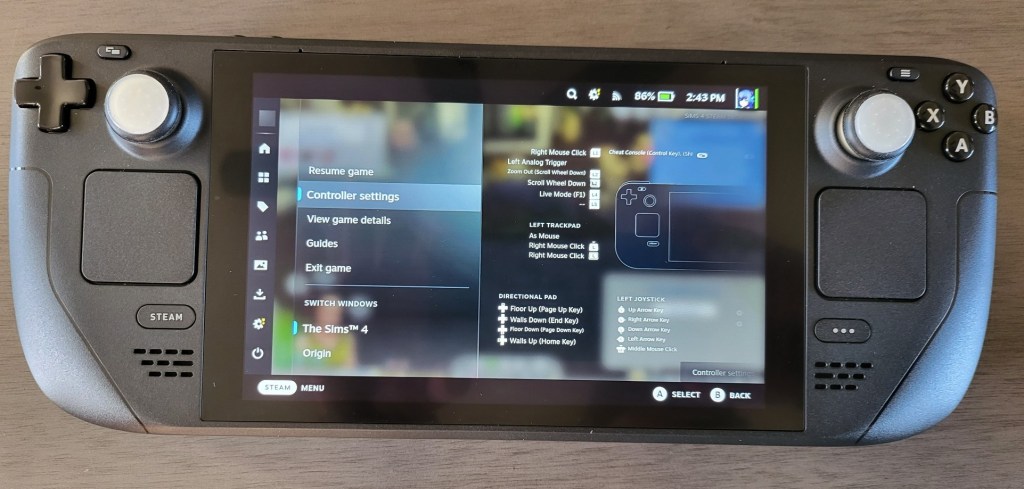
The operating system is dual sided, not unlike Windows 8’s ill-received desktop and tablet modes. The “Game Mode” boots into the Steam store’s Big Picture mode. It looks and works like a console for the most part. The desktop mode of the Steam Deck gives you full access to the Linux operating system and this is where you’ll do most of the work to get the non-steam store software working. Adding Office software, a Remote Desktop solution, or other non-gaming software is also an option on the desktop side of the system.
Desktop Mode is more complicated than the default Game mode.
Installation difficulties aside, The SIMS 4 plays really well. The controls are better than those on the Xbox edition of them game. The dual thumbtack and dual touchpad design is simply genius. I’ve had great experiences with other “un-supported” games including emulators for the Xbox, Playstation, Nintendo, and Sega consoles. It seems that low settings, and 30 FPS is the average for intensely graphical games. Older titles and those with casual hardware requirements can hit 60 FPS.
There is still plenty of room for Valve to improve the design. The unit can get very warm during extended play sessions. The fans are loud, yes even the new one, and the battery life is short. As I alluded to before, the software’s learning curve can be challenging at times. The device seems to fragile and complicated for young children to enjoy unsupervised.
Those who like to tinker with technology and gaming, will almost certainly enjoy owning one. It runs standard PC hardware which means that it can be customized to no end. Everything from parts replacement to swapping out the operating system is possible. The usual fair of custom skins, cases, docks, and other accessories is available online. If you’re in the market for a portable gaming experience, the Steam Deck offers access to more games than other handheld systems and costs less than most gaming laptops. If you can tolerate the learning curve it makes a great alternative.
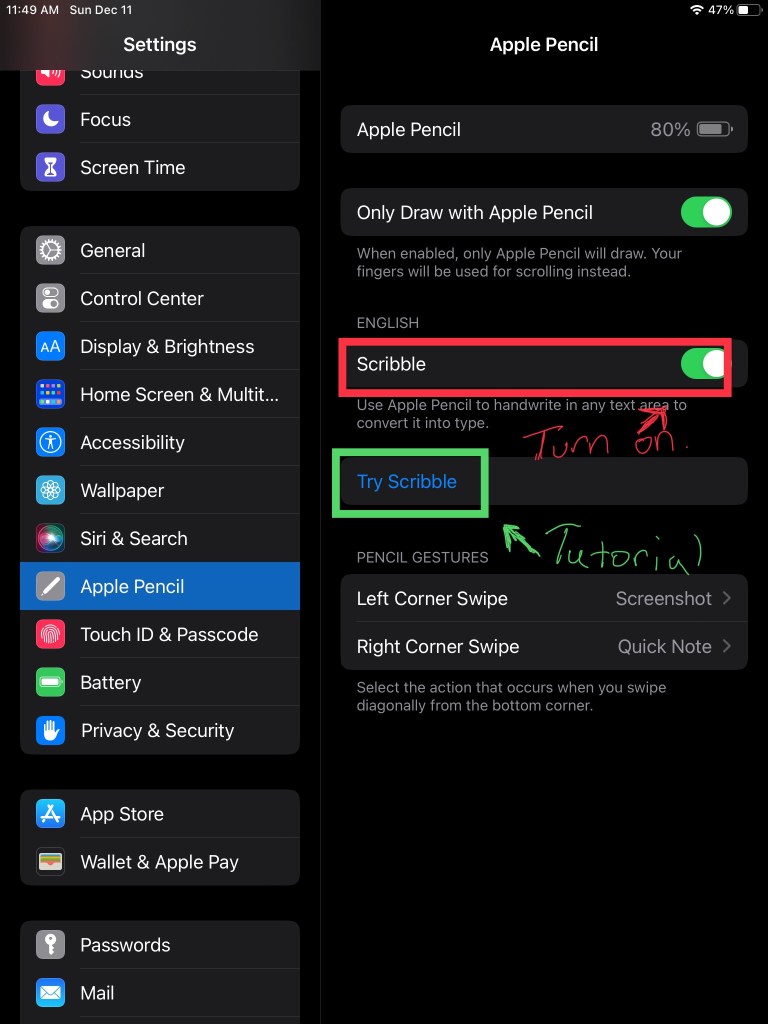
Unlike Samsung and Microsoft’s pen solutions, Apple’s Scribble handwriting recognition has to be programmatically added to each application it is used in. This has contributed to a slow rollout of the popular feature.
Microsoft Word mobile was the app I wanted it to work most in. I had given up checking whether or not it had been added a while back. Just out of necessity, I accessed the draw tab in Word on my iPad today and noticed a new icon in the pen carousel, it activates Scribble.
Activate Scribble in the Draw Menu
I checked Excel and it works the same way there. It is also available in PowerPoint, but it is missing from the OneNote app. Open the Draw tab from the file menu and select the Apple Pencil icon to enable Scribble, then you can use your Apple Pencil to write on the screen in any space that would normally take typed text as input.
For a better experience, keep your handwriting as straight as you can. Writing a little larger than you are used to also helps. Print will probably be the most accurate, but Scribble can understand cursive and the combo I seem to write in most often.
If it doesn’t work with your Apple Pencil, make sure that you have the latests software updates installed. Check in settings to be sure the feature is enabled. There’s also a tutorial wizard that teaches you how to use Scribble in the settings app.
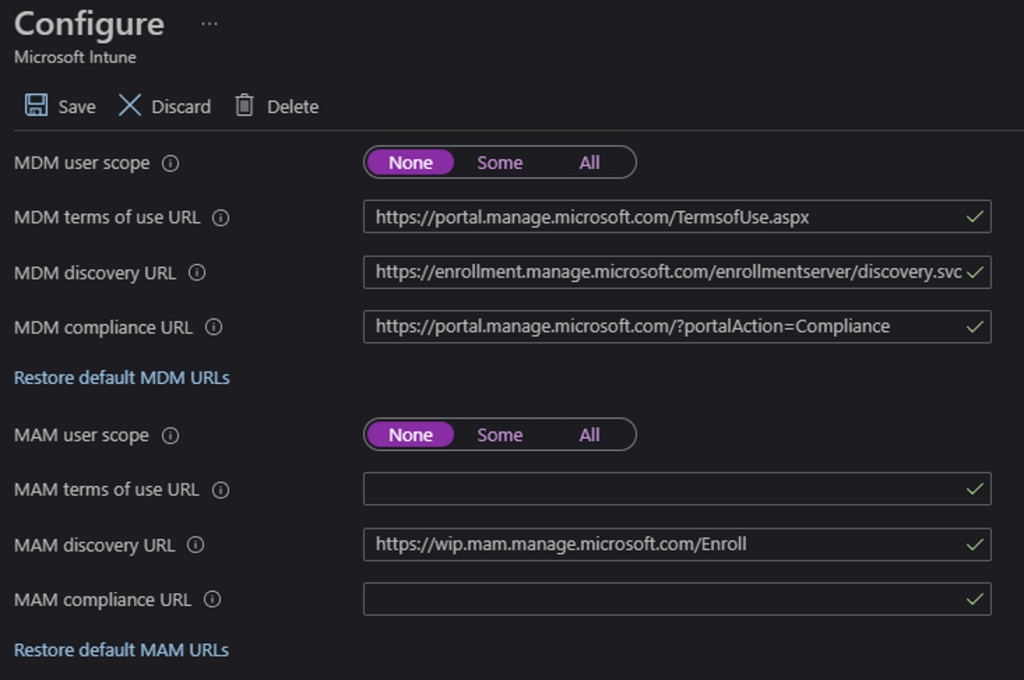
Recently I encountered an error while trying to join a brand-new laptop to an Azure AD domain. Generally, the process is straight forward. Open Settings, go to Accounts, Add A Work or School account and choose the option to Join this Computer to Azure Active Directory.
The error (screenshot below) was “Invalid_Client” which made no sense. How could a Windows Pro laptop be an invalid client for Azure AD? Why was the error mentioning MDM? We didn’t enable MDM. After some research and testing, the problem was traced down to the Intune MDM registration URLs being populated.
The clue that points to the cause is the top paragraph in the error message rather than the error itself.
I am still not sure how the registration URLs became activated. It is possible that another administrator enabled the feature, but I suspect it was done by Microsoft. Probably the result of some mass action script that hit some customers it was not supposed to. The Endpoint Manager and Intune blades aren’t visible in your admin center if you haven’t subscribed to Intune, which makes discovering this setting more difficult.
Login to your Azure AD portal and go to this URL: https://portal.azure.com/#blade/Microsoft_AAD_IAM/ActiveDirectoryMenuBlade/Mobility select Intune from the menu. Then set both control options to None and click Save. You’ll need to wait 15 – 30 minutes for the change to take effect after which you should be able to join systems to your Azure Active Directory again.
These URLS work like Exchange Autodiscover and allow new systems to enroll in MDM automatically.
I traded in my beloved Note 20+ for the Galaxy Z Fold 3 a little over a year ago. I had some concerns about the durability and questioned the price to value ratio. I also wondered how annoying not having onboard storage for the stylus would be over time.
Let’s start with the cost. Prior to the Fold 3, I was prone to using a PC (laptop), a mid-sized tablet (Surface Go or iPad), and my phone. The tablet device is no longer part of my daily gear. For me, the Fold’s utility replaces a separate chair/home device.
I don’t use a standalone tablet anymore
Against my expectations, this thing has proven to be tough as nails. A few weeks ago mine fell from a server rack, open-face, onto bare concrete. The drop was around four feet, it hit so hard that it bounced. My heart skipped a beat and the people in the room with me audibly gasped. I was sure I would turn it over and find total destruction. There wasn’t a scratch on it.
It’s lives in my pocket, gets tossed on to desks, and has been dropped on various surfaces, but looks like new. The hinge gets opened and closed countless times everyday. I’ve written miles worth of strokes with the S-Pen. All the marks wipe off and the screen shows no signs of wear. The only issue I’ve had to address is replacing the factory installed screen protectors.
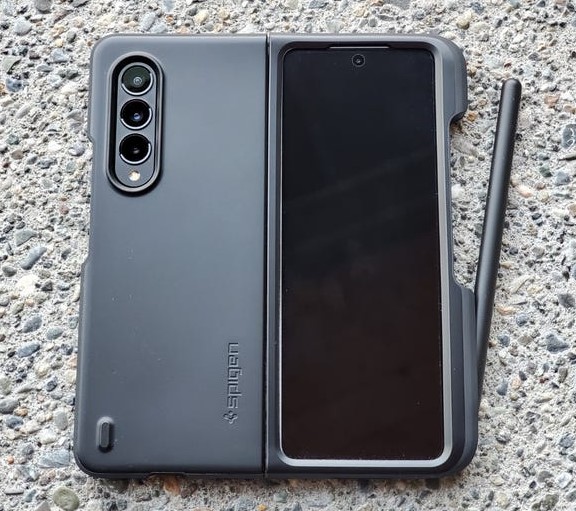
Part of the durability is no doubt due to the Spigen Thin Fit P case that it lives in. Which also happens to solve the S-Pen storage problem. The stylus attaches to a channel on the side securely. When the S-Pen is in place, it provides extra room for my thumb. Remove the stylus and the notch that is left forms a perfect place to grip the device for writing.
The case works with all my accessories; keep reading for more on those. It also doesn’t obscure wireless charging, looks great and doesn’t add much bulk. Basically, it works as advertised. Spigen offers a version for the Fold 4. If I eventually upgrade, I’ll be ordering it on the same day.
The Thin fit P is almost perfect
People like to point out that the crease where the screen folds is visible. It is. Not only that, but it can be felt, both with a finger and the stylus. It would be great if they are able to remove it in future iterations. It doesn’t detract from my overall happiness with the phone though.
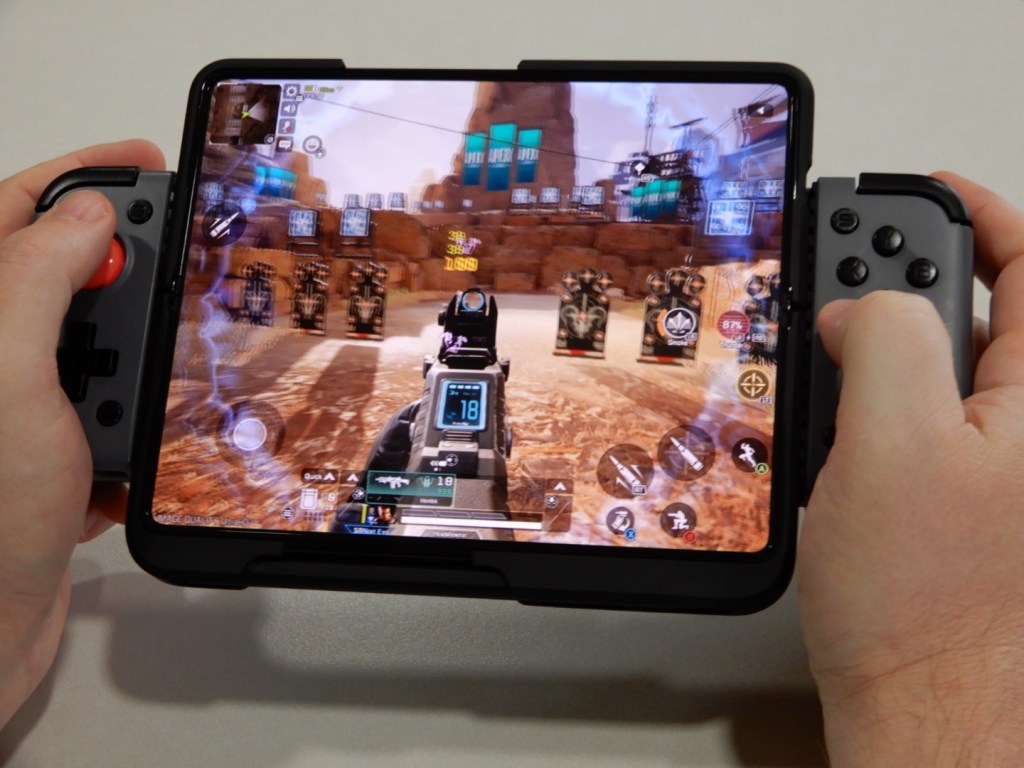
I didn’t expect to enjoy gaming on the Fold as much as I do. Even after all this time, it is still my go to option for casual play. Android games and emulators are fine but where the Fold really shines is streaming. To get the best experience you need to pair the phone with a controller.
I use Gamesir’s X2 Bluetooth gamepad. It’s micro switch buttons and tiggers feel great. The sticks are small, but they are accurate and smooth. The portability is excellent, the controller will fit in a jacket pocket. I run mine in Xbox mode to get the best compatibility with the streaming apps.
Geforce Now, Gamepass Ultimate, and Steam link streaming all work on the Galaxy Z Fold 3 like they were made for it. It’s light, has no fans, has good sound, and an OLED screen capable of 120 FPS. I played all of The Outer Worlds via Gamepass Ultimate streaming. I am about to complete Cyberpunk 2077 which I’ve streamed via Gamestream.
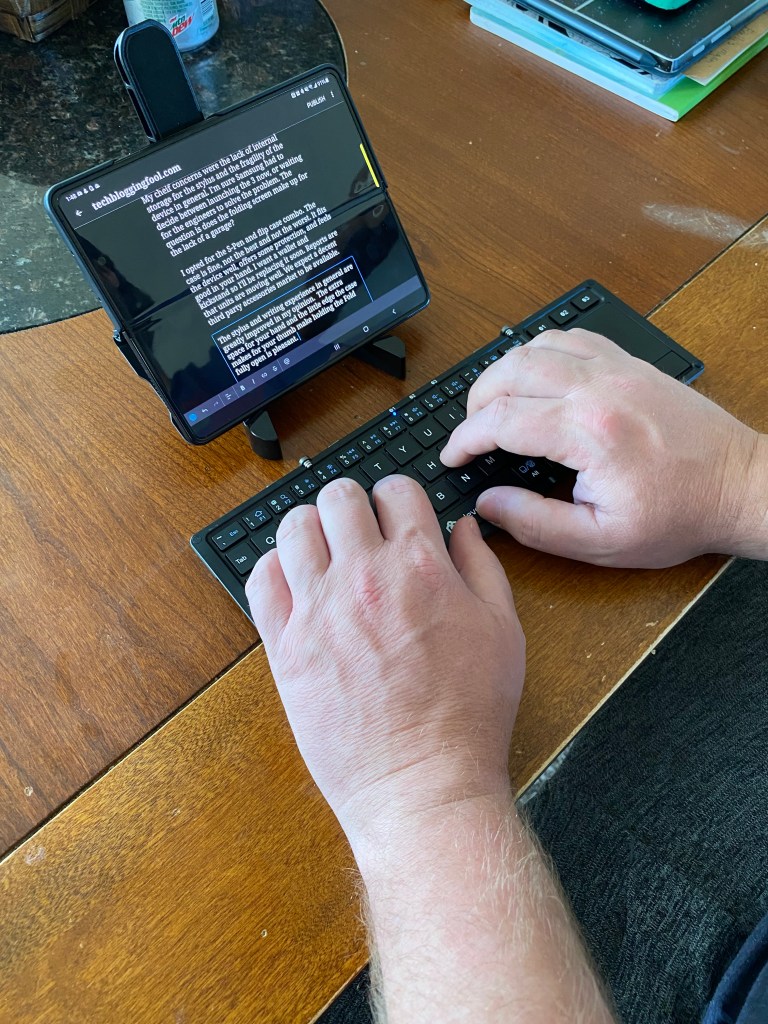
Speaking of streaming stuff, I setup my Windows PC with Remote Desktop Services. Then use the Fold as a client for a powerful mobile productivity combination. I frequently use a portable keyboard and mouse to achieve laptop levels of productivity from items that fit in my pant’s pockets.
As a smart screen in your vehicle, the interior view is large enough to display my map and something else simultaneously. The speakers and microphones work well enough to use the Fold on its own in most cars. It also connects to Bluetooth or Wi-Fi direct easily.
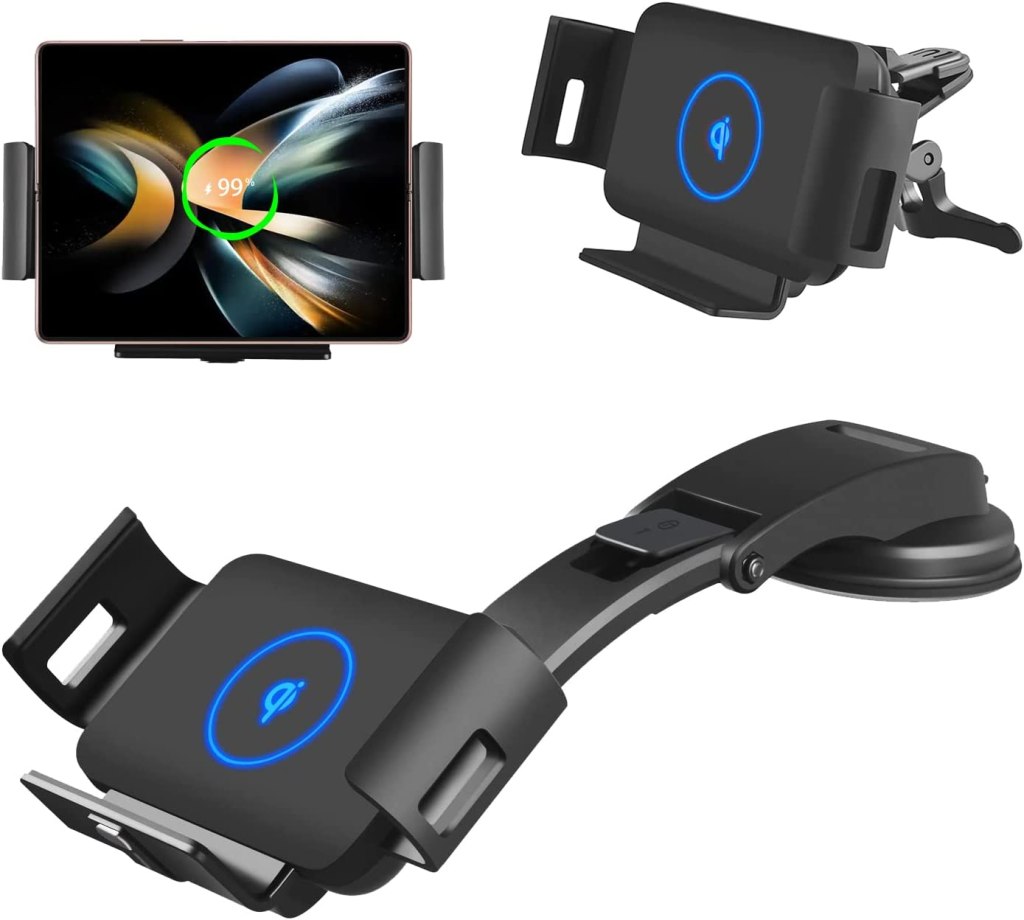
There are multiple third-party solutions for mounting the Fold 3 to your car’s dash in the open position. I cycled through a handful over the preceding months. The one that stuck is the DOODBI Wireless Car Charger Mount for Galaxy Z Fold 4/3. It uses motorized arms that grab the edges at the press of a button. I got it on Amazon. It also fits in most other vehicle mounts if I leave it closed and use the front screen.
Like most Fold owners, I wish that the battery lasted longer. It will just barely make it through an average work day without reacharging. To get there, I leave the Powersave feature enabled. Weekend and PTO days almost always require a recharge half-way through. Again, I have gotten used to it.
A lot of people report that they would like the exterior screen to be wider, more like the size of a normal smartphone. I am not in that camp. I love how the narrow design fits in my front jeans pocket. It also lends itself to one-handed operation when retrieved from said pocket. If a larger display is needed for the task at hand, I just open the hinge.
Throughput my work day, I keep the phone open flat on my desk. Generally I have OneNote open to a blank page and use the device as one might use a paper notebook. I also find that I like to read longer emails and documents on it.
As a media consumption machine, the Fold 3 is in a league of its own. Of course, the big interior screen is great for books, blogs, Reddit, magazines, video and movies. I didn’t expect to use flex mode much. However, having the fast-forward, rewind, brightness and volume controls always on the lower screen is too good to pass on.
The cameras could be better, but in my opinion they recieve more bad press than they deserve. I’ve managed to take some fantastic pictures by leaving everything on full auto. There are three late model iPhones in my household too. I haven’t looked at any of their shots and thought, “iPhone pictures are so much better! I’m trading this folding thing in.”
Taken with the Fold 3 on Full Auto at night
The in-display front camera is fine for Teams or Zoom. I use it almost every day and have received exactly zero reports of looking dim, fuzzy, or out of focus on video calls. Not having a notch or punch-hole breaking up my screen is just awesome. It’s better than the Dynamic Island in my opinion.
To get the most out of my folding phone I have put some time into customizing it. My interior home screen is plastered in widgets and operates as a life-dashboard. I’ve customized all of the notifications so that only the important beeps get through. I’ve also put some work into automation with Bixby routines.
The folding screen is a big win in my book. I don’t see going back to a non-expandable phone screen. At the same time, I’m not sure the trick works as well at larger scales. I know several manufacturers are releasing their folding laptops, but they don’t seen as compelling as the one in my pocket.
The newest entry in the Call of Duty franchise has proven to be a hit. The single player campaign features almost photo-realistic graphics and a compelling storyline that keeps you on-edge until the end. The multi-player offerings are on-par with the best of the best. Tight controls, skills-based matchmaking, and new gaming modes will keep you coming back for more.
Like many new games at launch, not everything has come up roses. PC players using NVIDIA GPU’s have experienced a wide range of problems from screen flickering to the game completely crashing. The newest GeForce driver (526.47) did not fix things, it made them worse. Advice from both NVIDIA and Activision has been to roll-back to or re-install older driver versions.
NVIDIA has released a HOTFIX driver to address the issues. HOTFIX drivers are not automatically downloaded. If you want to try the new driver. You will need to download it from this NVIDIA link and manually install it yourself. The installation is straight forward, download the file and double click to start the installation. I advise that you reboot when it is complete, even if you are not prompted to.
I’ve been playing with the new driver all day. The dark artifacts, white flickering, and crashes have stopped in both the campaign mode and multi-player.
I have a gaming laptop, but when playing at home I hook it up to a full-size monitor, keyboard, and mouse. By the time you include the power supplies, speakers, and cables, I end up needing a desk for it.
Floor space is a valuable commodity everywhere. You can squeeze a top-tier PC experience into a small space. Going vertical is the key. This wire-rack option is barley wider than the monitor. The upper shelf is great storage space that is large enough for a desktop PC. My laptop fits on the keyboard tray. This layout allows for a two-screen setup in a very narrow space.
Velco straps make a great cable management option on wire shelves.
If you prefer something that looks like more traditional furniture, the desk in a cabinet design is also an efficient use of space. Again, the keyboard tray will hold my laptop while a 32″ monitor fits in the top.
The cabinet units feature doors that close to hide everything. If you have a similar setup, be careful not to cause an overheating situation. I cut some holes in the cardboard backing and installed some cheap USB powered fans to exhaust the heat.
There are countless options besides these two. I’ve used small tables, and carts. I’ve hidden computers in the living room entertainment center and the kitchen island. Just remember to allow for plenty of air flow. Your cabinet cooling solution should move as much air as the computer system exhausts under heavy load. Without adequate airflow you lose some FPS and could possibly cause physical damage to your computer.
One of the features promised during the Windows 11 run-up was that it would be able to natively run Android applications. The Windows Subsystem for Android fulfills that promise. The WSA is officially out of preview.
Before you start installing the new feature there are some of those pesky requirements to contemplate. At the bare minimum you’ll need 8 gigs of RAM, an SSD storage device, and i-3 or Ryzen 3000 series CPU. However, like all things PC, the minimum specs will probably leave you unsatisfied with the performance. 16GB and an i-5 or Ryzen 5000 series will let Android apps run like they do on your phone or tablet.
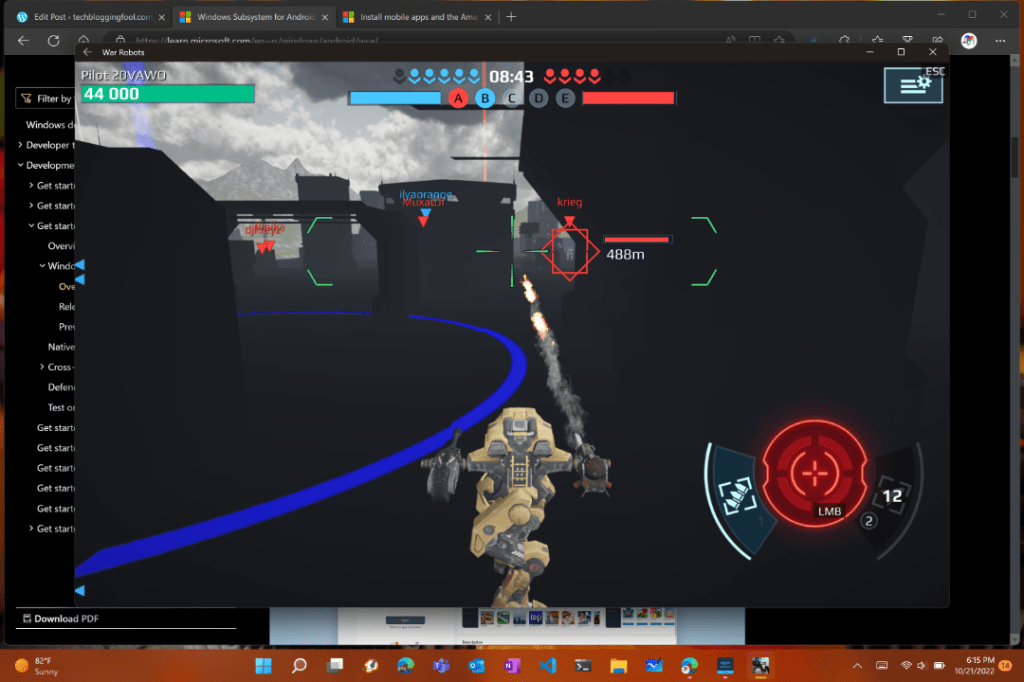
I have an i-7, 16GB, an SSD, and discrete GPU in my laptop. I tested out several apps, they all ran fine. I was able to play War Robots, a 3-D mech warrior clone, without lagging or other issues. Even on-line matches worked well. It should be noted that not all apps are supported, and some will suffer from re-sizing issues depending on how they were coded.
If on-line shooters work in WSA, most other apps should too.
You should also be aware that the Amazon App store is the only supported option for installing apps at the moment. If you are so inclined, there are a few posts on-line that explain how to hack the system into running other famous app stores along with getting direct APK files to install and run.
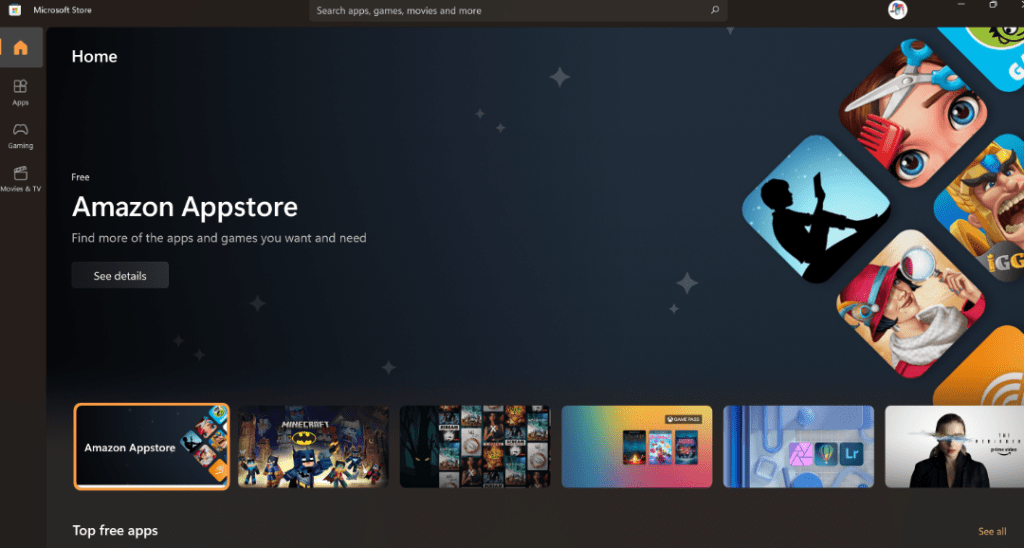
Installing the Windows Subsystem for Android is a simple matter. Open the Windows App store and install the Amazon App store. Yes, I know that sounds weird but nonetheless it is correct. If you have issues, make sure that the virtualization features of your processor are enabled. These settings are accessed in the UEFI BIOS. Microsoft has published this handy document that has links to most manufacturers’ instructions. Typically, the options are enabled by default in my experience.
Installing the Amazon Appstore triggers the Windows Subsystem for Android installation.
I’ve already found the feature useful for testing Android apps and playing a few Android games. Outside of development and techs playing around, I’m not so sure the feature will catch on. The Amazon Appstore is missing some key apps. I had hoped to install the Microsoft Authenticator app for some end user documentation efforts but found that it isn’t available. If Microsoft can secure support for Google Play store the mass appeal will be stronger. It remains to be seen if that’s in the cards.
All of us are seated at large, round, wooden tables. The themed hotel conference room is framed by dark heavy beams and wooden floors that are so dark they seem to be burnt black. A paranormal pro paces the room, gives us advice, and a safety talk. He’s wearing jackboots, a military style coat, and a hardhat. I suddenly feel under dressed in my street shoes and leather jacket. We drove almost an hour to get to the Belvoir Winery and Inn and booked the tickets for our Ghost tour months in advance. There was no turning back.
The grounds are vast. Prepare to meet your weekly step goal in a single night.
The creepy old limestone and brick buildings we are visiting were originally constructed by the Oddfellows. A mysterious fraternity with an origin story that stretches back to the Roman Empire. Much like the well-known Masons, the group is recognized for their grand lodges, elaborate ceremonies, and odd reputation. Seemingly to prove the point, one of their member’s skeletal remains lies entumed in a glass coffin on the grounds. Be sure to pay your respects to George should you decide to visit.
The ambiance of the compound lent itself to the event quite nicely.
We hit the spooky night jackpot. A full moon hangs in a slightly hazy sky. The compound is far enough from town for it to be truly dark. The trees are missing most of their leaves. Oh, and just to bump the spooky up a notch it’s also that special see your breath cold outside.
What a night for ghost bunting.
The Winery has been visited by more than one paranormal investigation television show. It is also featured on podcasts, blogs, and several social media feeds. People that believe come to see proof. People that are skeptical come to debunk the very notion. I am here for date night. There are people from all walks of life at the event. From overhearing the conversation my wife is having with our table mates, it seems that some people make a full-time hobby out of ghost hunting. Apparently, there are several serious cash prizes for finding proof of the afterlife.
We were told that only a select few are ever invited to explore the cemetary.
The group that runs this event hosts at least one session per month and has the operation down pat. Each table of guests is escorted to one of the five haunted buildings by a professional paranormal investigator. They handout ghost hunting gear of various types along the way. EMF detectors, rim-pods, twist-lock flashlights, motion detectors, and curious little boxes they call K2s.
The K2 devices caught my tech guy attention as soon as I saw one. They’re about the size of a Rasbery Pie with two short antennae on the top and a small LCD touchscreen on the front. I immediately gave my wife the “get one of those” look. Once I got my hands on it, I set to work accessing it’s control menus.
Ghost hunting gear has gone hi-tech.
The little box had several spooky features. It ran a random word generator. According to the paranormal investigator, ghosts could use their “energy” to alter the word pattern into coherent speech. We were encouraged to shout questions to elicit a response. Ours said some really odd stuff throughout the evening, but it never made sense to me. There was also a ping-sweep function that looked like a small radar screen. Things that reflected its electro-magnetic signals were indicated as blips. A motion detector was also available.
As we entered each building, the guide deployed the gadgets while they told us about the history of the space. The grounds had served as a hospital, an asylum, and a shelter for the downtrodden souls of society. According to the paranormal guide, people that lived challenging lives are more likely to haunt a place after their passing. In some cases, we were told about named entities that were known to harass staff members and guests alike. During one of these stories, standing in what had served as the hospital’s morgue, the lights were turned out to enhance a seance. The various detection gear was triggered in the center of our circle. I used my phone to snap pictures of the dark spaces around us and one of them shows what looks like a person’s shadow. The thing is all members of our group where visible in the circle and I couldn’t see any light source powerful enough to cast a shadow near any of them.
The light and “shadow” were not visible to the naked eye.
The buildings were all crumbling, dark, cold, smelly, graffitti covered shells. Some of them seemed to be held up by nothing more than spite. If you’re reading this ahead of your own outing, I highly recommend wearing tough boots and a heavy outer jacket. There were nails, broken pieces of glass, sharp concrete edges, and all kinds of building rubble to negotiate in the dark. In certain places on the upper floors I could feel the structure giving way to my weight.
Some of the graffiti was eye catching to say the least.
We met some great people. The Oddfellows home was clearly a beautiful place in its day. Time has not been kind to it, but the new owners are renovating. The winery and inn frequently host weddings and serve as photography backdrops. We had a great time, check it out if you’re looking for something a little different to do in the KC area.
I’m always going after an improved experience with any technology, but that espeically applys to displays. My current favorite is from Gigabyte. A company known for their PC gaming equipment.
The Aorus F048U is a 48 inch, 4K, HDR, 120 FPS, OLED computer monitor based around LG’s fantastic panel. It’s enclosed in a uber thin case with bezels so small they almost disappear. The panel is being backed up by some smart software and useful connection options.
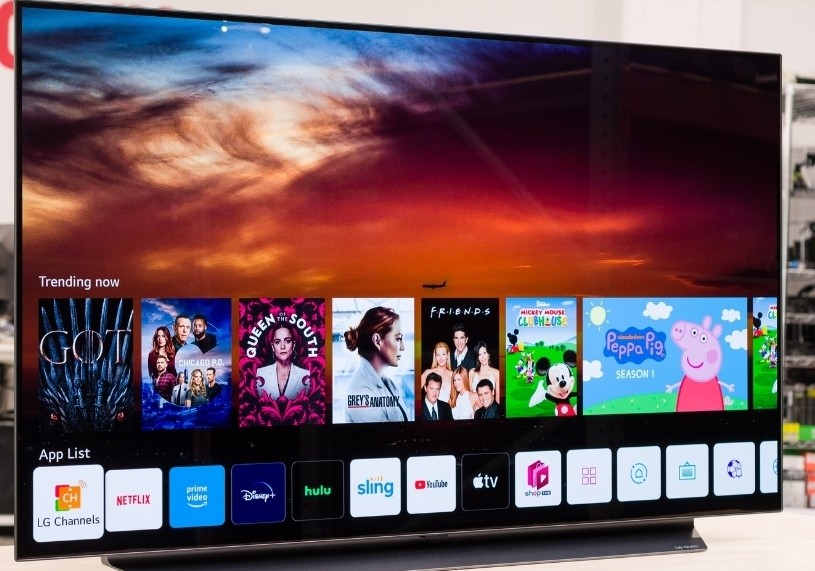
LG’s 48″ OLED TV is missing a Displayport connection.
In it’s out of the box auto mode, the screen is breath taking. Think about the best Samsung or Apple mobile phone screen, streched to fill your full field of view.The pixel density is lower, but the colors and infinite contrast remain. If you put some time into mastering Gigabyte’s software, the results are even more impressive. Download the optional Window’s agent from their website at: https://www.gigabyte.com/Monitor/AORUS-FO48U/support#support-dl.
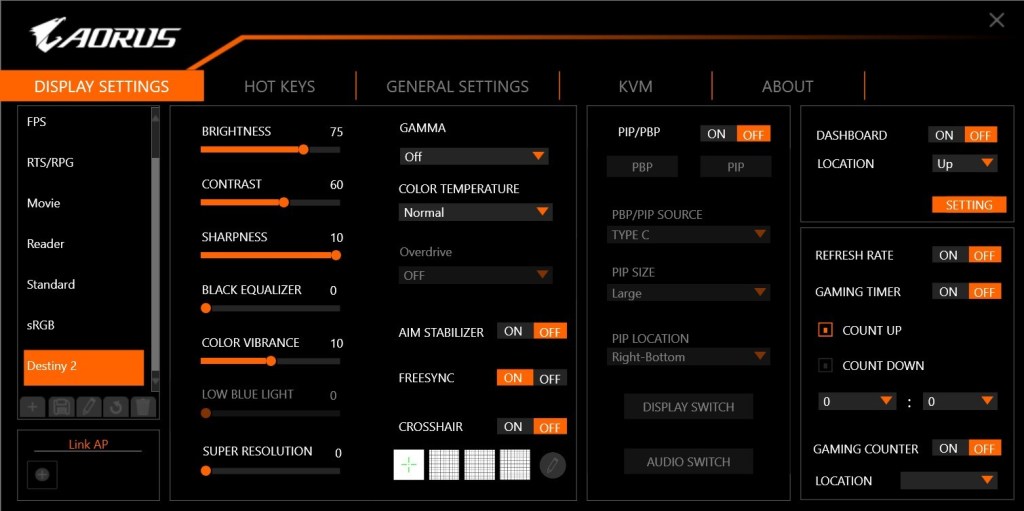
You can use the software to create profiles for any senario. For example, I noticed that Destiny 2 sufferers FPS lag on 180 snap turns. It turns out that Destiny 2 doesn’t like the monitor’s Black Stabilizer feature. I was easily able to configure a profile with that feature disabled.
Customize dozens of settings into profiles that match your activities.
People ask why I got the monitor when a 48 inch LG OLED TV is the same display panel, but also a Smart TV? LG’s OLED TV line is awesome, I have one. It can take input via HDMI 2.1.
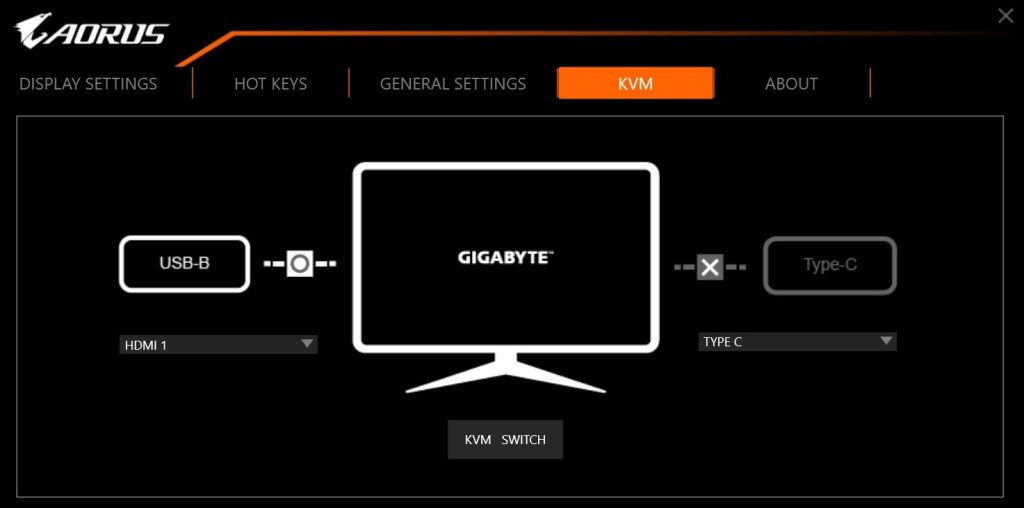
The monitor can display HDMI 2.1, Displayport 1.4, and USB C. What makes it’s input options unique even among monitors, is the integrated KVM. I hook my business laptop up to the USB C port, and my gaming PC up via Displayport. My keyboard and mouse are also connected to the monitor (USB) rather than either of the computers.
The built in KVM and USB C dock powers my laptop and connects to my accessories with a single cable.
With a button on the remote, or on the monitor itself, I switch my controls and display between the two systems. I can operate each independently in full screen mode, or split the screen and use both computers at the same time. There’s also a picture in picture option for keeping an eye on the secondary system.
The main screen is my desktop, my laptop is in the PiP window in the lower right. The size and position can be adjusted.
If you are considering using an OLED panel of any kind as a monitor, there are some challenges to be aware of. The technology is suceptable to screen burn-in. The built-in management system adjusts attributes of the image output to automatically protect the screen. Don’t fight it, even if you don’t like the adjustments it decides on. Don’t unplug, crank up settings, or reboot it to “fix it”. The system will shift back to full awesome when it’s safe.
I’ve been using mine as both a gaming screen and business montior for several months. I work from home frequently and sometimes follow those eight hours with gaming sessions for hours more. I let the management system do what it needs to. I also use a live (moving) wallpaper with a screen saver set for five minutes and have had zero issues with burn-in so far.
There are monitors with far faster refresh rates, higher resolutions, and more inputs. For me, Gigabyte’s Aorus F048U superb KVM function combined with LG’s OLED panel performance make it the best overall and my favorite screen in the house.
Microsoft has been engaged in the removal of Basic Authentication from their Exchange On-line systems for almost a year. The final cutoff is currently set for October of 2022. Some business applications and devices like scanners logon to the cloud with their own user account to deliver their messages. Older apps and machines that impersonate a Microsoft 365 user in this way may not support MFA (Multi-Factor Authentication), aka 2FA.
In preparation for decommissioning the basic logon protocol, Microsoft has begun modifying the SmtpClientAuthenticationDisabled attribute for Tenants and mailboxes they’ve deemed to not be using it anyway. According to their documentation, they will post a notification in the Message Center before making the changes to your organization’s subscription. We’ve received multiple reports of this change effecting established systems that are used every day with no message being seen in the Microsoft portal.
If you find that your apps, MFPs, or other non-Outlook email clients have suddenly stopped working, there are some useful PowerShell commands that will help you diagnose the situation. You can also re-enable SMTP authentication for either your entire Org or for individual mailboxes. Most of this information is outlined in another Microsoft Document.
To check the SMTP Authentication status of an Exchange On-line subscription, logon from a PowerShell session in your favorite terminal app. The instructions in this post assume that you have already installed the new EXO V2 PowerShell module.
To check settings for the organizational level, run the command below. An output of True means the authentication is disabled at the top level. This is not the whole story. Each mailbox can also have its own setting. The top-level only applies when a mailbox’s corresponding attribute is blank.
If the mailbox SmtpClientAuthenticationDisabled attribute is set to a value other than $null (empty in the report you generate below), it overrides to top-level command. Use this one-liner to generate a report showing each account’s setting.
To change the Organizational (default) level, execute the following line in your console. Change the value at the end from $true to $false to fit your desired outcome.
To modify individual mailboxes, you’ll need the email address. The SmtpClientAuthenticationDisabled value can be set to $true (disable SMTP auth), $false (enable SMTP auth), or $null (use ORG level).
Use this simple script to modify all of your mailboxes at once, the same values apply here. Note: if you are at a larger company, you may need to add the ResulteSize Unlimited switch. As written, it will enable SMTP Authentication for all mailbox accounts.
Typically, the 700003 error code indicates that the computer’s machine account cannot be found in Azure Active Directory.
Recentley I encountered a situation that had dozens of systems showing the error message. It was difficult to explain how that many system accounts could have been removed from Azure AD.
Eventually I traced the problem to some work another team was doing. They were reorganizing on-prem computer accounts into new organisational units. The Azure AD Connect configuration pointed at specific OUs and nobody had thought to add the new ones.
As the systems were moved to their new OUs they were marked for deletion by Azure AD Connect. The fix was to add the new organization units to ADC and force a sync.