Are you stuck at home with no work, no classes, and no basketball, fretting about the end of the world? The best medicine is to distract yourself. Video Games are my go to escape, below you’ll find some great titles to get lost in.
Call of Duty Warzone is the franchise’s latest attempt at a battle royal style shooter. It launched a few days ago on Xbox, PlayStation, and PC for free. When you get taken out, you are placed into a one-on-one battle, the winner is returned to the main fight. With one-hundred and fifty cross-platform players in a match, the action is intense. The shooting is classic COD Modern Warfare, whether you play with a keyboard and mouse, or a controller, the action is satisfyingly precise.
If you have a Nintendo Switch, Link’s Awakening is a fantastic remake of a classic adventure. Remade in a unique 3D top-down graphical style, the whimsical world, bright cheery colors, and cute characters will make you smile. Puzzles and enemies are challenging at times and will force you to focus. You’ll soon forget all about how much toilet paper is left in your cupboard.
Destiny 2 is available on the Xbox and PlayStation, but it really shines on the PC. The graphics are stunning and the game world is expansive. The free to play edition will keep you busy annihilating various alien races while you zoom around the solar system with your buddies. The game has the perfect mix of player versus player and player versus environment activities. Tweak your character to get the right look and balance your powers, go on epic adventures to find the perfect weapons, then dominate your peers in the crucible. Season 10 has just begun, so there are plenty of people playing to keep you from feeling socially isolated.
Are you missing sports? FIFA, NBA2K, Madden NFL, NASCAR, and The Show are some of the franchises that may help scratch your itch. They run on almost every platform and many include “Watch” modes that let you pick the teams and the stadium and then let the games unfold their own. I once visited a bar where the patrons where watching a soccer game that turned out to be FIFA. Based on the cheering, I’m not sure that everybody in the place realized they were watching a computer game. That’s how far the sports genre has come in the last couple of years.
If playing isn’t your thing watch the action instead. Mixer, Twitch, Steam, Xbox, and PlayStation streaming services are packed with people playing and talking about almost every game you’ve every heard of. Don’t sit home eating lonely stew. Get on-line and enjoy the same things you always have in the digital world.
As the Covid-19 pandemic becomes more likely to be an issue in the United States, businesses are beginning to form contingency plans. Group gatherings, travel, and even routine meetings are being postponed. Conferences and conventions are being canceled. Companies are fearful of losing the services of large swaths of their workforce and supply chains.
One strategy is to keep people physically separated as much as possible. Wash hands and disinfect surfaces regularly. If possible, instruct your employees stay home if they feel under the weather. Even if they think it is just allergies or a cold.
The work from home movement has inadvertently prepared many organizations for this event. Many of today’s technology based workers are already able to utilize VPN, Remote Desktop, Cloud Applications, Soft-phones, and the like to do their jobs from almost anywhere. It is important for IT leadership to realize that the virus situation could result in an influx of remote access that will test these platforms.
Perhaps you have Remote Desktop or Citrix severs to support remote workers. Will they be able to handle an increased load? What about your VPN solution? Is it licensed for a small number of travelling users? Now is the time to work with your engineers to scale these platforms up or out. In-path equipment like routers, switches, and firewalls could also be stressed by the extra external pressure, so be sure to include them in your evaluation.
Do you have cloud or hybrid platforms that need to be temporarily buffed? Some vendors are offering free or low cost service upgrades for the duration of the crisis. For example, Cisco is offering to increase your virtual meeting abilities and Microsoft is offering a free six month subscription to a fully functioning Teams solution. Many other service providers have similar offers to help see their customers through the coming crisis.
Hybrid platforms can usually be configured to extended into the cloud on-demand. Some on-premises software can be easily made hybrid or migrated to the cloud. Businesses frequently have subscriptions to services like Office 365 or G-Suite that are not being fully utilized. Both include features that support remote work and communications. Now is the time to get them fully spun up.
If your organization doesn’t already have remote access solutions in-place, obtaining them is easier and more cost effective than you realize. Almost any Windows or Linux server can be configured to host VPN services, so can many firewalls. A Remote Desktop Gateway will allow your workforce to securely connect from their home/personal end-points to their company owned desktop computers, just like they were sitting at their desk.
If your business doesn’t have an IT staff of its own. I recommend contacting a local service provider. Technology experts can help you understand how to utilize the services you already have, or what solutions you should add to your technology portfolio to support a larger remote workforce.
This winter, it was time to help my son find a new laptop. He needed a well balanced system that could do most everything well. He’s a student with a focus on technology, he writes code, edits graphics, produces video and music, and spends a lot of time on-line. He’s also an avid gamer that likes to stream on Twitch.
His system would need a screen on the larger side to accommodate multiple windows, but it still needed to be portable for school. The keyboard needed a true number pad for coding, crisp clicks and a back-light for gaming were also a must. He also needed a lot of connectivity options for robots, musical devices, microphones, headsets, cameras, and the other equipment his endeavors required.
Whatever system we chose would also need an exceptional GPU. With a budget of eight-hundred dollars, I knew we would have to make concessions somewhere. Often, when shopping for laptops that include a powerful GPU, the other components are also top of the line, weather you need them to be or not. I was hoping to trade CPU and RAM for video performance to stay in budget, but wasn’t having much luck at first. If a system had an Nvidia Ti GPU it also had an I-7 CPU and 16 gigs of RAM we didn’t need. Due to this, most of the laptops that had the features we were after came in closer to the fifteen-hundred dollar price point.
I knew that Alienware was Dell’s gaming line and had looked at several of their systems. I did not know at the time, that Dell also marketed another line of gaming systems known as the G series. I ran across them in a Best Buy and was intrigued. They were less expensive than the Alienware models but still included some of the features we were looking for. I also appreciated that they looked like a normal laptop rather than something that fell off a stealth bomber. After some research, we ended up with a Dell G3 15.6″ system.
I was able to find the unit on-sale for less than our budget. It has an Nvidia 1660 Ti with 6GB of video RAM. The card can run Destiny 2 at 1440P 60FPS on high, or at 120 FPS + at 1080P. It easily handles AutoCAD, Photoshop, and Illustrator duties as well. The laptop has USB-C with direct GPU (Displayport 1.4) pass-though and an integrated HDMI port. The heat pipe based, dual fan cooling system is able to keep up even when pushing VR games on an Oculus. In short, this is an unbelievable card to find in a “budget” gaming system. It easily out-preforms the Nvida 1050 in my Surface Book 2.
The 9th Gen Intel 9300H I-5 CPU keeps up with everything my son asks the system to do. At first I was concerned that the eight gigabytes of DDR-2666 RAM might not be enough for all the multi-tasking requirements my kid has, but I needn’t have worried. Windows 10’s superb memory management combined with the page/swap file being located on a high-speed SSD means he can open as many apps as he likes without noticeable degradation.
With 2 USB 2.0, 1 USB SS 3.0, 1 USB-C, a 3.5 mm headphone/mic jack, an RJ-45 network port, HDMI Out, A/C Wi-Fi, and Bluetooth all included, there are plenty of connection options for all of his extra equipment. He frequently has his Yeti mic, an external camera, and his drawing monitor all connected and still has ports left over.
He’s had the system for a little over two months now and has really put it through its paces. I’ve been impressed with the results. Especially when you consider the price. Dell has the laptop for around $1200.00 right now, but it you shop around it can be found for much less. Pay attention to the specs, there is an older generation of the G3 system that has a much weaker GPU and slower processor that is still being sold on-line.
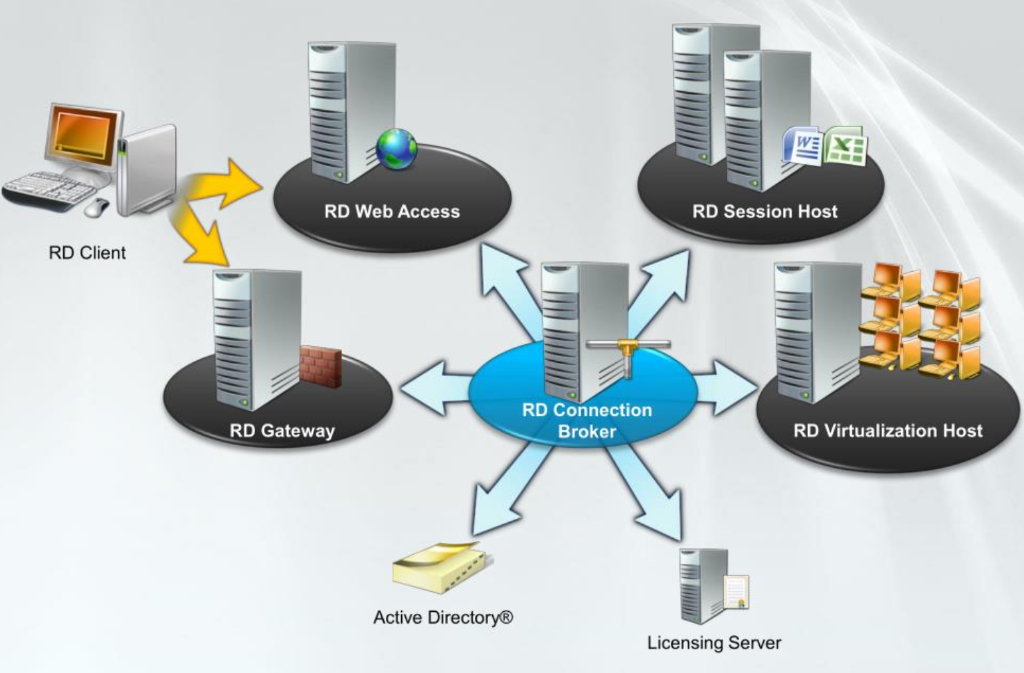
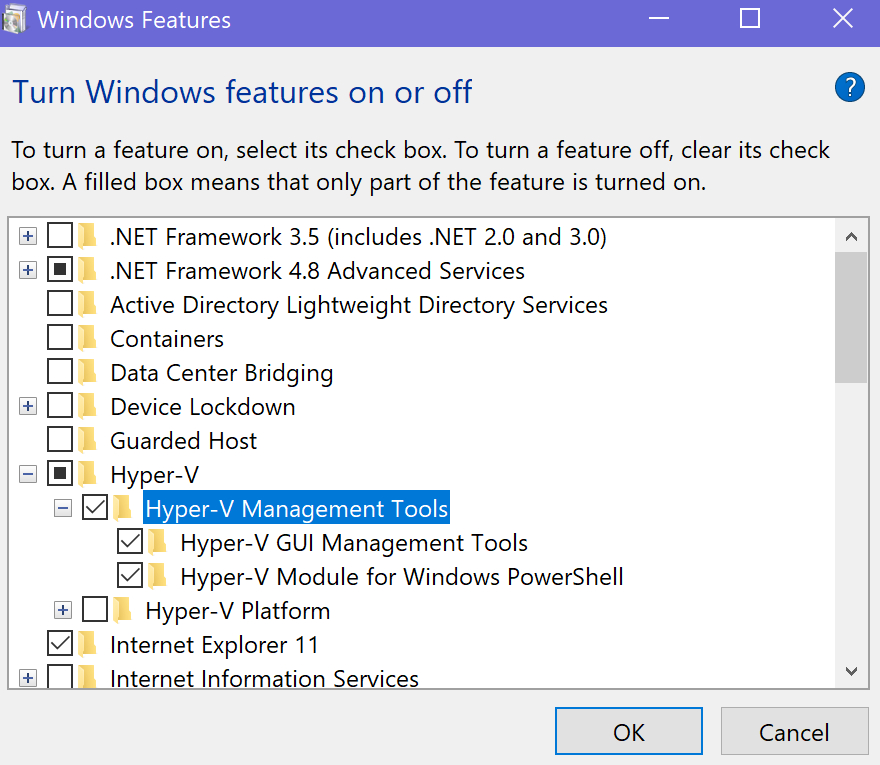
If you administrate a Hyper-V environment that has been deployed on Windows Core Edition Hosts, or if you’re required to manage multiple Hyper-V clusters remote management will make life easier for you. Configuring the option to use the GUI Hyper-V Manager application installed on your workstation to control remote servers is a straight forward process that only takes a few minutes.
The first step is to install the Hyper-V Management Tools. Right-click on the Windows Start button and select Apps and Features. Toward the bottom of the screen click on Programs and Features. On the left, click Turn Windows Features On or Off. Scroll through the list until you locate Hyper-V, expand it, select Hyper-V Management Tools, then click the OK button.
Now we’ll need to configure the Hyper-V hosts to allow the remote management connections. If you intend to control a multi-host cluster perform the following steps on each node. First open an elevated PowerShell console and run: Enable-PSRemoting -Force -SkipNetworkProfileCheck
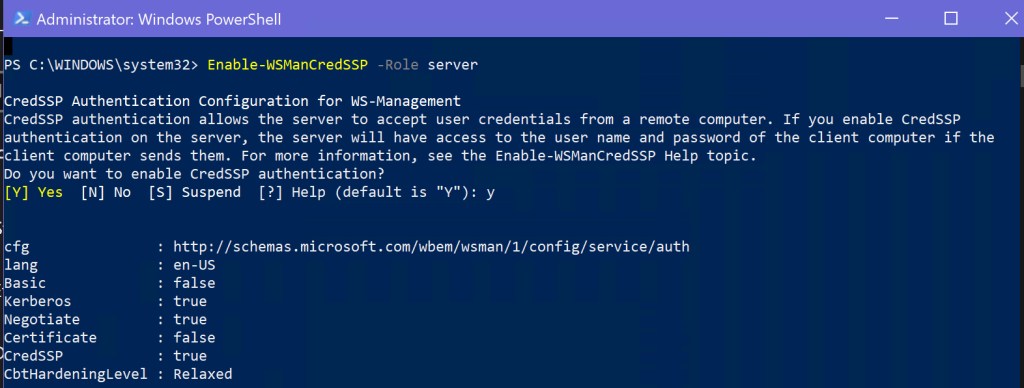
If your workstation is on a different domain than the Hyper-V host(s), you will need to configure CredSSP delegation. Note: the Hyper-V Manager for Windows 8.1 and earlier is only capable of connecting to hosts on the same domain as the workstation itself. In the PowerShell Console you opened on the host run: Enable-WSManCredSSP -Role server
Now you’ll need to configure your workstation to send delegated credentials. Open an elevated PowerShell console and run: Set-Item WSMan:\localhost\Client\TrustedHosts -Value “fqdn-of-hyper-v-host” Depending on the current configuration of your workstation, you may have to respond with a “Y” to multiple prompts to complete this process.
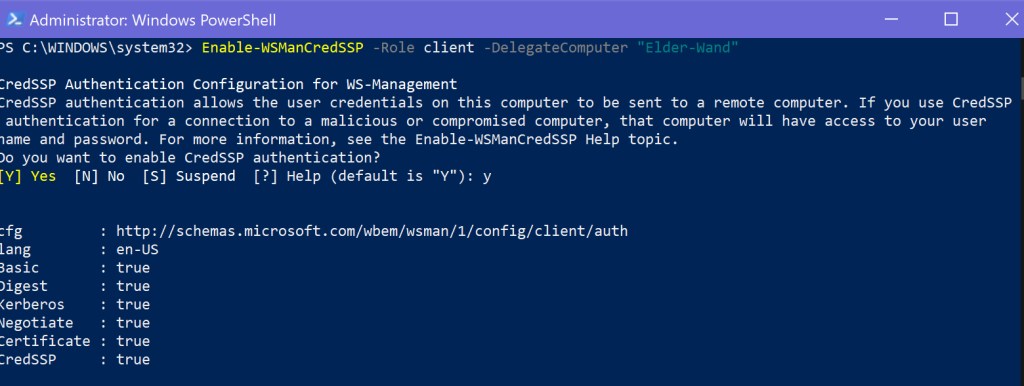
Now configure your workstation as a CredSSP client. In the same PowerShell console run: Enable-WSManCredSSP -Role client -DelegateComputer “fqdn-of-hyper-v-host” Depending on the current configuration of your workstation, you may have to respond with a “Y” to multiple prompts to complete this process.
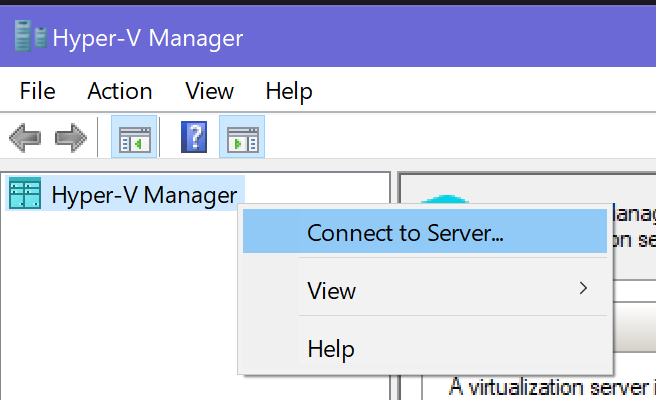
The configuration is done. Now all that is left is to connect the Hyper-V Manager. Open it from your workstation’s start menu and right-click on the Hyper-V Manager header in the left menu. Then click Connect To Server.
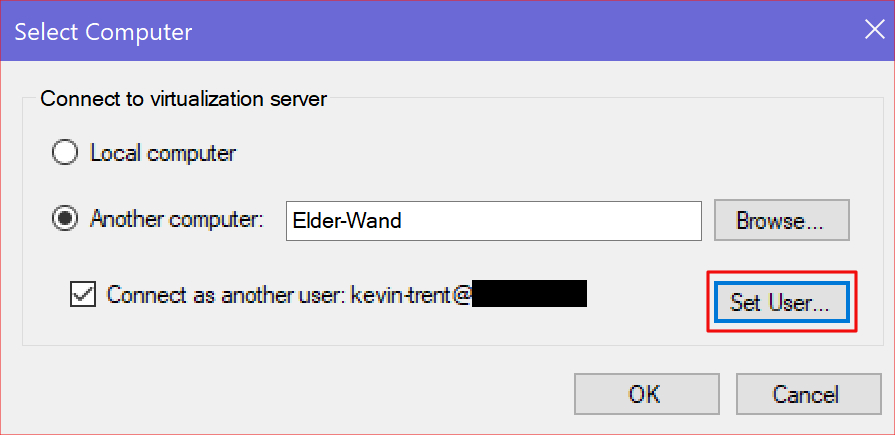
Enter the name of the Hyper-V host you wish to connect to and then use the Set-User button to specify your credentials. Click the OK button.
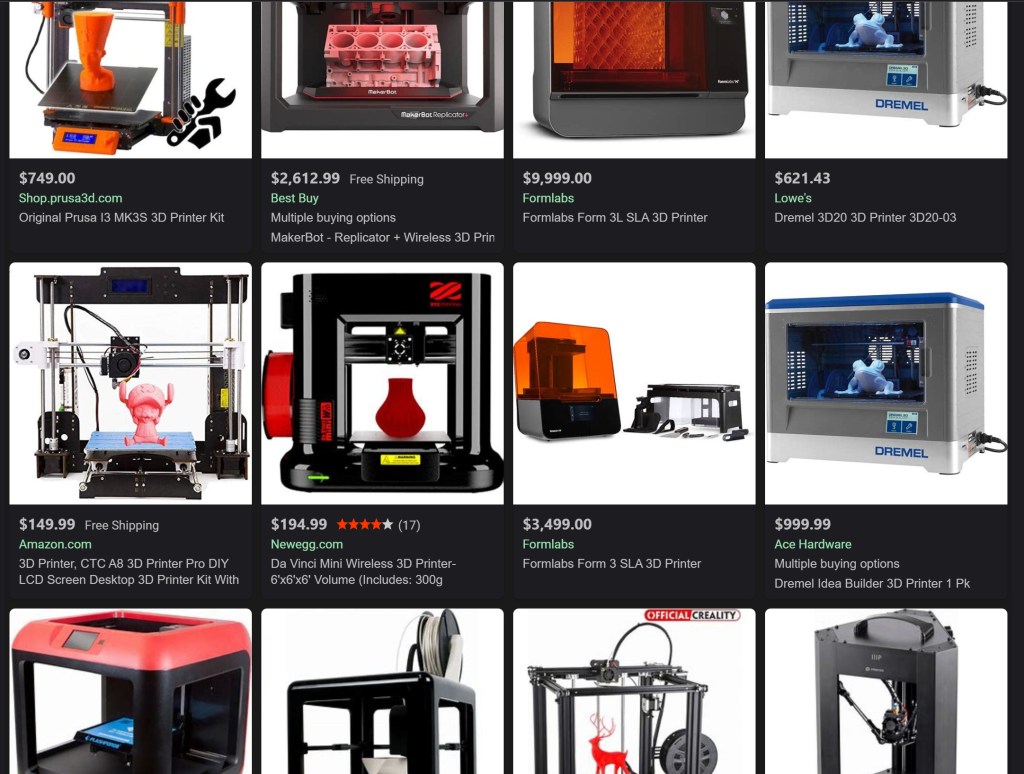
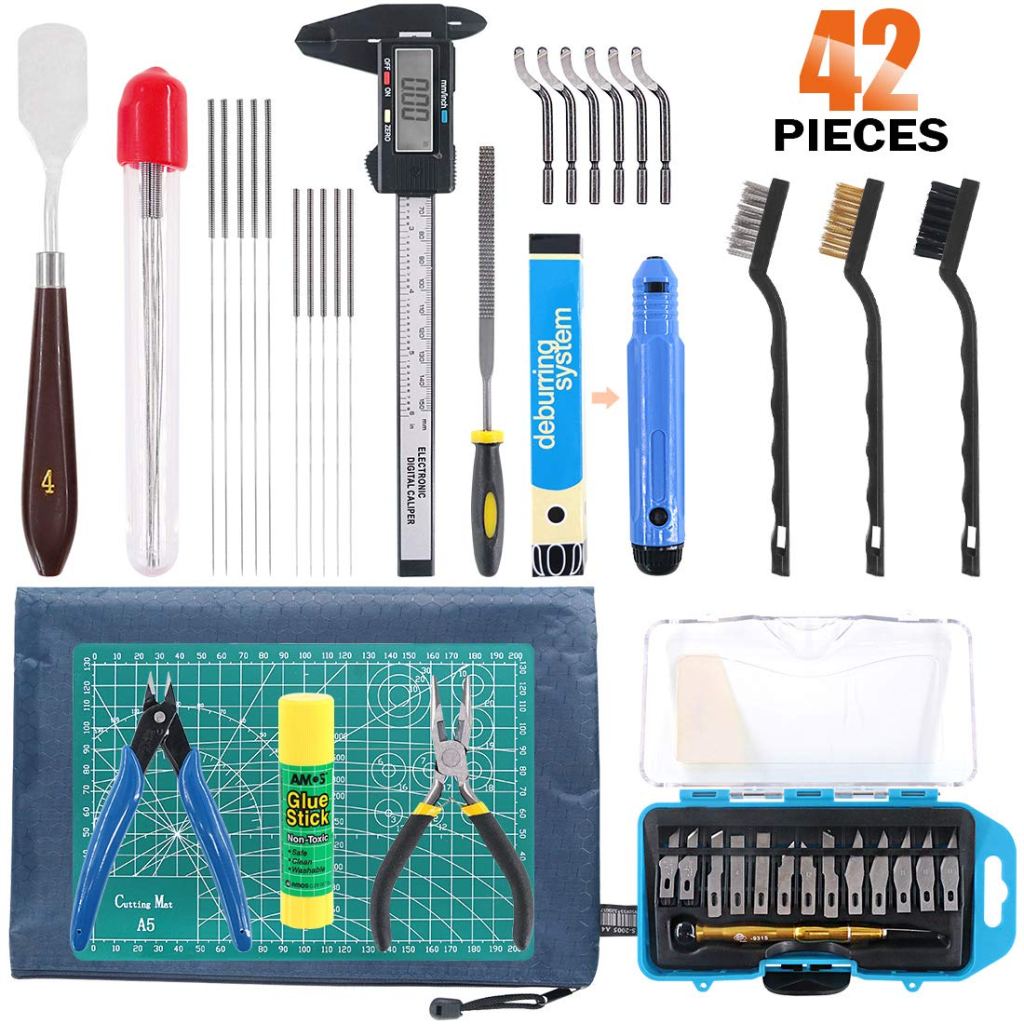
Just a few years ago 3D printers were expensive and required a high level of specialized knowledge to operate. Today, the fantastic machines have gone mainstream. They are both more affordable and easier to use, but there are still a few things you need to know before you jump in.
Like every other machine, 3D printers are available in numerous makes, models, and styles. Choosing one can be overwhelmingly difficult when you don’t know what to look for. There are actually only a few key differences to understand and the rest is creature comforts. You can get a 3D printer with a built-in Laser Engraver, or one that interfaces with your smart-home, but those features are personal choices.
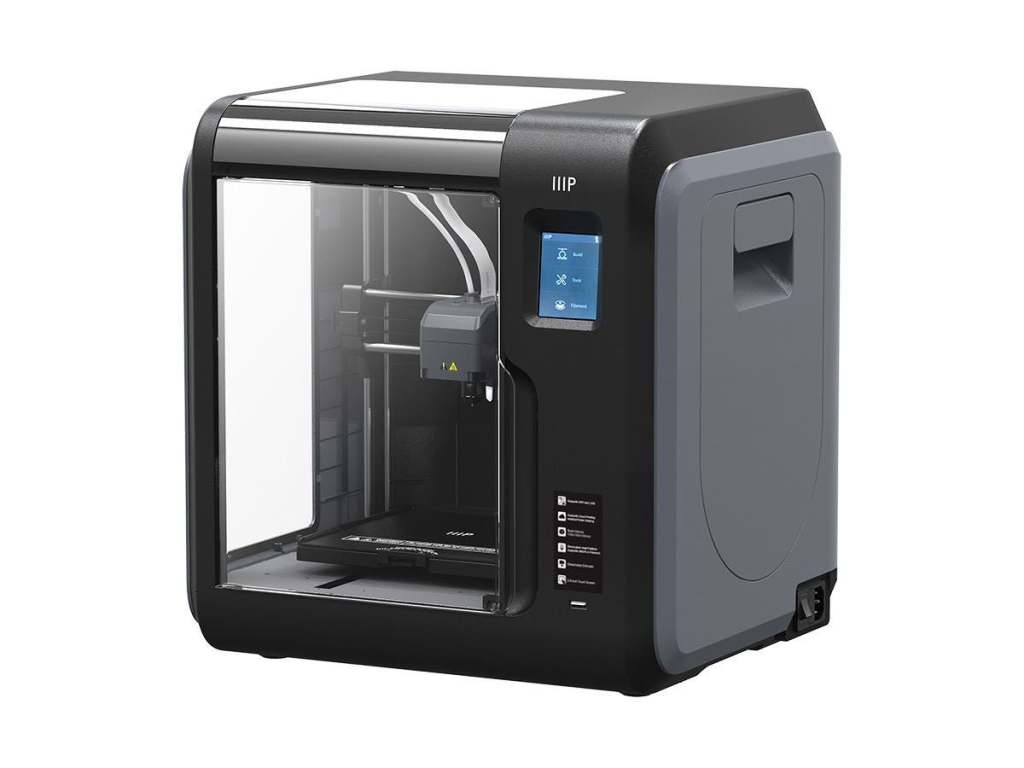
The first thing for consideration is what type of chasis you’ll need. More or less there are two choices, enclosed or open. 3D printing involves heating plastic to a liquid state and depositing thin layers on top of each other to build an object. Enclosed frames keep a more consistent temperature inside the unit which results in a higher degree of precision. If you’re planning on prototyping intricate machinery or printing extremely detailed models, the extra cost of an enclosed body may be justified. If 3D printing is a curiosity, open designs are much less expensive and still achieve impressive results.
The Monoprice MP Voxel is fully enclosed
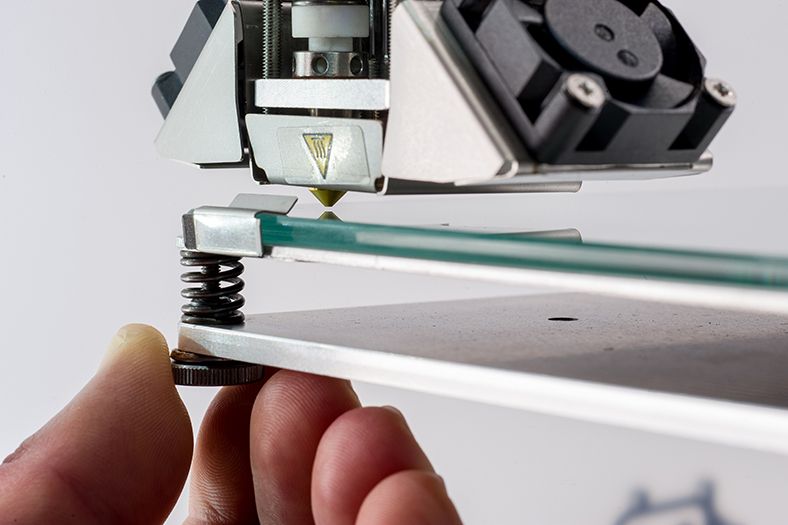
The layers of plastic, called slices, are stacked on your printer’s bed, or deck. Some printers are equipped with Self-Leveling beds. Imagine layers of warm gooey plastic precisely stacked on each other and waiting to dry and you will understand why the surface must be perfectly level in all directions. If you intend to move your printer from place to place, a self leveling unit will be a necessity.
Manually leveling a bed is tedious and can be frustrating. You must adjust each corner independently to achieve a perfectly flat surface. Moving one post, effects the others. Each time the printer is moved, or jostled the leveling has to be redone. However, if your printer will live on a dedicated stand, or table, the manual option can save considerable cost.
Manually leveling each corner is time consuming
Some printers have multiple nozzles and allow you to print with mixed materials. For example, two or more colors of plastic, or soft and hard formulas. Switching spools in the middle of a print can be problematic, but unless you have specific requirements for multiple materials you probably don’t need this option. I tend to print everything in white and paint it to get the refined look I am after.
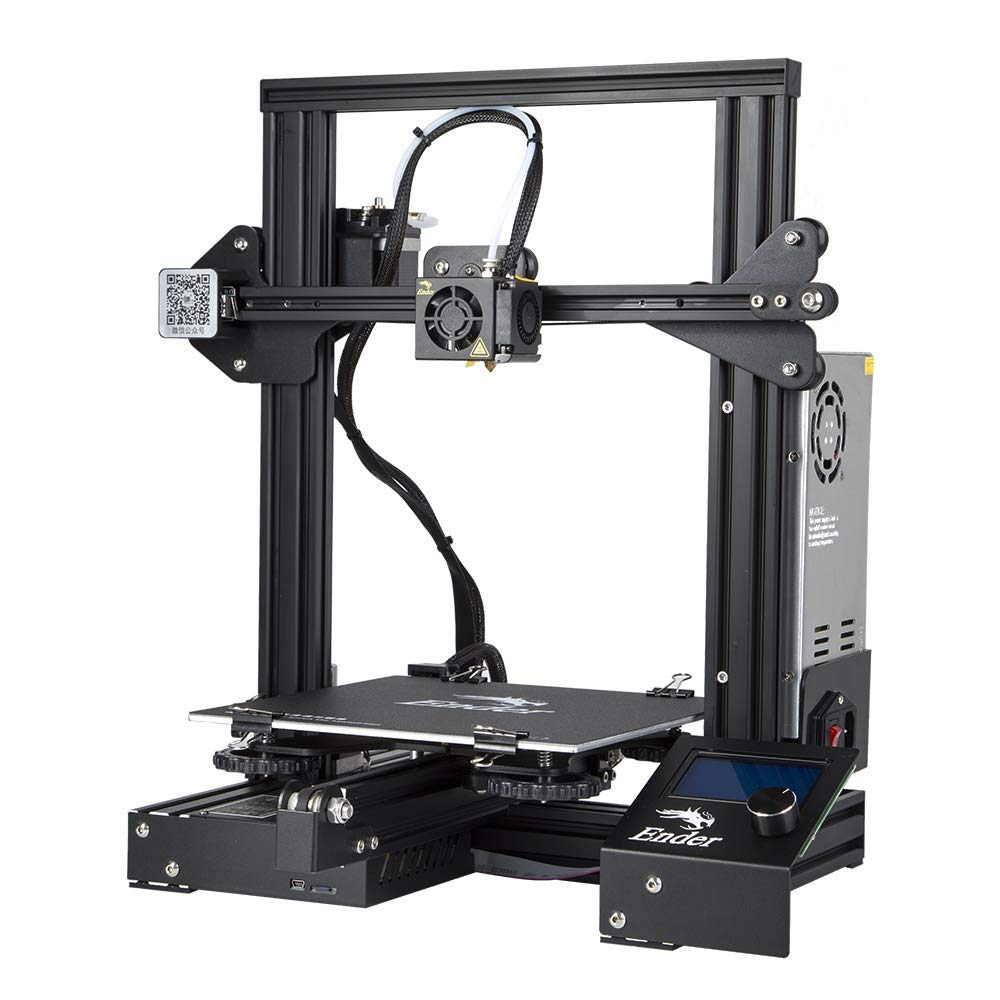
My family uses an open framed Creality Ender 3 Pro. It is a great middle of the road printer that can be found for around $250.00. There are plenty of upgrades available, ours has an upgraded power-supply (gets hotter) and a larger spring assisted leveling bed. We’ve printed sculptures, parts for home machines, toys, and cases just to name a few items. It has handled everything beautifully.
The Ender-3D-Pro is an affordable open chassis printer
Once you’ve chosen your printer, you will need to decide on software. There are two different major pieces of software you will need to be successful. First up is a slicer app. The slicer software functions much like a printer driver for your run of the mill office printer. It converts your 3D object to instructions your printer will use to lay each sliced layer down in the correct location and order.
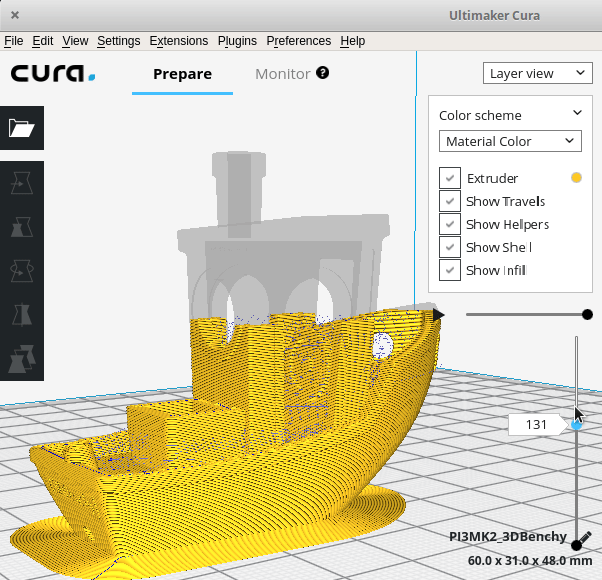
Cura slicing a 3D boat, the black lines are the layers that will be printed
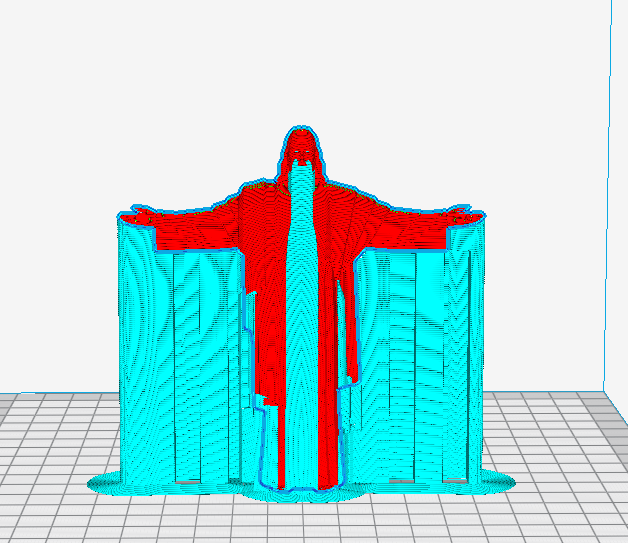
Good slicer software will also take care of things like building supports for overhangs in your piece. Think about a statue with an outstretched gooey plastic arm and gravity to understand why supports are important. Rarely will you want to print truly solid works (geek humor). Slicer software packages can be told to automatically honeycomb the internal structure of solid objects to save plastic, energy, weight, and time.
Notice the blue supports to keep the statue from drooping or breaking while drying
A quick on-line search will show you there are quite a few different slicer programs available. Many are free, some are extremely expensive. I’ve tested quite a few of these applications, Cura’s Utilimaker is the one I stick with. It is relatively easy to use and there’s a large community of people using it. Finding video help and instruction is a cinch. It is completely free for personal use and supports more brands and models of printers that some of the others.
To create and manipulate three-dimensional objects on a computer you will need some type of CAD software. It stands for Computer Aided Drafting, Computer Aided Drawing, or Computer Aided Design, depending on who you ask. Haven’t acronyms outlived their usefulness yet? Whatever it stands for, one of the most famous CAD applications is AutoCAD.
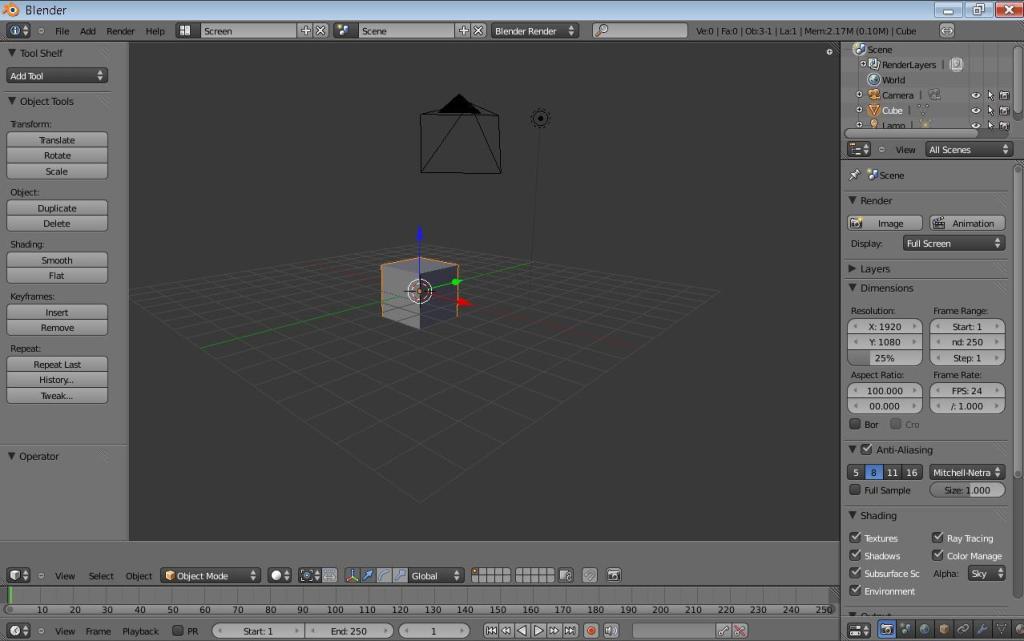
Blender is Open-source CAD software used by many 3D printing hobbyists
AutoCAD is the eight-hundred pound gorilla of CAD software, but at $1600.00 per year, is cost prohibitive unless you are a student or work for a non-profit. Microsoft includes 3D Paint with Windows 10 and it is a great way to get started using CAD software. Eventfully you will outgrow it and need something else. I like Blender, it is opensource (aka free for personal use) and very advanced. Blender is popular with the 3D printing community, so getting help is just a YouTube search away. It also detects if you’re a new user and will run you through a tutorial to learn the basics.
Microsoft 3D Print is included with Windows 10
Great, you’ve got your printer and your software so you are ready to go right? Technically you are ready to print but getting your newly minted thing off the printer and finishing it to match the idea in your head is another matter. There are some miscellaneous things you’ll want to pick up to have a good outcome.
There are tool sets specifically made for 3D printers and they are great, but you can also purchase or use some generic tools you may already have. You’ll want a nice sharp knife to trim your pieces and free them from the supports, I like exacto-knives. Varying grits of sandpaper are also a must-have. A sheet-rock spatula is a great tool to separate your creations from the printer deck, they occasionally get stuck.
A purpose made 3D printing tool kit
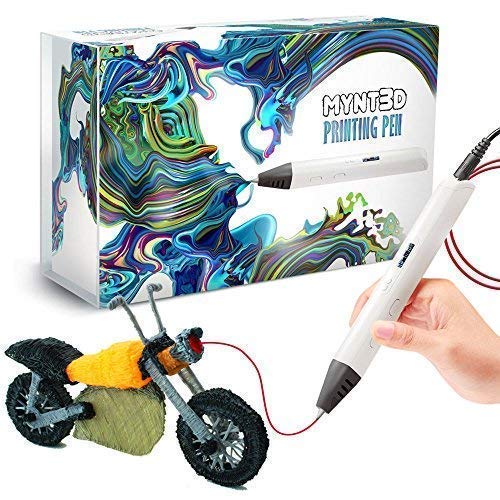
3D printing without a Dremel is like painting your house with a tooth-brush. Sure, you can make it work but, do you really want to? A few years ago my mother got my kids those 3D pens that you’ve seen on TV. They spit out hot plastic much like your printer does. The idea is that you can hold your hand steady enough to build 3D objects, good luck with that. The funny thing is, they are a great tool for 3D printing. I use them to weld sections together. If you don’t have one, you’ll need some plastic glue.
That leaves paint, paint-brushes, paint thinner, a pallet, and lots of painters tape. Spray-Paint and Airbrushing are also excellent ways to add flair to your pieces. Visit your local art store, they’ll have stencils, stickers, and everything else you need to get the final look you’re after.
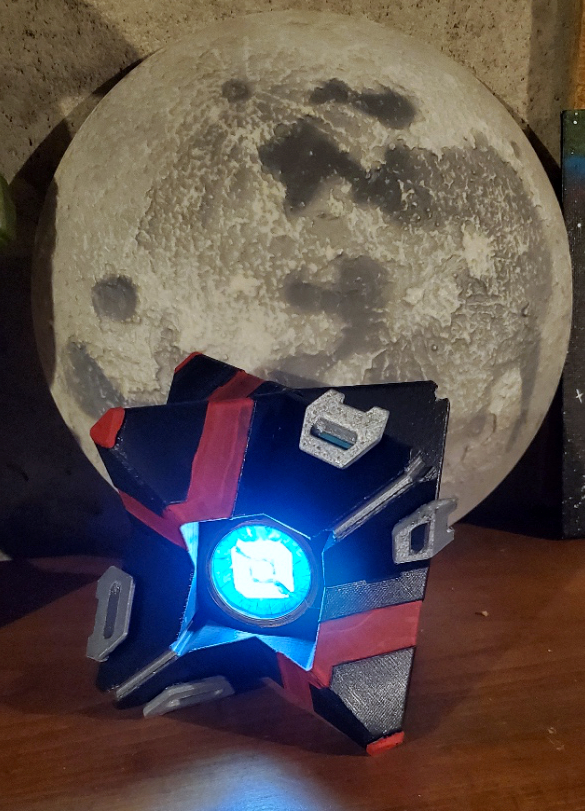
A Battle Hardened Ghost Shell from the game Destiny
My obsession with gadgets and gizmos is not relegated to computers, electronics, and video games. I enjoy engineered devices of all types, including all the weird doodads that people dream up to make cooking less of a chore. Toaster ovens, crock-pots, and air fryers, oh-my; the counters and cabinets in our home are full of the things.
Unsurprisingly, only a handful of the stuff ever gets used. Most of it seems to forever be in-front of the item you want at any given moment. You need spelunking gear and will pull a muscle in your shoulder trying to extract that Panini-press in the back. When my spouse received an Instant Pot as a gift I was simultaneously excited to experiment with it and loathed having to find it a home.
I had assumed that an Instant Pot was more or less a crock-pot with some electronics bolted on. Here’s a tip: do not hop on any of the Instant Pot Facebook groups and refer to it as a fancy crock-pot. The so called “Pot Heads” don’t like it and for good reason. This is one of the most versatile kitchen appliances I’ve used. It has managed to replace several other appliances that find themselves in the “Sell on Facebook” pile in my garage.
An Instant Pot combines several seldom used cooking tools into a single contraption that is more than the sum of its parts. You get eleven devices in one, it’s a: pressure cooker, saute pan, crock-pot, steamer, sous-vide, air fryer, roaster, oven, broiler, dehydrator, and a food warmer. The unit has a powerful heating element in the base and two different lids.
The pressure-cooker lid forms an air tight seal over the pot to handle all the water-based and slow-cooking duties. It has an automatic steam release valve built-in. The entire thing is dishwasher safe and the silicone seals are easily replaceable.
The air-fryer lid contains an additional heating element along with a high-powered fan. Pizza rolls take more than twenty minutes to bake in the oven, on top of ten minutes spent preheating. They come out crunchy on one side and mushy on the other, because I’m too lazy to flip them all. The same rolls take eight minutes from start to finish in the Instant Pot and turn out golden-brown-delicious every time.
The previously mentioned Facebook groups are full of recipes and tips. For example, I recently learned that the pot’s handle makes a stand for the lid. There are plenty of first and third party accessories that expand your pot’s capabilities. We ended up purchasing the clear lid.
Man I wish these things would have been around when I was in college! If you’re considering an Instant Pot of your own, do some research. There are several different models available, mine is the eight quart duo-crisp combo.
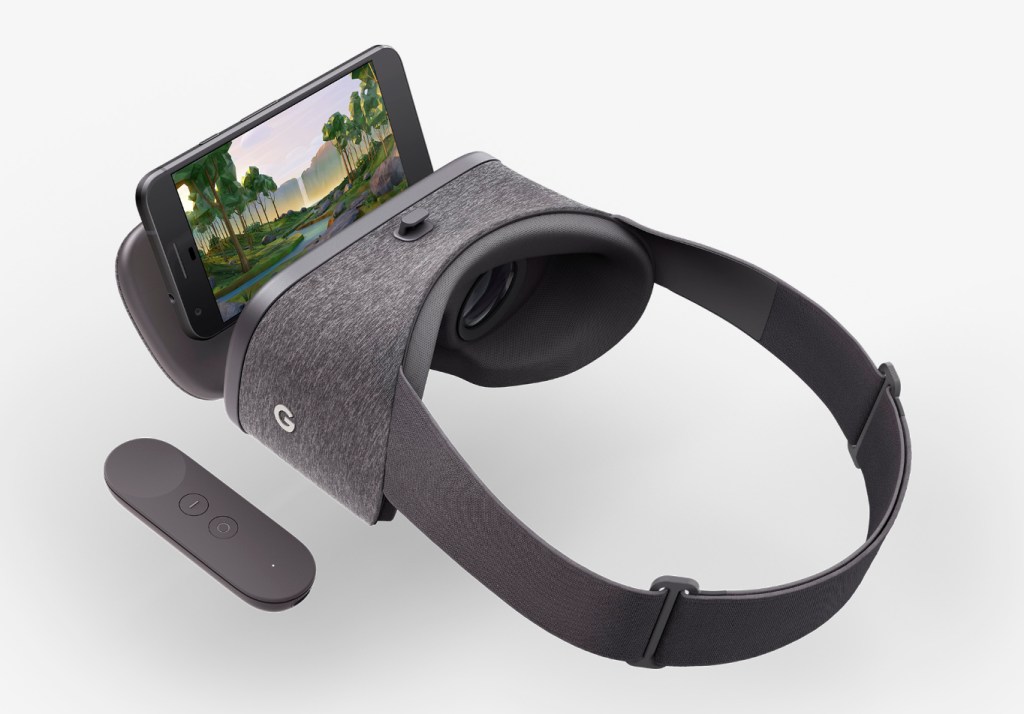
Almost everyone agrees that virtual reality represents the future of entertainment and education. Many predict it will serve as the primary interface between the world we were given and those we create displacing monitors, phones, and televisions. Before V/R can assume this role, there are several hurdles it must overcome.
Chief among the obstacles of virtual reality’s wide-scale adoption are the cord and high-end PC that are required to experience it. Google Cardboard and the many phone based V/R sets like it, attempted to bring tether free immersion to fruition and were successful in many regards. They gave us a taste of what could be and sold in numbers sufficient to warrant the capital investment required for innovation.
In my opinion, Facebook’s marketing of the Quest as, “just like the Rift, without the cord” has hurt initial sales. I think they’ve made the same mistake that Nintendo made with the Wii U. I personally looked at the Quest multiple times and decided it didn’t offer enough difference from the Rift to justify purchasing it. My lovely wife got me one for Christmas. Now I understand how wrong I was.
Facebook’s Oculus Quest hit the streets in May of 2019. The headset is physically similar to the other Oculus offerings, but is fully self contained. No computer and no cord. Just slide the goggles down over your eyes, pick up the controllers, and you’re in. The Quest does for V/R what the Wii did for gaming consoles. Within a few minutes of gearing up, anyone, including your grandparents, can easily navigate their way to an untold number of adventures, entertainment options, and venues.
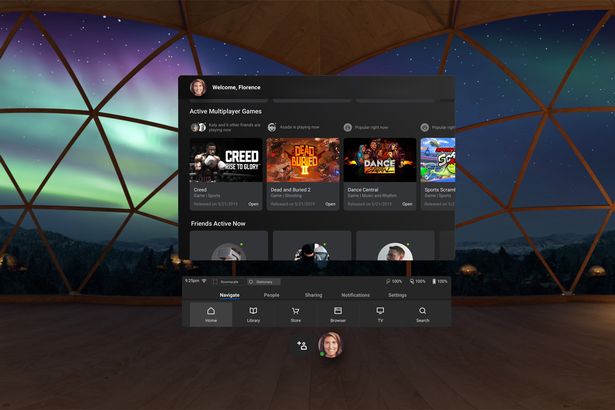
The experiences that are available cover almost every conceivable genre. I’ve hung out in Adam Savage’s (Mythbusters) workshop and watched him build a sheath for his priceless sword. I took a guided tour of the British Museum and went shark diving off the coast of South Africa. I watch Netflix in my own personal theater with a view of snow capped mountains. I attended a basketball game and chatted with my fellow fans. Virtual Reality is so much more than games.
Don’t get me wrong, there are plenty of games to play. Adventure, Shooters, RPG, Cards, Strategy, and more are represented. Some are of poor quality, some are nothing short of amazing. Nothing quite compares to being in your game. Developers are really starting to understand how to deliver V/R experiences that blow meat-space options away.
One major difference of the Quest is that like an iPhone, it is locked to the Oculus App Store. This makes it easier to use, but limits choice. With a little tech know-how you can enable the option to side-load software and there is an underground app store for those that choose take the chance. Checkout SideQuest if you’re interested in that sort of thing.
Besides SideQuest, you can also gain access to more games through a Quest Link compatible cable. If you have a strong gaming PC, use it to access the full V/R experience including Steam V/R and Oculus games that don’t nativity support the Quest. For a list of supported cables and GPU’s see https://support.oculus.com/444256562873335/.
Directly comparing the Quest to the Rift or Hive is a misnomer. It wasn’t created to compete with, or replace them, yet. Sit in a chair and watch a movie on your Rift and you’ll soon be annoyed by the cable draped across your lap and sitting in your computer chair instead of your recliner. How would you provide an entire classroom of students with full gaming PCs and all that goes with them, so their teacher could take them on a tour of the International Space Station? The Quest was made to simplify V/R and make it portable, it does both of those things well. I look forward to seeing what the world does with this technology now that it is here.
If you use PowerShell long enough you will inevitably need to combine data from more than one module, method, or object into a report of some kind. As an example, I ran into a situation where I needed to show mailbox sizes by city. Exchange doesn’t have the city attribute, but we know Active Directory does.
First we will get the mailbox size from the Exchange module; Get-MailboxStatistics user@domain.com|FL TotalItemSize should do the trick.
We know that Azure Active Directory has our address in it; Get-MsolUser -UserPrincipalName user@domain.com|Select City -ExpandProperty City will show the city name to us.
I’ve witnessed people resorting to complicated procedures to combine the output from two different modules. Copying and pasting the data from each module into Excel seems to be very popular. There are many problems that can occur with these types of solutions. The best way to accomplish our goal is to use a construct called a Hash Table.
What’s a hash table? In the simplest terms it is an array (a spot in memory) that stores key/value pairs. In our case, we are going to store a key (the name of our column) and a value (the results of a command) in the array. It sounds complicated, but is actually quite simple once you get the hang of it. The trick with hash tables in PowerShell is to get the syntax right. @{Name = “Name of Column”; {Expression = {Value, or Command}} is the formula.
To create the hash table from our example the command is: Get-MailboxStatistics user@domain.org|FL TotalItemSize, @{Name = “City”; Expression={Get-MsolUser -UserPrincipalName user@domain.org|Select City -ExpandProperty City}} We get the mailbox size and then insert a hash table that contains the city. The comma in between TotalItemSize and the @ symbol that starts our hash table is what tells PowerShell this is a new column of output.
Keep in mind this technique works with any number of PowerShell modules. SQL, SharePoint, Lync, Teams, most Microsoft server products and even many third party Windows based programs have a PowerShell module at this point.
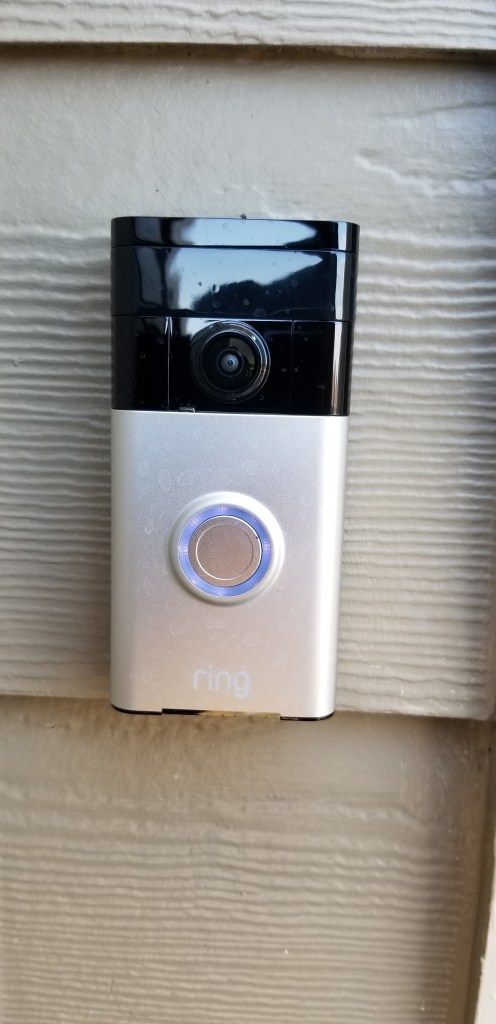
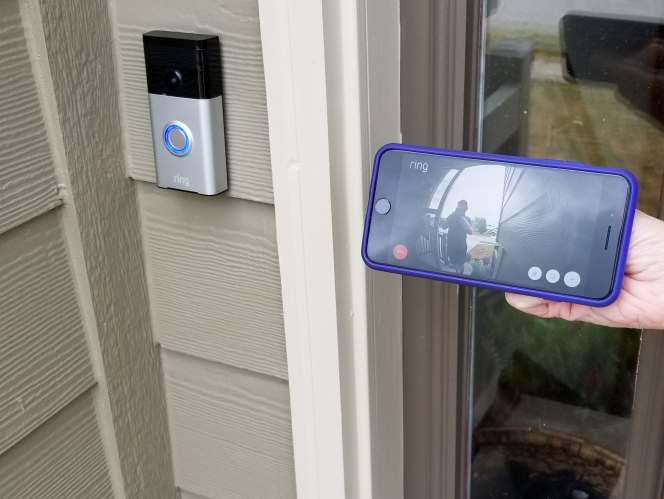
There has long been a Ring doorbell keeping watch over the front door of our home. The tireless sentry has become an indispensable part of our lives. Being able to see who, or what is on our porch from wherever we might be is a superpower we won’t be giving up, ever. I’ve written before that door cameras should be standard equipment for any residence and I still feel that way.
No matter if you choose Ring, Nest, or some other brand, all doorbell cameras suffer from a similar issue. Seeing a small section of your front porch 24/7, is the gateway drug for a full fledged security camera addiction. In “Knock, Knock, Anybody Home” you can watch a strange man ring our doorbell. When we don’t answer, he grabs a ladder out of the back of a truck and heads up our driveway, out of the Ring’s view! It’s incidents like these that drive the urge to survey your property at all hours of the day or night.
Searching the Internet for security cameras is like going to a restaurant who’s menu is too long. Do you want NVR, ONVIF, IP, or BNC? What do all of the acronyms even mean? More or less, the major choice boils down to those that stream to your phone, or the multi-camera systems that you see in businesses. Most of us are going to be more comfortable with the kind that work with our home network and stream to our mobile devices.
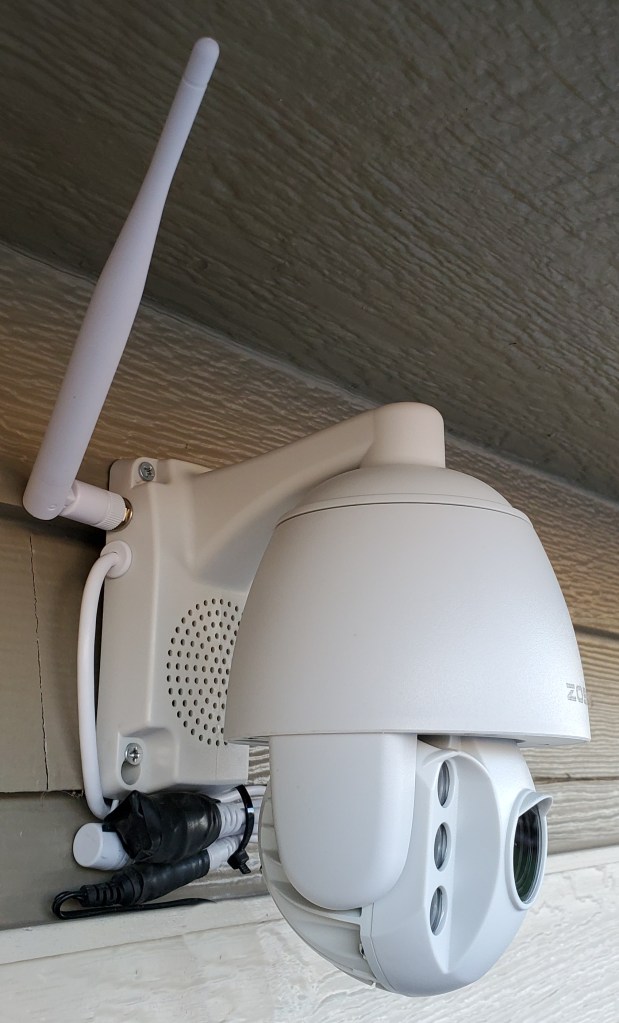
Once you’ve chosen streaming cameras, you will be very tempted to install the version that matches your doorbell. There’s nothing wrong with that decision, they will work well together. I wanted some features that didn’t seem to be available from Ring’s security cameras. Specifically, I wanted to be able to pan, tilt, and zoom the camera remotely. I needed to be able to track someone, or something anywhere on our section of the street, not just the front yard.
One might think that deciding on a PTZ IP Cam rated for outdoor use would limit the choices to a handful of options, that isn’t the case. The market for these things is huge. You end up left on the ole, “Most bang for the buck” quest. You’ll be choosing between options like: wired or Wi-Fi, optical or digital zoom, flood lights or night vision, recording or streaming, and on and on, forever.
I was lucky and stumbled across a unit that has all of the options in one device. The Zosi ZPTZ-B220W-W has a 5X optical zoom, digital zoom, pans 355°, tilts 90°, infra-red night vision, flood lights, two-way audio, SD card recording, motion detection, and will connect to a wired or Wi-Fi network. It’s all in a weather proof case that screw mounts to any flat surface in almost any orientation. The list price on Zosi’s site is $129.00, but I purchased mine on Amazon for $99.00.
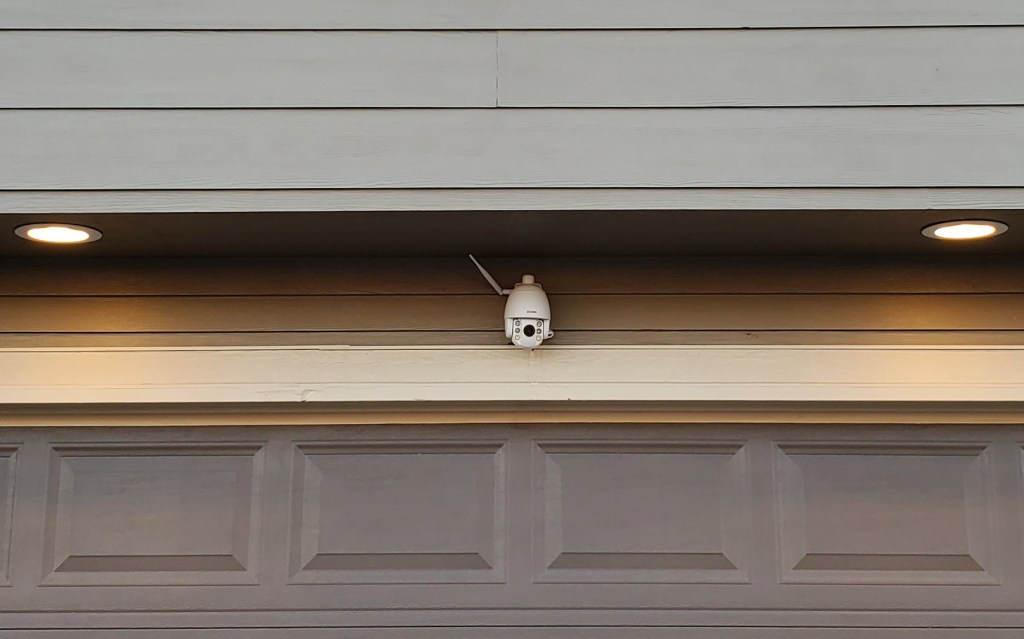
Installing the camera was pretty straight forward. I marked and drilled four pilot holes into the siding under the garage’s eve. Then drove the included screws through the mounting bracket’s holes. I plugged the power supply into the same ceiling outlet that my garage door opener uses. All-in it took about two and a half hours to finish the project. Amazon offered the camera with professional installation for $179.00, but I’m a full member of the ISECDISCI clan (If Someone Else Can Do It So Can I).
The camera’s configuration is handled by the app that you install on your phone, tablet, or PC. To setup the connection, I just needed to scan the QR code on the back of the unit. If only I had known that before I climbed down the ladder and put it up! Once you get the app connected to the camera, the rest of the configuration is down to your personal choices.
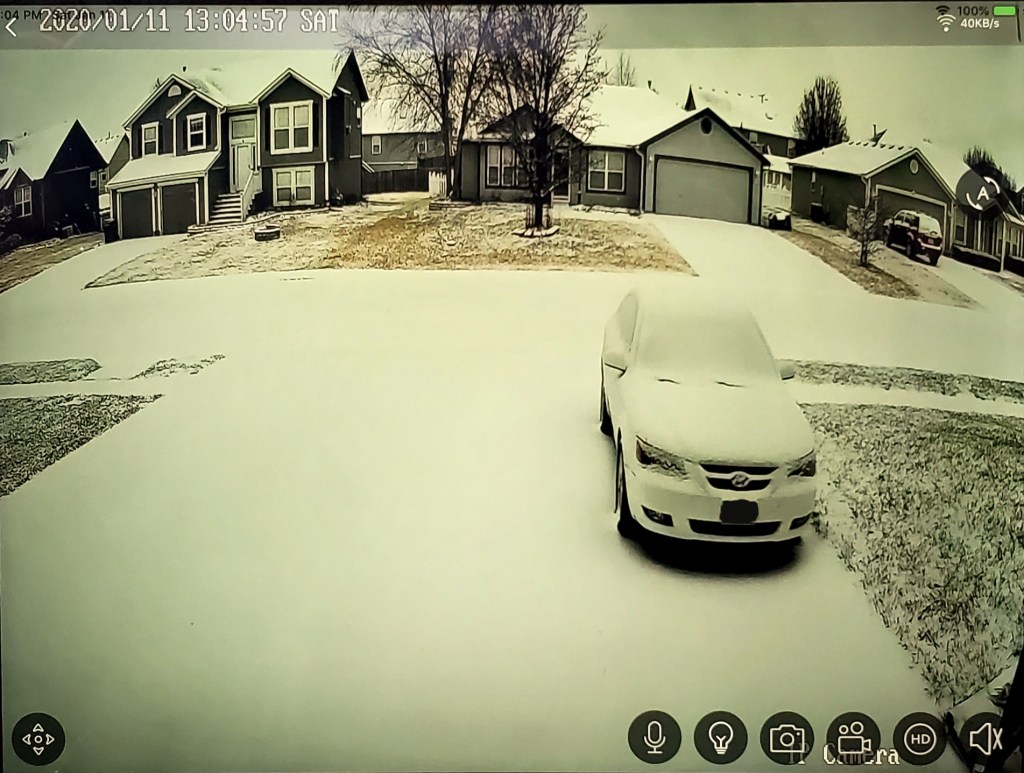
My family and friends have all been very impressed with how well this thing works. The 1080P video is clear, the zoom allows me to see details of far away objects; I.E. read the license plates of passing cars. The night vision reaches all the way across the street and the flood lights illuminate the entire driveway. Day or night, I can see what is going on all the way to the end of my block.
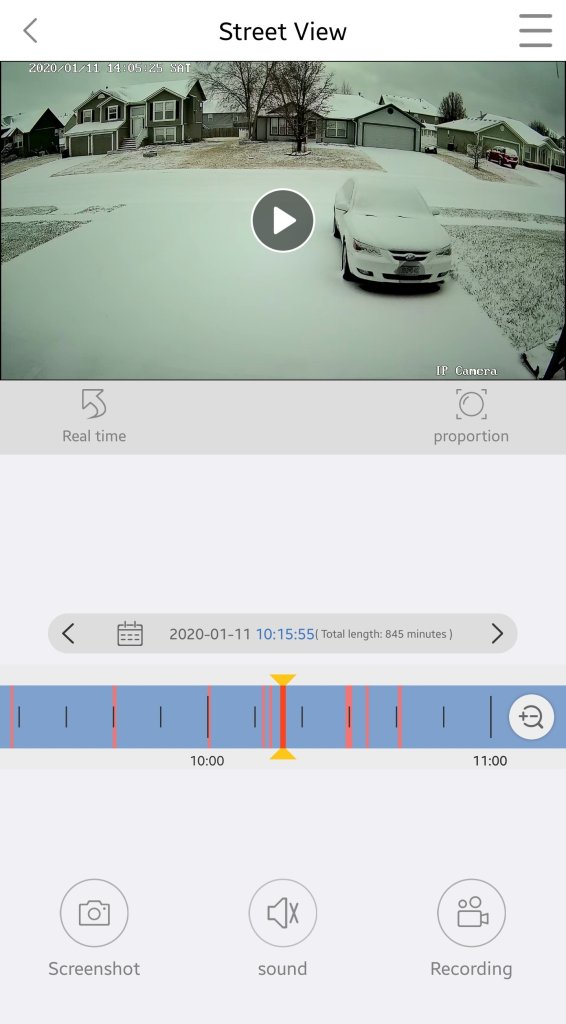
Adjustable motion detection sensitivity and intelligent lighting allows the camera to pickup and record moving objects with precision. If you program the unit to record 24/7 and enable motion detection, it will flag motion events in the playback timeline by coloring them red. This makes finding a specific event incredibly easy. There’s also an alarm function, if the camera detects motion it will play one of several alarm tones through its built-in speaker.
Cloud storage is available for a small fee from the app, but an SD card has been working well for us so far. Our testing shows around 0.33 GB per hour is consumed. A 32 GB card will record around 3.5 days worth of continuous video. For those of you who don’t like multiple trips up ladders, put the card in before you mount the camera.
My wife has installed the app on an old iPad and leaves it running on a stand next to her seat in our living-room. She calls it her window and really enjoys being able to glance at the screen to get an unobstructed view of the neighborhood, sunset, and weather. Every once and a while we screen cast the iPad to our big screen TV to watch the snow or rain. We also use it from bed to keep an eye out for our departing and arriving teenagers. More than once I’ve pulled it up to see what that noise in the middle of the night was.
Whether you go with the cameras that match your video doorbell, or purchase a standalone solution you’ll almost undoubtedly enjoy the benefits of remote surveillance. Now if someone would just write an app to coordinate my security cameras with my drone. Imagine if motion detection triggered my drone to go inspect interesting items, hmm.
If you have been reading my blog for very long, then you will know that my biggest gripe with the iPad is it’s lack of handwriting recognition. Why on earth would Apple have invested so much into the design of the glorious Apple Pencil and leave out the thing it would be most useful for? Where is my dog supposed to sit while I write if I have to put a keyboard in may lap?
I use the handwriting recognition on my Surface and Galaxy Note every day. The iPad’s lack of what should be a basic function has kept me from even considering a purchase. My wife, on the other hand, has been happy to forgo handwriting and been satisfied with trying to type on a touch screen. Good thing, it means we always have a late model iPad in the house.
She excitedly woke me up this morning, “Honey, look what I found!” Then she opened iMessage, changed her keyboard, and used her Apple Pencil to hand-write me a text! “Woah,” I said. “They finally did it?”
It turns out not exactly, but close enough. Apple had nothing to do with this particular piece of magic. An app named Selvy PenScript adds a handwriting recognition keyboard to your iOS device. I’ve spent the last couple of hours putting pen to screen and I’m impressed.
It isn’t quite as accurate as Microsoft’s version and there’s no floating option, but it gets the job done. It has one feature that I really like that Microsoft and Samsung don’t. You can change the color of the ink. Other than that , it’s a no nonsense handwriting tool. Now that it exists, I may even consider an iPad the next time I upgrade my tablet.
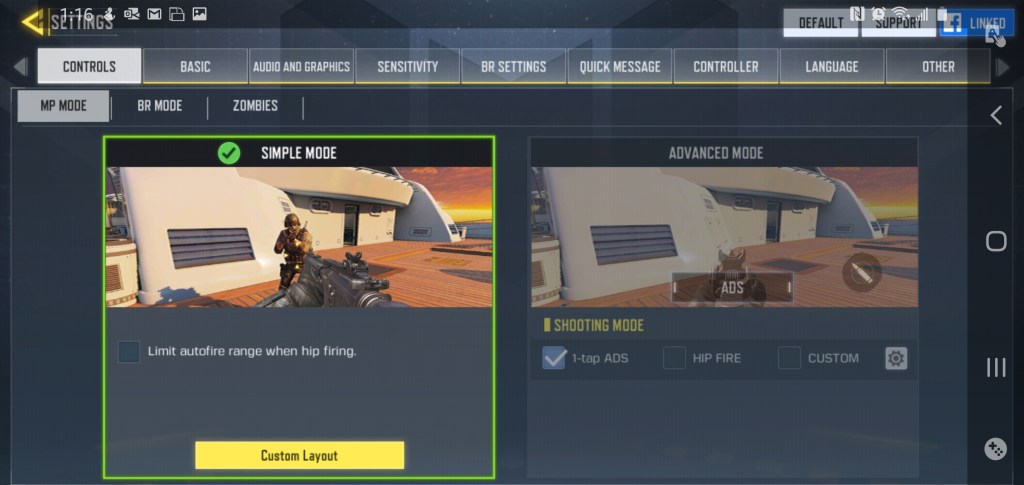
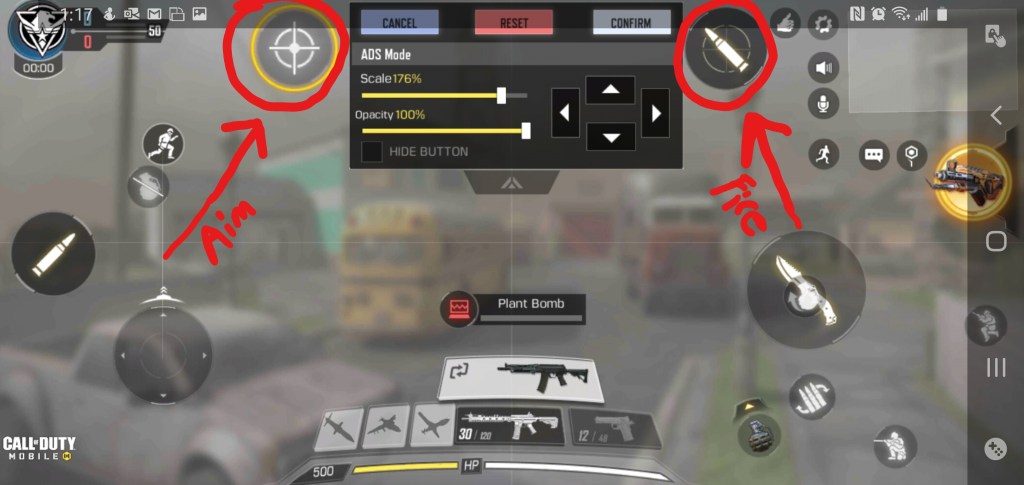
Playing a shooter like Fortnite or Call of Duty on your phone can be frustrating. Without physical “triggers” I find myself having to look at the screen to find the touch spots for aiming down the sites and firing. Each time that I do, I end up the one bleeding out on the ground.
Some games have attempted to rectify this situation. Call of Duty Mobile for example, has an “auto-fire” mode in which your weapon fires at any target that lines up with the sights. Auto-fire does its job, some of the people that I play with prefer it. It makes the game feel less like a shooter and more like an arcade game, but that could be my years of Xbox showing through.
There are also many types of external controllers for your mobile phone. You can even pair a Bluetooth Xbox or PlayStation controller. Competitive shooters tend to force you play with other controller enabled players when you opt for physical controls. You can end up in a much smaller pool of players which makes finding games more difficult. You may also lose the ability to play with friends who don’t have controllers of their own.
There are a few phones on the market that have built-in shoulder buttons. They sound like a good idea and the one made by ASUS works well in the handful of games that support it. There’s no way I’m giving up my Galaxy Note and its pen though. How would I finish writing this article? It’s too bad that I can’t add a couple of buttons to my precious.
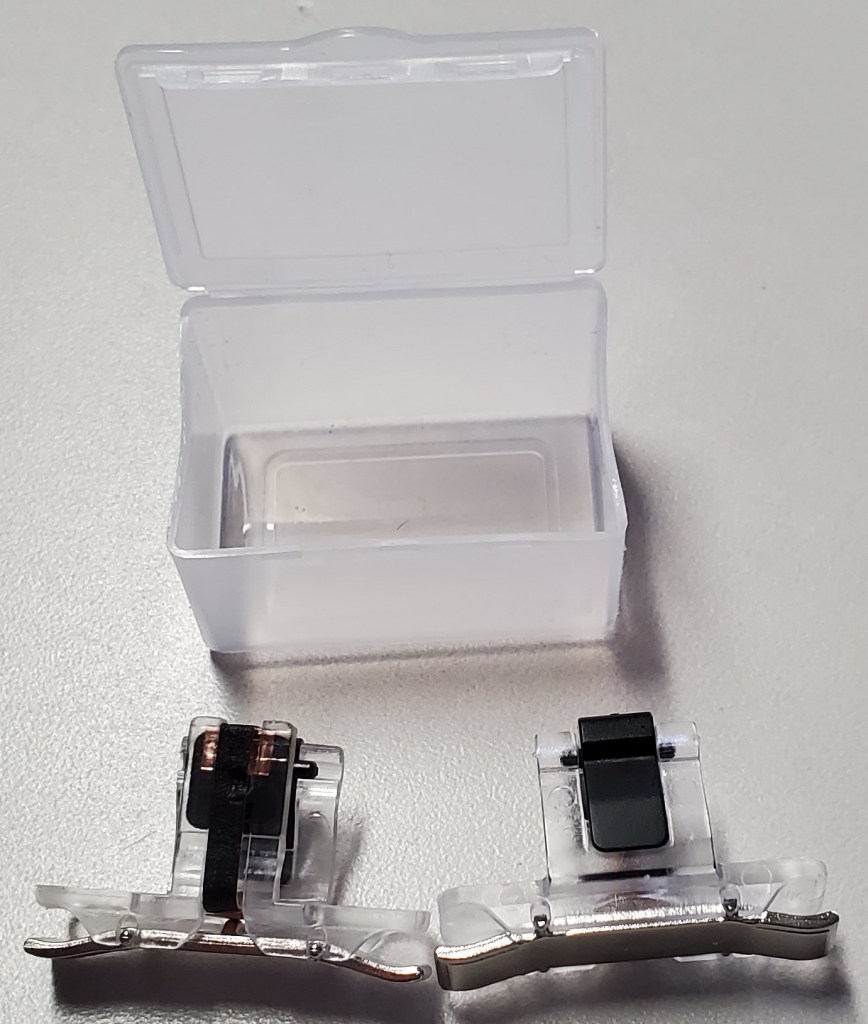
Apparently, some enterprising people had the same thought. There are several manufactures that are making universal shoulder buttons that you can slide onto any mobile. They function by tapping the screen with a small mesh pad when the trigger is depressed. Your game will need to allow a customized layout. The aim and fire controls need to be moved under the button’s pads.
I was skeptical, but you can get a set on Amazon for less than ten bucks and I like trying new stuff. They showed up the same day I ordered them (same day shipping rules) and I have been pleasantly surprised. These things are great. They fit in a tiny case that easily slips into a pocket when you’re not playing. The button press feels great on the set I got. They do block the screen a little. Each pad is a .5 centimeter square, but the trade off is well worth it from my point of view.
Since they are tapping the screen, you won’t be isolated in a controller only game queue. The advantage for me is in gripping my phone, I can hold it more like a PlayStation or Xbox controller. I also don’t have to constantly look at the screen to find the touch spots and can use the ADS and Fire functions simultaneously.
Some may consider these types of devices “cheating”, but they don’t have that big of an impact. On average, I got the same kills per game when using them versus not. As a developer, I must warn you, detecting and disabling these shoulder buttons would be simple. If they do start being counted as a cheat they may be outlawed in a future update for your game.
If you administrate an Office 365 tenant, you’ve undoubtedly discovered that PowerShell is a requirement rather than an option. Using PowerShell with Office 365 isn’t all that different from the on-premises version, but connecting to all the services can be challenging. Often, a task or project requires multiple modules to function.
With a little scripting knowledge we can connect to and manage all of the O365 services at once. I can’t tell you how many times I got half-way through a project only to realize that I didn’t have all the required cmdlets. Logging on to everything each time I use PowerShell saves time and frustration.
To make the code below work, install the PowerShell modules each service requires. Open an elevated PowerShell console (right click, run as administrator). Check the execution policy (Get-ExecutionPolicy), if it is restricted use the following command to change that: Set-ExeuctionPolicy -ExecutionPolicy Unrestricted . Then use the following commands to install all of the tools:
Install-Module AzureAD
Type A and press Enter (yes to all) when prompted.
Install-Module MSOnline
Type A and press Enter (yes to all) when prompted.
Install-Module MicrosoftTeams
Type A and press Enter (yes to all) when prompted.
Type A and press Enter (yes to all) when prompted.
Copy the code below and save it as a PS1 file named Manage-O365.PS1 in your documents folder. Make a new desktop shortcut with the following path: C:\Windows\System32\WindowsPowerShell\v1.0\powershell.exe -NoExit “C:\Users\profile\Documents\Manage-O365.ps1” . When you double-click it you’ll be prompted for credentials and the Office 365 organization name. After entering them, a PowerShell console will launch and connect to O365 services. The window stays open until you are done with your tasks.
Tis the time of year when all mankind comes together to bring the world peace and happiness, through discount shopping. There’s a lot of technology out in the world today. Some of it is nice and some is naughty. Here’s our list of tech items you probably know about but may not have yet.
4K TV’s time has come. We have crossed the point where not having one means you are missing out. Netflix, Hulu, Amazon Video, YouTube, many gaming consoles, and computers can all take advantage of the format. My cable provider even broadcast’s some sporting events and shows in 4K. If you’ve been holding out for the ideal moment to upgrade, this is it. 65 inch 4K screens are available from multiple vendors for less than $500.00 and smaller screens are under $200.00.
True wireless earbuds are a godsend for office and blue collar workers everywhere. If you wear headphones to stay focused and block out the world, then you have probably run into these situations: drug your phone off something, gotten a headache from the headband, been mistaken for princess Leia in a video chat, been cord yanked, or gone to a meeting with headphone hair. Personally I like the true-wireless buds that feature active noise cancelling, but no matter your flavor they are all at the lowest prices we’ve seen.
Remote start for your vehicle is an easy add-on. Best-Buy will install it into any automobile for less than $300.00. If you’re more a of a do-it-yourself type of person, you can find kits on Amazon. Most are under $200.00 and the one I put on my truck took less than an hour to install. It required no tools, or skills, of any kind, I just had to plug-in a few wires. Scraping snow and ice off your windshield and freezing to death for the first twenty minutes of your commute is so passe’.
I can’t say enough about video doorbells. They are so useful in so many situations that they should be standard equipment on all homes. The ability to see who is at your door no matter where you are is a game changer. They improve security and more importantly let you chase off solicitors without getting off the couch. All of the major brands are available in easy self-install kits that require very little expertise. Follow the video instructions and you’ll have yours installed in no-time.
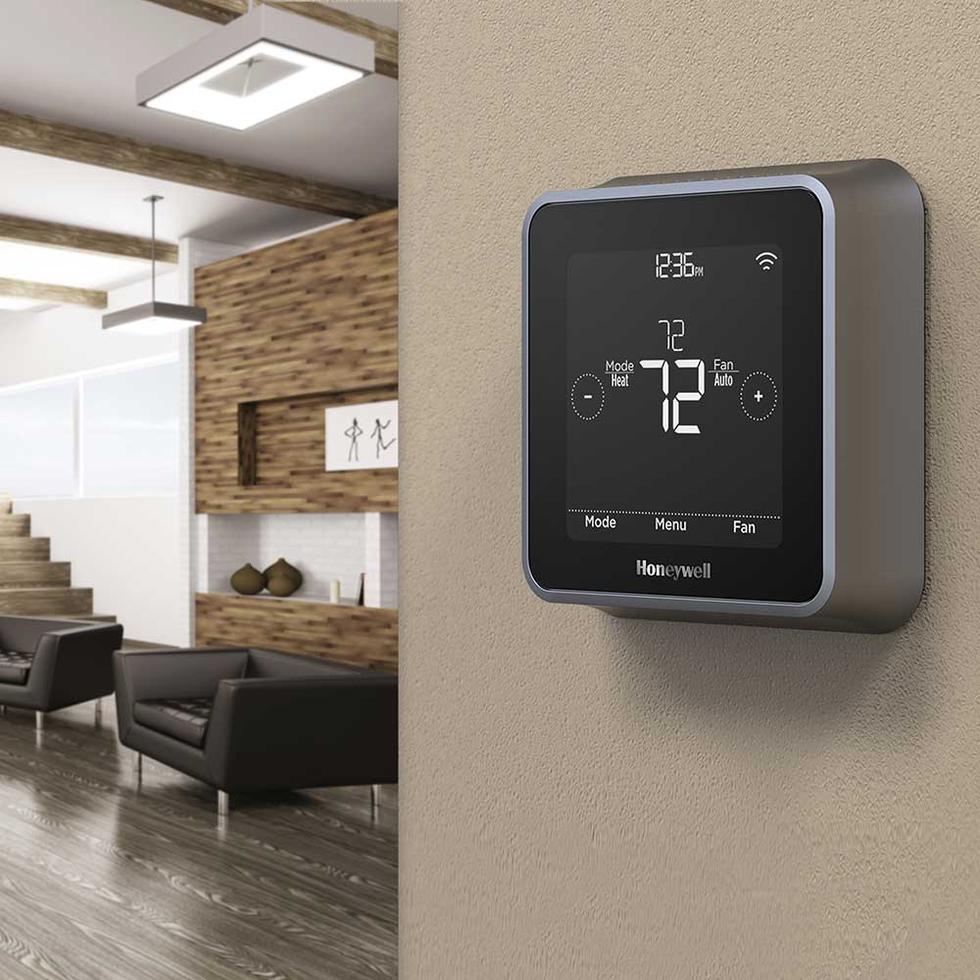
Smart thermostats save money, keep your home a more consistent temperature, and they look cool. They are available in easy to install kits that require basic home improvement skills. If you can use a screw driver and understand how sheet-rock anchors work, installing one will be a cinch.
In addition to devices, there are some subscription services that can make great gifts for people. Of course you know about Netflix, Amazon, and the new Disney Plus. Have you heard of the Xbox game pass? It gives you access to an ever increasing library of games (more than 300) on the Xbox and PC (Ultimate Pass). There’s an exploit for their $1.00 per month introductory price that will let you purchase up to three years worth of the service at the discounted rate.
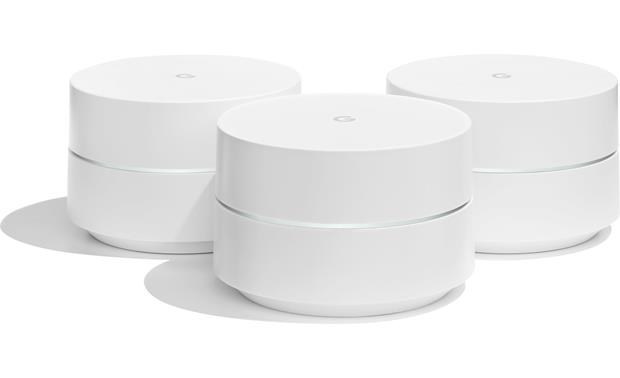
Mesh wireless networks have been available for quite a while but until recently they required professional installation. Now major manufacturers have engineered solutions that you can setup with an app on your smartphone. If you can connect your phone to a new WiFi network, you can install equipment that will drench your property in full strength signal happiness. Many of the networks are smart and will automatically load balance your devices to keep them all running at full speed.
Many of my co-workers, friends, and family continue to use paper planners and post it notes, for impromptu meetings and interactions. They tend to use Outlook or Gmail only for items that were derived via email. When I ask why, I get variations of “paper is easier”, and “paper looks nicer”. Which I agree with. However, there’s no searching paper, you can’t back paper up, and there’s no sharing.
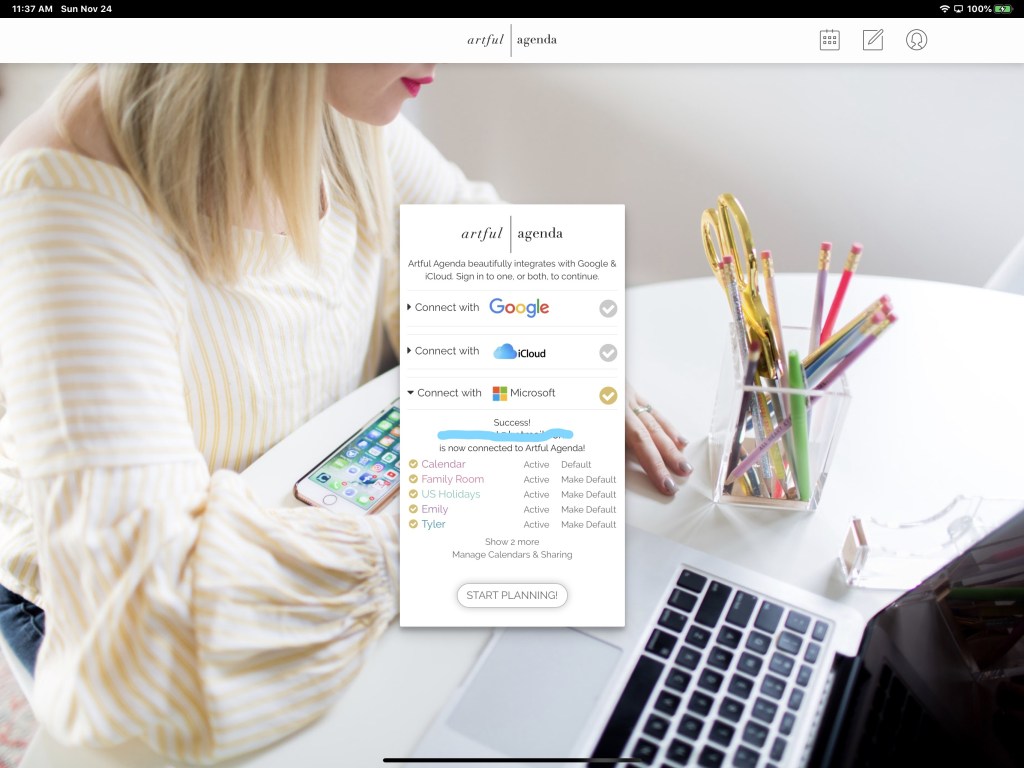
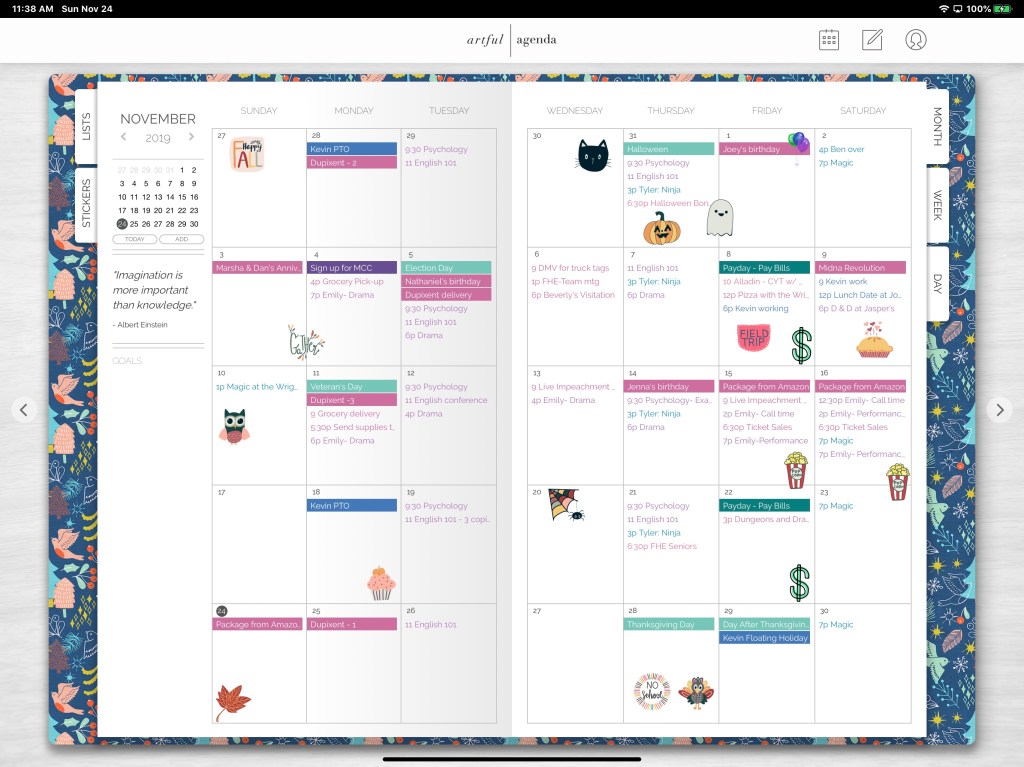
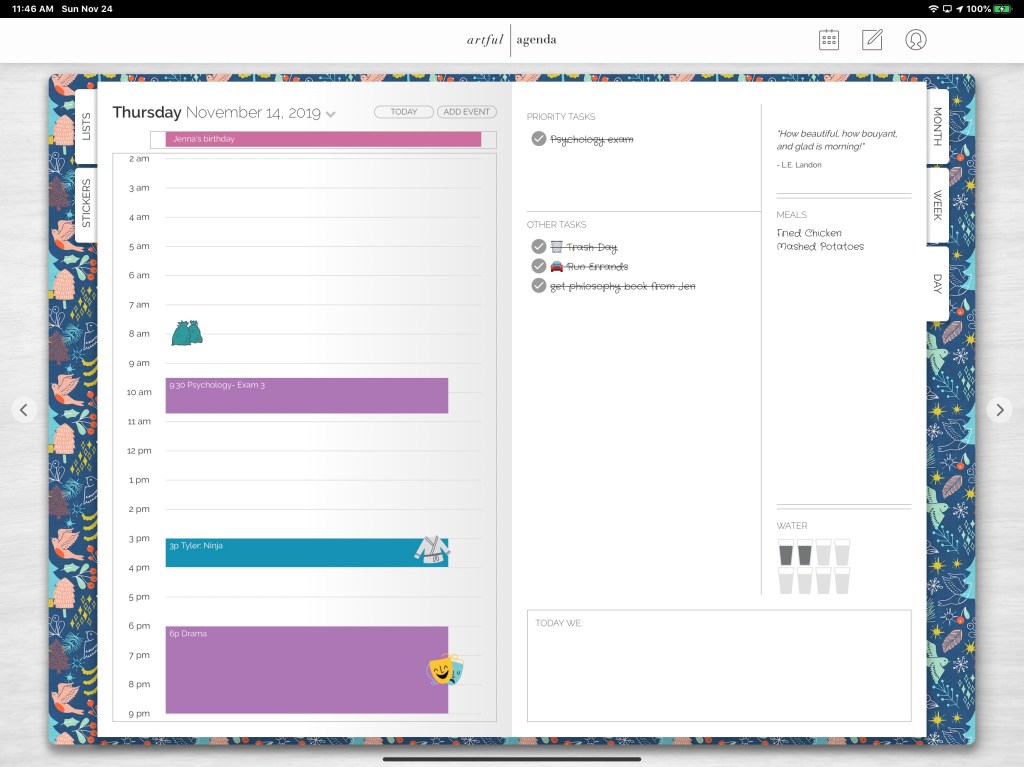
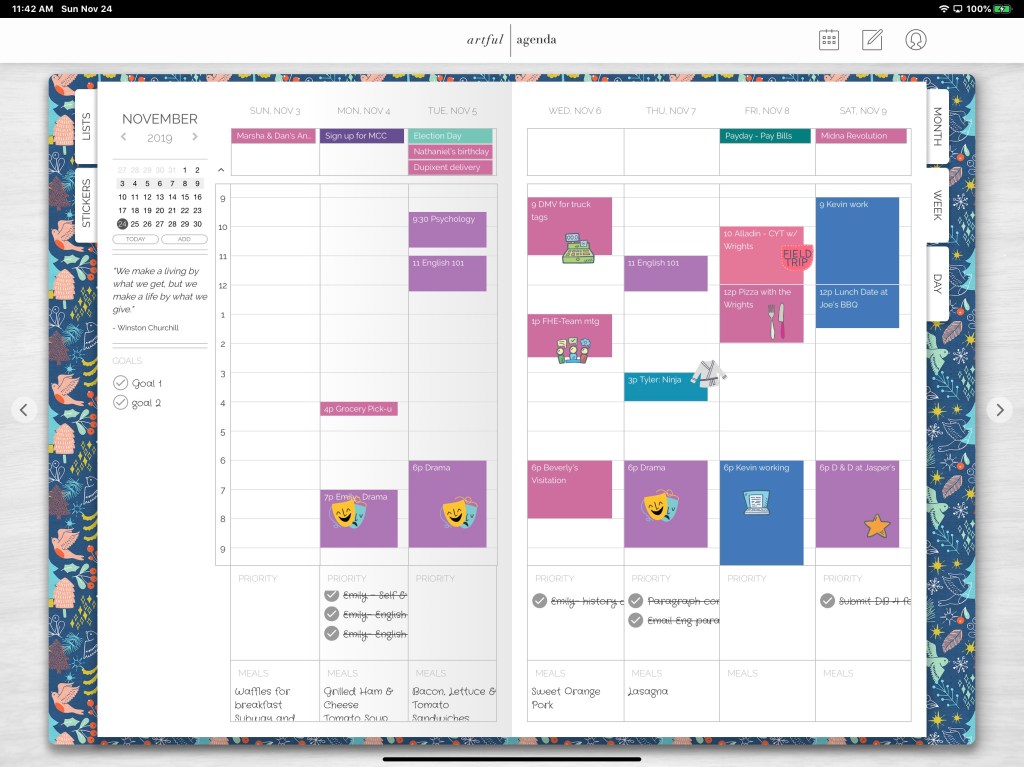
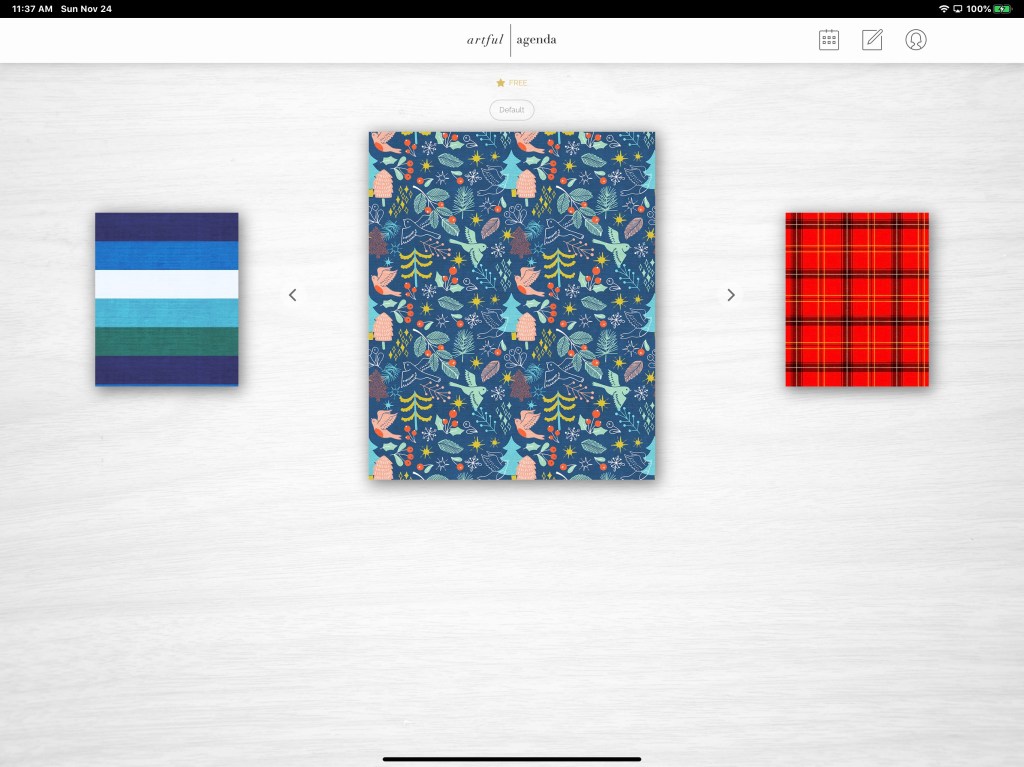
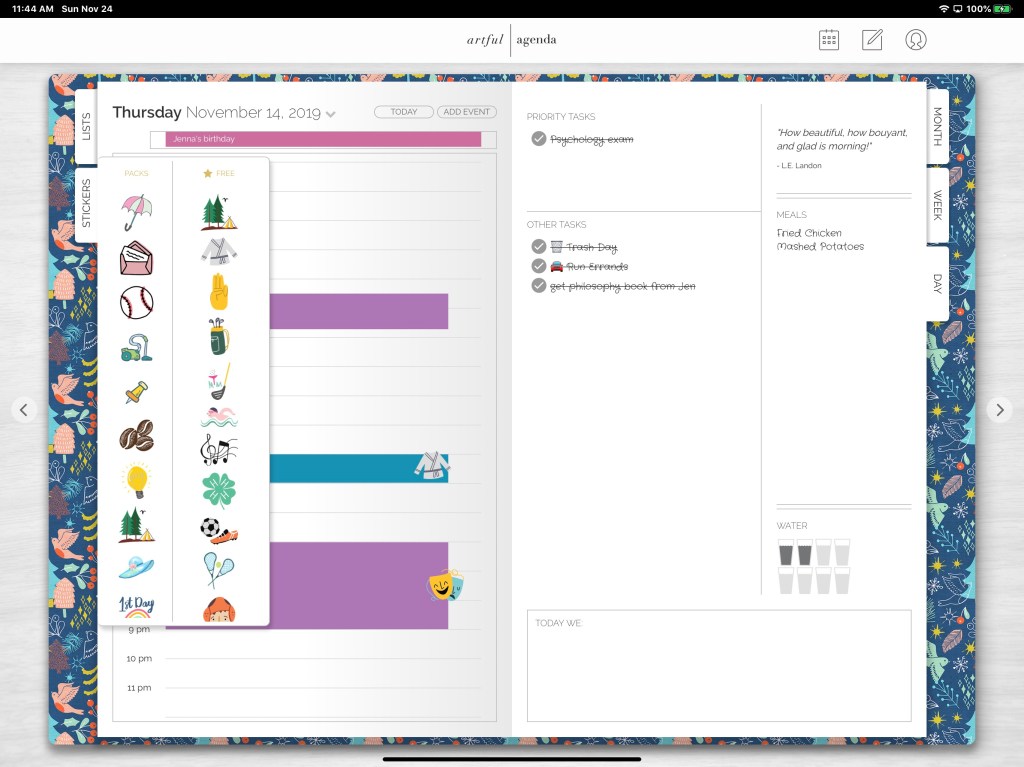
Artful Agenda strives to combine the best of both worlds. Connect it to your Google, Microsoft, or iCloud calendar and use its paper like layout and whimsical forms to manage your appointments.
The data you enter is saved to your cloud calendar and accessible through all the normal means your service provides. Artful Agenda is available as an App in your device’s app store and as a web site. The web site currently has more functionality and its layouts are more like paper.
Month, Day and Week views are accessed from tabs as they would be in a paper planner.
Each calendar gets its own cover, colors, and handwriting styles.
The included stickers make visually identifying your appointments a breeze and add artistic flare.
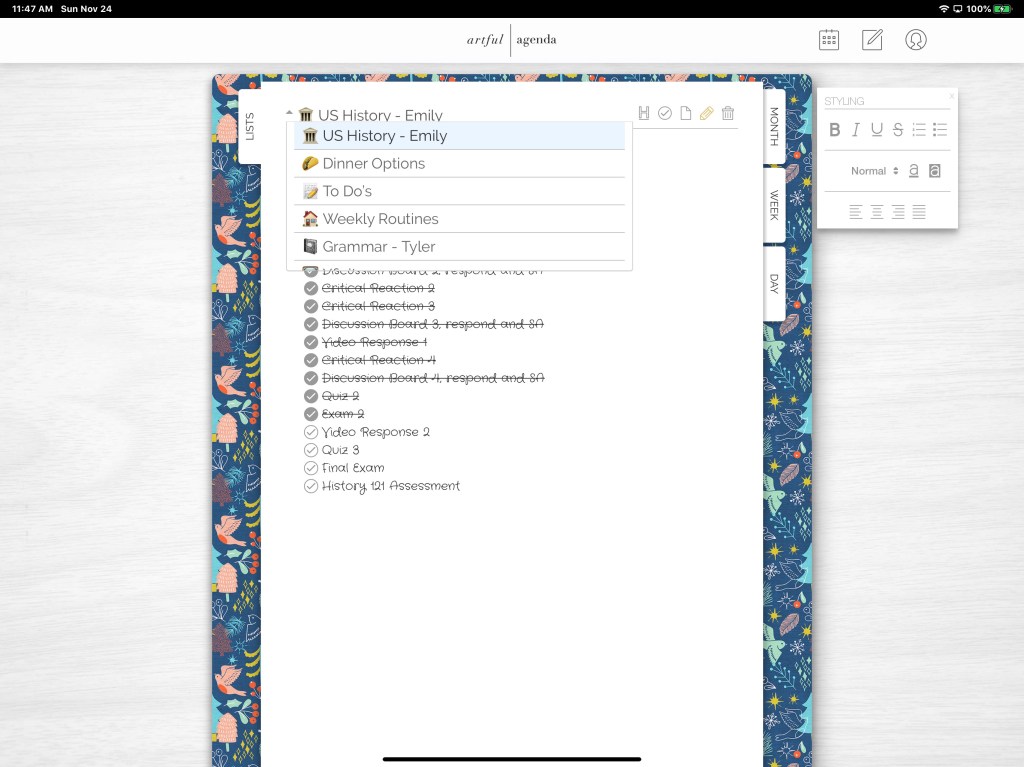
In addition to appointments you can also make custom lists, manage tasks, and takes notes.
If you have wished that Outlook or Gmail worked and looked more like a paper planner, give Artful Agenda a try. There’s a free trial after which a $3.99 monthly or $34.99 yearly subscription will keep you artfully plugging away.
Each Office 365 user license includes one-terabyte of space in Microsoft’s cloud storage service, OneDrive. File sharing, versioning, offline synchronization, and mobile device apps are just some of the available features. Recent versions of the OneDrive software also includes the ability to backup key desktop folders automatically.
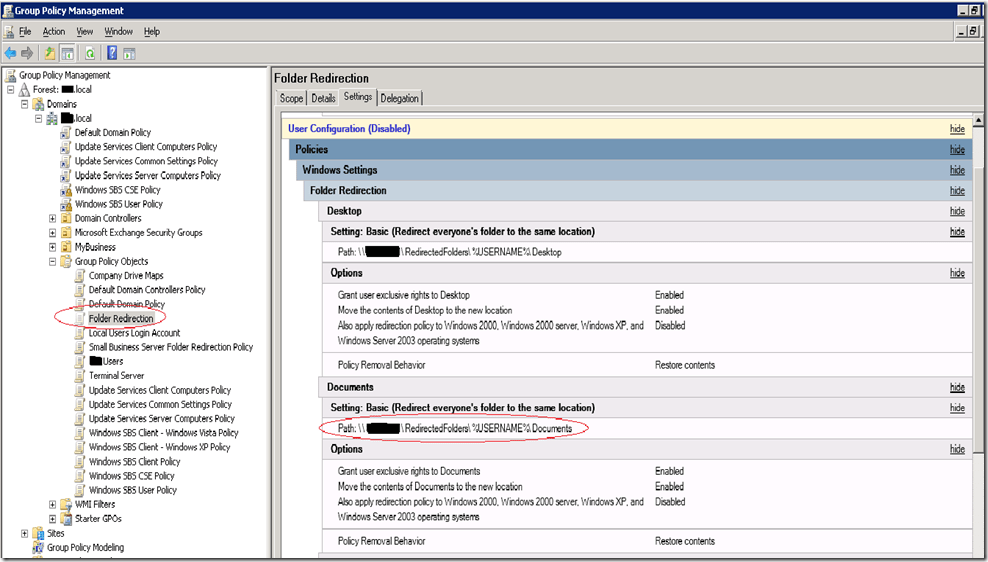
One of the biggest headaches suffered by IT staff is caused by worrying about the countless files stored on laptops and desktops. As with all IT conundrums, there are multiple solutions. One of the most common is to use a GPO to redirect user’s files to shared folders and back those up.
Folder redirection is a successful technique that has saved an untold number of office workers from certain doom, myself included. The files stored on the server are made available to every machine you log on to. If you lose a file, your IT people can restore it for you.
There are a few problems with redirection that present themselves over time. Without careful pruning and a lot of thought around policies, the shares will balloon quickly. If quotas weren’t enforced from the start, convincing management after the fact can be challenging. Getting your user population to clean up after themselves almost never works.
Then there are the dreaded permissions issues. If you’ve ever administrated an environment with folder redirection you probably just shook your head in sympathy. Where do they come from? Who knows? Suddenly random users will be unable to access their files. After it happens once, you can bet it will again.
For most environments, replacing folder redirection with OneDrive’s Backup is a Win Win. It can reduce storage costs and backup times while adding modern features your users will appreciate. Of course no solution is one-size-fits-all, so evaluate your options carefully before proceeding.
A limitation of OneDrive Backup is that the files must be located on the profile’s Desktop, Documents, or Pictures libraries. Therefore, if you are using re-directed folders, the first step is to disable them. Generally, excluding the user from the redirection GPO and updating their policies will cause the files to be copied back to the original folders. If you run into issues, a robocopy script configured to move the files might help.
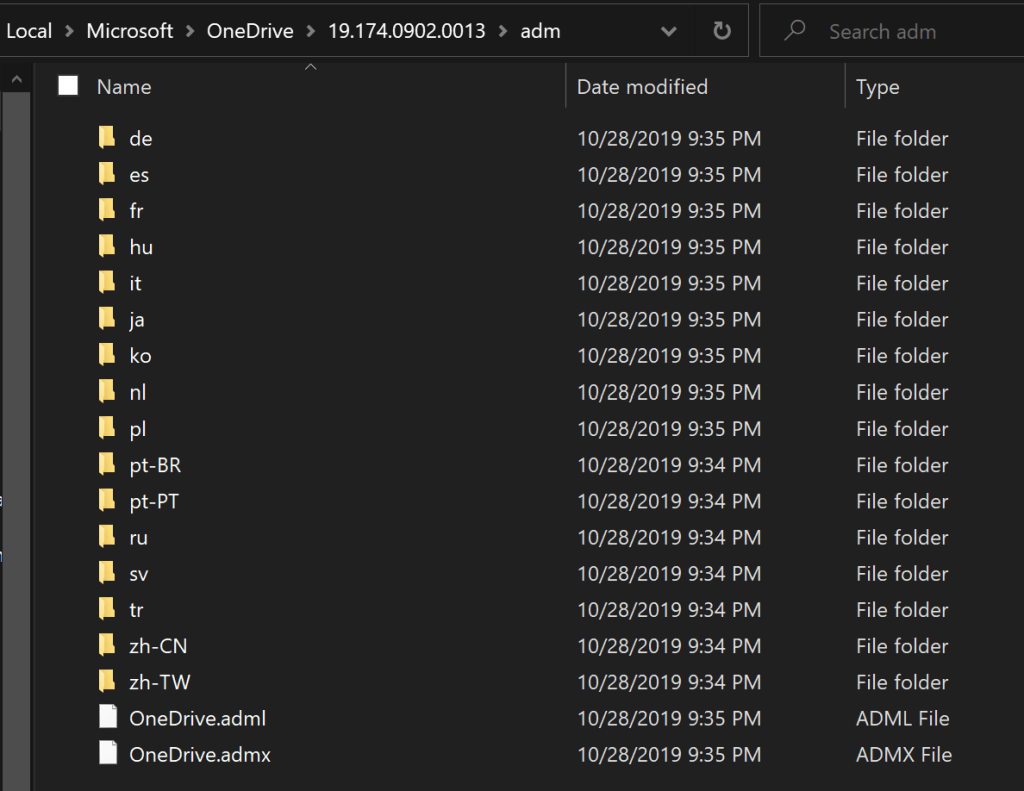
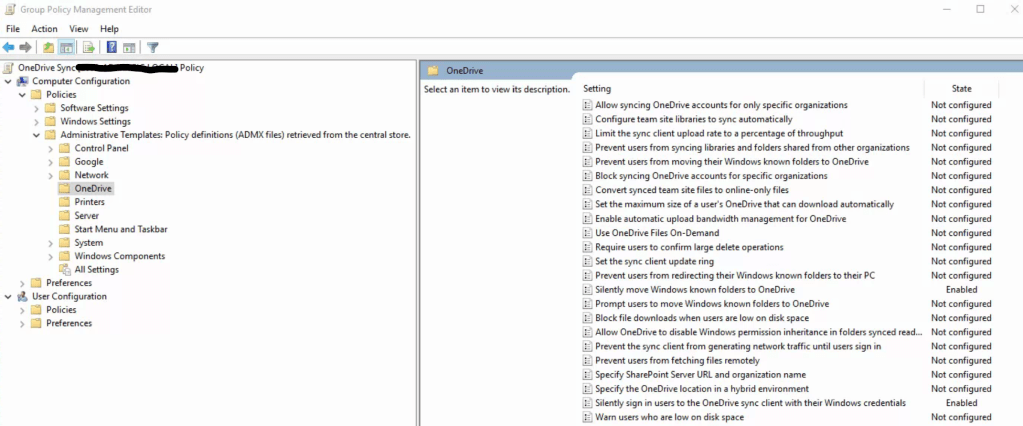
To configure OneDrive via group policy objects, you will need to copy the OneDrive administrative templates to your GPO Central Store. The templates can be found on any system that has the OneDrive client installed and are located at %LocalAppData%\Microsoft\OneDrive\ look for a folder named for the OneDrive build number, then a sub-folder named adm. The files you need are: OneDrive.adml and OneDrive.admx.
Typically the GPO Central Store is located in the SYSVOL directory of a domain controller. The location can be customized, this Microsoft support document should help you locate or create the folder. Place copies of the template files into the Central Store and wait a few minutes for replication to occur, or force one.
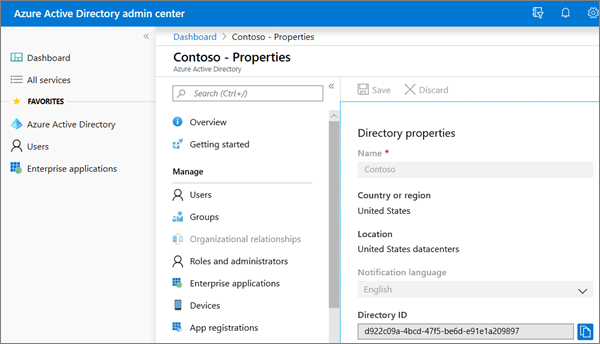
Before we can edit the GPO, you will need your Office 365 Tenant ID. It can be found in the Azure AD admin portal on the properties page and is labeled Directory ID.
These policies will be machine based. To selectively apply them create separate Active Directory Organizational Units for the systems that will and will not, use OneDrive Backup. Link the GPO accordingly.
There are a lot of options to configure in the OneDrive GPO template, but only two of them are required to automate the backup process and replace re-directed folders. “Silently sign in users to the OneDrive sync client with their Window’s credentials” will use the Office 365 tenant ID. “Silently move Windows known folders to OneDrive, is the aspirin that will cure your workstation files headache.
With these two options configured and enabled, your user’s files will follow them between systems, be backed up, and gain all the advanced features OneDrive offers. These are by no means the only options you should enable, each admin’s situation will be different. I could write a book describing the rest of the policy configurations. Thankfully Microsoft has documented this entire process and all the options for us; https://docs.microsoft.com/en-us/onedrive/use-group-policy
In a previous post I wrote about the ins and outs of working from home. It has been one of my most popular posts. Now that I am an Senior Systems Engineer for a Managed Services Provider I find myself in many different situations. I am constantly needing to work from the road, literally. I’ve had to pull over at a gas station or a McDonald’s on more than one occasion.
In addition to parking lots, I also end up in clinics, numerous types of offices, manufacturing facilities, mechanic’s bays, and pretty much any other environment you can imagine being in your average city. Through trial and tribulation, I’ve filled my bag with the gear that allows me to be successful, no matter the location.
The most important item in a road warrior’s bag is their laptop. You want to choose your’s carefully. For example, if you work from it all day, a twelve inch screen will probably be a hindrance regardless of how little the laptop weighs. If you spend time in professional settings, a gaming system that resembles a Tie-Fighter might be inappropriate. Battery life isn’t as important as it used to be now that most systems will hit the four hour mark.
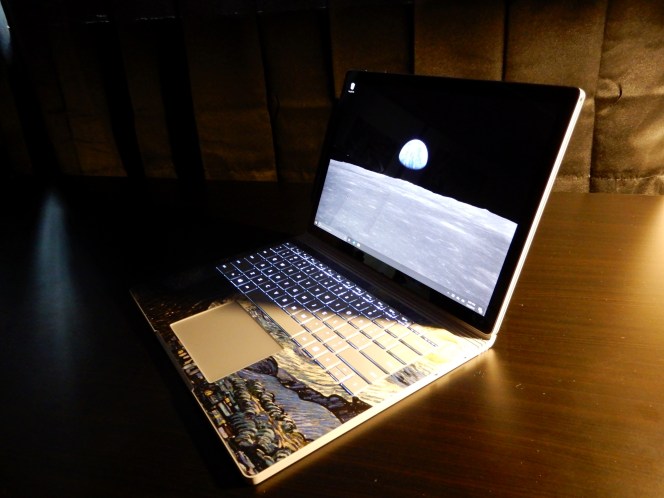
My weapon of choice is the Surface Book 2. I find that with a few key accessories, it adapts to any situation. From drawing out plans during a presentation from the tablet, to running three monitors while managing an entire company’s infrastructure, and even some gaming on down time, the Surface Book does it all.
I mentioned that adaption requires some accessories. I find that a portable docking station is a necessity. With the right one, you can connect to any type of equipment you may need no matter what it is. I carry the TOTU USB C 12 – N – 1 Hub . Three monitors, a keyboard, mouse, network connection, power, and SD card all at once are no problem for this little gem.
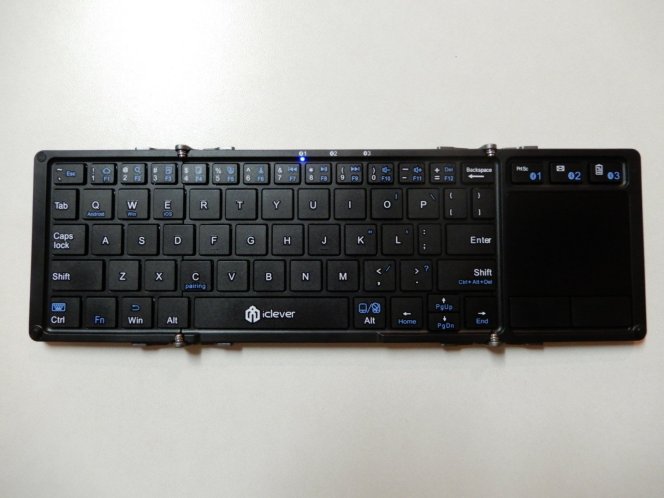
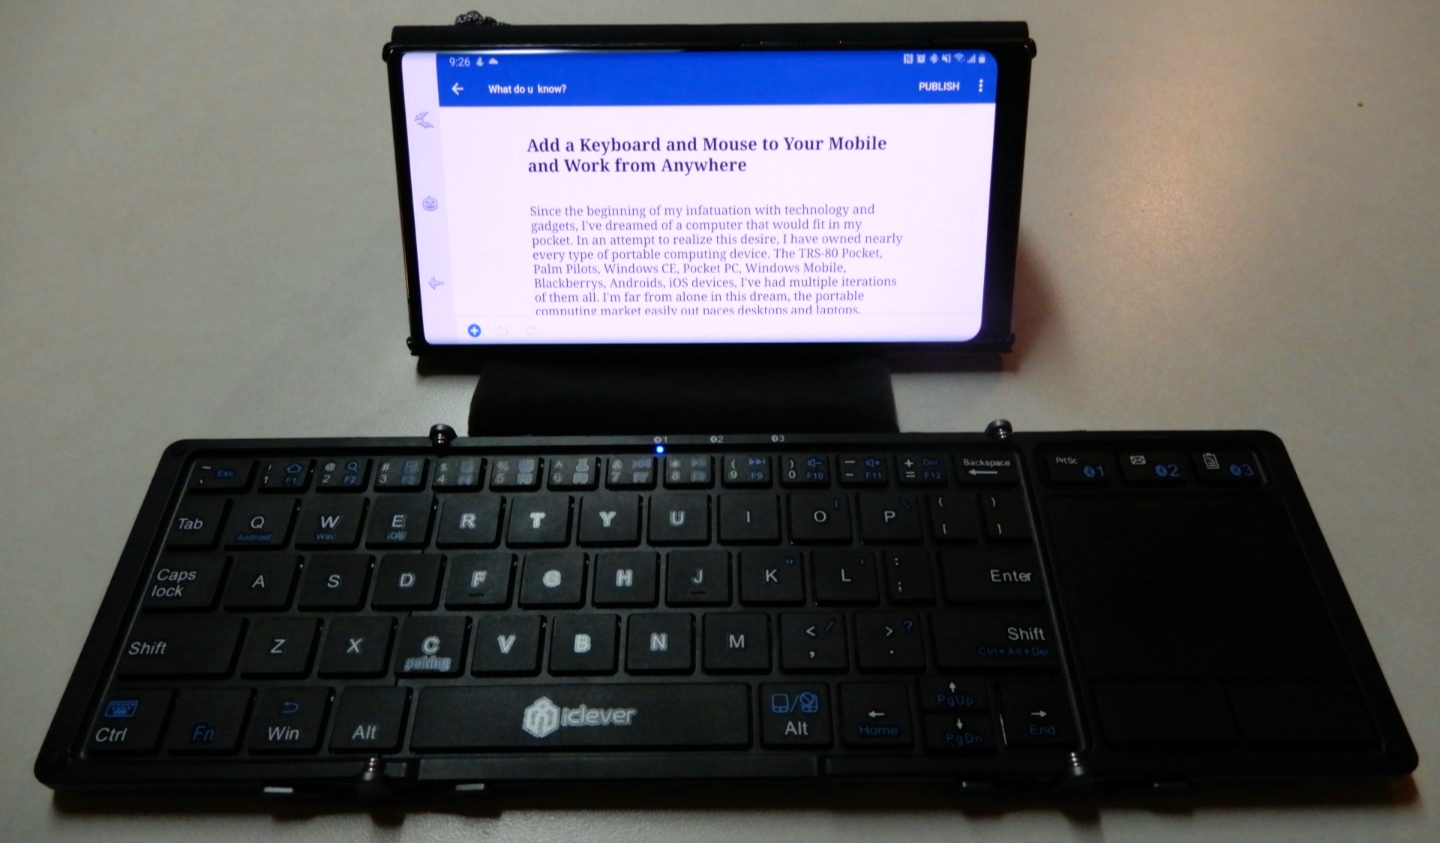
When it comes to connecting to other people’s equipment; I’ve never been a big fan of using random keyboards and mice. You never know which button doesn’t work, when the batteries will die, or where they’ve been. I avoid the jank and carry my own. The iClever IC-BK08 folds up to the size of a phone, connects to three Bluetooth devices at once, as well as anything with a USB port, and includes a great little touch-pad.
Monitors, monitors everywhere and not a screen to use. How do you take an extra screen on the road ? There are several ways. If you carry a tablet in your bag there are apps that will turn it into a wireless monitor. You can also purchase purpose built portable monitors.
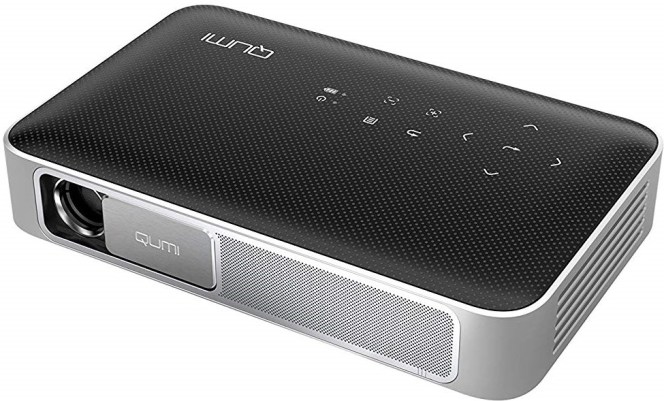
I have tried both of those options, but have landed on something that is more useful than either. I carry a Vivitek QUMI Q38-BK mini projector. It’s small, battery powered, displays in 1080P HD, and is bright enough to use almost anywhere. A few days ago, I propped up a white binder, pointed my projector at it and had an instant second screen. I’ve also given full presentations to customers with it. It runs Android so you can install your favorite apps on it. It supports Wi-Fi, Bluetooth, AirPlay, Mira-cast, HDMI, and USB connections.
Cables are the key to connectivity. I have a one of each type of USB cable: 2.0, 3.0, C, Micro, A, B (printer), and Mini in my bag. I also carry two ten foot CAT 6 network cables, a USB to serial port adapter, a Cisco serial console cable, a 3 foot HDMI cable, a Display Port to HDMI adapter, an extra PC power cord, and a lightning cable.
In addition to all of that you will also find a 5 port mini switch, a 1.5 terabyte USB hard drive, a Bluetooth mouse, a pair of over-the-ear headphones with mic, a Voyager Pro wireless headset for phone calls and conferences, and a Nintendo Switch.
After reading all of this you might be asking yourself, “Does he actually use all of that?” The answer is “Yes, all of the time”. I don’t bother carrying things that I rarely use in my bag. Those things live with the junk in my trunk. Sorry, it was too easy.
Speaking of bags, the one you choose is as important as the gear it will carry. If you are going to stuff this much stuff into a bag of your own you will want sturdy straps, a reinforced handle, and lots of pockets to keep everything organized in. I use the Wenger Ibex 17″ Laptop Bag because it has all of those features and then some.
I’ve been a fan of interactive workouts for quite some time. I have an elliptical machine and stationary bike, both of which will hold my tablet or phone. I play YouTube videos of people running and biking in exotic places to keep myself motivated. Treadmill TV is one of my favorite channels.
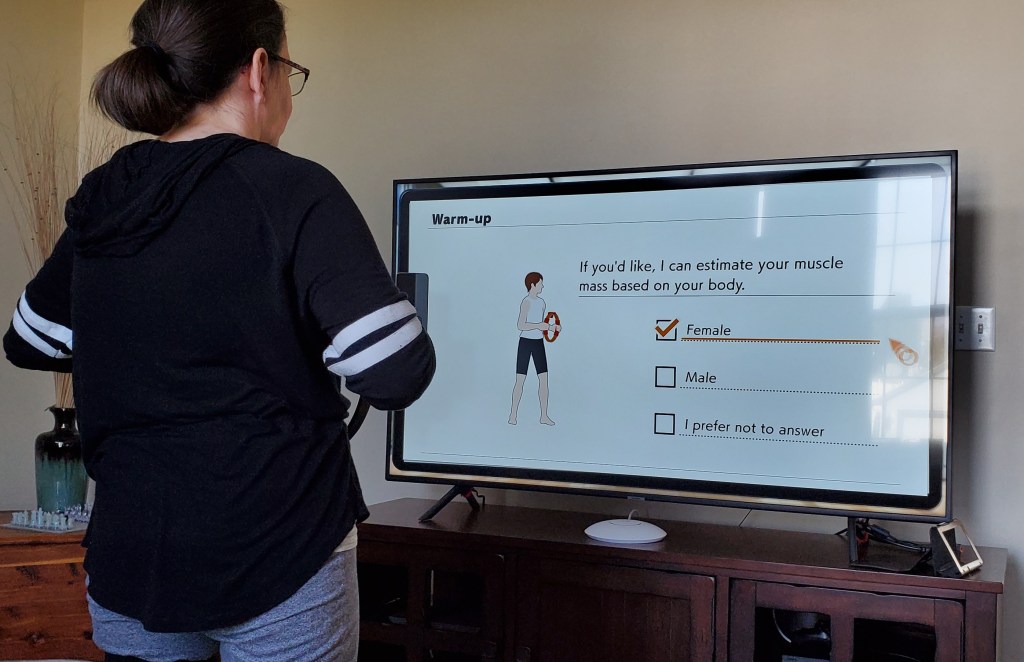
The Ring Fit was $69.00 at our local Walmart. If you have ever used a resistance ring in Pilates class, you will instantly recognize the Ring Fit hardware. You attach a Joycon to the ring and insert the other one into the included leg strap.
As the ring is stretched, pulled, rotated, raised and lowered, the changes in its shape and location are detected by the motion sensors. The same is true for the leg strap. The pitch, position, and angle of the controller strapped to your thigh is translated into movement. The design is pure genius, but it isn’t the hardware that makes the Ring Fit special.
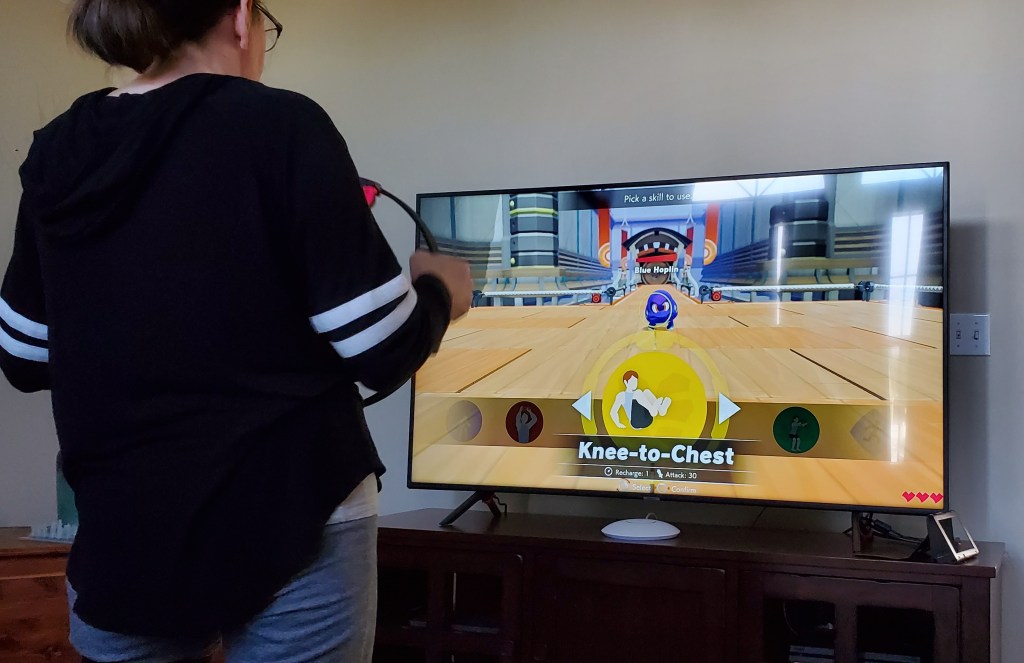
The Adventure Ring Fit game is fantastic. The fitness aspect is dynamically tuned for each player. Calibration includes a strength test, accounts for age, and asks for workout preferences all of which are used to calculate difficulty. You can also manually select a difficulty level in the game’s menu.
Once calibration is complete you select a character, choose its eye color then you’re off on an adventure. The ring is used as a weapon, or a shield with the game requiring specific exercise moves to accomplish various in-game tasks. You jog in place or high step to move your character through the world and over obstacles.
Boss battles are workouts that will have you doing squats, ab crunches, chair lifts, arm crunches, knee lifts, and more. The ring provides resistance and the haptic vibration marks the beginning and end of moves. The leg sensor detects if you are squatting low enough, holding a position long enough, or generally using the correct motion.
As you progress through the game you collect tokens and XP points that unlock new exercises and customization options for your character. I won’t spoil the game, except to say that it is fun. My entire family has been playing it everyday. My wife got up early to play this morning and she usually doesn’t like indoor exercise. We seem to be engaging in a friendly competition, trying to reach new levels and unlocks first.
On the first day, I set the difficulty to intense and played through the first boss fight. It took twenty minutes during which my heart reached one-hundred and thirty five beats per minute. I broke out in a pretty good sweat by the end. My muscles were feeling it the day after but it didn’t stop me from playing again.
Kansas City is fortunate enough to have a world renown art museum. I’ve always enjoyed my trips to the Nelson-Atkins Museum of Art, but haven’t been in quite some time. My family and I were on stay-cation and decided to visit some of our favorite pieces and see what was new.
This article is being written in its entirety on my Galaxy Note 10 Plus. I’ve written pieces on the super-phablet before, but this is the first time I will be doing so in real-time and without using a PC for post-editing. All pictures, videos, and text are products of the phone itself. I am using a combiniation of the S-Pen and my iClever keyboard for input.
In addition to writing a post about the art muesum, I will be keeping up with my employer’s emails and texts, will probably play a few games, and I’m sure somebody will call me at some point. I will not be using an extra battery or charging the Galaxy, if the battery dies the post will just end at that spot.
The Nelson-Atkins is in the Plaza area surrounded by many of the water fountains that our beautiful city is famous for. The large white building is itself a work of art. It sits in the middle of an expansive green park and is framed as the net of the world’s largest badmitton game. The giant shuttlecock that sits in the green field has become famous in it’s own right and adorns countless articles and videos about Kansas City.
Jeff Sonhouse, Return to Sender
The multiple colors, shades, and textures in this contemporary piece give the auto-focus a workout. The characters hair is made from matchsticks. In the photo below, the wide-angle lense captures an entire room in the contemporary section.
Several works by Andy Warhol hang in this room
This ultra- realistic statue of a security guard has been catching people by surprise for as long as I can remember. He stands in a dimly lit corner and there is no flash allowed, but the camera still captures great detail.
Don’t Touch the Art!
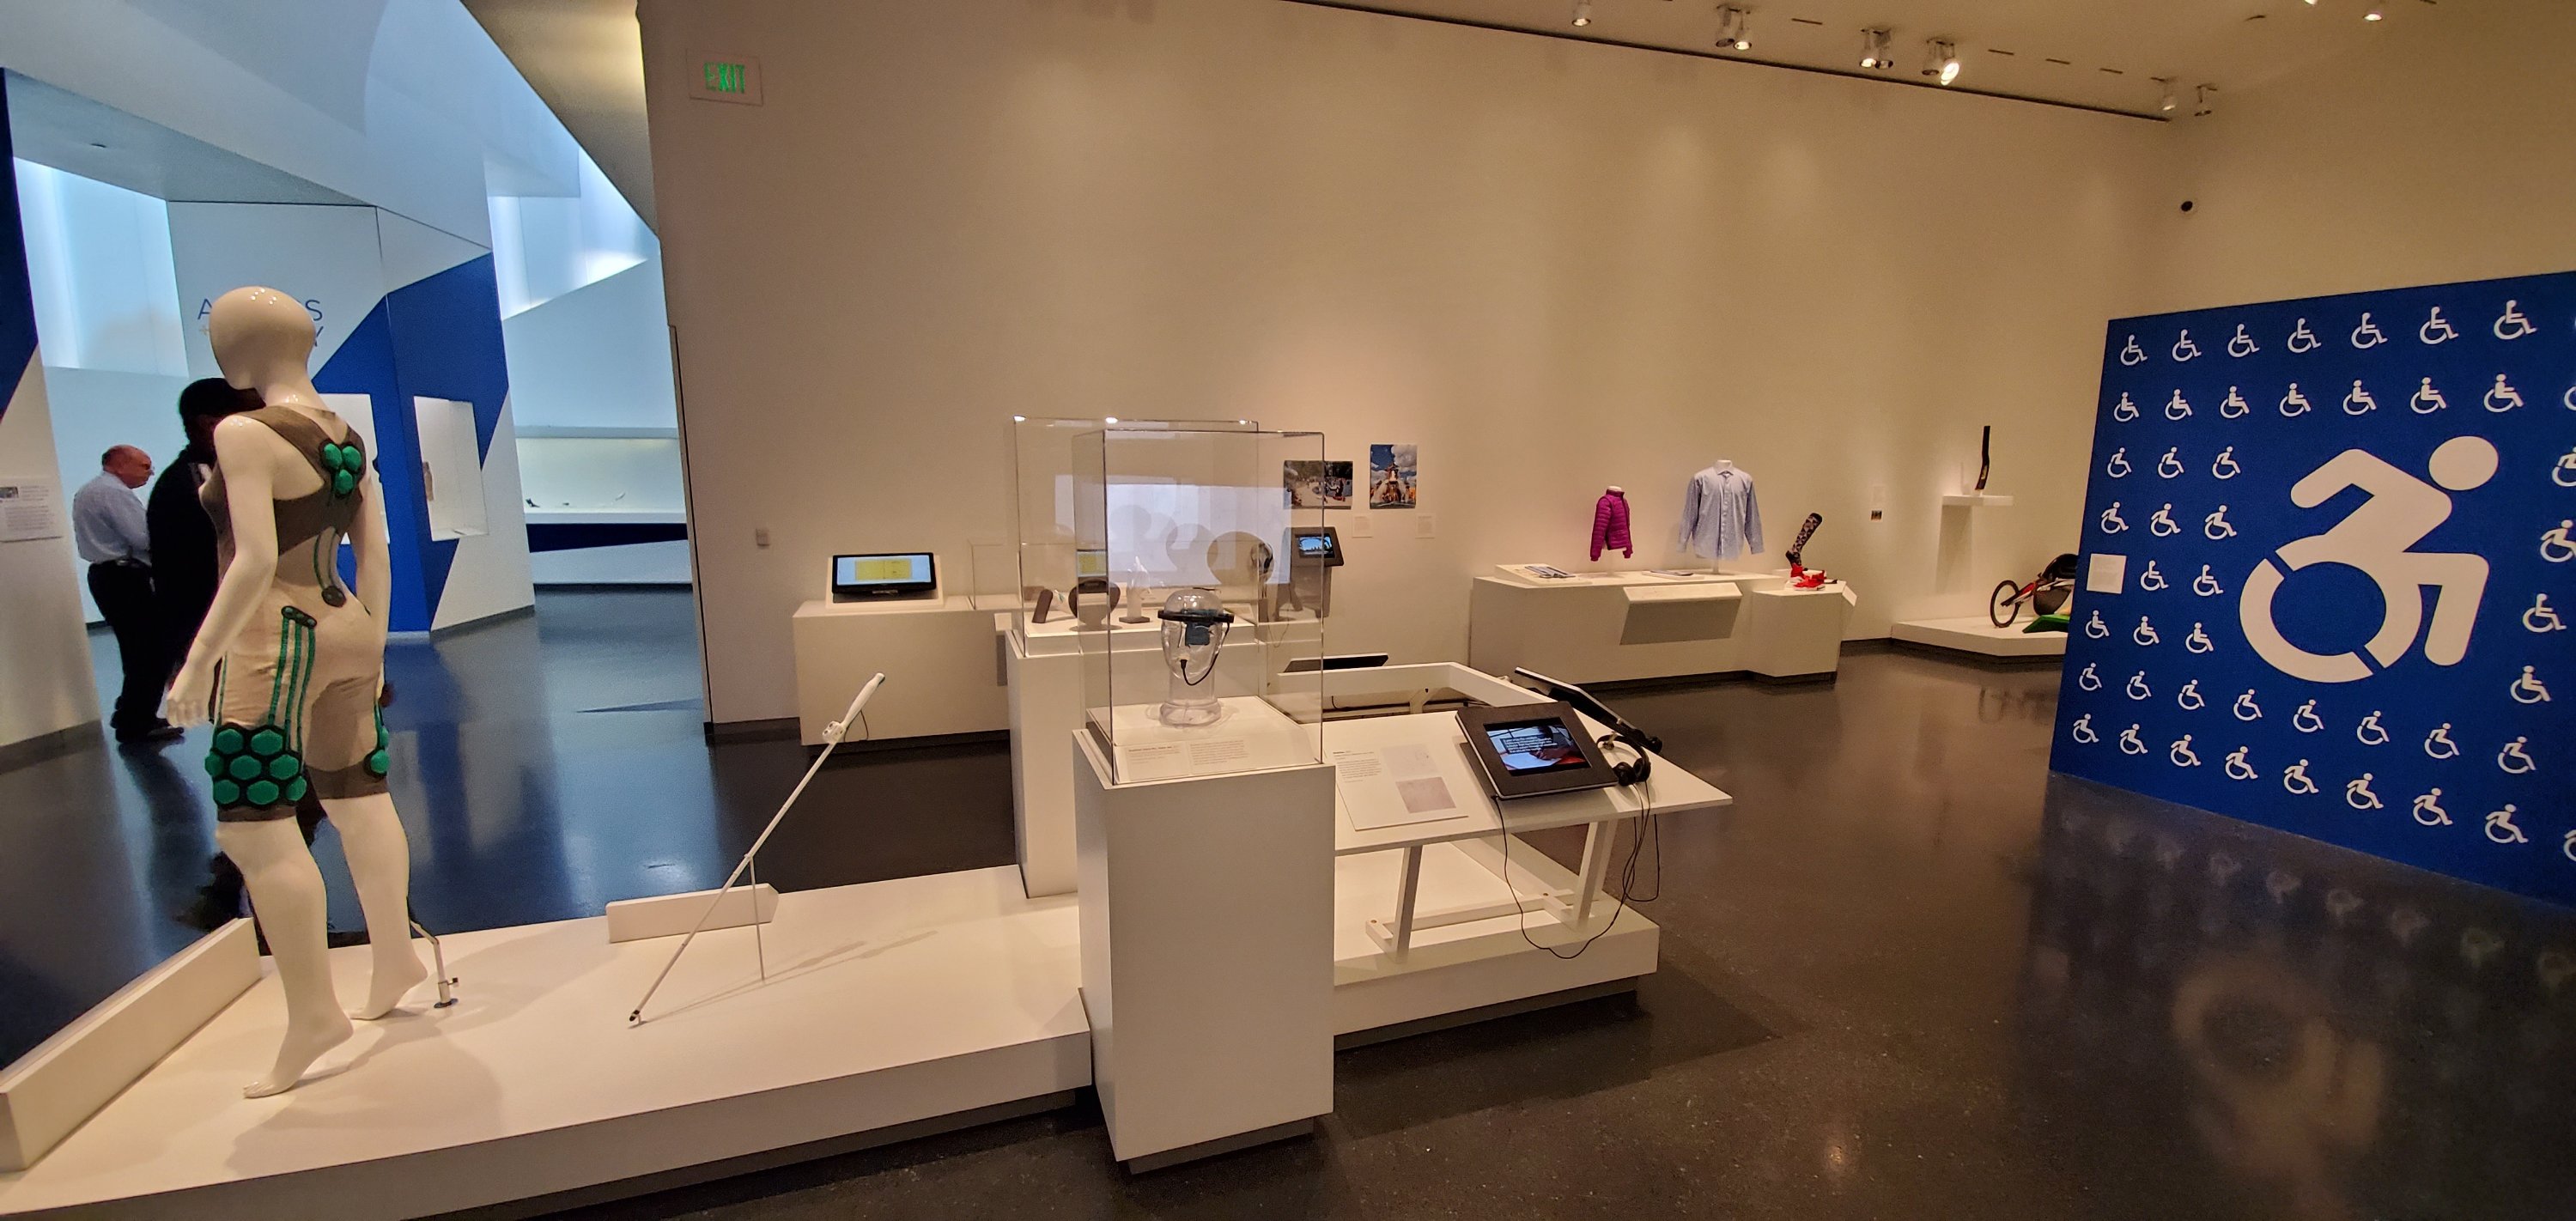
There’s an entire room dedicated to the technology that helps make the world more accessible to those of us who are differentley abled. 3D printed prosthetic limbs, cameras that turn vision into vibration, and watches that output in brail, are just some of the amazing devices on display. This exhibit is one of my favorites.
The Access + Ability Display
I’ve been fascinated by these suits of armour since I was a child. I cannot imagine wearing a metal outfit, nevermind trying to fight for your life in one. The room these items are in is actually quite dark. The camera’s automatic mode does an excellent job of adjusting to the different lighting situations presented by the museum.
Skyrim forever
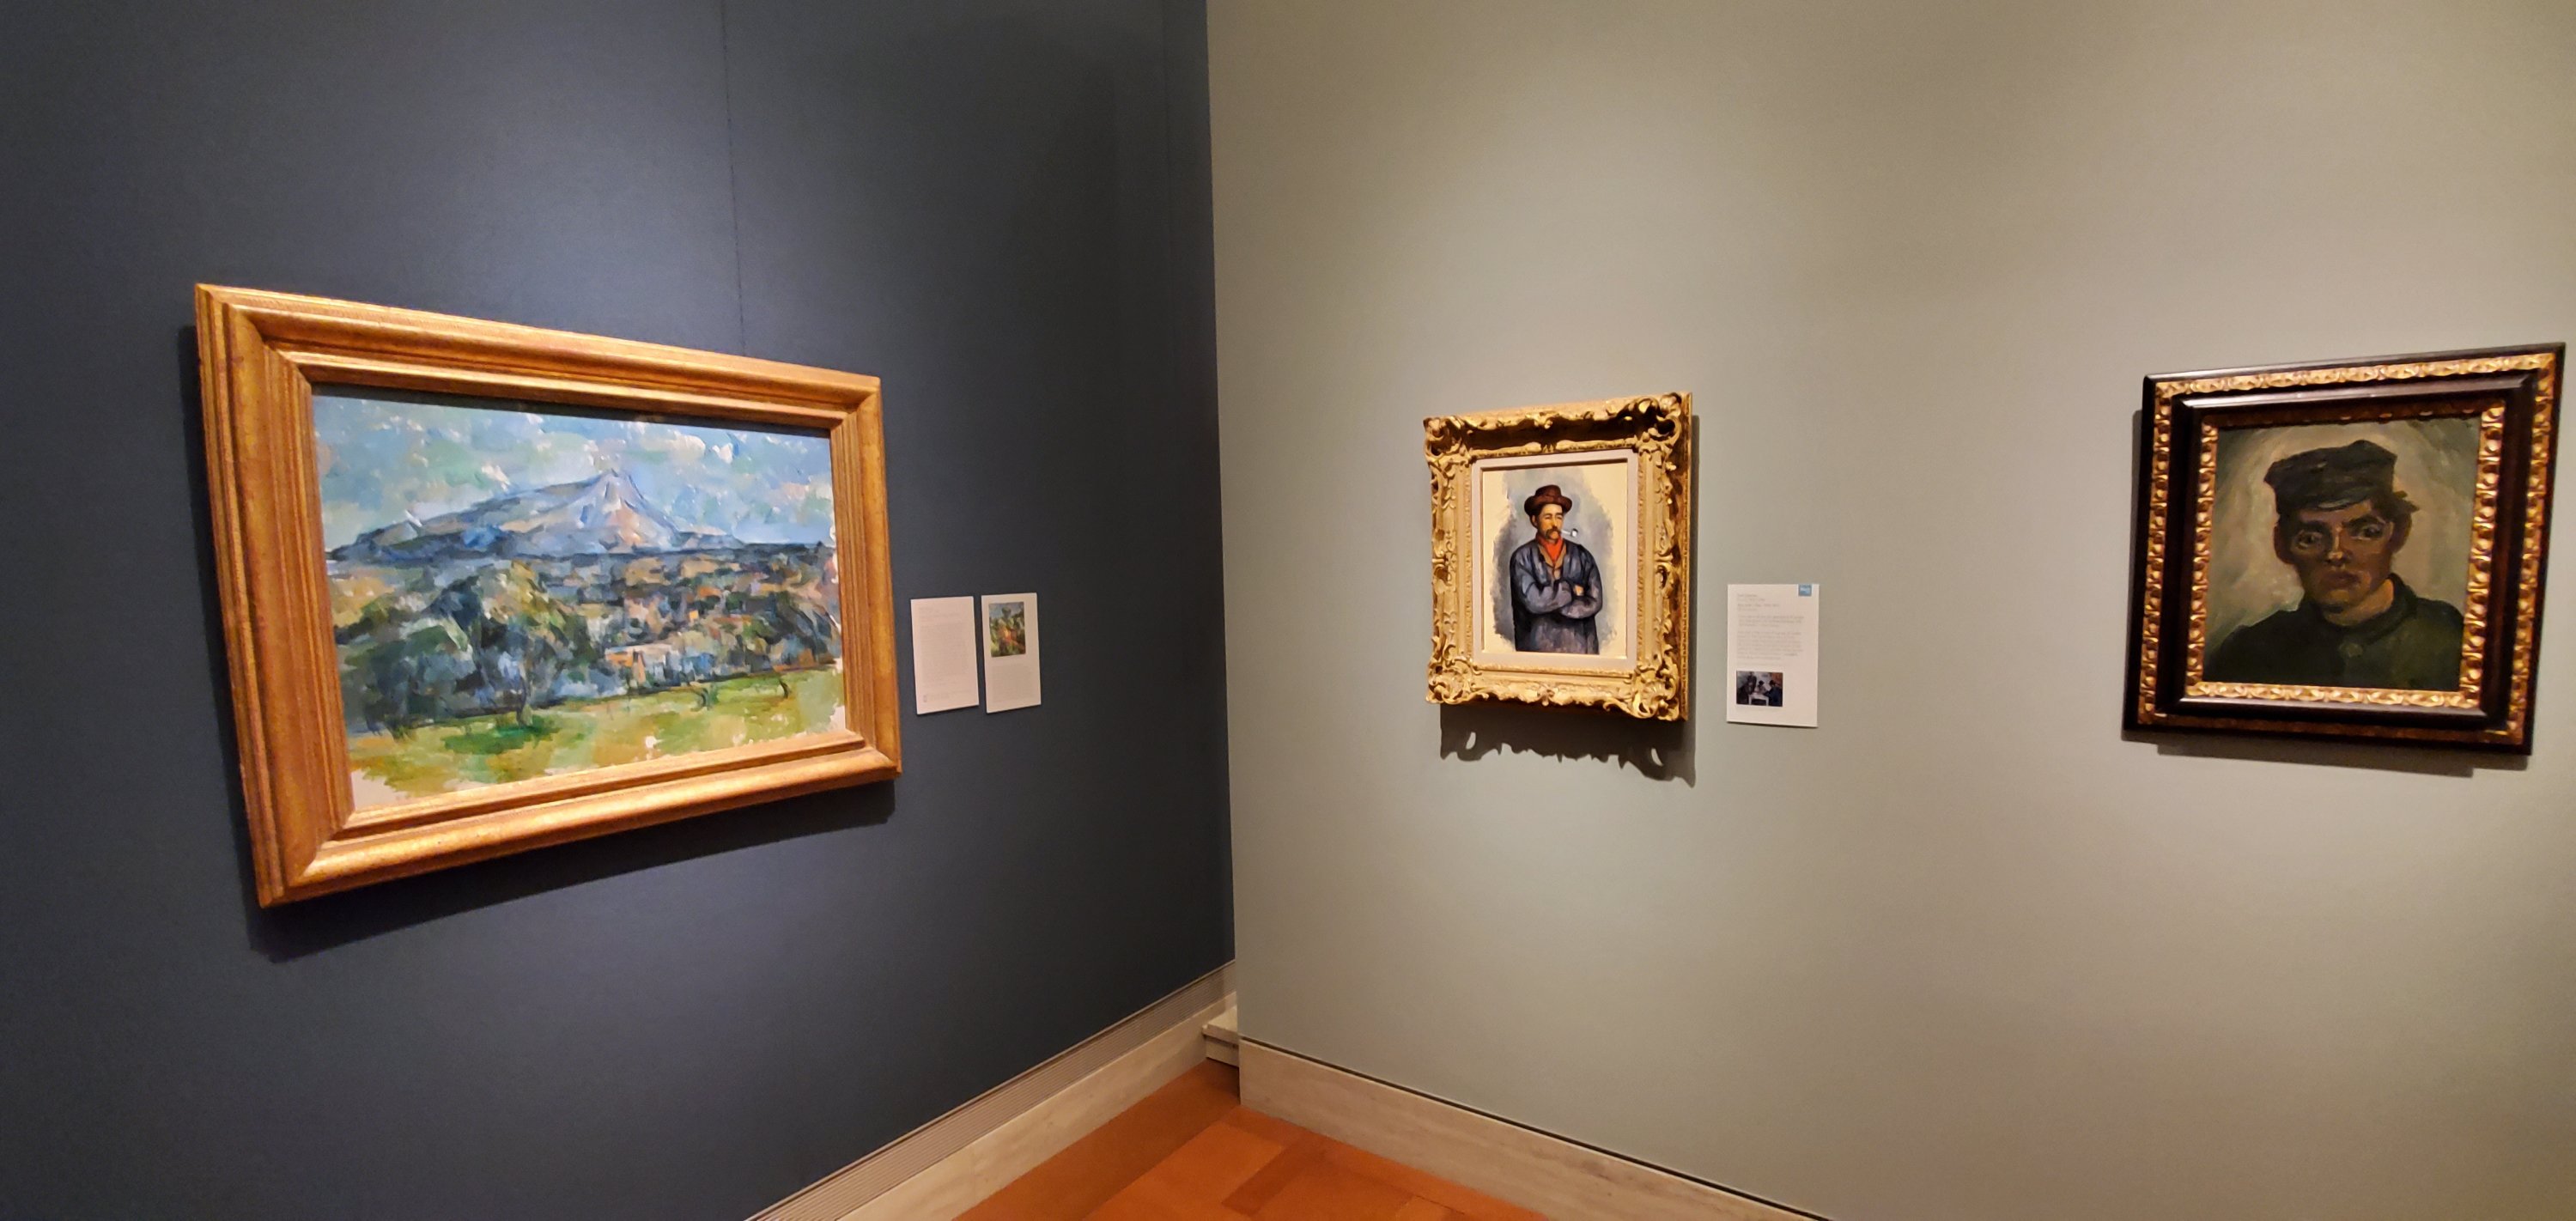
Impressionism is my personal favorite of the classical styles. Lucky for me, the Nelson-Atkins has an extensive collection. The masters are well represented some of the most famous works by: Monet, Van-Gogh, Cezan, and Renior hang here.
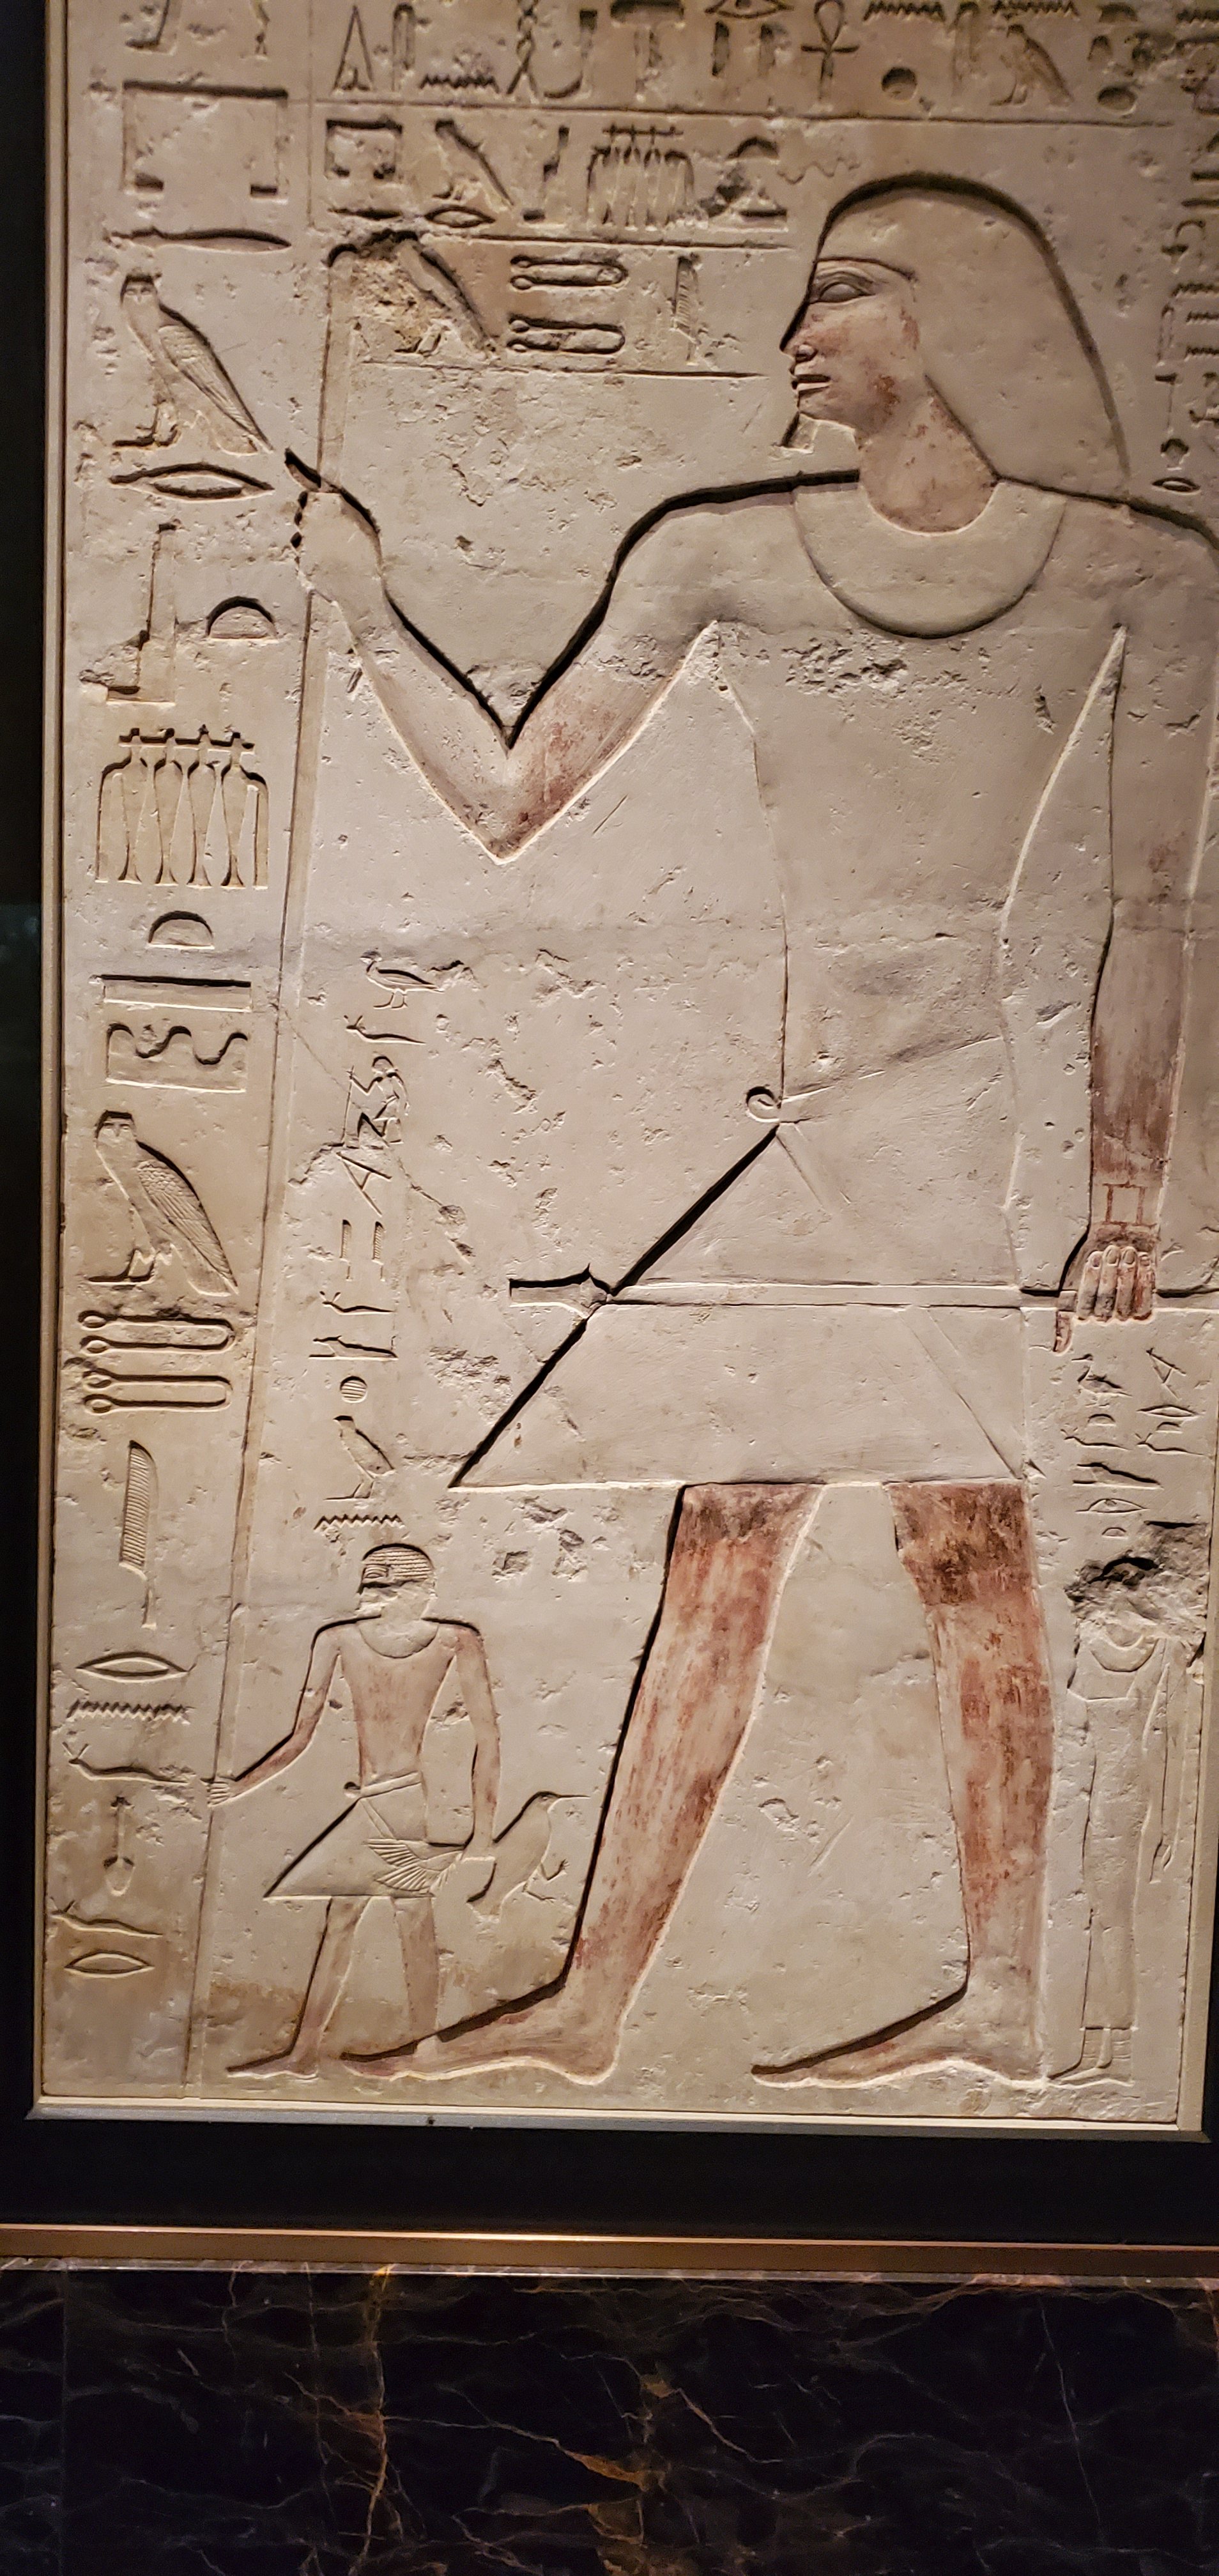
There’s an impressive collection of Egyptian art. Sculptures, stone tablets, even mummies, are displayed. Some items are behind glass, but many are out in the open. Security gaurds keep those who may be too tempted to touch something in check.
We had a great day at the Nelson-Atkins. If you’ve never been, or haven’t been for a while, I highly reccomend that you take the time to visit. Entry is free, parking is not. I used my GPS for an hour and a half, took twenty two pictures, answered two emails, sent three texts, had one short phone call, and composed this article. My battery still has 66% of its power left and that is almost as impressive as the works of art were.
In part one of the series I described how to make and capture an image of a Windows 10 system while keeping the secure boot partition intact. We used the block copy based Clonezilla to create our image.
Block based copies or “clones” create a challenge when it comes to deploying “click to run” software such as Microsoft Office 365. O365 is generally installed by signing on to a web portal and clicking a link that installs and configures the software for you; hence the “click to run” moniker.
When using a component streaming solution like MDT, commands can be used that emulate the process of a user signing on to the portal and clicking the install link. Clone based deployment mechanisms have no such ability. You will need to use the Office Deployment Tool instead.
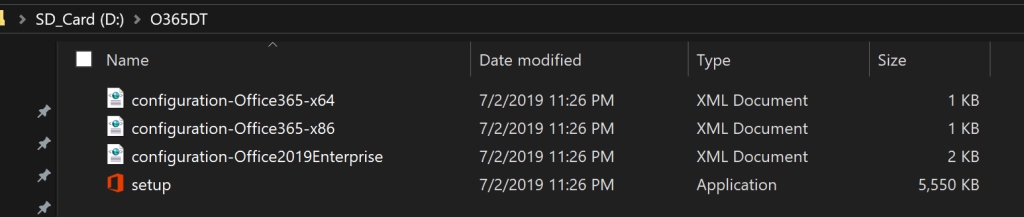
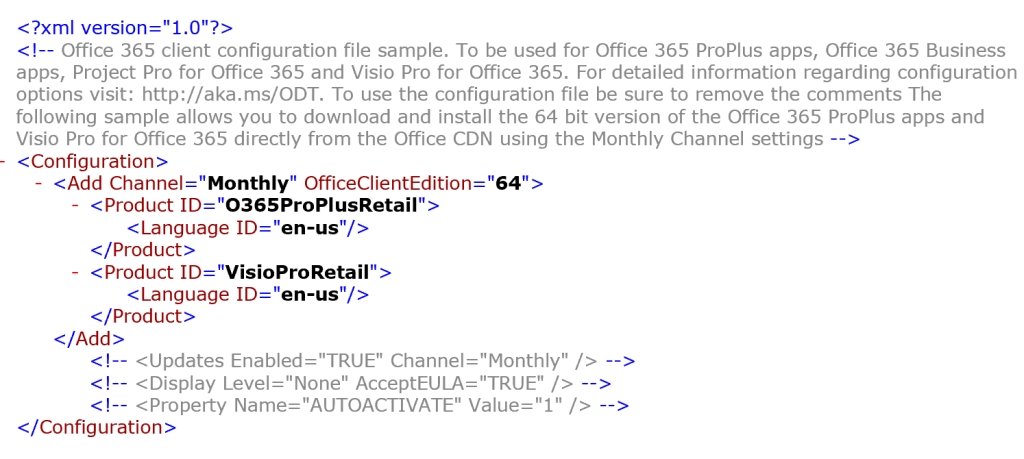
Download and run the Office Deployment Tool. You will find the application extracts four files to the folder that you choose, or create. Each of the XML files is a sample that will download, configure, and install a particular version Office. You can manually edit the files to reflect your requirements with most text editors.
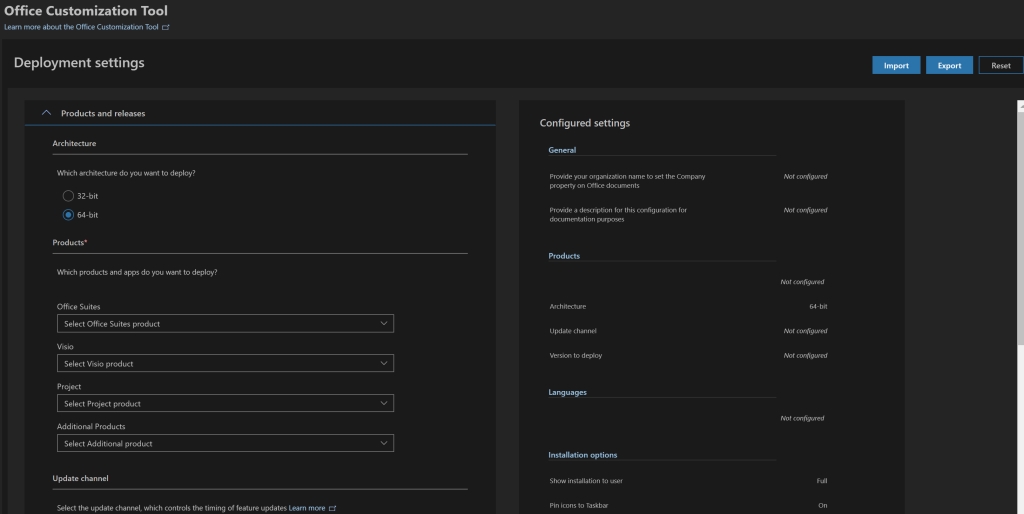
Personally, I find editing XML files tedious and time consuming, I prefer to do it the easy way and use Microsoft’s Office Customization Tool . The OCT is a web based GUI tool that will create your XML based on the options you select with your mouse. No XML editing or tagging required.
Once you have your XML file all that is left is to call it with the Setup.exe that was also deposited in your folder during the ODT extraction. Open and elevated CMD or PowerShell console, switch to that folder, and run : setup.exe /configure nameofxml.xml . Office will be downloaded and installed according to the preferences you configured in your file.
DO NOT OPEN OFFICE to test it, unless you plan on removing and re-installing it again. Office 365 click to run products attempt to activate immediately on launching. Even if you don’t provide credentials for the activation, the software will activate in demo mode. This will complicate your imaged system deployment.
Assuming that everything has gone according to plan, you are done after the install completes. Don’t forget to delete the Office Deployment Tool folder and files before running sysprep and capturing your image.
My Surface Book 2 is my favorite laptop of all time (so far). It does everything I need and want except when it comes to connectivity. It only has two USB ports and a and single USB C connection.
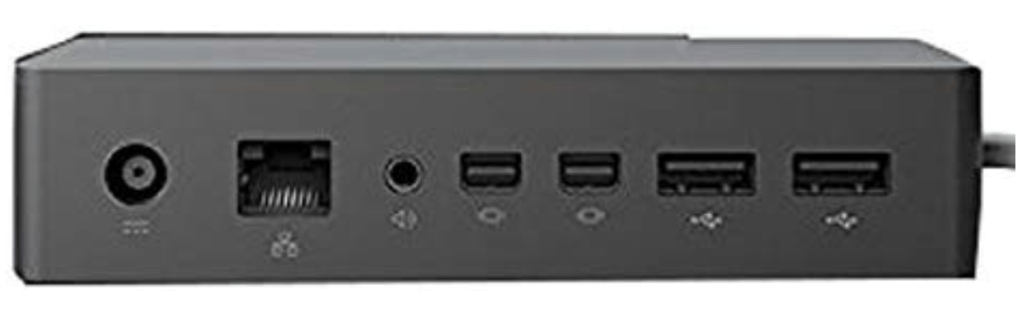
As a technology consultant I often need to connect to customer’s random equipment. If I am going to be on location for an extended period; multiple monitors, a keyboard with a number pad, and a mouse are must haves. There’s no way to hook up all this gear to my Surface. I need a dock to extend the ports.
Microsoft makes a dock specifically for the Surface line, but I’m not a fan. It has mini-display ports for monitors and a few USB ports for everything else. I’m sure it works, but I would like more options. I was looking for every type of monitor connection, multiple USB ports, storage, power, and network connectivity in a single device.
It took a lot of research, but eventually I found a solution. The TOTU USB C 12 – N – 1 Hub is available on Amazon for less than $80.00. It will connect to any kind of monitor: HDMI, VGA, and Display-Port are all available. There are both a full size and mini SD card reader. Plug your headphones into the 3.5 mm audio connector. Two USB 3.0 and two USB 2.0 connections will handle your keyboards, mice, and other accessories. A USB-C PD Power port will charge your supported device. Getting on-line with the Gigabit Ethernet connection is a breeze.
I assumed that the video ports would be Display-link but that is not the case. The video signal is passing through from my laptop’s GPU. This is a big advantage; Display-link works but often at slow frame rates which makes video choppy.
I’ve had the little dock for a few weeks and have used it almost every day since it arrived at my door. It works really well, doesn’t take up much space in my bag, and has a nice little carrying case. I didn’t expect it to also function as a Dex dock for my Galaxy Note, but it even does that. A few of my friends and family have ordered them after seeing mine and we all agree this thing is fantastic.