PowerShell; Set UPN to match current Email address

If you’re in the process of migrating to or setting up a hybrid relationship with Office 365 SaaS offerings you probably want to simplify the login process for your users. There are a ton of articles and setup guides out there that explain how to set up Azure AD Connect and even AD FS if you need it but one thing that is more difficult to figure out is setting the UPN. The UPN is a logon in the format of an email address instead of the more common domain\username NTLM nomenclature. Office 365 prefers UPN logons and to be honest they’re easier in your on-premises Active Directory as well.

To prevent your users from needing to logon twice in hybrid environments and to make the UPN easier to remember in on-premises authentication it makes sence to set it to match the user’s email address. The script below assumes you have created a csv file of the user accounts that you want to modify. At least one column in that csv needs to be a qualified identity parameter (SamAccount, Distinguished Name, etc.). When you run the script it will ask for the file and then for the name of the column containing the ID parameter. After you’ve provided those, it will loop through the file and set each user’s UPN to match their current email address.

Import-Module ActiveDirectory
[System.Reflection.Assembly]::LoadWithPartialName('Microsoft.VisualBasic') | Out-Null
Start-Transcript -Path "$env.userprofile\documents\upnupdatelog.txt"

Function Get-FileName($initialDirectory)
{
 [System.Reflection.Assembly]::LoadWithPartialName("System.windows.forms") | Out-Null

$OpenFileDialog = New-Object System.Windows.Forms.OpenFileDialog
$OpenFileDialog.initialDirectory = $initialDirectory
$OpenFileDialog.filter = "CSV files (*.csv)| *.csv"
$OpenFileDialog.ShowDialog() | Out-Null
$OpenFileDialog.filename
} #end function Get-FileName

# *** Entry Point to Script ***

$userlist  = Get-FileName  

$idcolumn = [Microsoft.VisualBasic.Interaction]::InputBox("Enter the case sensitive name of the column that contains the employee's account information:","SamAccountName, DN, CN or Name Column", "ID")

$usernames = Import-Csv -Path $userlist | select $idcolumn -ExpandProperty $idcolumn

Foreach ($user in $usernames)
{
    $address = Get-ADUser -Identity "$user" -Properties proxyAddresses | Select -Expand proxyAddresses | Where {$_ -clike "SMTP:*"}
    $newUPN = $address.SubString(5)
    Set-ADUser $user -UserPrincipalName $newUPN
}


PowerShell; Extract the Email addresses from an Outlook copy/paste TO, CC, or BCC list.

User in a panic, “OMG! I need you to delete the email I accidentally sent to the wrong people.” Tech in a calm cool voice, “Who’d you send it to?”. Inevitably this conversation leads to you recieving a list of addresses that the user copy and pastes out of the To, CC, or BCC field of an Outlook object.

Unfortunatley, this data will not be in a useable format as far as bulk PowerShell operations are concerned. The Outlook name resolution feature will have changed the user’s names or email addresses to the format “First, Last <email@mycompany.com>;” The extra characters make using the data as the identity pararmeter in the Export-Mailbox or Search-Mailbox cmdlets impossible . Many people end up editing the list in Excel or Notepad to remove the extra text and get down to a list of just email addresses.

$arr = @()
$path = "$env:USERPROFILE\documents\outlooklist.txt"
$pattern = "(?)
$list = Get-Content $path
$list -split ';'|Foreach {if ([Regex]::IsMatch($_, $pattern)) {
           $arr += [Regex]::Match($_, $pattern)
            }
        }
$arr | Foreach {$_.Value}|out-file -FilePath $env:USERPROFILE\documents\emailaddresses.txt

This PowerShell code uses RegEx pattern matching to turn your mess of a list into a useable list of email addresses. The split adds a carrige return after each semicolon and the RegEx pattern matches everthing between the < and > symbols. Incidentally, I searched all over the internet trying to find somebody else that was correctley using RegEx to copy the text between two symbols and never found anyone that did it correctly, so I’m pretty proud of myself for figuring this out.

You’ll need to paste your email dump into a text file and save it somewhere. Then alter the $path variable to point at it. When you execute the script it will output the email addresses to a file in your documents folder named emailaddresses.txt,  but you could easily pipe it into your Search-Mailbox cmdlet instead.

Can a game help teach your teen to drive? City Car Driving Review & Case Study

Simulations have long been a part of driver education. Back in my day we sat in a classroom equipped with a movie screen that played video of a road course while each student manipulated a set of car like controls to react to situations presented on-screen, such as having a kid run out in front of you or a vehicle blowing through a 4-way stop. I’m not sure the exercise imparted any useful information about how to handle a car IRL, but it absolutely helped prepare me for unexpected events while driving. The simulation helped me conclude that these types of surprises probably happened a lot if they went to all this trouble. It showed me that driving was more about being mentally prepared to react in a controlled manner than it was about going fast, which, until this class, was all my teen boy brain was concerned with.

OldSchoolDrivingSimulator
Old-School Driving Simulator, drivers education was literally taught at school in those days.

Fast forward 20 years and I now have two teens of my own who are ready to prepare for entering the highways and city streets. The thought scares the crap out of me. Roads are much more congested than they were even 10 years ago. I see and interact with so many incompetent drivers on the way to and from work each day that it boggles my mind. How did the lady putting on her makeup doing 60 in a 45 get her license? Why is the guy behind me intent on being less than a foot from my rear bumper? Doesn’t he have even a rudimentary understanding of physics? What makes that girl think she can read her phone and pilot a two and half ton vehicle moving at 88 feet every second at the same time? We all know she can’t walk and chew gum without running into the door.

I love driving, it’s one of my favorite activities in life. That being said, I cannot wait until cars drive themselves and humans are forbidden from touching the wheel. Too many of us do not give driving the respect it deserves and it costs others their lives. Just a few months ago I was hit on the freeway by someone changing lanes without looking because they were texting instead of paying attention to their driving. They pulled right into me at 60 mph. If I hadn’t been a well-trained driver, we’d both be dead. I was able to recover from the skid caused by the impact and come to a stop before going off a 30 foot high embankment that ended in a dry creek bed. My manuevers also stopped the other vehicle from taking the plunge, my car formed a guard rail for it, LOL.

I happen to have a decent gaming rig and I’ve long been a fan of racing games, so I also have a Thurstmaster T150 Force Feedback Wheel and pedal set.  I play a lot of Assetto Corsa with it. The game is a fantastic race simulator. I know that playing it has made me a better driver. The military, air line pilots, boat captains, and F-1 race drivers all use simulators to hone their skills. I want my children to be ready for anything and have the skills it takes to handle a vehicle in any situation. Could a driving sim help teach my kids? Research time!

I knew that tossing my daughter in Ferrari 458 at the ring wasn’t going to help her understand how to drive around our city. It may help her understand the physics of handling a car but there are no 4 way stops on Laguna Seca. As it turns out there are very few road driving simulators that concern themselves with the actual rules of the road. The only one that matters is City Car Driving. For only $25.00, I decided to give it a go.

The game has full support for wheel input including force feedback, HD and UHD graphics and even supports VR. It downloaded from Steam in a few minutes and installed with no issues. The wheel setup was a little tricky, it doesn’t have a default set of controls mappings that match the T150. I started out with the default settings and spent around 30 minutes mapping the controls. If you get the game and have this wheel ask for the config in the comments and I’d be happy to send my setup to you.

This is not a AAA title with a multimillion dollar development budget so I didn’t expect much in the way of graphics. I was pleasantly surprised, it looks decent; not on the same level as AC or Forsa 7 but more than good enough to get the job done. I’m running it at 2160p on my monitor and 1080P when we play in VR and either way the graphics are good enough to be immersive. The simulation is scary good if you have an Oculus Rift or HTC Vive combined with a force feed back wheel. You can look over your shoulder out the rear window and check out the people sitting next to you at stop lights. Also, being able to look into the corners is far more realistic than the pan view that happens on a flat monitor. Combining that with the bumps and slides the wheel emulates leads me to forget I’m not actually driving a car sometimes.


The game features a career mode in which a digital instructor leads you through a series of missions that range from buckling your seatbelt and starting the car and basic navigation through high-speed evasive maneuvers. To keep things fun you unlock more exotic vehicles as you progress through the stages. The simulator ensures you learn everything from the ground up and nags you when you do things like turning without your blinker, or pulling out without looking around a corner. It costs you points when you drive poorly and you don’t level up as quickly. You can set it to rules for countries other than the United States, I can see how this would be helpful if you need to drive in Europe on a business trip.

Career Mode Menu

Instructor.png

City Car Driving simulates every kind of weather: fog, rain, ice, and snow are all accounted for. All of the road surfaces you might encounter: cobble stone, dirt, gravel, pavement, and concrete are also available. It has you drive in the county, in a city, and even in a state park. I was shocked at the number of environments it prepares young drivers for. I personally learned to drive in the snow on the way home from my first job when it snowed 2 feet in early October. I would prefer that my kids not have that butt clenching experience if it can be avoided.

There are pedestrians, aggressive drivers, rush hour traffic, accidents, and police to deal with. Roads as small as dirt trails to 8 lane freeways are required routes in the various missions. In short, it is wholly representative of real life driving.

The answer to the question posed in the title is a resounding yes. A game can absolutely help teach your teen, or even yourself, be a better driver. I will require mine to complete the entire career mode before they are allowed to get behind the wheel of the real thing on a public road. They’ve already learned much from the application, my oldest who is studying for her permit just told me how much the game helps the meanings of the signs stick in her memory. Seeing them in action is better than memorizing them from a book in the same way that singing a song is easier than memorizing the same text on a page.

Sneak Attack! Blob Bombs; A Tech support scam that locks up your system.

Denial of service attacks (DoS) have been around for quite a while and will continue to be a bothersome presence for the forseeable future. In part DoS attacks are popular because they are relatively simple to accomplish. The attacker isn’t required to hack secure systems or subvert encryption algorithms. They only need to instigate an action that causes the target system to become so busy that it is unable to fulfill its legitimate user requests.

DDoS (Distributed Denial of Service) methods involve getting multiple systems to make erroneous requests to a service until it can no longer answer its real users. These types of attacks have been responsible for taking down services like Google and Facebook on multiple occasions throughout the last few years and have gained notoriety in the process.

DoS attacks are less flashy and generally only effective against one system at a time. However they are now being combined with social engineering in new type of scam. Tech support scamming has been around for a while; you go to a web page and get a pop-up that says you need to call 1-800-FIX-MEUP because your computer has something terribly wrong with it.

techsupportscam
A classic Tech Support Scam

These were effective at first, but they’ve been around for so long now that most people just close their browser and start over; being more careful not to type the wrong address or avoid the link that led them to the bad page. Occasionally you have to go as far as clearing your browser’s cache to keep the pop-up from recurring. This means the scammers need to do something different to get users to turn over control of their systems, passwords, and personal information.

Enter Blob Bombs. In short, a blob bomb is a technique in which nefarious characters code a web page in such a way that it causes your browser to download a small file over and over again. It performs the repetitive download so rapidly that your system can do nothing else and appears to be locked up. At the same time the page pops up a tech support scam like the one pictured above; the exact scam page will probably vary. The hope is the notion that something is really wrong will be more convincing since your system will appear to be hung when the message is presented. Social engineering at its finest. If you’re interested in the details of the method itself, the malwarebytes blog has published a full technical analyisis.

The current round of Blob Bombs are targeting the Chrome browser’s window.navigator.msSaveOrOpenBlob API. If you think you’re safe from this because you run Linux or Mac you should reconsider your position. The same technique will work on their browser APIs with just a slight modification to the landing page. It will also be possible to craft the landing pages to work with other browsers. I suspect this is going to be a wide-spread issue in the near future.

What do you do if you fall victim to this DoS scam? The first thing to try is to launch your task manager or application monitor software and forcibly close your browser (end its task). If your system is so busy that it can not open the task manager you can power off by holding down the power button until your computer shuts off, then turn it back on. Once you’ve gotten your browser shut down, use its menu options to clear its cache (temporary files) it will be full of the downloads. The downloaded files are blobs or unassociated raw data and shouldn’t pose a threat themselves but they do take up room on your hard drive. If this happens to you on your company system you should contact their tech support immediately and let them know what’s happened. I also suggest that you run a full virus and malware scan.

PowerShell on Linux and Mac OS X: Kumbayah or Microsoft Takeover?

Microsoft has really turned over a new leaf in regards to its view of the previously despised Linux operating systems. Satya Nadella has led the company through a complete 180. Not only have they stopped dissing Linux, Microsoft seemingly fully supports it. Previous CEO Steve Balmer tried to put Linux in a guillotine with its 59,000 strong, patent portfolio blade. He pushed companies into signing patent licensing deals; search Amdocs for the details on one such agreement.

With Nadella at the helm, the company now views Linux as an asset rather than a competitor. They may be on to something, Linux is a fantastic operating system that has propagated to data centers world-wide. It usually far outnumbers Windows nodes in those same dcs. However, a lot of the software available for Linux is sub-par in many a users’ eye. Kolab is able to ape some of the best features of Microsoft Exchange, but lacks the polish and scalability features. Libre Office Writer 5 is good for free software, but I write all my documents in Microsoft Word.

The ablity to run Microsoft’s flagship software on Linux machines could greatly expand Microsoft’s user base, both in the Enterprise and by individuals. Last year MS released an edition of its SQL 2016 Server that runs on Linux and enabled Bash (the Linux terminal for my Windows readers) in Windows 10. It fully supports Linux virtual machines in its Azure cloud and Unbuntu on Windows is available in the Microsoft store.  Its latest offering is the ubiquitous PowerShell and .Net core. The old lines in the sand are starting to become awfully blurry. The official Microsoft announcement is here if you’d like to read it.

Speculation could lead one to ponder what else will run on Linux now that it has the next-gen .Net framework easily available. Rumors abound that everything from Microsoft Exchange to Microsoft Office is on the way. Only the future will tell for sure, but I can’t imagine that MS went to all this trouble just to let Windows admins run their PowerShell scripts on the Linux team’s VMs. Python isn’t that big of a leap for those of us that are proficient at PowerShell, there’d be no reason for this type of overture unless they have plans to do something more with it.

So how do we get PowerShell on to Linux and what can you do with it after you do? Let’s find out! If you don’t have an old system lying around that you can toss your favorite Linux distro on, I suggest building a VM on your Windows machine. You can use Hyper-V if you have Windows 10 Pro or Server, and VirtualBox if you don’t. See my article about building a VM on windows for more info.

I’m using Ubuntu 17.10 and I’m going to add the Microsoft repository to my package manager so that my install stays up to date with my regular update procedure. If you’re doing this on a MAC you’ll want to grab one of the OS X packages from the GitHub Repository. The Macintosh operating system has an unknown developer lock on it just like your phone does. You’ll need to CTRL + Click on the PKG file that you downloaded and then pick Open to bypass the security feature. Follow the Wizard to complete the installation.

In Ubuntu, open a terminal and follow the instructions below.

  1. We need to add the curl program unless you’ve already had to for some other task.
    1. Type: sudo apt install curl and press enter.
  2. Now we’re going to import the repository GPG keys.
    1. Type: curl https://packages.microsoft.com/keys/microsoft.asc | sudo apt-key add – then press enter.
  3. We need to register the repository.
    1. Type:  curl https://packages.microsoft.com/config/ubuntu/17.04/prod.list | sudo tee /etc/apt/sources.list.d/microsoft.list and press enter.
  4. Next we need to check for updates.
    1. Type: Sudo apt-get update and press enter.
    2. installpowershellonlinux2
  5. All that’s left is to install PowerShell
    1. Type: sudo apt-get install -y powershell

That’s it, you’ve installed PowerShell on Linux. To those of us that have been in tech for more than a few years, that is a very odd sentence to type. Now what? Well, first you’ll need to launch it. Open your terminal and depending on the version of Linux/Mac OS X and the package you’ll need to type either powershell or pwsh to access it.

Once you’re in, it works exactly like it does on Windows. A good way to see what you can do is to list out the commands and modules available. Try Get-Help Get* for a list of get commands and Get-Help Set* for the settings you can alter. Get-Module -list is also handy.linuxpowershellget

There are a lot of commands available but some of my favorites are missing. Get-NetAdapterConfiguration and Test-Connection are nowhere to be seen but the trusty Get-ChildItem and Get-Process are both fully functional. You’ll have to check for your favorites. One would assume cmdlets will be added with future updates as there were in the evolution of PowerShell on Windows.

As I’ve stated in numerous posts before, I like and use all technology. I see the new trend of intergration as an extreme advantage for the future of computing in general. I sincerely hope it continues.

XP-Pen Fix Screen Flicker and Pressure Sensitivity Loss

There are a couple of issues that commonly occur with the XP-Pen tablet drivers. First is the screen flickering. If your screen flickers on and off, it is most likely happening because the refresh rate of the XP-Pen tablet was incorrectly detected at 59Hz. You need to adjust the refresh rate to be 60Hz. Search for Display Settings, open the app and select your XP-Pen monitor then click the Display Adapter Properties link and use the drop down under the monitor tab to select 60Hz.

displayadaptersettings

Refresh_Rate

The other common problem with XP-Pen and other drawing monitors is a loss of pressure sensitivity during long drawing sessions. I’ve had luck in stopping the drop-outs by adjusting the Windows Ink driver settings. Search for Pen Settings and open the app. Disable all of the switches and select Nothing in all of the drop downs. This will keep Windows from interfering with the drivers that control your pen. Your mileage may vary.

windows pen settings

State of the Switch Address. What to play after the Christmas boom.

My Nintendo Switch is by far the most played console in my collection. The longer I have it the more I like it. The system is so popular with my family that I purchased 4 of them for Christmas this year. Now everyone has their own and they can stop taking mine!

Along with the additional consoles we also picked up a bunch of new games. Mario Odyssey has been a hit in my tribe. Everyone enjoys playing it. The graphics are great, the art style is fantastic, and the play is just challenging enough to keep your interest without serious frustrations. It’s reminiscent of Mario 64 but more advanced.

Rocket League, a game in which you play soccer with cars is both a lot more challenging and more fun than you imagine. I was shocked at how long I had to play before I could score my first goal in a match. Rumble mode adds various weapons and abilities to the vehicles and turns everything into an all out war. Custom cars like the DeLorean from Back to the Future add to the fun. It’s also one of the few online games that is cross platform. People on Xbox, PC, Playstation, and the Switch are all in the same player pool.

2018010920024600-6F4D679ED7D2A016B654B265B956C5F0

DOOM has been my go to game during lunch breaks since Christmas. I played the game when it launched on the PS4 and it was awesome. I was skeptical that it would carry over to the graphically weaker Switch but there’s something infinitely satisfying about being able to play this type of game on the go. Nothing gets my mind off of work like mowing through hell spawn or vanquishing foes in Team Deathmatch for a half hour. As an added bonus, it keeps me from needing to eat out just to escape the office which is great for my budget and staying in shape. The graphics don’t look quite as good as the PS4 or PC versions but on the Switch’s small screen you’ll hardly notice.

2017122515392800-CF035A1DEF1D6DADE285B7ACA9873642

Everyone in my family has a copy of Splatoon 2 now and you can find us battling it out at least one weekend night on the living room couch. Several of our friends have joined us and the game keeps getting better, adding new weapons and maps at a steady clip. Recently we started playing the Salmon Run wave battles as a team. Its good family fun.

2017122517123600-CBA841B50A92A904E313AE06DF4EF71A

I’m still playing Breath of the Wild. I’m around 70 hours in and love the game even more than when I first started. Just when you think you’ve seen it all, something new pops up and blows you away all over again. It really is one of the best video games of all time on any system. Watch out for Eventide Island!

2018011420454600-F1C11A22FAEE3B82F21B330E1B786A39

Skyrim is just as epic on the Switch as it was on the Xbox 360 and PS3. The load screens aren’t too bad, the graphics look better than the 360 / PS3 Gen but not as good as the PC HD version. I haven’t spent a lot of time with this title yet, but overall I’m impressed. Both my wife and son have hundreds of hours in Skyrim in its various forms and they give the seal of approval.

If you’re considering more than one Switch in your circle you might want to consider purchasing most of your games on cartridges that way they can easily be shared. If you started out with a single Switch and need to move user profiles to new devices; its relatively easy to do. Just follow these instructions on Nintendo’s site. You might also want to read through my document about getting multiple Switches to play online with a single Internet connection.


Patchageddon; Microsoft issued a patch to disable Intel’s patch!

If you listen to the silicon valley hipsters and their PR armies; AI is going to be taking over the world soon. Right after they figure out how to stop relativey simple injection techniques from powning every CPU on the planet. I’m sure in their minds, they truly believe that if they can just beat this one last hack everything will be fine.

Humans have an inate ability to destroy what they make. Watch any child with a pile of blocks and you will inevitably witness the joy that comes from wrecking their own creations. I think a certain segment of our technical society revels in being the wrecking ball.

AI will have a difficult time making useful headway into our lives as long as the balls are flying and knocking down all of the blocks. These types of technical disruptions have been part of the computing landscape since the beginning and show no signs of slowing. If anything they are gaining in frequency and ferocity. As people, communities, and nations become more wary of AI; the headwinds it faces will blow stronger.

In the latest round of you build it I’ll break it, Microsoft has released an emergency out-of-band patch that disables Intel’s spectre variant 2 patch. Microsoft believes the patch is ineffective, causing corruption and unwanted reboots, and that this variant has not been seen in the wild. Read KB4078130 for the details and the patch.

The new Surface Pen. Is it worth upgrading?

My kid and I were rough housing, I moved in to tickle him and felt my hand be poked by something sharp. When I looked down, the cap of my Surface Pro 3 stylus was laying on the floor; the batteries had bounced to who knows where. When I picked up the parts I immediately noticed that the cap’s rubber attachment seal that holds it to the battery cover was torn.

It was my fault I should have paid more attention to what was in his hand before I started playing. Oh well, I had been wanting to get the new stylus ever since I’d demoed it at the Microsoft Store and now I had the all important justification for my purchase! Maybe I subconsciously picked the wrong time to wrestle?

My daily driver is a Surface Pro 3. It’s been my favorite mobile computer of all time. I splurged and got the most powerful model that Microsoft offered and I’m nowhere near ready to replace it. That being said, I’ve never loved the stock stylus. Don’t get me wrong it works just fine. It doesn’t fit my hand very well because it is both too short and too thick. I’m not a huge fan of the balance and really wish the top functioned as an eraser. Unfortunately, you can’t just hop on-line and order some other stylus to use with the Surface Pro. The technology is proprietary so unless Microsoft releases a new stylus; you’re stuck.

Lucky for me, MS did exactly that. When they designed the next generation pen for the Surface 4 and Surface Studio line they made it compatible with the previous generations and sold it separately. At $99.00 it’s not exactly cheap. So is it worth the moolah?

The short answer is absolutely! The long anwser is that for me personally, it corrects every issue that I had with the original. It feels like an expensive writing instrument. It’s well-balanced and the dimensions are a much better ratio. Holding it reminds me of a number 2 pencil, the flat edge accentuates the nostalgia and also serves to help you easily find the barrel mounted select button.

Dormant Tree
The first thing I did with my new pen

The stylus tip is made of a softer material than the orignal’s and provides a little more drag as you write or draw on the screen with it. The added drag gives you more control, helping to prevent overshot on connecting planes and tightening handwriting strokes. Speaking of control, the pressure sensitivy is 4 times higher than the original at 4096 points. The device also seems to communicate with the Suface faster and reduces the lag I used to see while drawing in PhotoShop.

The top button can activate up to 3 programable functions (one for click, double -click, and another for press-n-hold); I have mine set to Take a screenshot, open OneNote and launch Cortana
Pen settings Did you make a mistake while drawing? Just flip the device over and erase; no need to go to the tools menu and select the eraser (such a time saver).  The barrel button is the same as right cliking on your mouse; you press the pen on the screen and hold it there to left click.

While we’re on the subject of navigation with your pen. Here’s a tip! Windows has a little known feature in it called flicks. Pen flicks let you perform an action by quickly moving your stylus across the screen in various directions. You can find the settings and enable flicks by opening the control panel (search) and selecting the icon for Pen and Touch, then choose the Flicks tab. Flicks

I am really impressed with the new Surface Pen and will be using it for years to come. Microsoft has been at the forefront of digital input devices and this one will go a long way toward keeping them at the top.


Digital Art and the XP-Pen Artist 15.6 drawing monitor

I’ve written about my fondness of pen input on computers and mobiles before. I’m writing this article on my Galaxy Note 8 with the S-Pen in handwriting mode. Some of my posts feature digital sketches and drawings that I’ve done on my Note or my Surface Pro.

My son has also shown an interest in digital art. We share an Adobe Creative Cloud subscription which gives us access to all of their software; Photoshop, Illustrator, Premiere Pro, and even their animation software is included. You can install the applications on two devices but can only use one of them at a time. It’s a good value in my opinion. I don’t think I’d ever drop the thousands it would cost to purchase all of the apps independently. They also give you a synchronization solution and 100GB of cloud storage so your works can be accessed from any of your devices at any time.

There are lots of free or inexpensive art and photo editing apps like Mediabang and Paint.Net, the built-in Microsoft Paint, and more; they’re good enough, but not the same caliber as Adobe’s software. In the same way that Open Office is good, but not quite as great as Microsoft Office. They make a great place to start if you want to make art, edit photos, or try your hand at animation while keeping costs down. They’re also great for learning how digital tools work.

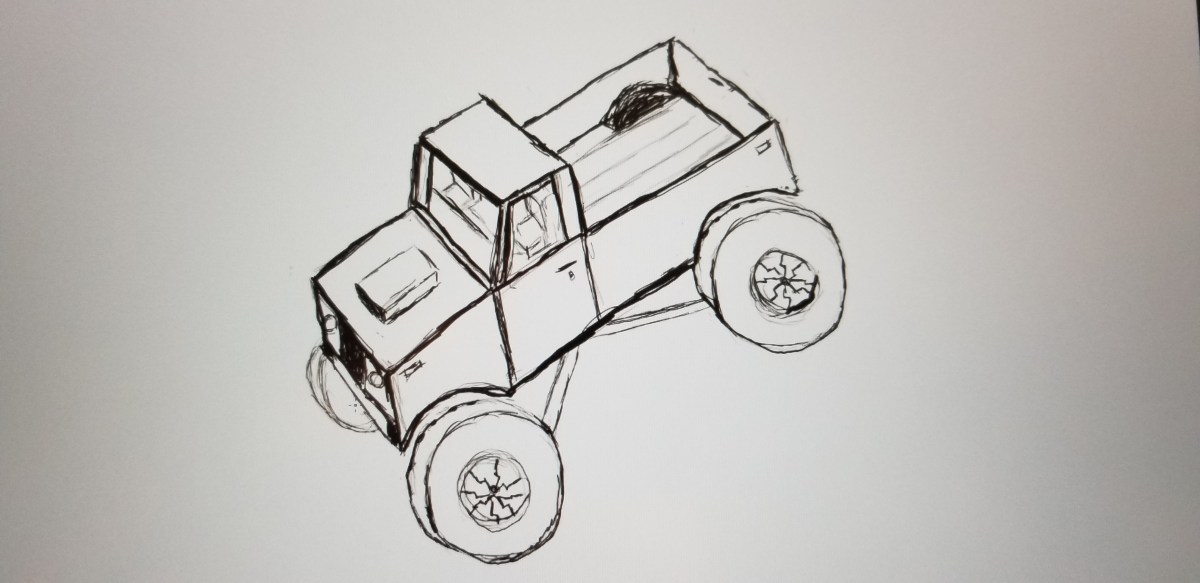
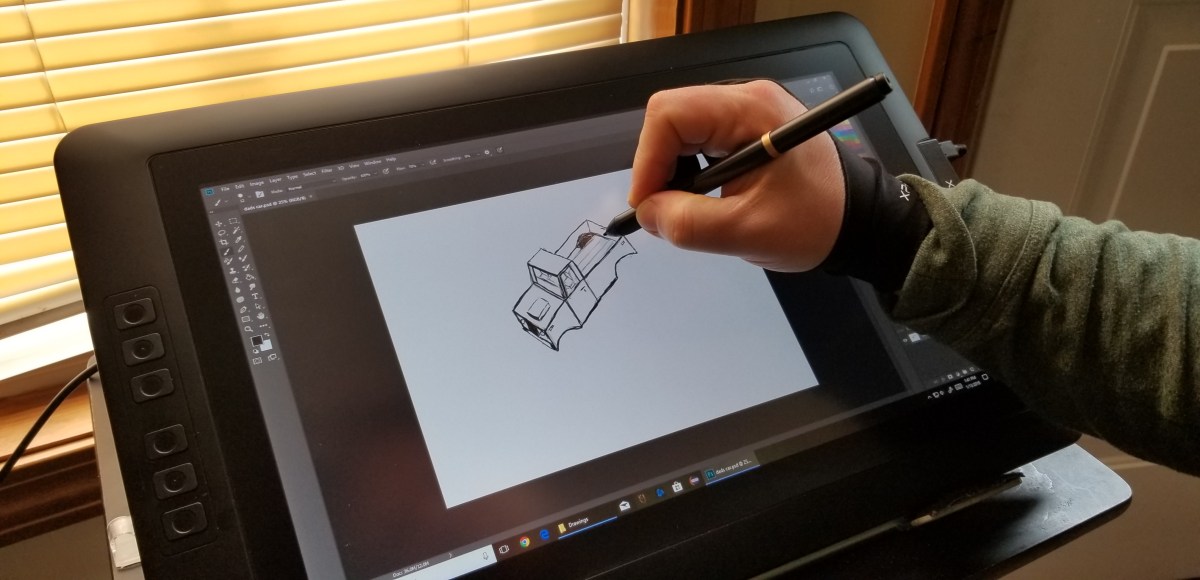
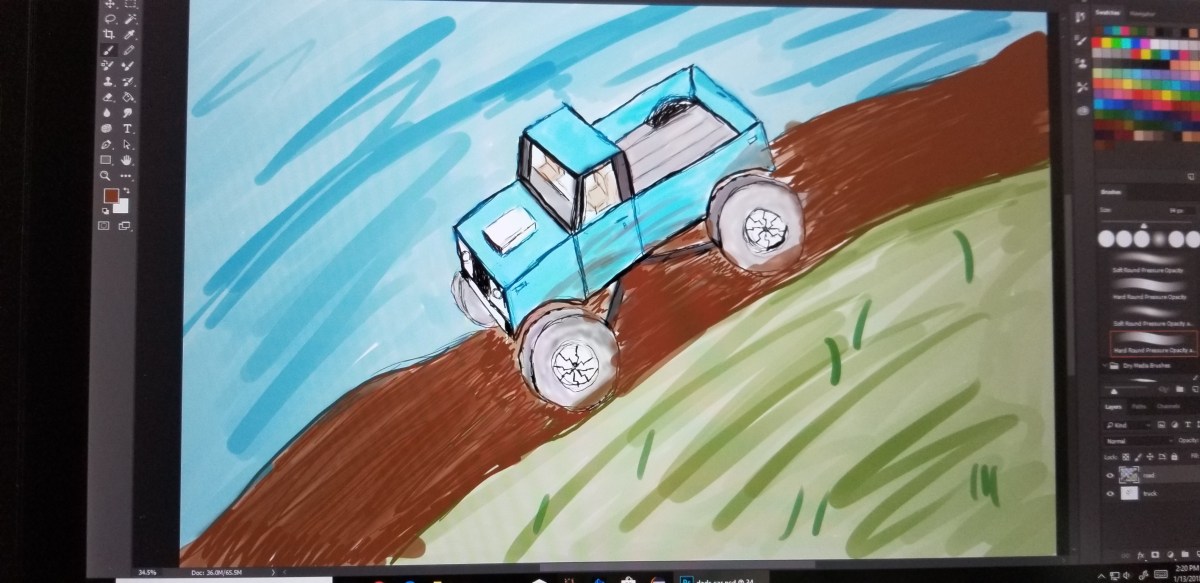
Things like layers, lassoes, and pixel cloning are going to be new concepts if you’re used to paper. It’s features like these that separate digital and analog art techniques. For example; in the sketch of a truck that I’m using throughout this article, I only needed to draw one tire and then copy/paste. The truck is a seperate layer from the background and color which would let me easily do something else with it. When I drew the hood scoop, it was a little off-center. I didn’t need to start over. I  just had to use the lasso tool to move it.

TruckSketch

When we started out with digital art, my kid had decided on a Wacom Intous Draw tablet. This tablet is like a mouse pad that you write / draw on with a stylus. They are in-expensive (depending on size); I picked up ours at Best-Buy for $79.00 on sale. In terms of art, it works well but there is a disconnect between the tablet and what you’re working on, because your drawing or photo is on the screen but your stylus is touching the pad on a different plane. It works reasonably well after acclimation.

While we’re on the subject, it takes around 40 hours to become accustomed to any input device. Whether we’re talking about a drawing pad, a game controller, a keyboard, or a stylus you won’t have it mastered until you’ve spent about 40 hours working with it. So many of the people I know pick up a tool and judge it a failure if they can’t fully use it in 10 minutes. That’s just not how learning a new motor skill and building muscle memory works. In my opinion, it’s the biggest downfall of stylus input on computers. When the digital tool doesn’t work exactly like a pencil or pen on paper, people get turned off. It’s not supposed to be like paper. The experinece is supposed to be better than paper and if you dedicate the time to gain the skills, I think you’ll be surprised.

The trouble with drawing pads occurs when you lift your pen to connect two lines. For example; when drawing a large square you might lift your pen at the end of each side. Knowing where to put your pen down to start the next line can be a little challenging. The screen will show you where your stylus is hovering but there’s still a disconnect between your hand and your eyes that you just can’t quite overcome at first. There is also some translation happening between the size of your monitor (40″ in my case) and the size of the drawing space (5.7″) that you just can’t quite predict every time. Don’t get me wrong, if you spend the afore-mentioned 40 hours working with the device you’ll get the hang of it, but when working on complex shapes with minute details, it can be slower and become bothersome if you’re working on a long project.

The next step in digital art tools is a drawing monitor. Of course the primary difference between a drawing pad and a drawing monitor (aka pen display) is that the drawing surface is also a screen. The Cadillac of drawing monitors is the Wacom Cintiq line. Wacom popularized the technology first and owns several patents around the technology. Their screen based products are quite expensive, especially if you’re not using them for professional reasons. My son and I are not able to spend thousands of dollars on a digital art device so we needed to find an alternative. Lucky for us, several key patents for pen tech have expired or are about to expire. As a result, there are lots of competitors on the market that understand if they want “everyday” people to consider purchasing this type of device; the price point needs to be much lower.

I never purchase a new gizmo or gadget over $50.00 without doing a ton of research first. In this case, I’ve worked with pen displays through-out my career and know several professional digital artists. My experience and their recommendations were combined with hours of research online (lots of YouTube reviews) by myself and my son to produce our short list.

In the end, we chose the XP-Pen because the Huinon was so large that it would always require a stand and sometimes we like to draw on our lap. The Parblo Coast had a lot of complaints on various blogs for driver issues with Photoshop. Although, from their descriptions, I think it was probably a failure to adjust the refresh rates in their video driver.

XP-Pen

The XP-Pen was easy to set up; just go to their web-site and download the newest drivers, hook up the included cable(s) and hit the power button. If your system is relatively new you should be able to plug the USB power cable in to one port and the controller cable into another. It comes with a power adaptor and plug fittings for both the US and Europe. It also ships with a mini display-port to HDMI adapter cable. They have drivers for both Windows and MAC so no matter your computer preference, it should work well.

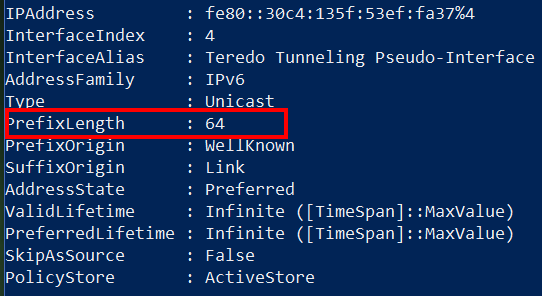
There’s a reported issue with many of these tablet devices blinking or flickering while you’re using them. If this happens to you, try adjusting the refresh rate of your video card to match the 60Hz refresh rate of the screen. For some reason it gets auto-deteced at 59Hz and this causes the flicker. In Windows just search for Display Settings, then click Display Adapter Properties and use the drop down to select 60Hz.

Refresh_Rate

This thing is fantastic. It’s the best overall drawing experience I’ve had to date. Part of the reason behind this is that the graphics are being driven by my Radeon GPU instead of a the Intel chipset my Surface Pro has. Even if that wasn’t the case, the drawing experience itself is better. The screen is not smooth like glass, there is a texture applied to it that offers a little tactile feedback to your strokes. The pen tracks well and suffers very little, if any parallax (pen tip and cursor don’t align). There’s a rocker switch on the side that adjusts the brightness and the colors look good.

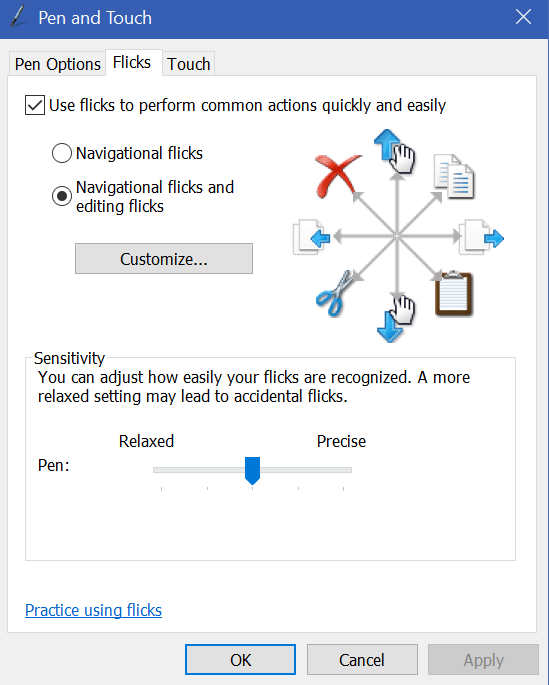
The drivers work great. If you’re using it with Windows 10 and want the pressure sensitivity to work you’ll need to enable Windows Ink; search for it to find the settings. I tested it with the Adobe products, Paint.Net, Microsoft’s built-in apps, MediaBang, and Auto-Desk. It worked well on all of them.

My son and I both wish the tablet had more shortcut keys but that isn’t a deal breaker by any means. Also, we already had a tablet stand that we knew would work with this thing. If you don’t, you’ll need to consider buying theirs. There’s a bundle that includes the stand on Amazon or you can order it as an accessory from the XP-Pen website. There are also quite a few inexpensive tablet stands out there that would work well for it and I suspect that you could use a painting easel.

Overall we’re very happy with our purchase and would recommend it to anybody looking to use a digitizer for computer input. At $359.00 with free shipping from Amazon, it’s a bargain. If you’re wondering how that sketch of the truck came out, here it is with the color layer turned on. Thanks for reading.

TruckPainting


I have so many fans! The perilous adventures of a CPU cooler upgrade

As I have stated numerous times throughout my blog, I am a gamer. I have custom-built my gaming PC and I’m pretty proud of it. One of the things I like best about Elder-Wand is it’s RGB LED lights that are controlled by my MSI motherboard’s “Mystic Light” feature. As long as the lights that I install are RGB, the motherboard’s controller and app can change them all to the same color with an app on the rig or from my mobile. It even controls my Razer Chroma Keyboard, Mouse, and Headset. This is a fairly common feature among high-end gaming systems now, but they usually don’t go the same extreme.

When I built Elder-Wand, I put most of my fun money into the running components: motherboard, CPU, GPU, M2 SSD, and Vengeance RAM. I skimped on the case, fancy fans, got a no name CPU cooler, etc. figuring I would update those components later. I have stuck with that goal, updating components as my budget allows. I’ve put everything in a nice new case, upgraded all the fans to LED 120 mm PWM, upgraded the power supply and more.

While I was moving everything into the new case, I broke one of the plastic mounting tabs for my CPU cooler. It still worked, but it wasn’t attached in all four corners as it should be so I decided to replace the cooler over the Christmas break from work. This is where my tale begins.

I started my project the same way that I always do, with a ton of reasearch. I wanted something that worked well but it also had to look great. I considered converting to liquid cooling but I don’t need to overclock my system right now, so I settled on copper tube based designs, there are a lot of them out there. One of the most popular units is the Cool Master Hyper 212 it’s been around  a while and has great reviews. It looks nice, but I wanted something with a little more flair. The Noctua Dual Tower looked big enough to chill my living room but was overkill for my requirements. In the end, I chose the Deepcool Gammaxx GT, I thought it would be a good balance of performance and looks.

I had planned on this taking an hour or so, boy was I wrong.

Oldcoolergone
Step 1 is to remove the old CPU cooler. I needed to remove my GPU first.

I used a thermal paste kit that I purchased on-line to remove the grey goop from my CPU and prep its surface for the new paste.

Readytoinstallnewcooler
Next, I read through all the instructions for the new unit.

I followed the instructions to insert the nuts into the bracket, mount the brackets, and mount the rails.

The instructions with new cooler said to place 5 pea size dots of thermal paste on the CPU. I used the paste that came with my kit, Arctic Silver is supposed to be the best you can get and I’ve used it for years.

InstallCPU

I installed the cooler, connected the cables, installed my GPU and double checked everything.

InstallCooler

When I booted up my PC, I was concerned to see it shutting down almost as soon as it powered up. The fans and board lights would come on for a second or two but then turn off before the BIOS post even started. My first assumption was that I had a partially connected cable somewhere so I took the case back off and re-seated my components along with re-plugging all the connectors.

No go. Still blinking on and then back off. My next guess was that something was amiss with the thermal paste. I took the case back apart, removed the GPU, pulled off the CPU cooler and sure enough, the paste was not evenly distributed. The fan screws in to the mounting bracket and unless you have a 4 screw driver rig of some sort, there’s no way to apply pressure evenly (yes, I did opposite corners a few turns at a time). I decided to clean the CPU and cooler base and try again. This time I applied the thermal paste in an X pattern (what I’ve always used in the past).

I got everything back together, booted up and I almost lost it!!! My system was still blinking on and then back off. I decided to remove the BIOS battery to reset everything. Of course on my board, the battery is underneath the GPU so I had to take everything back apart again. Bye now I am around 4 hours in to this project and my nerves are starting to fray. I got the battery out then re-assembled and tried booting. Yes! Elder-Wand booted up, the BIOS config screen loaded. I set the clock and boot options then saved and exited the BIOS. A quick reboot and my Windows logon screen loaded.

After I got logged on I decided to load my hardware monitoring app and see how the new fan performed while I played a game of Overwatch. Just about the time my match was starting my PC shutdown hard. When I tried to boot it back up I got the blinks back *%^! That was it; I’d had all I could take. I had to work in the morning so I decied to leave my system down and deal with it on the weekend.

Over the next couple of days my mind was turning over all the things that could be causing my issue. I knew the i-7 CPU had built-in thermal protection and so did my board so I was reasonably sure I hadn’t fried anything. I closely examined the pictures above and decided that the thermal paste would work better if I spread it like peanut butter. So I took my system apart, cleaned everything and used a silicone spatula to evenly apply a nice thin coating to the processor. Put it all back together and it booted again. Time to test. This time I made it through a couple of games before it shutdown. I had data though, there was a temperature spike on the processor.

I thought about it for a bit and looked at the pictures some more. I noticed the ridges in the copper cooling plate had gaps that were not being filled by the paste. I decided the paste was too thick to get down in there and was just smooshing out to the sides. I went and dug around in the box my new cooler had come with and found the paste that came with it. So I proceeded to dis-assemble, clean, and re-apply the manufactures paste. Then I put everything back together and booted. After 3 matches of Overwatch and an hour or so of Destiny 2 I felt I was in the clear. My system has been running fine for more than a week now. The new cooler works great and keeps the temp around 5 degrees lower than my previous one did. It looks nice too. The moral of this story is, “Don’t think you know better than the people who made your hardware”.  If you have a system that won’t stay up after a CPU cooler swap; you might try thinner thermal paste.

PowerShell; All Windows Servers and / or Workstations Storage Report

A lot of companies have monitoring software that will generate a report showing the amount of storage used on all of your systems. Smaller organizations may lack this type of software and occasionally even if you have monitoring, it won’t provide the specific data you require.

You can use PowerShell for all types of system monitoring and reporting. By calling WMI (CMI) we can access nearly any component of a system and obtain its status. If you’re planning on following the instructions below from your workstation you’ll need to install the appropriate RSAT package from Microsoft or use PowerShell remoting to connect to a domain controller and import a session for the Active Directory module. It may be easier to run the script from a Domain Controller.

The first step our script needs to accomplish is to build a list of the systems we want to report on. For most windows networks that means importing the Active Directory PowerShell module and using its Get-ADComputer function.

Import-Module ActiveDirectory
$domains = (Get-ADForest).domains
$dcs = Foreach ($domain in $domains) {
Get-ADDomainController -DomainName $domain -Discover -Service PrimaryDC
}
$servers = Foreach ($dc in $dcs) {
Get-ADComputer -Properties * - Filter {(OperatingSystem -like "*Windows Server*")}|Select DNSHostname -ExpandProperty DNSHostName
}

The snippet above will find all the primary domain controllers in your AD Forest and then scan them for all computer objects who’s operating system properties contain the words “Windows Server”. It will store the dns hostnames of those systems in a variable named $servers. If you wanted to scan workstations instead (or add them to your report) you just need to alter the filter or add a line.

$workstations = Foreach ($dc in $dcs) {
Get-ADComputer - Properties * - Filter {(OperatingSystem -notlike "*Windows Server*")}|Select DNSHostName -ExpandProperty DNSHostName
}

Now that we have our list of systems to scan the rest is just a matter of using WMI to find the drives and their status. We’ll also toss in a little math to make a report that’s easier to read.

$report = Foreach ($server in $servers) {
Get-WMIObject Win32_Volume -Filter "DriveType = 3" -ComputerName $server|Where-Object {"Label -ne 'System Reserved'"}|Sort-Object Freespace|FT -Property @{Name = "Mount Point"; Expression = {$_.Caption}}, @{Name = "Capacity (GB)"; Expression = {[math]::Round(($_.Capacity/1GB),2)}}, @{Name = "Free Space (GB)"; Expression = {[math]::Round(($_.Freespace/1GB),2)}}, @{Name = "% Available"; Expression = {[math]::Round (($_.Freespace/$_.Capacity)* 100)}} -GroupBy SystemName -Autosize
}

Combine the snippets above into a script and you’ll have full functioning storage report. You can add a SendMail command and schedule it with the Windows Task Scheduler to create an automated report. It also wouldn’t be difficult to output the results to a HTML page somewhere to create a dashboard. There are a lot of possibilities once you understand the data collection techniques. For another alternative look at my Exchange storage report, its essentially the same script but finds and filters for your Exchange email servers.

PowerShell; Office Add-ins and Plug-ins report for Office 365 implementation

If you’re considering implementing Office 365 in your company, you need to know that some add-ons and plug-ins for Microsoft Office applications will not work. There’s not really a good way to tell which ones will or will not work other than trying to upload them to the plug-in page in the admin tools section of the portal. Before you can do that you’ll need to know what plug-ins are being used across your enterprise. That’s where PowerShell comes in, we can scan the registry and generate a nice HTML report from either each machine on your network or just from a select few.

The code below will create an email an HTML report from whatever machine it is executed against. This comes in handy if your network security blocks WinRM.

$userinfo = $env:USERNAME+" "+"on"+" "+$env:COMPUTERNAME+$env:userdnsdomain

Function Get-Plugins {
$searchScopes = "HKLM:\SOFTWARE\Microsoft\Office\Outlook\Addins","HKLM:\SOFTWARE\Wow6432Node\Microsoft\Office\Outlook\Addins", "HKLM:\SOFTWARE\Microsoft\Office\Word\Addins", "HKLM:\SOFTWARE\Wow6432Node\Microsoft\Office\Word\Addins", "HKLM:\SOFTWARE\Microsoft\Office\Excel\Addins", "HKLM:\SOFTWARE\Wow6432Node\Microsoft\Office\Excel\Addins", "HKLM:\SOFTWARE\Microsoft\Office\MS Project\Addins", "HKLM:\SOFTWARE\Wow6432Node\Microsoft\Office\MS Project\Addins", "HKCU:\SOFTWARE\Microsoft\Office\PowerPoint\Addins", "HKLM:\SOFTWARE\Wow6432Node\Microsoft\Office\PowerPoint\Addins"
$searchScopes | % {Get-ChildItem -Path $_ | % {Get-ItemProperty -Path $_.PSPath} | Select-Object @{n="Name";e={Split-Path $_.PSPath -leaf}},FriendlyName,Description} | Sort-Object -Unique -Property name
}

$style = "BODY{font-family: Arial; font-size: 10pt;}"
$style = $style + "TABLE{border: 1px solid black; border-collapse: collapse;}"
$style = $style + "TH{border: 1px solid black; background: #dddddd; padding: 5px; }"
$style = $style + "TD{border: 1px solid black; padding: 5px; }"
$style = $style + ""
$report = Get-Plugins|ConvertTo-Html -Head $style|Out-String
Send-MailMessage -SmtpServer yourmailserver -From yourreport@yourdomain.com -To youremail@yourdomain.com -Subject "Office Plugins for $userinfo" -BodyAsHtml:$true -Body $report<span id="mce_SELREST_start" style="overflow:hidden;line-height:0;"></span>

If you are able to use WinRM to access all of your computers you can expand this script to invoke the function on every workstation in your AD Forest by scanning for the domain controllers, the using Get-ADComputer with a filter to find all of the workstations. After you have all the workstation names stored in a variable you’ll just need to use “invoke-command” against them to create a comprehensive report.

Import-Module ActiveDirectory 

$domains=(Get-ADForest).domains
$dcs = foreach ($domain in $domains) {Get-ADDomainController -DomainName $domain -Discover -Service PrimaryDC|select -ExpandProperty hostname
}

$systems = foreach ($dc in $dcs) {
Get-ADComputer -properties * -Filter {(OperatingSystem -like "*Windows*") -and (OperatingSystem -NotLike "*Server*")} -Server $domain |select DNSHostName
}

$userinfo = $env:USERNAME+" "+"on"+" "+$env:COMPUTERNAME+$env:userdnsdomain

Function Get-Plugins {
$userinfo = $env:USERNAME+" "+"on"+" "+$env:COMPUTERNAME+$env:userdnsdomain
$searchScopes = "HKLM:\SOFTWARE\Microsoft\Office\Outlook\Addins","HKLM:\SOFTWARE\Wow6432Node\Microsoft\Office\Outlook\Addins", "HKLM:\SOFTWARE\Microsoft\Office\Word\Addins", "HKLM:\SOFTWARE\Wow6432Node\Microsoft\Office\Word\Addins", "HKLM:\SOFTWARE\Microsoft\Office\Excel\Addins", "HKLM:\SOFTWARE\Wow6432Node\Microsoft\Office\Excel\Addins", "HKLM:\SOFTWARE\Microsoft\Office\MS Project\Addins", "HKLM:\SOFTWARE\Wow6432Node\Microsoft\Office\MS Project\Addins", "HKCU:\SOFTWARE\Microsoft\Office\PowerPoint\Addins", "HKLM:\SOFTWARE\Wow6432Node\Microsoft\Office\PowerPoint\Addins"
$searchScopes | % {Get-ChildItem -Path $_ | % {Get-ItemProperty -Path $_.PSPath} | Select-Object @{n="Name";e={Split-Path $_.PSPath -leaf}},FriendlyName,Description} | Sort-Object -Unique -Property name
}

$style = "
BODY{font-family: Arial; font-size: 10pt;}"
$style = $style + "TABLE{border: 1px solid black; border-collapse: collapse;}"
$style = $style + "TH{border: 1px solid black; background: #dddddd; padding: 5px; }"
$style = $style + "TD{border: 1px solid black; padding: 5px; }"
$style = $style + "

"

$report = Foreach ($system in $systems) {Invoke-Command -ComputerName $system {Get-Plugins|ConvertTo-Html -Head $style|Group-Object $system|Out-String}}
Send-MailMessage -SmtpServer yourmailserver -From yourreport@yourdomain.com -To youremail@yourdomain.com -Subject "Office Plugins for $userinfo" -BodyAsHtml:$true -Body $report

Either way, you’ll end up with a nice report that will help you obtain and test all the plug-ins being used in your company.

Name FriendlyName Description
ExcelPlugInShell.PowerMapConnect Microsoft Power Map for Excel Power Map 3D Data Visualization Tool for Microsoft Excel.
InteractionVoicemail.OutlookLauncher Automatically initiates playback of Interactive Intelligence voicemails.
Microsoft.VbaAddinForOutlook.1 Microsoft VBA for Outlook Addin
NativeShim.InquireConnector.1 Inquire NativeShim Inquire Addins used by SpreadsheetIQ.
OneNote.OutlookAddin OneNote Notes about Outlook Items Adds Send to OneNote and Notes about this Item buttons to the command bar
OneNote.PowerPointAddinTakeNotesButton OneNote Linked Notes Add-In Adds Take Notes in Onenote button to the command bar
OneNote.PowerPointAddinTakeNotesService OneNote Notes about PowerPoint Presentations Enable OneNote Linked Notes Content Service for PowerPoint
OscAddin.Connect Outlook Social Connector 2013 Connects to social networking sites and provides people, activity, and status information.
PhishMeOutlookReporter.AddinModule PhishMe Reporter PhishMe Outlook Reporter
Search.OutlookToolbar Windows Search Email Indexer Windows Search Email Indexer
TFCOfficeShim.Connect.15 Team Foundation Add-in Team Foundation Add-in
UCAddin.LyncAddin.1 Lync Meeting Add-in for Microsoft Office 2013 Lync Meeting Add-in for Microsoft Office 2013
UCAddin.UCAddin.1
UmOutlookAddin.FormRegionAddin Microsoft Exchange Add-in Exchange support for Unified Messaging, e-mail permission rules, and calendar availability.
VS15ExcelAdaptor Visual Studio Tools for Office Design-Time Adaptor for Excel Visual Studio Tools for Office Design-Time Adaptor for Excel
VS15WordAdaptor Visual Studio Tools for Office Design-Time Adaptor for Word Visual Studio Tools for Office Design-Time Adaptor for Word

Sneak Attack! Proxy Malware; What it is, How to Find It, and How to Remove It

There’s a new trick up the Internet bad guy’s sleeves and it’s a doozy. Instead of installing keyloggers or other capturing tools they install a proxy server and set your browsers and other web apps to use it. A proxy server is a tool that re-directs web traffic to the proxy which then forwards it on to the site you asked for. For example, when I open google.com at work my browser asks the office proxy server for the page which checks against a list of allowed sites and then sends my computer google.com (assuming its allowed and safe). It’s a man in the middle. Advanced programming techniques have allowed nefarious characters to package an entire proxy server into a small easily executed file.

Once the proxy has been enabled on your system all of your traffic gets directed to it, which then forwards to the dark web servers so the bad guys can see the bank site and password you typed in. Here’s the rub, you don’t usually know this is happeing. Their system is a true proxy and is returning the pages you’re asking for. You might notice a delay or you may get errors when you try to go to certain sites that say “Proxy Error”. The other problem is that this type of software is a legitmate tool so most Anti-Virus or Anti-Malware software doesn’t detect or flag it.

How do you know if you’ve been hit by this type of malware? Besides the afore mentioned “Proxy Error” you may notice unusual delays in your browser or web apps. The first thing to check is your Browser’s proxy settings. These are different for every broswer and every Operating System so Google “My browser proxy settings” and “My Windows Version” to see where to look on your system. When you get there, you should not see an address of 127.0.0.1, if you do this is an indication you’re a victim of a proxy attack. You’ll know for sure if you turn the proxy setting off, reboot, and find it turned back on (assuming your not on a mananged PC where you IT staff is doing this).

Windows10_Proxy_Settings

You can also go to a site like http://www.ipchicken.com and see if the public IP address it shows you matches the one on your internet modem / gateway’s admin page. If it doesn’t this is proof your web traffic is being re-routed through a foreign IP.

You’re being proxied, now what? Follow the instructions below at your own risk, I’m not in-front of your computer and each situation is unique. This is general advice and you are responsible for your actions, not me or whatdouknow.com. If you have a backup available you should consider formatting your hard drive and re-installing everything.

I’m going to assume your operating system is Windows. I’ve not seen this type of attack on Linux or MACs yet. So, first open PowerShell (search for it or find it in the start menu). Once you have it open type: Netstat -n -o and press enter. This is going to show you all the open network connections on your computer and the PIDs (Process ID) for the software that opened them. We’re looking for a line or lines that match what you saw in the browser settings of your computer.

WIndows10_Netstat

Once you’ve found it open another PowerShell session. Type: Get-Process -PID Number where number is the PID number that corresponds to the PID of your Netstat command (4200 in my case). Press enter and PowerShell will show you the name of the process. Write this down or type it into Word or notepad.

Windows10ProcessName

Now open task mananger (CTRL+ALT+Delete, click TaskManager) and find that process in the list of running apps. Right click on it and choose Open File Location, this will launch Windows Explorer and go to the directory that contains this file. Go back to the task manager and right click on the file again, this time choose End Task. Now go to the Explorer window you just opened and delete the entire folder. Just ending the task won’t stop the software from running again the next time your reboot your computer but you can’t delete the file until you’ve ended the task so the order is important here.

Once you’ve killed the task and deleted the file run Netstat -n -o again you should no longer see connections from 127.0.0.1. If you do, you may have more than one copy of the proxy attack installed, keep repeating the process until you’ve gotten them all. Always right down the name of the process. After you’ve stopped them all and deleted all their files we’ll need to clean up the registry.

Type Regedit in the search or run bar to open it. Right click on computer (top left) and choose find and search for the IP and Port numbers you found in your Netscan. If you find a match, delete the value by right clicking on the entry and choosing Modify, then clear the Value box and click OK. Press F3 to keep searching. Repeat the process until you see the “Finished Searching through the Registry” message pop-up. If you found more than one proxy on your system repeat the process until you’ve cleared all of them.

Now we’ll search the registy for the software entries. Right click on computer (in Regedit) and click find. Then enter the name of the process you found when you ran Get-Process in PowerShell. This time instead of deleting the value we’re going to delete the Key (folder) or Record itself. Right click on whatever it is and choose delete, click yes when prompted. Press F3 and keep searching / deleting until you get to the end of the registry. Repeat this process for every copy that you found.

Now go to your Proxy settings and turn it off. Then reboot your computer. When it comes back up everthing should be back to normal. Run the Netstat -n -o command again in PowerShell to be sure you got everything cleaned up. Go change all of your passwords for everything.


HP Sprocket; the little printer that could….

The only Christmas present on my wife’s list this year was an HP Sprocket printer. I must admit to being a little embarrassed because I had absolutely no idea what she was talking about.  What kind of tech blogger am I anyway?

After she explained what the Sprocket was, I jumped on-line and did some research of my own. The Sprocket is a printer that utilizes ZINK (Zero Ink) paper. Each piece of the paper is a multi layered packet that is impregnated with heat activated dye crystals. The printer contains the heating element, not traditional print heads. These things are the new trend for “crafty” types and most printer manufactures are making at least one model of ZINK printer.

Sprocket

So basically, we’re talking about the digital age version of a Polaroid camera. In fact, the Polaroid company makes one of these things with a camera attached. It’s called the Polaroid Snap. They all have an embedded camera or hook up with your mobile via bluetooth. Most of them spit out 2X3 photos that double as stickers if you peel off the back. I was a little sceptical about how useful a 2×3 photo would be but it was the only thing she really wanted and I always like new gizmos so I dropped the hint to my mother and she ordered one from Best Buy. HP’s model is available in 6 different colors, I went with white.

After the food and present exchange, I offered to set it up for her but it was so easy to get going she’d already done it herself. She had even printed a photo from our celebration on one of the 10 sheets of demo paper that comes with it. I was impressed, the print looked great and the size was better than I had imagined. suddenly a whole bunch of uses for the thing popped into my head. Lables for my gear being chief among them. We travel in an RV and I thought of plastering the ceiling with shots from our trips.
Sprocket_Print

The software is easy to use and apparently HP’s implementation is considered the best by ZINK connoisseurs. It offers easy photo touch ups, frames, stamps, text insertion and more.

I’ll let you in on a little tip. Each manufacturer makes their own ZINK paper but as long as you keep the little bar code card that comes in your brand’s first pack of paper you can use any of them in your printer. Sometime’s Polaroid’s paper is on sale, order it, scan the card that came with your HP paper and insert the Polaroid stack into your printer. On average you’ll be spending about $0.50 per print. It prints a sheet in just a couple of minutes and because its battery-powered and not much bigger than an iPhone you can easily take it with you. We’re taking ours to my son’s birthday party to make stickers for all the kids with their pictures on them.

All in all, they are neat little gadgets. I’m not sure anybody actually “needs” one but if you’ve got the extra money and you like pictures, you can come up with some pretty cool uses for it. For instance my wife, sticks the pictures on her notebook pages.

Sprocket_Scrapbook


Updated- Native IPv6 on Android with Pfsense 2.4.x and Comcast/Xfinity; Fix Facebook, Youtube, Flipboard and more.

I’m an early adopter of most technology. I’ve been running IPv6 (dual stack) since the day my ISP (Comcast) made it available and learning how it works as I go. It has changed drastically from the early days with new protocols like DHCP6 being added to overcome challenges. Most of my devices now prefer IPv6. I vote we get rid of the v and just call them IP4 and IP6 who agrees?

The Problem:

I’ve seen plenty of posts in forums about people struggling to get this working, especially on Android devices. I like to help people with tech, so this article is all about how to make this work. Here’s the deal, Android’s makers have decided not to support DHCPv6 which is how a lot of routers are configured to hand out addresses for IPv6 networks. You can read about that here if the reasoning matters to you; https://www.techrepublic.com/article/androids-lack-of-dhcpv6-support-poses-security-and-ipv6-deployment-issues/

This decision actually causes a lot of trouble if you have IPv6 turned on but not configured correctly. Some of the most common symptoms are slow or failed web page loading, Facebook comments not loading, the Youtube app is slow, etc. If you’re on a mobile phone you can turn Wi-Fi off and everything will work over LTE just fine. In a nutshell, the issue is that you’re trying to go to web services that are IPv6 enabled but your device isn’t using it correctly. You end up having to wait until IPv6 times out and falls back to IPv4 before everything works. This can take a long time.

A lot of posts out there on the intertubes say to disable IPv6; the trouble is you really can’t. IPv6 is baked in to your devices now, you can’t just turn it off. At best, you can block it at your firewall or stop it at your network card, but that won’t stop all of the problems because a lot of the apps you use (even the OS itself) expects IPv6 to be there. Not to mention, the whole world is going to IPv6 right now. Turning it off is the equivalent of saying you want to go back to the horse and buggy until they get those car things figured out.

The Solution:

Router manufacturers have started including or updating firmware to allow an RA mode (Router Advertisement) of “Assisted” meaning it will use SLAAC and DHCP6 in parallel. This gives you the best of both worlds, and is what we need to do so your Android devices can use IPv6 on your network. SLAAC is a process that allows the device to pick its own IPv6 address from a range of addresses provided by your ISP vs. being assigned one from your personal router (DHCP6).

The following information and instructions are based on Whatyouknow.com’s lab which consists of a Comcast Xfinity modem in bridge mode connected to a Pfsense 2.4.2 firewall. The terminology and locations may be a little different for your case, but Bing or Google should be able to help you figure out the exact settings for your equipment.

First, you need to know what prefix delegation your ISP is passing out. Sometimes you can retrieve this info from your cable modem’s admin page, generally under connection status (usually the admin page will be https://10.0.0.1 or https:// 192.168.0.1). If you can’t access your cable modem then try looking it up (Google, Xfinity Prefix Delegation). If you can’t find it on-line then try:

  • Plug an IPv6 capable computer (must be turned on in your network settings) straight into your cable modem.
  • Open PowerShell and type Get-IPNetAddress (on Linux or Mac use Terminal to run ifconfig)
  • Find your IPv6 Address and look for the PrefixLength field
    • IPv6-PreFixLength

Now that you have the prefix delegation, logon to your firewall and configure your WAN interface to use DHCP6 (for Comcast), and set the Prefix Delegation size to 64. You can probably leave all the other settings alone. Here’s what it should look like in PFSense.

PfsenseIPv6WanSettings

Now we need to configure the LAN interface to get is IPv6 address from your ISP connection. Go to Interfaces, LAN, select Track interface in the IPv6 drop down, then select WAN for the interface to track.

After you have saved and applied these changes, you should be able to go to your dashboard (connection status page if you’re not using PFsense) and see IPv6 addresses listed for both your WAN and LAN interfaces. If you don’t, try rebooting your cable modem and your firewall. If you still don’t see them, then you missed a step in the setup. Start Over.

Now for the Android Magic sauce: we need to configure the distribution of IPv6 to other devices on your network. As I mentioned before, Android is expecting a SLAAC address assignment, depending on the rest of your network equipment it may eventually get one in the current configuration, but setting your RA to “Assisted” will help it along.

Go to Services, DHCPv6 Server & RA and check the box to enable DHCPv6, save and apply. You shouldn’t need to change any other settings.

PfsenseEnableDHCP6

Now click on the Router Advertisement tab and in the Router Mode dropdown select Assisted RA. This is the magic sauce that will help your Android devices use IPv6 effectively. After you save and apply these settings, I highly recommend that your restart your cable modem and router.

Still Not Working?

While adjusting the settings on our lab equipment to get the screenshots for this article, I noticed something peculiar. I could setup the firewall just as I’ve described above and my Android device still wouldn’t use IPv6. I was still getting the time-out problem when connected to the lab’s WiFi. Our production system was working just fine with these same settings.

I dug into the logs and found that IPv6 wasn’t binding correctly to the LAN interface even though the status page showed that it had an address. I had just upgraded to 2.4.2 to write this article on the latest version and I suspect something got corrupted during the upgrade process. I looked on the PFsense Bug tracker and found a few other posts that matched what I was seeing.

I installed an App named IPv6 and More from the play store on my device and sure enough, I wasn’t getting an IPv6 address at all. I was able to correct this by disabling DHCPv6 (uncheck the box), and turning off IPv6 on both WAN and LAN interfaces. I then rebooted and performed the steps above again and bingo, IPv6 was working. I’m not sure if this is an actual bug or just a glitch for a few of us but if you’re having trouble you might try it. You can also use Putty to connect via SSH (assuming you haven’t turned it off) and pick option 4 from the admin menu to reset everything in the Firewall back to defaults. A word of warning, it does what it says, the IP addresses of your interfaces will be set back to defaults, all of your rules and routes will be gone, all of your preferences and add-on packages will be removed. Make sure you’re in for setting everything up from scratch before going nuclear. Making a backup of your configuration before engaging this option would be a very good idea.

PfsenceSSHMenu

Once you think everything is working open a browser on your Android device and head over to http://test-ipv6.com/ you’ll be able to tell in just a few seconds if everything is up and running.

Update 5/01/18

Since writing this article I have discovered that my Wi-Fi access point’s bandwidth must be set to 40 MHz for IPv6 to function on my Android devices. If the bandwidth is set to 20 MHz or Auto the Android device will obtain an IPv6 address but will be unable to utilize it. I have tested this with ASUS, Linksys, and Ubiquity access points. As of yet, I do not have a satisfactory explanation for the situation


Galaxy Note 8 Wallet Case Shootout

As I have said in other articles, I’m not a fan of cases in general. However, if a case can extend the functionality of a gadget, that is a different story. Wallet cases do just that for me. One less thing I have to find in the morning, gets me that much closer to being on-time to work. I’ve been on a mission to find the perfect wallet case for my beloved Galaxy Note 8.  I’ve purchased, carried, and used 3 of the top models and thought my readers might appreciate what I’ve learned.

First Up is the Samsung LED Wallet Case:

You can find this case on Samsung’s web-site, on Amazon, and even at Target. It retails for $59.99 but I’ve seen it on sale for as low as
$41.00 several times. Its available in the same 3 colors as the Note itself and holds two cards (I stuffed 3 in mine). This protector has a pretty cool trick up its sleeve; LED lights embedded in the case display icons for your notifications. There are several default icons and software that will let you create custom ones. The LED section on the front of the case is touch sensitive you can answer calls by swiping on it etc..


I bought this case with my phone and carried it for a couple of months. It barely adds any thickness to the phone and looks great. The LED lighting function is cool to show off but isn’t really all that useful in my daily life. I wear a smart-watch and the notifications it shows are detailed vs. the generic icons the case displays. The LED notifications don’t last very long so if the phone is in your pocket when it buzzes you’ll probably miss the ICON . I constantly found myself wishing I could carry more than two cards. I was disappointed in the durability of this case. After just a few weeks the material started to unravel next to the power button (open the last pick full screen). I put some tape over it but at this price point it should last a lot longer before having these types of issues.

Next I purchased the Burkley Leather Wallet Case:

You can find this case on their web site and if you watch the price it will go on sale for around $50.00 (normally $69.99). This thing is gorgeous. It is the nicest looking phone case I have ever owned, period. It feels soft and supple, like the inside of your favorite fuzzy slippers. The case fits the phone perfectly and easily holds 3 cards and some cash. I wanted it to work so, so bad, but it just doesn’t. The magnets that hold the phone in the wallet are in the wrong place and kept the screen from turning off when you hold the phone up to talk on it. The magnetic field also disturbs the auto-brightness sensor and stops it from working when attached to the wallet. More importantly, the entire back of the inner phone case is metal which stops wireless charging from working all together and for me, that is a deal breaker.


I ended up sending this case back. I told Burkley that if they could make it work with wireless charing I would purchase another one in a heart beat and be happy to pay twice as much for it. It is so nice I actually considered keeping it even though it stopped three important functions from working. I’ve never gotten so many compliments from random people as when my phone was in this case. If they can fix the magnet issues this will be the top of the line wallet for your Note 8. Please fix it Burkley, I really like it a lot.

Last is the AMOVO Detachable Wallet Folio:

This is the case I am currently carrying. It’s also made of leather and feels very nice but in my opinion it doesn’t quite look as nice as the Burkley did. It is glossy leather instead of suede. It fully works with the phone. It doesn’t stop any of the features from functioning thou wireless charing is a little finicky. You have to get the phone in just the right position due to the magnets being on the sides but once you get a feel for where it needs to go it works just fine.


It holds 3 cards and cash and the inner case seems like it might protect from drops better than the others. My phone will be living in this case for the forseeable future. You can beat the price either, its only $24.95 on Amazon.

Summary:

  1. Samsung LED Wallet Case
    • Pros
      • Looks Nice (matches phone color)
      • Thin
      • LED display
      • Works with wireless charging
    • Cons
      • Only 2 cards
      • No cash pocket
      • durability issues
      • Phone is always in a wallet, this one doesn’t have an inner case that detaches
  2. Burkley Leather Wallet Case
    • Pros
      • Looks excellent
      • Feels excellent
      • 3 cards and cash pocket
      • Attention getting
      • Makes a stand for watching videos
    • Cons
      • Not compatible with wireless charging
      • Breaks auto-brightness
      • Breaks screen-off while talking
      • Expensive (when not on-sale)
  3. AMOVO Detachable Wallet Folio
    • Pros
      • Looks good
      • Feels good
      • All functions work
      • 3 cards and cash pocket
      • Makes a stand for watching videos
      • Available in multiple colors
      • Half the cost of the others
    • Cons
      • None

If you’re in the market for a wallet style case for your Galaxy Note 8, the winner in whatdouknow.com’s opinion is the AMOVO. It looks and feels nice and doesn’t hinder any device functionalilty. If you have a favorite wallet case that isn’t listed, let me know in the comments.


Stop the Distribution List Apocalypse; Dynamically Populate Outlook Contact Groups with PowerShell

Almost every company that I have ever worked for has an enormous collection of distribution lists; many are duplicates or very slight variations of other group names. This makes group communications difficult to say the least. Do you use the Network Team, Network Support Team, Network Help, or Network HQ list to get in touch with your current network group? Sure, you can check the membership, but at a large company you probably don’t know the correct individual’s names, it’s why you’re using the group address in the first place right?

Where did all these address collections come from? That is a simple question to answer, people ask for them. As a team’s management and membership changes the people in it want a way to email their group all at once. They aren’t sure about the existing lists so they ask IT to make a new one. Before you know it; the company address book is a giant mess with more groups than people in it.OutlookDlOverkill

Not only is having this many DLs confusing to use, it is a security nightmare. Security professionals are finding that controlling who can communicate with whom is almost as important as changing your password. The “Wild West” days of allowing all employees to email anybody they see fit should be coming to an end at your company. Every message that leaves your organization represents it in the marketplace. Each one is a piece of data that can be used by your competition or for nefarious reasons by dark net residents.

What’s the solution? There quite a few, from commercial DL management tools like ManageEngine and Ensim, to hiring a FTE to manage distribution. If you use Microsoft Exchange you can set security and transport rules to control access to groups and the same is true for Office 365 (How To coming soon). Personally, I think the best solution is to avoid putting them in the Global Address Book in the first place. Personal or small team DLs belong in each individual’s Outlook. Outlook calls its lists Contact Groups.

Outlook Contact Groups have a lot going for them. They’re local to the user’s Outlook profile but can be shared, they can auto update email addresses for the members, and don’t require an administrator to update them. So what’s the catch? Why doesn’t everybody use Outlook Contact groups?OutlookContactGroup

Email address distribution groups in the Global Address List are often dynamically populated. If your company uses Active Directory there’s a good chance that they have filled that directory with employee details like phone numbers, email addresses, physical addresses, and more. Dynamic DLs are formed when an administrator creates a query and filter set in Exchange. This rule searches AD based on the specified parameters and inserts the matching addresses into the desired list, essentially automating the process. Outlook contact groups lack this ability and have to be manually created which is tedious and time-consuming. I believe this is the biggest obstacle to their widespread adoption.

dynamic_distribution_group

Being the crafty scripter that I am, I decided to see if I could create Outlook contact groups dynamically. Did you know that Active Directory usually contains your entire firm’s management structure? There’s a field in which you can enter an employees manager. If your HR or IT department populated this field you can view the information but there’s no way to create an email list from it. I imagined it would be useful for my company if a person could choose a supervisor from a list and end up with a contact group that contained all that manager’s employees. If you select multiple managers you can create lists that contain entire departments. Unlike most “scripts” this tool has a full GUI. Does that make it an Application? What exactly is the dividing line between script and app?

OutlookDLBuilderManagers
Manager’s List Generated From AD Query Select, Filter, and Sort

The code below is written for Windows 10 and requires the RSAT package be installed. You’ll also need to be sure the Manger’s list is done populating before you select items from it. The scroll bar will stop shrinking when it is done querying all your accounts. If you’re running this on a large distributed directory it can take up to a couple of minutes to complete. If you select a manager and click “Ok” and nothing happens then the scan wasn’t finished. Try again and wait a little longer.

THE CODE:

Import-Module ActiveDirectory
[System.Reflection.Assembly]::LoadWithPartialName('Microsoft.VisualBasic') | Out-Null

$temppath = "$env:userprofile\documents\Outlook_dl_builder_selected_managers.csv"

function Get-Managers
{
Get-ADUser -properties * -Filter {(directreports -ne "$null") -and (displayname -notlike "*test*")  -and (displayname -notlike "123*")}|
Select @{n="Name";e={$_.Displayname}},@{n="Logon";e={$_.SamAccountName}},@{n="Email";e={$_.PrimarySmtpAddress}},Company,@{n="Country";e={$_.co}}|
Out-GridView -Title 'Select Managers to build Outlook Distribuiton List'-PassThru|
export-csv -Path $temppath -NoTypeInformation
} 

function Get-ADdirectReports
{
    PARAM ($SamAccountName)
    Get-Aduser -identity $SamAccountName -Properties directreports | %{
        $_.directreports | ForEach-Object -Process {

            Get-ADUser -identity $Psitem -Properties * | Select-Object -Property DisplayName, SamAccountName, Mail, @{n="ManagerName";e={(Get-ADUser -Identity $_.Manager -Properties displayName).DisplayName}}

            Get-ADdirectReports -SamAccountName $PSItem
        }
    }
}

function OutlookDL
{
    $outlook = new-object -com Outlook.Application
    $contacts = $outlook.Session.GetDefaultFolder(10)
    $dl = $contacts.Items.Add("IPM.DistLIst")
    $dl.DLName = "$groupname"
    $dl.Save()
}

function OutlookDL-Delete
{
    Try {
    $outlook = new-object -com Outlook.Application
    $contacts = $outlook.Session.GetDefaultFolder(10)
    $DL=$Contacts.Items("$groupname")
    $dl.delete()
    }
    Catch {Write-Host "No duplicate Outlook Group found"}
}

function AddContacts
{
    $outlook = new-object -com Outlook.Application
    $contacts = $outlook.Session.GetDefaultFolder(10)
    $namespace = $outlook.GetNamespace("MAPI")
    $DL=$Contacts.Items("$groupname")
    $recipient = $namespace.CreateRecipient("$employee")
    $recipient.Resolve()
    $DL.AddMember($recipient)
    $dl.Save()
   }

function DisplayDL
{
    $outlook = new-object -com Outlook.Application
    $contacts = $outlook.Session.GetDefaultFolder(10)
    $DL=$Contacts.Items("$groupname")
    $dl.display()
}

$groupname = [Microsoft.VisualBasic.Interaction]::InputBox("Enter the name of the Outlook Contact Group to be created or updated:","Outlook Contact Group", " My Outlook Distrobution List")
OutlookDL-Delete
Get-Managers
$managers = Import-CSv -Path $temppath |select Logon -ExpandProperty Logon
$drlist = Foreach ($manager in $managers){Get-ADdirectReports -SamAccountName $manager|select-object -ExpandProperty mail}
OutlookDL
Foreach ($employee in $drlist) {AddContacts}
DisplayDL

Now that you’ve seen the technique at work you should be able to easily adjust the AD query to scan or filter for the fields that are most useful to your organization. You could also use sources other than AD, it would be simple to connect to a SQL database or import a CSV file.

Multiple Nintendo Switches play Splatoon 2 on the same ISP/Network and fix NAT Type D; Pfsense Firewall

In my house there are two Nintendo Switches and we have two copies of Splatoon 2. We like to play the game together but of course we only have one Internet connection. At first it seemed like this wasn’t going to work. We could start two games separately and play just fine but if one tried to join the other’s game (through the friend option in the game menu) then both would get kicked out of the game. I was able to use advanced logging and network captures to see where the problem occurred and come up with a solution.

I use Pfsense for my router/firewall and a Ubiquiti Unifi mesh wireless network. The principal configuration in my solution should be possible on most modern networks but the terms and menu options will be different on other manufacture’s equipment. We’re going to create static IP addresses for each device and then make virtual wireless networks for them as well. This fools Nintendo’s network into treating each device as connecting from a separate network (allows UPnP to set the same ports).

Nintendo network games are notorious for having issues with multiple consoles using the same Internet connection. Some routers deal well with it right out of the box, and some don’t. The steps below outline what I did to get mine working. The same steps allow all my kid’s 3DS consoles to play Mario Kart at the same time as well.

Assign a Static IP Address

Before you can set special rules for a device on your network you need to assign it a static (never changes) IP address. This is a slighty different process in each type of router/firewall; use Google or Bing to find out how to do it in yours. Just type: “Firewall/Router Model Set Static IP”  BingSetStaticIP

  1. In Pfsense open the web console
  2. Click on Status
  3. Choose DHCP Leases from the drop down menu
  4. Find your device and click the pencil icon at the end of the row. pfsencestaticip
  5. Enter an IP address that is outside of your DHCP range in the IP address box.
  6. Click the Save button at the bottom of the form.

Allow NAT Outbound Static Port

This sounds complicated but most residential firewalls (bought at Best Buy) don’t have this setting in the first place. Advanced (enterprise class) systems randomly scramble the source port to prevent NAT hacking. This has no effect for browsing the web or basic Internet activities but network games cannot handle it. If your firewall or router scrambles the source port on NAT traffic you’ll need to create a rule to stop it for your Switches. Assuming that you have Pfsence;

  1.  Open the web console
  2. Click on Firewall -> NAT -> Outbound
  3. Click the Add button at the bottom of the page. pfsencestaticnatport
  4. Enter the Static IP address that you created in the seciton above with a / 32 subnet mask and check the Static Port box. pfsencestaticnatportandip
  5. Click the Save button at the bottom of the form. You should not need to change any of the other boxes.

You should configure the two options above for any multi-player gaming device connected to your network. This includes consoles, smart-phones, tablets, PCs, etc. The scrambled source port will keep most devices from connecting properly. It shows in games and “Strict NAT” or “NAT type 3”.

Create Multiple Wireless Networks

UPnP is a service that is already enabled on most modern firewall / router devices. If it isn’t turned on in your edge device you’ll need to enable it; again Google/Bing “Firewall/Router Model Enable UPnP” UPnP is a service that allows your firewall to automatically open network paths from the Internet to your devices. The trouble is, the way it accomplishes its goal can fail when two similar devices are trying to create similar paths on the same network. The way to work around this issue is to create multiple SSIDs and join a Switch to each.

In most wireless access points you are allowed to create more than one SSID or the device will have a guest network. Some systems even have multiple radios and will let you setup one network on each radio. Once again, use Google or Bing to find instructions for your particular setup. The goal is to create and join one wireless network for each Switch that you have. BingMultipleSSID

If you have a Unifi wireless network you’ll need to go to settings (the gear icon on the left) and then to Wireless Networks. Click the CREATE NEW WIRELESS NETWORK button and complete the form that opens. UnifiAddSSID

After you join each Switch to one wireless network you should be able to play Splatoon 2 multiplayer; I think you’ll find that most other multiplayer games work now as well. I’ve also adapted the same technique to resolve issues with multiple Xbox One and PS4 consoles. Games like Destiny 2 and Overwatch also use UPnP to establish their network paths and will sometimes not allow multiple consoles to play on the same network.

Splatton2LisaandKevinleaderboard
My wife and I are the top two players on the winning team! This game is a blast for couples.

Life with the Galaxy Note 8;  3 months in and going strong. 

I have been a “Gadget Guy” my entire life. Growing up, my favorite stores were The Sharper Image and CompUSA! As soon as I got my paycheck from whatever part-time job I had,  it would inevitably end up in their registers. I can’t say that much has changed, the days of dropping my whole paycheck on some gizmo are gone but I still manage to stimulate the economy. 

Lots of people seem to choose a type or brand of device and then stick with that choice. I’m not one of them, I like Windows, MACs, Linux, and Chromebooks equally. I enjoy switching between Androids, iPhones, and even Blackberry. I think my openess to all technology allows me to give my readers a more balanced opinion of all this stuff. Keep this in mind when reading the following paragraphs.

The Note 8 is the best overall piece of tech gear that I have owned period. In a word it is amazing. The engineers that created it deserve nobel prizes. The S-Pen pushes this devices productivity out of the competition’s reach. I am sitting on my couch chatting with my wife, my dog is napping on my lap and I am writing this article. I also just emailed my boss, ordered my son’s Christmas present and did the little doodle below. 

Some where in there I also wished an important person happy birthday on their FB timeline in a pretty unique way. It only took a few seconds to make and post this GIF.

The phone would be fantastic without the pen. It is fast, intuitive, and just the right size. I’ve had mine since launch day and the more I use it, the more infatuated I become. It’s not just the big stuff like the screen and the fast CPU . The little things are impressive too; when using handwriting mode it plays the sound of a pencil dragging across paper. The flashlight mode has adjustable brightness levels. It automatically cleans up old temp files and warns you when an app is draining your battery. 

I’ve been succesful in replacing my laptop with it for on-call type work. I just installed Microsoft Office, Juice for SSH and Telnet, Microsoft’s RDP app, Skype for Business, Web Ex, and Anyconnect. Wallah, no more lugging around a backpack to run errands or go out on the weekends. I just need my phone and RSA token. Last night I fixed an email problem in Hyderabad, India while I was waiting for a diner table at the local steakhouse with my family. The freedom it affords me is easily worth the price. 

I’ll be ordering the Dex dock for my phone soon. This piece of kit turns the Note into a desktop replacement. In the near future it will support full blown Linux while running in the dock. Full Linux on the Note 8 demo video. Watch for my review of this feature soon. 

I normally get bored with new tech gear and am ready for the next thing in less than a month. I can honestly say that isn’t the case with the Note 8. I look forward to having this in my pocket for a long time.