You can use Outlook 2007 and newer to merge PST files. This process is useful if you have acquired somebody else’s mailbox export, or have numerous archive files that are difficult to deal with. You can not select a source PST that is in use by Outlook so you must close it first. If you are consolidating into a single new PST file, create it before you continue with the steps below. The target PST file needs to be mounted in the Outlook profile or it will not show up as an option in the import dialog.
Open Outlook, right click on the Source PST file and close it
Click File -> Open / Export
Click Import / Export
Click Import from another program or file -> Next
Click Outlook Data File (.pst) -> Next
Browse to and select the source PST file (the one you are moving data from)
Make sure the “Do not import duplicates” option is selected.
Click Next
Be sure the “Include subfolders” check box is selected.
Select the radio button labeled “Import items into the same folder in:”
Choose the Target Outlook Data File from the drop down menu.
I had converted over to to the OneNote Microsoft Store app a while back when Microsoft announced they were ending support for the full desktop edition. I’ve always been inclined to adapt to the ever changing technology world rather than constantly trying to swim upstream. I preferred some of the features that were in the full version but, I found workarounds and moved on.
Last week I needed to test an Outlook Plug-In which meant I had to download and install the desktop version of Office from my Microsoft 365 subscription. I noticed that it installed OneNote, but didn’t think much of it at the time. A few days later I opened it for a nostalgia kick. I was surprised to see that it had been updated. It had the new Feed feature, dark mode, and it was now named OneNote for Microsoft 365 rather than OneNote 2016.
Some research turned up several posts by mainstream blogs like The Verge and Endgaget confirming that Microsoft is not only bringing back the desktop app, but that they are merging the newer Windows 10 app features back into it. Over the next year or two they will update the desktop edition with new features and move to it rather than away from it. Eventually I located a Microsoft FAQ page that also points to the full version’s future.
The full version of OneNote has three features that are important to me, but remain missing from the app store edition. One is the ability to backup and store notebook files on local storage. Another was the ability to index handwriting, text in pictures and video, and audio from various media sources to make them all searchable. Finally, I really missed the customization options, I prefer my sections on the left and pages on the right. Microsoft has a page that runs down the differences in all of the versions here.
If like me, you have avoided the desktop edition due to Microsoft’s previous abandonment announcement, feel free to move back in. I already have.
I’ve written several articles about my recent foray into laptop gaming. I purchased an ASUS TUF gaming laptop, Logitech Keyboard and Mouse, and Logitech Headphones to use with my big screen in the living room. Everything has been working well until a week or so ago.
I noticed that when my laptop was connected to my home theatre system via the HDMI port, audio would drop out for 1 or 2 seconds every minute or so. It happened in games, movies, YouTube, and everything else. It was slowly driving me insane.
I tried every possible setting and trick I knew of to fix it. I swapped out cables and changed the Nvidia HD Audio driver to the standard Windows driver, I adjusted from various versions of surround sound to stereo. I even switched to the TV’s internal speakers. Nothing worked. I strongly suspected it was a driver problem because my headset and laptop speakers worked fine. The issue only occurred when using the HDMI port but video through it was great.
Today I installed the previous Nvidia driver package (466.27) and the problem is fixed. Once I corrected the problem and understood the cause, I was able to find a thread on Nvidia’s forum where other people are having the same issue with the 466.47 driver. That forum is at Stuttering sound driver 466.47 | NVIDIA GeForce Forums. You can download the 466.27 version of Nvidia’s driver from NVIDIA DRIVERS GeForce Game Ready Driver WHQL, just run the file and it will remove the new version automatically.
A short time ago I jumped into laptop gaming, in part so that I could easily enjoy playing in my living room. Right after I purchased my new ASUS laptop I found out that the Bluetooth keyboard and mouse I was planning on using wouldn’t cut it. Logitech’s Lightspeed gear saved the day. I had not planned on running any multiplayer games in the living room. So I skipped audio gear.
That plan lasted two whole weeks. I really enjoy playing on my big screen while sitting in my recliner. The kids are busy on the weekends nowadays so I have more time to play upstairs than I thought. I needed a wireless headset that didn’t lag, sounded great, and whose signal could reach across my living room.
I was impressed with the Logitech keyboard and mouse, so I picked up the matching G935 headphones. I lucked out, the local BestBuy had them on-sale for $99.00. As with the keyboard and mouse, the build quality of the headset was apparent as soon as I removed it from the packaging. The band that connects the earphones is metal, the articulation points are sturdy, and the plastic is dense. One of the earphone’s covers conceals the USB dongle and the other provides access to the rechargeable battery. The removable covers are attached via magnets that hold them fast.
Magnetic covers and a stowaway microphone
Each earphone easily covers my entire ear and I don’t feel the speaker grill rubbing anywhere. Each cup features a strip of RGB lights on the back. The colors and effects of the lights can be controlled from the GHUB software. The left earphone contains a boom mic that you pull down to activate or stow to mute. The end of the boom can be extended and is flexible so that you can put the microphone in the perfect position to fit your face.
The 50mm drivers work with DTS X:Headphone 7.1 surround sound, and the GHUB EQ to bring the soundscape of your games from the background to front and center. A lot of the headphones I’ve used over the years trade nuance for volume. The bass thunders but you miss the tinkle of a bullet casing bouncing off the concreate. DTS really balances things out. The explosions still rattle your head, but you don’t loose the foot steps in the grass behind you.
Deep padded ear cups prevent rubbing
The wireless signal easily reaches across my living room. I’ve made it down the hall to my kitchen while still chatting with my buddies and nobody noticed. The headset also includes USB and 3.5mm connections. The battery life is advertised at 12 hours with the lights off and 8 with them on. I don’t have gaming sessions that last that long IRL so I will probably never find out if those times are true LOL. The ability to swap the battery out should alleviate any longevity issues you might have.
Everything about the G935 isn’t lollipops and honeysuckle. There is a fly in the ointment. If your system doesn’t have any true USB 2.0 ports, you will find that you are not able to use the wireless dongle out of the box. When you connect it, the headset will pair and you’ll hear the confirmation beep. The GHUB software will forever show “setting up” and no matter what sound you create on your system you will never hear it.
For whatever reason, Logitech’s own driver is not compatible with the G935 over USB 3.0. Yes I know they are backwards compatible with 2.0 but in this case it doesn’t matter. If you only have USB 3.0 ports, you will need to use the device manager to change the driver to Microsoft’s. Trust me, I’ve tried everything including an external USB 2.0 hub, removing / reinstalling the GHUB software, multiple versions of the GHUB driver, and even opened a ticket with Logitech support. The only option to use the wireless dongle on USB 3.0 systems is to change out the driver. Research leads me to believe this isn’t just a Logitech issue, it seems to affect many wireless gaming headsets that use a USB dongle.
Onboard controls and lighting
The good news is that swapping the driver works and doesn’t affect the headset’s performance minus one thing. To change any settings like lights, the EQ, etc. you will either need to use the onboard buttons, or connect the headset to a system with a USB 2.0 port. If you dig through the Logitech support pages you will eventually find this one, that specifically calls out the USB 2.0 requirement. On their support page you should also find the instructions for changing out the driver. I’ve written better ones below.
Change to Microsoft drivers:
Connect the USB dongle and turn on the headset.
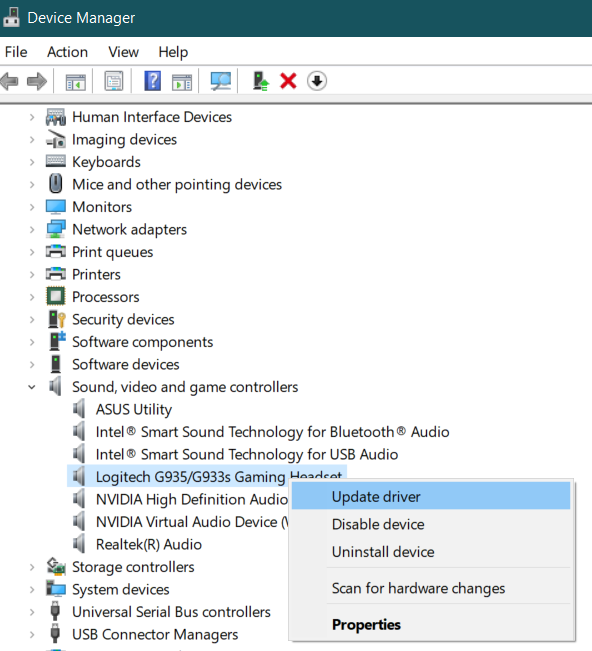
Go to Device Manager (Right-clickStart button, click Device Manager).
Scroll down to and expand Sound, video and game controllers.
Right-click on the Logitech G935/G933 Gaming Headset and click Update Drivers
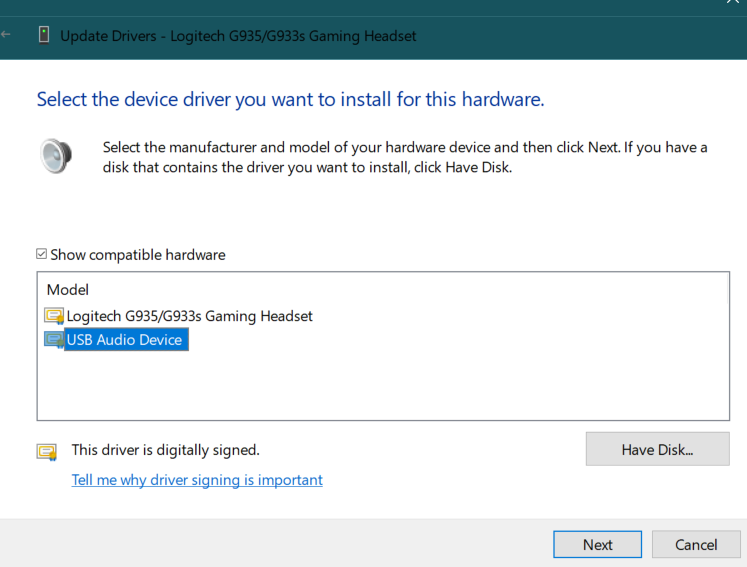
Click Browse My Computer for Drivers.
Click Let me pick from a list of available drivers on my computer.
Click the USB Audio Device in the list.
Click the Nextbutton.
Click the Closebutton.
The headset should immediately start working.
If you can live with the driver issue, the headset is fantastic. Like the keyboard and mouse, I like the Logitech better than Razer Kraken I have hooked up to my desktop. The driver thing is really annoying though, every time the GHUB software updates it re-installs the Logitech driver and you have to repeat the process above. Given the specifics of this problem, I don’t see it ever being fixed. I’m personally able to tolerate the problem and will keep the headset, but you should consider the situation carefully if your system only has USB 3.0 ports.
Normally when an account is given full permissions to a shared mailbox, the shared mailbox is auto-mapped to the delegate account’s Outlook profile. The shared mailbox is added to a linked attribute in Active Directory. Linked attributes describe a relationship between objects and are often paired as ForwardLinks and BackLinks. In the case of Exchange shared mailboxes, the user DN is added to msExchDelegateListLink and the shared mailbox is added to msExchDelegateListBL.
Auto-mapped shared mailboxes are opened as a function of the forward linked attribute (msExchDelegateListLink) in combination with the Autodiscover feature. When the Autodiscover XML is examined (Test E-Mail Autoconfiguration) the auto-mapped mailbox appears in the XML tab in the AlternativeMailbox tag.
<AlternativeMailbox> <Type>Delegate</Type> <DisplayName>Sales</DisplayName> <LegacyDN>/o=contoso/ou=Exchange Administrative Group (FYDIBOHF23SPDLT)/cn=Recipients/cn=Sales</LegacyDN> <Server>ServerName</Server> </AlternativeMailbox>
Mailboxes opened in this manner (shared, archive, public, etc.) are not natively part of the Outlook profile and therefore are not processed by Outlook’s account creation routine. As a result, the auto-mapped shared mailbox does not acquire a signatures folder in the file system. By default, Outlook creates signature folders for all accounts that go through the creation process at C:\user\username\appdata\roaming\microsoft\signatures.
To add a signature to messages sent from shared mailboxes in Outlook we need the software to treat them as if they were a regular user account. This goal can be accomplished by disabling the auto-mapping for the delegates that access the shared mailbox and manually connecting Outlook to it. Unfortunately, this cannot be accomplished through the Exchange Control Panel or the Microsoft 365 Portal. It is easiest to disable automapping with PowerShell.
Before we learn the PowerShell code, it is important to understand that modifying the permissions, or membership of a shared mailbox with the Exchange Control Panel, or the Microsoft 365 Portal will re-enable the auto-mapping feature for all delegate accounts. The various GUI management tools for Exchange do not expose the attribute for auto-mapping. As a result, the attribute is always returned to its default state ($true) when these tools submit their commands.
The default enabled state of the auto-mapping feature imposed by the Exchange GUI tools causes the workaround to potentially malfunction for any or all member accounts. The issue occurs because Outlook will connect to a particular resource only once and the first connection wins. If the first successful connection to the shared mailbox is the auto-mapped AlterativeMailbox, the signature folder created by the work around will not be mapped to Outlook’s send function.
If a shared mailbox is mistakenly modified using one of the Exchange GUI management tools, each delegate must be removed and re-added using the PowerShell method (below) with the auto-map feature disabled. If a delegate user’s Outlook has already connected to the AlternativeMailbox, their signature for the shared mailbox will not function for up to four hours after the correction with PowerShell has been executed. The auto-mapped shared mailbox must be disconnected from the user’s Outlook profile by the Exchange Mailbox Agent before the explicit connection created by the workaround will be guaranteed to connect first.
To establish the workaround and enable Outlook signatures from shared mailboxes, create a shared mailbox. Once the shared mailbox is established use the Add-MailBoxPermission cmdlet to add the delegate’s accounts.
(replace “Shared Mailbox Name” and “Delegate User ID” with the actual values, leave the “” in place)
If you are applying this technique to an existing shared mailbox, or if you are correcting a mailbox that was modified with one of the Exchange GUI tools, you will need to remove and re-add all the delegate members with PowerShell. This small script automates the process.
(replace “Shared Mailbox Name” with the actual name, leave the “” in place)
Once the shared mailbox and its membership (auto-mapping disabled) have been established or corrected, all that it left is to access it with Outlook as if it were a separate account. You will use the delegate’s credentials to logon. Open Outlook, go to File -> Add Account, enter the shared mailbox’s primary email address, enter the delegate user’s email address and password when prompted for credentials.
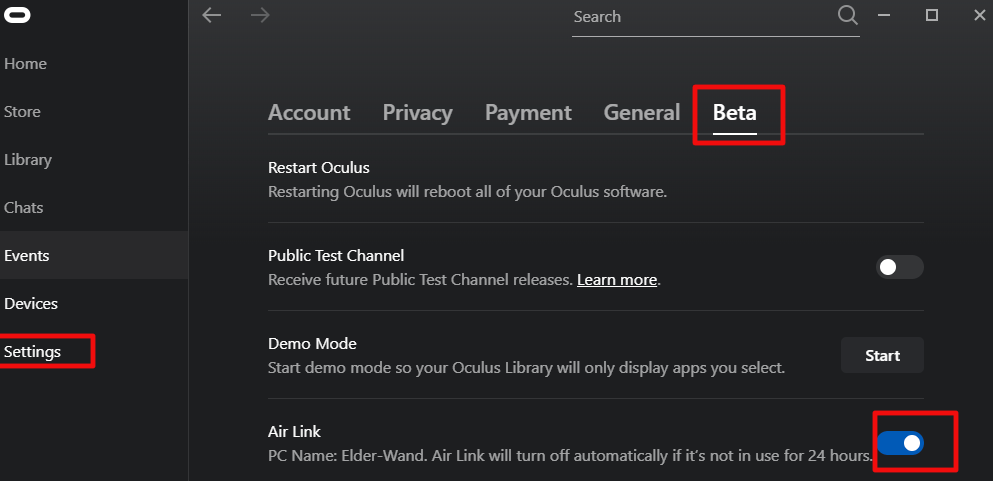
Until now, wirelessly streaming games to the Oculus Quest 2 has been limited to using development drivers in combination with specialized software like Virtual Desktop. I’ve written step by step guide to getting that option working here. Now, Facebook has enabled Oculus Air Link which allows streaming of Oculus Store apps too. It was a little tricky to get working on my network so I decided to share what I’ve learned.
Your desktop system must be connected to your network with at least 1Gbps. Your desktop system needs to have at least one USB-C port to connect your Quest with. I’ve heard that a USB-3 port with an adapter works but have not tried it. Your wireless network must support AC or AX (Wi-Fi 5 or Wi-Fi 6) and be capable of sustaining 800 Mbps in the area you intend on playing in. You must have at least WPA2 security enabled on the wireless network. If you don’t meet these requirements you should not proceed.
Assuming your gear all checks out, you’ll need to install the Oculus app on your desktop if you haven’t already. Download it from Setup Your Oculus: Quest, Quest 2, Link, Rift S & Rift | Oculus once you’ve downloaded and installed the software, complete the basic setup by connecting your Quest to your PC via the USB-C cable that came with it and following the wizard.
Your Quest will need to have at least software version 28 installed. In the Quest, go to Settings then About. There’s not much you can do to get the new version if you don’t already have it. Facebook pushes it out slowly like an Android mobile update. You just have to wait for it.
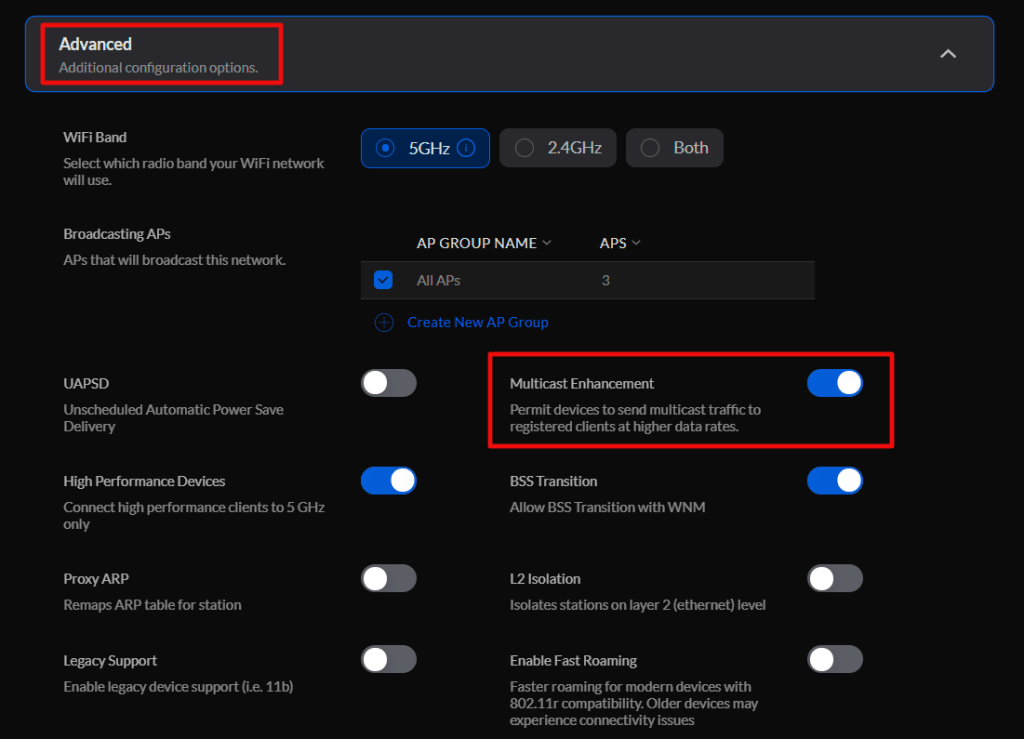
If your network is a mesh topology, the access points can not be wirelessly uplinked. Each one needs to be cabled. Air link is a multicast protocol, your network will need to have Multicast DNS, Multicast IGMP, and IGMP Snooping enabled. These settings are in different places depending on the brand of network gear you are using.
On Unify networks, enable Multicast Enhancement in the advanced settings for the WLAN you will connect your headset to.
Enable IGMP Snooping in the advanced settings for the network your WLAN is connected to.
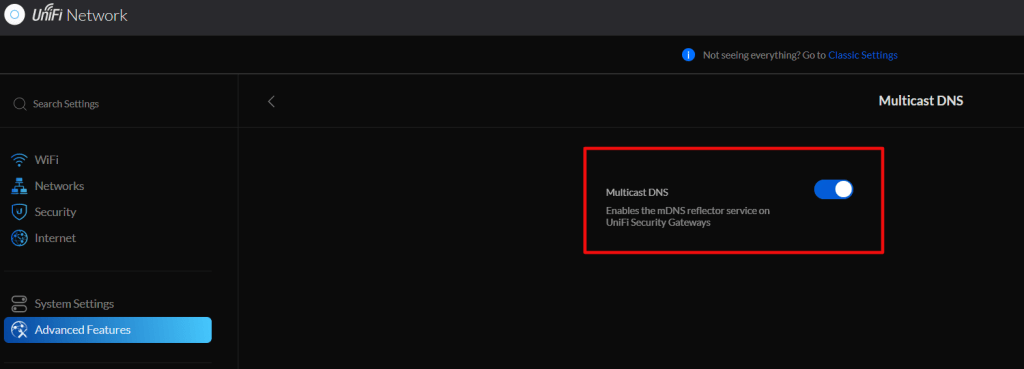
Finally, turn on Multicast DNS in the Advanced Gateway settings under the Advanced Features menu.
The PC running the Oculus desktop software can not have more than one IP address assigned to the network adapter that is on the same network as the Quest. This causes the Launch button to be greyed out, the Quest will pair but multicast will not function properly. Check the advanced IP settings for your network card and ensure that only one address is listed there.
Now enable the Air Link option in the Oculus desktop software under Settings -> Beta.
All that is left is to put on your headset and go to the Settings menu. Then go to Experimental Features and turn on the slider for Air Link. Now go to the Quick Action menu in Settings and select the Air Link button at the far right. The first time you run Air Link you will need to pair your headset with your computer. Then tap the Launch button. After a few moments the Oculus Desktop Home should load and work just like it does from a link cable or Rift.
I jumped on the Xbox Game Pass Ultimate bandwagon at the very beginning. The service started out strong and has only gotten stronger. When they added game streaming to Android devices I knew that I had picked a winner. I had just started playing The Outer Worlds on my Xbox and the ability to play the same game with synchronized saves from my phone was fantastic. My Xbox and TV are in demand from my family so being able to play on something else was a big advantage.
Like the Switch, my phone’s screen could be a little small for a game that was designed to play on a TV or PC screen. The text was difficult to read and distant objects were a challenge to make out. It wasn’t a big enough problem to keep me from playing. I’ve played more of The Outer Worlds on my phone than on my Xbox. I don’t have a current Android tablet and wouldn’t purchase one just for game streaming. Instead, I gazed longingly at my Surface Go 2 and wondered how long it would be before I could use the service with it. I had already been streaming Steam games to it so I knew it would be perfect for Xbox games too.
It took a lot longer than I expected, but I got the invitation to participate in the cloud stream to PC beta a few days ago and have been putting to use. Like I thought, it is difficult to imagine a more perfect system for this experience than the Surface Go 2. It’s screen size, Wi-Fi 6, excellent speakers, and most of all it’s kick stand, make it a fabulous game streaming platform. Just pair an Xbox controller and you’re ready to get your game on anywhere there’s a good Wi-Fi signal.
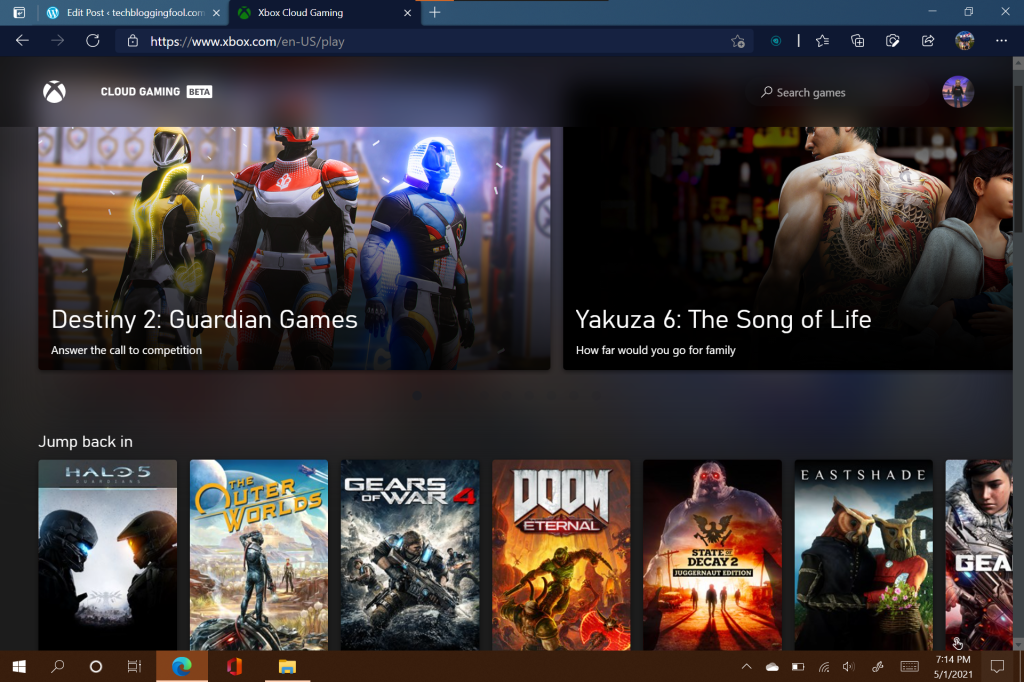
As for the service, it does not disappoint. It runs from any HTML5 web browser. There’s no software to install, or configure, just go to https://xbox.com/play and sign in with your Xbox account. As with the Android streaming option, you’ll need fast Wi-Fi or 5G Internet and a Bluetooth Xbox controller. There is not currently any support for keyboard and mouse controls. A list of the cloud stream games will be presented, click the one you want to play. That’s it.
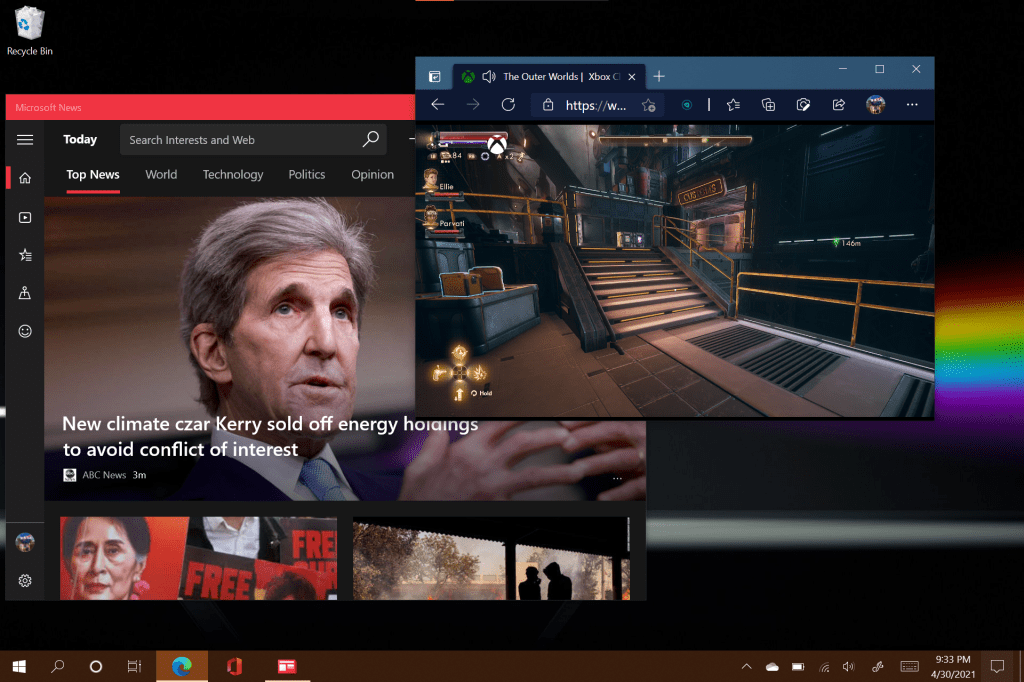
I picked up The Outer Worlds right where I had left off. It looked great, I was surprised that the service adapted to full screen with no artifacts or other visual issues. It was awesome in full screen, but I really enjoyed being able to drop down into a window once in a while so that I could keep an eye on my email.
Playing in a window can be useful.
Game play was smooth. There’s no counter, but I would guess it is between thirty and sixty FPS, depending on the game and scene. There is a barley detectable input lag even on a 1.2 Gigabit connection with less than a twenty millisecond ping. It is difficult to put into words. The lag doesn’t inhibit solo game play, but you do have to adapt to it. I am able to play Doom Eternal with almost zero issues. When I try Halo PvP matches I get slaughtered even though I usually come in near the top of the leaderboard on my actual Xbox. I feel like if I practiced enough in the streaming edition that I could make it to the middle, but I doubt that I’ll ever be winning any matches that way.
The input lag is hard to adjust for in FPS multiplayer matches.
Are streaming services the future of all gaming? I think the industry really wants them to be. Who wouldn’t want a completely pirate proof way to distribute their work? From what I know of gamers, games, and network technology, I think streaming will eventually capture a large portion of the casual market, but it will struggle to overtake local media for competitive players. Its a nice option to have when your main console or system is busy though.
I needed to rename a bunch of computers in a hurry. As usual I turned to PowerShell. The old and new names were provided to me in a CSV. The systems were spread over a wide area and throughout different departments so I would need to include connectivity testing and some simple reporting to keep track of the progress. I came up with the little gem below. I’m sure I’ll be pulling it out of the toolbox again.
To use this script you’ll need a CSV with at least two columns; one named “currentname”, and another called “newname”. You will have to run the operation from a system that can communicate (ping & WMI) with the workstations. The remote systems need to support remote PowerShell commands and you will require domain credentials with enough permissions to rename domain computers.
Once you have all of that, copy the code below and paste it into a file. Save it as “Rename-Computers.PS1” where you keep your scripts. When you run the script you’ll be prompted for the credentials to perform the rename with. Then an “open file” dialog box will pop so that you can browse to your CSV. Once you’ve selected your file, the script will ping each machine and if they reply, the command to rename will be issued. If they aren’t reachable, they’ll be added to a report.
At the end of the run, three text files will be in your documents folder. One shows the machines that were renamed. One has the systems that couldn’t be pinged. The other is an error log. The same information will be displayed in the PowerShell console as the script runs.
The script is not currently set to reboot the computers which is required to complete the renaming process. To add a reboot insert a -Restart after -Force. Removing the -Force will give the user a chance to reject the rename.
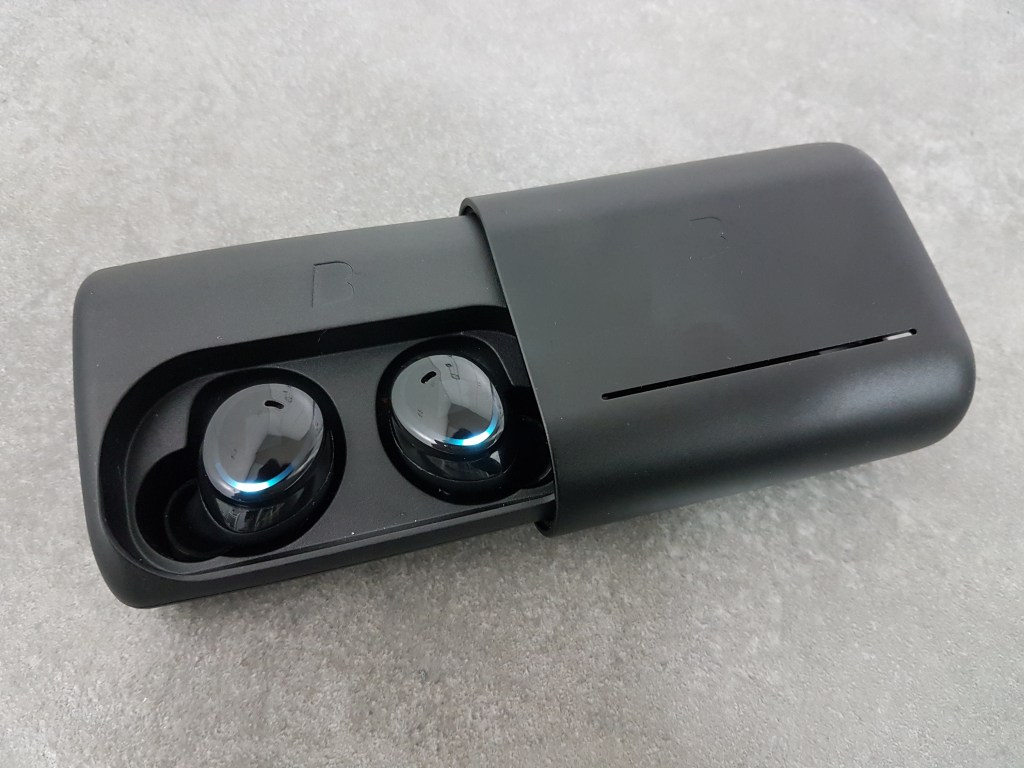
I’ve been a fan of Bluetooth headphones since the beginning. When true wireless headphones first launched in 2015, I was lucky to get to try a pair of Bragi Dash at a tech show. They sounded horrible by today’s standards and if you turned your head too much you’d loose one. To have no cable or connector bouncing off your neck I was willing to overlook their shortcomings.
Fast forward a few years, we saw sweat and water proof headphones for running. Awesome, I got a pair of Jaybirds and ran hundreds of miles in them. Active noise canceling came out and I got a pair of Sony’s. ANC was awesome (the headset connectivity sucked). The whole time I have been waiting for just one feature. The ability to connect to my phone and laptop at the same time.
I’ve had a softphone on my laptop for years, but all of my music, podcasts, and books are on my phone. I’m sure many of you have experienced the frustration of having to take out your earbuds, to put on your phone headset and vice versa. That, or you just give up on listening to your earbuds at all and use a full size headset that can multi-link. The problem for me is that over the head cans give me a headache where the band rubs and make my ears hot.
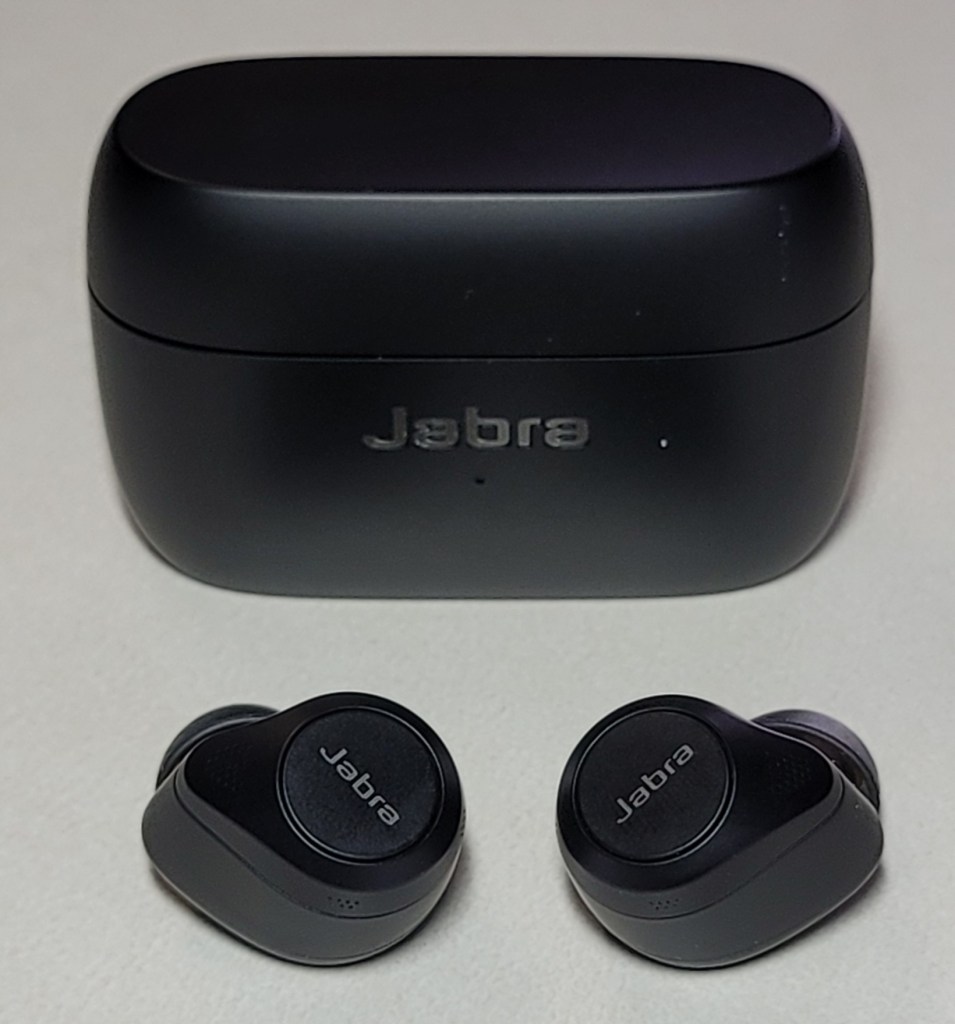
Jabra is the only brand of true wireless earbuds that support multi-link. l knew that they had enabled the feature on the 65t and 75t models, but I was holding out until the 85t set launched. I’m glad that I did. They are the best overall true wireless audio solution on the market. The multi-link works flawlessly, no buttons to push or waiting for software to move my connection. If I’m listening to a book on my mobile phone and my VoIP softphone rings on my laptop, I hear it and can immediately answer it. It will even pause my book if I pick up, via a setting in the app. Optionally, you can configure them to drop the Bluetooth connection to the device without the call to boost range and reliability. You can pair the 85ts with up to eight devices, but only connect to two at a time.
I’m not an audiophile by any means so sound quality isn’t the most important feature for me, but it still matters. I listen to all genres of music, tons of podcasts, and lots of audio books to help keep me focused on the task at hand and the 85ts sound great. I like them better than AirPod Pros, they seem to have a little more base. Like the Apple design, the Jabras are vented instead of sealed so the sound is open and there is no pressure build up. The app has a built-in EQ so you can tune the profile to your preference. If your phone supports the ACC codec, lag is almost non existent. Although I convinced myself I could detect a delay in some games, no one else in my house did. They get plenty loud for my taste, but do distort a little on max volume.
The active noise cancelling is spectacular, again I think that it edges out the ANC on the Apple set. There are eleven adjustable levels. On the highest setting you can sit in a car headed down the freeway and hear essentially nothing. I also find they’re adept at tuning out distracting noises and neighboring conversations at my office. They fall into the “works so well they could be dangerous” category of ANC. You should lower the setting when driving, running, biking, or doing activities where hearing the environment is a factor of safety. The app features ambient noise tracks like thunderstorms and crowded spaces that you can overlay on the ANC to create your ideal soundscape. There is an effective hear-through feature that you can configure to activate and mute your audio with a single button press, no need to remove an earbud every time that someone wants to chat.
You’ll be using that hear-through feature plenty, the earbuds are some of the most comfortable I’ve ever owned. They do not press into your ear canal, which always seems to make my ears sore after a few hours. The tips are oval and align with the opening of the ear to form their seal. I find this design far more comfortable and am able to keep them in all day. The batteries last between five and six hours with ANC on, fifteen minutes in the case will give them another hour. The case supports wireless charging and easily fits in a jeans pocket. The app will show how much power is left in both earbuds and the case.
The call experience is flat-out the best that I have personally encountered on a pair of earbuds. According to Jabra, there are six microphones on each bud that help to filter out ambient nose around you and focus on your voice. In addition they have a feature they call sidetone which is often found on higher-end gaming headsets. The ability to hear your own voice during conversations keeps you from speaking too loudly. I’ve used them with Teams, Zoom, my VoIP softphone, and my mobile phone without issue or complaint. I’ve called my friends and family from random locations and about half of the time they could not tell I was using earbuds at all. The 85ts do not feature integration with VoIP software so the buttons may not control your experience; mute always works, functions like hold can be hit or miss.
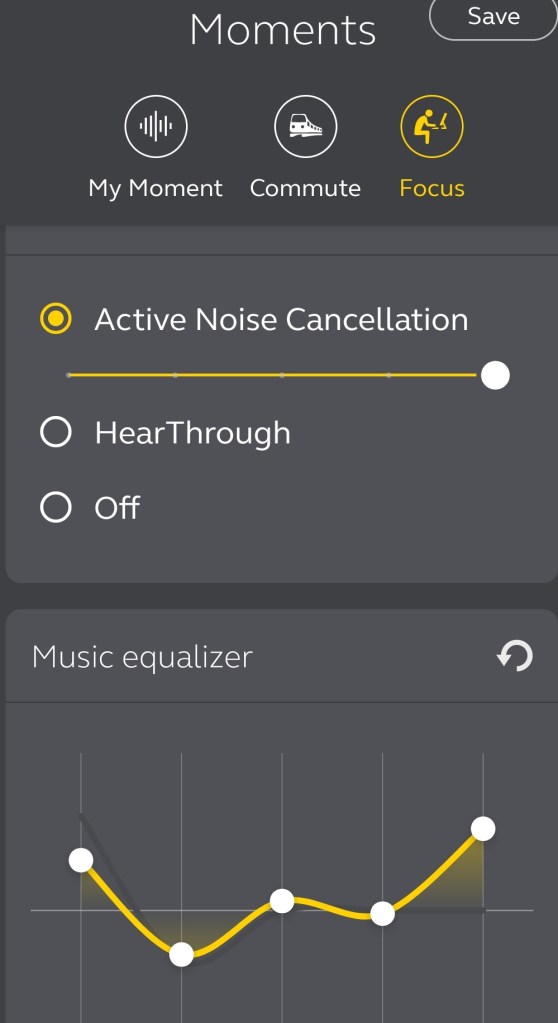
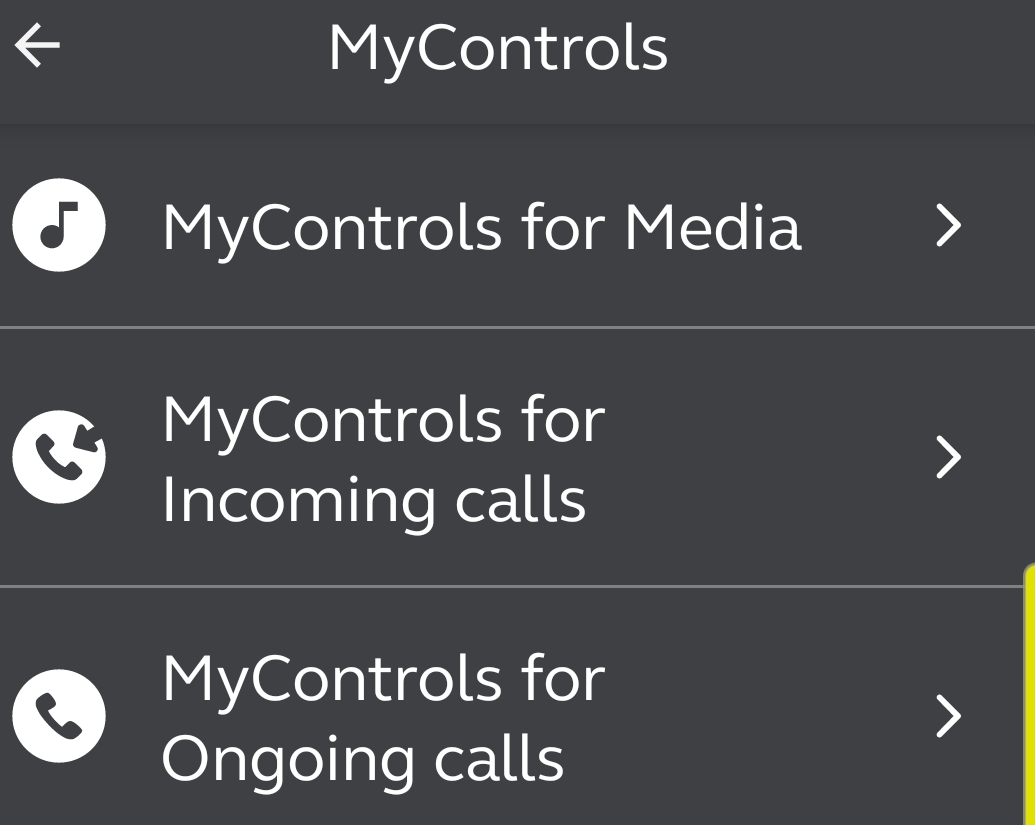
The mobile app is easy to use and allows for a surprising amount of customization. Each earbud has a single physical button and what happens when you press it is up to you. Configure options for single, double, and triple clicks on each bud. You can group preferences like ANC settings and EQ tunings into moments that can be selected with a single tap. There are also settings to control what happens when a call comes in and an option to show a map of where they were last used.
At two-hundred and thirty dollars, the Jabra 85t earbuds are certainly not cheap. The cost is not out of line when compared to other options of this caliber. They absolutely deserve a spot on the top shelf of true wireless earbuds. They’ve either been in my ears or in my pocket since the day I bought them and I’m sure that will be the case for quite some time.
No one solution will correct all TPM issues, but here are some of the most common and effective fixes listed in the order you should attempt them.
Updates
Many times, TPM errors can be corrected by applying updates to the operating system and system BIOS.
The operating system should be updated with the Windows Update mechanism. Windows updates should be applied before any TPM or BIOS updates from the manufacturer.
The procedure for updating the System BIOS is different across systems, but in general the manufactures update utility should be used.
UEFI Discrepancy
TPM 2.0 (check status) requires the system BIOS to be in a Native UEFI mode only. Disable any legacy functions, modes, or settings.
Clear TPM
TPM security processors include their own sealed storage. Occasionally that storage becomes corrupted. Clearing the TPM storage is done with the Security Process Details page or, the TPM MMC (see Status section). It can also be done via PowerShell (Clear-TPM in an admin console).
You should backup a system before clearing the TPM. Data loss is possible in certain situations.
Windows Hello will not function after clearing TPM storage and needs to be reconfigured.
Reset Power
Often a full power loss will restore TPM functionality to systems that cannot detect their TPM security processor. TPM is missing or not detected status messages from either the BIOS or Windows Status warrant the following procedure. It is important to remove all power and fully drain any capacitors or other power supply available to the TPM chip, a reboot or shutdown is not sufficient.
Shutdown the system
Unplug the Power Cable or Power Supply
Remove any batteries from laptops.
Disconnect any UPS or USB power.
Hold down the Power button for a minimum of 30 seconds.
Re-connect power cords, power supplies, UPS, or USB power.
If you are unable to resolve TPM issues after completing these steps you should contact your system’s or motherboard manufacturer’s technical support. There is likely a hardware issue that may require replacement. It is possible to disable the TPM function in your system BIOS. Be sure to decrypt disks and turn off features that require it (Windows Hello) first.
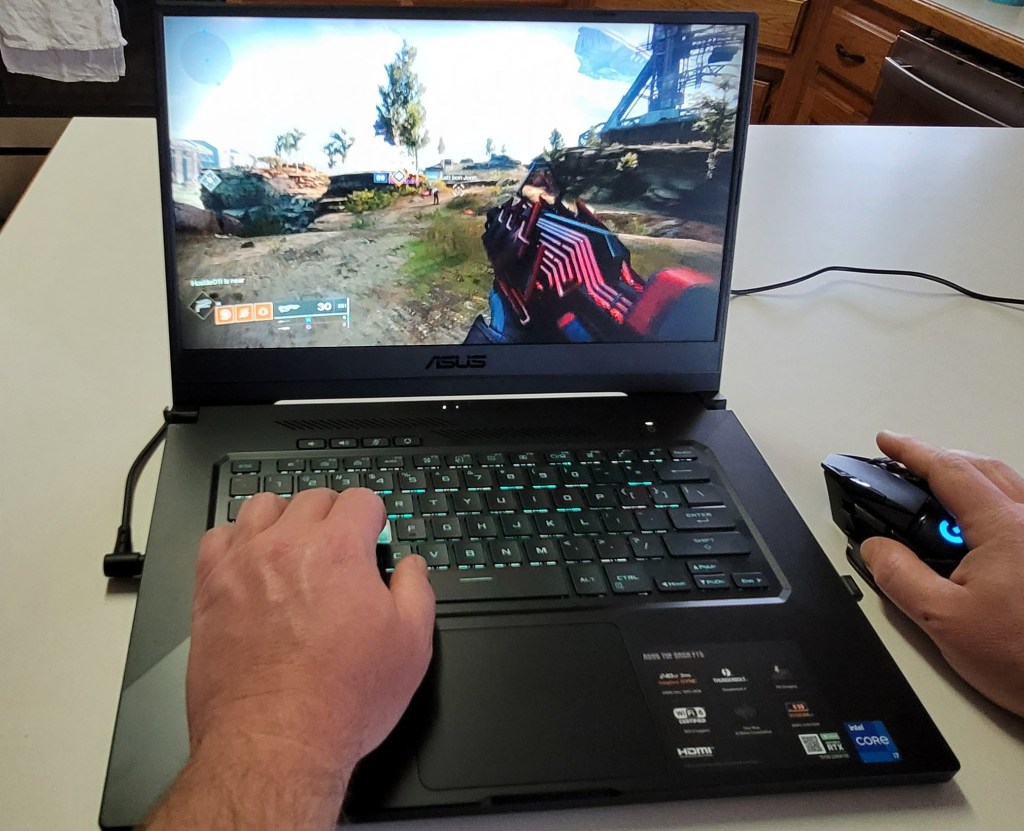
Recently, I purchased a gaming laptop with the intention of connecting it to my home theatre and answering the Call of Duty from my recliner. The laptop did exactly what I wanted, but it didn’t take long to learn I had overlooked something. I planned on running an extra Bluetooth keyboard and mouse that I had lying around, but they just didn’t cut it. Bluetooth dropped, there was too much lag, and they just didn’t feel like gaming equipment.
I tried using a wired keyboard and mouse, but that was also less than ideal. I had to use USB extension cables to reach, or I needed a really long HDMI cable. Either way, having a cable draped across the middle of my living room proved to be hazardous. My wife got tripped up one night and almost fell. Time to find a better solution.
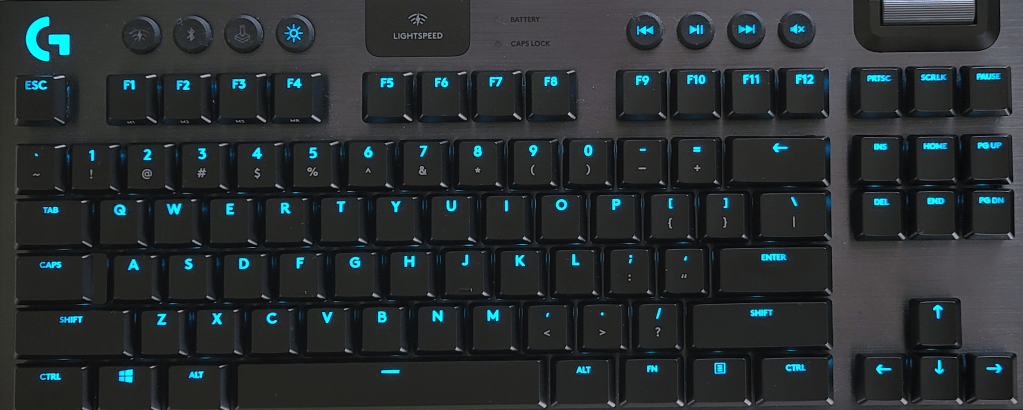
I started researching wireless options for gaming. Most manufacturers have something to offer. Traditionally I’ve used Razer equipment with my gaming systems. Before I placed an order, I decided to go look around my local computer store. They had lots of options on display. I was surprised to discover that I preferred the look and feel of the Logitech gear over Razer this time. I picked up the ten keyless version of the G915 and the G502 mouse hoping that the TKL would give me enough space to use both on a lap desk.
Both devices use Logitech’s Lightspeed wireless technology. The company claims that it has less than one millisecond of lag. I don’t have the equipment to confirm or deny that at a technical level, but I can say there’s no noticeable lag of any kind. I’ve had zero issues with signal dropout and no missed clicks or keypresses. The only complaint I have about Lightspeed is that each piece of gear requires it’s own USB dongle. So if you are thinking about picking up a keyboard, headset, and mouse make sure that you have three free USB ports. You’ll also want to be sure to not loose the tiny receivers. Luckily each piece of equipment has onboard storage.
The G915TKL is 368 mm (15.2 in) wide, 150 mm (5.9 in) high, and 22 mm (0.9 in) thick. The chassis is aluminum and provides a flex free deck for the rigorous punishment gaming boards must endure. The keys are full RGB with several built-in patterns and effects. The software will also let you create schemes and some games provide their own. There are dedicated media control buttons and a clever volume control that is similar to a mouse’s scroll wheel. The volume control is extremely useful and more accessible than the one on my headset.
There are three choices of switch styles available: Tactile (brown), Linear (red), and clicky (cherry). You can also choose between carbon and white colors. I went with the tactile carbon combo. Normally I prefer a cherry switch, but I wanted to keep the sound down for use in the living room. The keys feel great and actuate about half way though their travel. They are spaced perfectly for my hands. The metal chassis is heavy enough for the keyboard to stay put and there are two levels of heights adjustment on the back edge. The TKL edition does not include a wrist rest, but my lap desk has a built-in one so this wasn’t an issue for me.
The batteries are rechargeable via micro USB and you can use both the keyboard and mouse while they are plugged in to your PC charging. The keyboard will last for around forty hours and the mouse for about 60, with the backlights on. You can use the keyboard and mouse with your Xbox or PlayStation on supported games. They both also support a secondary device connection over Bluetooth and can flip between them easily.
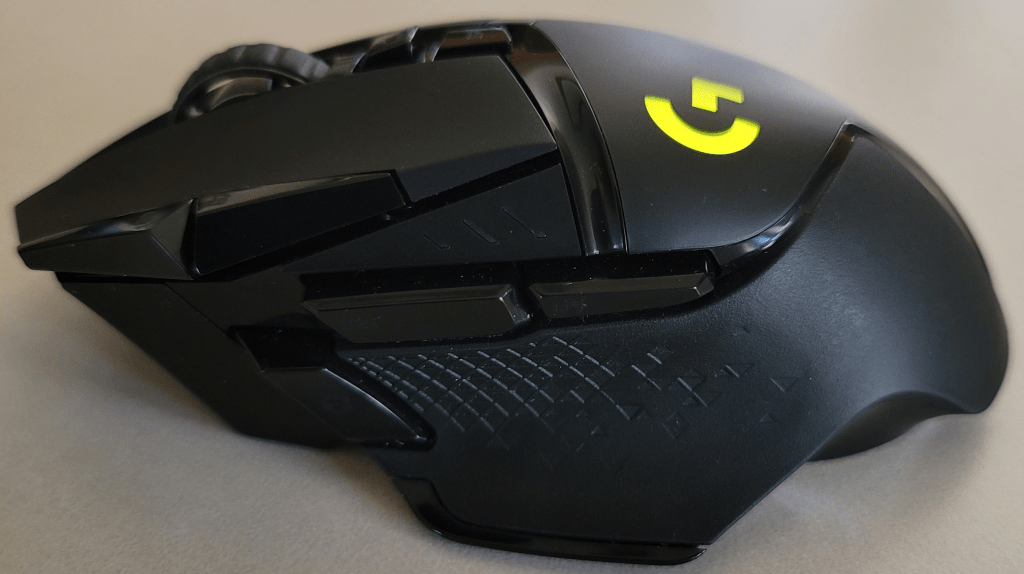
Speaking of the mouse, the G502 Lightspeed features user adjustable weights and a sensor that can track at 25,600 DPI. There’s a dedicated sniper button on the thumb rest that drops the sensitivity to a lower level while you keep it depressed. It also has Logitech’s famous scroll wheel that changes from click scroll to free scroll with the press of a button. If you have ever used an MX mouse, you know what I’m talking about.
The mouse is controlled by the same GHUB software as the keyboard, but requires it’s own USB chip. The RGB lighting is easy to manage. The eleven on-board buttons are fully customizable and support macros too. The mouse fits in my hand well with plenty of room for my fingers. The buttons are right where they should be and long enough that any size of hand should easily be able to find them. The mouse also supports wireless charging from an optional mouse pad. I don’t currently have the charge pad so I can’t comment on it.
Both the TKL keyboard and G502 mouse fit comfortably on my lap desk. I’m using a LapGear Home Office Pro that I picked up at BestBuy. It has an integrated mouse pad with a lip that keeps the mouse from falling off every time you move or need to get up. The mouse pad is a little small but if you crank up the sensitivity a little, it works well. It is really nice to be able to sit in my favorite chair and play all my favorite games. The Lightspeed tech works flawlessly from across my living room even with my non-Bluetooth friendly WAP sitting right next to it.
Microsoft’s 365 enrollment has three states: Enabled, Enforced, and Disabled. Enabled means that a user has, or will be prompted to enroll for multi-factor authentication. However, if they do not complete the enrollment and you do not have any type of enforcement policy, the account will continue to be authenticated without MFA. Once a person has completed the enrollment their account’s status is changed to Enforced. MFA is required from that point forward. An administrator can manually set an account to Enforced, but that account may not be able to logon and complete the enrollment on their own.
The multi-factor authentication page in Microsoft 365 admin portal will list all the users and show their states, but organizations with lots of users, SharePoint or Teams external accounts, and the like may have a difficult time displaying the data they need. The script below will list all licensed Microsoft 365 users that do not have an MFA state of “Enforced”.
Several of the solutions for controlling mobile data on the market claim to have provide simple solutions, but only one of them has impressed me. Microsoft’s Intune Endpoint Device Manager is extremely robust and very complicated. However, if you forget about trying to push apps and manage user profiles for now and concentrate on securing your corporate data on mobile devices, you’ll find Intune has a trick the others don’t.
Microsoft’s leg up comes from the fact that the software that is most likely being used to access company data is theirs, or one of their partners. Embedded in smart device apps like Outlook, Office, OneNote, Teams, Adobe, Box, Zoom and other popular titles is a process that checks for a special DNS record every few hours. If the record is found, its presence informs the device that there may be an Intune Mobile Application Policy configured for it’s user. The full list of apps that contain this feature is available on Microsoft’s site Supported Microsoft Intune apps | Microsoft Docs.
If you configure a Mobile Application Management policy and assign that policy to a user, when that person uses their company credentials with the specified program, they will be prompted to complete the protection process you have specified. You will also be able to stop access to the clipboard, prevent interactions of corporate data with non-approved apps, require extra device security, and more. Depending on the options you set in the policy, they will loose access to the resource if they refuse. No emailing codes to users, no trying to get them to follow odd instructions on a web page from their phone, they just open the app they have always used and follow the instructions.
Your accounts need to be licensed to use Intune before you can get started. The licenses are included with the Business Premium edition of Microsoft 365, they’re also included with several versions of Enterprise licensing. Licenses for Intune can also be purchased individually. Check Microsoft’s page for more details Licenses available for Microsoft Intune | Microsoft Docs.
Once you have the licenses taken care of you’ll need to configure your tenant. Assuming that you already have Microsoft 365 setup with your custom domain and user accounts, you’ll need to create a couple of DNS records for Intune. Log on to your public DNS host and create a CNAME for EnterpriseEnrollment.company_domain.com that points at EnterpriseEnrollment-s.manage.microsoft.com. Create another CNAME record for EnterpriseRegistration.company_domain.com that points at EnterpriseRegistration.windows.net. More detailed information about the full setup is available at Set up Microsoft Intune | Microsoft Docs and at Set up enrollment for Windows devices by using Microsoft Intune | Microsoft Docs.
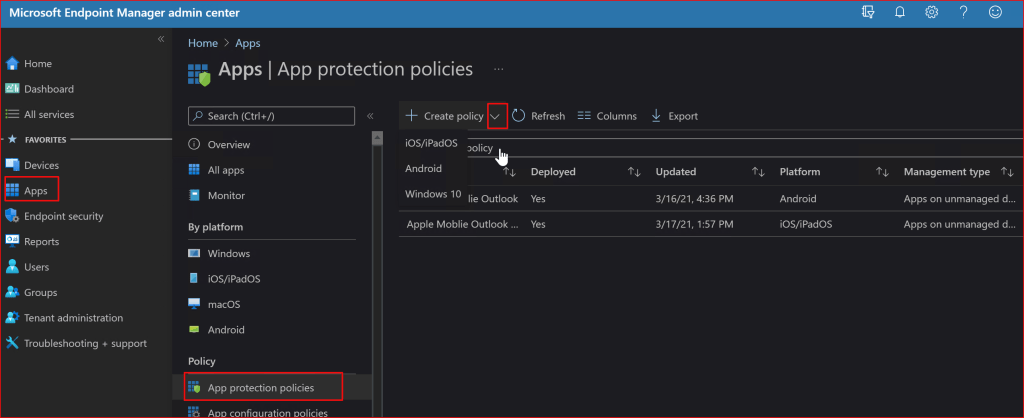
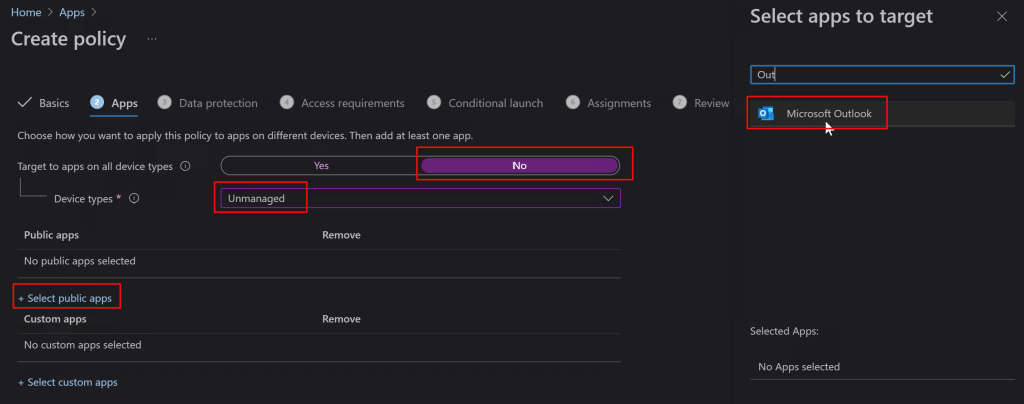
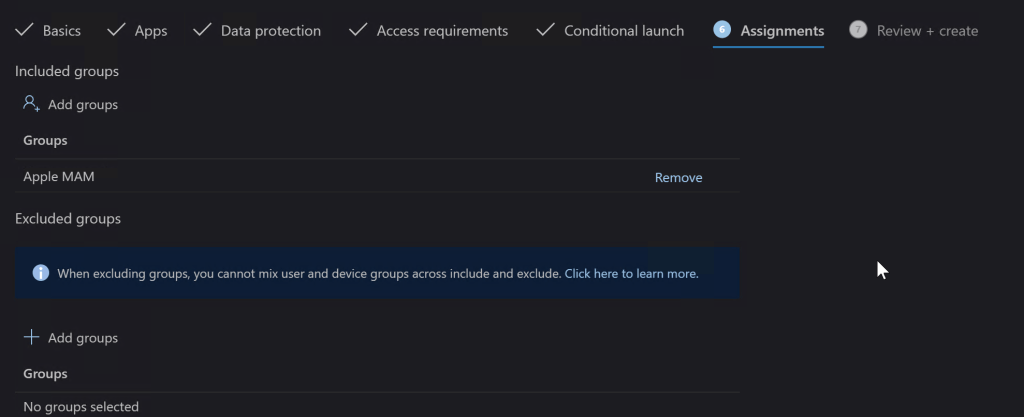
Once the basic setup is finished it is time to setup your first mobile application policy. In this post we’ll create a rule for Outlook. Log on to your Microsoft 365 admin portal and go to Admin -> Show All -> Endpoint Manager -> Apps -> App Protection Policies. Then click the drop down next to the Create Policy button and choose the OS you want to make a policy for.
Try not to get sidetracked by all the other options until you become more familiar with Intune.
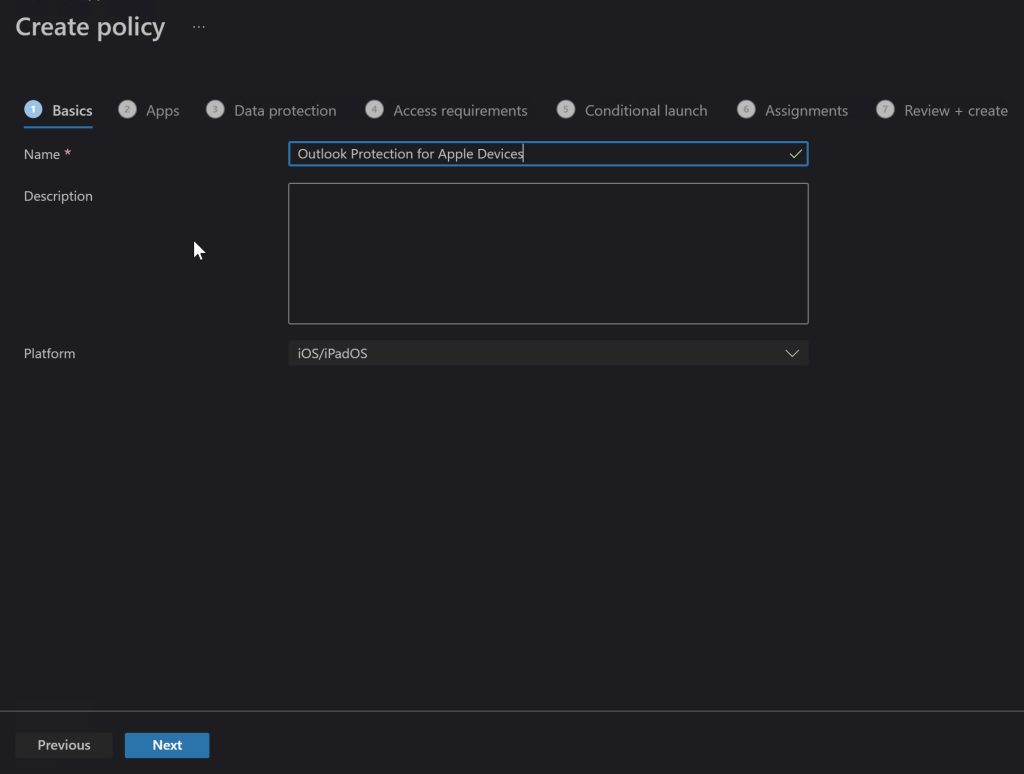
On the next screen, name your new policy something appropriate and add a description if you like. Click Next.
Naming becomes important when you have lots of rules so give it some thought.
On the Apps screen, toggle the option to Target All Device Types to “No”. Then use the drop down to select device types and check “Unmanaged”. Now click the link to select public apps and type the name of the application you are interested in protecting in the search box, in our case Outlook. Select it and then click the next button to continue.
You can add your companies in-house apps too, but that is out of scope for this post.
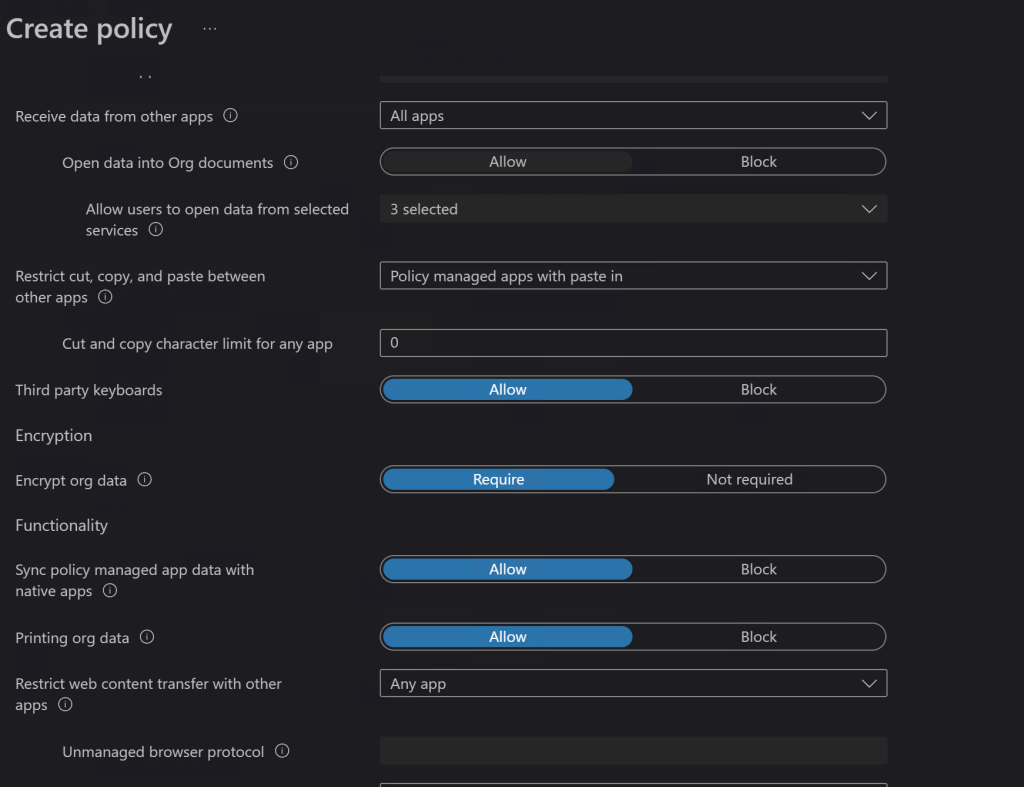
On the Data Protection screen you’ll choose the options that you feel best protect your corporate resources. Will you let them print from Outlook? Should the app encrypt the data on phone or tablet? What about copying and pasting between apps? There are lots of choices and combinations to choose from. Luckily the explanations are pretty straight forward. If you need more information the official Microsoft documentation is located here for iOS: iOS/iPadOS app protection policy settings – Microsoft Intune | Microsoft Docs and here for Android: iOS/iPadOS app protection policy settings – Microsoft Intune | Microsoft Docs.
Data connection options let you control how the device and its apps can interact with your cloud data.
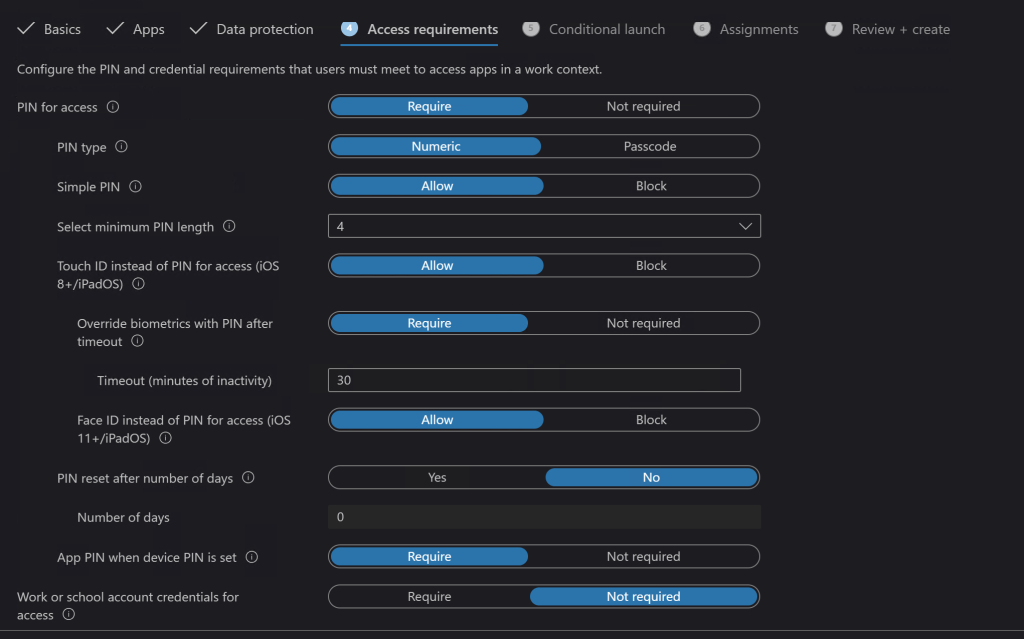
Next up are the access requirements where you will choose what hoops the devices have to jump through to access your data (Outlook). Do they need a device PIN? Should Outlook have its own PIN that prompts every time they open it? Are you going to allow the devices biometric features? There are a lot of choices in this section. I can tell you from experience that these choices are what will annoy your co-workers the most, so don’t be more aggressive than you need to.
You don’t want to go overboard on the access requirements.
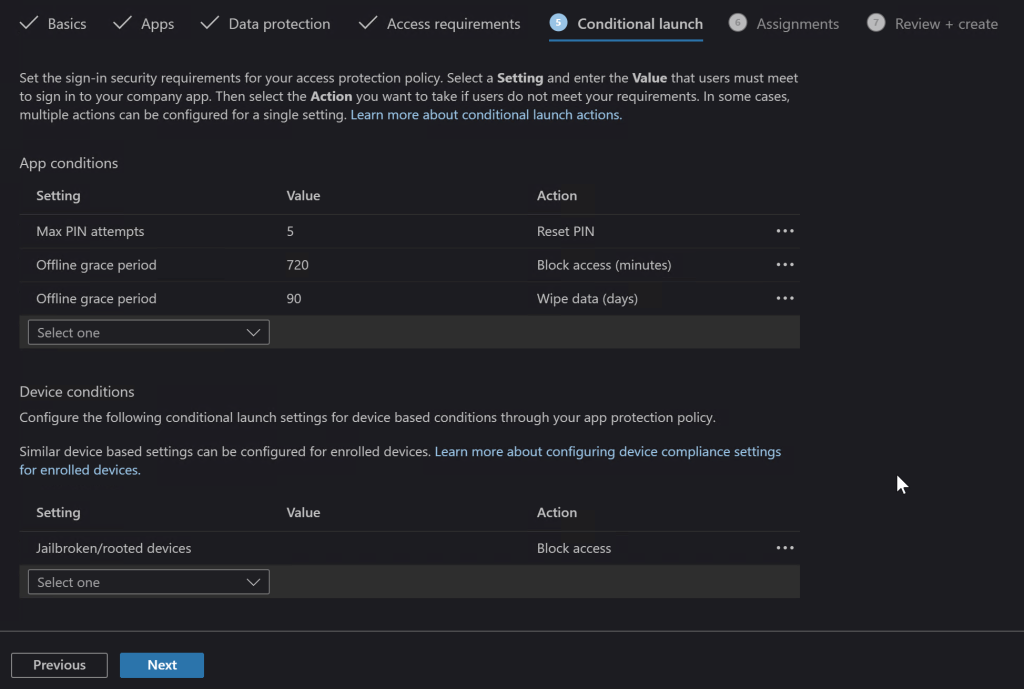
Launch conditions let you control certain aspects that are required for your user’s device to open the app (Outlook) in the first place. A popular choice is to block jailbroken or rooted devices since they are more likely to contain malware. You may also want to consider warning users when their devices are on old versions of their operating systems.
The Assignments tab is where you select the groups of users that the rule you made either applies to, or those that are excluded from it. I typically use the inclusive option and create a group that matches the rule name. If you don’t already have a group that will work you do not need to exit the Endpoint Manager session to make one, you’ll loose your progress and have to start over if you do. Just open another tab in your browser and go to Microsoft 365 admin center – Groups to create your group and add the users. Then switch back to the Endpoint Manager tab and add the group you’ve created.
On the last screen you be given a chance to review all the options you’ve selected and create the rule. It can take up to eight hours before Microsoft deploys the rule in your instance of Intune and up to eight more before the devices check in and get the policy applied, be patient. You can check on the status of your rules and devices by using the monitor. In the Endpoint Manager console go to Home -> Apps -> Monitor -> App Protection Status to see the available options.
In today’s world every business should take steps to protect their data. Until the age of ransomware, small businesses were largely exempt from the perils of hackers. Now they are prime targets, data doesn’t need to be valuable on the black market. It only needs to be worth something to you and your company. Often when we think about security we focus on computers and servers, but our mobile devices have just as much access and we don’t want to leave them vulnerable. If all of this proves a bit much to tackle on your own, don’t let that stop you. Reach out to a Microsoft 365 partner or Microsoft themselves and get your mobile endpoints protected.
I’ve have owned so many laptops that I’ve literally lost count. Some of those systems, like my Surface Book, are capable of playing games. However, none of them are, or were, dedicated game machines. I’ve helped my friends and family pick out their portable game machines and have spent plenty of hours playing on them. Their cost versus their life span was always prohibiting from my point of view. I could get more bang for my buck from a desktop rig and portability wasn’t a concern.
Now that top of the line GPU cards cost almost as much as an entire laptop, I have reconsidered my position. I wanted something that I could treat like a gaming console and hook up to my televisions. I also plan on it traveling with us some depending on the destination. It needed to have enough power to play AAA titles on decent settings, but I didn’t want to break the bank. The closer I could stay to $1500.00 the better. I figured I would pay at least that much to get a hold of an upgraded GPU for my desktop, if I could find one at all.
I started my shopping spree by doing a bunch of research. At the time the best gaming laptops still had RTX 2070 and 2080 cards in them. I just happened to be on BestBuy’s site when they put up the ASUS TUF system with an RTX 3070 for pre-order. I was a little concerned with pre-ordering a system that featured a brand new, untested card, but you can’t always play it safe. I wasn’t in a hurry and I knew I could return it if I didn’t like it, so I pulled the trigger. Waiting more than two months for it to get here was agonizing.
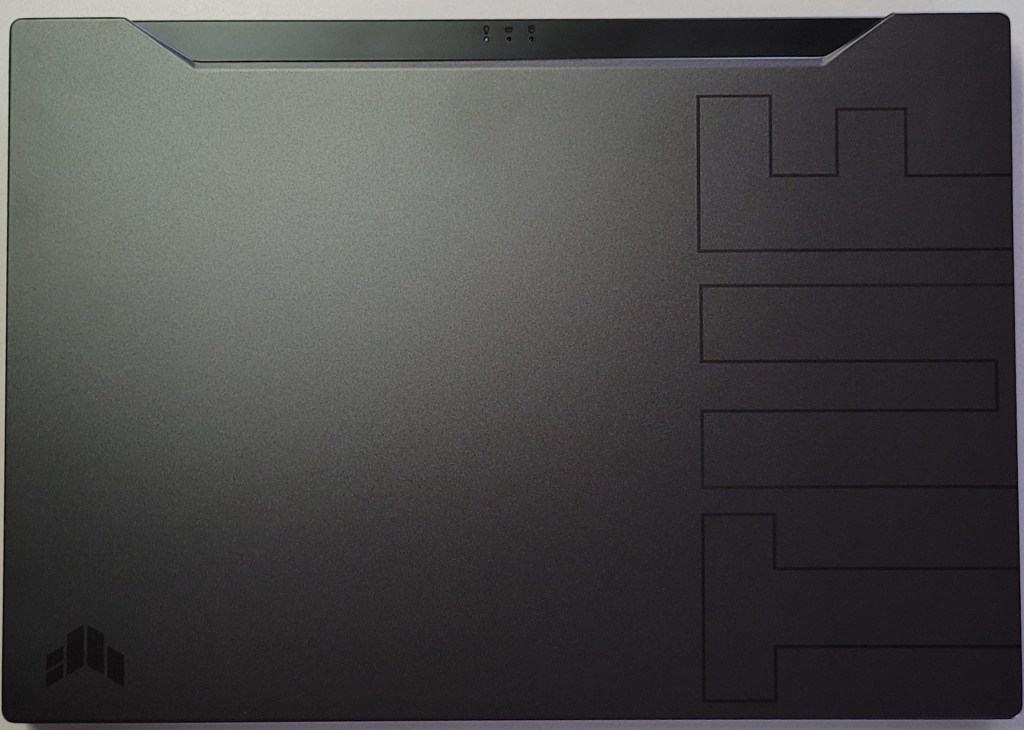
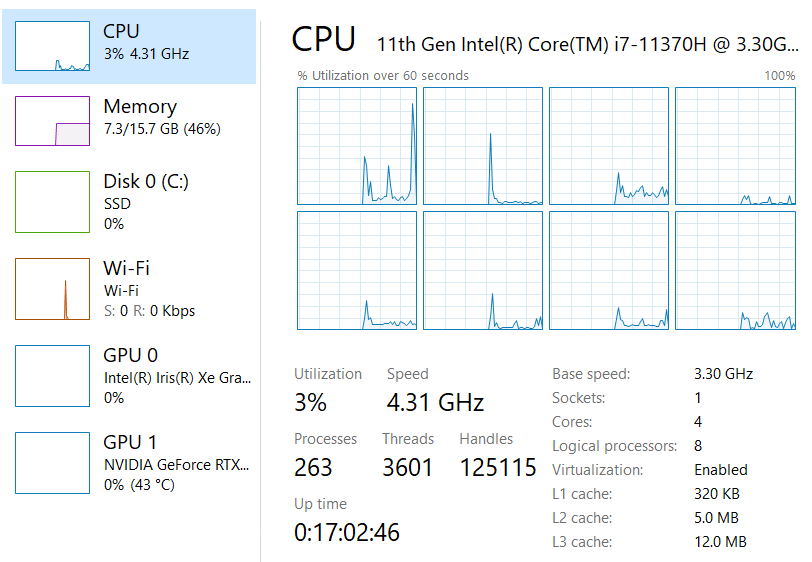
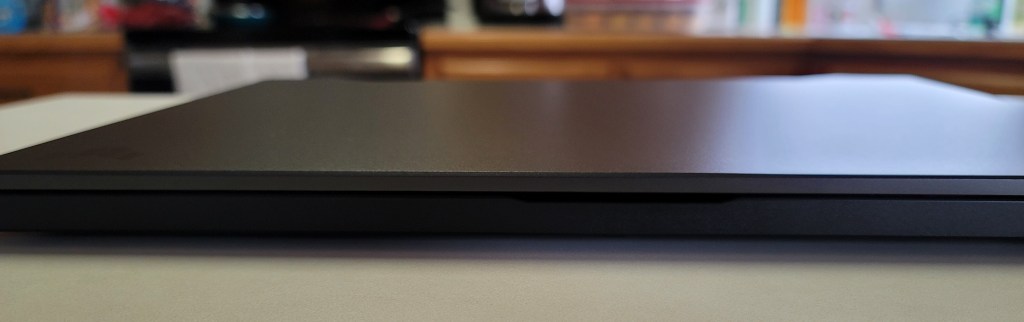
Of course it showed up in the middle of a work day so I couldn’t immediately tear into it. As soon as my shift was over, I carefully opened the box and was pleasantly surprised by the look and feel of the system. The nondescript case is metal, there are two color choices, I have the black one. Except for the lightly etched TUF and logo on the lid, it looks like any other high-end slim notebook you might see in a boardroom. It measures 14.17 x 9.92 x 0.78 inches (360 x 252 x 19.9mm) and weighs 4.41 pounds (2kg).
The 15.6 inch screen features thin bezels along the top and sides. There’s no built-in web cam and if you’re planning on this being a daily driver, that may be an issue in today’s video conference based world. The non-HDR screen is 1080P and can hit 240 frames per second witch is super smooth. You may wonder why I didn’t go for a 4k or 1440P screen. On a 15.6″ display the extra res doesn’t exactly equate to a better picture. It does however, require more of your GPU and battery to push. You’ll also spend more on the systems that have higher resolutions. I didn’t see any 3070 laptops with a 1440P+ screen for less than $2000.00.
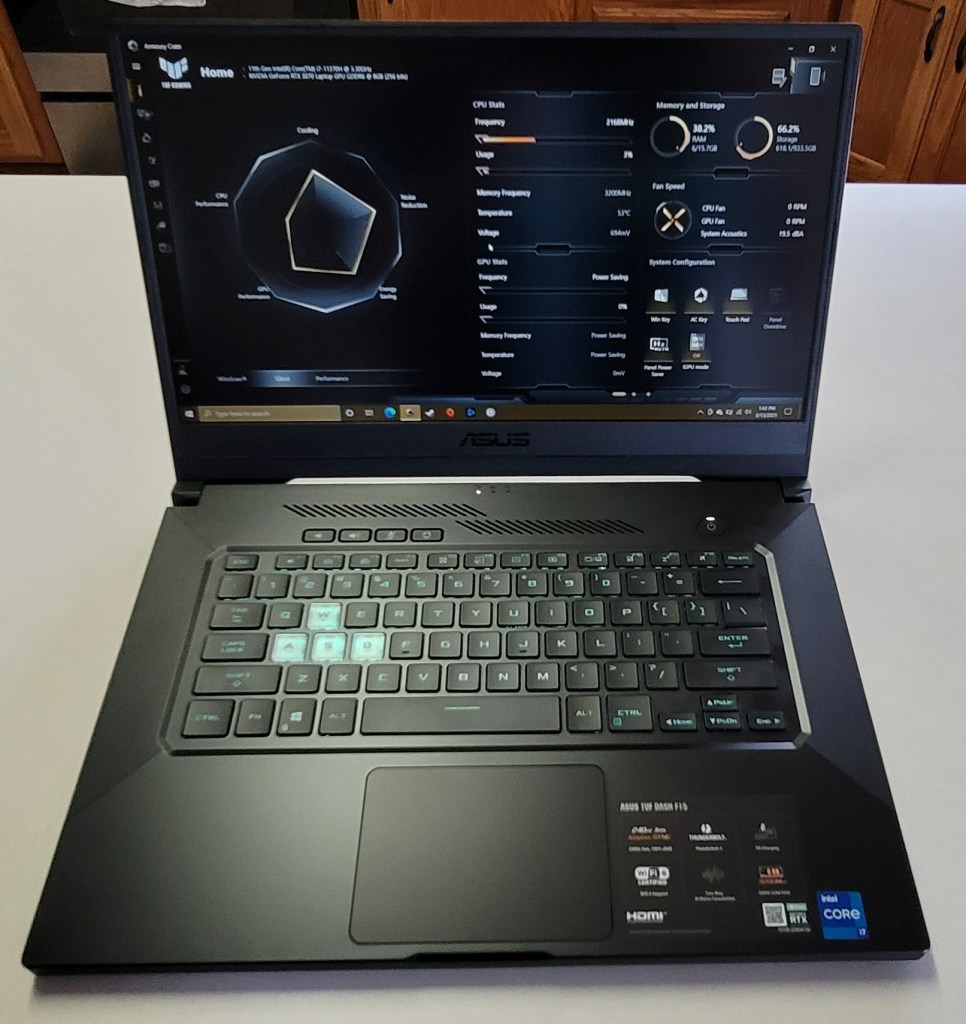
The keyboard is backlit and the WASD caps are clear. It is only a single teal color but I like it. There’s a row of dedicated volume, mic, and management keys which I find myself using more than I thought I would. The keys themselves feel great, the caps are a little concave and there’s a decent snap from the membrane that lets you know you’ve completed the stroke. The trackpad is nice. It is offset from the spacebar, but centered under your thumbs where it should be. It’s responsive, but ignores my accidental brushes while typing.
The deck and trackpad are fingerprint magnets.
The sound system is decent and has a trick that I didn’t expect to work. It has built-in noise canceling in the on-board mics. You know what? It totally works. I’ve played multiple on-line games of CoD, Apex, and Destiny without head phones and questioned my friends about how I sounded. I wanted to know if they could hear the fans, or the game echoing from the speakers and was pleasantly surprised to learn they didn’t. It’s really nice to be able to play without headphones once in a while.
You’ll find an HDMI 2.1 port to connect the system to your home theatre. I recommend that you get an HDMI 2.1 rated cable to go with it. Otherwise you will probably have issues hitting higher frame rates with HDR enabled. I did. When connected to my Q70t home theatre using an HDMI 1.4 cable, I could do 120 hertz or 60 hertz with HDR. A new $10.00 2.1 cable from Amazon solved the issue.
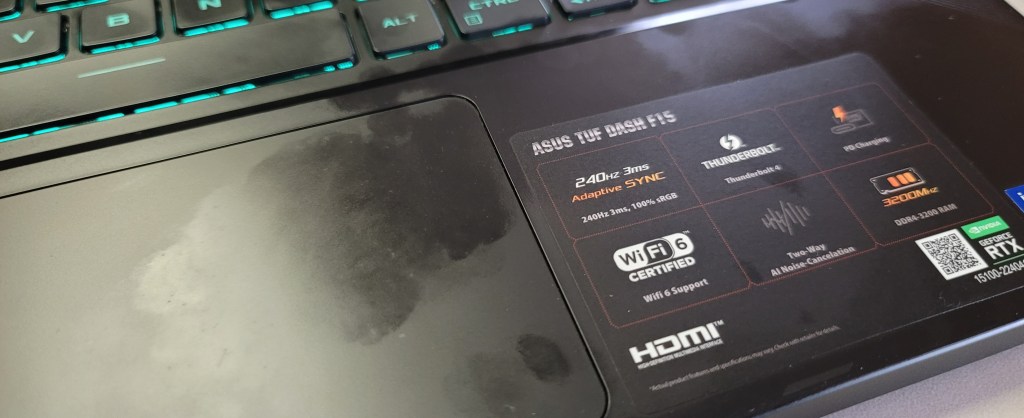
You will also find a Thunderbolt 1.4 port which will take care of docking stations, external GPUs, display port monitors and lots of other accessories including most USB-C devices. It also has an RJ-45 network jack, headphone/mic jack, and three USB 3.0 ports. The Intel AX201 is Wi-Fi 6 compatible and hits the 1200 MB/ps mark with ease. Bluetooth is built-in as well. I’ve connected my system to the afore mentioned home theatre with an external keyboard and mouse without needing another port.
The one terabyte SSD is fast and large enough to hold the games I am currently playing. It came with 16GB of PC-3200 RAM, I will probably be taking advantage of the fact that it is user upgradable in the future but it does the job. The 11th gen 4 core i-7 11370H CPU is more than fast enough for anything I plan on doing.
Right out of the box I was disappointed with the performance of the GPU. I spent an hour running updates, BIOS, firmware, Windows, drivers, and the management app all needed updates. It’s a good thing I bothered before packing it back up, it was like a totally different system. When playing CoD BlackOps, Destiny, Apex, Tomb Raider, and Doom Eternal on the built-in screen I was able set everything to ultra, including ray tracing, and still hit over 120 fps with the fans barely running.
When connected to my big screen I have a choice to make. I can run the games on high, or ultra at 1440P and still hit my TV’s 120 FPS limit with HDR on. Or, I can crank down some of the settings to medium and low and run at 4K with 60 – 90 FPS. Personally I prefer the lower resolution with more post processing, but the games look and play great either way. At 4K they look and play better than the same games on my PS4 Pro, or Xbox One X at the same resolution. If you want more out of your system make sure to get one that is not a Max-Q GPU design. Basically, the thin and light gaming systems use the Max-Q versions of GPUs which limit power to prevent overheating. The thicker, heavier systems tend to have the full power chips that preform better but are, well, huge.
Overall I’m really happy with the ASUS. It is a good balance of performance and cost. There are systems with the same GPU that have features like a web cam and RGB lighting, but they’re all much closer to the $2000.00 price point. I’ve had the DASH F15 for a couple of weeks and have spent a lot of hours sitting in my easy chair with it on my lap and connected to my TV. It’s a keeper.
Normally I would not write a post about something so mundane as configuring a remote for a TV, but this was difficult to figure out. There appear to be quite a few people searching and posting on the Xfinity and Samsung forums, Reddit, and other places, but I wasn’t able to find the actual answer anywhere. Once I figured it out, I thought it would be nice to share how it is done.
The newer Xfinity cable boxes have the X1 voice remote and these controllers are radio frequency (RF) based rather than IR (Infra-red). Most of the various models of Xfinity cable boxes do still have traditional IR ports, but the target window is extremely small and hard to hit. If your model has one, it is located in the bottom right hand corner. Even if you do have an IR port, the functionality isn’t very good. Your Samsung smart TV’s hub and universal guide will struggle to control the X1 media options. Many of the proposed solutions on-line involved purchasing an IR relay, but you don’t need to.
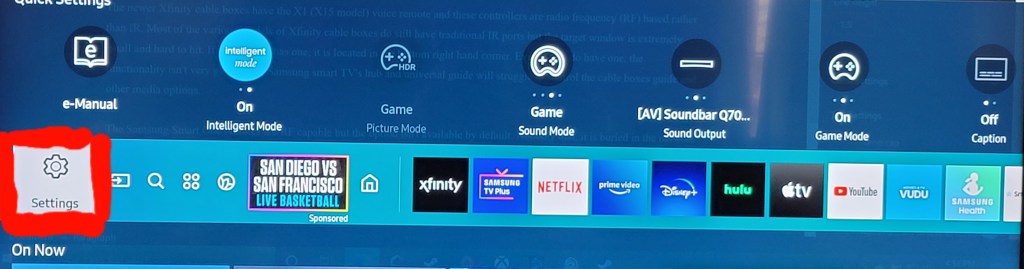
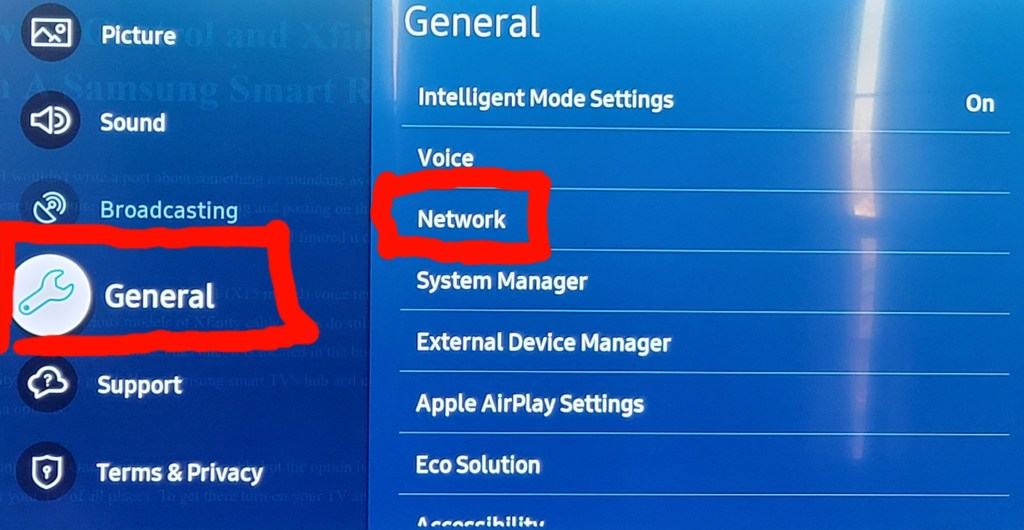
The Samsung Smart One remotes are RF capable. The option isn’t enabled and doesn’t show up in any of the menus by default. Not only that, the setting is buried in the network menu for your TV of all places. To get there turn on your TV and hit the Home button on your Samsung remote. Scroll all the way to the left and select Settings.
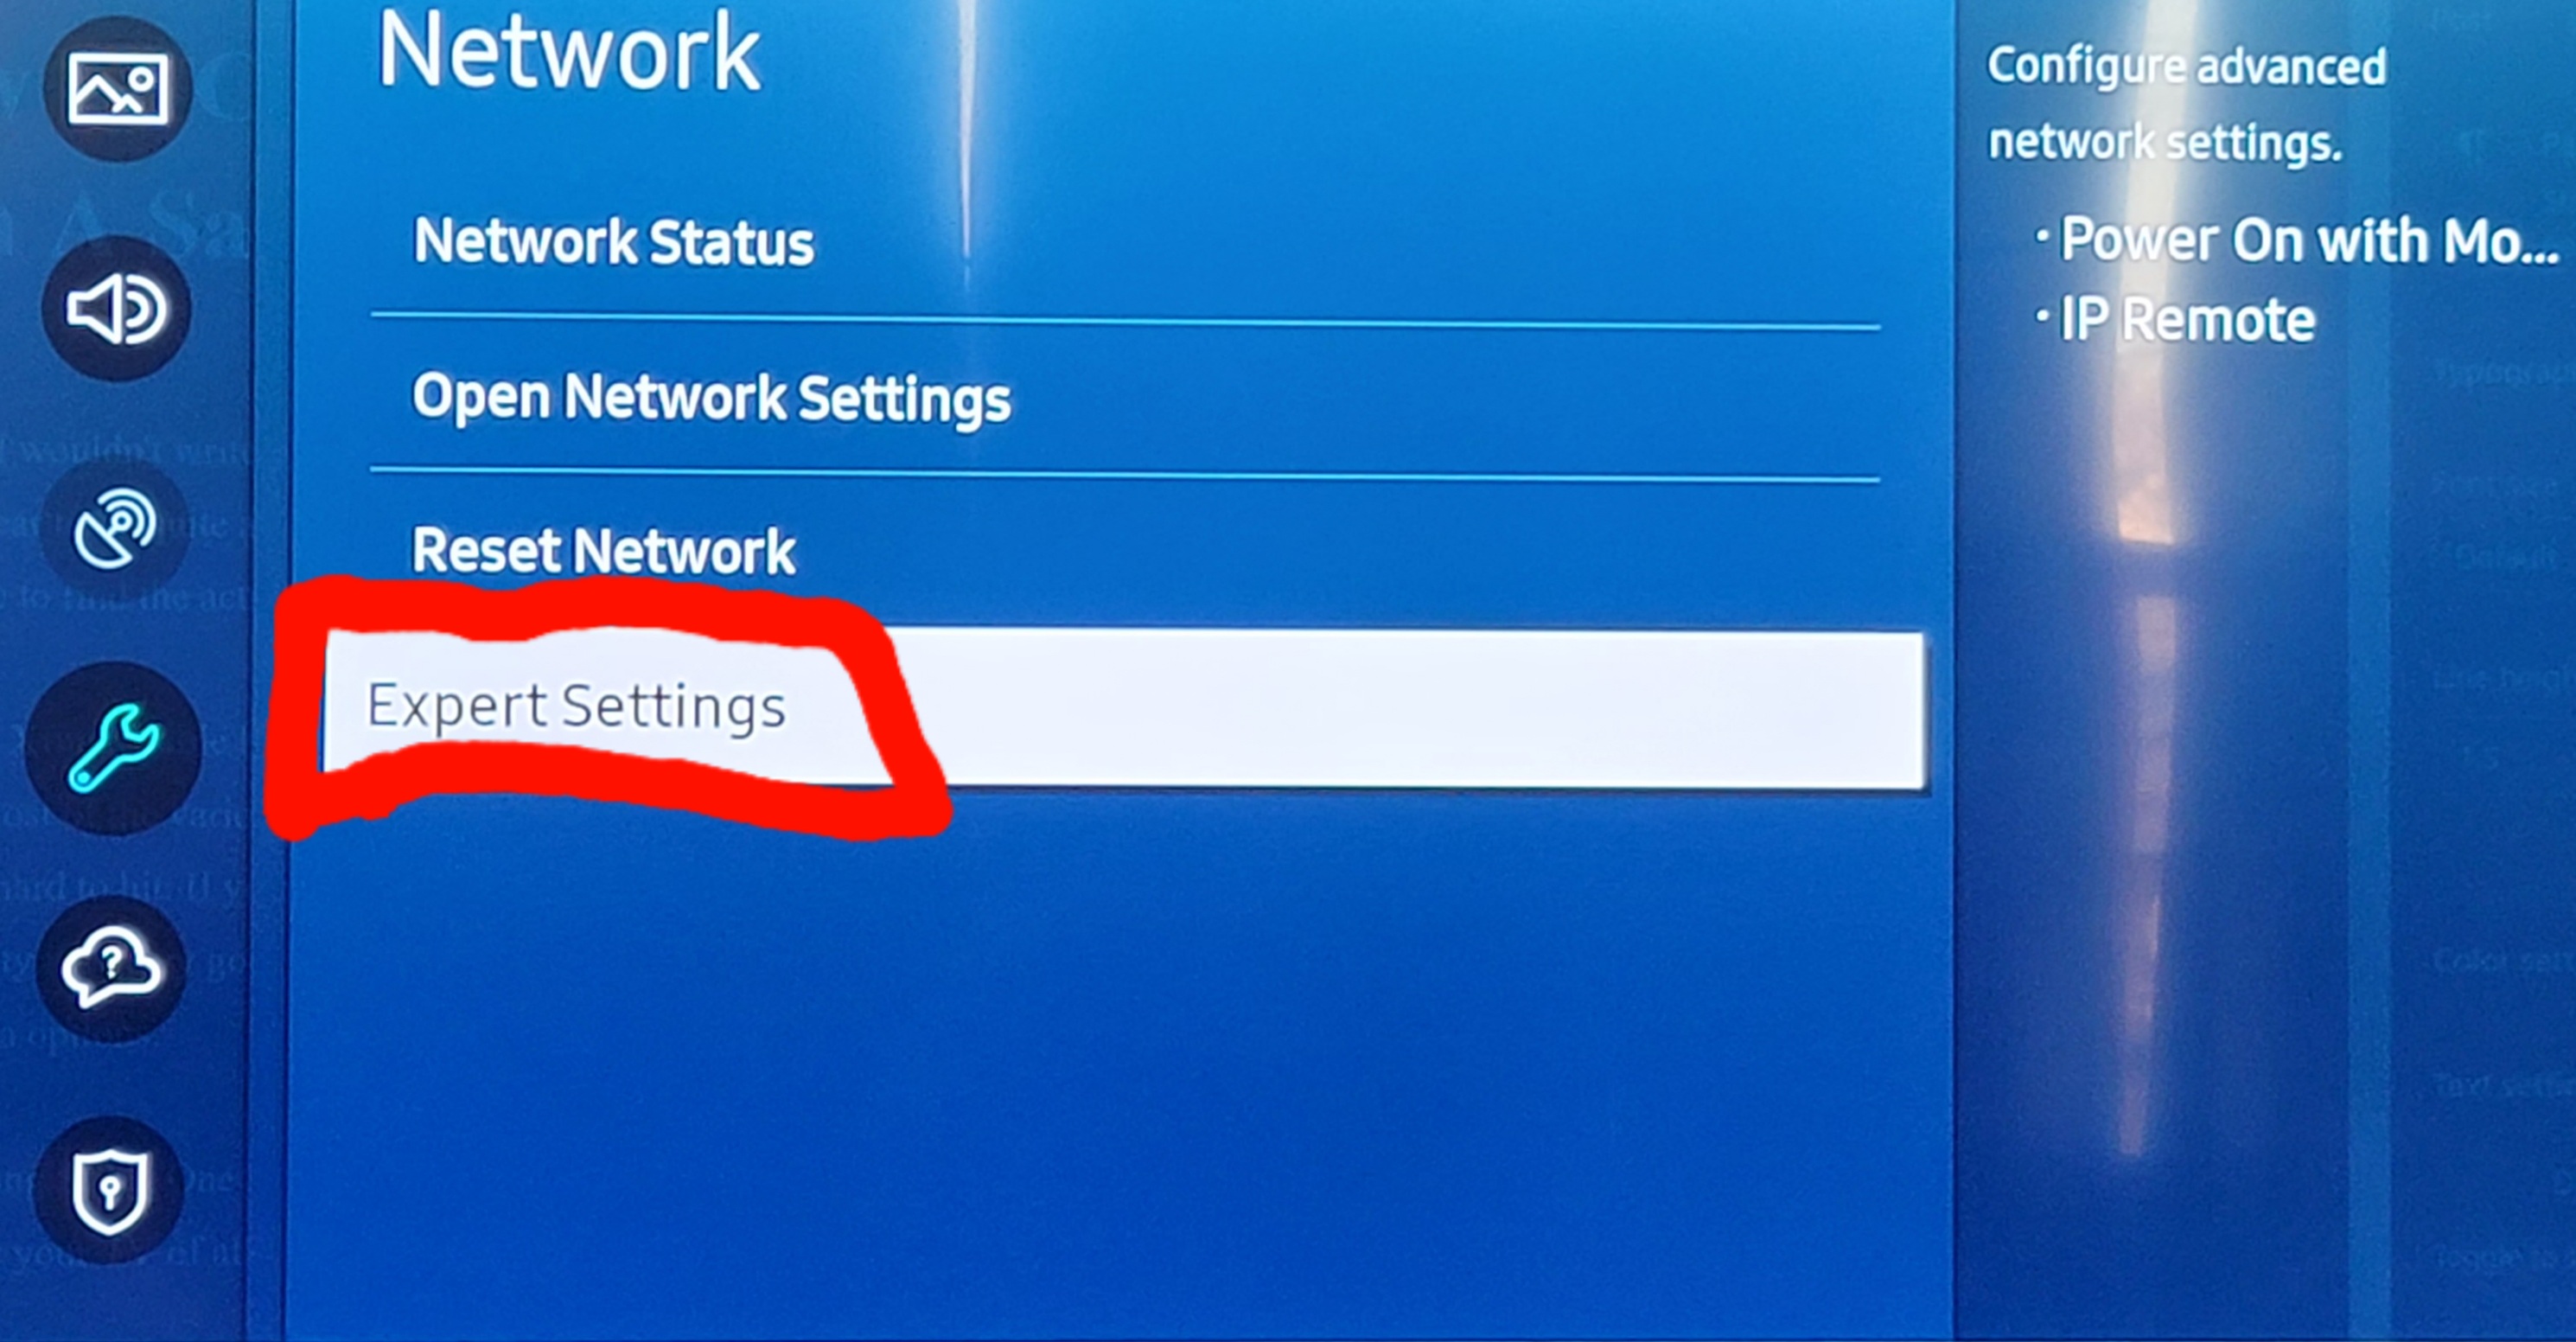
Go to General, then pick Network.
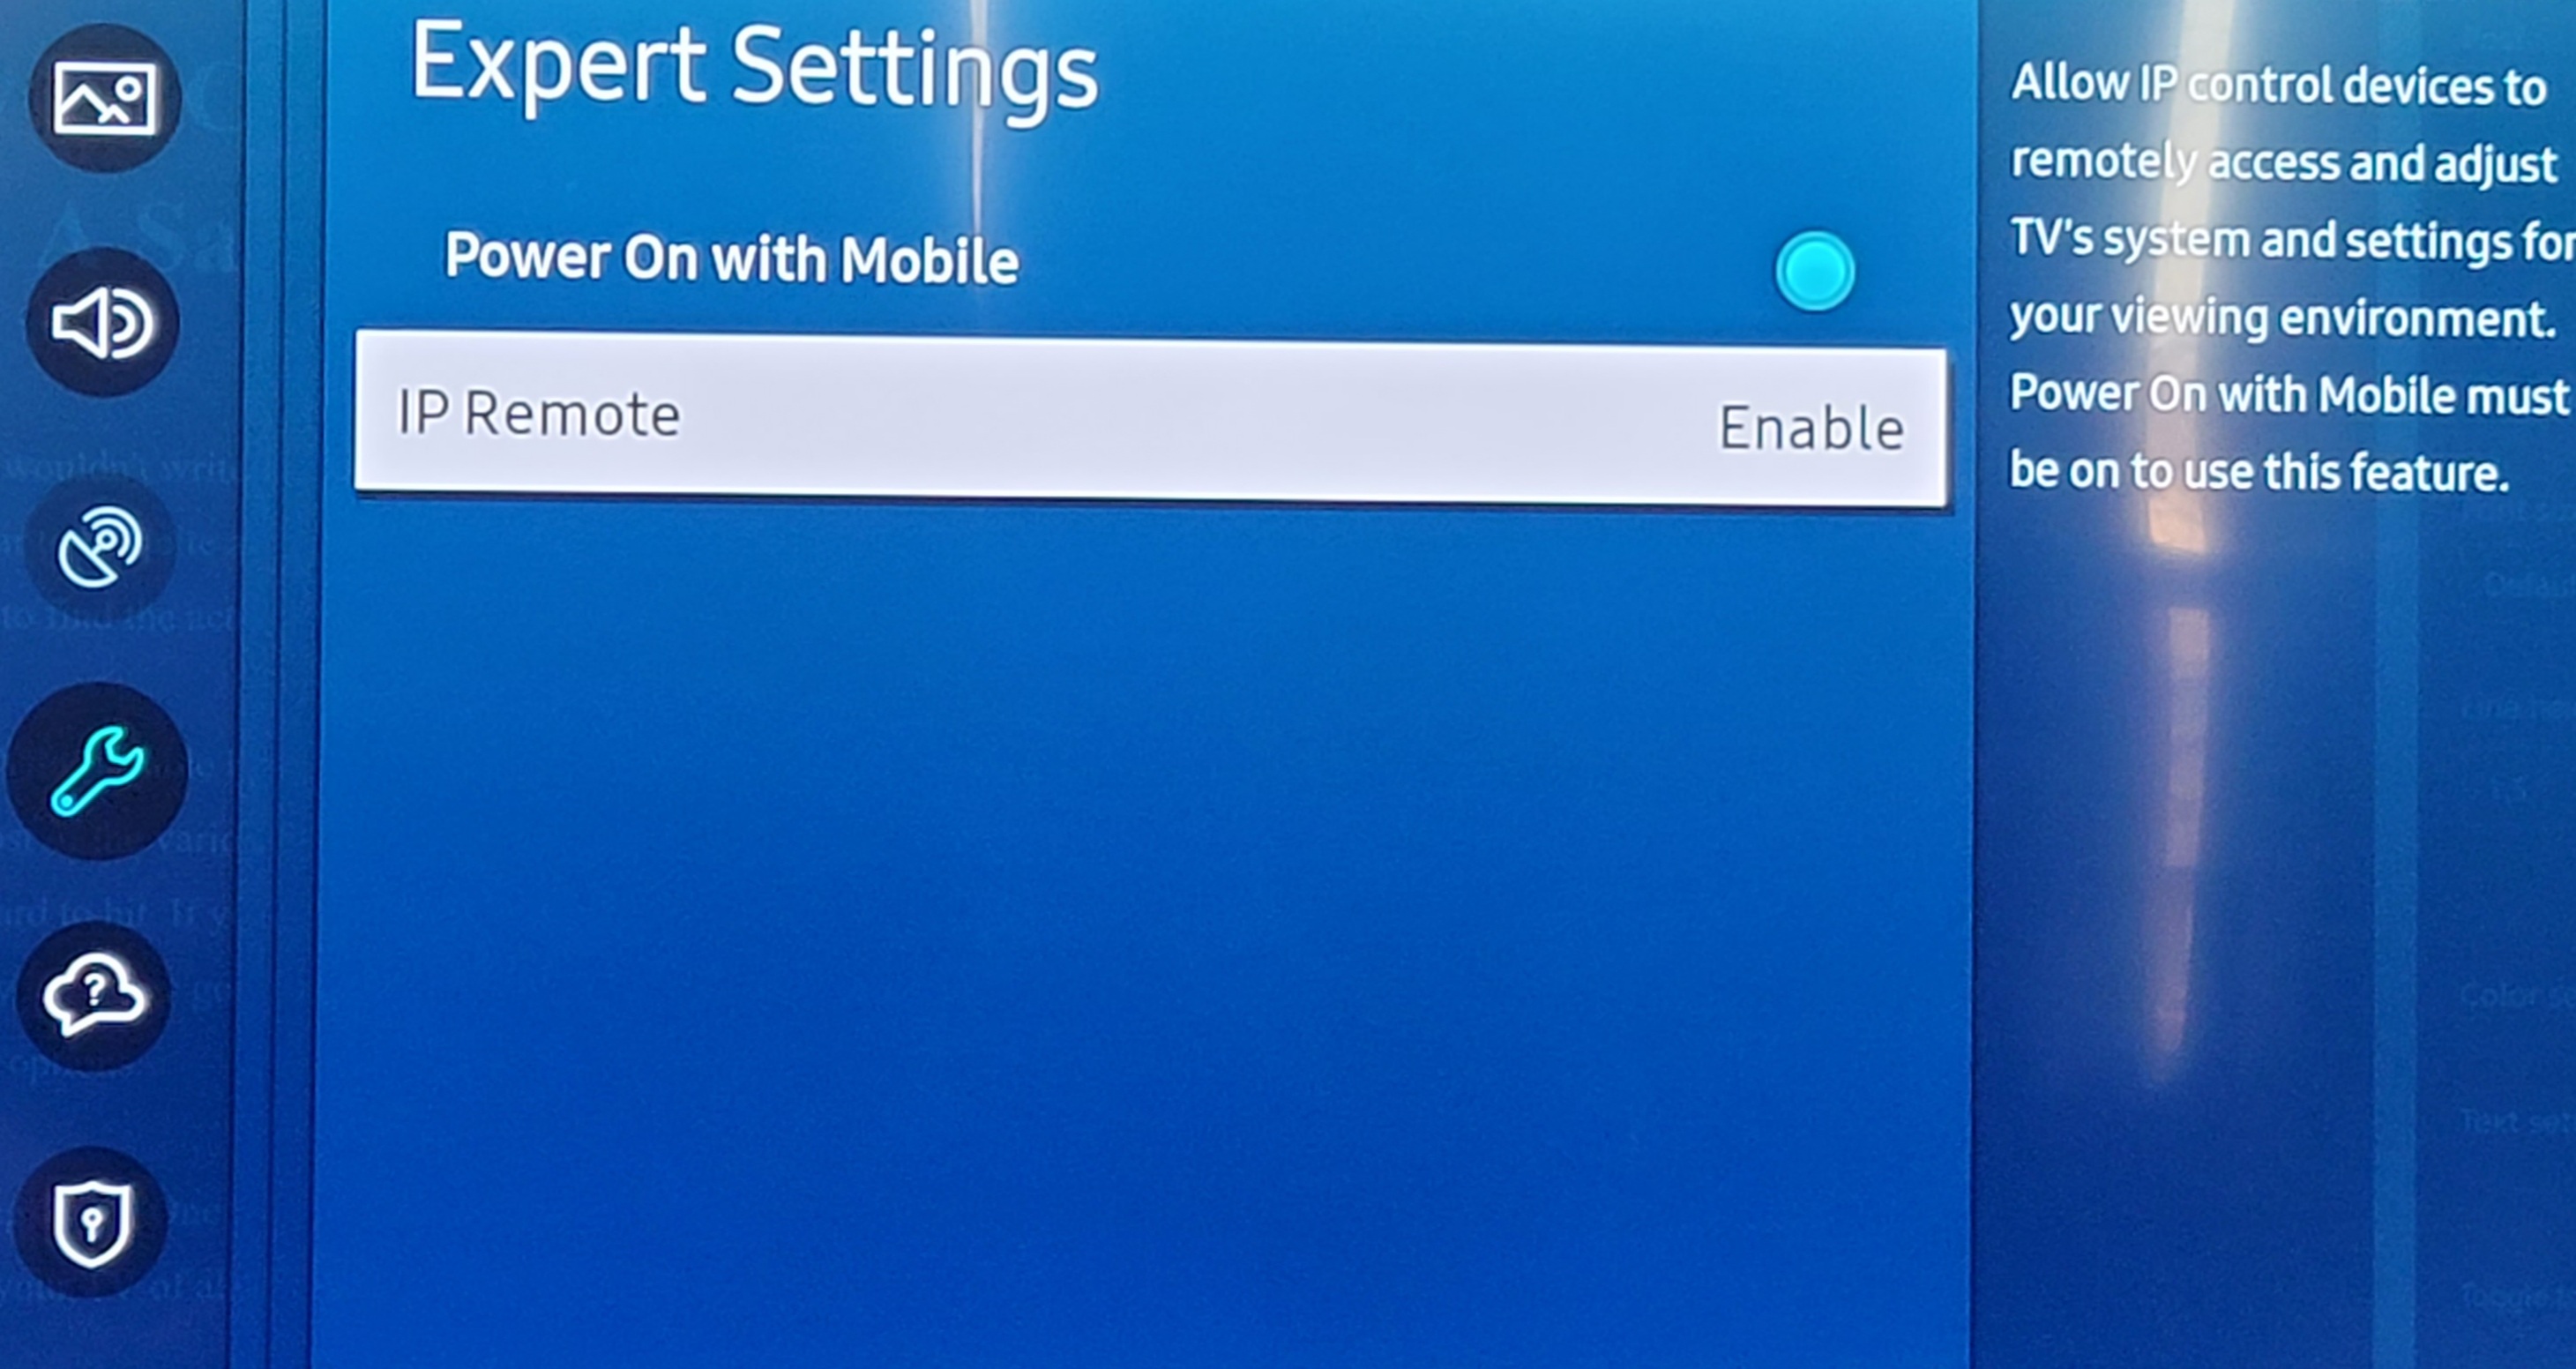
Finally, click on the Expert Settings option and enable Power On with Mobile and IP Remotes.
Assuming that you’ve already got your cable box plugged in and setup as a device, use the back button on your remote to return to your home screen. Now hit the home button on your remote again to bring up the menu. Scroll to the left until you get to Source and go up to that menu. Scroll all the way to the right until you get to Universal Remote and select it. Select your Comcast device and at the top of it’s menu you will see an option to Enable RF Remote now. Click it and follow the instructions to pair your remote.
If you haven’t already configured your Comcast Xfinity cable box as a device, follow the same path except click the New Device option in the last menu to start a wizard that helps you choose your provider, enter your zip code, pick your HDMI input and so on. Skip the channel test. Say OK on the first option even if the channel doesn’t change. Then use the Universal Remote menu again (as described above) to get to the Enable RF Remote option.
Once you have it setup the Samsung One Remote should be able to control all of the functions of your Xfinity X1 device. You can even setup Google or Alexa and use it to operate your cable TV system instead of the voice remote itself.
I’ve written several posts on creating Hyper-V virtual machines on Windows 10. One of my most popular covers how to create a Linux VM with sound. Inevitably, somebody will follow up with a question along the lines of, “How do I access XRDP (Linux RDP Server) from other machines on my network?”
One might be tempted to think the answer to this question is just a simple firewall rule. It isn’t. After the Windows 10 1607 update, Hyper-V started including a default virtual switch that uses NAT to allow your virtual machines access to the same network resources that your host machine can reach. This default switch makes the Quick Create function extremely useful. With a couple of button clicks, you can deploy a VM that has full outbound (Internet) network access. No network chops required.
Your newly deployed VM will be running on its own network segment that uses NAT to reach the host network’s resources. It is fantastic when you are trying to go from your VM out to the world. Getting traffic to go in from your host network(s) to your VM is another matter. Since the VM is running in its own network, there’s no path for traffic to reach it. The NAT is handled on your Windows host system so your router won’t be much help either.
Like all technical problems there are multiple ways to address this challenge. For example, if all the machines you intend to access the VM from are running Windows 10 Pro +, or Windows Server 2012 + you could configure the Hyper-V manager to access the host remotely. I’ve written those instructions here. You could also create an external virtual switch that would allow your VMs to use the same network your host system is attached to. In this post I’ll create a new NAT virtual switch and forward the traffic to the VMs.
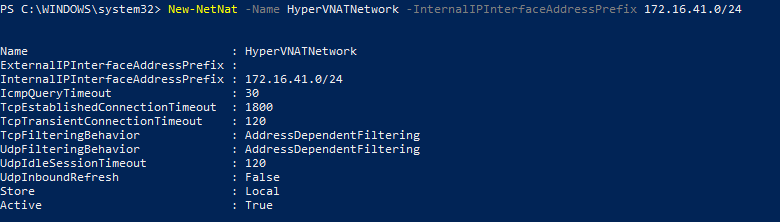
Windows 10 has built-in port forwarding and NAT mapping. Normally you would need a few lines of PowerShell to forward the packets to your VM, but there’s a problem. The Hyper-V default switch’s NAT is not exposed to the OS. If you open PowerShell and run Get-NetNat you will probably see no return (assuming you haven’t configured other NAT mappings). We need to create a virtual switch that uses NAT and allows us to control it. Microsoft has not included this functionality in the GUI, but it can be done.
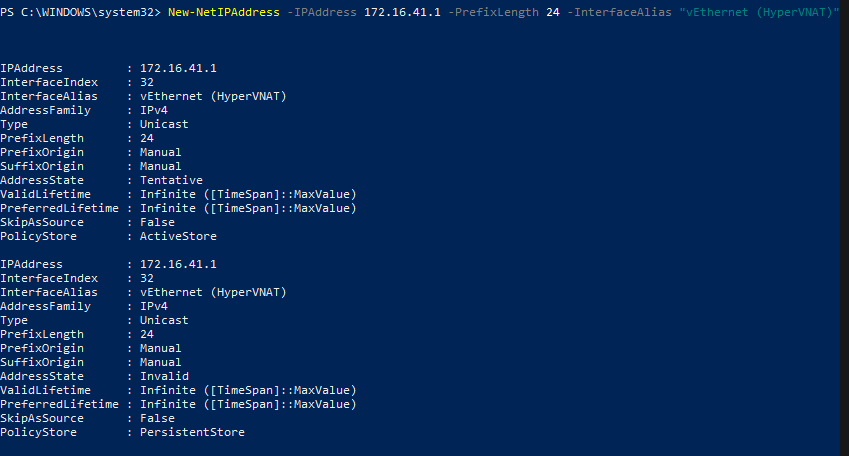
First we need to create a new Hyper-V switch. In an elevated PowerShell console run:
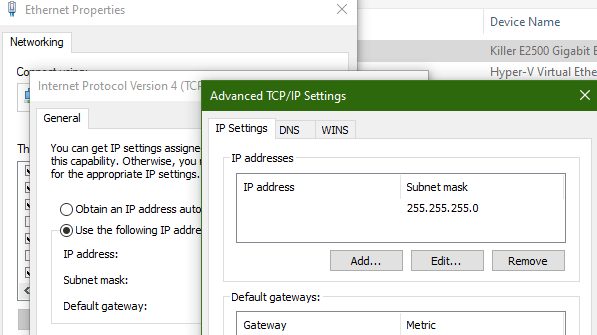
If you look in the Windows network adapter console, or list them with PowerShell (Get-NetAdapter), you will see that a new NIC has been created with the name you specified between the “” marks in the command above. It can’t access anything because it isn’t configured. First we need to give the switch adapter an IP address. This address will be the gateway for all the VMs that are attached to this virtual switch.
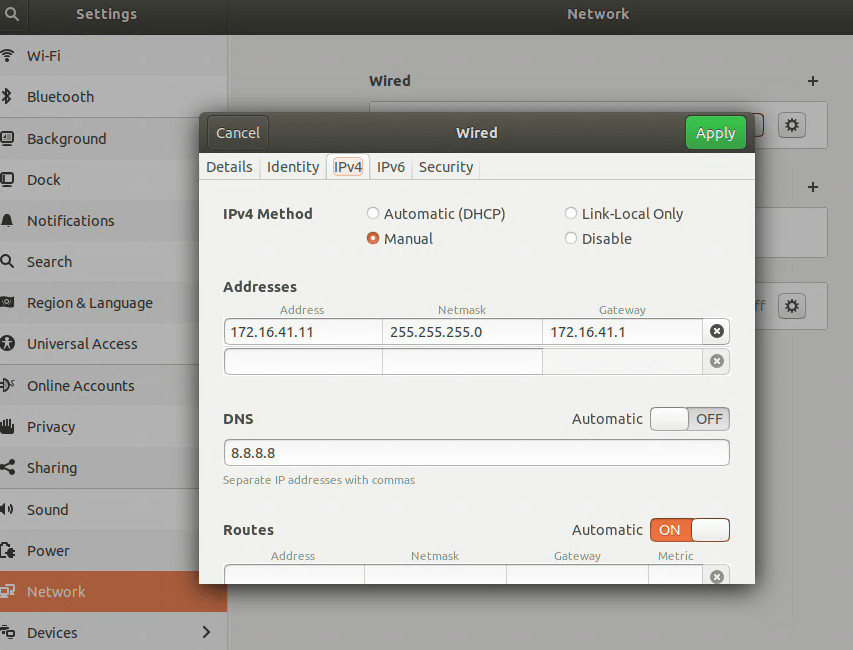
The built-in default virtual switch includes a DHCP function that automatically assigns IP addresses to the attached VMs. Our new virtual switch does not. You will need to manually assign your VM an IP address in the same subnet. If you followed my example, the useable addresses are 172.16.41.2 – 172.16.41.254 the subnet is 255.255.255.0, and the gateway is 172.16.41.1. You’ll also need to configure DNS if you plan on surfing the web or accessing named resources, 8.8.8.8 is Google’s public DNS server.
There are numerous ways to configure the IP information for a computer. They all differ according to the operating system. Generally, somewhere in the settings of your OS should be the network options. Set the IPv4 interface to manual (not automatic or DHCP) and enter the correct numbers for each. Below I’ve configured an Ubuntu Linux machine for the network we’re creating in this post.
It is always a good idea to reboot after changing an IP address.
Now the VM should be able to use our new virtual switch to access the outside world. Also, when we run Get-NetNat on the host in PowerShell you’ll see information returned. You should be able to open a web browser on your VM and hit your favorite sites or check your email. We’ve done all of this and basically ended up where we started LOL. The key difference is that the NAT rules can be controlled now.
The problem we started out to solve was to allow XRDP access to a Linux VM on our Windows 10 host from other computers on our network. Add a NAT mapping to forward a custom port (3391) from our host to our VM as XRDP (3389) by using the PowerShell command below. Note: Do not forward 3389 to 3389 unless you do not use RDP on your host system.
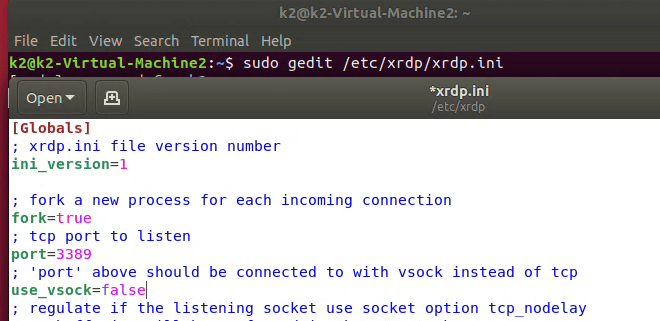
Depending on how XRDP was installed and configured on your Linux machine, you may also have to edit the XRDP.INI file. If XRDP is configured for vsock, it is not listening on the traditional RDP port. Vsock is only accessible via the Hyper-V management console’s enhanced session function.
sudo gedit /etc/xrdp/xrdp.ini
Depending on the distro, you may need to use nano or vim to make sudo changes to the xrdp.ini file. Change the line use_vsock=true to use_vsock=false. Make sure there is a port=3389 line that is not commented out (;) and save the file. Reboot the VM.
Note: chaining this setting will mean that to connect to an enhanced session, you will always need to manually open an RDP connection. Right clicking on the VM in the Hyper-V Management console and choosing connect will only open a basic session if vsock is disabled.
You should now be able to connect to RDP via the Windows 10 host’s IP (not the VM’s) address to port 3391 (X.X.X.X:3391) from any machine that is able to reach your Windows 10 host computer. If you want to access the VM from the Internet you would need to forward the custom port (3391) from your external firewall to your Windows 10 host system.
This technique was demonstrated in Windows 10, but it would work for Windows Server and a Windows Docker Container as well. You can find more details about the NAT abilities built into Windows at Set up a NAT network | Microsoft Docs .
If there’s one thing Outlook really likes to do, it is to make sure that you are notified. Sometimes it can be a little overbearing, especially if you are a member of very many shared mailboxes, a room delegate, or have full access to another individual’s mailbox. You will get all of those notifications too.
Often the solution is to reduce the number of Exchange objects that a person has access to, but how do you find out what those are? The easiest way is to use PowerShell. The little script below will prompt you for your Global or Exchange administrator credentials for Microsoft 365. Then it will prompt you for the email address of the user account you are working with. It will use those pieces of information to connect to Exchange online and generate a list of all the objects that person has full access to. Note: this does not include share permissions assigned by a user in Outlook.
Once you have the list of Exchange objects you’ll want to investigate each and decide if the user really needs the level of access they have. Full access or delegation results in notifications. If the number of objects can not be reduced to a satisfactory level, there is another strategy available in Outlook itself. You will need to disable the general alerts function and then create alert rules for the specific objects that matter.
In Outlook, go to File -> Options -> Mail and then uncheck the box for “Display a Desktop Alert”. This will do what you think, disable all Outlook notification pop-ups.
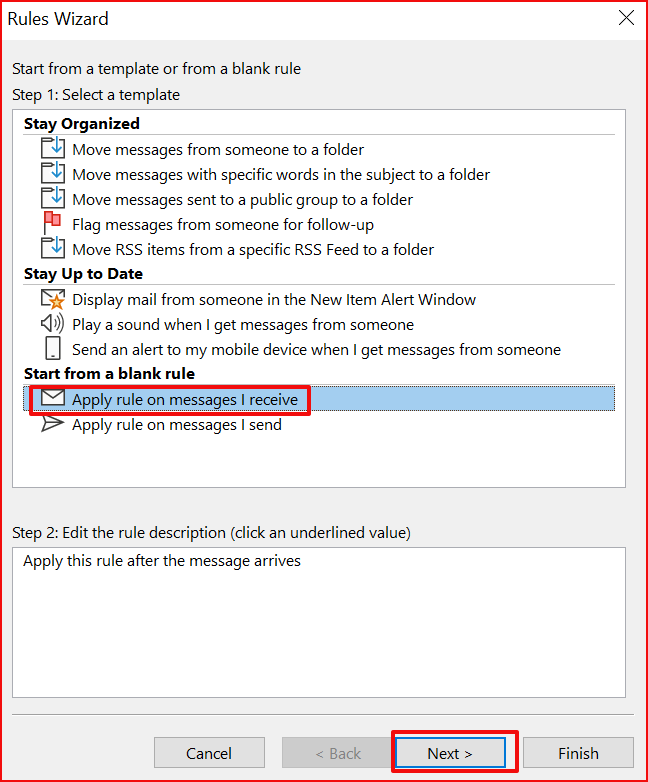
Now we’ll need to build rules for the alerts that we still want to see. Use the chevron at the far right of the Outlook ribbon to expand it. Then click the drop down for rules. Click “Manage Rules and Alerts”.
In the rules wizard select “Apply a Rule on Messages I receive” then click the Next button. Now select the most appropriate condition, often I use “through the specified account”, click on the word specified and pick the account you are creating a rule for. You may find another option more useful. From people or group is a good one too. You can actually select as many conditions as you like for the rule.
On the next screen scroll down and check the box for “display a desktop alert”. Then click Next, you probably don’t need any exceptions. When you click Finish your rule is done. You can use a series of rules like this to customize all the notifications that Outlook displays.
What do you get your wife who has everything for Valentine’s Day? Sure you could go with the standard flowers or candy and my wife would be more than happy with that choice. However, I’ve noticed that she’s been borrowing my Surface Go more and more lately. Mostly due to needing a keyboard and trackpad to edit my blog posts and our children’s research papers. So what’s a tech blogging fool of a husband supposed to do?
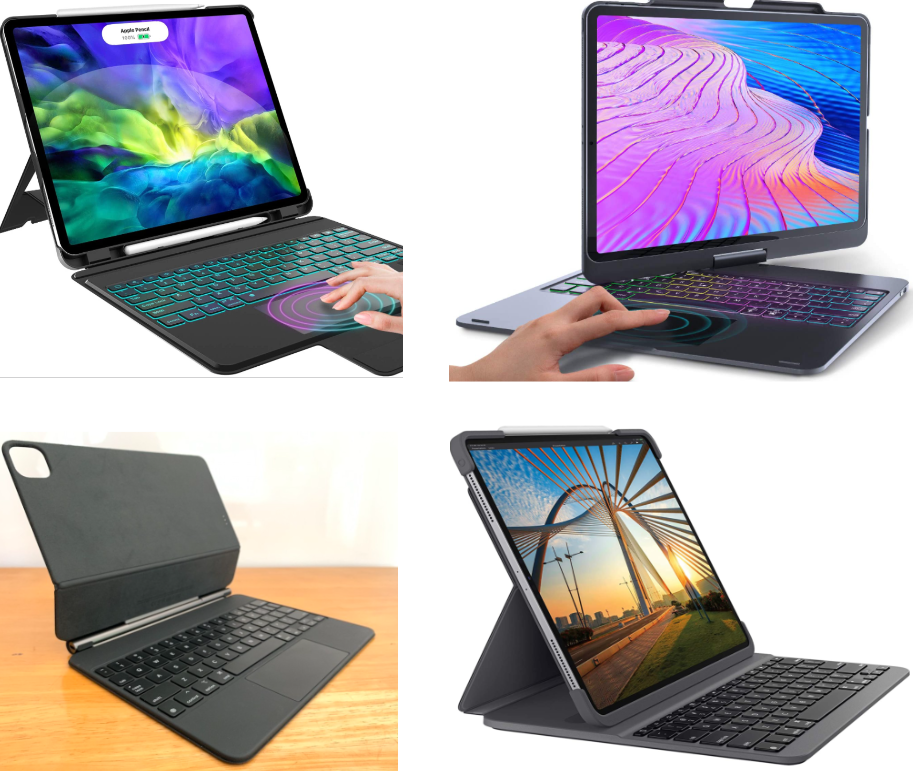
I hopped online and spent a few hours doing research on the various keyboard options that are available for the iPad Pro. I had previously purchased the Apple Folio keyboard for her when she got the iPad but neither of us liked it. The keys weren’t great, the case sucked, it was too expensive and so on. We took it back to the store. Now Apple has come out with the Magic keyboard. For $350 it had better be the best keyboard on Earth. There are also contenders from Logitech, Brydge, and a host of no-name options from Amazon.
The new Logitech with the touchpad looks great, but it doesn’t work with the third generation iPad Pro so it was out. I never have the greatest of luck with knock off stuff and too many of the reviews I looked at for the cheap options on Amazon included scary words like “bent my iPad” and “couldn’t get the case off” so, nope. That left the Magic Keyboard and the Brydge.
My local BestBuy had both options in stock so I masked up and headed into town. The store was mostly empty so they were happy to let me stand there and play with both keyboards. The Magic keyboard is not magic. It isn’t worth the asking price, it has too many flaws that I suspect were intentionally introduced to protect the MacBook product line. Chief among them are the angle of the screen, lack of plam rests, and missing function buttons. What is the point of having a keyboard if won’t sit on your lap and you keep having to tap the screen? The keyboard itself felt and worked well and so did the track pad, but seriously it just isn’t good enough.
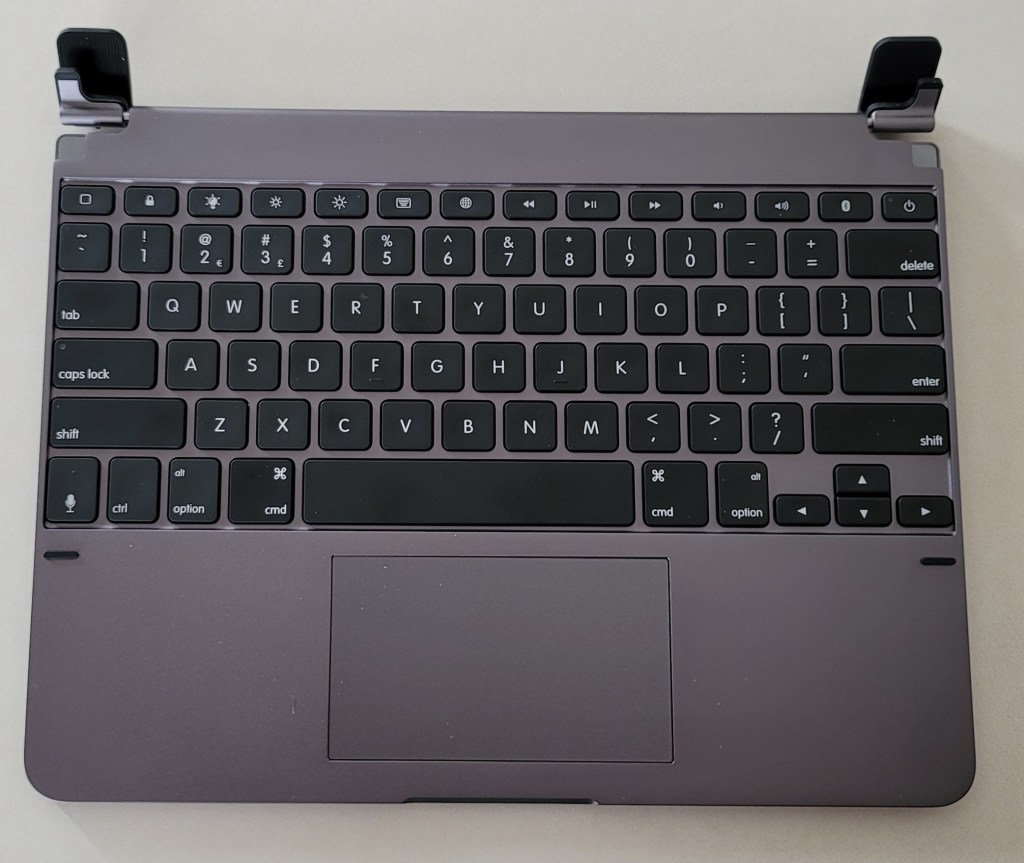
I picked up the Brydge. I’m writing this post with it now. Is it perfect? No. Is it good enough? Yep. The biggest issue I’ve had with it so far is that my meaty man hands tend to brush the trackpad when I get typing too fast and the cursor jumps somewhere unexpected. It isn’t a deal breaker, I’m already learning where to hold my hands to make it stop, I just need to position my wrists a little more outward. The chicklet keys are well spaced, have good travel and are backlit (only white). They feel great to type with.
The keyboard’s chassis is made of metal and is heavy enough to to offset the iPad’s pull forward. So when the tablet is mounted to the keyboard the entire contraption sits well balanced on your lap, like a laptop should. The tablet slides down into the foam padded hinges and is held in place with friction. The hinges will securely hold the screen at any angle you like. The row of function buttons keeps you from having to reach up to tap the screen for every little thing. Search, access the Home Screen, control screen brightness, control volume, manage media playback, access Siri, and more all with dedicated buttons.
No chance of bending the iPad, but it is held tightly.
The trackpad is spacious and centered between the palm rests where it should be. It doesn’t support all of the gestures that are available on the Apple device. You can scroll left, right, up, and down with two fingers. I also mapped the app switcher to a three finger tap. Scrolling is fairly smooth on Facebook and the web but not as fluid as Apple’s touchpad. Like me, you may need to adjust were you place your palms on the generous wrist rest to avoid accidental taps.
We’ve only had the Brydge keyboard for a few hours, but I can already tell its going to be with us for the long haul. At $229.00 it is the most expensive keyboard in our house but, it isn’t the best. It does its job well enough and most importantly, my wife is happy with it. If you’re looking to add a keyboard to your third generation iPad Pro, I think it is probably the best option available.
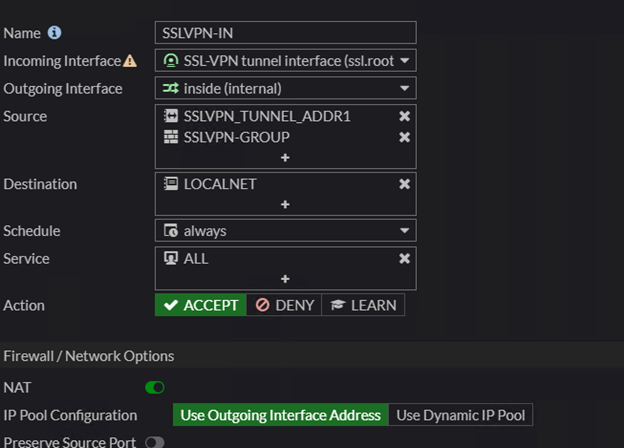
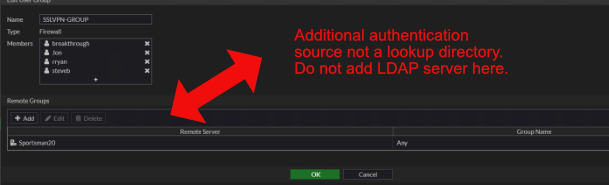
Due to a misunderstanding of a poorly designed form it is easy to allow LDAP to bypass Fortitokens or other MFA technologies when implemented on Fortigate VPNs. In a Fortigate VPN configuration, you create an inbound rule to allow VPN tunnel access. That rule specifies the source objects and groups that have access to the tunnel.
Typical Fortigate Inbound Rule
In the example above you see that a firewall group named SSLVPN-GROUP is allowed to use the tunnel. The bypass arises because the form that controls that group does not make it clear that adding an object to the remote groups section is an additional accepted authentication source.
I assume that some engineers are interpreting the remote groups section as a directory lookup for users placed into the members section of the firewall group. The bypass occurs due to Linux and Window’s interpretation of character case. If the user enters their credentials in a case that matches the way it appears in the member’s section of the firewall group, they will be prompted for their MFA token.
However, if the user enters their credentials in the client using a case that is different (all caps, mixed case, etc.) then the credentials will not match a member of the group. The Firewall group will then proceed to check the remote groups, in our example this would be an LDAP server. The credentials will match (Windows doesn’t consider case in usernames) and the user will be logged in without MFA.
LDAP directory lookups are accomplished by selecting the protocol and then the LDAP server object when adding new users to the Firewall group, not by including it as a Remote Group.
If you have Fortigate VPN devices in your environment, I suggest that you ask your network engineer to check for this situation. I’ve run into the misconfiguration quite a few times in the field. I’ve submitted a feature request to Fortigate to have the “Remote Groups” section on the form more clearly defined.
The Windows software based controller for your UniFi wireless network is more useful when run as a Windows service. Running the controller as a service allows it to start automatically when your computer reboots, among other things. If you haven’t already configured it to run as a service, see these instructions on the UniFi support site UniFi – Run the Controller as a Windows Service – Ubiquiti Support and Help Center.
The downside of running the controller software as a service is that updates become considerably more painful to accomplish. You have to uninstall the service, install the update, and then re-install the service by issuing a series of commands each time. It isn’t difficult. just annoying.
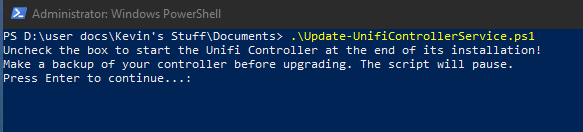
I wrote the script below to automate most of the process. Copy the code and paste it into notepad. Save the file as Update-UnifiControllerService.PS1 in your documents folder, or wherever makes sense to you. The next time your controller console prompts to download a software update, do so. Then open an elevated PowerShell console (as administrator) and run the script by typing .\Update-UnifiControllerService.ps1 then press Enter.
# Author: Techbloggingfool, https://techbloggingfool.com
# Update-UnifiControllerService.ps1
# This script assumes that you have already configured the UniFi controller to run as a service and are upgrading it with a new version that you have already downloaded to your hard drive or another location Windows Explorer can reach.
# Directions to configure the Windows Unifi Controller to run as a Windows service the first time can be found here: https://help.ui.com/hc/en-us/articles/205144550-UniFi-Run-the-controller-as-a-Windows-service

Write-Host "Uncheck the box to start the Unifi Controller at the end of its installation!"
Write-Host "Make a backup of your controller before upgrading. The script will pause."
Pause

#Stop the Unifi Service
Stop-Service -Name UniFi

#Loading VisualBasic interactions to create GUI
[System.Reflection.Assembly]::LoadWithPartialName('Microsoft.VisualBasic') | Out-Null


Function Get-FileName($initialDirectory)
{
 [System.Reflection.Assembly]::LoadWithPartialName("System.windows.forms") |
 Out-Null

 $OpenFileDialog = New-Object System.Windows.Forms.OpenFileDialog
 $OpenFileDialog.initialDirectory = $initialDirectory
 $OpenFileDialog.filter = "EXE files (*.exe)| *.exe"
 $OpenFileDialog.ShowDialog() | Out-Null
 $OpenFileDialog.filename
} #end function Get-FileName

#Use the Get-FileName function to find the UniFi Controller Upgrade file
$controller_exe = Get-FileName -initialDirectory $env.userprofile\downloads

#change to the unifi user directory
cd $env:userprofile
cd 'Ubiquiti Unifi'

#execute the java command to remove the existing service
java -jar lib\ace.jar uninstallsvc

# install the upgrade
Write-Host "Please complete the Unifi Installation. Uncheck the box to start the Unifi Controller at the end"
& $controller_exe
Pause

#execute the java command to create the windows service
java -jar lib\ace.jar installsvc

#start the new service
Start-Service -Name UniFi
Get-Service -Name UniFi
Pause
Exit
You will need to run PowerShell as an administrator to start and stop the services.
Right-click on the Start button and pick Windows PowerShell (Admin) from the menu. CD\ to the folder you saved the script in.
The script will pause and ask you to make a backup of your controller.
Logon to the UniFi web interface and click the gear icon at the bottom left to go to settings. Click System Settings in the menu and then expand Backup / Restore. Click the Download Backup link and save the file to your PC.
Always a good idea to backup your controller before you upgrade it.
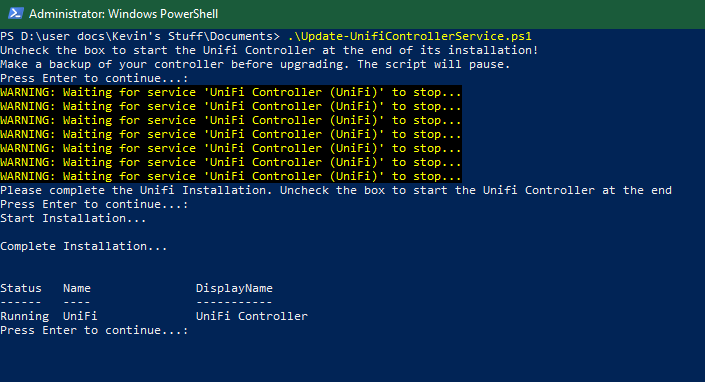
Return to the script (click it on your task bar) and press enter to continue. The script will stop the running UniFi service and open an explorer window. Locate the downloaded update file and click the Open button.
Locate the update file and click Open.
The update installer does not have command line options so you will need to use its GUI to complete the installation. The script will pause and open the installer. Click the Install button.
Click Yes when asked if you want to upgrade.
Click the Yes button when asked if you have made a backup.
Uncheck the box to start the controller and click the Finish button.
Now return to the script (click it on your task bar) and press Enter to continue. The service will be installed and started. The script will pause one more time to show you that the service is running. When you press Enter, you are done. The upgrade has been completed, close the PowerShell window. Anytime an update is available, download it and repeat the process.