Almost everyone knows a paper-oriented organization person. They want to draw on a paper calendar and stick sticky notes to everything. Long ago, I attempted to convert one from paper notebooks that were easily lost or damaged and impossible to search to a digital system.
The only thing I found that the friend enjoyed using nearly as much as paper was Goodnotes on an iPad. A few years ago, they had hoped to migrate from an iPad to a Windows tablet. Not because of anything against iPads, but because they were growing tired of needing to carry an iPad and a laptop, along with a phone everywhere they went. Ultimately, they kept the iPad because there wasn’t a satisfactory digital paper app for Windows.
Goodnotes has been a favorite note taking app of Apple users for years.
No doubt everyone that just read that paragraph asked themselves “What about OneNote?”. I am a OneNote fan and tried to get my person to use it. There’s a fundamental difference that keeps paper people from really getting into OneNote. It was designed as a digital note taking system from the ground up. Whereas, Goodnotes emulates paper journals. They both have very similar functions, but the overall feeling is different.
Goodnotes requires a Microsoft or Google account to sign in with.
While searching the Microsoft store last night, I noticed that Goodnotes was out of beta and downloaded it. The app installs from the store, but upon opening, it is obviously a PWA (Progressive Web Application), which means it is running the Edge browser. There’s nothing wrong with this method. I was just surprised. It’s the first PWA app from a vendor other than Microsoft I have personally encountered.
The notebook covers make each one easy to identify at a glance.
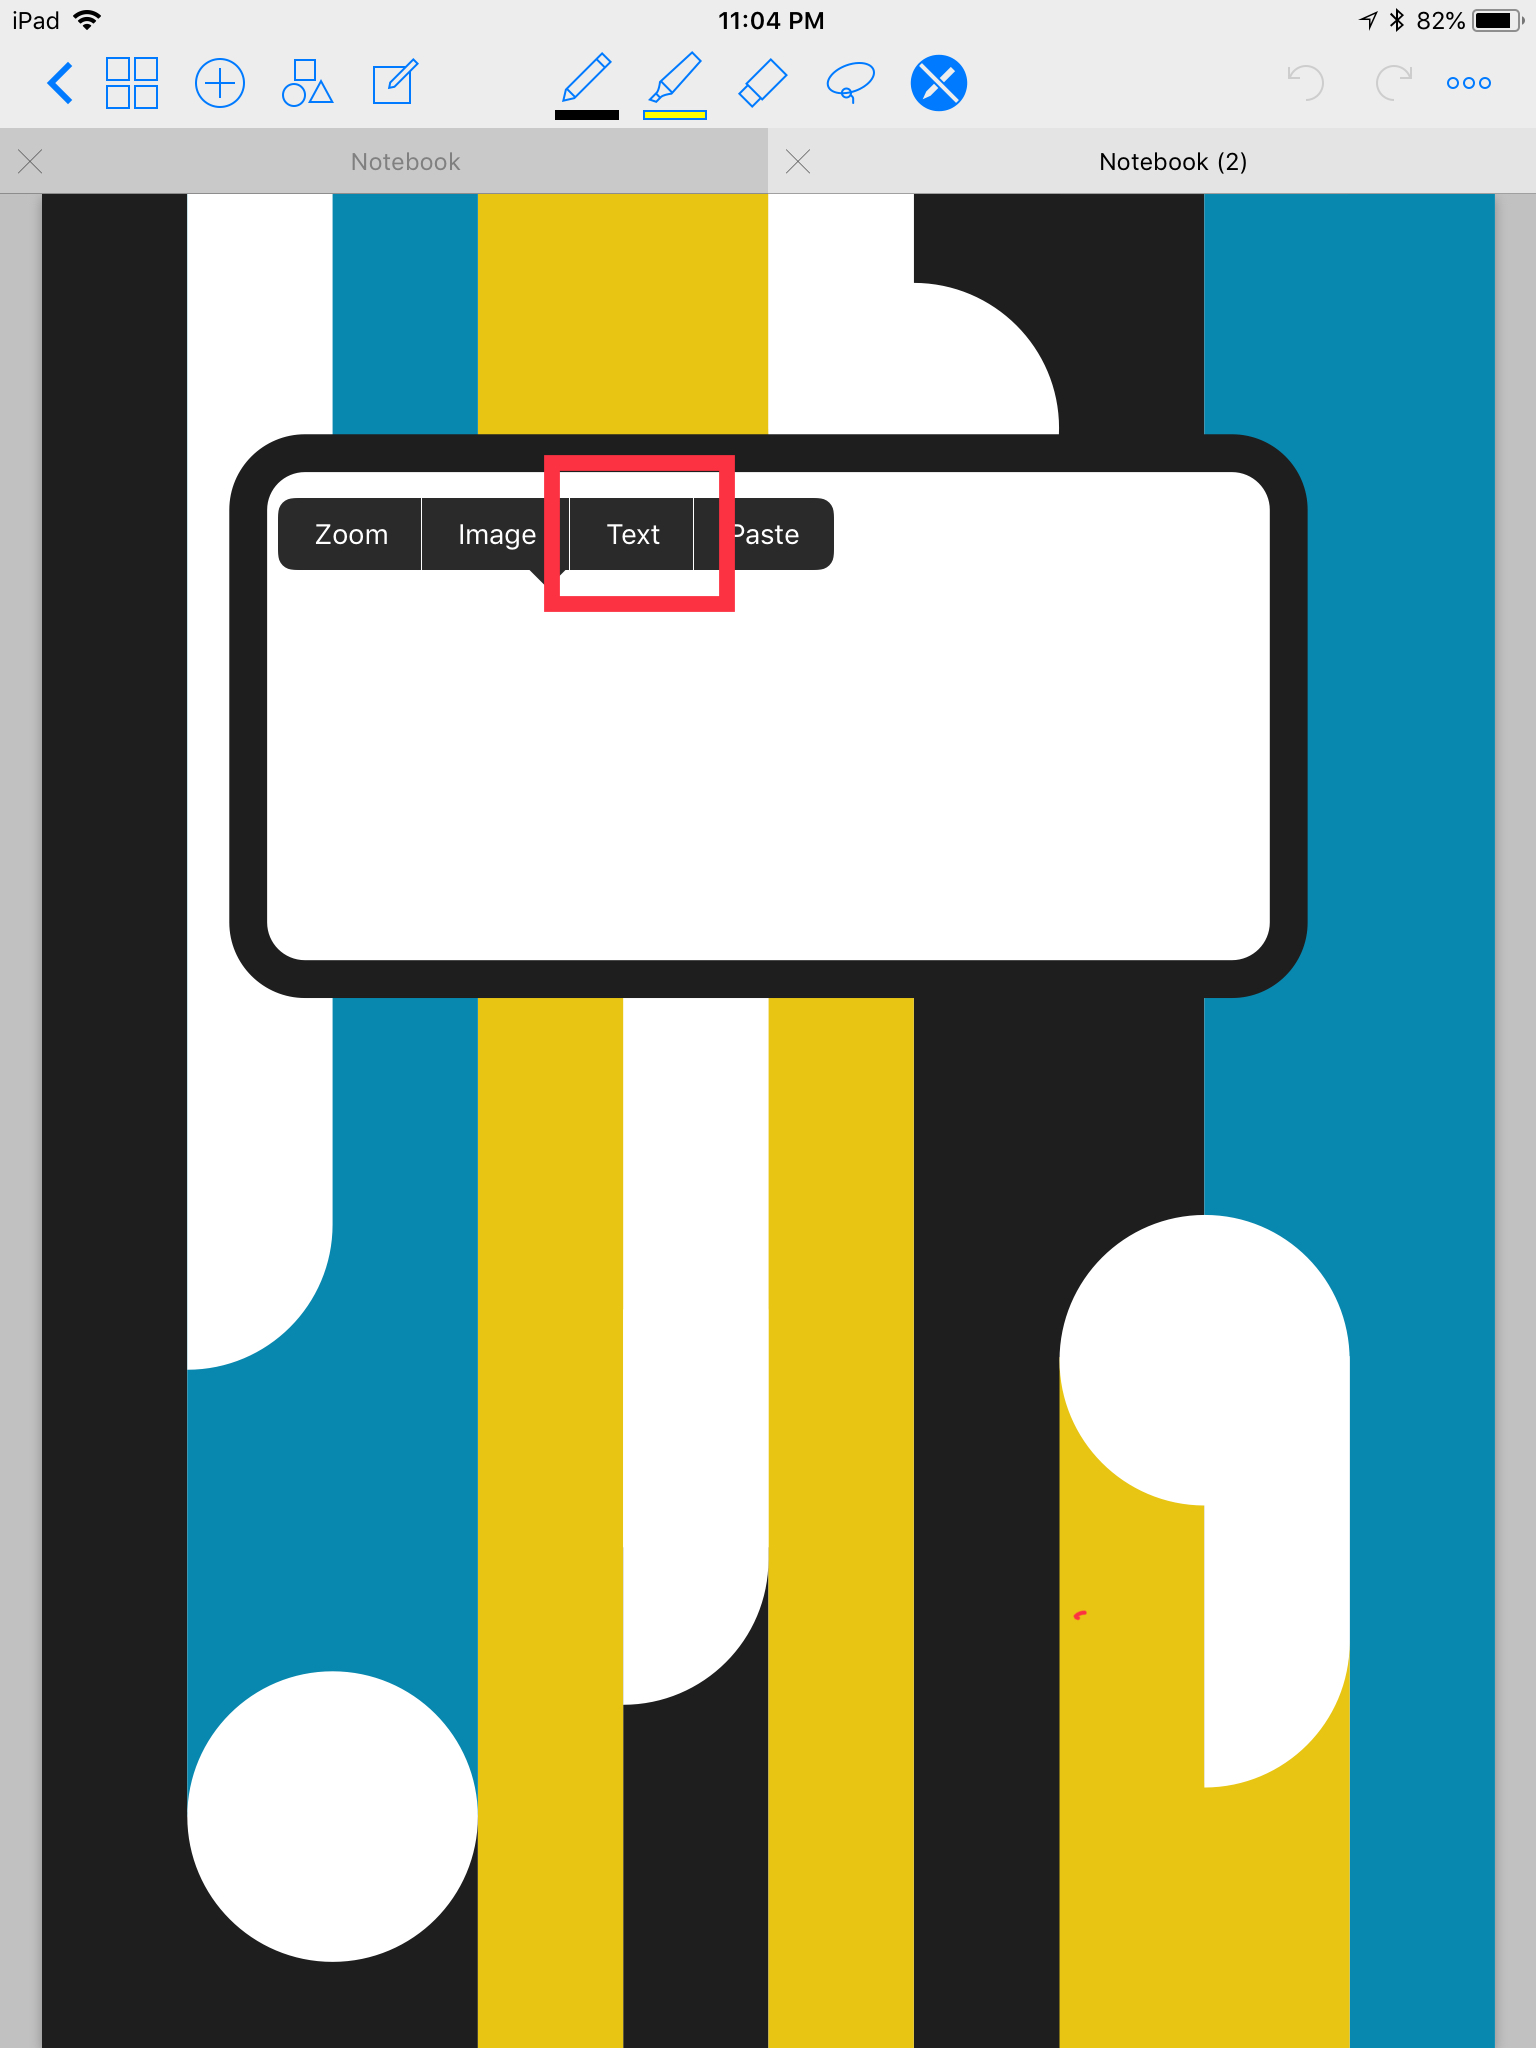
I’m happy to report that the application functions pretty much exactly like its Apple counterpart. The ability to lasso and move anything is there. Dozens of templates for things like calendars and todo lists are easily accessible and well designed for their roles. Inserting pictures, sticky notes, text boxes, and handwriting are all based on a simple tool selection menu that hangs out at the top of every page.
Goodnotes insertion tools, sticky notes that you can write on, and lasso tool make it function like digital paper more than other apps.
The application is free to download and trial for 7 days. After the trial you’ll need to decide between a yearly subscription, or a one-time purchase. You can find more info about pricing options on their website @ https://www.goodnotes.com/pricing. If you wished that your Windows or Android device could operate more like a paper notebook you probably won’t find a better experience than Goodnotes.
I’ve been a OneNote user since the beginning. I’ve used Microsoft’s fantastic tool to organize my life, work, and to augment my memory. The software has previously featured an OCR engine that would allow for the conversion of selected handwriting to typed text. Not long after that feature was added, another option to search handwritten notes was included.
OneNote has included optical character recognition since the early days. Select some inked text and use the menu to convert it to typed data.
These features were game changers. They were the reason I switched from other note taking apps to permanently using OneNote. Eventually many OneNote users, me included, learned to disable automatic pen detection and to manually select Window’s text input panel to achieve real-time writing to text in their notes.
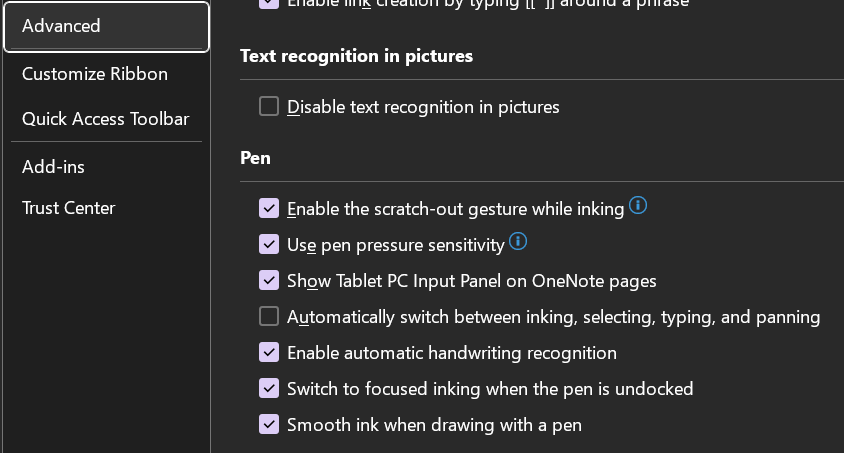
Disabling the advanced option to automatically switch the pen modes allows you manually select the Windows Input Panel and write in it. You will need to manually select draw mode to sketch in your notes.
Using the Window’s Ink Input Panel trick has been my go-to method of creating easily read and shared notes for the last several years. Documentation for my work projects usually consists of me copy-pasting the notes I took while working. Many of my coworkers and peers do the same. It’s a timesaver to be sure.
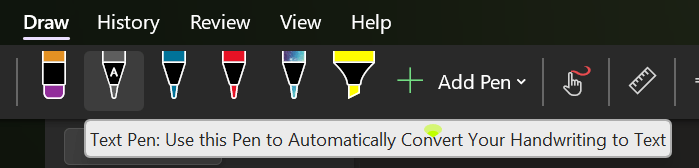
Today, I noticed there is another option for handwriting in OneNote available in the Draw tab. The icon is a white pen with the letter A on it. I first saw this icon in the iPad version of OneNote when they added it to induce Scribble (Apple’s Handwriting Recognition Tool). I am an Office Insider and am currently on Microsoft® OneNote® for Microsoft 365 MSO (Version 2308 Build 16.0.16731.20052) 64-bit. I am not sure if this is first version to include the new feature but suspect that it is. I have not been able to find any documentation on it as of yet.
Tap on the screen to place the cursor, then select the A pen from the draw tab and write on the page. Your writing will be translated into typed text in real-time. The tool is more efficient and easier to use than the manual select method I mentioned above. It also allows for easy editing, draw a line through text to select it and the editing menu will hover over it.
I’m enjoying the new feature, I’m sure the help and documentation for it will be updated as soon as it hits the mainstream version of the software. Happy note taking.
A friend asked which handwriting engine was best. The answer is complicated. Microsoft, Apple, and Samsung are the top three manufactures of retail devices with handwriting recognition built-in to the devices’ operating systems. There are plenty of other companies that offer stylus based writing solutions, but this post will focus on the ones I have countless hours of experience with.
The learning curve from tapping, to comfortable writing, can be steep. The tools feel deceptively familiar to the analouge versions. The similarities can cause a lot of frustration when attempting to transition. Your mind wants it to feel like paper and pen, but you are not writing. You are controlling a word processor, on a glass computer, with a plastic stick.
Your muscle memory will probably engage and cause the entire experience to feel wrong. The only solution I’ve found is to keep at it. Reaserch suggests that you are looking at anywhere from twenty to forty hours before it feels “normal” and that is a lot of writing. To get there, I used the pen for everything. No matter how slow and cumbersome it felt.
There are numerous benefits to be had from writing with a stlyus if you can get past the ackward phase. Perfect erasing, layers, predictive text, spelling and grammar tools, unlimited colors, numerous ink styles, the list is extensive. Perhaps the most unexpected benefit is the increased productivity. I wouldn’t dream of thumb typing a post like this on my phone, but I enjoy writing on it. Once your muscle memory is tuned to glass, it is a surprisingly fast form of computer input and control.
To answer the original question, the best digital handwriting engine is the one that you’ll use. If you are an Apple person, it is unlikely that uprooting your digital life’s baggage and hauling it over to Android Town will be a wholy positive experience. There is a lot of nuance to learn. Adding a new OS could be a lot to deal with all at once.
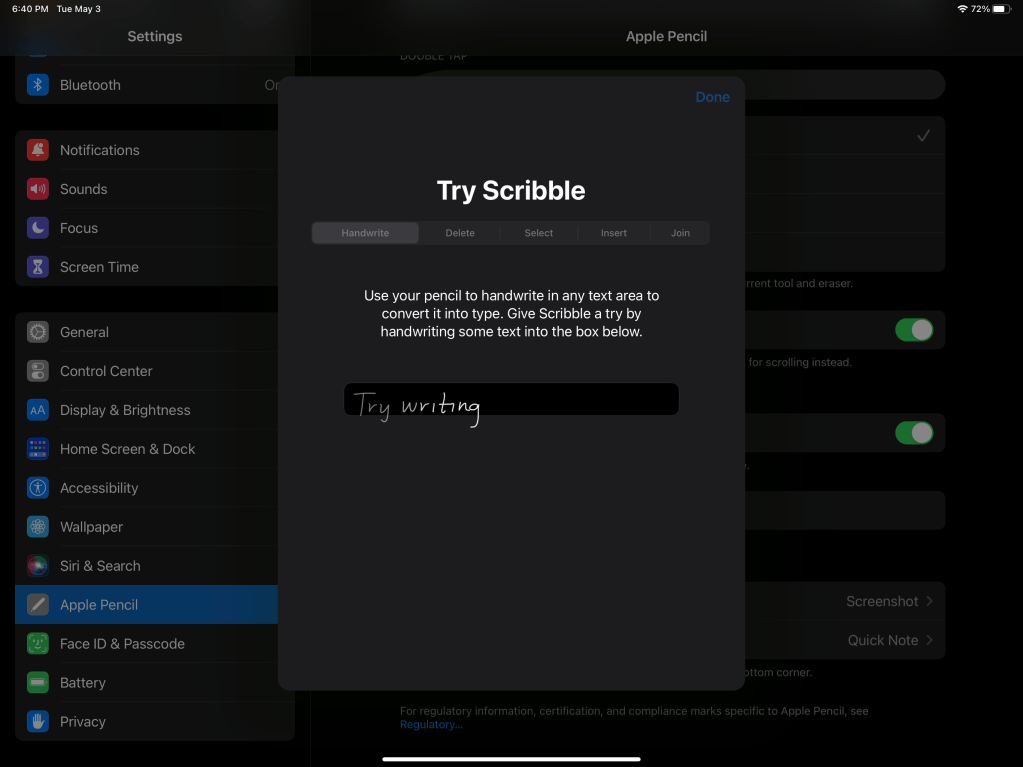
One key to success is to work with alternate apps that support your system. Apple’s Scribble engine requires developers to include its APIs in their code. Microsoft’s Word lacks the new function on Apple devices. However, Apple’s own Pages app is able to edit Word documents and fully supports Scribble. Searching in your app store is a quick way to find the best app for your situation.
You’ll find the training for Scribble under Apple Pencil in the settings menu.
Another tip, power matters. Reading my quick form of handwriting is hard work. Processing power gets you a shorter wait between recognizing your input on the on-screen writing pad and it’s appearance as typed text in your app. It also allows for a more accurate translation. Systems that include dedicated AI solutions provide real-time prediction of your next words for a tap based speed boost.
All three solutions work really well after you learn them. Like anything else, they also have strengths and weaknesses. Scribble is the newest solution and it shows. It isn’t fully compatible with loads of third party apps yet, and some of the gestures are difficult to execute. It is improving with every update and devs are incorporating it into apps quickly. Microsoft has recently added support to Outlook and Teams.
Apple being Apple, is going for a more elegantly integrated presentation. Rather than popping a keyboard overlay on top of your app to ink in, you write in-line with the on screen text. The lack of a clearly defined space to write in can feel off in some apps. When it is done right, like in the afore mentioned Pages, it is a fantastic experience.
The handwriting recognition is good, it easily keeps up with my mix of cursive and print on my 3rd gen iPad Pro. The Apple Pencil feels nice in your hand and on the screen. Apple’s powerful and light weight devices make them excellent choices for pen based interaction. I especially enjoy writing on the new 6th Gen iPad Mini.
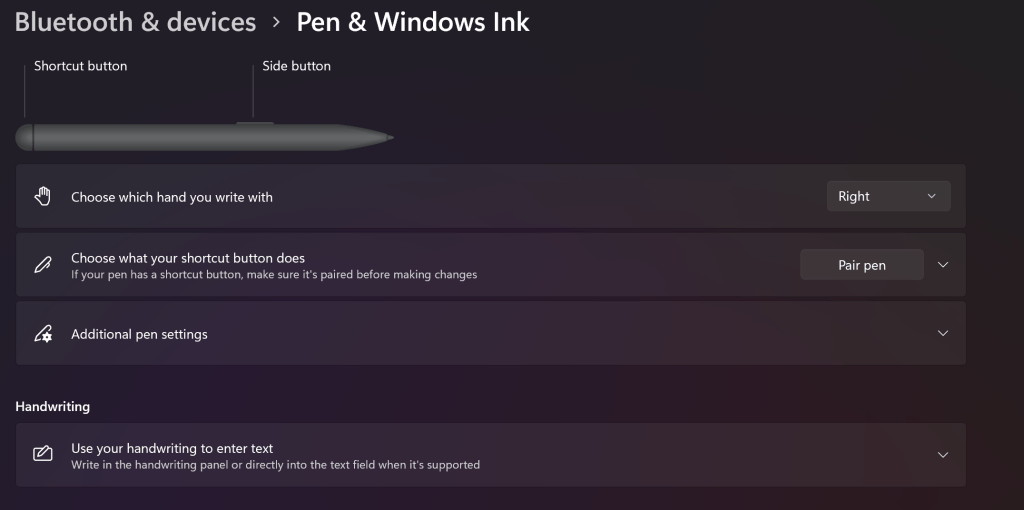
Microsoft has been including handwriting as a form of input in their operating systems since Windows XP. Their founder believed that writing with a stylus was the future of computer input. In my opinion Microsoft’s handwriting recognition is the best, overall with some caveats, of course.
When the operating system is running on suitable hardware, it’s uncannily accurate. It easily understands text I wrote in haste and can hardly read myself. Unfortunately, many people’s experiences with Windows handwriting are limited to underpowered tablets. If your Windows tablet has less than four gigabytes of RAM expect to experience performance issues while using the ink recognizer. I find that Microsoft’s own Surface line is the standard for pen computing.
Microsoft detects if you touch the on screen keyboard icon in the task tray with your finger, or a pen, and automatically presents the correct option. It can be configured to allow in-line writing like Scribble. There are numerous integrations with both 1st and 3rd party apps. You can customize the input panel’s color and the font your handwriting is converted to. In most cases you can even choose your own custom stylus.
Like all things Microsoft, the need to include options for every type of hardware and each user’s personal preferences makes for a complicated solution. You will need to spend some time setting up before you start penning your Memoirs.
Microsoft’s Pen experience is best when you spend a few minutes setting it up for your preferences.
Samsung’s approach has matured nicely over the years. The first Galaxy Note’s giant screen lent itself to a pleasant writing experience. The new Galaxy Fold 3 and it’s optional S-Pen is the current pinnacle of what is possible with a digital pen and screen as far as actual productivity is concerned.
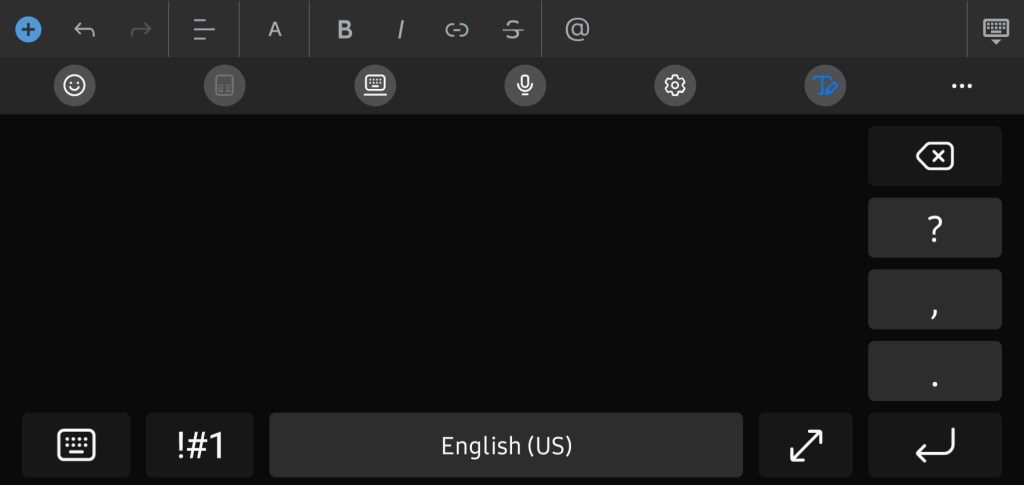
Samsung’s recognition has really ramped up as of late. It nips at Microsoft’s heels in accuracy. It’s a native function of Samsung’s keyboard, so it works in all applications. Even some that it shouldn’t, but that is another story.
Samsung’s writing panel takes the cake with its plethora of quick access buttons to make editing a cinch. What makes their solution the one I use most is portability. I hear that squeezing an Apple or Microsoft tablet into your jeans pocket is a no go.
Samsung’s Handwriting Recognition is always with me
No matter who’s digital handwriting tools you prefer, the technology has reached a milestone.The point where devices have become powerful and light enough to deliver on their original pitch has been realized. If you gave the stylus a go “a while back” and had a negative experience, it’s a good time to consider sticking a toe in the screen writing pool again.
I had converted over to to the OneNote Microsoft Store app a while back when Microsoft announced they were ending support for the full desktop edition. I’ve always been inclined to adapt to the ever changing technology world rather than constantly trying to swim upstream. I preferred some of the features that were in the full version but, I found workarounds and moved on.
Last week I needed to test an Outlook Plug-In which meant I had to download and install the desktop version of Office from my Microsoft 365 subscription. I noticed that it installed OneNote, but didn’t think much of it at the time. A few days later I opened it for a nostalgia kick. I was surprised to see that it had been updated. It had the new Feed feature, dark mode, and it was now named OneNote for Microsoft 365 rather than OneNote 2016.
Some research turned up several posts by mainstream blogs like The Verge and Endgaget confirming that Microsoft is not only bringing back the desktop app, but that they are merging the newer Windows 10 app features back into it. Over the next year or two they will update the desktop edition with new features and move to it rather than away from it. Eventually I located a Microsoft FAQ page that also points to the full version’s future.
The full version of OneNote has three features that are important to me, but remain missing from the app store edition. One is the ability to backup and store notebook files on local storage. Another was the ability to index handwriting, text in pictures and video, and audio from various media sources to make them all searchable. Finally, I really missed the customization options, I prefer my sections on the left and pages on the right. Microsoft has a page that runs down the differences in all of the versions here.
If like me, you have avoided the desktop edition due to Microsoft’s previous abandonment announcement, feel free to move back in. I already have.
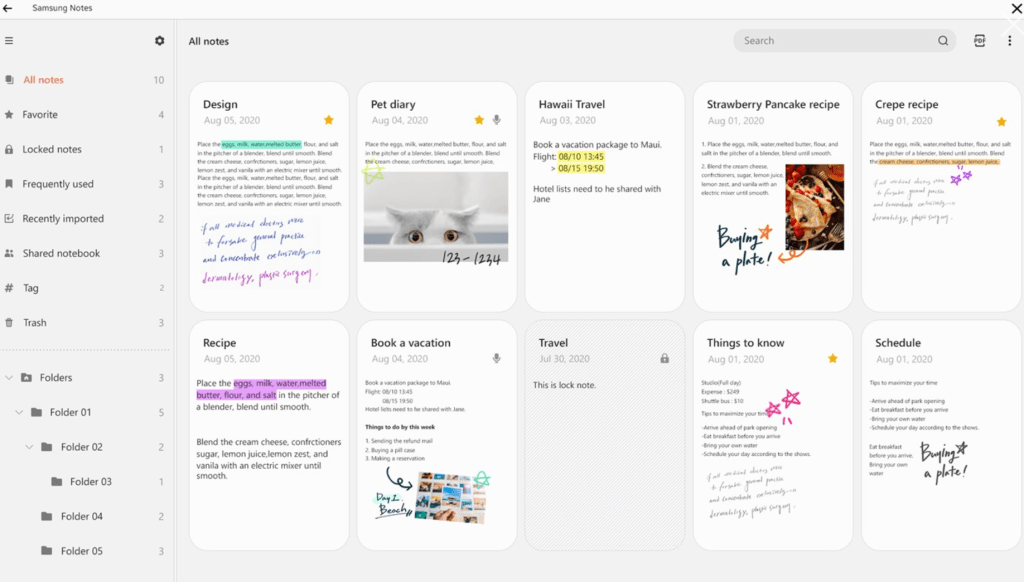
In a previous article I wrote about the first phase of being able to synchronize the Samsung notes from your phone with OneNote. It worked, but was a little clunky, mostly because you could only view the items in Outlook Web Access.
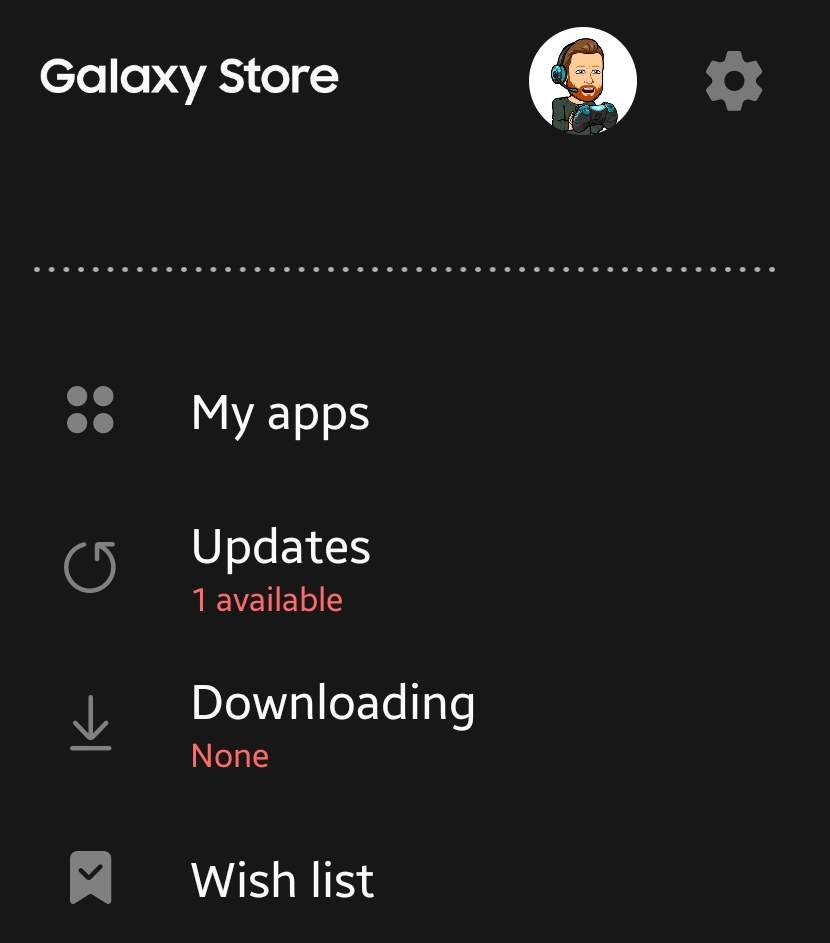
I’m happy to report the synchronized notes feed is now viewable in the Windows 10 OneNote app. To get started update the apps on your phone and Windows system. Open the Samsung Galaxy Store, tap the hamburger menu button then tap updates and install them all.
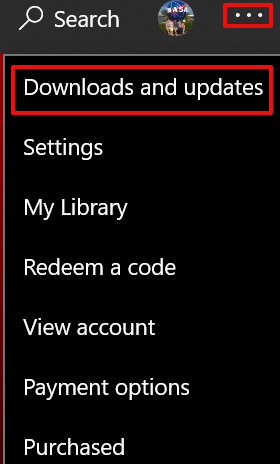
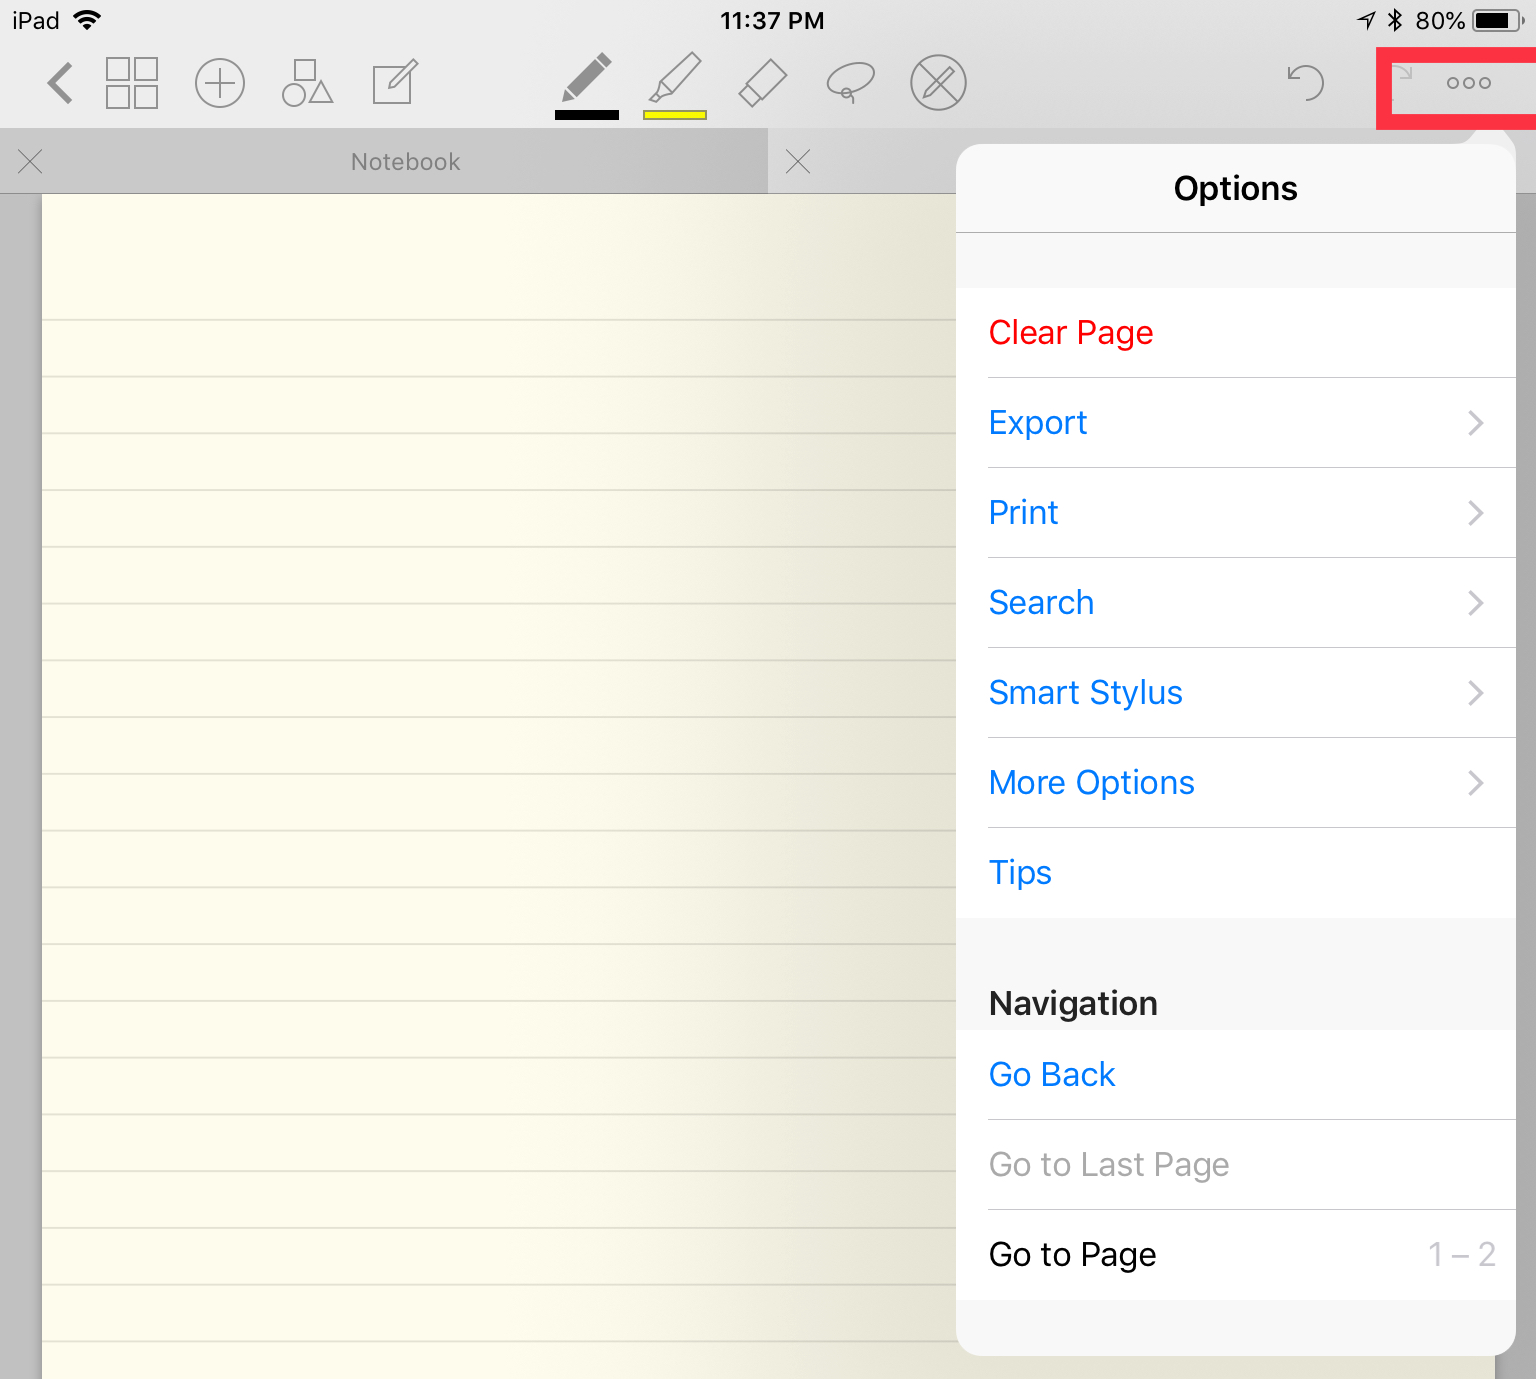
On your Windows machine, open the Microsoft Store app. Click the three dots menu in the upper right, then click downloads and updates. Click the “Get Updates” button and install them all. Depending on your update settings you may need to do this multiple times to get them all.
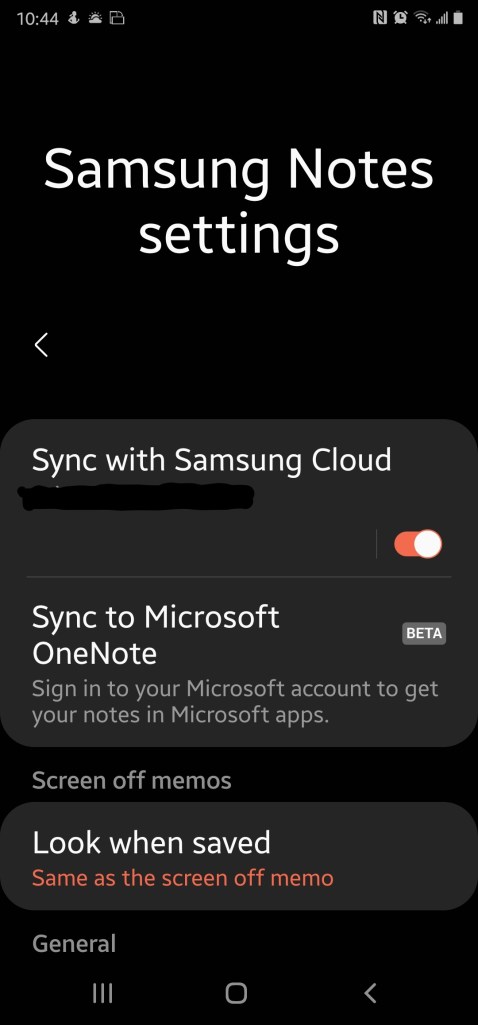
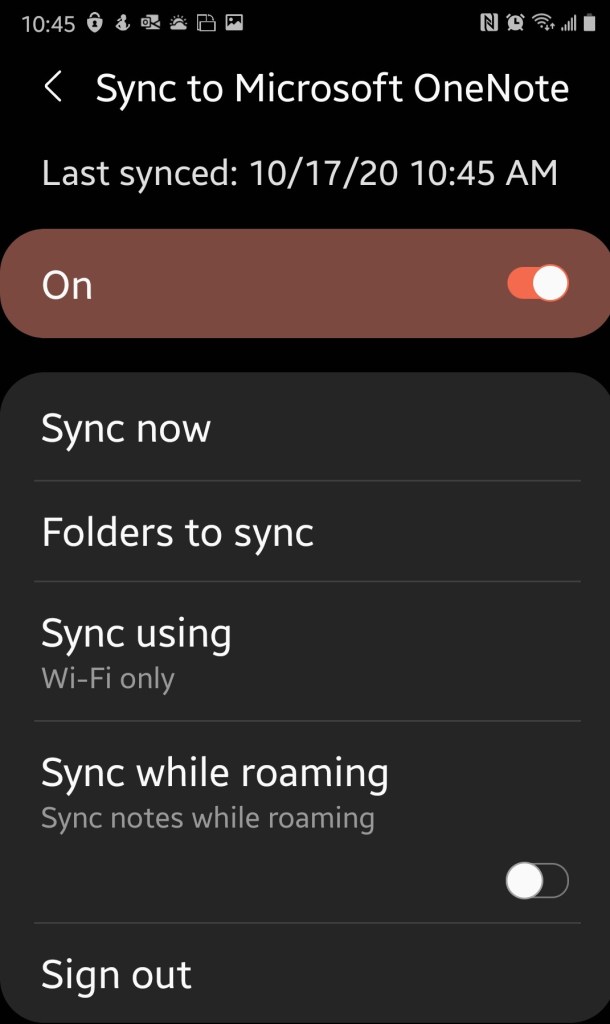
Configure the Samsung Notes app on your mobile device. Open it and hit the options icon. You should see “Sync to Microsoft OneNote Beta”, toggle it on and sign in with the Microsoft Account you want to share notes with. You’ll also need to select the folders who’s notes you want to sync. I recommend tapping the sync now button just for good measure.
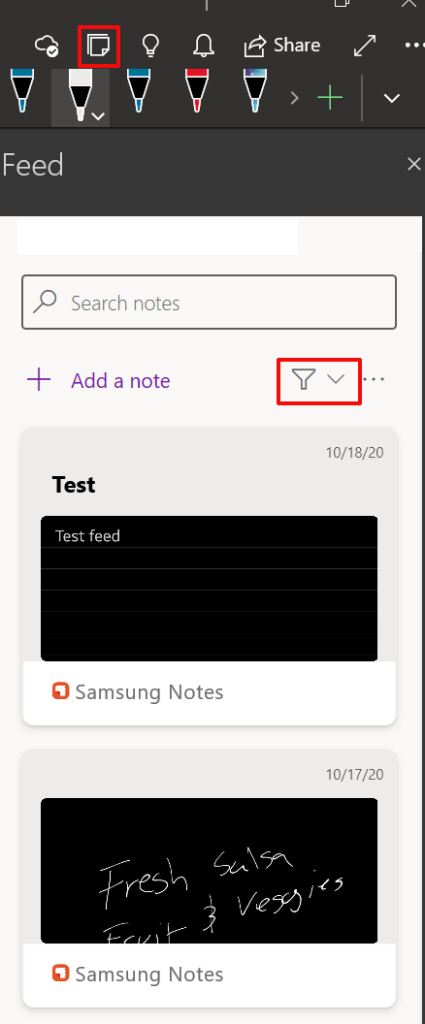
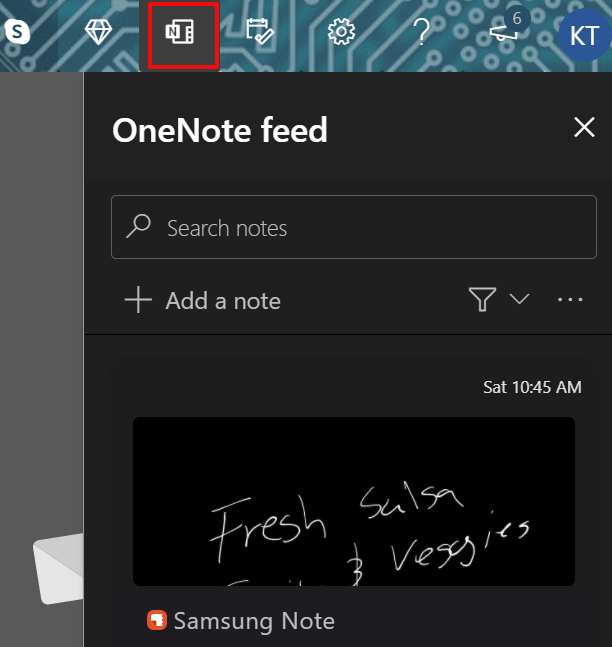
Now open the OneNote app on your Windows computer and select the “Open Feed” button on the right side of the tool bar. Depending on your security settings, you may be prompted to sign in. Use the same Microsoft account that you set up in the Samsung Notes app. If you don’t see your Samsung notes, click the down arrow next to the filter symbol and select “All-Notes” or “Samsung Notes”.
Click a note to see the entire entry. You will also be able to copy the item to your clipboard. The synchronization of Samsung notes is one-way. When you copy them to your clipboard they paste as an image. I noticed some trouble with the copy / paste function when holding my Windows tablet in portrait mode. This isn’t what I would consider to be true synchronization, but it is serviceable and a step in the right direction. At least we can see the Samsung notes in OneNote now.
During the announcement event for the Galaxy Note 20 one of the features I was most interested in was the ability to synchronize Samsung Notes with OneNote. Samsung Notes has the screen off memo function that OneNote can’t match. The problem is, when I’ve used it to jot down something quick that information ends up isolated from the rest of my repository.
For the longest time Samsung’s solution was to install their Note app on your PC. The PC version of Samsung Notes is a decent experience but lacks the integrations with other Office software that OneNote enjoys. There’s also no easy method to migrate from OneNote to Samsung Notes, both reasons kept me from using the software.
Samsung Notes for the PC is in the Microsoft App Store.
Now, the newest version of Samsung Notes on your Galaxy will synchronize to your Microsoft 365 account. The synched data can only be viewed in the Outlook web client at the moment. However, if you have selected to be an Office Insider you can see that Microsoft is building the framework for the OneNote feed to show Samsung Notes, it already appears as a non-functioning option.
The first thing you’ll need to do is to upgrade both apps. Open the Galaxy Store app on your mobile and tap the hamburger menu, then tap updates and install the newest version of, well, everything. The same goes for your PC, open the Windows Store and click the … menu in the upper right. Choose Downloads and Updates then click the Get Updates button and install everything.
Now configure the Samsung Notes app on your mobile device. Open it and hit the options icon again. You should now see “Sync to Microsoft OneNote Beta”, toggle it on and sign in with the Microsoft Account you want to share notes with. You’ll also need to select the folders who’s notes you to sync. I recommend tapping the sync now button just for good measure.
Sync to Microsoft OneNote Beta is available in the newest edition of Samsung Notes.
To see the synchronized notes, sign-in to Outlook.com with the same account that you configured in Samsung Notes. In the upper right, click the OneNote feed icon. The OneNote Feed pane will slide open from the right. Click a note to see more of it and to get an option to copy it to the clipboard. Right now I find that copying a Samsung Note in this manner and pasting it to a blank OneNote page is the optimal way to use the tool.
The OneNote Feed in the Outlook Web App will show your Samsung Notes after the first sync.
We know that Microsoft and Samsung have plans to enhance this feature in the near future. The Note Feed is present in the insider edition of the Windows 10 OneNote app and Samsung Notes is an option in it although it doesn’t work yet. Hopefully they’ll get to a point where the Samsung Notes become pages in OneNote but we’ll have to wait and see.
If you have been reading my blog for very long, then you will know that my biggest gripe with the iPad is it’s lack of handwriting recognition. Why on earth would Apple have invested so much into the design of the glorious Apple Pencil and leave out the thing it would be most useful for? Where is my dog supposed to sit while I write if I have to put a keyboard in may lap?
I use the handwriting recognition on my Surface and Galaxy Note every day. The iPad’s lack of what should be a basic function has kept me from even considering a purchase. My wife, on the other hand, has been happy to forgo handwriting and been satisfied with trying to type on a touch screen. Good thing, it means we always have a late model iPad in the house.
She excitedly woke me up this morning, “Honey, look what I found!” Then she opened iMessage, changed her keyboard, and used her Apple Pencil to hand-write me a text! “Woah,” I said. “They finally did it?”
It turns out not exactly, but close enough. Apple had nothing to do with this particular piece of magic. An app named Selvy PenScript adds a handwriting recognition keyboard to your iOS device. I’ve spent the last couple of hours putting pen to screen and I’m impressed.
It isn’t quite as accurate as Microsoft’s version and there’s no floating option, but it gets the job done. It has one feature that I really like that Microsoft and Samsung don’t. You can change the color of the ink. Other than that , it’s a no nonsense handwriting tool. Now that it exists, I may even consider an iPad the next time I upgrade my tablet.
Many of my co-workers, friends, and family continue to use paper planners and post it notes, for impromptu meetings and interactions. They tend to use Outlook or Gmail only for items that were derived via email. When I ask why, I get variations of “paper is easier”, and “paper looks nicer”. Which I agree with. However, there’s no searching paper, you can’t back paper up, and there’s no sharing.
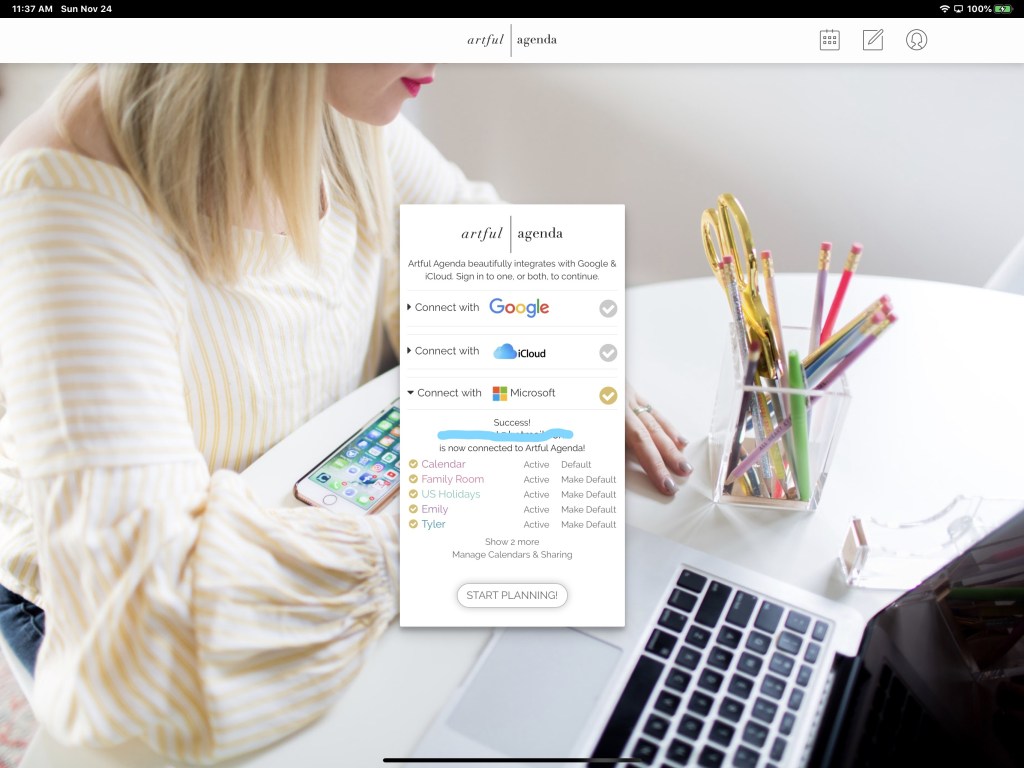
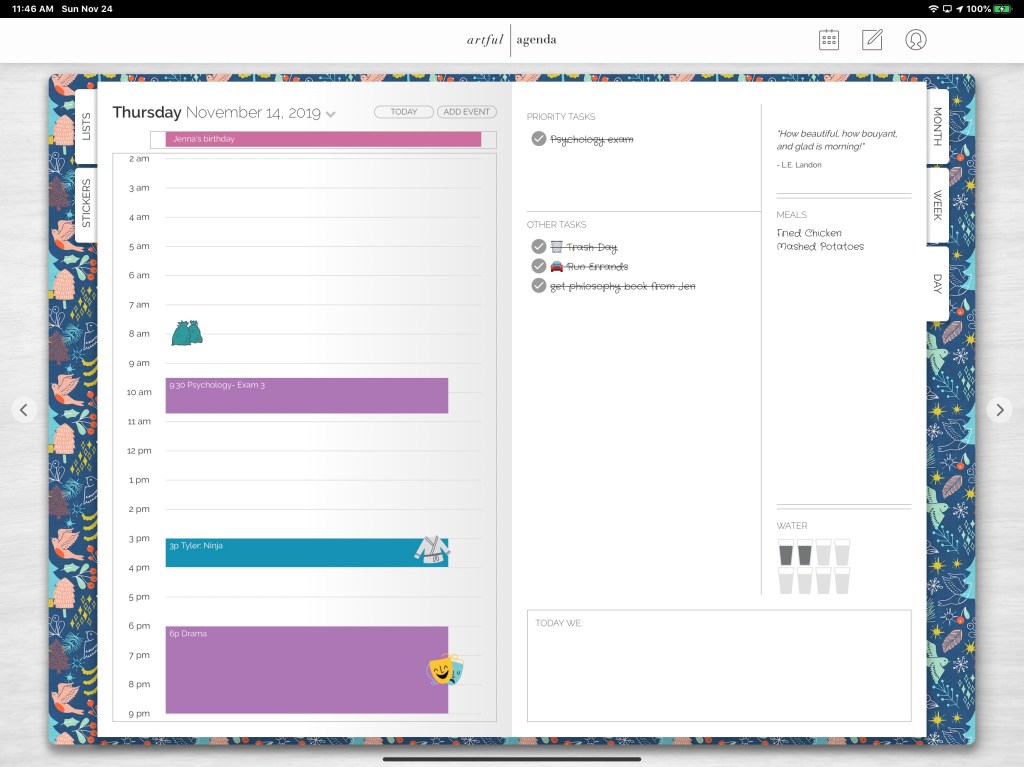
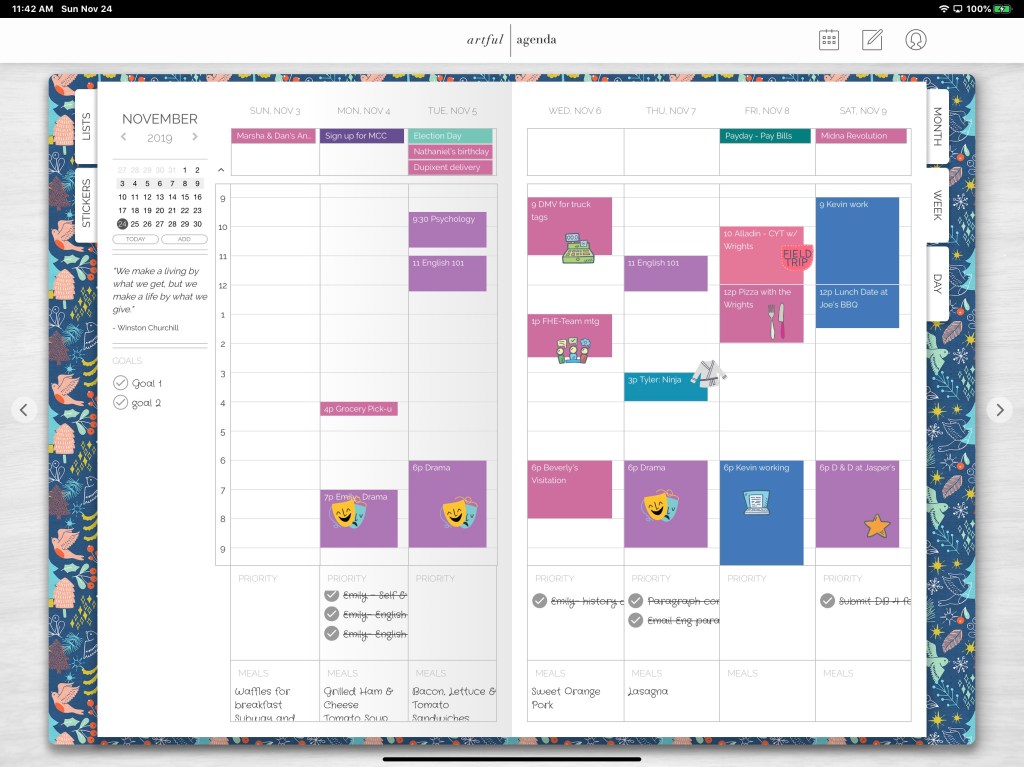
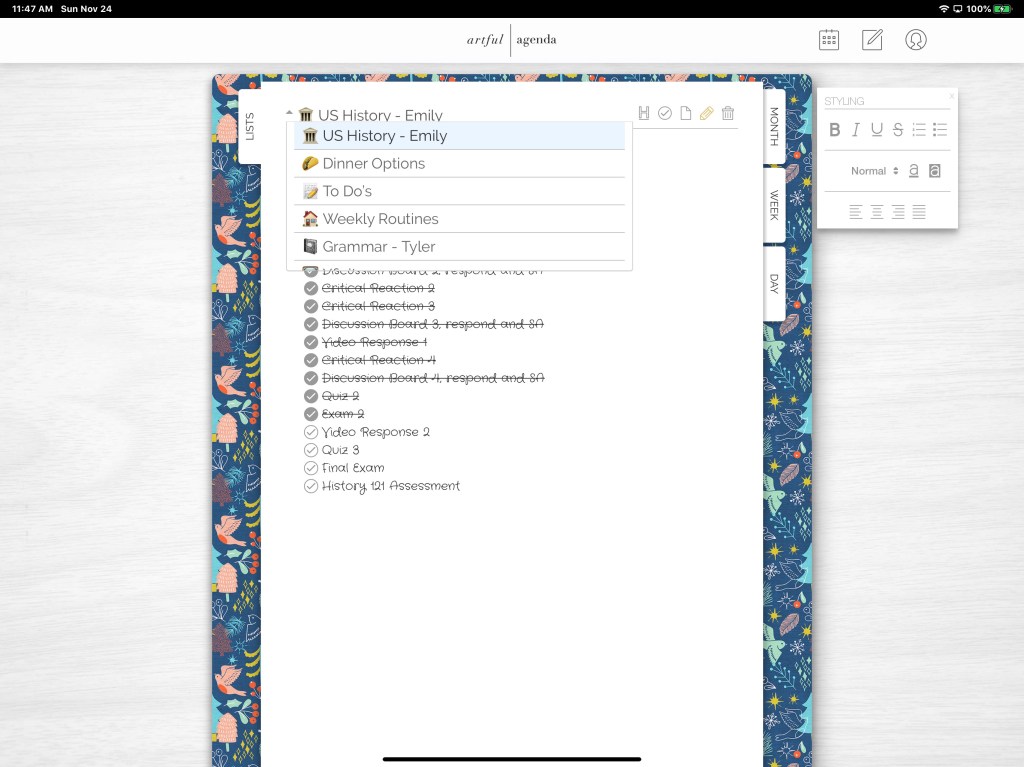
Artful Agenda strives to combine the best of both worlds. Connect it to your Google, Microsoft, or iCloud calendar and use its paper like layout and whimsical forms to manage your appointments.
The data you enter is saved to your cloud calendar and accessible through all the normal means your service provides. Artful Agenda is available as an App in your device’s app store and as a web site. The web site currently has more functionality and its layouts are more like paper.
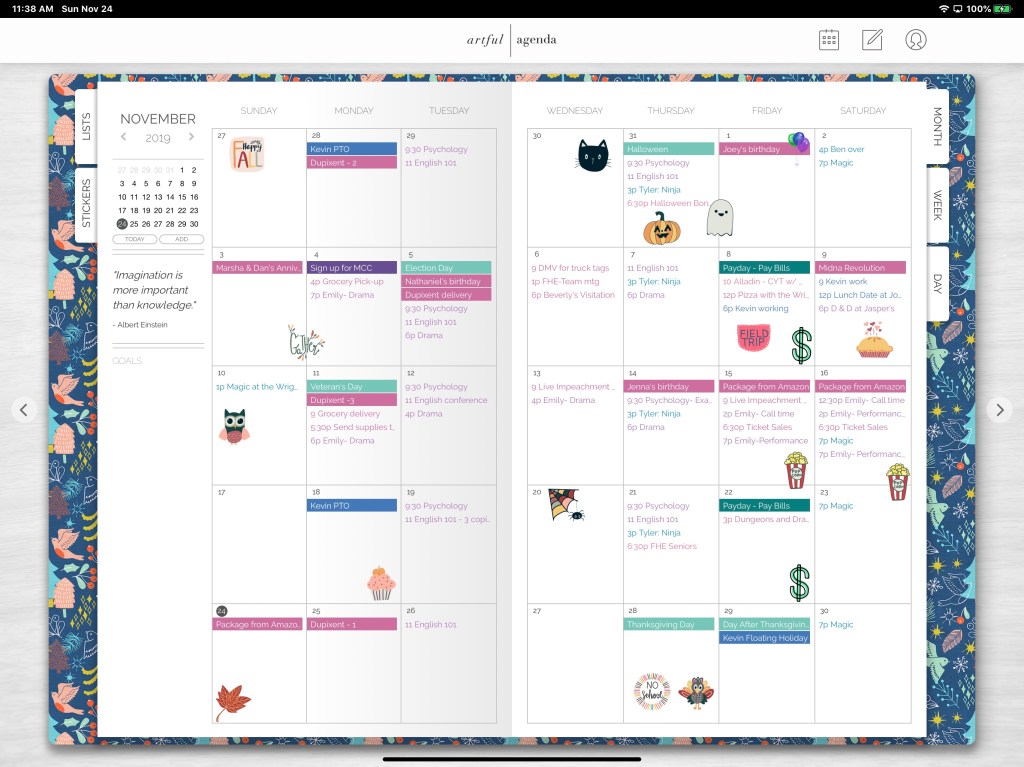
Month, Day and Week views are accessed from tabs as they would be in a paper planner.
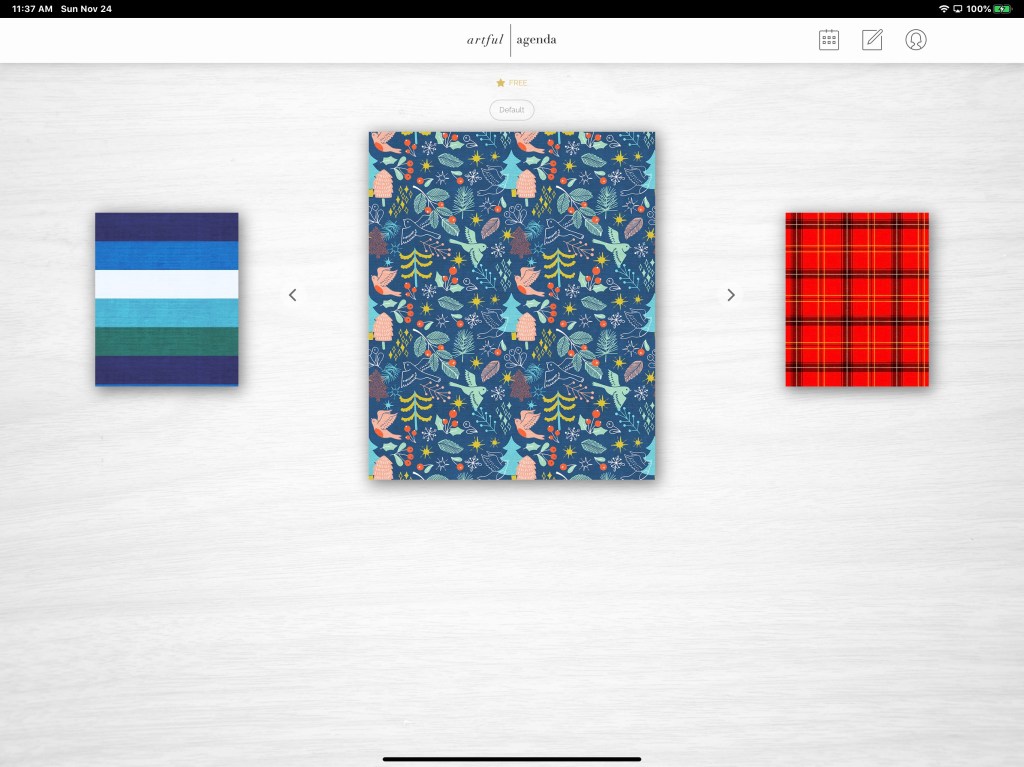
Each calendar gets its own cover, colors, and handwriting styles.
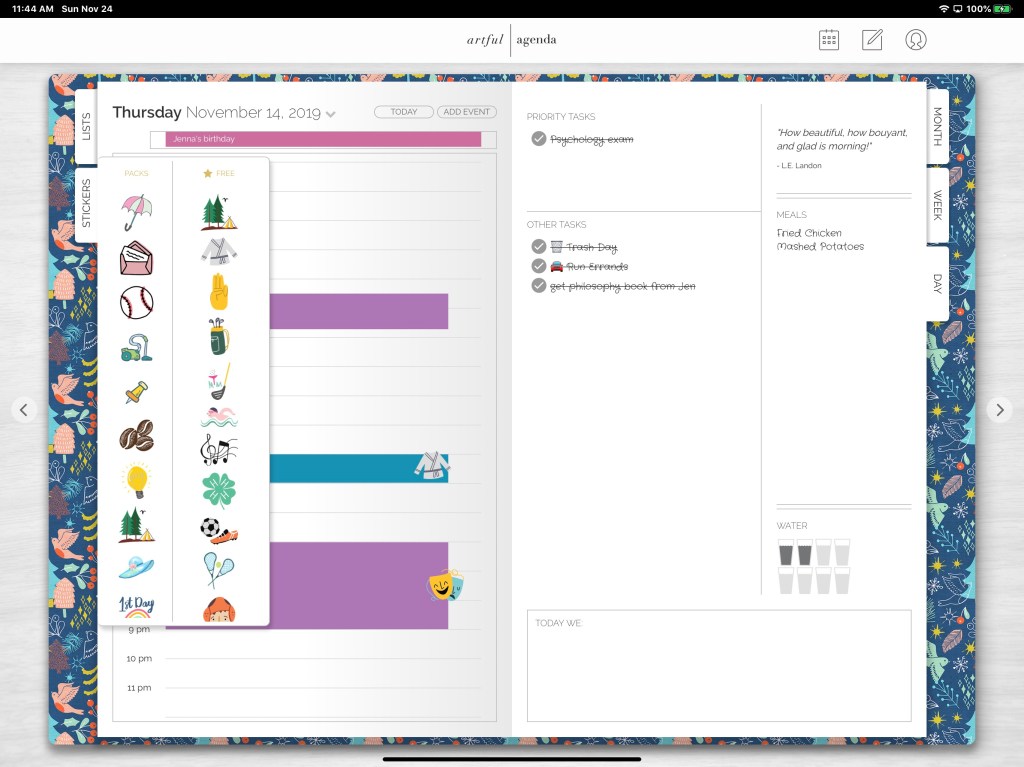
The included stickers make visually identifying your appointments a breeze and add artistic flare.
In addition to appointments you can also make custom lists, manage tasks, and takes notes.
If you have wished that Outlook or Gmail worked and looked more like a paper planner, give Artful Agenda a try. There’s a free trial after which a $3.99 monthly or $34.99 yearly subscription will keep you artfully plugging away.
The new magic of digital notes is the ability to scale up or down to your heart’s content without loosing visual acuity. Microsoft’s OneNote has always been able to achieve this feat but lacks some of the creative features bullet journal users covet. Enter Zoomnotes, an iOS application from Deliverance Software Ltd.
Zoomnotes has the creativity features of Goodnotes with some of the business features you would find in OneNote. Zoomnotes will allow you to use the many PDF planner templates found on Etsy and Pinterest but also offers built-in templates and functionality for more traditional note taking. For example, there’s a wizard that will allow you to build a custom linked view calendar with all your personal preferences.
The software’s infinite whiteboard allows you to write forever without creating a new page or section. By comparison, in OneNote when you fill a page you have to use the add space button on the tool bar to continually expand the note. With Zoomnotes you only need to zoom out with your fingers.
Goodnotes is not able to use custom fonts. This is more than a little annoying. Thankfully Zoomnotes supports any font that you can install on your iPad. This means that digital planner templates look the way the artist intended and everything fits in the designated pages.
Some of the other features you’ll find in Zoomnotes that are missing from other iOS note apps are: Table support, custom color palettes, color matching tool, custom links, and layers.
Lasso any object on the screen; images, handwriting, pictures you’ve inserted, etc. and with a couple of clicks you can add them to your sticker library to make the item easier to re-use. This feature alone is worth the $8.00 purchase price.
Zoomnotes is one of the most Powerful note taking applications available on iOS. I suggest that you visit their web site and then download the free version to try it out. I’m still a OneNote fan because I need my notes to work across all devices but if Zoomnotes ever adds PC and Android support I would consider switching.
I spend hours working in Microsoft OneNote everyday. It’s my go to tool for planning, documentation, and notes. I’ve been using it since the beginning and have evangelized its benefits far and wide. If OneNote has a weakness (not saying it does LOL) it probably lies in being too complicated for some jobs.
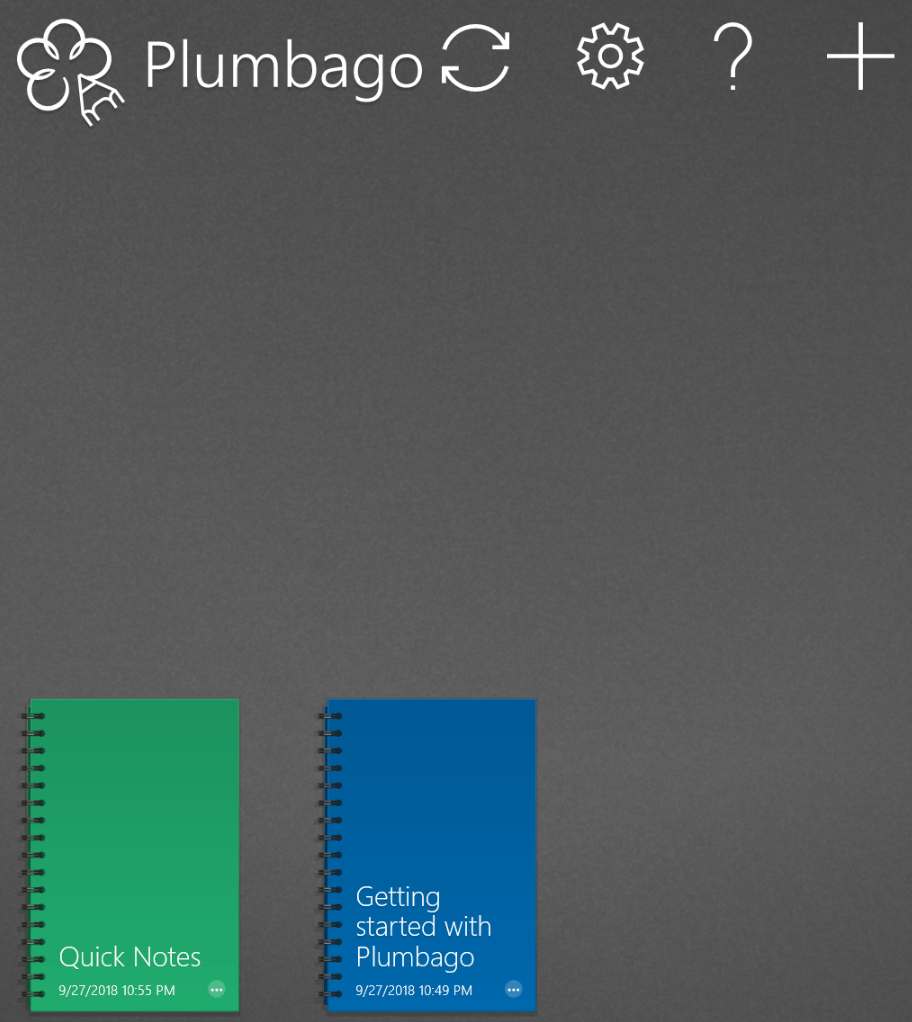
Enter Plumbago, from the Microsoft garage. Rather than act as a full digital note solution, Plumbago aims to replicate the paper notebook experience. Removing many of the complications you find in OneNote or Evernote makes the app much easier to use. There is a very small learning curve. A short video that plays the first time you open the program explains everything that you need to know.
Basically, you create a new notebook for each category of notes or sketches that you need. Each time that you make a notebook you can choose the type of pages that it will contain. Ruled, graphed, music, and more templates are available.
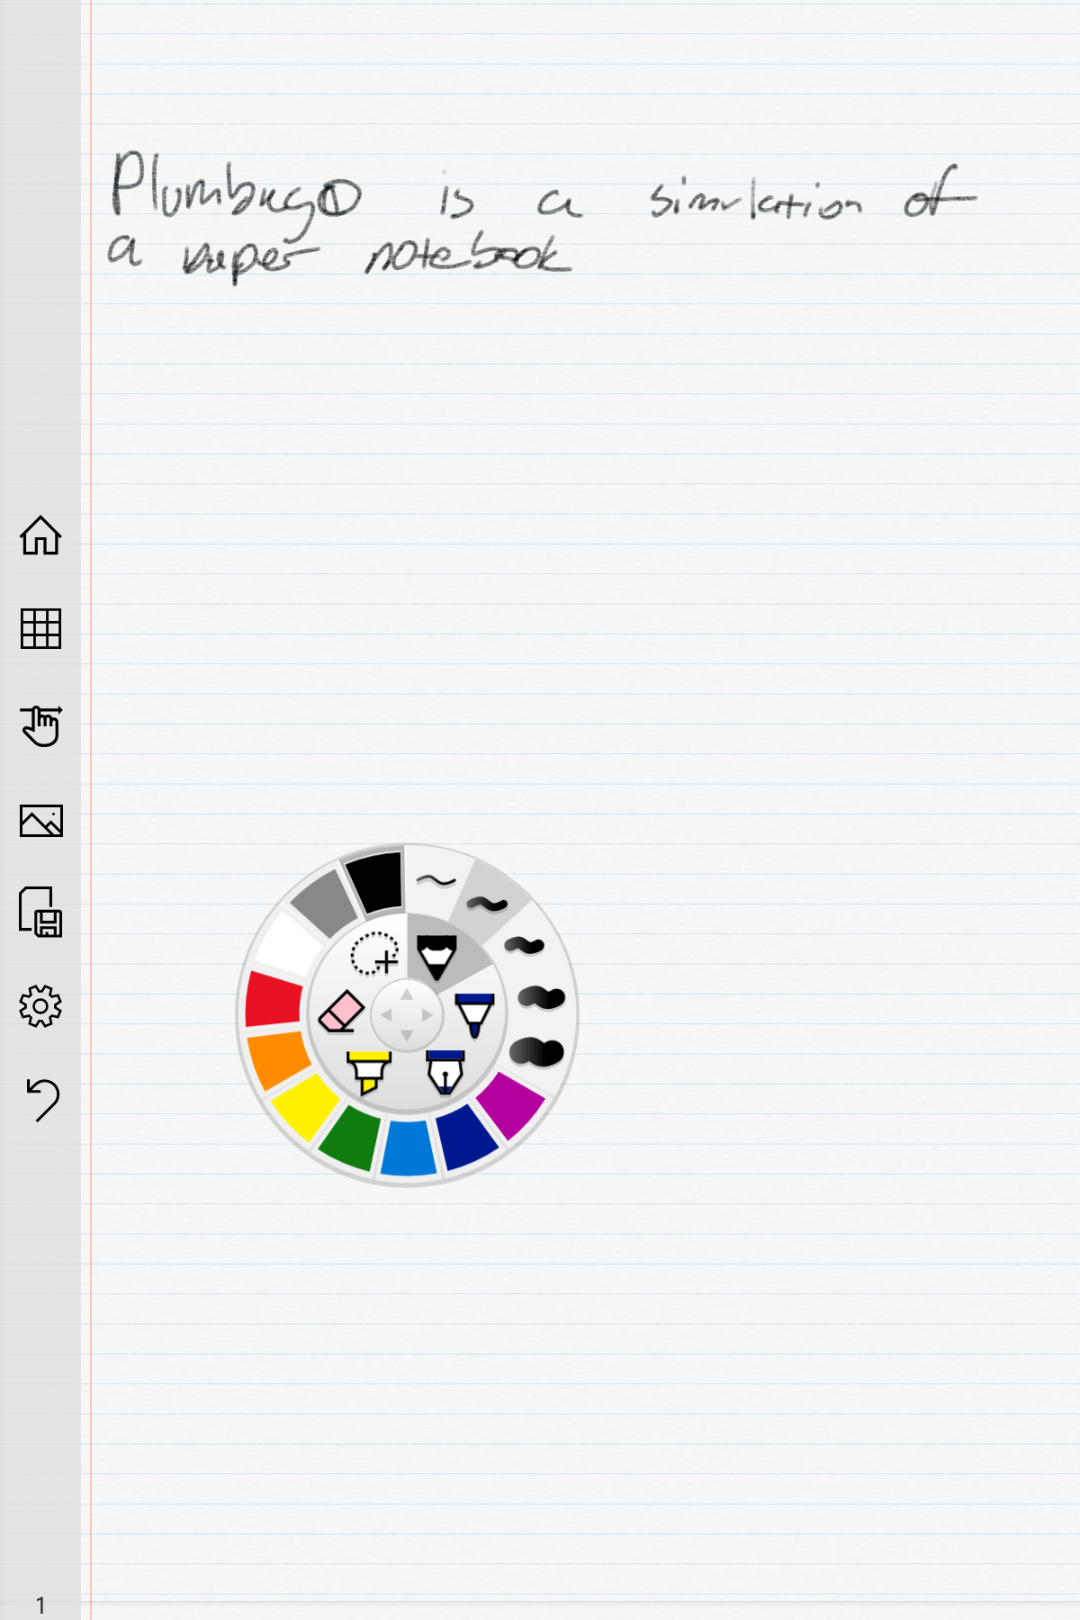
Input options are controlled via a simple wheel selector. Pick your tool, color, and stroke size with a few taps and start drawing or writing. The wheel remembers your previous choice for each tool. The sparse tool bar will let you insert pictures, see all of the pages in your notebook, or switch between draw and navigation modes. You can also export your pages to a PNG or PDF for easy sharing.
That’s all there is to it folks, which is the point of the application Keep it simple. If OneNote or Evernote seem overly complicated for your needs give Plumbago a try.
As I concluded in the previous article in this series, my preferred application for notes, brain-dumps, sketches, and even password management is OneNote. Microsoft has been perfecting it’s OneNote software for almost 15 years, and it shows. As a user of all compute devices, I appreciate that they make a version for Apple (iOS and Mac OSX), Android, Windows and the web. Even better, my notebooks will sync across all of them so I can work on whatever device is handy.
Goodnotes is oriented toward being a straight up digital replacement for spiral notebook(s) you create a new notebook for each topic. OneNote uses a hierarchical organization system. Notebooks -> Section Groups (not available in iOS) -> Sections -> Pages -> Sub-Pages is the grouping order. You can (and should) have multiple notebooks but if you’re careful with your Sections you can easily fit everything into one.
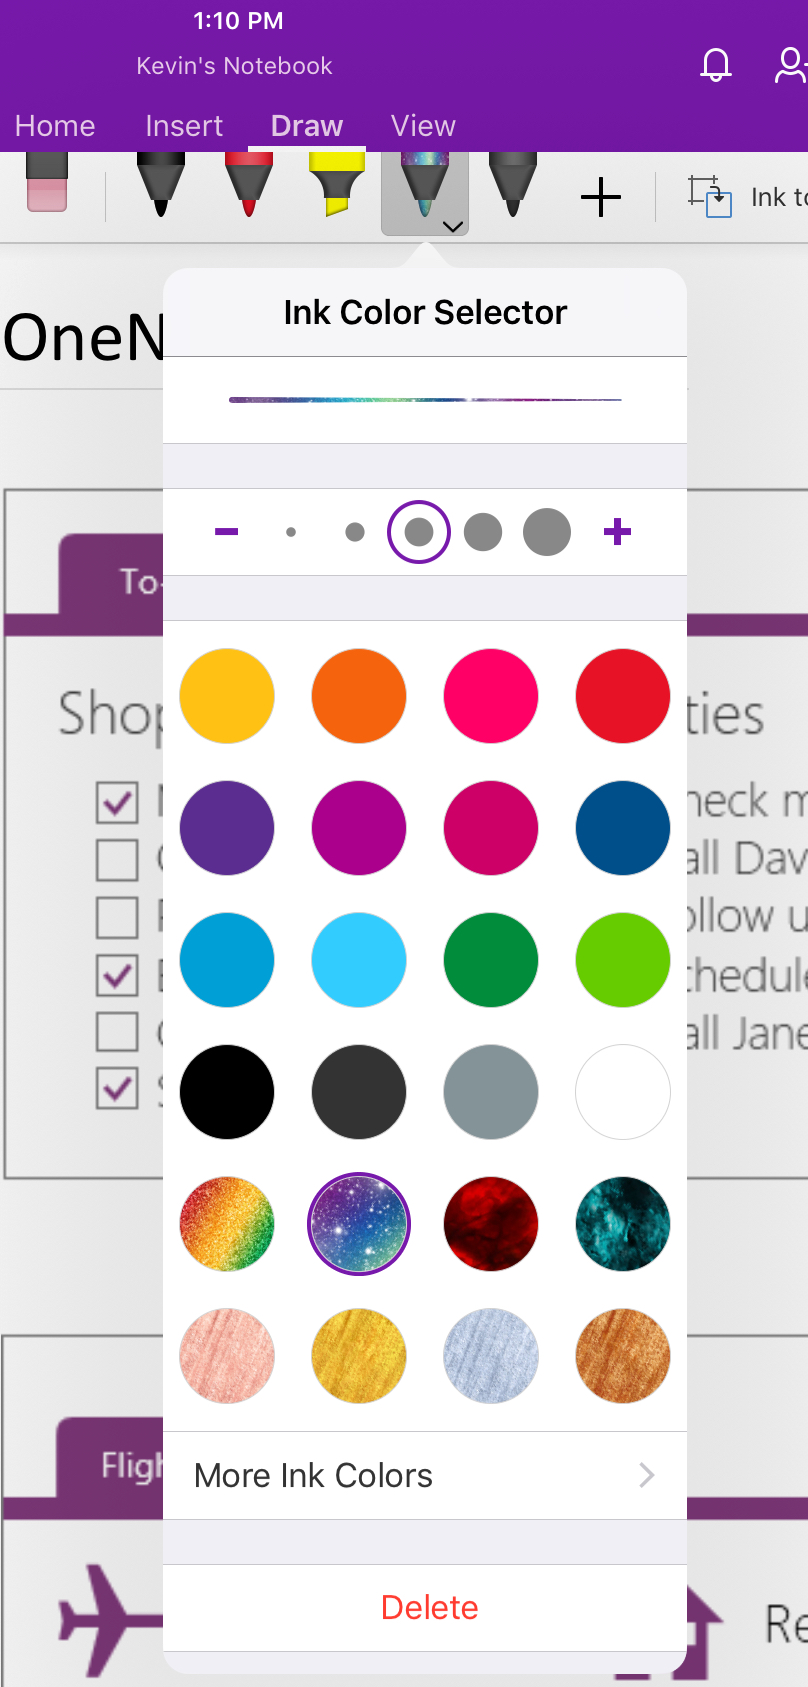
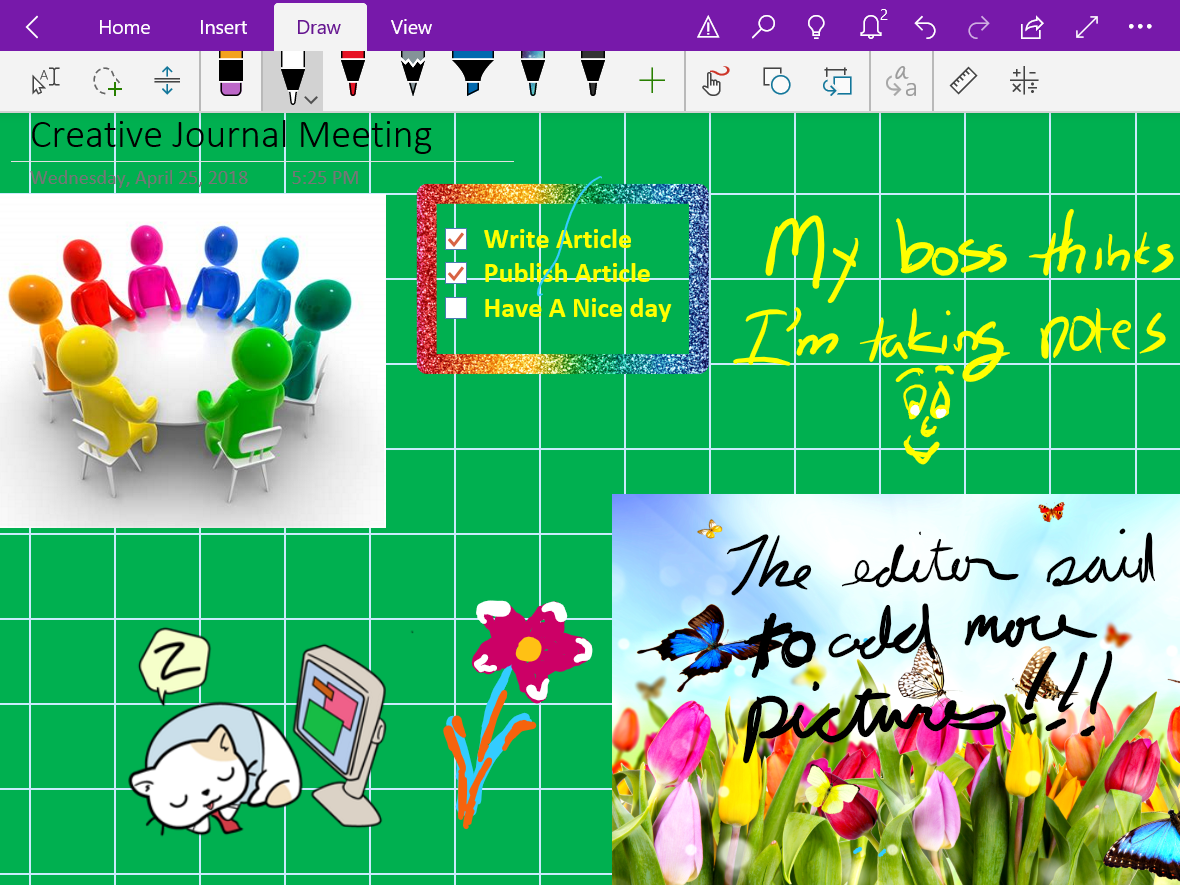
As of late, Microsoft has realized that creative types want the freedom of artistic expression to be a main feature of their journals. OneNote has always had drawing tools, lasso select, auto-shapes and more but now those features are up front and they’ve been enhanced with stickers, straight edge tools, a picture gallery and more. Just look under the Draw tab for a ton of great features including glitter, star and wood grain inks, custom pens, and more. One of my favorites is the Ink to Shapes feature. Click the button and draw a standard sloppy circle. It will magically become a perfect circle.
Another recent edition is enhanced palm rejection. This means you can rest your hand on the screen while using the stylus, in the same way you would rest your hand on paper when drawing with a pencil. If you have an Apple pencil this feature is activated automatically. For those of us using capacitive (non-active) styluses, access the Drawing Mode menu and enable the feature along with selecting the way you hold your writing instrument.
Tip: It is important to be sure your hand is resting on the screen before you touch it with the stylus tip.
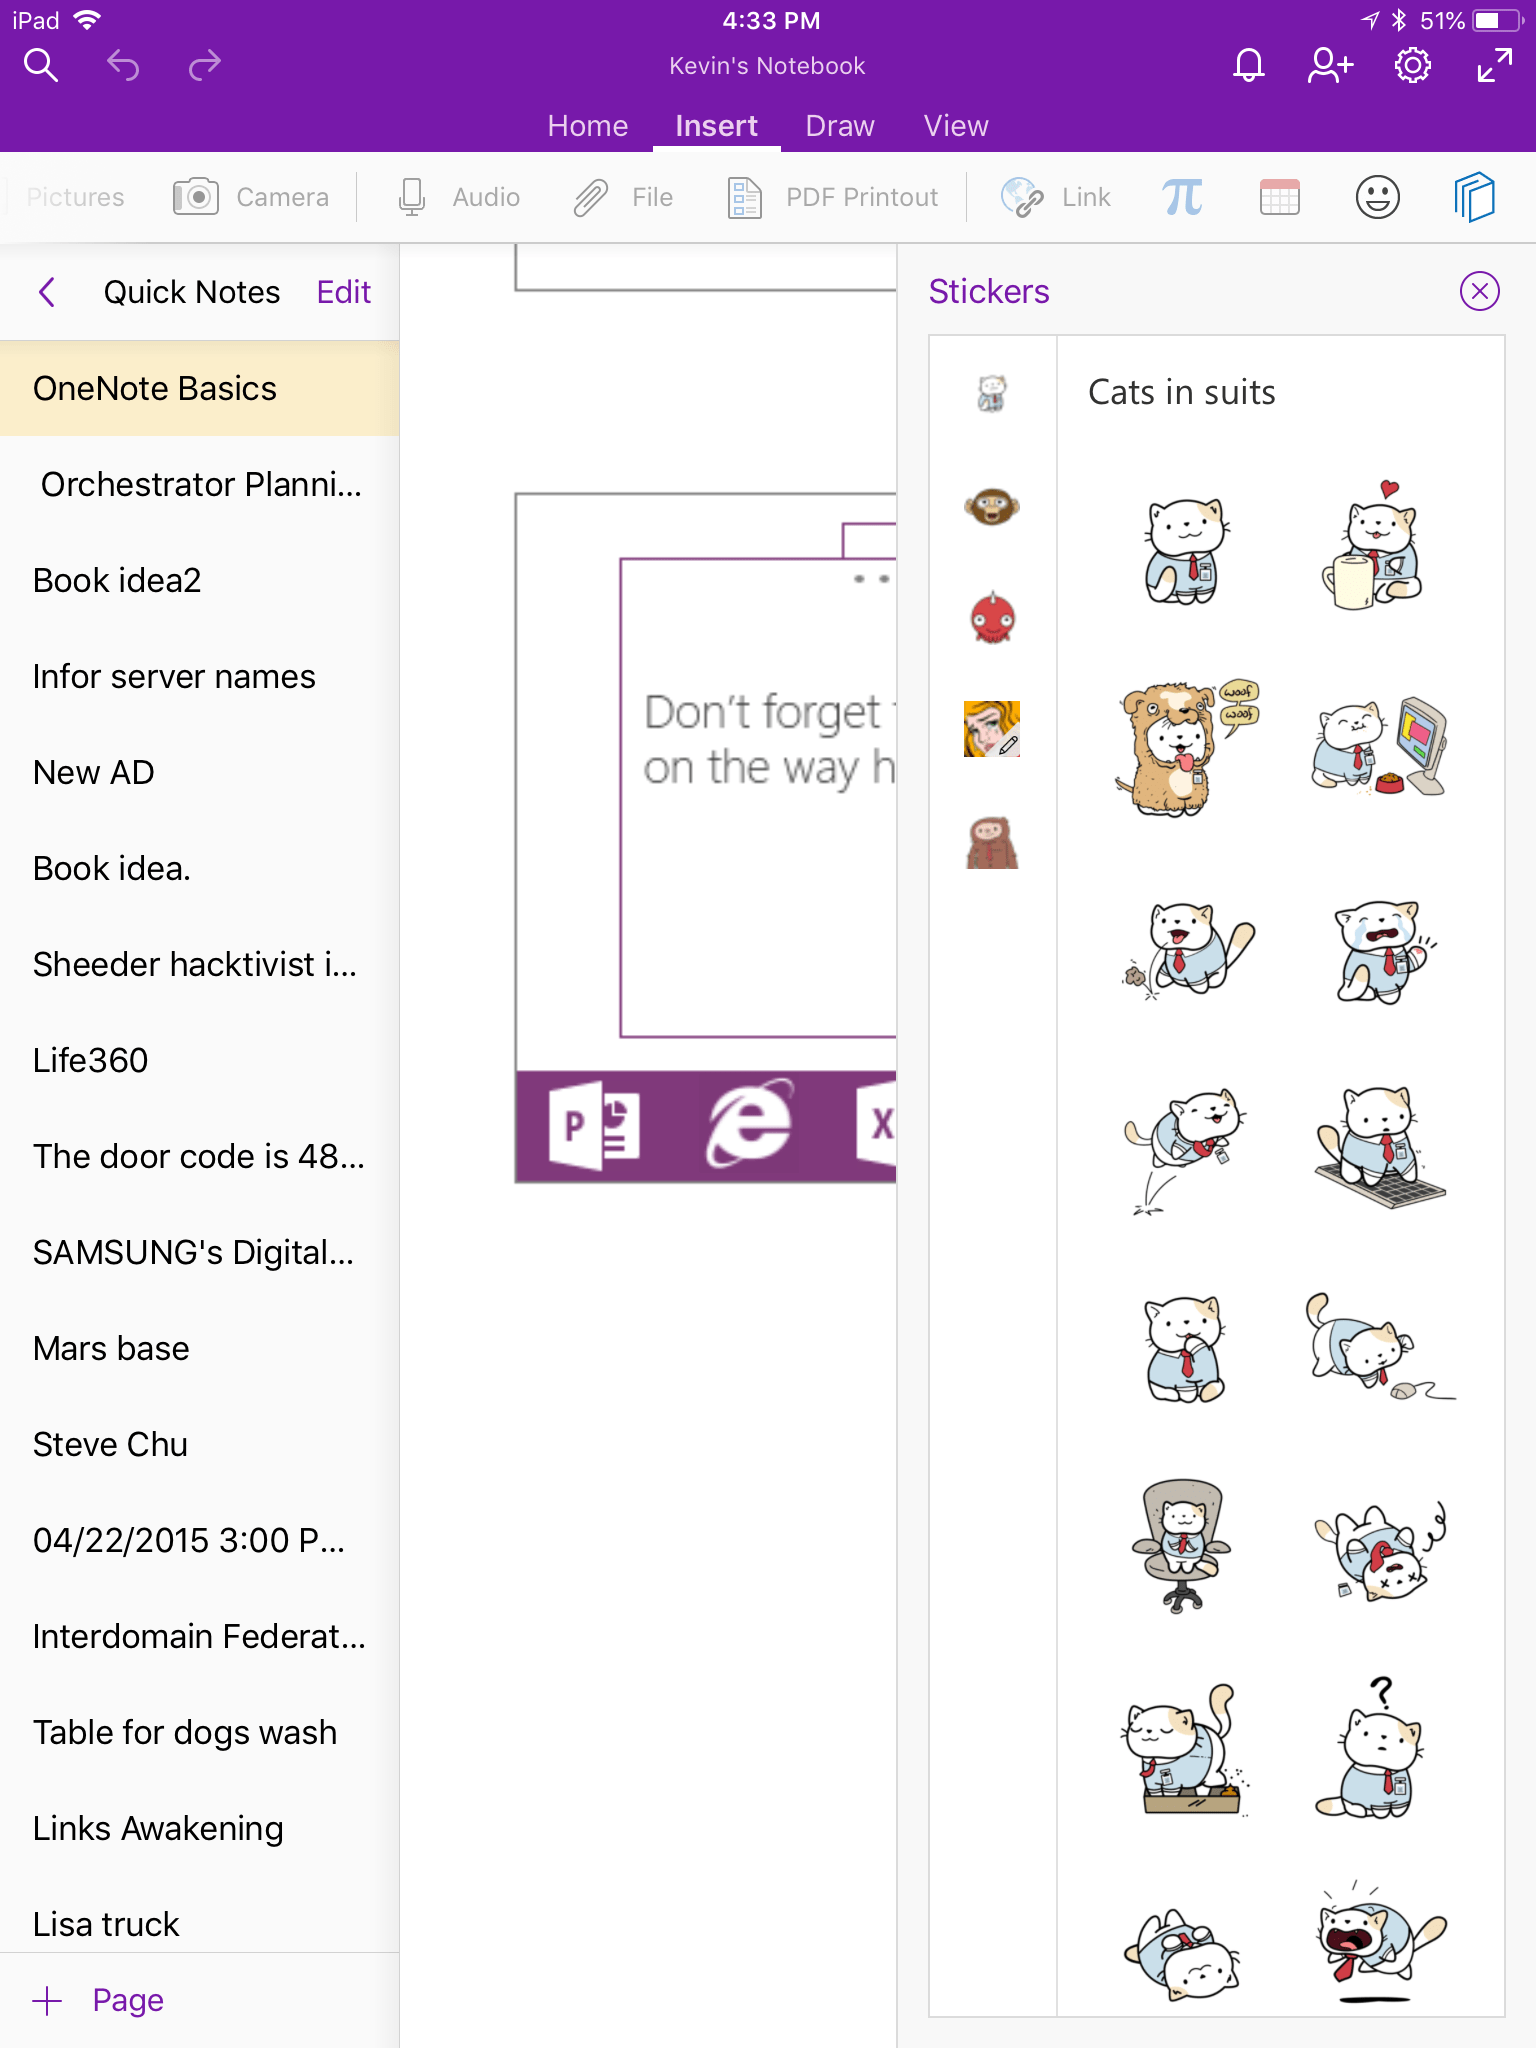
Under the insert tab you’ll find options for adding pictures, files, audio recordings, math equations (yes, you read that right), and even stickers. For the most part, these options are how you get data from other software into OneNote on the iPad; some apps will also allow you to share data (photos for example).
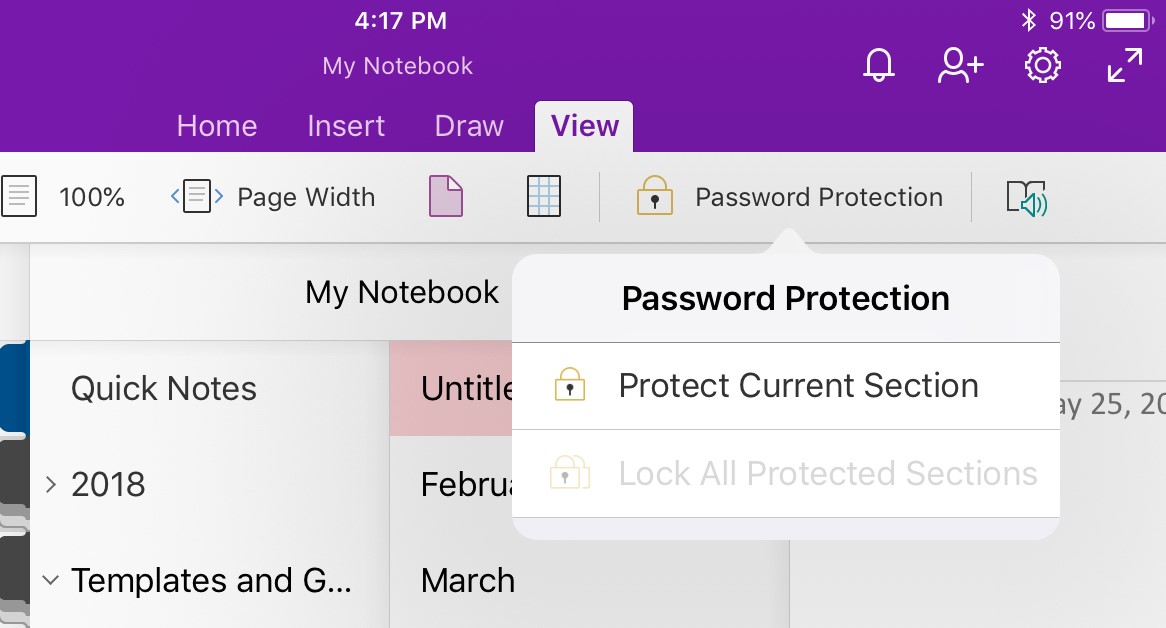
The view tab has tools that let you add grids and rule lines to your pages; you can also change the background color here. One of the most useful functions on this page is password protection. Create a section for passwords and then put a password on that section. Make a page for each of your various accounts and you’ll have made a password manager that works on all of your devices for free. I also use the feature when sharing notebooks with people to keep them out of specific stuff.
Assuming that you want to get started with a notebook for your job, I suggest creating the following sections. You will of course need to add items for your specific profession, but these should apply to generic business.
Passwords – Password protect this section and then add a page for each of your accounts. Don’t forget to include links to the sites, documents, etc. and a good description so you can find them by searching. OneNote supports the iPad fingerprint reader.
People – Here you’ll keep tabs on the people who you interact with. People you manage, co-workers, vendors, contractors, and bosses; you’ll want to record details about them all in this section. What they like and don’t, personality traits, and information they provide about their lives can all be valuable later. Tip: insert hyperlinks to these “people pages” on pages in the other sections for quick reference.
Projects – Make a page for each project you’re involved with so that you don’t loose track.
Meetings – If everyone took good notes in meetings we could probably have a lot fewer of them.
Tasks – This is where I track all the little actions I have to do that are not part of a project. I need to pull a report on sever storage once a quarter and I’ve detailed how to do it along with the script I use in this section.
Instructions – Manuals, written instructions, and even videos off YouTube get posted in this section. Onenote will index all of this stuff (even the dialog from video and text in pics). This means that the next time you search for ” use postage” the manual will pop-up.
Ideas – Self explanatory, everybody gets ideas about how to do something better, easier, or faster; the trick is in remembering them at an appropriate time.
Issues – If you want to solve problems or have one you need help solving, track them here to ensure you don’t waste time repeating fixes or worse yet forget all together.
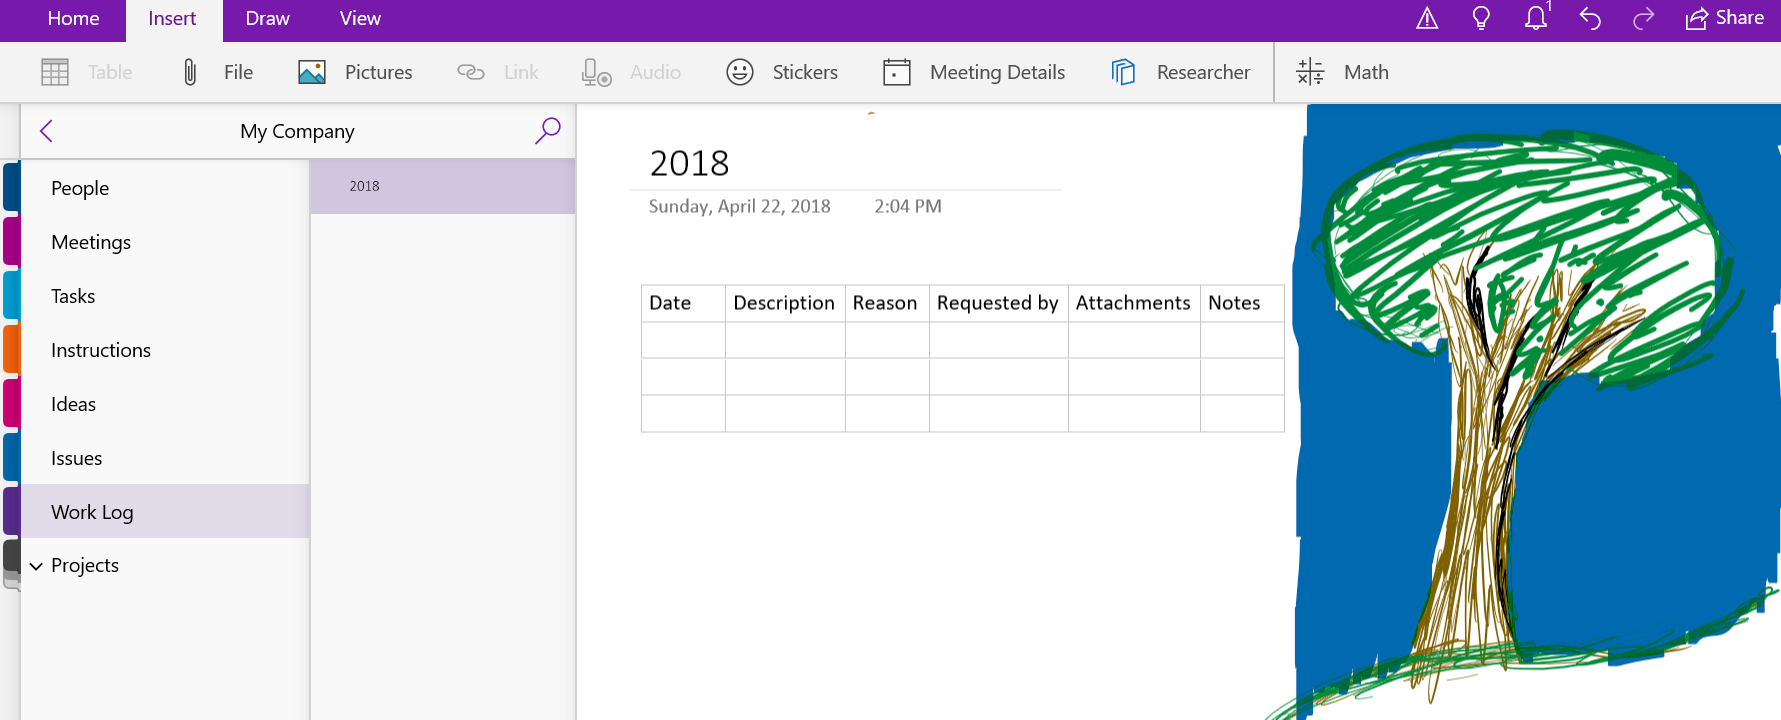
Work Log – I insert a table with the following columns: Date, Description, Reason, Requested By, Attachments, and Notes. At the end of everyday I spend 10 minutes jotting down what I spent my time on.
Whether you use OneNote, Goodnotes, or one of the hundreds of other note taking apps available for the iPad, what’s important is that you use something. Like I’ve said in other articles, next to exercising, organizing your life and work is one of the most stress relieveing things you can do. Once you have a system working it only takes a few minutes a day to stay on top of everything.
In the same way that computerized word processing displaced type-writers; many people are making the switch from paper journals and diaries to digital ones. Computer based journaling offers several key benefits over paper: backups, sharing, multimedia, and security options are all easily accessible options in an application but difficult to achieve in paper.
Apple’s tablets and phones have a multitude of applications dedicated to the art of journaling and notetaking. One of the mot popular options is Goodnotes. The software has quickly become a favorite among creative types and for good reason. It features support for multiple smart styluses including: the Apple Pencil, Wacom’s Bamboo Finetip, and Pencil 53 to name a few. The app also has advanced palm detection and PDF markup. Your data can be automatically backed up to one of several cloud storage providers and synchronization between multiple Apple devices is facilitated by iCloud.
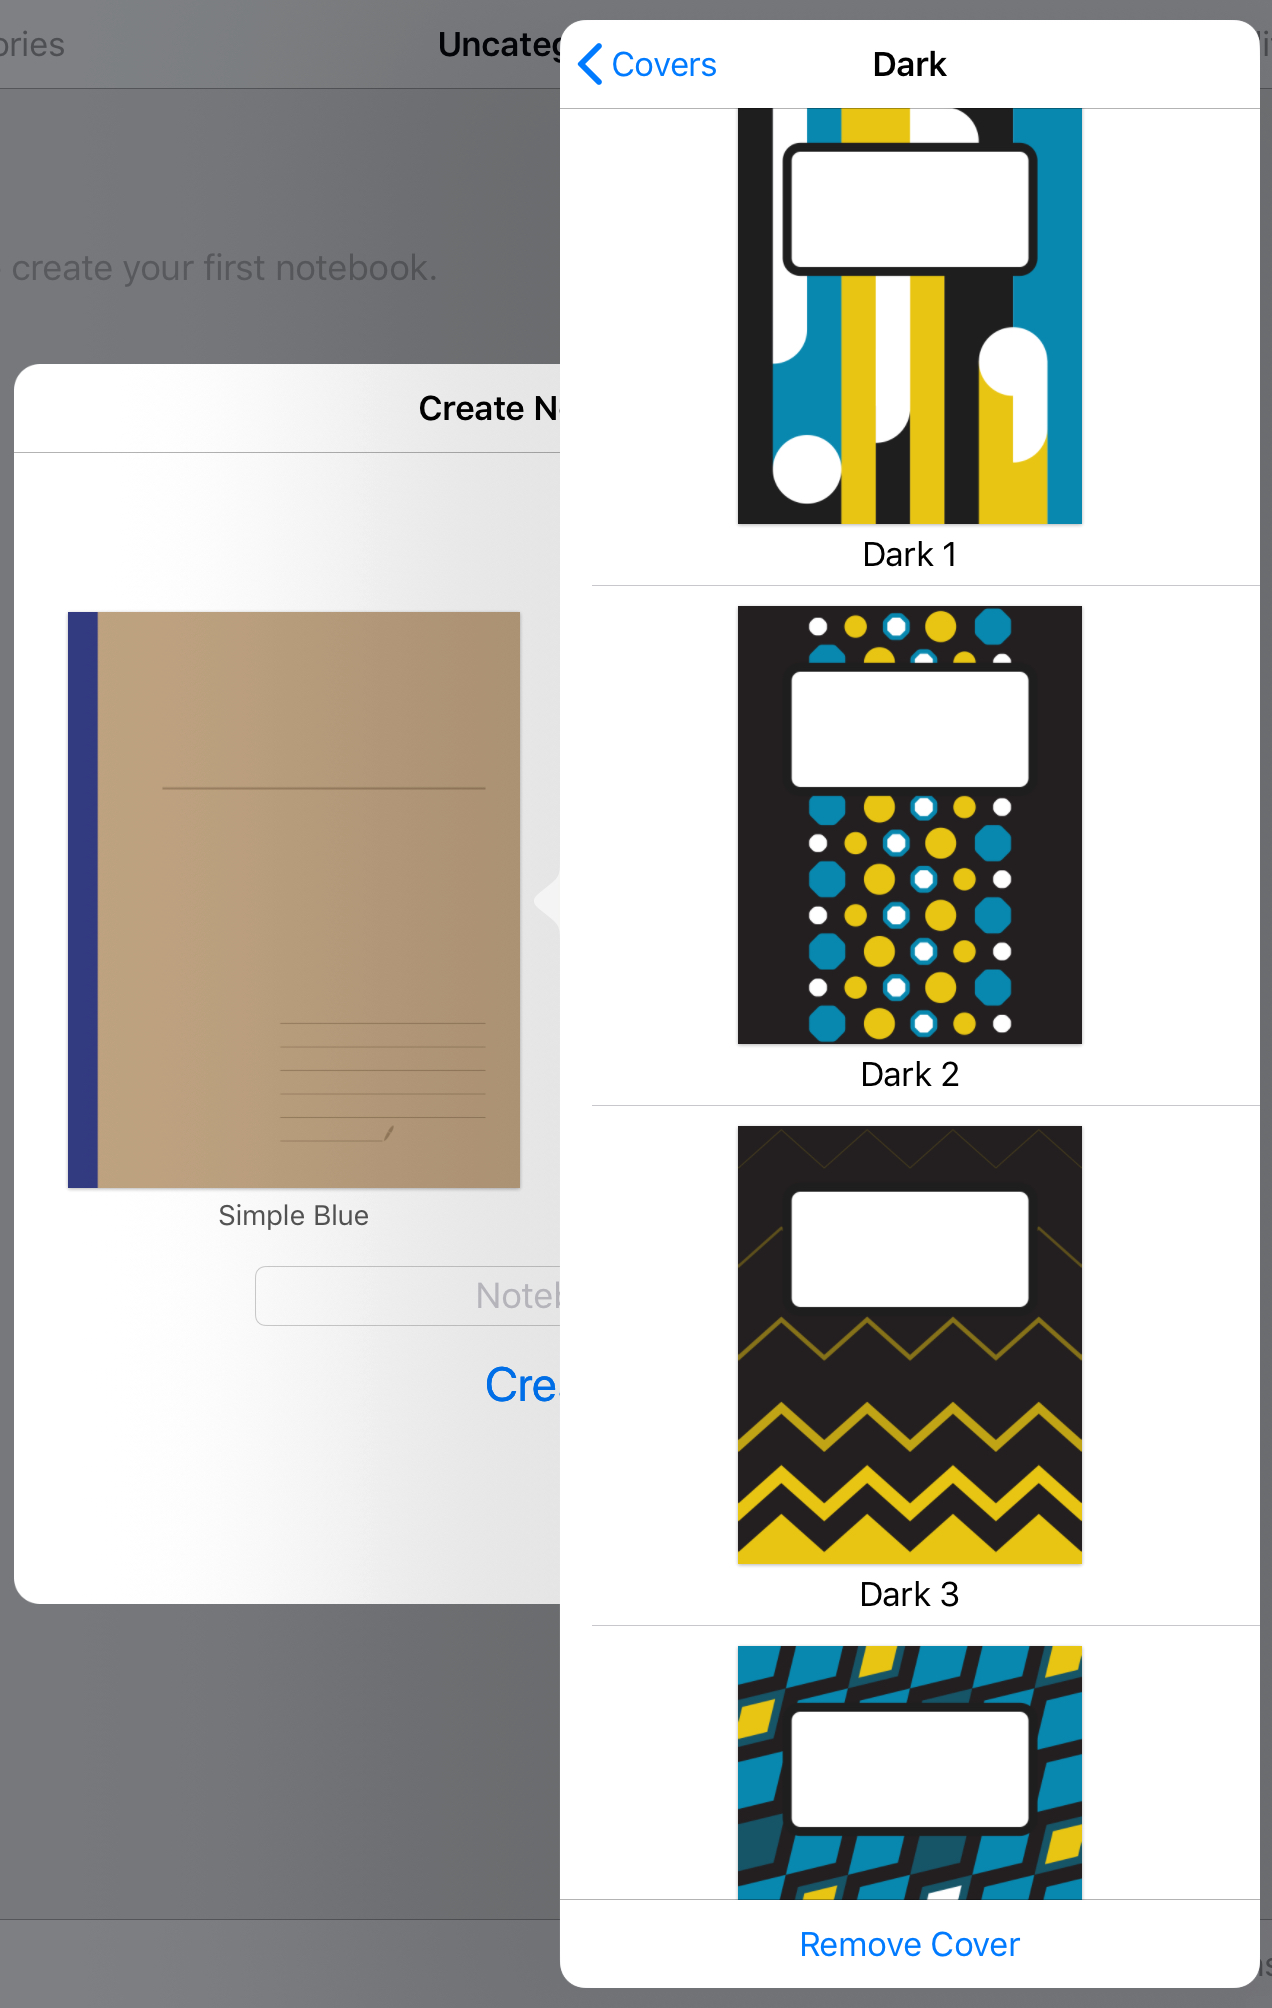
Goodnotes works well as an everyday note taking app. You can easily create a personalized notebook with it’s many built-in Notebook covers and page styles. Unlike other note taking programs, Goodnotes does not use a sectioning layout. You’ll just add a new notebook for every subject. The brushes and pencils are great and the lasso tool is epic. You can lasso and move almost any object.
Where Goodnotes really shines is in it’s ability to import notebook templates. Etsy is full of templates that have been created by some very talented people. Many of them come with stickers, banners, and other premade flair that you lasso and drop onto a page. Lots of the templates have hyperlinked facades that replicate actual paper journals down to the bindings and cover stitching.
The information you enter into your notebooks will be indexed and searchable. Even the items you enter in handwriting will show up in most cases. You can also export pages from your notebooks to either PDF or image files for easy sharing.
To get started in Goodnote; download the app from the Apple Store. I suggest restarting your device before launching the software. If you’ve purchased a template you’ll want to follow the instructions that came with it, most of them utilize the import function to get going. Otherwise open the software and watch the introduction. When it’s finished click the + button in the upper left corner and choose “Create Notebook”
Tap the cover thumbnail to choose the cover you like best and then do the same for the paper. You’ll be able to easily change both options later so don’t strain your brain on this step. Tap and hold on your notebook’s label and select text to give it a name. You can also use the writing tools in the top menu for the name tag.
After you have the label sorted, swipe to the left with two fingers to open the first page. The tool icons in the top menu are self explanatory. Tap on an icon twice to open that tool’s menu for more options.
The action menu icon in the upper right corner will allow you to change things like the page type (under more options) and allow you to export or import information. You can also print your pages from here.
Overall I find Goodnotes to be more creative and decorative than either Evernote or Onenote are, especially if you have an Apple Pencil or one of the other supported styluses. It doesn’t offer the structure or integration options available in the other packages. As a business oriented professional, I appreciate Goodnotes’ design and it’s templating solutions but I struggle to come up with a reason to use it over OneNote.
If you have to choose between them I think the decision is similar to choosing between an Apple device or a PC. Goodnotes looks better and one could argue that it’s easier to use but OneNote is more flexible and integrated into lots of other Office software. Lucky for me; I have both.
In this series we’ll be investigating the options for digital journaling on the iPad. We’ll take a look at the available software along with various techniques for bullet journaling in a digital format. First we’ll say hello to the new iPad 9.7 with Apple Pencil support. This series has a twin based on Windows Tablets: Part 1, Part 2, and Part 3 that you may also enjoy.
Until now, if you desired to use an instrument for writing or drawing on your iPad, other than your finger, there were only a couple of options. None of which were particularly grand.
The first thing most of us try is a capacitive stylus; a mesh tipped stick that works for tapping but is too wide for precision marking. Next up are the 3rd party active pens like Fifty-three’s Pencil. These these types of tools use various electronics to send more data about your strokes to the tablet, usually over bluetooth. They work better, but not great, and have some severe limitations; chiefly, they only work in the app that comes with them more often than not.
Your other option was to shell out some serious cash for the iPad Pro and the Apple Pencil. I’ve enjoyed being teased by the wealthy Apple fans of the world that could drop close to $1000.00 so they could draw with precise results on their tablets.
Lucky for me (and my wife) Apple has decided to grace the rest of us poor sobs with a non-pro tablet that works with the treasured stylus. The new iPad has pencil support and pricing starts at $329.00. Of course, the pencil itself is just shy of $100.00. I was able to find the 128GB iPad for $399.00 and decided that model was the winner.
So, what’s it like you may be wondering? It’s both amazing and frustrating. Allow me to explain. The pencil itself is well-balanced, totally round, the same lenght as a #2 pencil, and pleasant to hold in your hand. The iPad supports pressure sensitivity, tilt (used for shading), and it tracks well. It’s fantastic when using it in one of the supported apps.
A fine line trace done in Autodesk’s Sketchbook
Unlike Windows Ink or Samsung’s S-Pen, Apple’s Pencil only works in designated apps. You can use it to tap on the screen anywhere but there’s no handwriting recognition, you can’t just draw and scribble on any screen, it’s not a general system input tool. It also lacks the hover mode (think mouse pointer) that is typical for most active writing tools. For someone who writes with a digital pen most of the time (doing it now) this is a big let down. Apple is still fairly new to the digital pencil club, so hopefully future editions of iOS will add handwriting support. There are a few apps that have built-in handwriting recognition like Writepad that are a step in the right direction but using them to write WordPress and Facebook posts is clunky.
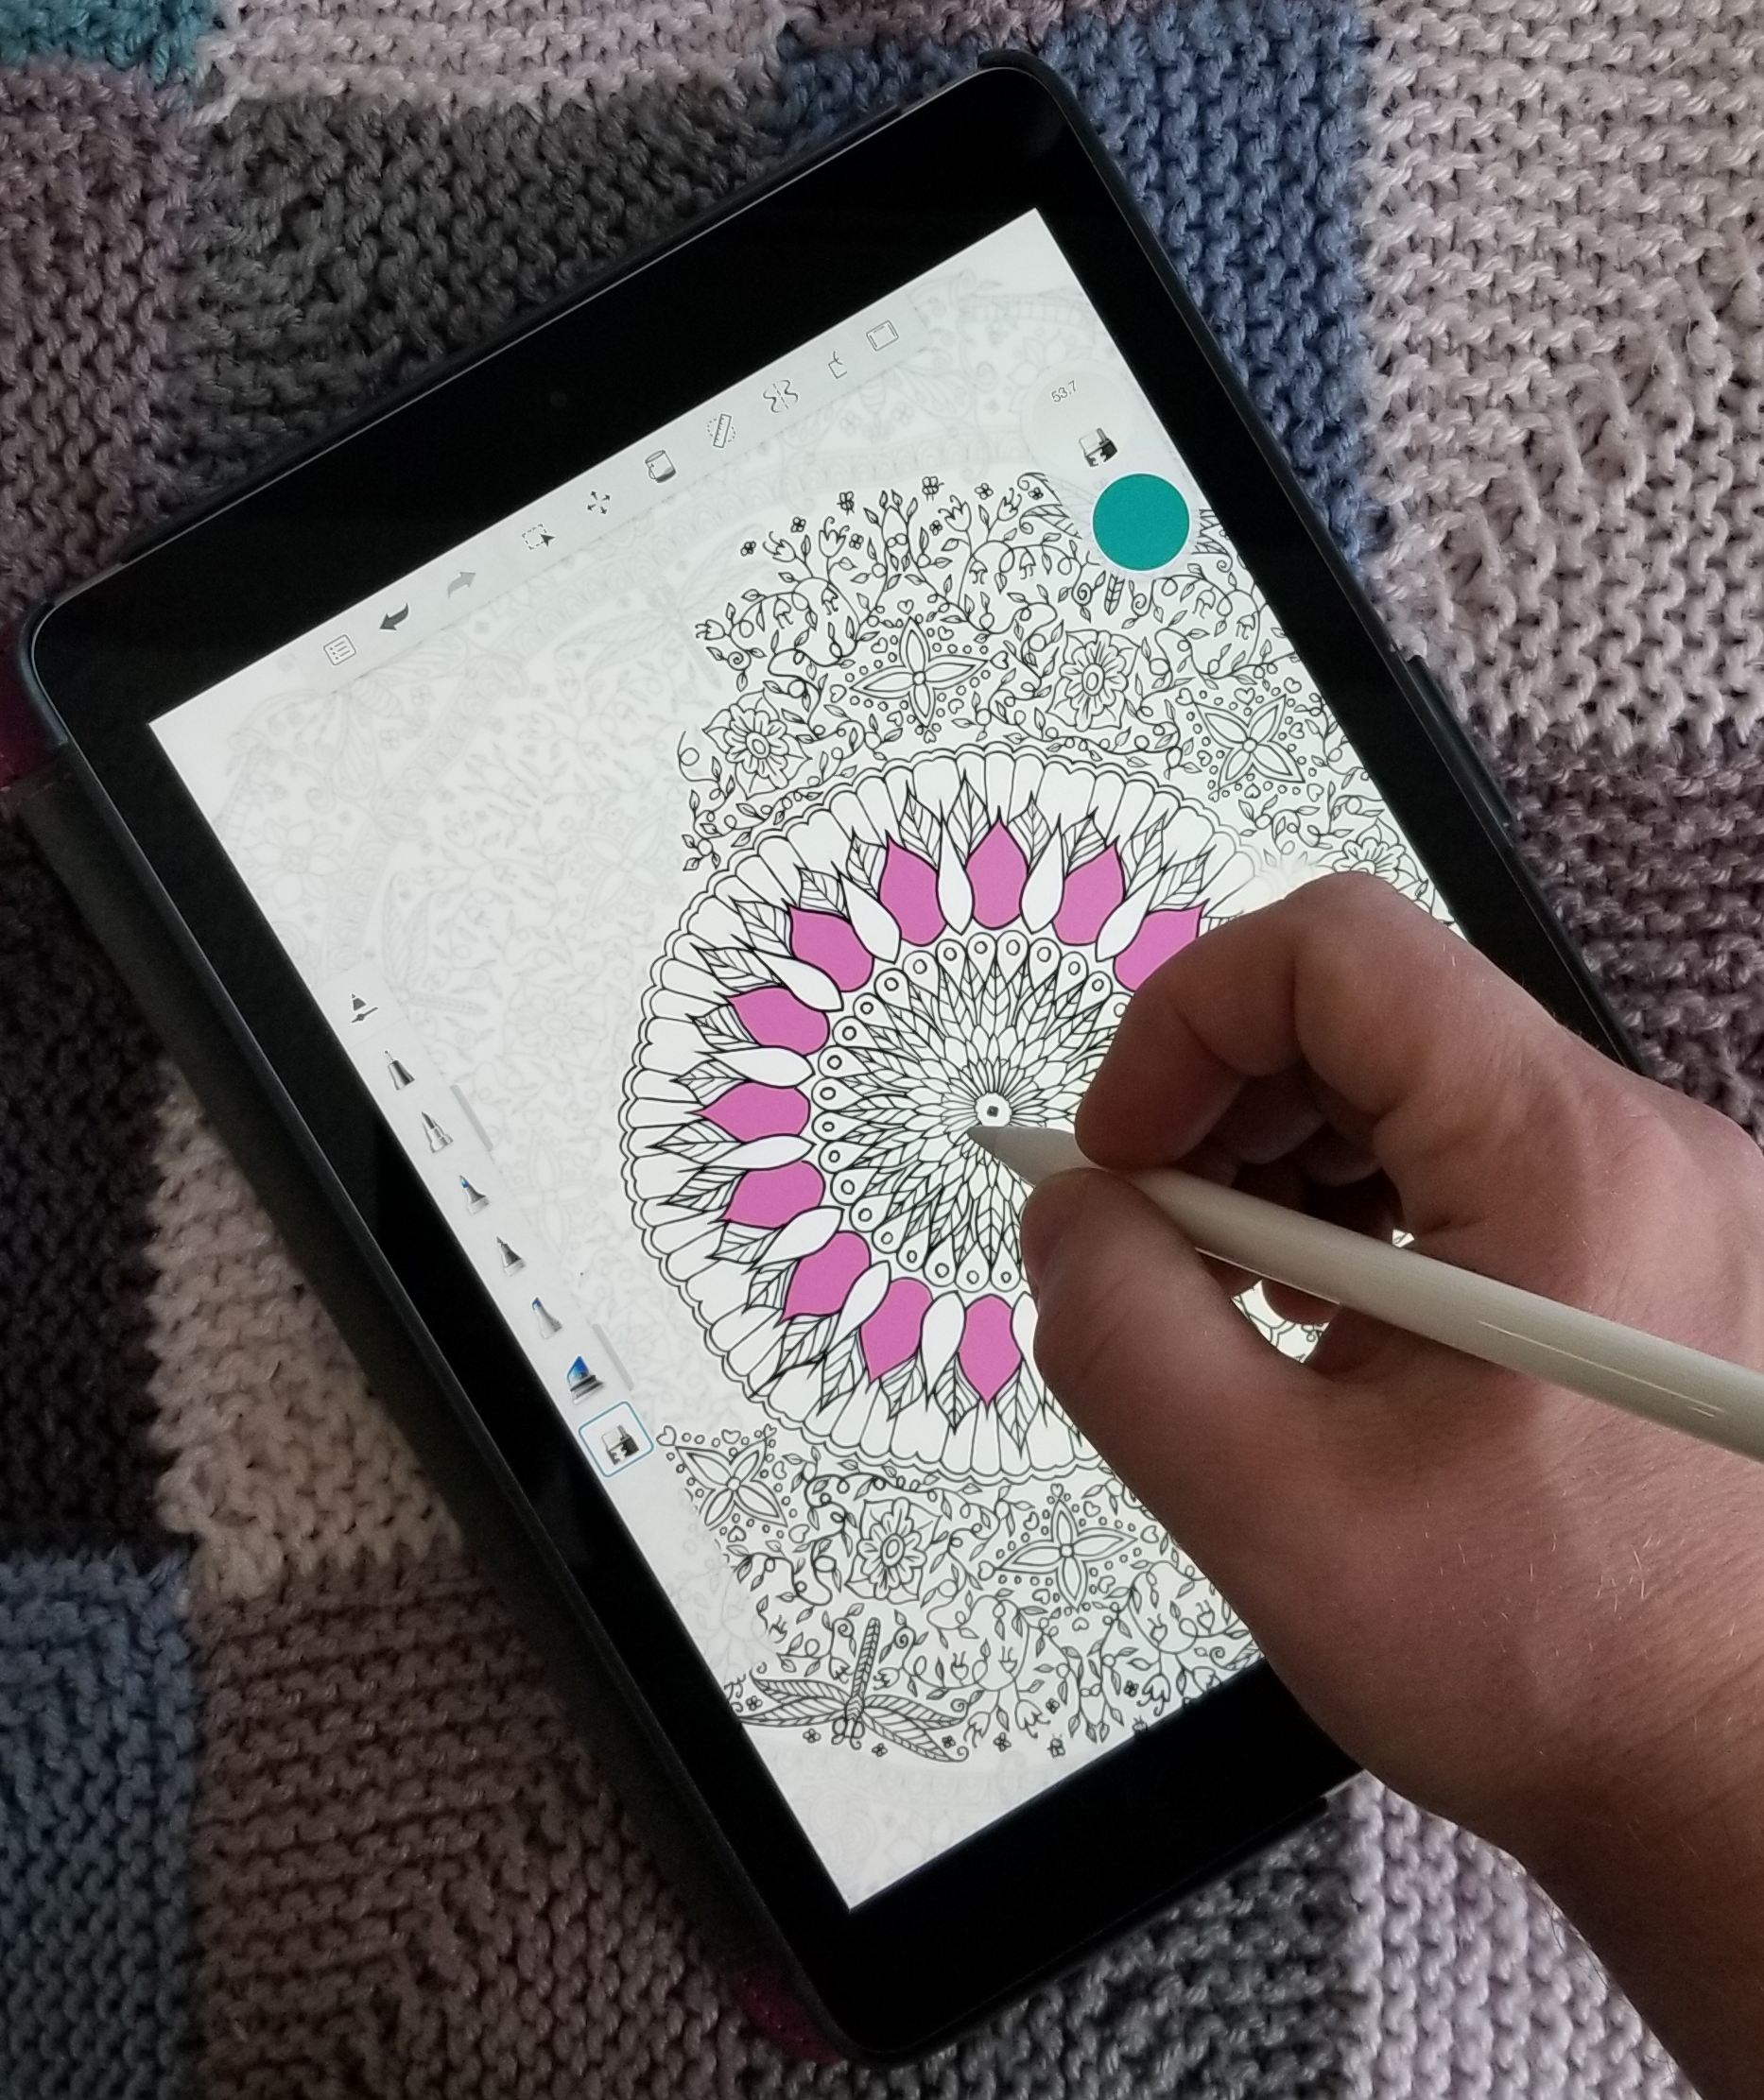
Fire up your favorite drawing app and you’ll soon forget all about the handwriting thing. Personally I like Autodesk’s Sketchbook, it has most of the pro level tools but is far less complicated than Photoshop. There’s not much resistance between the pencil’s tip and the iPad’s screen. Some artists may not like the slide. Personally, I’ve grown to prefer less resistance; drawing on paper feels slow and awkward to me now. Especially when coloring and shading. The pencil is responsive and the tilt and pressure sensitivity work well in apps that support the features.
An original freehand done in Autodesk’s Sketchbook
The new iPad is fast, really fast. It runs on Apple’s new A10 brain chip and it sings. Now that iOS supports multiple (2 + a video) windows and has the horsepower to run them, it’s capable of replacing a traditional computer for general use. The 9.7 inch screen looks great. The rest of it is what you’ve come to expect from the latest generation of Apple’s tech. It feels great to hold in your hand and because it shares a footprint with the previous 9.7 there are a plethora of accessories already available for it.
Some reviewers and owners complain about the screen bezel on this and other tablet devices. I see not having a bezel causing another issue. Without it there would be nowhere to put your thumb(s) when holding the device that didn’t interfere with the view.
Overall I really like the new iPad and am thrilled that Apple added pencil support to the base model. For me, the lack of handwriting input and hovering will keep me using Windows or Android based pen tablets. Alas, I didn’t purchase it for my use. My wife absolutely loves it. If you’ve followed my blog for long, you’ll know that I was trying to convert her to a Galaxy Book. She learned to use it but never truly enjoyed Windows. That’s ok, it means the Galaxy tablet is mine now. Look for a review of it soon.
If you’ve been following along with this series, you’ll know that I am hip deep in the process of converting my spouse from an iPad to a Windows tablet and from paper to digital journaling. So far, we’ve chosen the perfect tablet and set up the best windows profile for pen enabled machines. Now it’s time to dig into journaling and note taking.
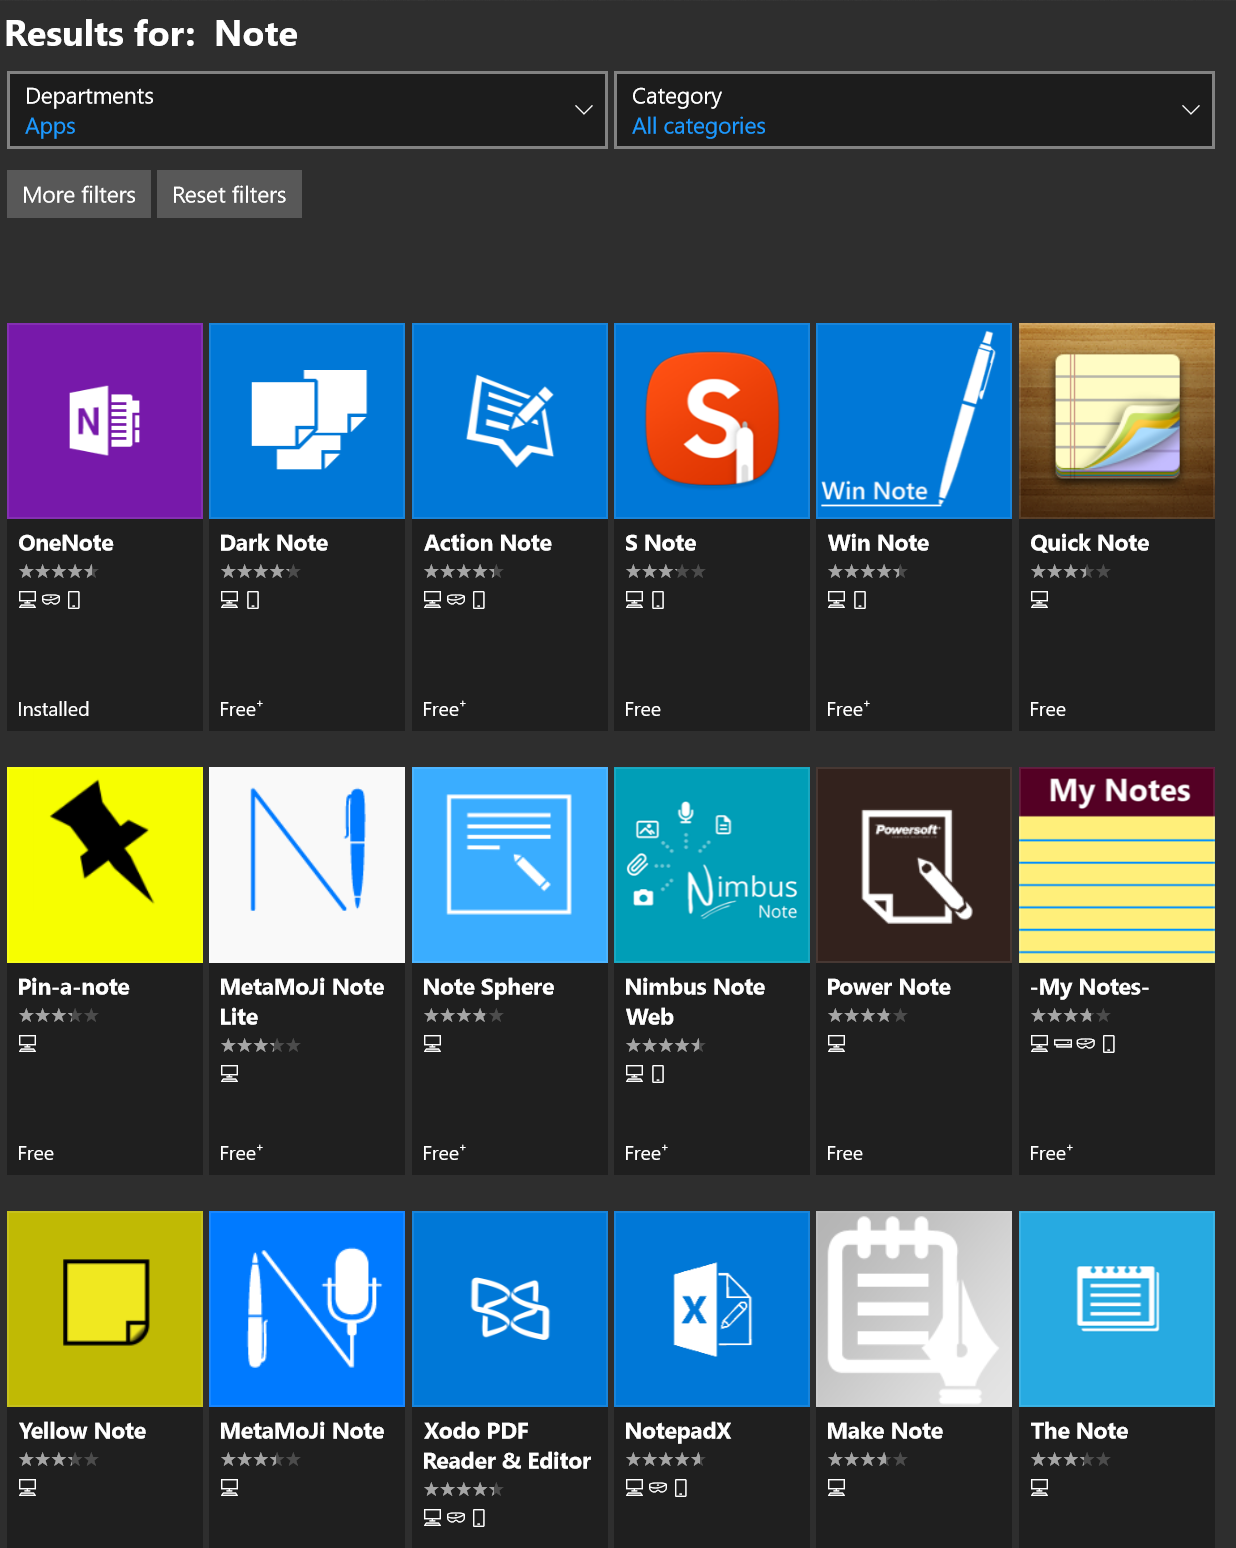
A quick search of the Microsoft Store will return an overwhelming number of applications dedicated to taking and organizing notes. We’ll examine a few of them in detail with future posts in this series. The patron saint of notes, doodles, and mind-dumps in Microsoft’s world is OneNote and that’s what we’re focusing on this time around.
As a long time fan, I consider OneNote to be one of Microsoft’s greatest achievements and a core contributor to my success. I have thousands of pages of memory augmenting documentation from every job or project I’ve ever been involved with. Every computer problem that I’ve ever encountered, all of the code and scripts I’ve written along with plans, meeting notes, article ideas, book ideas, things I am planning on building or buying, manuals for the stuff I already have; it’s all in OneNote. All searchable in a moment from any of my computers, my phone, or even my watch.
It is difficult to explain the full value of having all of this data available on-tap but a couple of situational examples might help. How many times have you sweated it out trying to remember what you did all year for your review at work? This never happens to me. In IT work, running in to the same problem months or even years apart is common. Can you remember what you did to fix that IIS app pool last summer? Get yourself organized and documented people! Next to exercising it’s the most stress relieving thing you can do. My boss thinks that I have a photographic memory but I can barely remember my own birthday.
Enough evangelizing, on to the good stuff. Microsoft publishes OneNote in three different versions. There’s the desktop edition that comes with Office; it’s icon name matches the version of Microsoft Office that you have installed, in my case OneNote 2016. The tablet/mobile version named OneNote, is free and can be found in your device’s app store; including the Microsoft Store for Windows 10. Finally, if you subscribe to Office 365 or have SharePoint at your workplace you can access a web edition that runs entirely in your browser. All three versions can share data and have the same core feature set but there are slight differneces between them. Through out the rest of this article when you see (DE) I am referring to something that can only be accomplished in the Desktop Edition. Microsoft will be phasing out the desktop edition after 2016. They are concentrating their efforts on the UWP (Universal Windows Platform) AKA the App Store version. Already they’ve added features to the UWP version that are unique to it. When you see (UWP) I am referring to something that is available only in the Universal Windows Platform (app store) verion of OneNote.
OneNote uses a hierarchical organization system that imitates your high school trapper-keeper. Notebooks -> Section Groups -> Sections -> Pages -> Sub-Pages is how the train flows. You can (and should) have multiple notebooks; personally I have one for Work, one for Home, and one for Writing. In a notebook you create sections and occasionally it makes sense to group several sections together. For example; in my Work Notebook I organize major categories like Software, Networking, Troubleshooting, etc. as section groups. Inside the software section group you might find sections named Windows, Exchange, Lync, and so on.
The first time you open OneNote it will create a notebook for you. The pages of this first notebook are actually a tutorial on how to use the software. The instructions are well thought out and more than good enough to explain how the software works; do yourself a favor and spend a few minutes reviewing them. This post is not about how to use OneNote , that is easy enough to figure out and there are already plenty of How To guides on-line. Being successful with any note taking system requires a lot of forethought and setup. As with most projects of this type, the hard part is figuring out how to get started. In this post we’re going to step through creating a OneNote notebook for tracking a typical office worker’s responsibilites but with a creative flair. Nothing will inspire you to use your notebook more than making it visually appealing. Like your living room, you want it be a comfortable place to be.
Step One – How To
Read the afore mentioned tutorial notebook pages so that you are able to follow along. In most cases I will not be explaining every action in minute detail. You can also get some excellent instructions via Microsoft’s quick start guides, they include one page cheat sheets for both the UWP and DE versions.
Step Two – New Notebook
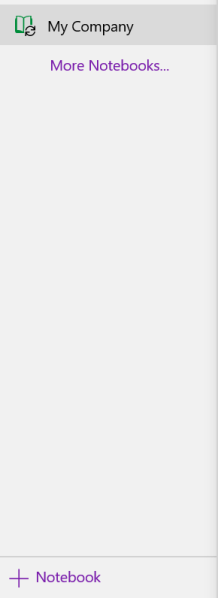
Make a new notebook named for your job. I always name mine after the company I am working for. In DE Goto File -> New. In UWP Goto the +Notebook button at the bottom of the notebooks section.
Step Three – Organize
Now we’ll create the basic structure of your notebook. You’ll want to make a section for every major function of your profession. There are a few that are ubuiquitos among office jobs so we’ll start with those but you’ll want add any that are unique to your position. Create the following sections to start with:
People – Here you’ll keep tabs on the people that you interact with. People you manage, co-workers, vendors, contractors, and bosses; you’ll want to record details about them all in this section. What they like and don’t, personality traits, and information they provide about their lives can all be valuable later. Tip: insert hyperlinks to these “people pages” on pages in the other sections for quick reference.
Projects – I like to make Projects a section group and then create sections for each project that I’m involved in under it. To do this just click tap and hold or right click in the navigation pane and choose new section group from the pop-up.
Meetings – If everyone took good notes in meetings we could probably have a lot fewer of them.
Tasks – This is where I track all the little actions I have to do that are not part of a project. I need to pull a report on sever storage once a quarter and I’ve detailed how to do it along with the script I use in this section.
Instructions – Manuals, written instructions, and even videos off Youtube get posted in this section. Onenote will index all of this stuff (even the dialog from video and text in pics). This means that the next time you search for ” use postage” the manual will pop-up.
Ideas – Self explanatory, everybody gets ideas about how to do something better, easier, or faster; the trick is in remembering them at an appropriate time.
Issues – If you want to solve problems or have one you need help solving, track them here to ensure you don’t waste time repeating fixes or worse yet forget all together.
Work Log – In the lead-in I mentioned that I never freak-out come review time. This section is why. I make a page for each year and on them I insert a table with the following columns: Date, Description, Reason, Requested By, Attachments, and Notes. At the end of everyday I spend 10 minutes jotting down what I spent my time on.
What your notebook should look like when finished. Be sure to doodle in the margins.
Step Four – Create
Now that we’ve got a notebook up and running, we can dive into the creative part of journaling with OneNote. Drawing and doodling in OneNote is a cinch; just select the draw tab in the ribbon, pick a tool and color and knock yourself out. It works best on a system with an active stylus but capacitive pens and even your finger will get the job done.
Draw
The draw options available in the ribbon offer a lot more than just your standard pen and marker choices. Poke around and you’ll find premade shape tools, and in the UWP edition there’s a straight-edge as well as ink-shapes that turn the sloppy circles that you usually make into to perfect ones. There are also highlighter markers (which I use often) and a lasso select tool that will help you move stuff around no matter the shape.
View
Under the view tab in the ribbon you can add lines and grids to your pages. You can also change the background color of your pages from this tab. The DE version will allow you to set a picture as the background for a page. Right-click (tap-hold) any picture that you’ve inserted and pick save as background. Tip: for the best effect edit your photo in paint or Photoshop first and turn down the opacity or turn up the transparency before setting the image as your background.
Insert
The insert tab presents a lot of possibilities. You can of course insert photos but also, videos, files of all types, audio recordings, and more. OneNote will attempt to index the audio from multimedia files and the text from images to make them searchable. It will also index the text from any files you embed on a page.
There are two options here that don’t get mentioned much; one is on-line pictures, the other is stickers. Both let you search for and insert an unlimited amount of artistic flair even if your best drawing is of a stick figure. In fact it is these two options that allow OneNote to compete with the likes of Goodnotes in the creative journaling market.
All Together
Of course you’ll get the best results if you combine all of the options available in the ribbon. If you’re using the DE versions you can get your page just right and then save it as a template so it can be used over and over. Look for the Page Templates button on the insert tab. Need some inspiration? Try an image search for OneNote Art to see what people are doing with this tool.
If you’ve read the first article in this series then you’ll know that I am in the process of helping my wife convert from a paper journaling system to a Windows tablet even though she usually prefers Apple devices. Obviously, I enjoy a good challenge.
In my opinion one of the biggest differences between Apple devices and Windows computers is that an Apple device is largely ready to use out of the box; basically, you just need to load your apps from the store, log on to your accounts, and go. Windows on the other hand is infinitely customizable. These customizations make the operating system more flexible for all kinds of people and uses, but can be source of frustration for those that just want to pick something up and go. Microsoft attempts to start you off with a basic profile that works for everyone, but it just doesn’t cut it for most people.
There are lots of guides about setting up Windows already out on the interwebs. Most of them show you where the settings are and what they do. From my experience in the IT industry, I’ve come to the realization that finding the settings isn’t the hard part. Especially when you can just ask Cortana “How do I turn off the WiFi?” or, “How do I setup a printer?” The hard part is getting your head around how best to organize a system and deciding what settings you should or should not use.
In this post I’m going to show you exactly how I setup a Windows profile to use with a Pen enabled system. It’s going to be a long post so I’ve broken it down into sections. I am assuming that you’ve completed the initial setup of Windows and created a user account. I’m also assuming that you know how to install apps from the app store and logon to your various accounts. If you want to try these settings but would prefer not to mess up your current profile I suggest creating a new user account. Select the Start button, then select Settings >Accounts > Family & other people > Add someone else to this PC. You can always delete it if you don’t like it or switch to it if it works better for you.
A word of warning, my philosophy around the best organization of an operating system is not predicated on reducing the number of mouse clicks/screen taps. I understand that this is important for some, but to me hunting for the thing to click is more annoying than being able to get to it in one. Also, I feel that the indexing provided by modern operating systems already allows for zero clicks with regards to launching applications making pleasing aesthetics and organization in the GUI more desirable than all out efficiency.
The Software
Everyone has specific needs for applications but people who are reading this may just be starting out with Windows 10, so I’m going to list out some applications you should consider installing. Installing software before arranging your start menu and adjusting other settings will make things a little easier in the long run.
Microsoft Store Apps
Windows 10 can operate as both a PC and a tablet (2-n-1) to facilitate this flexibility, it has two methods of installing applications. The Microsoft Store is essentially the same thing as Apple’s App store or Google’s Play store.
Somewhere in your start menu you should see a shopping bag icon. Click it and then search for and install the apps below. If you don’t already have an MS account you’ll need to create one now. Don’t complain, Apple and Google both require accounts, too, LOL. If you’d prefer to set up your account on the web rather than going through the wizard you can do that here.
Alarms and Clock – built-in if your version of Windows 10 is new enough.
Amazon – Amazon shopping, has voice recognition and bar code scanning
Amazon Music – Stream and download Amazon Prime music.
Audible – Audiobooks, this service requires a subscription but you can get two books for free.
AutoDesk SketchBook – A great drawing and sketching app that is easy to use.
CPlus for Craigslist – Lets you setup searches for Craigslist that notify you when those items become available.
Drawboard PDF – A PDF viewer that supports drawing and inking on/over the files. This app is free on some systems or $9.99 on others.
Facebook – I actually prefer the website but installing the app makes it show up as a sharing option in other applications.
Flipboard – The built-in news app is great, but I use Flipboard because it allows me to publish articles from my blog.
Flixster – Movie theatre show times & tickets, reviews, clips, etc.
Fresh Paint – Another great art app that is easy to use.
Google – Easy access to all of google’s services: Search, Gmail, YouTube, ect.
Instagram
Kindle – Book reading app
Messenger – Facebook Messenger app
Merriam Webster Dictionary
Microsoft Jigsaw – Puzzles on your computer
Microsoft Mahjong
Microsoft Minesweeper
Microsoft OneNote – Free tablet edition of the note taking app.
Microsoft Skype
Microsoft Solitaire
Microsoft Sudoku
Microsoft Translator
Nook – Barnes & Noble book reader
Netflix
Scan
Sence Clock – Great nightstand clock but also gives you live tile clock for your smart menu.
Skype
Sway – A new type of document that combines the features of a Powerpoint and a web page
Twitter
Desktop Software
Everybody has their prefered desktop software and programs they require for their profession but there are a few that are ubiquitous from my point of view. As I stated earlier, having the majority of your software already installed will make organizing your start menu (next step) easier.
7zip – File compression utility
Acrobat Reader DC – there are still some PDF files that require Adobe to fully work. I do not make it the default.
I find that one of the keys to enjoying the Windows 10 operating system revolves around spending some time to configure the user interface settings. These settings control what you see in the start menu along with how your system looks and works. We’ll also need to adjust the settings for how our pen works. There are hundreds, maybe even thousands of other settings you can tinker in Windows, but Microsoft does a good job of picking defaults and unless you have a specific reason to change things like the Power settings or the Update frequency I recommend that you leave them as is.
Start Menu
The Windows start menu has a starling number of configuration options most of which are available under the personalization heading in the settings app.
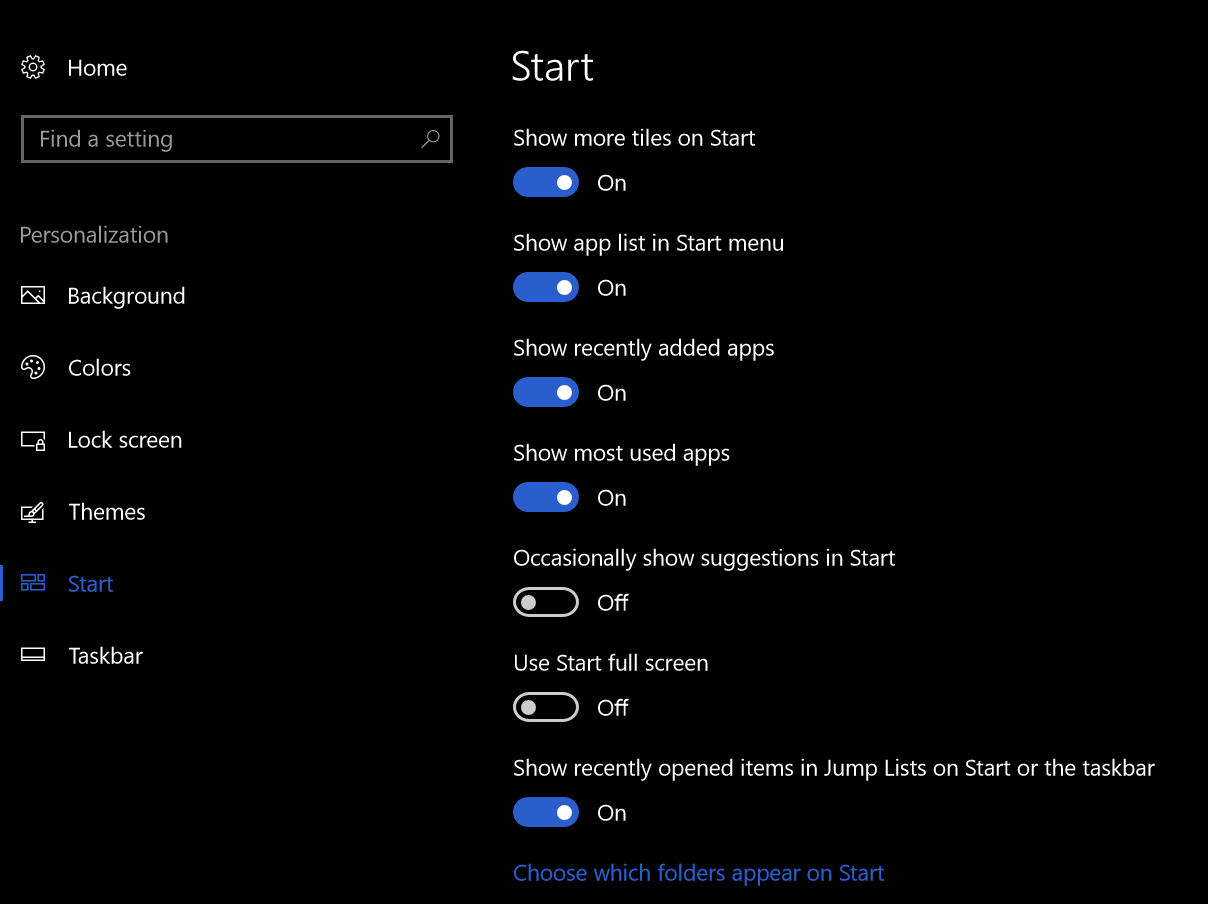
In your search bar type “Start Settings” and adjust the toggles to match the picture below.
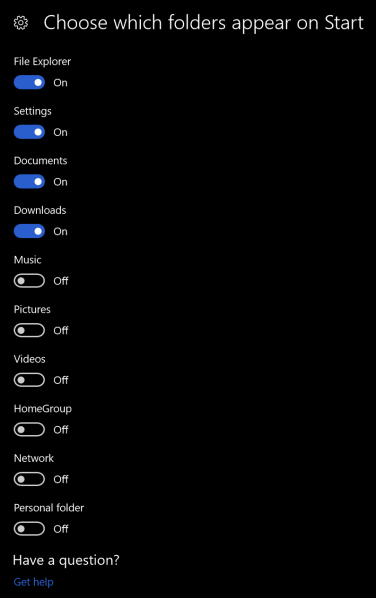
Now click the “Choose which folders appear on Start” link at the bottom of the start settings screen and adjust those toggles to match the following picture.
These settings control which folders appear above the start button. They are handy shortcuts that I use often but having too many of them causes screen clutter.
Themes
Themes are composed of background pictures, color schemes, icon packs, sounds and sometimes even screen savers. They do more to personalize the way your computer looks than almost anything else. There are built-in themes, themes in the app store for free and for pay along with countless web sites (google Windows 10 Themes) to get them from. Microsoft has a free library of all kinds of themes organized by subject categories here.
If you choose to download themes from a web-site, exercise caution. You have no idea what’s in the files you are downloading; get them from reputable sites and scan them with AV software (right-click on the downloaded file & choose scan with windows defender) before installing. You can also make your own themes; check out my article on how to turn your favorite pictures into one.
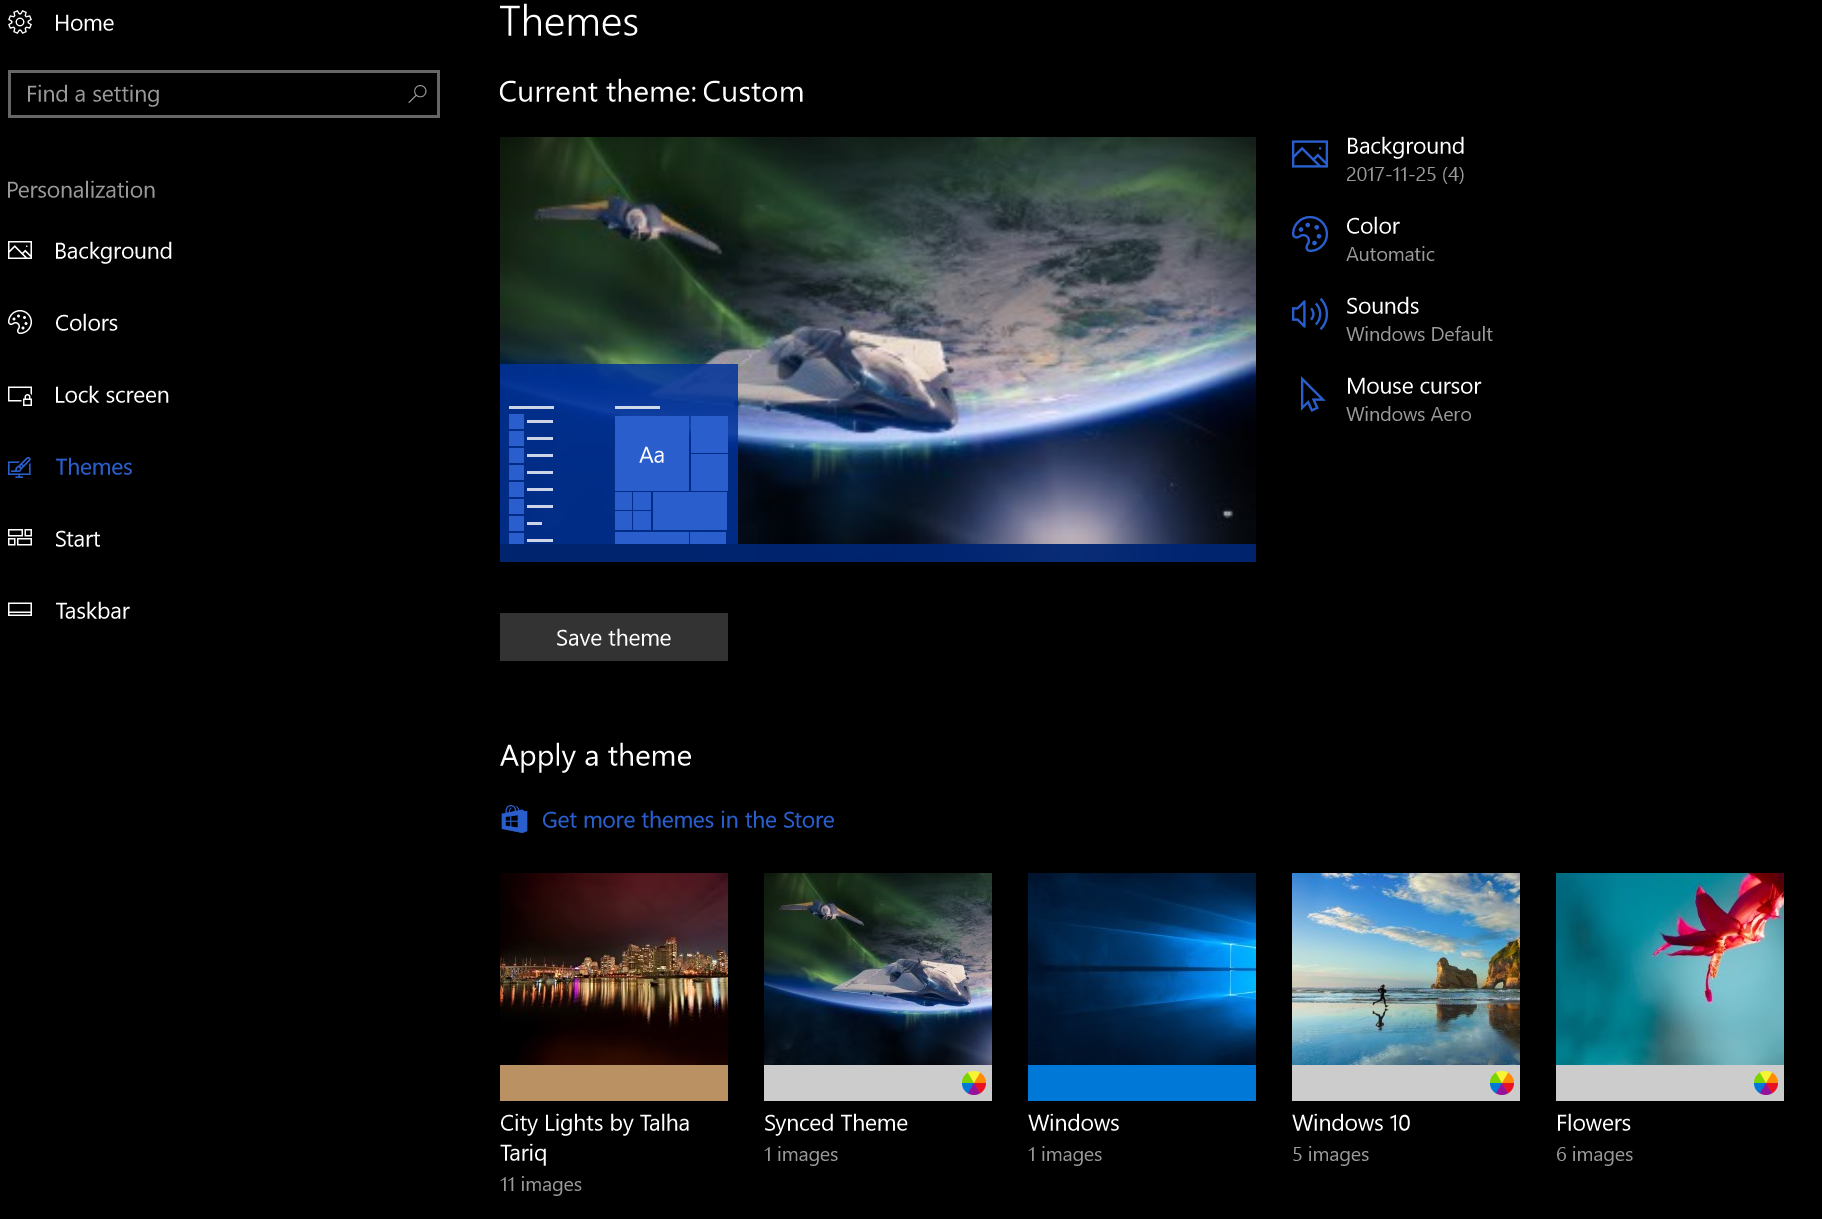
In the search box type “Themes” and click “Themes and related settings” in the results. You will find all the controls along with a link to find more themes in the app store. If you don’t have any downloaded and don’t want make your own I suggest selecting the built-in Windows 10 theme.
Lock Screen
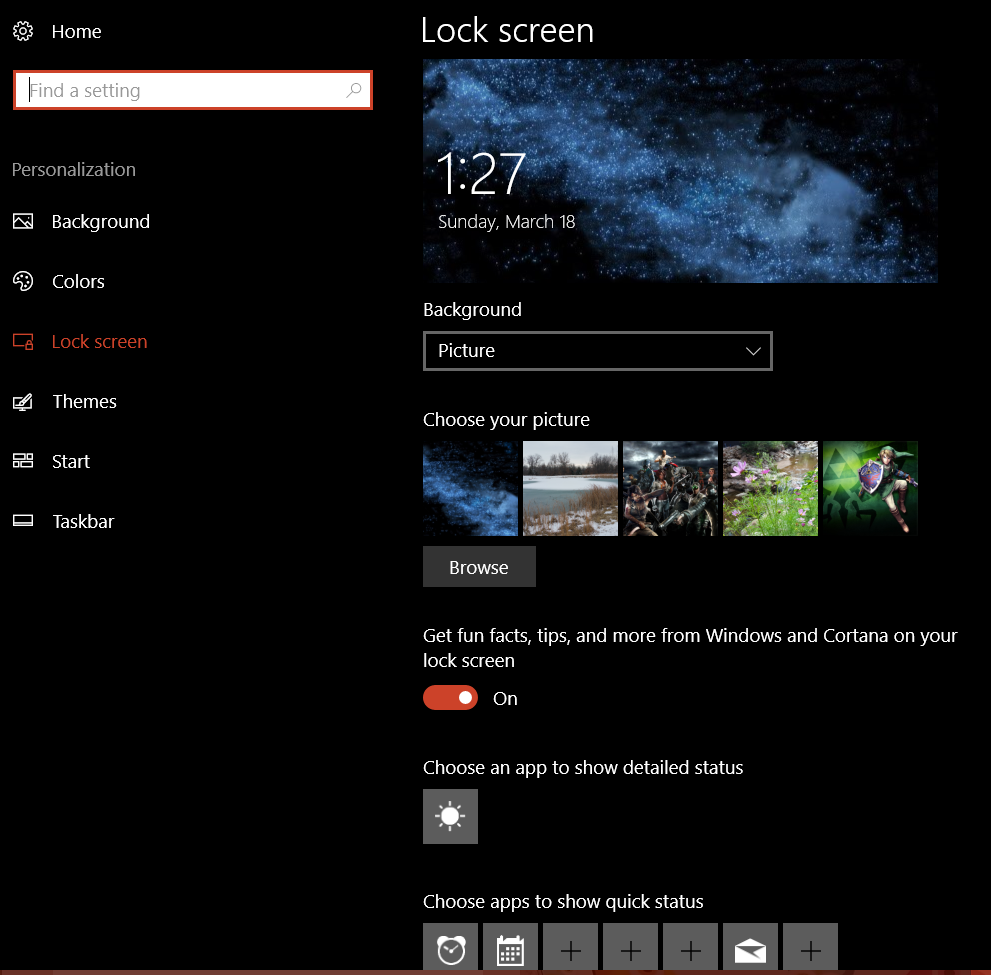
The lock screen in Windows 10 works just like the lock screen on your smartphone. You can select an image or even play a slide show for the background. Some apps like the weather and calendar are able to display information when the lock screen is on. Just type Lock Screen in your search bar and click Lock screen settings in the results. Adjust the settings to match your preferences.
If you have a case or skin that you like, take a photo of it and use it for your lock screen.
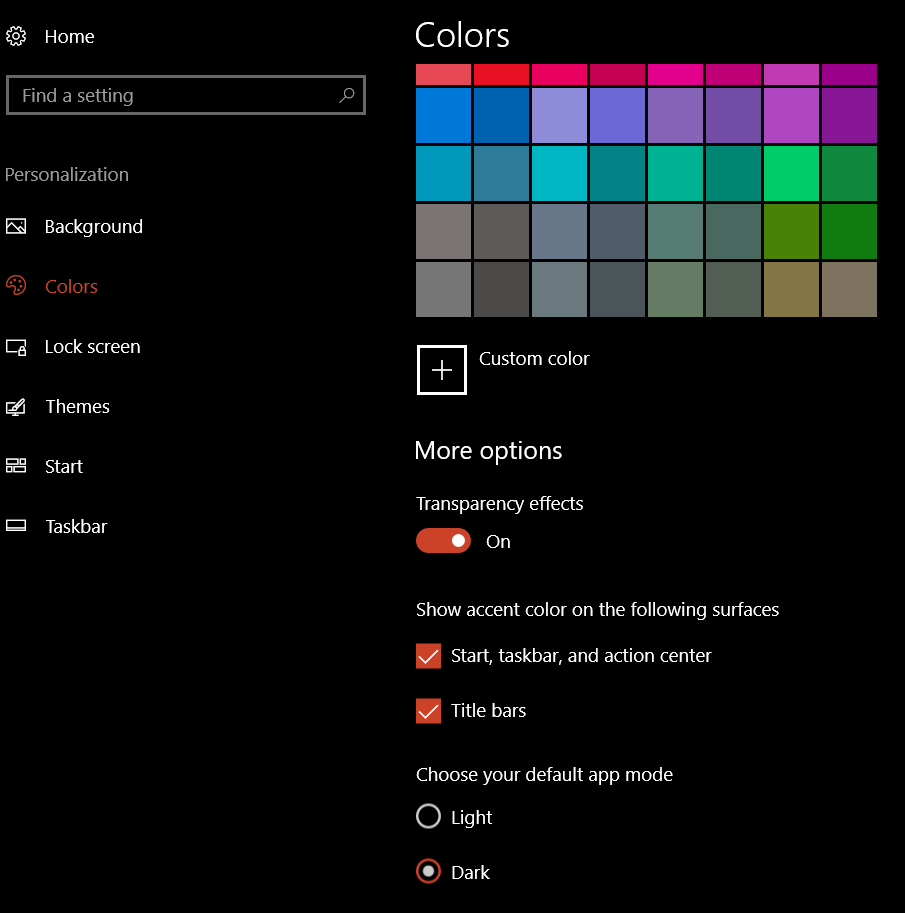
Colors
If you’ve opted to use a theme, it likely set the colors of your Start Menu background, Task bar, and the borders of windows. However there are still some options you’ll want to adjust. Type color settings in your search bar and select it from the results. I reccomend the options show below.
Choosing Dark as the default app mode will cause many applications to have a black background like the screenshots you see in this article.
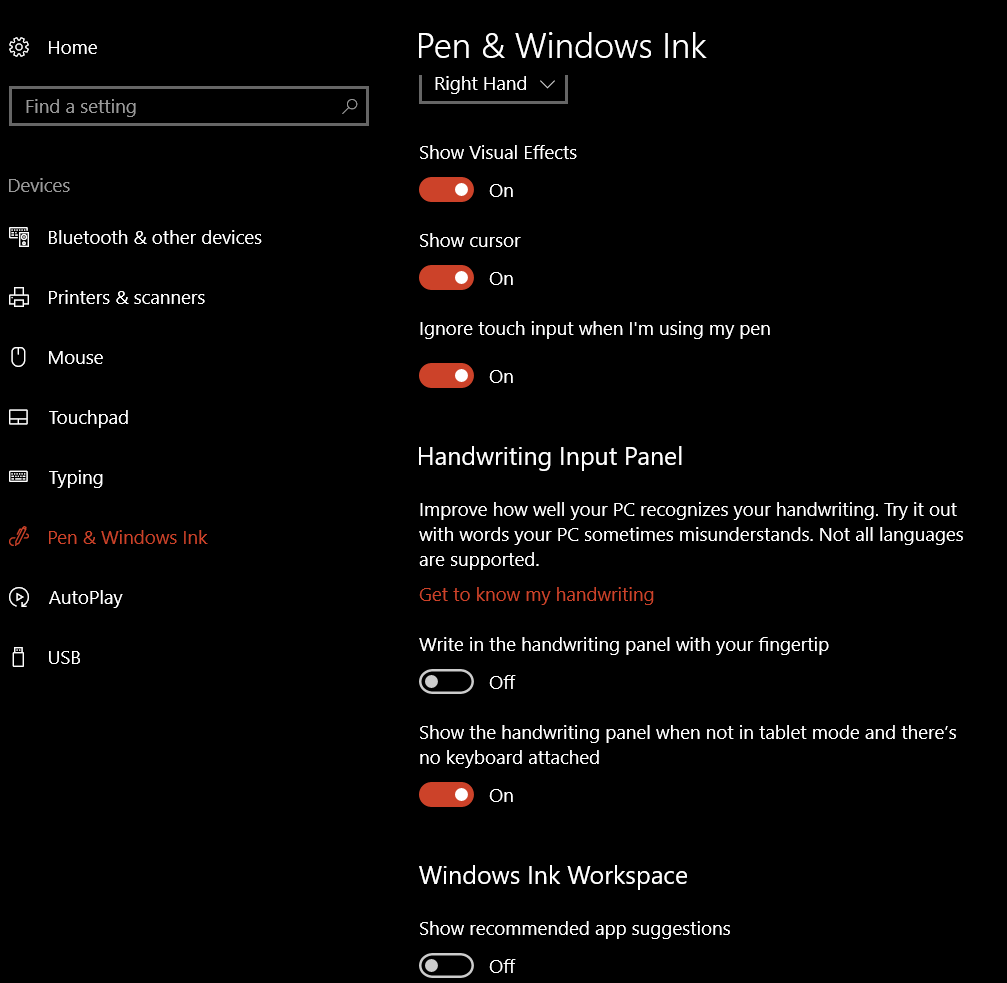
Pen Settings
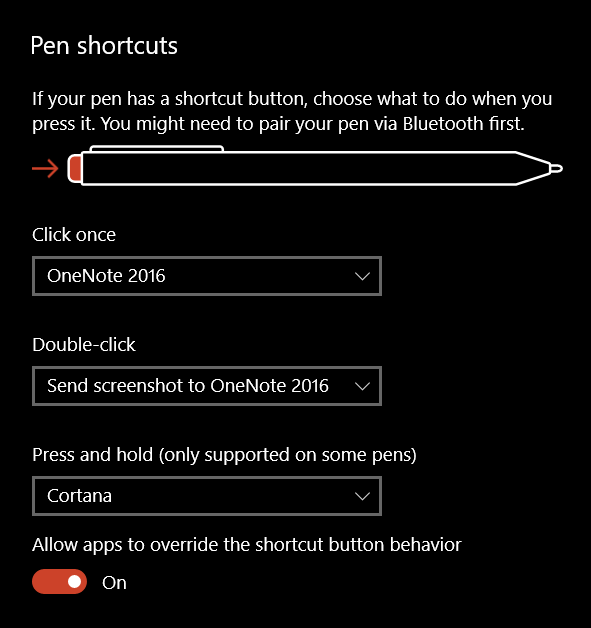
The point of this article is to configure your system for digital journaling, you will want to fine tune the way your pen/stylus operates so that you can get the best experience. Type Pen Settings into your search bar and select it from the results. I suggest the settings below. I also recommend that you click the “Get to know my handwriting” link, this will launch an application that fine tunes the handwriting recognition for even the sloppiest writers (like me). On the same screen you can control your Pen’s buttons.
There are some more pen settings in the classic control panel. Type control panel in the search bar and select it. Find the Pen and Touch icon. Here you can control the tap actions and enable the eraser function if your pen has one. You should also enable Flicks. Just keep in mind that they only work in Desktop Apps and not the Tablet apps (called Universal Apps) that you download from the store. You want to use the practice link at the bottom of the window if you’ve never experienced them before.
The Start Menu
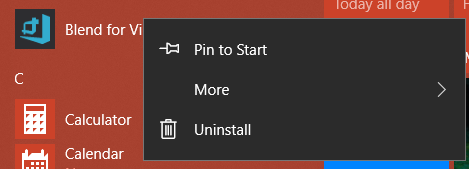
Now we’re ready to organize our Start Menu. First go through your apps list and right-click on the icons for all the software that you use frequently. Choose the option to “Pin to Start”. Note, if you see “Unpin from Start” it means the icon/tile for that program is already in the start screen portion of your start menu.
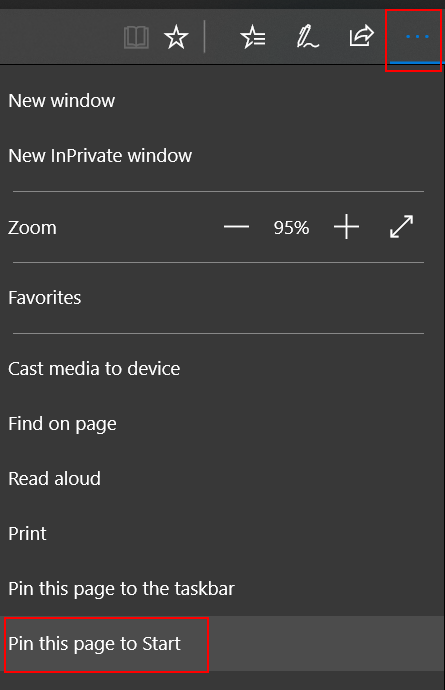
I also like to pin my favorite web sites, like those for my bank, the on-line access to my TV, and Facebook to my start screen. To do this you’ll have to use the Edge browser. Just go to the URL of the site then click the action menu … icon and choose Pin this Page to Start.
Organization is Key
Now you have a mess of icons and tiles all over the place in your Start menu. How did this help? To get the most out of the windows start menu you need to organize your icons into sensible groups.
Tile Sizes
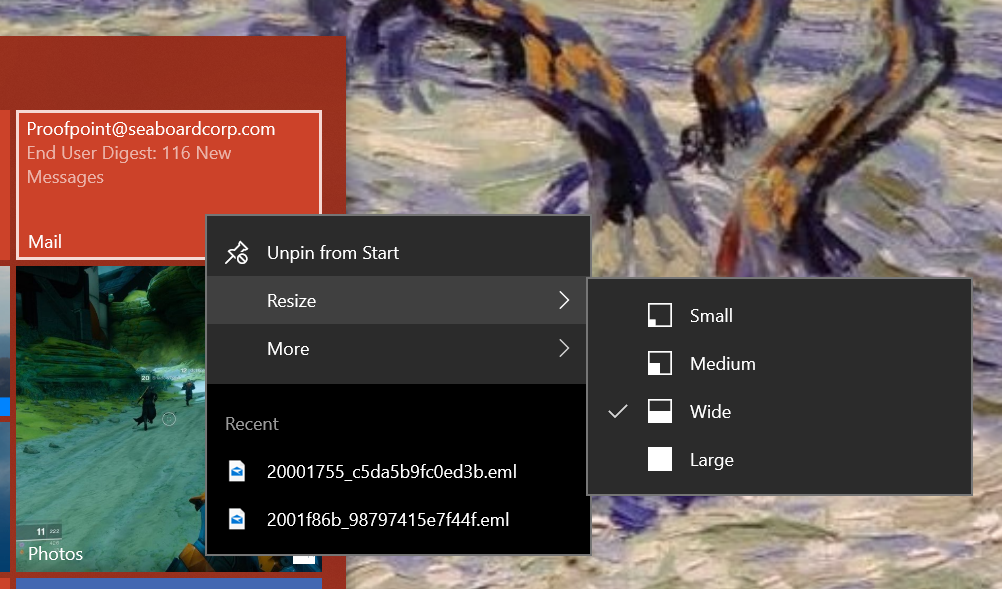
The icons in your start menu are called Live Tiles. Some have the ability to show updated information from the application that they represent. For instance the News tile will flip through headlines, the Photos tile will show your pictures, and the Facebook tile shows the latest posts on your timeline. To get the most out of live tiles you need to adjust their sizes so that they can display the information you want to see. Right click on a tile and go to resize to see its options. Many tiles change what they show in accordance with their size. For example, making the weather tile wide instead of medium will cause it to show the full weeks forcast instead of just the current weather conditions.
Group Tiles
You can group tiles together in named categories. Microsoft usually gives you a group called Life at a Glance to start with. You can make new groups by dragging similar tiles close to each other. When you get two or more tiles next to each other, hover your mouse just above them and you see the option to name the group. I make the following groups on every computer that I use:
Life at a Glance = news, mail, calendar, Facebook, Instagram, Twitter, Messenger, photos, calculator, etc.
Media = Art, photo editing, video editing, audio editing
Office = Any application that I use for documents
Games
Dev Tools
Movies, books, and music (sometimes I name this group entertainment)
Nested Tiles
Besides groups you can also create nested tiles. This works in much the same way it does on a smart phone. Drag one icon on top of another and let go. Add more icons to the nest by dragging them in. When you nest tiles you are able to fit more of them in a much smaller space but you give up the “Live” functionality. They will not show updated information or notifications in most cases.
My Book Apps as a Nested Tile
Conclusion
If you’ve made it through all these steps you should have ended up with a great looking profile that shows your most important information every time that you click the start button. Your pen has been optimized, handwriting tuned, options for the on-screen input adjusted, lock screen and backgrounds set, and more. Once of the nicest features of Windows 10 is that once you do go through this on one computer; the results will replicate to every Windows 10 computer you use afterwards as long as you didn’t turn this option off. Thanks for reading and stay tuned for the next article in this series.
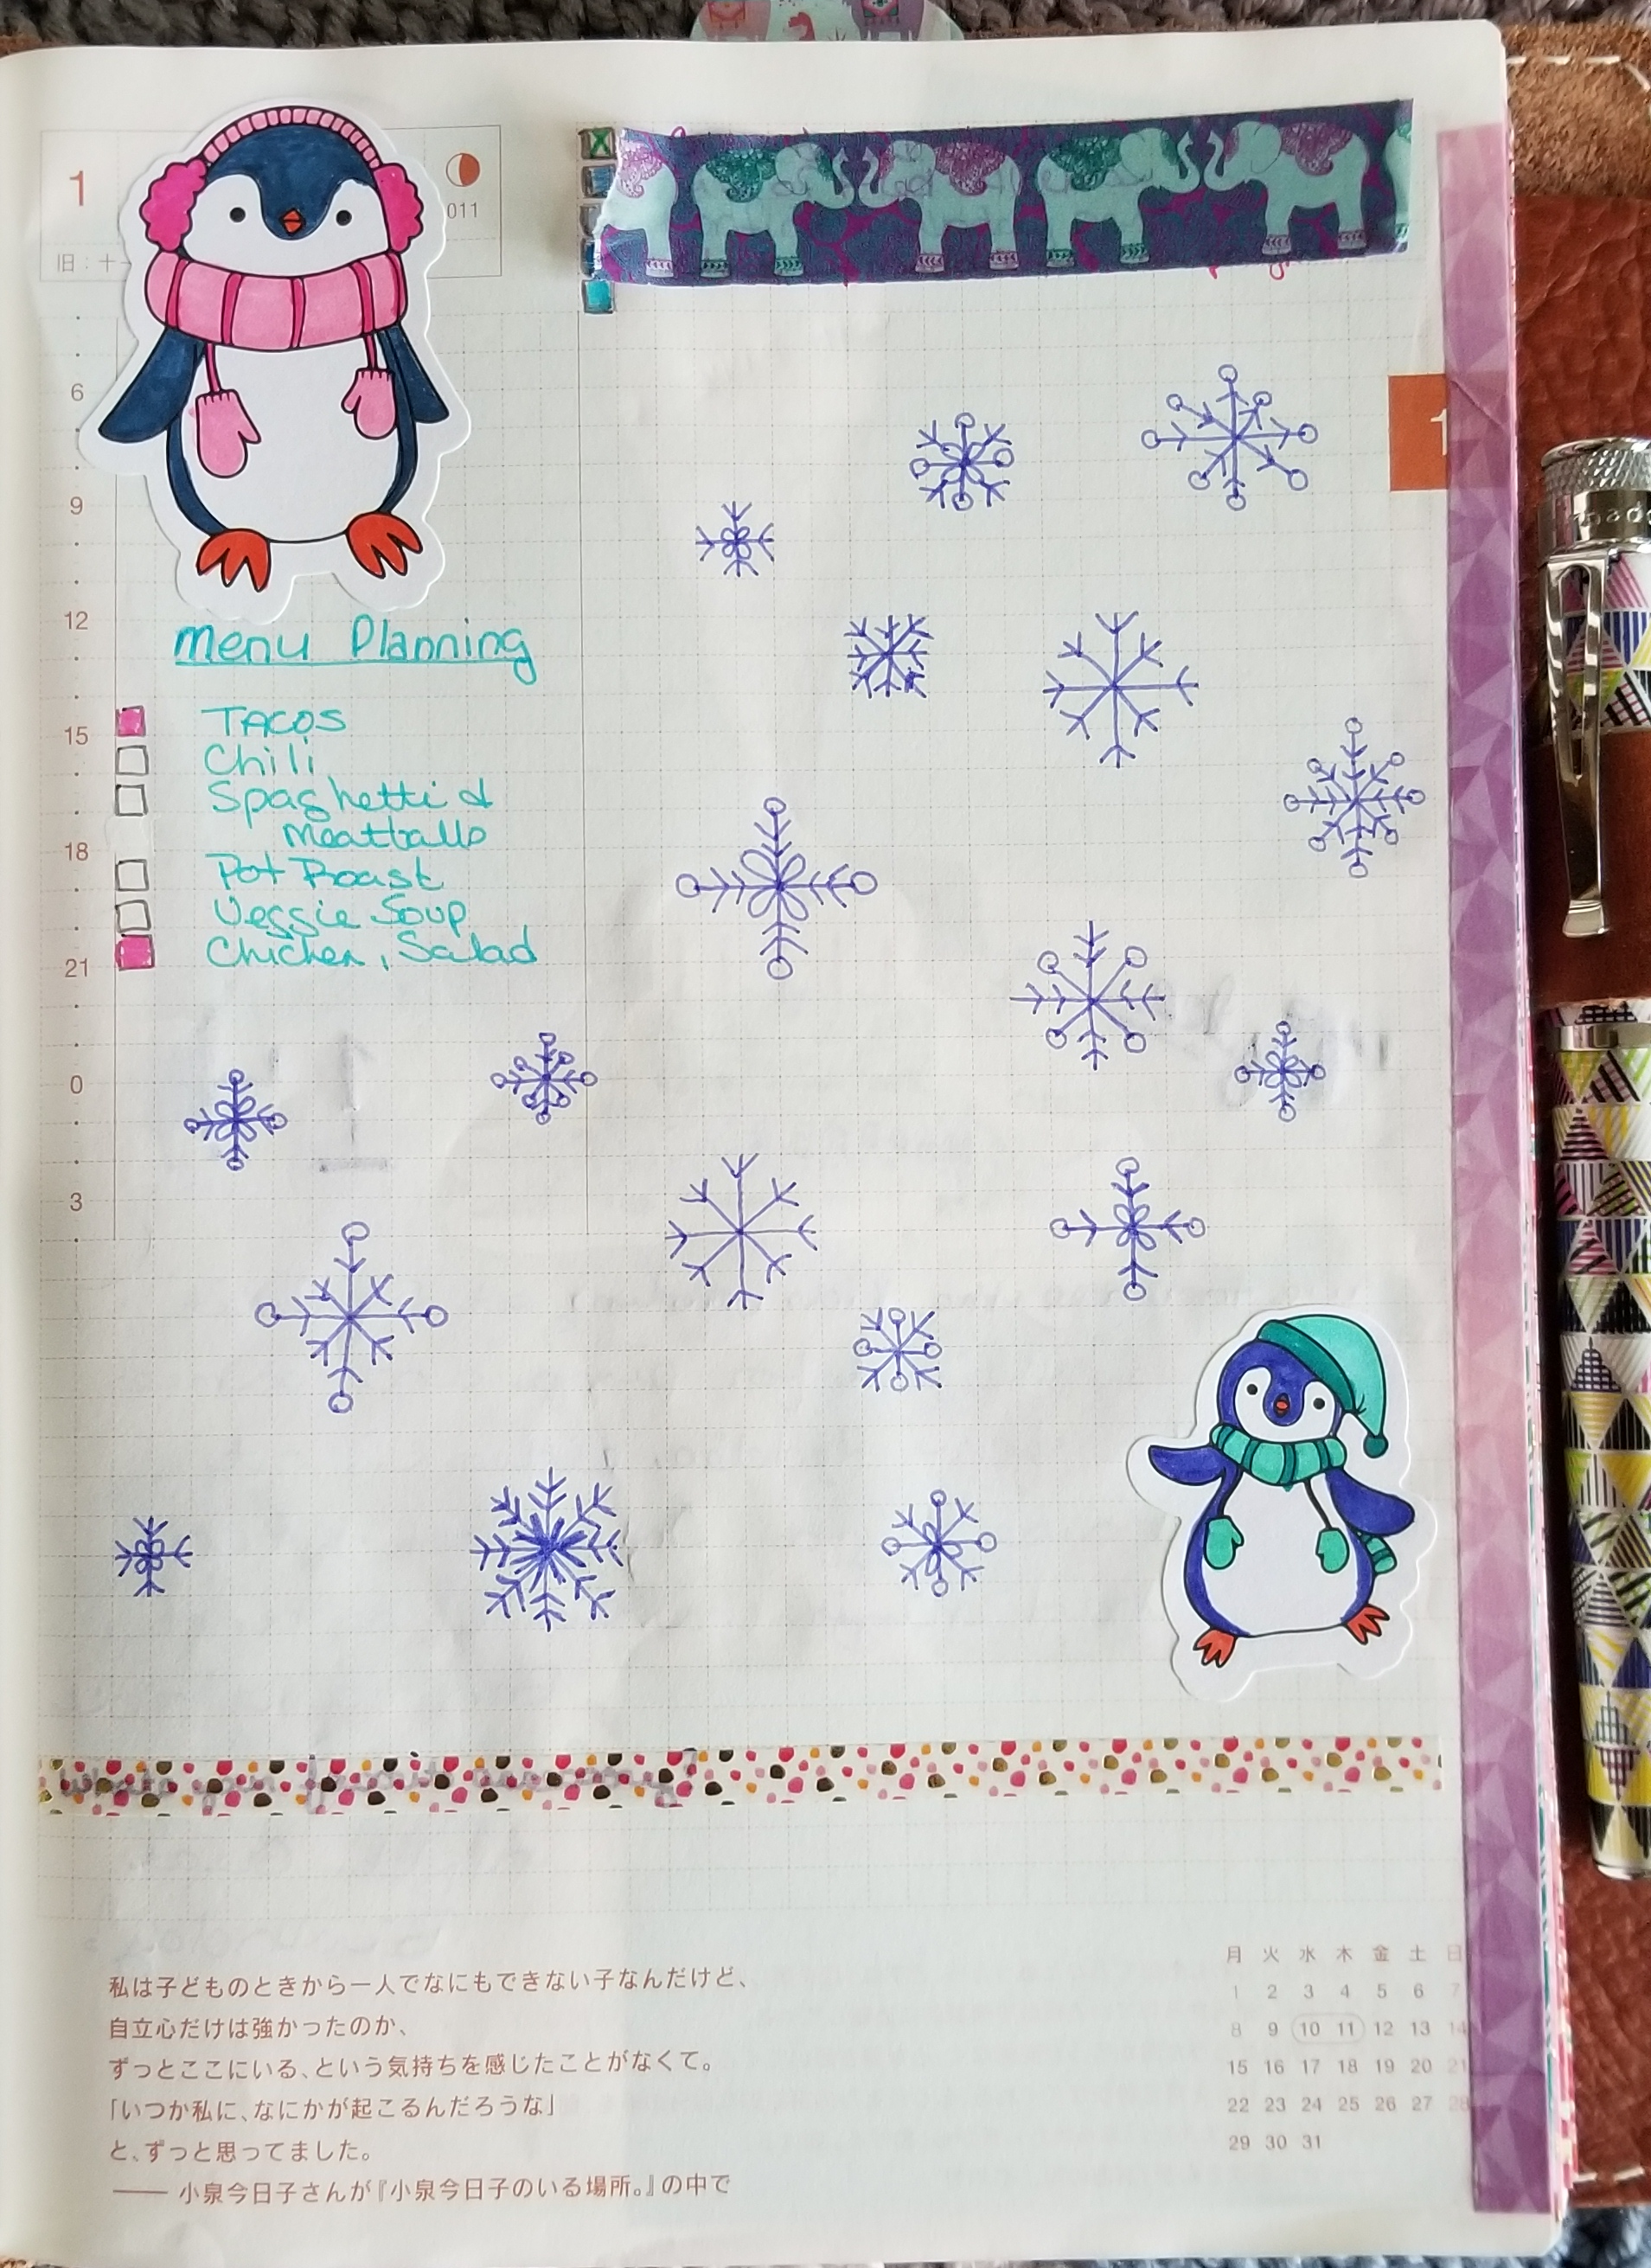
My wife has been looking at the iPad Pro devices for the last few months. She’s seen what I’m able to do with my Surface Pro and Galaxy Note pen enabled devices and has become interested in converting her coloring and more importantly her journaling to a digital format. She uses her Hobonichi Planner and a custom fountain pen I bought her to run our entire household, manage our children’s schooling, track our healthcare, and as a form of creative output. She prints pictures from the HP Sprocket and sticks them on various pages or diary entries about our activities. She colors, doodles, stickers, and even paints on some of the pages. You can see her custom leather journal cover from Chic Sparrow inscribed with the now famous Zelda quote, “It’s dangerous to go alone, take this!” in the featured image above. People don’t go to that expense and trouble for something that isn’t important to them. Convincing her to go digital has been a long, long journey.
Her journal is a very effective tool and an art form in and of itself, but as our family becomes busier and we rely more and more on the information contained within it, the technologist in me can’t help but see several major flaws with the paper system. The biggest of which is that it’s a single copy of important data with no easy method of backing it up. The best I’ve come up with is taking pictures of some of the more important pages. Other problems crop up when we need to incorporate digital information into the system like sites and passwords. The Sprocket lets her add photos but other digital media is out of reach. There are also challenges when she needs to share the info with other family members. I’m concerned about security; if she leaves it at a restaurant whomever picks it up will have access to important personal information just by flipping through the pages.
She’s prefered Apple’s technology for quite some time now. I’ve lost count of how many iPads and iPhones she’s cycled through over the years. As I’ve said in other articles, I’m not a brand oriented technologist, I use whatever works best for the task at hand. For her, that’s been Apple devices, hence her interest in a new iPad with an Apple pencil.
However, I’ve noticed that she needs to borrow my PC to accomplish certain tasks more frequently than she realizes. She likes games like The Witcher 3 and Sims 4 that just don’t run on Apple’s stuff. The full Microsoft Office is required when doing anything complex. Our educational curriculum requires the use of web-sites that still employ Adobe Flash. When it comes to digital pen input, Microsoft and Samsung have had years to perfect their solutions and they work in the entire system across all apps, not just a select few. These reasons led me to convince her to convert to a Windows 10 tablet instead of an iPad with a pencil.
She had been using my Surface for some of the PC related tasks I mentioned above and liked it. To show her Windows was the way to go, I set her up a customized user profile and she played with it for a couple of weeks. She enjoyed it for the most part, but was nervous that the learning curve would cause a lot of frustration. I didn’t argue, just agreed that it might and promised that if the transition wasn’t worth it, we’d return or sell whatever device she ended up with and I’d get her an iPad with an Apple pencil no questions asked.
I think a big part of the attraction to iPads over Windows is the physical size. People assume that the Surface Pro is the only available system; nothing could be further from the truth. For her birthday I got her a Samsung Galaxy Book 10.6″ which is a Windows 10 tablet that is roughly the same size as the smallest iPad (10.5″) that you can use the Apple pencil with. I’ll be writing a full review of it just as soon as I can pry it out of her hands and spend some quality time with it. It really is an impressive piece of hardware and I’m more than a little jealous.
She spent several hours, a couple of days really, getting Windows tweaked and installing software. Things like Google services, Email, Instagram, Facebook, Flipboard, Spotify, Pinterest, Amazon, Nook, Kindle, Audbile, Office 365, Steam, etc. were all just as easy to setup on the PC as they were on the iPad (her words). 75% of the software including Office 2016 came pre-installed and the rest was just a matter of opening the Windows store and finding the apps. Most modern apps store their data in the cloud, so once you get them installed and have logged on with your account everything is just there. I helped with some of the advanced stuff like: making a Windows theme out of her favorite pictures, arranging her Start Menu, enabling surround sound on her headphones, and exporting / importing data from her apple devices. I gave her a quick lesson on how to manage bluetooth and Wi-Fi, where to find all the settings she might need, and how to create and pin shortcuts.
When I followed up with her a few days later she told me how well the transition had been going so far. In her opinion, Microsoft has really nailed it with Windows 10. Cortana kicks the crap out of Siri in every way, she bragged about how awesome it was to have a voice assistant that could actually assist. She loved the speed of her new system and how it could play her favorite full games or stream them from our Xbox, Playstation, or gaming PC. She’d figured out the hand-writing input; had used bluetooth to pair a Dualshock controller, an external mouse, and her Sprocket printer. She setup all of her network connections, synced her iPhone and more. I was impressed. For most of it she just asked Cortana, “How do I….?”.
The trouble started when she logged on to the Windows store to download the Goodnotes app she’d experimented with on her iPad mini. Unbeknownst to me, this specific app was a big part of the reason she was willing to attempt to convert from paper to digital journaling. The Goodnotes app is featured in many journaling groups on Facebook, Instagram, and twitter and has a lot of fan support on Youtube. It wasn’t there. Now what? She likes Windows 10 and doesn’t really want to change to an iPad, but the journaling portion of the project was the most important part to her. Was my plan busted before it really got started? To be continued…..


 On the same screen you can control your Pen’s buttons.