I spend all day everyday and way too many nights looking at screens. For some cosmically ironic reason my eyes are very light sensitive. Nothing gives me a headache faster than bright white light. Over the years I’ve tried everything to reduce the strain on my peepers. I crank the brightness down as low as possible. I’ve tried every type of sunglasses, computer glasses, and monitor shade on the market. I turn off the overheads and have blackout curtains in my home office.
Dark mode has been a Godsend for people in my situation. The only problem with it is that it isn’t being deployed fast enough. All modern browsers can support dark mode (a dark background with light text), but for the effect to work the site has to be coded in a certain way. You can imagine how anxious web developers are to re-write millions upon millions of sites, pages, and tools.
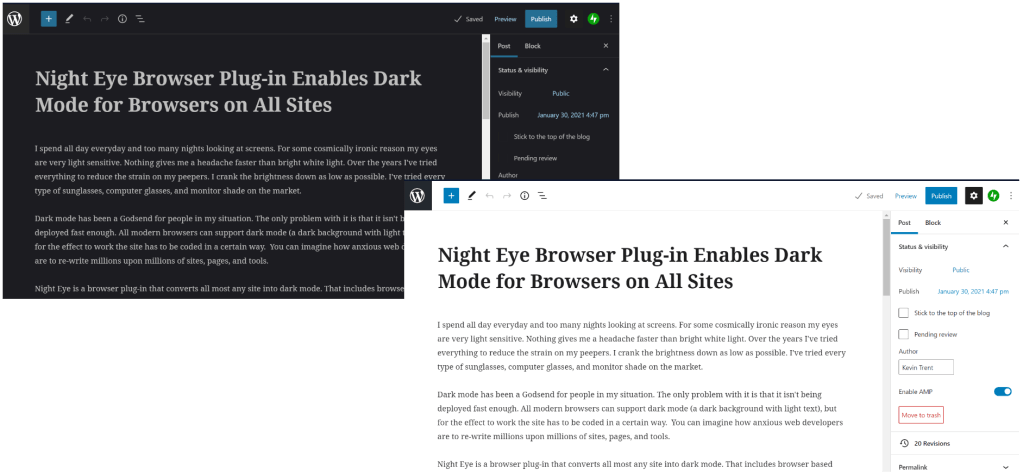
Editing this page in dark mode versus normal.
Night Eye is a browser plug-in that converts almost any site into dark mode. That includes browser based applications like the WordPress editor I am using right now. There are several other dark mode browser extensions available and I tried several of them before I settled on Night Eye. One of them really slowed my browser down and another was sending way too much data to an IP in China. Here’s a friendly tech tip, always run a network sniffer after you install an extension!
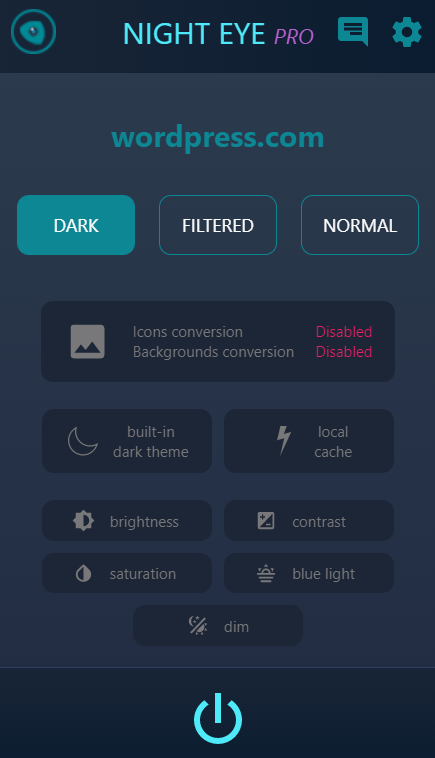
Night Eye is a paid application, which I actually prefer. The last thing I need in my browser is more tracking and adds. You can choose between several yearly subscription options, or the Pro license. Run the demo of Pro mode for ninety days after which it will drop into free forever mode that will continue working on any five sites you choose. I started out with the $9.99 subscription and upgraded to the pro license after a couple of years. I’ve emailed their support a few times and they’ve always solved my problem.
It couldn’t be any easier to use. Open the extension store in whatever browser and search for Night Eye. Install it and turn it on by clicking its icon in your browser’s toolbar. That’s it. If you don’t know how to get into your browser’s extension store just head over to their site and click the matching icon on their homepage. They will send you to the right spot. There are a handful of settings you can adjust to your preferences, but you probably don’t need to. There’s also a whitelist (no pun intended) for anything you don’t want converted.
Night Eye is the Frank’s Red Hot of browser extensions, “I put that sh*t on every thing”. When I have to work on someone else’s system and open their web browser, the experience is jarring. Now if we can just convince building managers that we don’t need double forty inch tube lights in every square foot of every office drop-ceiling on Earth, I might finally be able to stop wearing sunglasses indoors. Thanks Night Eye!
Many times when a new release is a mashup of other titles the results are abysmal. The ideas they borrow from more popular games are not implemented well and don’t form a cohesive experience. When they switch between the borrowed elements it can feel like you have changed games in the middle of play.
Immortals Fenyx Rising’s “design by committee” shows through in places. The title is a dead giveaway for the boardroom meetings that inspired the compromises. However, in this case Ubisoft seems to have limited their group decisions to mostly superficial matters.
The game itself is great. The world it takes place in is reminiscent of Breath of the Wild. You climb statues to reveal new sections of the incredibly large map. While you’re up there, a little maneuver reminiscent of Assassins’ Creed has you mark interesting locations on your map. Speaking of interesting locations, you will find Vaults that are similar to BoTW’s shrines, chests of loot, challenge quests, and collectible resources scattered everywhere. So much so, that I can’t imagine anybody but a professional having the time to 100% complete everything.
The combat system reminds me of the God of War series more than anything else. You are armed with a sword for quick strikes, an ax for heavier blows, and a bow for ranged engagements. Dodges and parries are available for defense. The weapons and armors feature unlockable upgrades and powerful combinations that make engaging multiple enemies easier. Eventually you’ll earn a sidekick that will fight along with you and other power ups that greatly enhance your lethality.
The enemies span the full gambit of evil creatures from Greek mythology. Gorgons, Harpies, Minotaur, Cyclops, and zombie soldiers will do their best to stop you from reaching your goals. There are also enraged bears, wild boar, and some crazy chickens thrown in for good measure. The fighting starts out simple and increases in difficulty as you improve your character’s abilities. Boss fights can be very challenging especially if you haven’t mastered all the abilities you have unlocked at the time.
The game is fully voice acted. A large part of its charm comes from the amusing banter of the narrators and NPCs. The story is fairly straight forward. You play Feynx, a lowly shield barer who is the only chance of restoring order to the Golden Isle before Mount Olympus is over run. The character creation system features a choice between male or female along with the usual face shape, hair styles, etc. You will unlock more options as you play. Your character’s look can be edited during play and micro transactions provide custom skins for almost everything.
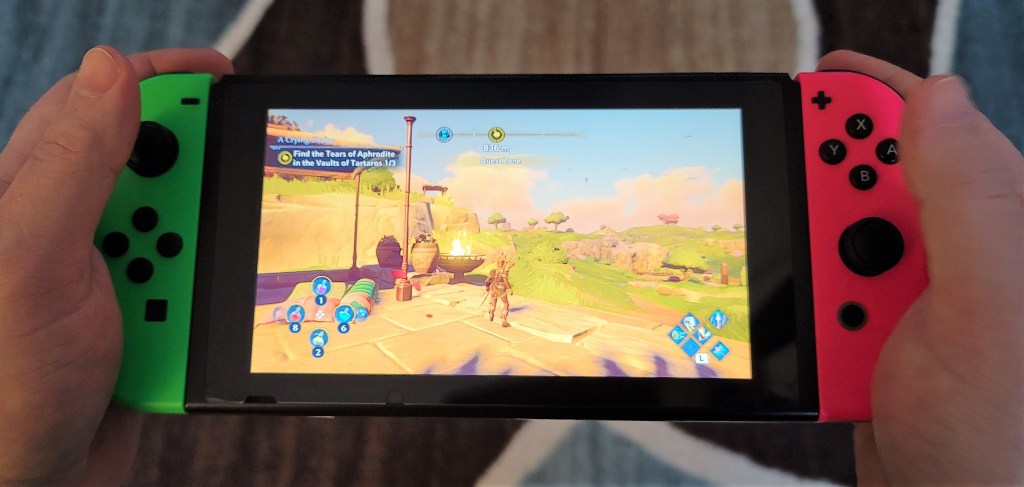
The game’s graphics fall squarely on the cartoon side of things which keeps the play family friendly. I’m playing the game on a Switch. It runs fine and looks good on the small screen although text can be hard to read. When blown up to a big screen TV the graphics are a little on the blurry side but still playable. The pictures above are of the Switch on my TV. I haven’t noticed any serious lagging so far. I’ve also played the game on a friend’s PC, which of course looks much better. The game is available for Xbox, PlayStation, PC and the Switch. According to Ubisoft, if you sign into their cloud you should be able to transfer your saves between the various platforms, but I personally haven’t tried to yet.
The sixth generation of wireless networking, technically named 802.11ax, has been available for around a year. However, mainstream devices are just now starting to take advantage of the upgraded capabilities. Wi-Fi 6 access points can be difficult to obtain, I was able to order one for my UniFi system straight from the manufacturer’s online store. Amazon, BestBuy, and other vendors were continually sold out.
Before we get into the particulars of how to install the equipment, a word on why you might want to. Fifth generation wireless networks also known as 802.11ac have a maximum speed of 866 megabits per second. 802.11ax devices can reach 1200 megabits per second. In my case, I stream Steam VR games from my PC to my Oculus Quest 2 and the extra bandwidth will let me crank the graphics to their max.
UniFi 6 Lite Packaging
I ordered the Unifi 6 Lite access point and am blogging the experience of adding the unit to my network as I do it in real-time. My entire network is based on the UniFi system; the controller, router, switches, and access points. If your topology incorporates another vendor’s products your experience may be different. The 6 Lite unit does not include a PoE injector, if your network switch does not support power over ethernet you will need to purchase a separate adapter.
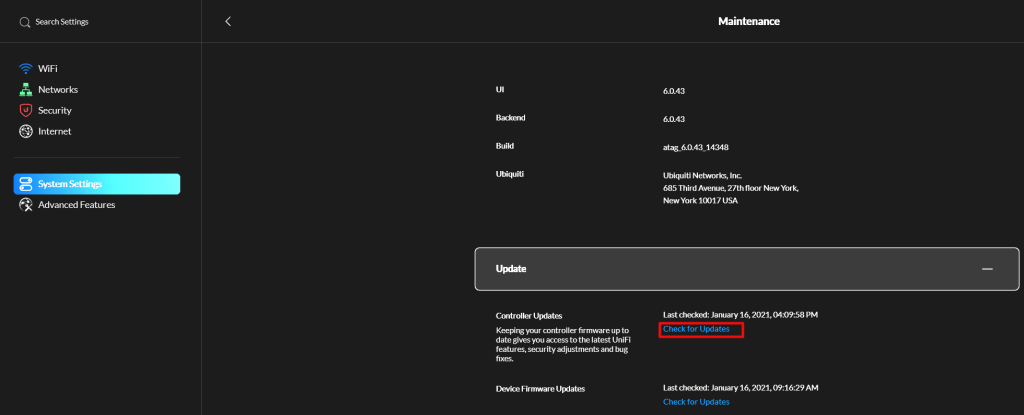
Anytime I start a project like this the first thing I do is make sure that all the software is up to date. At the time of this writing 6.0.43 is the newest edition of the Windows UniFi Controller software. Go to System Settings -> Maintenance -> Update and use the link to check for updates.
Update your UniFi Controller Software before installing the new WAP.
Unbox the unit and connect it to a PoE switch port using a suitable RJ-45 connection. Logon to your UniFi controller. The WAP should power on as indicated by the ring light on top flashing, then the unit will be detected by the controller, look in the devices section to locate it. Click on the device and then select Adopt in its pop-out panel. This process can take several minutes so be patient.
Before adding the new WAP to any of your AP Groups or creating one just for it, you’ll want to upgrade the firmware. While still in the Devices section of the controller, hover your mouse over the newly adopted access point and a menu will appear at the far left. Press the upgrade button and then click Confirm. Again, the process can take several minutes.
Upgrade the WAP firmware.
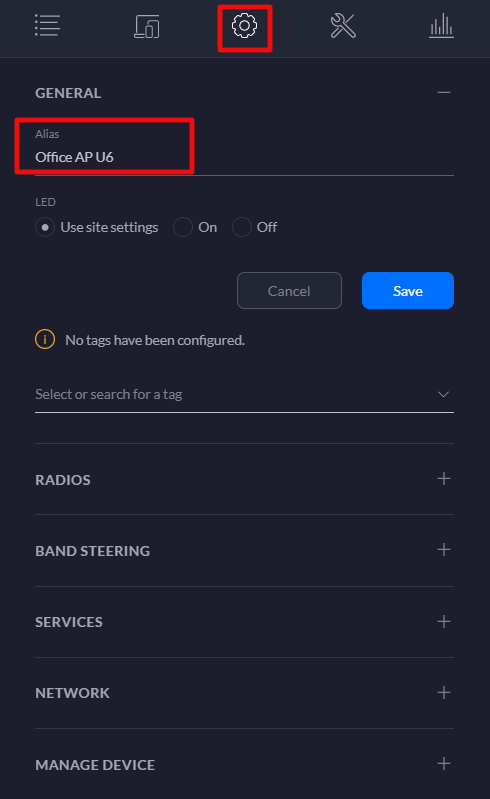
While still in the Devices section of the controller, click on the device after its firmware upgrade has completed to access its pop-out panel. Click the settings (gear) icon and name the device something appropriate for your network. You can also adjust any other settings that may be required for your environment in this panel. Save and Apply the changes.
Name your Wireless Access Point so that you can easily locate it in the controller and to make logs / events easier to understand.
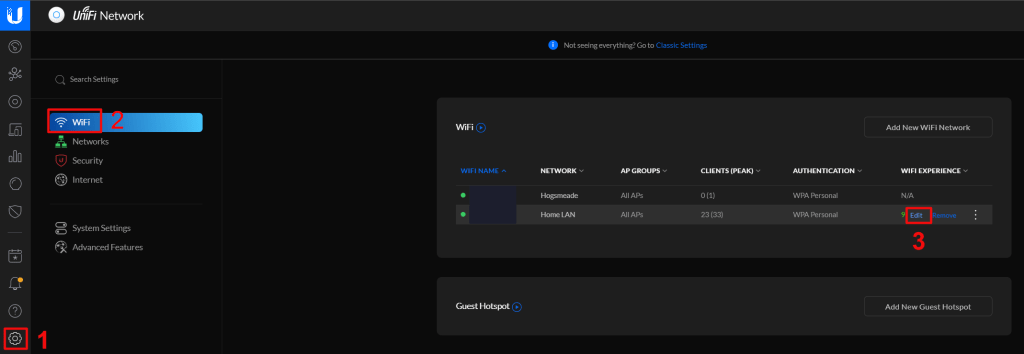
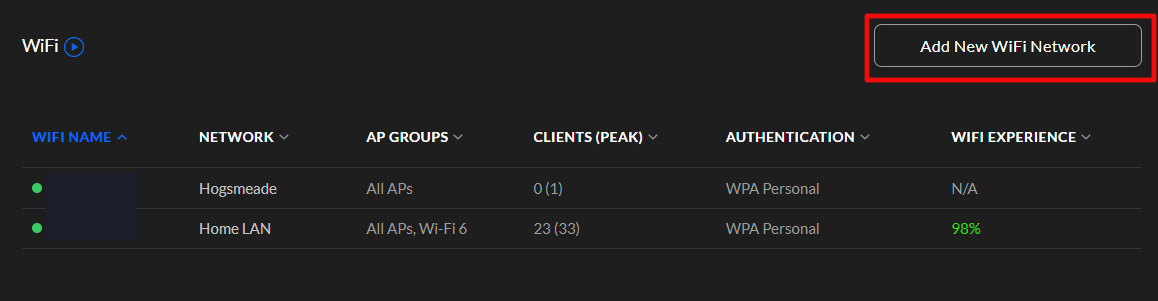
In my case, I am adding the UniFi 6 unit into the same AP group as the rest of my access points and will let the controller decide what clients should connect to it. So, my project is complete at this point. You could also create a separate AP group for the new WAP and add it to a stand-alone WLAN (Wireless LAN / SSID) to enable manual selection of the Wi-Fi 6 network. While logged on to the controller click the settings (gear) icon in the menu on the left. Then go to Wi-Fi. Hover your mouse over your WLAN (SSID) and click the Edit button when it appears.
Edit WLAN settings to access the AP Group function
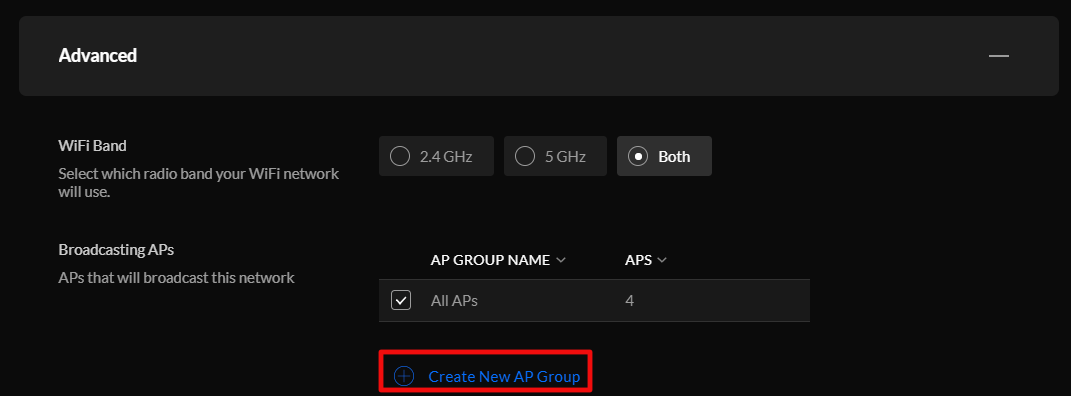
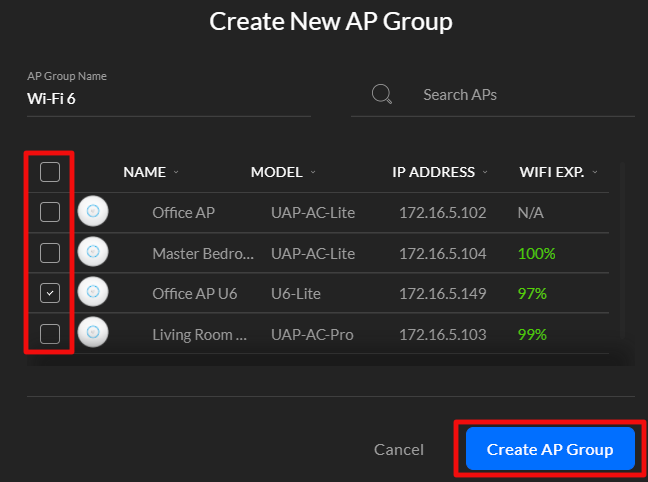
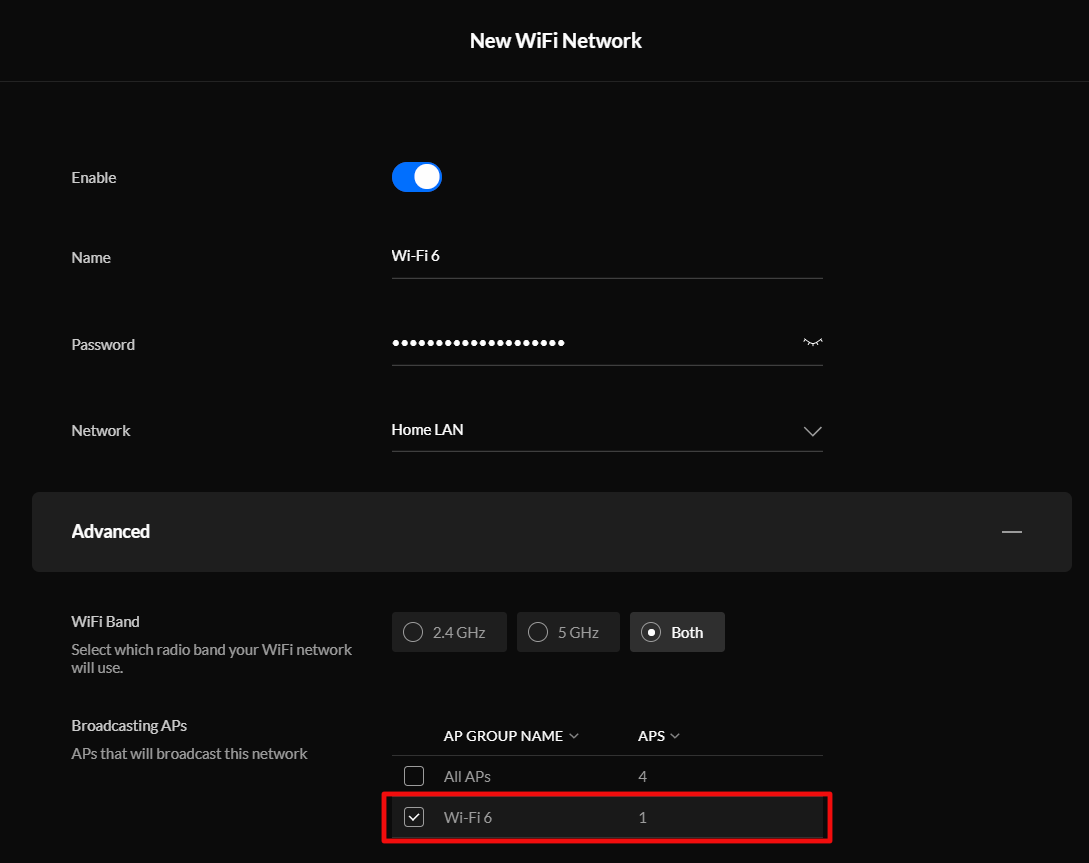
Use the Advanced menu to access the AP Groups. To isolate your Wi-Fi 6 unit into its own SSID you will need to create two new groups. Click the New Group button and select the devices that compose your current SSID, leaving the new unit unselect. Name this new group something appropriate (suggest same as SSID) and the click the create group button. Now create another group that contains only your Wi-Fi 6 WAP and name it. Select the first group you created to bind it to your current SSID. Save and apply the changes.
Now create a new WLAN from the Wi-Fi settings screen and choose the Wi-Fi 6 AP group after you have configured all the SSID settings. Devices that you manually join to this new SSID will be connected to Wi-Fi 6 access point. If you add new Wi-Fi 6 access points you can add them to this group using the same method.
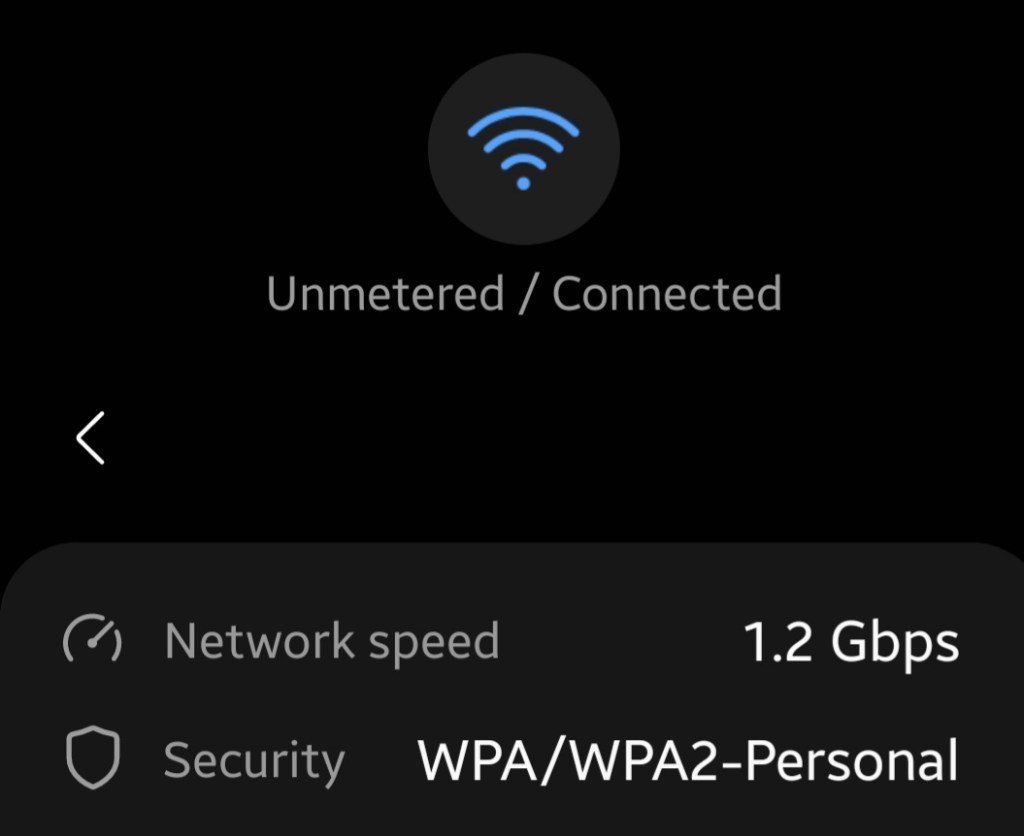
Once you have provisioned your Wi-Fi 6 access point and bound it to a wireless network connect a device to it and prepare to be astonished. On Windows systems and notification pops up to inform you that you’re using a more advanced network. On Android devices a little number 6 appears next to the wireless connection symbol. Checking the properties of the connection should show that you have 1.2 Gb/s of bandwidth available.
Mimecast, a popular Email Security and Archival platform, posted on its blog Tuesday that a certificate it uses to encrypt traffic between itself and Microsoft was hijacked. Details are sketchy at this point, but the company is estimating approximately ten percent of its more than 36,000 customers use the corrupted connection.
The suggested action is to delete the connection that uses the corrupted certificate if it is present in your organization. According to their post, they have already contacted those customers who are at risk. You can read the full post on the Mimecast site at Important Update from Mimecast | Mimecast Blog.
Of course speculation is running wild with this sophisticated attack coming on the heels of the SolarWinds debacle. Rumors are already suggesting this event was perpetuated by the same group of Russian hackers that infiltrated the monitoring company’s customer base. Techbloggingfool.com could find no substantial evidence or official channel to back this hypotheses at this time.
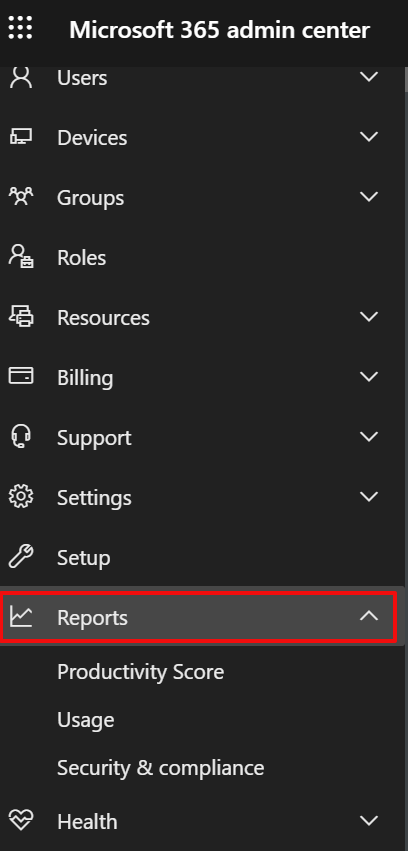
A question that I am often asked after a Microsoft 365 implementation is, “How do I know what people are doing with it ?” Microsoft’s ever evolving cloud platform has recently added an improved reporting feature that is easy to use and very informative.
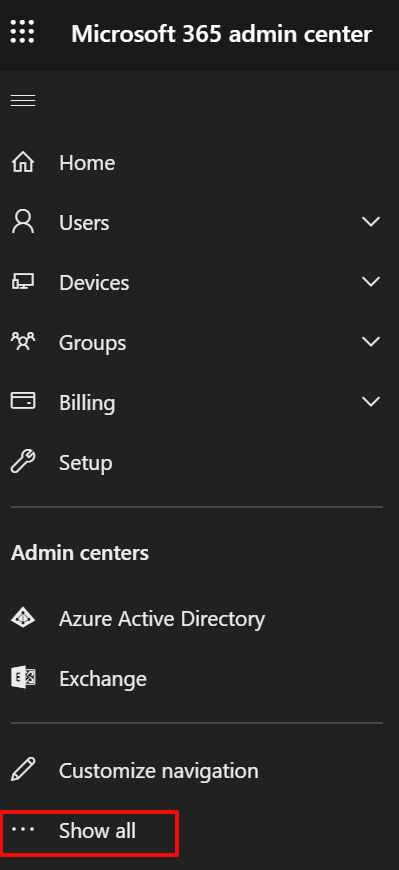
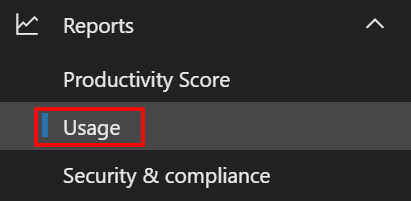
Logon to the Microsoft 365 admin portal with your global administration account by going to https://portal.microsoft.com/ and entering your credentials when prompted. In the menu on the left click the option at the bottom to “Show all”, click the drop down next to Reports, then click on Usage.
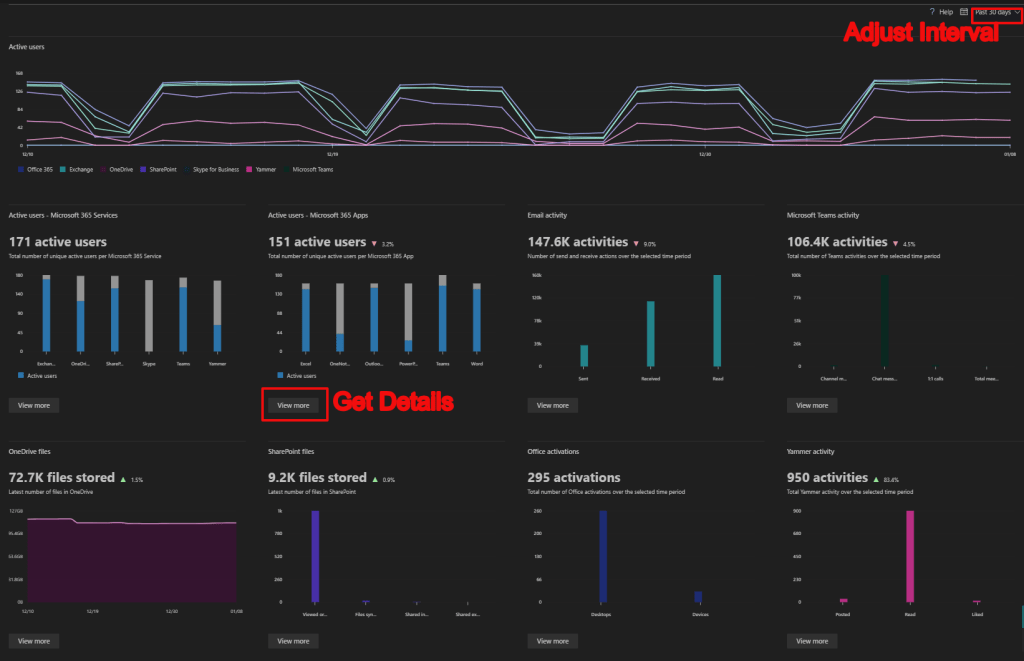
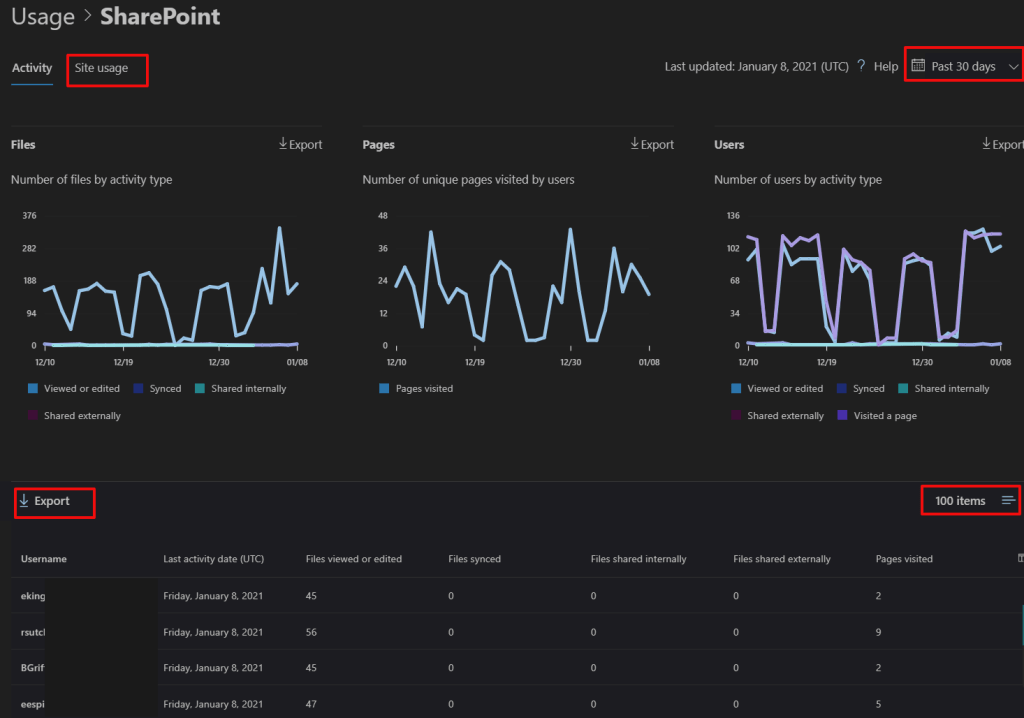
Once you have located the reporting feature using it is straight forward. There’s a drop down in the upper-right corner that changes the number of days worth of data you are viewing. The “View More” buttons on each section drill into more detailed views of each product like SharePoint or OneDrive. Some of the widgets also feature an export button to create a report that you can share with non-administrators.
There is a surprising amount of detail for each piece of Microsoft 365. You can see who is sharing data from their OneDrive and how many files they store there, along with what is in your SharePoint sites and how often they are accessed. You can even see which of the Office application are used most often.
I’ve been able to use the reporting facility to answer a lot of questions for the tenants that I support. I’m sure that you and your business will find the data useful as well.
It has been widely publicized that the death of Flash was coming in December of 2020, the major browsers are removing support for it. While working on a Flash related issue I ran across Adobe’s EOL page that suggests a more extreme measure than I had assumed. The Flash Player itself has a timebomb in it that will prevent it from working after 1/12/2020. The news caught me and several of my fellow engineers off guard.
The official Adobe EOL page is at Adobe Flash Player End of Life and clearly says; “To help secure users’ systems, Adobe will block Flash content from running in Flash Player beginning January 12, 2021.” My first instinct was to turn off Flash updates, but according to an article published by ZDNET Adobe anticipated attempts to avoid the software’s demise. The kill switch was written into the Flash player code base long ago, updates are only modifying the warning message.
Microsoft will also be releasing an update to remove all traces of Flash from Windows systems. The update will be optional at first, then upgraded to recommended at some unknown date. The update will be permanent and can not be undone. For more details see their post on the subject at Update on Adobe Flash Player End of Support – Microsoft Edge Blog (windows.com).
Both Adobe and Microsoft will be removing download links (many are already gone) for the older versions of Flash player software from their sites. All of the major browsers and even many of the secondary options have removed, or are removing support for Flash. This effort to end a piece of software’s use is the most aggressive that I can personally recall.
What can do if your organization still uses an app that requires Flash? Adobe has left one option available, Enterprise Enablement as outlined on page 28 (PDF page 33) of the Adobe Flash Player Administration Guide allows for the use of custom mms.cfg files to allow certain sites to still run Flash content. VMware’s document on the subject outlines how to use the files to allow its Flash based management console to continue working. Given that browsers and operating systems are also removing support, it is unclear how long a workaround of this nature will continue to function.
The bottom line is that Flash is being killed off completely. Much in the same manner as SHA1 certificates, it isn’t being left up to individual choice. The tech companies Adobe, Apple, Microsoft, Google, and others have banded together on this and we need to plan for the full demise of Flash Player.
Security and auditing efforts often increase the workload of your network administrators. The frequent requests to look up information can interrupt the admin’s own workflow. The auditor’s and security team member’s requests are legitimately required. However, those groups are often unable to retrieve the data themselves due to a lack of access to, or knowledge of, the administrative management toolsets.
One of the requests I get most often is to provide a report showing the membership of various active directory groups. Generally, any account in an AD domain has enough permission to view the membership of groups, although administrators can adjust who can see the roster. Teaching your auditors and security department to use the Active Directory Users and Computers console is not out of the question, but it lacks good reporting facilities.
When I get tickets requesting the data I lean on PowerShell to create the reports. One afternoon I thought that if I could make a script simple enough to operate, I could turn it over to the people making the requests. They could get the information they needed without waiting on my availability. Below is the script I came up with. It uses PowerShell’s Grid View to show a list of all the groups for the person to select from and then exports a report with the most commonly requested information.
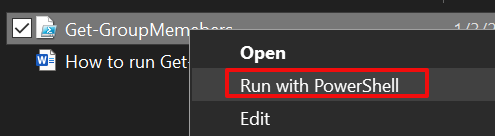
Copy the code and paste it into Notepad, save the file as Get-GroupMembers.ps1. Right click on the file you saved and choose the option Run with PowerShell.
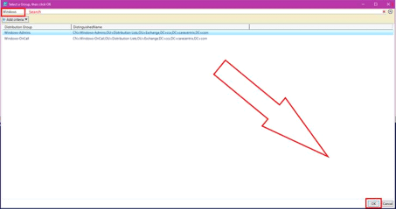
The Grid View will display all of the groups in the Active Directory forest. Use the search mechanism, or scroll through the groups and select the one you want to create a report for. Use CTRL + Click to select more than one group for your report. Then click the Ok button in the bottom right corner.
A report showing the Name, Logon Account, Email Address, Employee ID, Telephone Number, Created, Department, and City for each of the members of the group or groups you selected will be saved in your documents folder and opened on your screen.
To run this script you will need to have the Remote Server Administration Tools for Active Directory installed on the system you are running it from. The RSAT tools install the required Active Directory PowerShell module. You could also run the script from a domain controller.
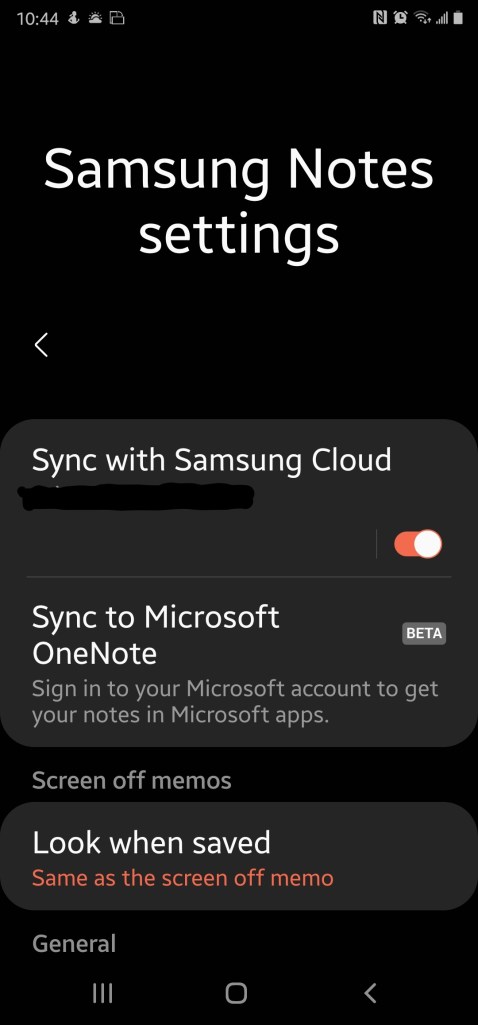
In a previous article I wrote about the first phase of being able to synchronize the Samsung notes from your phone with OneNote. It worked, but was a little clunky, mostly because you could only view the items in Outlook Web Access.
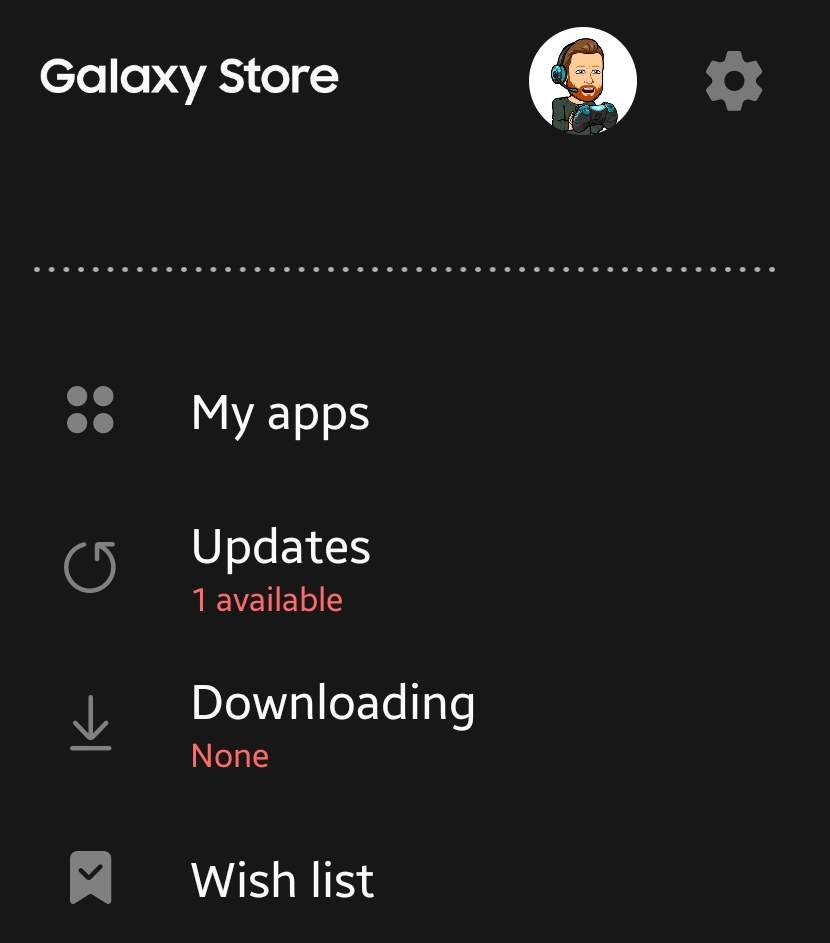
I’m happy to report the synchronized notes feed is now viewable in the Windows 10 OneNote app. To get started update the apps on your phone and Windows system. Open the Samsung Galaxy Store, tap the hamburger menu button then tap updates and install them all.
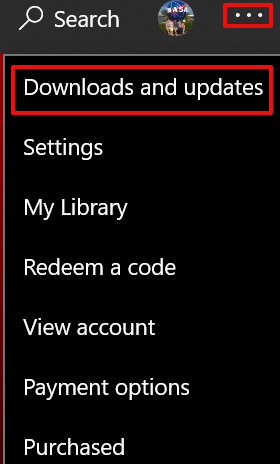
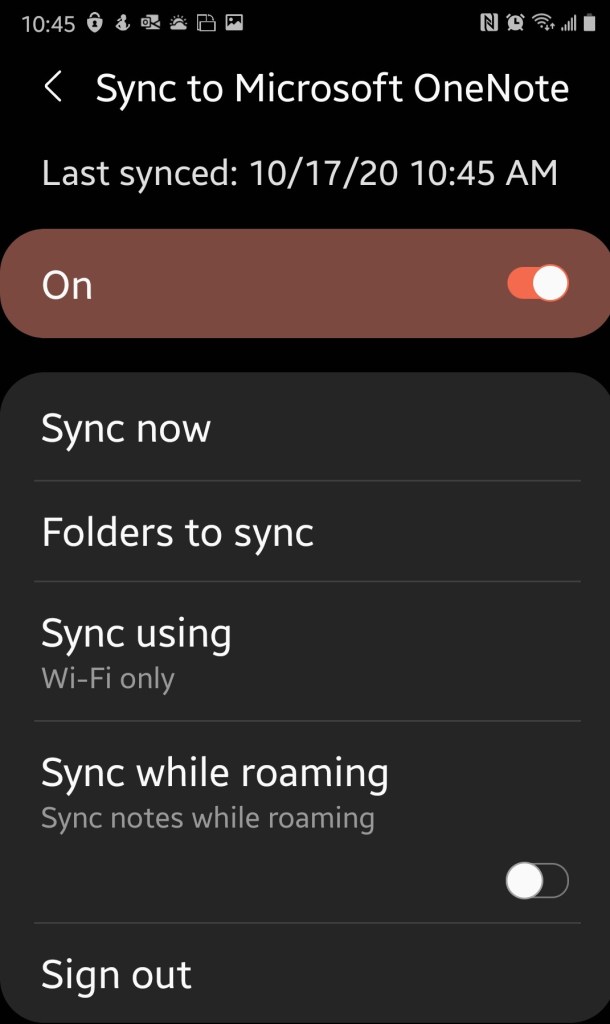
On your Windows machine, open the Microsoft Store app. Click the three dots menu in the upper right, then click downloads and updates. Click the “Get Updates” button and install them all. Depending on your update settings you may need to do this multiple times to get them all.
Configure the Samsung Notes app on your mobile device. Open it and hit the options icon. You should see “Sync to Microsoft OneNote Beta”, toggle it on and sign in with the Microsoft Account you want to share notes with. You’ll also need to select the folders who’s notes you want to sync. I recommend tapping the sync now button just for good measure.
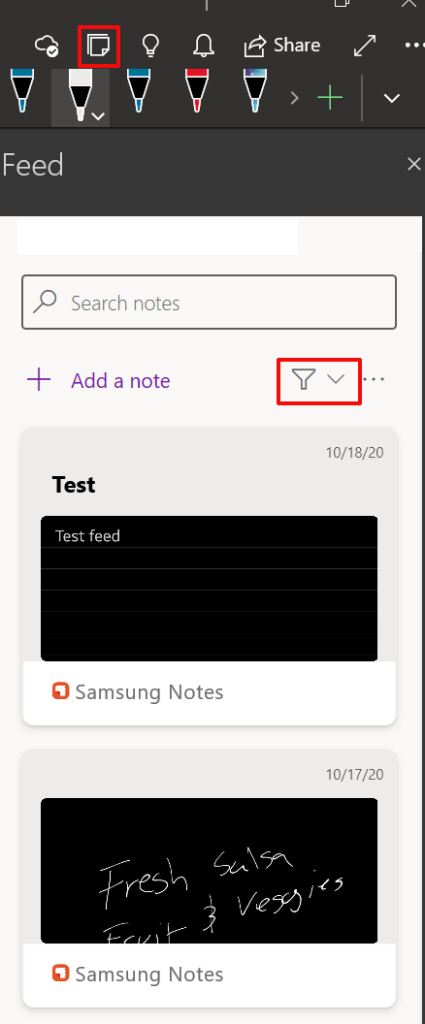
Now open the OneNote app on your Windows computer and select the “Open Feed” button on the right side of the tool bar. Depending on your security settings, you may be prompted to sign in. Use the same Microsoft account that you set up in the Samsung Notes app. If you don’t see your Samsung notes, click the down arrow next to the filter symbol and select “All-Notes” or “Samsung Notes”.
Click a note to see the entire entry. You will also be able to copy the item to your clipboard. The synchronization of Samsung notes is one-way. When you copy them to your clipboard they paste as an image. I noticed some trouble with the copy / paste function when holding my Windows tablet in portrait mode. This isn’t what I would consider to be true synchronization, but it is serviceable and a step in the right direction. At least we can see the Samsung notes in OneNote now.
In a previous article I explained how to use PulseAudio with XRDP to allow your Ubuntu Hyper-V VM to pass audio through your host machine’s sound system. It has been brought to my attention that the instructions do not work for everyone.
I believe most of the people that have issues are choosing the 20.04 version of Ubuntu when deploying their Hyper-V VM. The 20.04 edition of Ubuntu is not running XRDP (Linux RDP Server) by default. When you connect to it from the Hyper-V manager you are directly viewing the machine’s console. PulseAudio requires an enhanced XRDP session to work.
I’ve spent a lot of time getting pass-through sound working in 20.04. Deploy the VM as outlined in the original document choosing the 20.04 version instead. Once you have completed the operating system installation, run the software updater (in the apps menu) until everything is patched to the newest version.
Please Note: These instructions will not work if your VM is configured for auto logon. PulseAudio runs in the user space and requires active logon to work. It would be possible to convert the daemon to a service, but that is beyond the scope of this post.
Use Hyper-V quick create to deploy a VM
Once Ubuntu is installed and up to date we’ll need to manually configure it for an enhanced session. Open a terminal and run this command to download the configuration script:
You will be prompted to logon to your VM with XRDP, but it will not work until you reboot. Use the button in the tool bar to return to the basic session and power off the VM.
The highlighted button will return you to a basic session so you can shutdown the VM.
Open PowerShell on your host system and run the command below, where the name of your particular VM is between the quote marks.
Power on the VM and you will be prompted by the RDP client to select your monitor size. Logon to XRDP with your Linux credentials and the desktop will load. Now that we have installed and configured XRDP we can proceed to install and configure PulseAudio.
Occasionally you may stop being prompted to change your monitor size, etc. by the RDP client when you connect to your VM. There is a check box that can accidently be selected that stores your current settings for all future connections. To get the controls back, right click on your VM in the Hyper-V manager and then click Edit Session Settings.
Open a terminal.
Install the pre-requisite libraries with this command:
Now we need to get the source code for pulse audio and compile it. Run the following command groups one after the other. Each will take some time to complete.
sudo apt build-dep pulseaudio -y
cd /tmp
sudo apt source pulseaudio
pulsever=$(pulseaudio --version | awk '{print $2}')
cd /tmp/pulseaudio-$pulsever
sudo ./configure
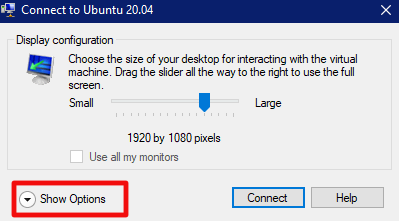
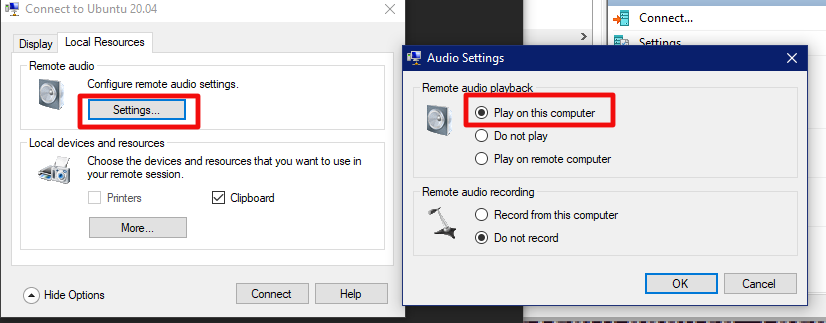
Power off your VM and wait until the snapshot merge in Hyper-V completes then power it back on. When you connect to it this time, use the “Show Options” down arrow and then click the “Local Resources” tab. Click the settings button and then choose the option to play back audio on this device.
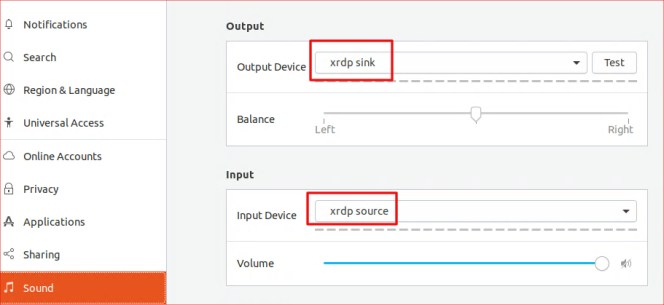
Now open the setting applet on your Ubuntu VM and go to sound. Use the drop down to select xrdp-sink as the audio device. Sometimes the option will be missing. Generally, if you wait some random amount of time the daemon will start on its own, I’m not sure what causes the inconsistency.
If the option never appears or you get tired of waiting. Close the Settings applet and open a terminal. Run: pulseaudio -k to start the daemon yourself. Then use settings to adjust the output device again.
The year 2020 has been a rough one for so many reasons. Pandemics, economic disasters, political division, and natural disasters have made it one of the darkest years in memory. If there is a silver lining, for me it was all the great technology that made its way to market this year. Before we discuss graphics cards, headsets, and laptops we should all recognize that the best technology of 2020 is without a doubt the Covid-19 vaccines that are beginning to be distributed. A big round of applause for the companies, scientists, doctors, technicians, nurses, and support personnel that have made them a reality. What a relief to society they will be.
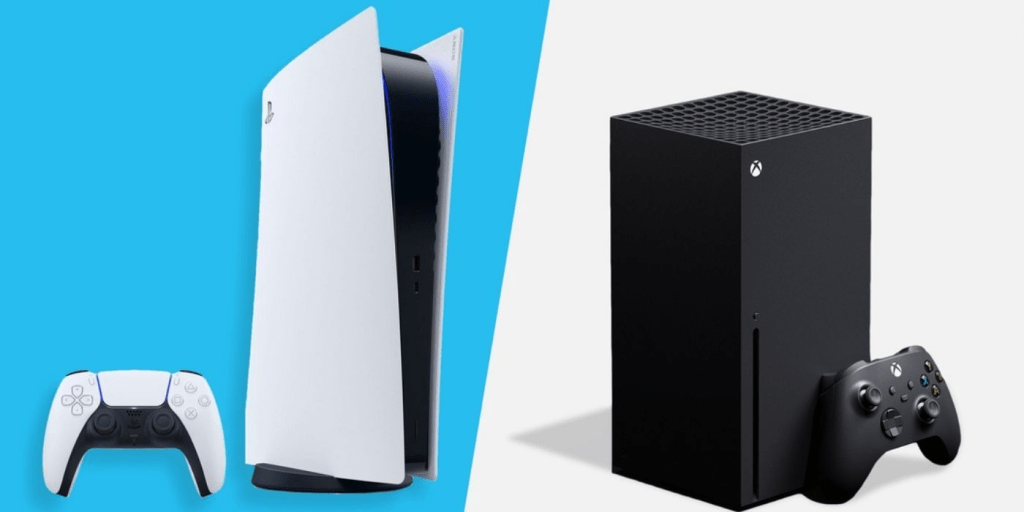
Excluding protection against one of the deadliest pandemics of the last century, there was some great gear and software released this year. Microsoft and Sony let their next-gen consoles out of the gate and man can those ponies run. If you were lucky enough to get your hands on one, you can revel in the knowledge that you’re using one of the most powerful personal computing devices ever created.
The PlayStation 5 and Xbox Series X are super-consoles
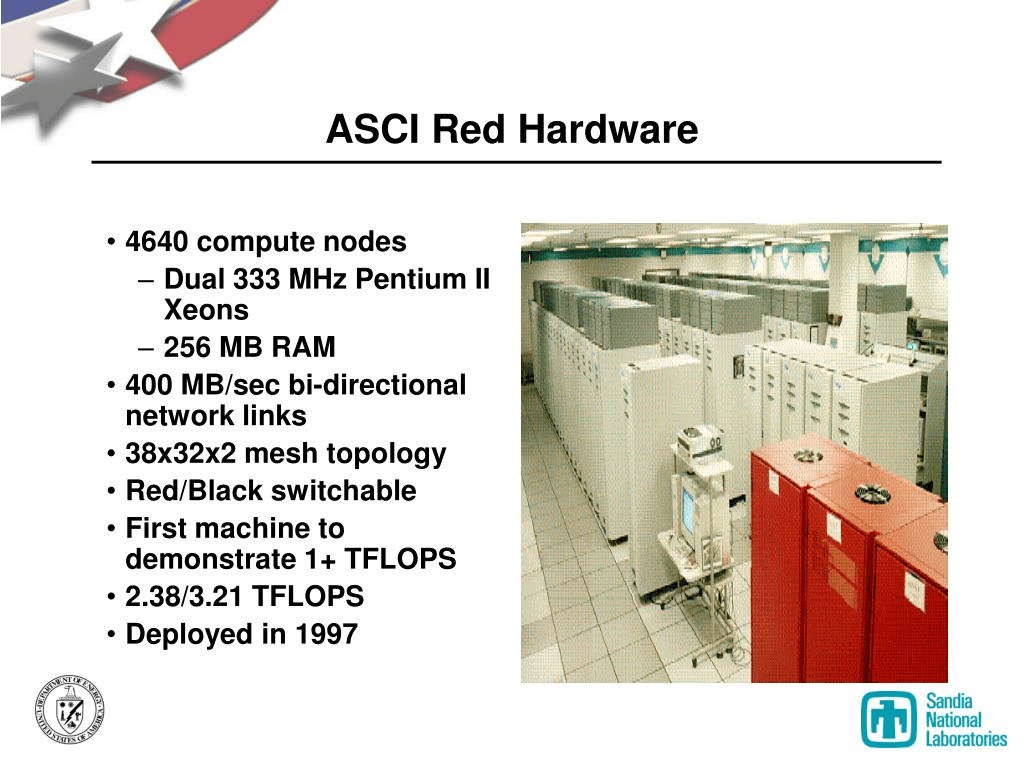
In June of 2006 the ASCI Red supercomputer was disassembled. ASCI Red was the first system to breach the teraflop speed barrier. Before ASCI Red was built, it was widely believed that a trillion calculations per second was an unreachable goal. It was ultimately achieved by linking thousands of processer and memory assemblies called compute nodes into a volleyball court sized system. That $500.00 wonder-box sitting under your TV can process your game at more than twelve teraflops.
The next-gen consoles get their supercomputer power from the advanced graphics processing units (GPUs) that use the same technique, thousands of cores linked together. Instead of a room, the cores of a GPU fit in one piece of silicone. Both AMD and Nvidia have released their most powerful GPU’s ever. Changes to the architecture of both manufactures allow for 8K graphics, ray tracing, extreme frame rates, and both will push the envelope of what is possible in the near future. Unfortunately, supply is not keeping up with demand at the moment and the cards are very difficult to get your hands on.
AMD and Nvidia have both released their most powerful graphics cards this year.
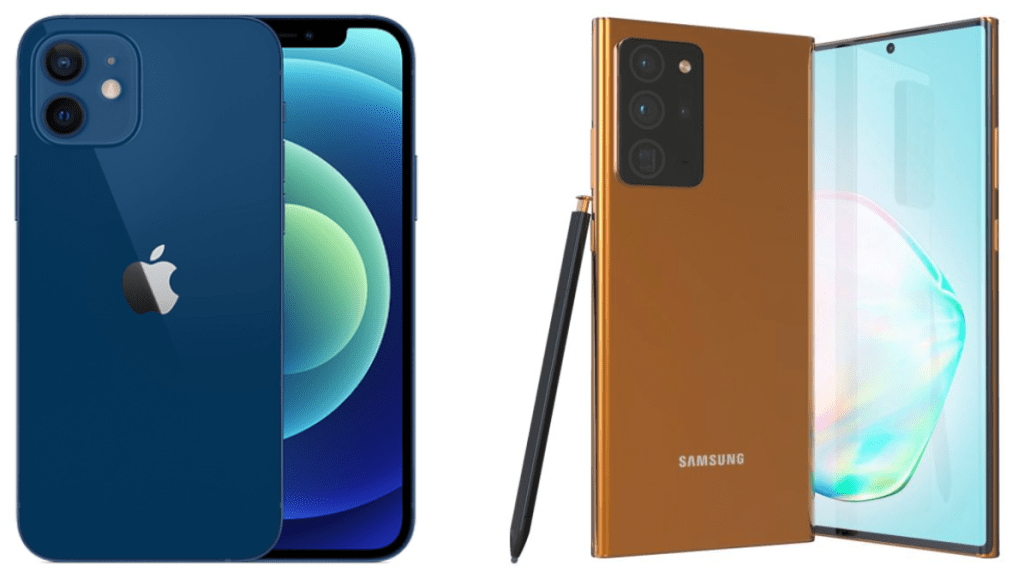
Samsung and Apple gave us the most powerful smartphones created to date. With twelve gigabytes of RAM, an eight core CPU, and at least one-hundred and twenty-eight gigabytes of storage the Galaxy Note 20 Ultra is more powerful than many of today’s laptops. Likewise, Apple’s iPhone 12 is the ultimate in mobile technology. Both devices sport an array of sensors and cameras that would make Spock jealous. They’re truly marvels of the modern world.
The Smartest Phones Made Yet
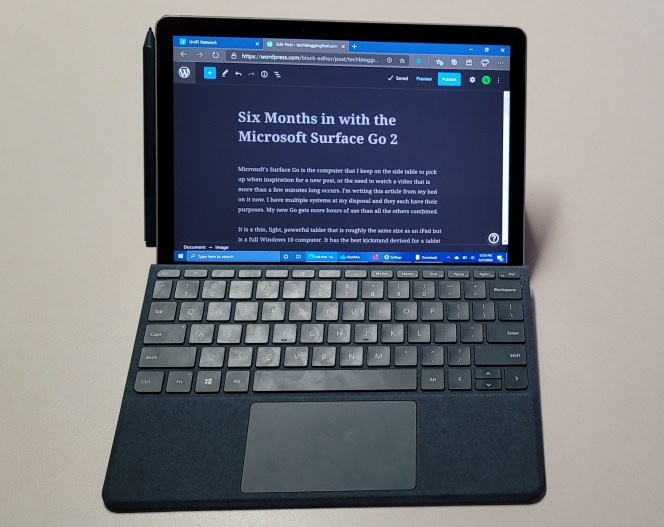
Microsoft created my favorite 2-N-1 system of all time. The Microsoft Surface Go 2 is a miniaturized edition of the wildly popular Surface Pro. With a 10.5 inch display, pen support, and that fantastic kickstand, the Go is made for couch time. I’m writing this article on one now. Fast, light, and running Windows 10 they’re an almost perfect machine for IT workers, college students, and anyone else that needs a computer that is roughly the same size as an iPad.
Mine goes everywhere with me.
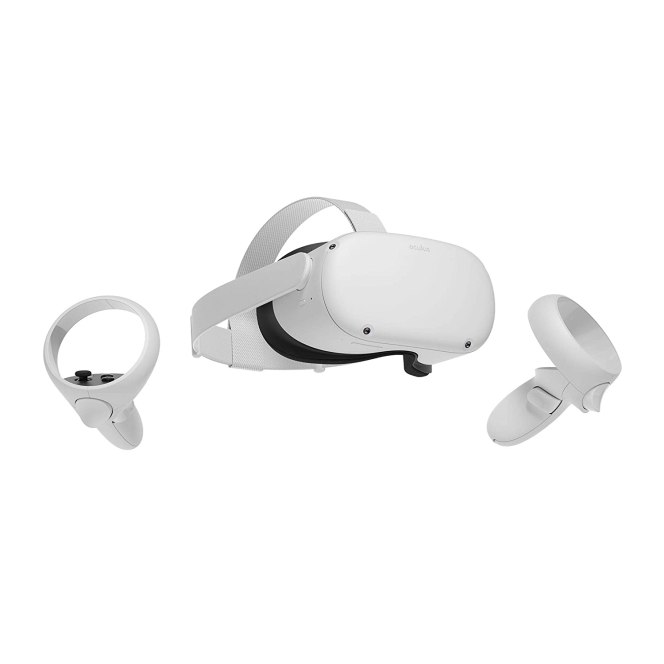
My absolute favorite piece of gear from 2020 is the Oculus Quest 2 VR headset. It is simply amazing, powerful, easy to use, world altering, technology for less than $500.00. VR is so much more than games. It is the ability to visit new places and have new experiences that aren’t easily attenable or even possible in the real world. Having a Quest 2 has made this quarantine infinitely more tolerable for me. Like some of the other items on this list the Quest 2 is difficult to find, but keep trying it is worth the trouble.
Escape quarantine
These lists are always subjective. If you look back through all of the technology from this year there is an astounding amount. Sony released a great OLED TV, Tesla gave us the Model Y, and Apple produced the M1 all of which will have an impact on our way of life. I get the impression that technology manufactures intended for 2020 to be a pinnacle year. Their plans were overshadowed in the end. Tell us what your favorite 2020 tech was in the comments.
Every once in a while I find myself needing to review or edit code on my mobile. It never fails, I’ll be out with my family and the solution to some problem I have been struggling with will pop into my head seemingly from nowhere. The other common scenario I experience is somebody emailing me a script to review, or fix when I’m not near a computer.
I’ve tried various solutions over the years. Until recently my go to option was to RDP into my desktop and launch Visual Studio. VS more or less works fine via RDP, but even the screen on my Galaxy Note feels too small to be fully effective. I have to zoom in and out on sections of code constantly and the syntax can be hard to follow.
I set out to find a code editor that would run on Android. If you’re considering the same there are a few things you should know. Android editors are not full integrated development environments, they lack a console for testing and debugging code. They also lack compiling facilities. They are editors in the strictest sense. There are a few apps in the Google Play store that claim to have a console and or compiling, but the ones I tried could only “debug” or “compile” HTML.
Mobile code editors do have a couple of major advantages over straight up text editors. The most important one is syntax support. The feature allows you to select your language and then the app will monitor for the correct use and highlight mistakes. File association and Search/Replace are also very handy.
File association makes opening your scripts and apps simple.
I tested several of the code editing apps in the Play store and only really liked one of them. Rhythm Software’s Code Editor is ad supported (free), but a $2.99 in-app-purchase removes them. It supports more than a hundred languages including PowerShell. I assumed that the auto-complete would be fairly limited, but it is very useful.
The auto-complete library is immense.
Code Editor has built-in support for cloud services like OneDrive, Dropbox, and GitHub. Sign in with your credentials and the service will appear in the open and save dialogs. It will also be added as a shortcut in the main menu.
Flexible storage support is nice.
Tab support let’s you easily work on multiple files. The highlighting and theme options let you customize your experience to the Nth degree.
Themes, tabs, and high-lighting make the job easier.
For my needs the app is just about perfect. It isn’t going to be replacing Visual Studio, but when I have needed to edit a few lines while on the move it has been a lifesaver.
SolarWinds is an Austin Texas based company that makes a lot of tools used by IT departments the world over. Their all-in-one monitoring suite known as Orion has been the victim of a supply chain attack. In what experts are calling a Nation State funded hack, updates to the software over the last several months were spiked with malicious code.
If your organization is running an infected edition, external entities may be able to gain full administrative access to your systems remotely. As with any event of this type, certain environmental conditions must be true for the access to be allowed. SolarWinds is recommending an immediate upgrade to the newest version and are aiming to release an additional hotfix on Tuesday December 15th. Review the SolarWinds page on the subject for new announcements, updates, and instructions. Security Advisory | SolarWinds.
Check your versions and spread the word. SolarWinds reportedly has as many as 300,000 Orion customers. FireEye, the security firm that discovered the hack, as a well as SolarWinds themselves, and several government agencies are attempting to notify as many as possible.
Most Administrators know that you can use a GPO to disable the ability to use USB storage devices on Windows computers. So you look up the instructions and implement the policy, but how do you know if it’s working?
I’m sure you made a test OU while you were working out the best option for your situation, but if you are disabling access for security reasons you’ll need a report. There are a few ways that you could go about getting the data. I like PowerShell. The code below will search your domain computers for USB storage. You should aware that savy users can use online tools to fool detection. As always, use at your own risk.
Have you every met a person who has invested in a four-wheel-drive vehicle and became a poor driver because of it? An acquaintance was taking me for a drive in his new SUV on a snowy day and was driving quite dangerously. “Don’t worry, it’s four-wheel drive”, he told me. I was thinking, “yeah, but 4WD doesn’t help you stop.” He assumed that the added traction and driver assist systems in his new ride meant that he could drive like a maniac in inclement conditions. He was confident that the technology would overcome his mistakes. His vehicle was in the body shop before then end of the first month.
I have observed MFA (Multi-Factor Authentication) causing a similar false sense of security. StuxNet jumped an air gap, Heartbleed crippled the world’s routers, and Specter attacked CPUs themselves, any single security measure can be subverted. There are more weaknesses than there are people or man-hours to fix them. Security works best when it is applied in layers, relying on a single solution is likely to land your network at the business end of a security event.
There are several methods that can be employed to beat MFA, just Google, “Defeat MFA.” One of the most effective is the good ol` man-in-the-middle. Evilginx2, who’s logo graces the top of this article, is a standalone pre-packaged MITM proxy server complete with instructions. Of course, Evilginx was designed to be a demonstration and to help security experts understand how these attacks work, but it is fully functional and could be used for evil (see what I did there).
Multi-Factor-Authentication is a tool that can be added to your security strategy, not an all encompassing security solution. The tendency to let your guard down after deploying a new security measure like MFA can be a costly mistake. I wouldn’t ease up on the password requirements just yet.
So you have downloaded, installed, and configured an evaluation edition of Windows Server 2019. You’ve installed your software and been cruising along with everything working fine. The decision has been made to keep the machine permanently, so you get procurement to purchase a volume license and figure you’ll activate the server with the new keys once the financial transactions are all squared away. Piece of cake.
Purchasing tells you the new keys are in the VLSC. You logon and retrieve them, open up the system properties, paste in the new key and blamo! It won’t activate. Fine you think, I’ll switch over and use the CLI, it always works. Open an elevated console, type in slmgr /ipk XXXX-XXXX-XXXX-XXXX-XXXX (your key) and hit enter. Huh, that didn’t work either?
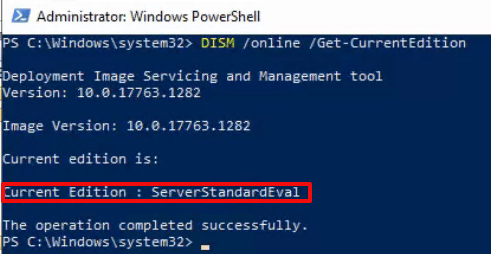
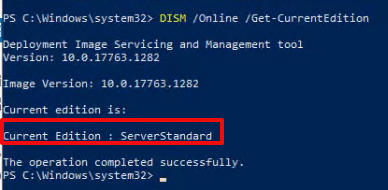
Here’s the deal, you can not apply a VLSC MAK Key to an evaluation edition because they are not the same version. The “Evaluation Edition” is considered to be a standalone edition of Windows. You can see this by opening an administrative PowerShell console and running: DISM /Online /Get-CurrentEdition
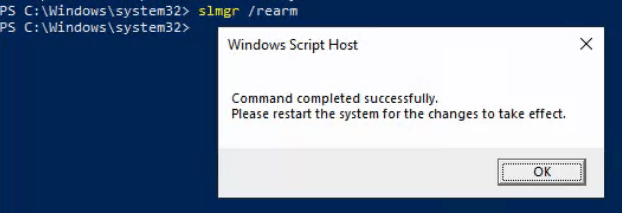
Contrary to some of the posts that I read when I ran into this snafu, the server can be upgraded to a full edition and your key can be applied without re-installing the server’s OS. It’s just a more circuitous route than you would probably like. If you are running low on time, you can extend the evaluation license for another 180 days by re-arming it. In the same administrative PowerShell console run: slmgr /rearm. You will be prompted to reboot.
You can re-arm the Evaluation Edition of Windows Server up to 5 times every 180 days.
Now that you have bought yourself some time. You will need to convert the evaluation edition of Windows to a production version using a General Volume License Key (GVLK), which are used when setting up KMS clients. Microsoft publishes a list of those keys here. I suggest that you make a backup or snapshot of the server before attempting a conversion.
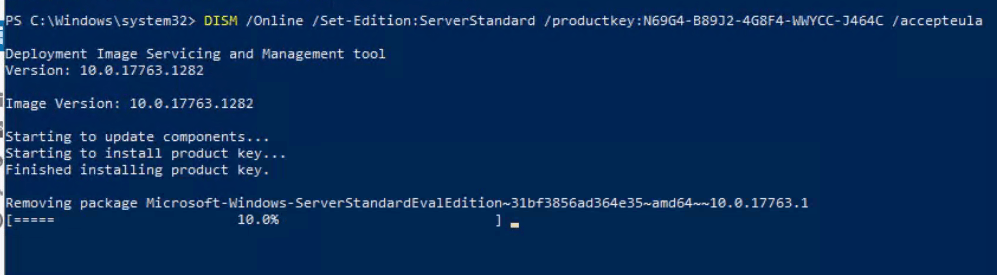
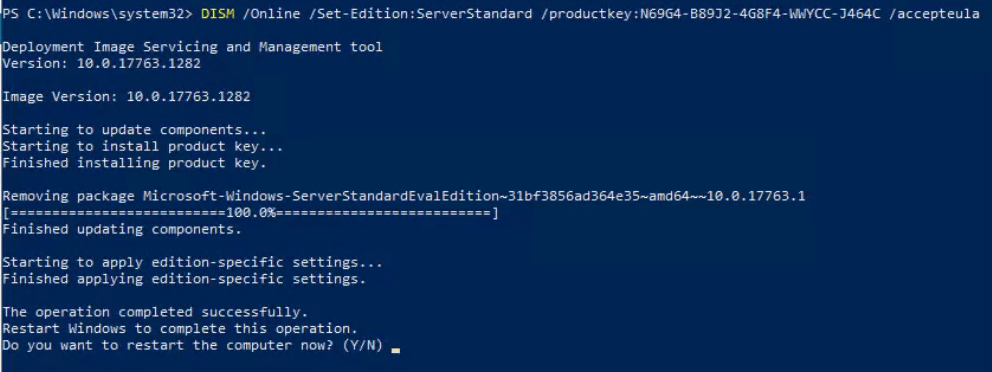
Open an administrative PowerShell prompt and run: DISM /Online /Set-Edition:ServerStandard /productkey:N69G4-B89J2-4G8F4-WWYCC-J464C /accepteula. Match the product key to the edition you want to end up on, listed in the Microsoft link above. The conversion can take hours to complete. I recommend that you reboot when the process is finished, even if you are not prompted to do so.
It is normal for the tool to look like it is hung at 10%. Be patient, it can take a long time to move.
Verify everything worked by opening an administrative PowerShell console and running: DISM /Online /Get-CurrentEdition again. This time the version should match the GLVK key that you used.
In the same PowerShell console run: slmgr /ipk XXXX-XXXX-XXXX-XXXX-XXXX (your key) and hit enter. This time you should get a pop-up saying the product key was installed successfully. Click the OK button. Now run slmgr /ato, you should get another pop-up that says Activating Windows XXXXXXX edition Product activated successfully. Click the OK button. You’re done.
Pretty much the first thing people realize after spending a few minutes in virtual reality via the Oculus Quest or Quest 2 headset is that VR should never have wires. The experience is more immersive without a tether bouncing off your back and the worry of tripping. The trade off is a loss of processing power.
Don’t get me wrong, the Quest, and especially the Quest 2 are packing some serious hardware and can deliver amazing experiences. However, the electronics inside them are similar to a Nintendo Switch or high-end phone and this means the games are limited to those types of environments. If you have a Rift or Hive you are probably enjoy playing AAA titles like Project Cars 3, Star Wars Squadrons, or the new Half-Life; all of which require a powerful desktop PC.
There are ports of popular games like Beat Saber, Onward, and Robo-Recall for the Quest headsets, but they don’t quite stack up to the full versions that I play on my Rift. Of course, you can use a link cable to connect your Quest to a PC and use it to play Oculus Rift or Steam VR games. Linking works really well with the right cable, but even a single cable can be bothersome once you’ve experienced wireless freedom.
It turns out that with a little ingenuity and a couple of apps, you can have your cake and eat it too. Virtual Desktop is a desktop streaming app that allows you to control your desktop PC from your VR headset. It is available in the Quest store for $19.99. There is a side-loaded add-on from the developer that converts the Oculus USB development drivers to function over a wireless network. Before you head down this road, know that your PC and network need to be robust to support a pleasant wireless streaming experience.
There are a lot of steps to complete in this project. Use this outline to stay on track.
Check Wi-Fi connection speed in headset
Check Computer GPU
Install Oculus app on phone
Setup Quest Headset and link to Facebook
Purchase and install Virtual Desktop application on your Oculus
Install Oculus PC application sign in with Facebook account
Install Steam PC Application sign in or create account
Purchase and install Steam VR game
Download and install the VR desktop streamer app on your PC
Configure the VR Desktop Streamer App
Register for Oculus Developer Account
Download and install the Quest ADB Drivers
Enable Developer Mode on the Oculus app
Download and install SideQuest on your PC
Connect the Oculus headset to your PC with USB C cable
Accept USB Content prompt
Accept USB debugging mode prompt
Install the Virtual Desktop Steam VR add-on from SideQuest
Tune Virtual Desktop
Tune VR Game
Enjoy
Your wireless network needs to sustain a 300 Mbps (Megabits per second) or faster connection to your headset for game streaming to be smooth. I experienced stuttering, visual artifacts, and fuzzy video anytime my bandwidth dropped below this mark. Check your network speed by selecting the Wi-Fi symbol on the menu bar while in your headset. Then click the SSID of the Wi-Fi network that you are connected to. Scroll down and click on the Advanced menu. Scroll down some more to see the send and receive speeds.
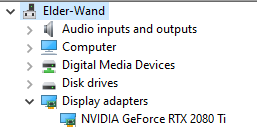
Your computer needs to be strong enough to run VR applications. On the lowest-end you’ll need at least an RX-480 8GB or GeForce 970 GPU. Check which GPU you have by right clicking on the Windows Start button. Then choose device manager from the menu. Click the chevron next to Display Adapters. If you have a lower end GPU you will need to carefully tune the graphics settings of your game. Disable SuperSampling, turn shadows to low, and use the least expensive anti-aliasing option to improve performance.
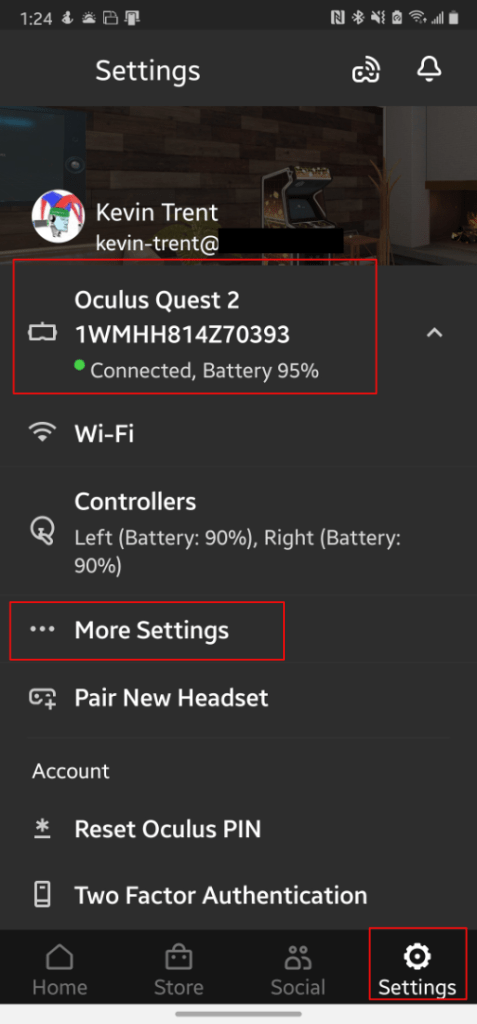
After you are reasonably sure that your network and computer can support VR game streaming, get started by downloading the Quest App on your mobile phone. Continue by setting up your Quest (put on the headset and turn it on) and link it to your Facebook account. The headset and app will walk you though this process. A tutorial will show you how the controls work. A Facebook account is required to install the streaming add-on, so you might as well use it for everything.
You’ll need to purchase and install the Virtual Desktop app from the Quest Store in your headset or the mobile app. Next you will need to download and install the Oculus and Steam VR applications on your PC. Sign into the Oculus Software with your Facebook account. Sign into or create an account for Steam. You’ll also need a Steam VR game installed and ready to go.
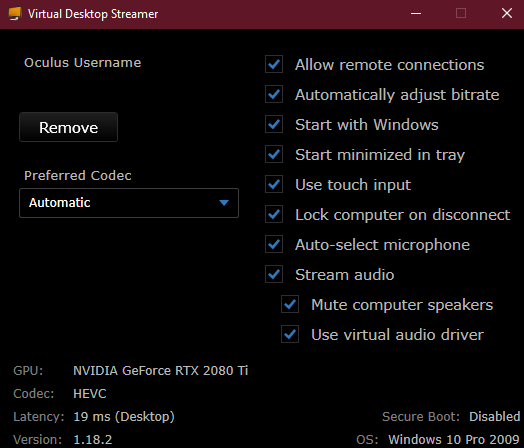
You will also need to download and install the VR streamer application for the Virtual Desktop software onto your PC and provide it with the Facebook account name that you setup in your Quest. In general you will want to select all the boxes in the application’s configuration screen.
At this point you should be able to open the Virtual Desktop app in your headset and use it to access and control your desktop. To gain the ability to stream VR games we will need to install the add-on that the Virtual Desktop developer releases for free. The add-on gets side-loaded onto the Quest headset. To side-load applications you’ll need a developer account, don’t worry its free and easy. Go to Oculus Developer Dashboard and sign-in with your Facebook account. Provide any unique organization name that you like and accept the agreement. Should you ever publish an Oculus store app, the name you pick here will be shown in the store.
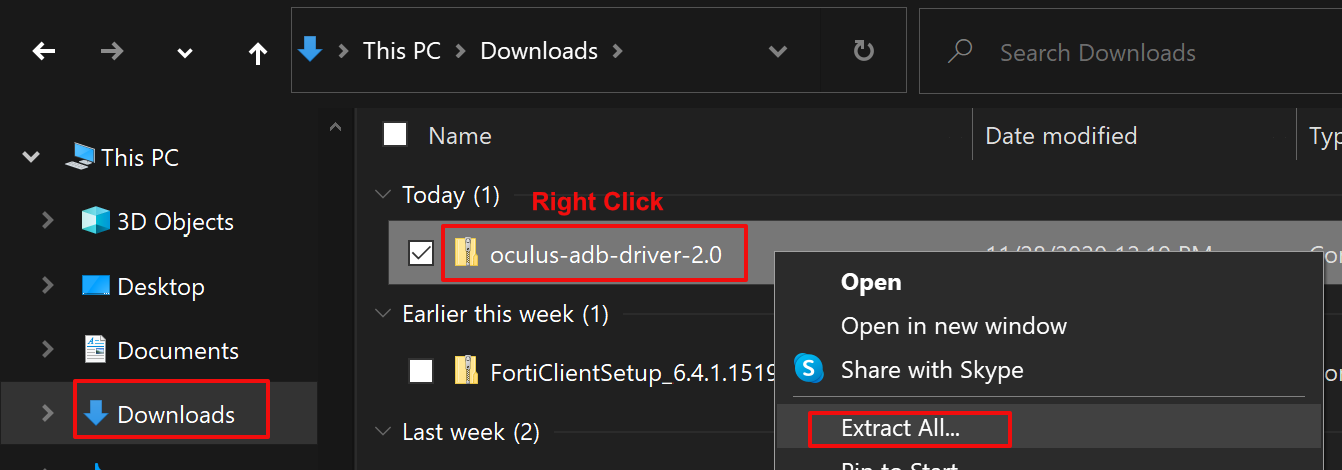
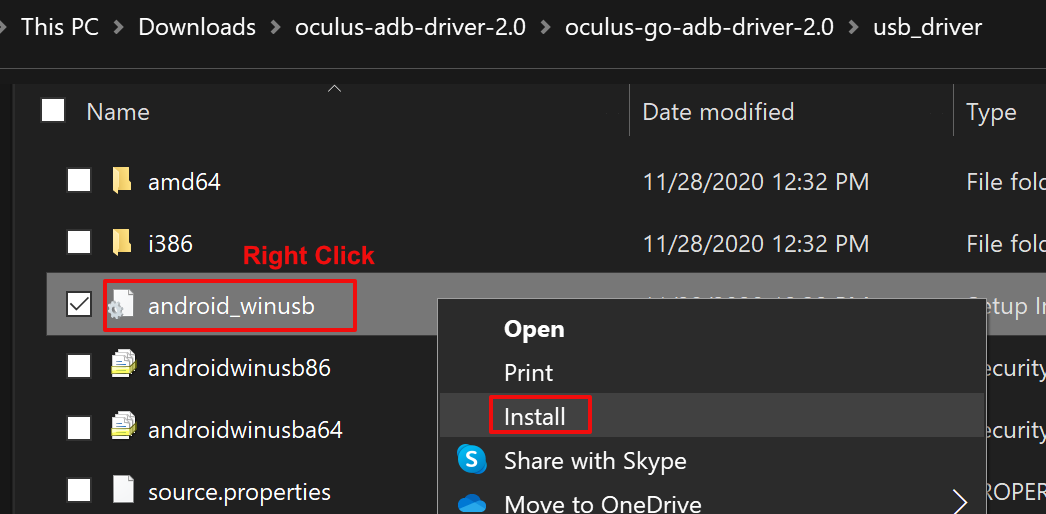
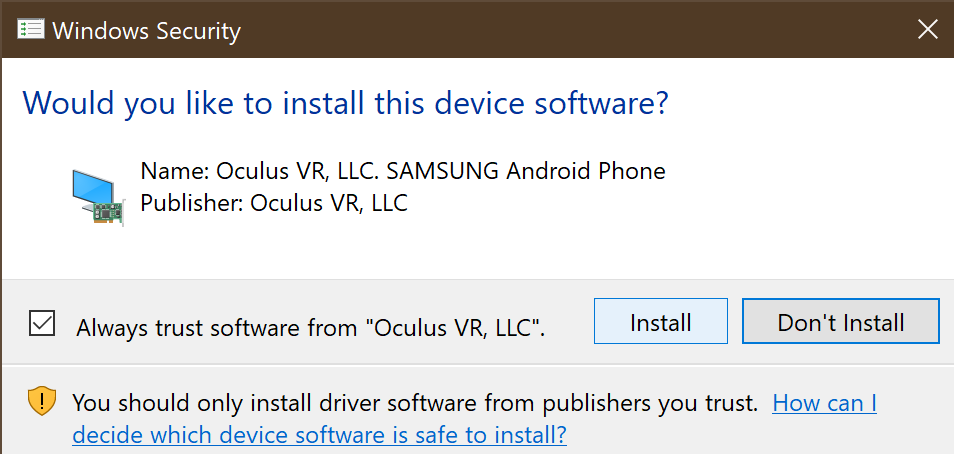
Now you’ll need to download and install the Quest ADB Drivers. On your PC, go to Oculus ADB Drivers | Developer Center | Oculus click the “I agree to the terms….” box and hit the download button. Open Windows Explorer and find the the downloaded file. Right click on it and choose Extract All from the menu then click the Extract All button. A new window should open, double click the “oculus-go-adb-driver-2.0” folder, then the “usb-driver” folder. Right click on the file named “android_winusb” and click Install from the menu. On the next screen click the Open button, then click Yes, then click Install.
Now we need to enable developer mode on your headset. Open the Oculus app on your phone. Tap on your headset to connect to it, then tap the settings button in the bottom right. In the menu that appears, tap on more settings, then tap developer mode and the slide the setting to on.
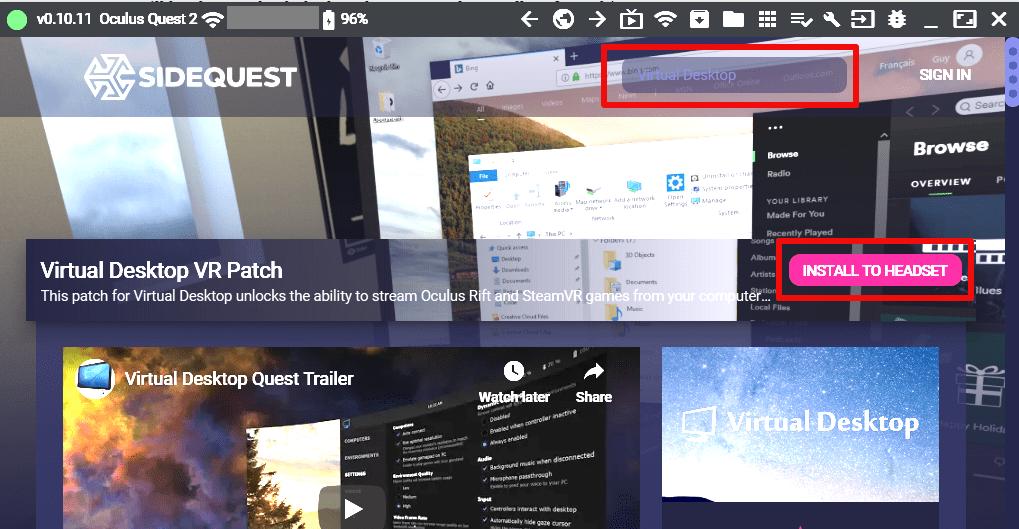
SideQuest is a 3rd party app store for your Quest headset. The Virtual Desk add-on is published here and that makes installing it much easier. In addition, there are lots of games and apps for your headset that are not available in the Quest store and many of them are free. On your PC head over to SideQuest (sidequestvr.com) download and install the software. You’ll notice they have an installation guide on the download page, you have already completed those steps, but it is a good idea to double check everything. Open SideQuest when the install finishes. You’ll notice that is says it can’t connect to a headset. This is normal.
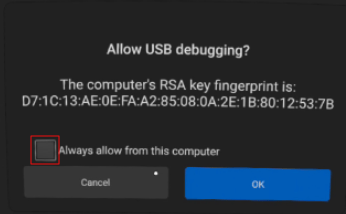
Now we are ready to connect your headset to your PC via the USB cable that came with it. Put your headset on and select a stationary boundary. You will be presented with a prompt to allow your PC to access content via the USB cable, accept it. Then another prompt asking to enable USB debugging will be shown, check the box that says to always allow from this computer and accept it as well. Do not enable the Oculus Link option if you are prompted to. Remove your headset (leave it connected) and the top right of the SideQuest app should show a green dot along with the name of your headset. If it doesn’t, you probably missed one of the security prompts, unplug and try again.
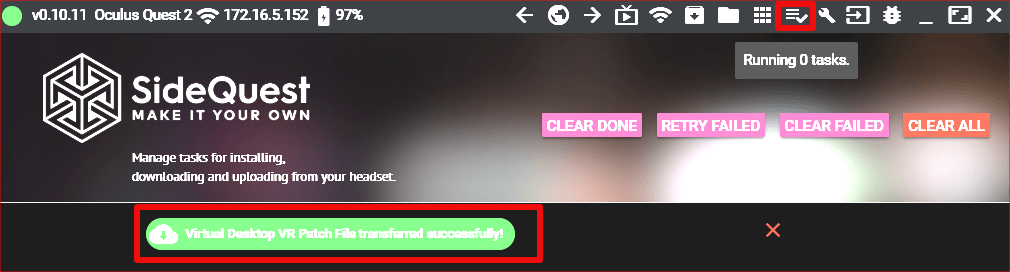
In the SideQuest app on your PC (with your headset still connected). Search or browse for Virtual Desktop. Click the Install To Headset button and watch for the message that the install task has been completed at the bottom. You can also use the task manager icon on the toolbar to verify the install has completed. When the install finishes, unplug your headset and close SideQuest.
The install is complete. Put on your headset and select / draw a play area sized boundary. Open Virtual Desktop and wait for it to connect to your PC or pick it from the menu. Once you are connected, quickly press and release the menu button on your left controller to access the Virtual Desktop settings menu. Long pressing (holding for a couple seconds before releasing) will access the Steam VR menu.
You will need to tune the application to align with your network and PC capabilities. I like to turn everything to the max settings try my game and then back the settings off until I find a good balance between looks and performance. Running everything on their highest settings is a fantastic experience, but requires some very beefy hardware in both your computer and network. Dropped frames and lagging game play tend to mean that you need to lower the graphics settings in your game. Fuzzy video, black screens, and lockups are usually related to the bitrate of your Wi-Fi which require you to tune Virtual Desktop settings.
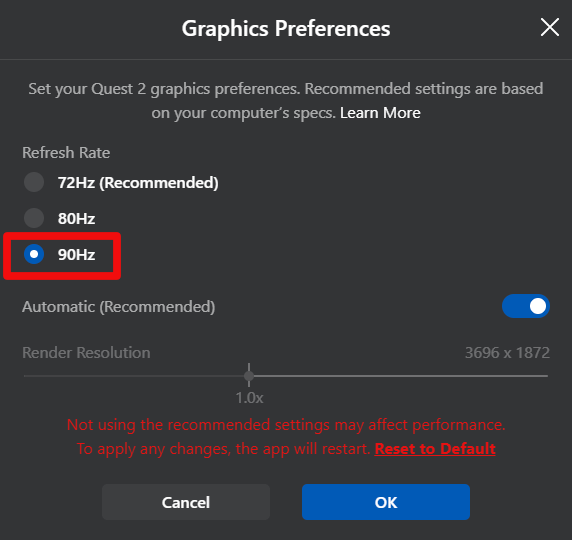
As of firmware version 23, the Oculus Quest 2 supports 90 FPS both in Quest games and desktop VR games via the Oculus Link cable. This is a major upgrade for Quest 2 owners and for those thinking of jumping in the VR pool. In my opinion, the new option raises the Quest 2 to being the best VR headset you can buy.
Ninety frames per second is the sweet spot for lessening the motion sickness that people experience while piloting virtual reality vehicles. Games that involve driving, flying, roller coasters, and even riding horses are notorious for causing queasy reactions if you turn your head to look around the environment.
Your computer will require a powerful GPU to play desktop VR games at 90 FPS. To achieve virtual reality, your system is displaying a copy of every frame in each eye at a resolution of 1440×1600. If your system cannot hit 90 FPS while playing regular games in 4K, you may be disappointed with the results of the new setting.
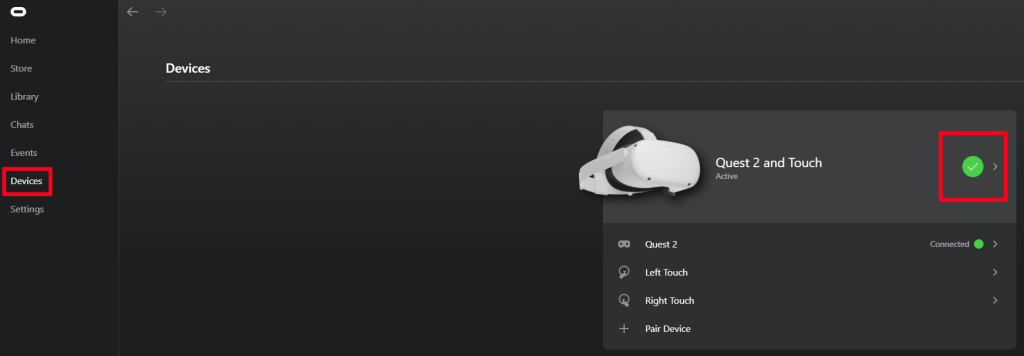
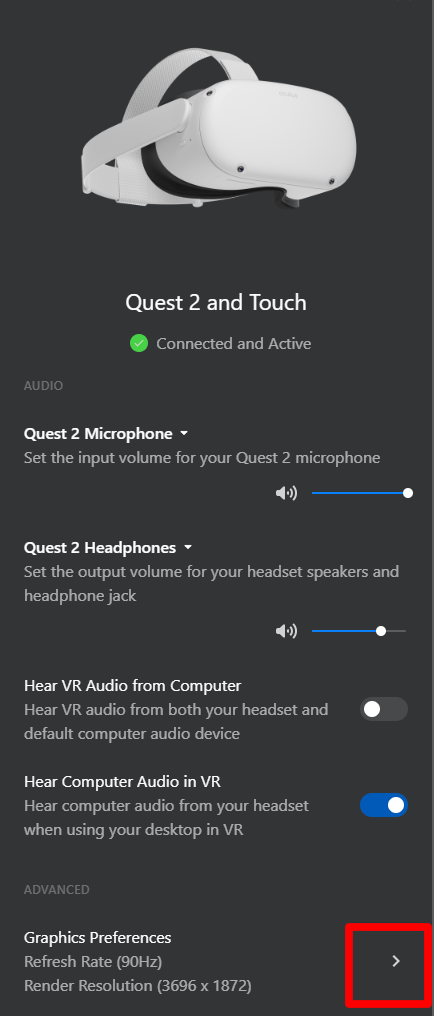
To enable the setting, make sure your Quest 2 has the newest firmware installed and then connect your Link cable and open the Oculus Desktop app. In the menu on the left select Devices, then click on your Quest 2.
In the menu that opens, select Graphics Preferences.
Click the bottom radio button and then click the Ok button to save and restart the Oculus application.
The setting will be applied to any game you launch from the Oculus desktop application. Steam VR will also automatically pick up the setting. Currently there are only a limited number of Quest store games that support the faster frame rate, those that do will automatically engage the option.
I’ve been a big fan of Samsung’s LED Wallet Case for years. I had them for my last three Samsung Galaxy Note phones. They hold a couple of cards and have an LED display on the front that displays various simple lighted icons for notifications, calls, texts, and music. The one thing the case doesn’t do is hold my phone up when I want to watch a video.
The missing kickstand bothers me so much that it has driven me to try other phone cases multiple times. Somehow I always end up back in the Samsung. There’s just something about the way it feels and fits both the phone and my pocket that the others don’t quite match.
A couple of years ago I started down a different path. Adding something to the Samsung Wallet that would keep it propped up seemed like an easy solution. This journey has taken far longer than I ever imagined. Rings, pop-sockets, fold-out card contraptions, and even 3D printed gizmos, I’ve tried them all to no avail. Granted, a big part of the reason they don’t work is due to the size of the Galaxy Note. When you attach a ring or pop-socket in the middle, the angle is to shallow when you change to kickstand mode.
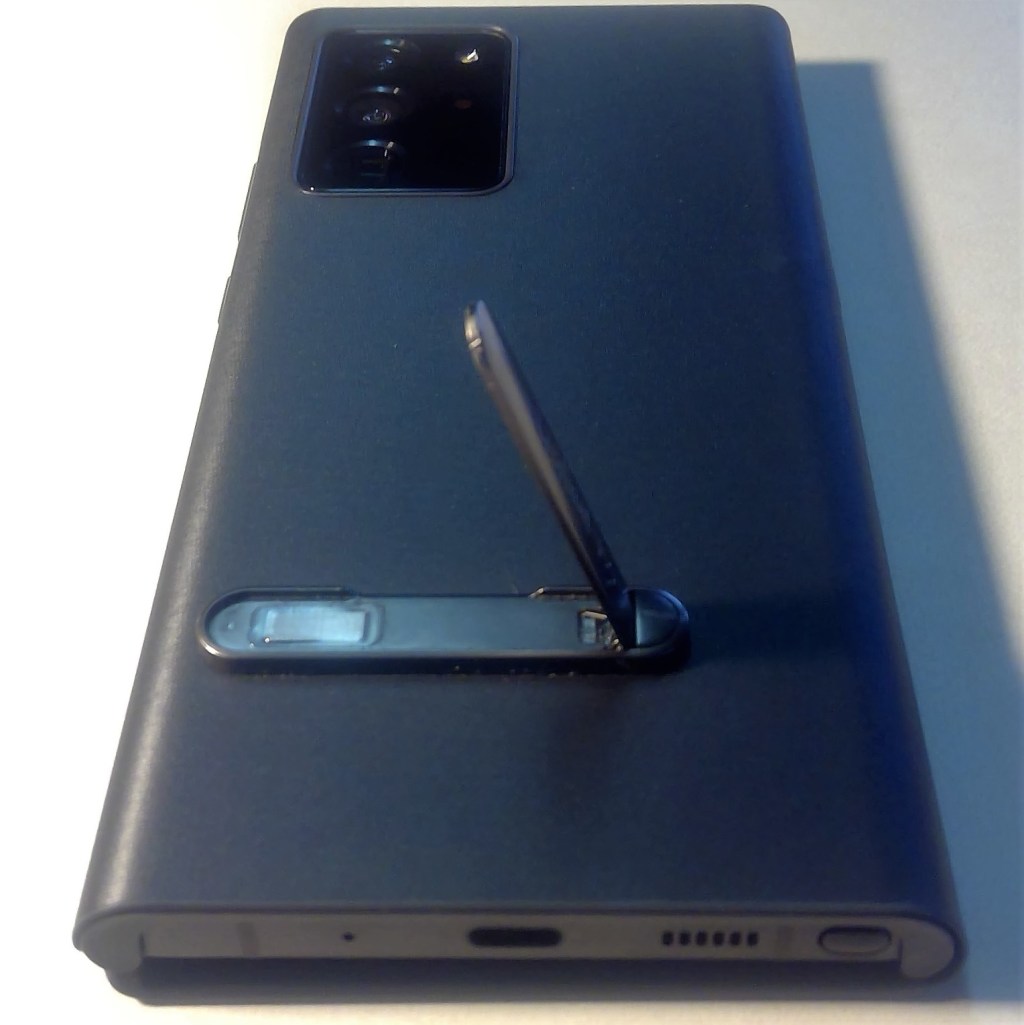
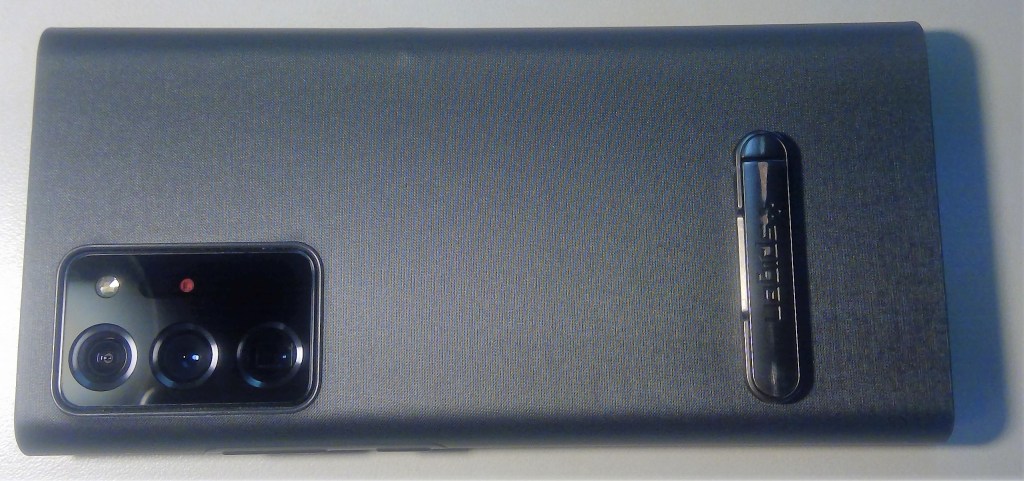
I had all but decided that I would forever be searching for something to prop my phone against when I ran across the Spigen U100 Universal Kickstand. This wonderful little gadget is a stick-on, metal, spring-assisted kickstand that adheres to your phone or case with 3M tape. It solves the angle issue because it is much longer than a ring or socket.
The kickstand folds pretty flat, I don’t notice it when the phone is in my pocket. I have it stuck to the bottom third of my phone case so it isn’t in the way when my phone is in my hand or while it sits on my wireless charger. The same strip of 3M tape has kept this thing stuck firm on two different cases for more than a year. Taking it off my last Samsung Wallet did leave a mark that I had to clean off with a magic eraser. It ships with an extra piece of the tape if you have a different experience.
It holds my phone steady at the perfect angle. I found the Spigen for $10.99 on Amazon. I especially like that it is available in a few different finishes. It was easy to match the style of my case. Spigen also makes several other models of kickstands, rings, and sockets.
User Profile Disks in Remote Desktop Services allow for a consistent user experience in a distributed computing environment. UPDs utilize Hyper-V VHDX technology to ensure a user’s profile and data is available for their use regardless of which session host the connection broker directs the client to.
User Profile Disks replace the more well known roaming profile and folder redirection solutions. UPDs are easier to manage and use, for the most part. However, they occasionally become orphaned which requires an administrator to dismount the virtual disk. Unfortunately, this can be easier said than done. There isn’t a direct way to perform this function in the RDS Server Manager.
If you search the web for “find user profile disk”, you will inevitably encounter the Sidder app. This tool was a godsend when it was released during the 2012 era. Just download the app, double click the .exe, browse to the location of your UPDs, and a popup lists each user’s mounted virtual hard disk.
The Sidder App
The Sidder app worked great in its time, but in today’s remote work environments most RDS farms have more than a single session host and multiple UPD storage locations. Searching them all one at a time is tedious. PowerShell to the rescue. The code below will prompt for a username, just enter the name part, the domain will be added automatically. You’ll need to run it from an RDS server or a workstation with the RDS RSAT loaded.
 $UserToFind = Read-Host "Enter Username (e.g. firstname.lastname)?"
 $User = $env:USERDOMAIN + '\' + $UserToFind
 $RDCollection = Get-RDSessionCollection
 $RDHosts = Get-RDSessionHost -CollectionName $RDCollection.CollectionName | select SessionHost

 $Array = Invoke-Command -ComputerName $RDHosts.SessionHost -ScriptBlock {Get-Disk | select Location,DiskNumber | where {($_.Location -notmatch "Integrated") -and ($_.Location -notlike "PCI Slot *")}}

 $UPDs = @()

 foreach ($VHD in $Array){
 $DiskID = (Get-Item $VHD.Location).Name.Substring(5).Split(".")[0]
 $objSID = New-Object System.Security.Principal.SecurityIdentifier ($DiskID)
 $objUser = $objSID.Translate( [System.Security.Principal.NTAccount])
   if ($objUser.Value -eq $User){
    $UPDs += "$($objUser.Value) has user disk number $($VHD.DiskNumber) on $($VHD.PSComputername)"
   }
 }
 If ($UPDS -ne $null) {$UPDs}
 Else {"$User does not have any user profile disks mounted in RDS"}
 pause
This version will list all of the user profile disks in the RDS farm.
 $RDCollection = Get-RDSessionCollection
 $RDHosts = Get-RDSessionHost -CollectionName $RDCollection.CollectionName | select SessionHost

 $Array = Invoke-Command -ComputerName $RDHosts.SessionHost -ScriptBlock {Get-Disk | select Location,DiskNumber | where {($_.Location -notmatch "Integrated") -and ($_.Location -notlike "PCI Slot *")}}

 $UPDs = @()

 foreach ($VHD in $Array){
 $DiskID = (Get-Item $VHD.Location).Name.Substring(5).Split(".")[0]
 $objSID = New-Object System.Security.Principal.SecurityIdentifier ($DiskID)
 $objUser = $objSID.Translate( [System.Security.Principal.NTAccount])
 $UPDs += "$($objUser.Value) has user disk number $($VHD.DiskNumber) on $($VHD.PSComputername)"
   }
 $UPDs
Ever since I first put on my Oculus Quest and jumped into a VR game, I’ve wished that I could pair my noise cancelling earbuds with it. The sound system built into Facebook’s virtual reality goggles sounds pretty good, but it isn’t quite loud enough to fully overcome the amount of ambient noise that it lets through. Facebook included audio jacks on the Quest and Quest 2 and it does solve the problem, but who wants to plug cables into their fancy wireless headset?
A few days ago we wondered what would happen if we tried to pair my son’s Air Pod Pros to his Quest. To our surprise they paired up and worked perfectly, even the microphone was supported. What’s more, is that they sounded fantastic. There is a slight lag that is worse if you are streaming a game from your PC.
To be sure we hadn’t experienced some type of fluke, I grabbed my Quest 2 and paired my MPOW X3 earphones to it. Again, they paired up without issue and worked perfectly. I went on to try several other Bluetooth headsets that I had lying about. All but one worked and those wouldn’t pair to my phone either.
Both of our Quests are running OS version 21 and are in development mode, but I don’t think it is required. To pair your earphones just go to Settings and then to Experimental Features to access the Bluetooth pairing option.