What I know, have read, and needed to figure out about Microsoft’s software, hardware, and platforms. I have spent a good chunk of my time on Earth mastering almost every piece of software and platform Microsoft has published. From DOS to Windows 2022 and from Microsoft Mail to Microsoft 365 and Azure.
If you have ever moved Windows print services to a new server, chances are that you have been left wondering what to do with the old stuff left over on the client computers. GPOs make deploying printers a snap, but when it comes to removing them, you are on your own.
Leaving the old printers installed can be confusing to people. In today’s world, printers are increasingly used as attack vectors to establish a beachhead inside corporate networks, leaving them could turn out to be a security risk. Plus, my dad taught me that no job is finished until you’ve cleaned up the mess you made doing it LOL.
If your workstation operating systems are new enough to be running PowerShell and WinRM is enabled, a script could be utilized to remove the old printers. First you will need to find the printers to be removed and store them in a variable. The Get-Printer cmdlet lists all the printers on a system and the Where-Object function will let us filter the properties that identify the specific printers we want to uninstall.
$OfflinePrinters = Get-Printer | Where {($_.Type -like "Connection") -and ($_.PrinterStatus -notlike "Normal")}|
Select Name -ExpandProperty Name
The line above will store the names of printers on the system you run it from that are connected via network and not online in the variable $OfflinePrinters. It should be noted that there is a potential to remove printers you use with this method. If you have a network printer installed from a location you are are not currently connected to, it will match the criteria. For example, if you have a network printer at home but are executing the script from your office the home printer will be deleted.
Next, we’ll loop through the printers in the variable and remove them. If you are concerned about the potential to remove printers you need, remove the -confirm $false and you’ll be prompted for each one.
Removing all the old printers from a single computer is well and good, but PowerShell’s true power comes from it’s ability to execute commands against all systems. With a few more lines of code we can search through your Active Directory domain and find all your workstations. Then we’ll use PowerShell’s Invoke-Command to execute our little printer removal tool on each one.
The script below will need to be run from a Domain Controller or from a system with RSAT installed. To use Invoke-Command, WinRM has to be enabled on your workstations to allow PowerShell Remoting. See Windows Remote Management – Win32 apps | Microsoft Docs
You can use Outlook 2007 and newer to merge PST files. This process is useful if you have acquired somebody else’s mailbox export, or have numerous archive files that are difficult to deal with. You can not select a source PST that is in use by Outlook so you must close it first. If you are consolidating into a single new PST file, create it before you continue with the steps below. The target PST file needs to be mounted in the Outlook profile or it will not show up as an option in the import dialog.
Open Outlook, right click on the Source PST file and close it
Click File -> Open / Export
Click Import / Export
Click Import from another program or file -> Next
Click Outlook Data File (.pst) -> Next
Browse to and select the source PST file (the one you are moving data from)
Make sure the “Do not import duplicates” option is selected.
Click Next
Be sure the “Include subfolders” check box is selected.
Select the radio button labeled “Import items into the same folder in:”
Choose the Target Outlook Data File from the drop down menu.
Normally when an account is given full permissions to a shared mailbox, the shared mailbox is auto-mapped to the delegate account’s Outlook profile. The shared mailbox is added to a linked attribute in Active Directory. Linked attributes describe a relationship between objects and are often paired as ForwardLinks and BackLinks. In the case of Exchange shared mailboxes, the user DN is added to msExchDelegateListLink and the shared mailbox is added to msExchDelegateListBL.
Auto-mapped shared mailboxes are opened as a function of the forward linked attribute (msExchDelegateListLink) in combination with the Autodiscover feature. When the Autodiscover XML is examined (Test E-Mail Autoconfiguration) the auto-mapped mailbox appears in the XML tab in the AlternativeMailbox tag.
<AlternativeMailbox> <Type>Delegate</Type> <DisplayName>Sales</DisplayName> <LegacyDN>/o=contoso/ou=Exchange Administrative Group (FYDIBOHF23SPDLT)/cn=Recipients/cn=Sales</LegacyDN> <Server>ServerName</Server> </AlternativeMailbox>
Mailboxes opened in this manner (shared, archive, public, etc.) are not natively part of the Outlook profile and therefore are not processed by Outlook’s account creation routine. As a result, the auto-mapped shared mailbox does not acquire a signatures folder in the file system. By default, Outlook creates signature folders for all accounts that go through the creation process at C:\user\username\appdata\roaming\microsoft\signatures.
To add a signature to messages sent from shared mailboxes in Outlook we need the software to treat them as if they were a regular user account. This goal can be accomplished by disabling the auto-mapping for the delegates that access the shared mailbox and manually connecting Outlook to it. Unfortunately, this cannot be accomplished through the Exchange Control Panel or the Microsoft 365 Portal. It is easiest to disable automapping with PowerShell.
Before we learn the PowerShell code, it is important to understand that modifying the permissions, or membership of a shared mailbox with the Exchange Control Panel, or the Microsoft 365 Portal will re-enable the auto-mapping feature for all delegate accounts. The various GUI management tools for Exchange do not expose the attribute for auto-mapping. As a result, the attribute is always returned to its default state ($true) when these tools submit their commands.
The default enabled state of the auto-mapping feature imposed by the Exchange GUI tools causes the workaround to potentially malfunction for any or all member accounts. The issue occurs because Outlook will connect to a particular resource only once and the first connection wins. If the first successful connection to the shared mailbox is the auto-mapped AlterativeMailbox, the signature folder created by the work around will not be mapped to Outlook’s send function.
If a shared mailbox is mistakenly modified using one of the Exchange GUI management tools, each delegate must be removed and re-added using the PowerShell method (below) with the auto-map feature disabled. If a delegate user’s Outlook has already connected to the AlternativeMailbox, their signature for the shared mailbox will not function for up to four hours after the correction with PowerShell has been executed. The auto-mapped shared mailbox must be disconnected from the user’s Outlook profile by the Exchange Mailbox Agent before the explicit connection created by the workaround will be guaranteed to connect first.
To establish the workaround and enable Outlook signatures from shared mailboxes, create a shared mailbox. Once the shared mailbox is established use the Add-MailBoxPermission cmdlet to add the delegate’s accounts.
(replace “Shared Mailbox Name” and “Delegate User ID” with the actual values, leave the “” in place)
If you are applying this technique to an existing shared mailbox, or if you are correcting a mailbox that was modified with one of the Exchange GUI tools, you will need to remove and re-add all the delegate members with PowerShell. This small script automates the process.
(replace “Shared Mailbox Name” with the actual name, leave the “” in place)
Once the shared mailbox and its membership (auto-mapping disabled) have been established or corrected, all that it left is to access it with Outlook as if it were a separate account. You will use the delegate’s credentials to logon. Open Outlook, go to File -> Add Account, enter the shared mailbox’s primary email address, enter the delegate user’s email address and password when prompted for credentials.
I needed to rename a bunch of computers in a hurry. As usual I turned to PowerShell. The old and new names were provided to me in a CSV. The systems were spread over a wide area and throughout different departments so I would need to include connectivity testing and some simple reporting to keep track of the progress. I came up with the little gem below. I’m sure I’ll be pulling it out of the toolbox again.
To use this script you’ll need a CSV with at least two columns; one named “currentname”, and another called “newname”. You will have to run the operation from a system that can communicate (ping & WMI) with the workstations. The remote systems need to support remote PowerShell commands and you will require domain credentials with enough permissions to rename domain computers.
Once you have all of that, copy the code below and paste it into a file. Save it as “Rename-Computers.PS1” where you keep your scripts. When you run the script you’ll be prompted for the credentials to perform the rename with. Then an “open file” dialog box will pop so that you can browse to your CSV. Once you’ve selected your file, the script will ping each machine and if they reply, the command to rename will be issued. If they aren’t reachable, they’ll be added to a report.
At the end of the run, three text files will be in your documents folder. One shows the machines that were renamed. One has the systems that couldn’t be pinged. The other is an error log. The same information will be displayed in the PowerShell console as the script runs.
The script is not currently set to reboot the computers which is required to complete the renaming process. To add a reboot insert a -Restart after -Force. Removing the -Force will give the user a chance to reject the rename.
No one solution will correct all TPM issues, but here are some of the most common and effective fixes listed in the order you should attempt them.
Updates
Many times, TPM errors can be corrected by applying updates to the operating system and system BIOS.
The operating system should be updated with the Windows Update mechanism. Windows updates should be applied before any TPM or BIOS updates from the manufacturer.
The procedure for updating the System BIOS is different across systems, but in general the manufactures update utility should be used.
UEFI Discrepancy
TPM 2.0 (check status) requires the system BIOS to be in a Native UEFI mode only. Disable any legacy functions, modes, or settings.
Clear TPM
TPM security processors include their own sealed storage. Occasionally that storage becomes corrupted. Clearing the TPM storage is done with the Security Process Details page or, the TPM MMC (see Status section). It can also be done via PowerShell (Clear-TPM in an admin console).
You should backup a system before clearing the TPM. Data loss is possible in certain situations.
Windows Hello will not function after clearing TPM storage and needs to be reconfigured.
Reset Power
Often a full power loss will restore TPM functionality to systems that cannot detect their TPM security processor. TPM is missing or not detected status messages from either the BIOS or Windows Status warrant the following procedure. It is important to remove all power and fully drain any capacitors or other power supply available to the TPM chip, a reboot or shutdown is not sufficient.
Shutdown the system
Unplug the Power Cable or Power Supply
Remove any batteries from laptops.
Disconnect any UPS or USB power.
Hold down the Power button for a minimum of 30 seconds.
Re-connect power cords, power supplies, UPS, or USB power.
If you are unable to resolve TPM issues after completing these steps you should contact your system’s or motherboard manufacturer’s technical support. There is likely a hardware issue that may require replacement. It is possible to disable the TPM function in your system BIOS. Be sure to decrypt disks and turn off features that require it (Windows Hello) first.
Microsoft’s 365 enrollment has three states: Enabled, Enforced, and Disabled. Enabled means that a user has, or will be prompted to enroll for multi-factor authentication. However, if they do not complete the enrollment and you do not have any type of enforcement policy, the account will continue to be authenticated without MFA. Once a person has completed the enrollment their account’s status is changed to Enforced. MFA is required from that point forward. An administrator can manually set an account to Enforced, but that account may not be able to logon and complete the enrollment on their own.
The multi-factor authentication page in Microsoft 365 admin portal will list all the users and show their states, but organizations with lots of users, SharePoint or Teams external accounts, and the like may have a difficult time displaying the data they need. The script below will list all licensed Microsoft 365 users that do not have an MFA state of “Enforced”.
Several of the solutions for controlling mobile data on the market claim to have provide simple solutions, but only one of them has impressed me. Microsoft’s Intune Endpoint Device Manager is extremely robust and very complicated. However, if you forget about trying to push apps and manage user profiles for now and concentrate on securing your corporate data on mobile devices, you’ll find Intune has a trick the others don’t.
Microsoft’s leg up comes from the fact that the software that is most likely being used to access company data is theirs, or one of their partners. Embedded in smart device apps like Outlook, Office, OneNote, Teams, Adobe, Box, Zoom and other popular titles is a process that checks for a special DNS record every few hours. If the record is found, its presence informs the device that there may be an Intune Mobile Application Policy configured for it’s user. The full list of apps that contain this feature is available on Microsoft’s site Supported Microsoft Intune apps | Microsoft Docs.
If you configure a Mobile Application Management policy and assign that policy to a user, when that person uses their company credentials with the specified program, they will be prompted to complete the protection process you have specified. You will also be able to stop access to the clipboard, prevent interactions of corporate data with non-approved apps, require extra device security, and more. Depending on the options you set in the policy, they will loose access to the resource if they refuse. No emailing codes to users, no trying to get them to follow odd instructions on a web page from their phone, they just open the app they have always used and follow the instructions.
Your accounts need to be licensed to use Intune before you can get started. The licenses are included with the Business Premium edition of Microsoft 365, they’re also included with several versions of Enterprise licensing. Licenses for Intune can also be purchased individually. Check Microsoft’s page for more details Licenses available for Microsoft Intune | Microsoft Docs.
Once you have the licenses taken care of you’ll need to configure your tenant. Assuming that you already have Microsoft 365 setup with your custom domain and user accounts, you’ll need to create a couple of DNS records for Intune. Log on to your public DNS host and create a CNAME for EnterpriseEnrollment.company_domain.com that points at EnterpriseEnrollment-s.manage.microsoft.com. Create another CNAME record for EnterpriseRegistration.company_domain.com that points at EnterpriseRegistration.windows.net. More detailed information about the full setup is available at Set up Microsoft Intune | Microsoft Docs and at Set up enrollment for Windows devices by using Microsoft Intune | Microsoft Docs.
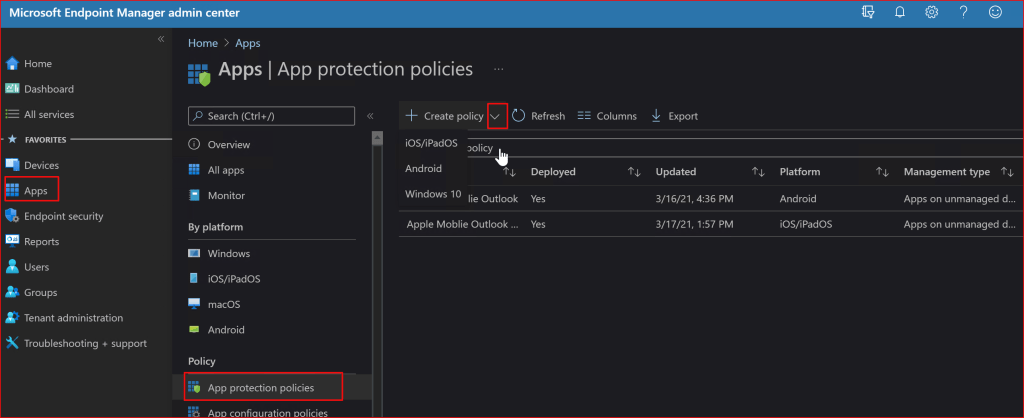
Once the basic setup is finished it is time to setup your first mobile application policy. In this post we’ll create a rule for Outlook. Log on to your Microsoft 365 admin portal and go to Admin -> Show All -> Endpoint Manager -> Apps -> App Protection Policies. Then click the drop down next to the Create Policy button and choose the OS you want to make a policy for.
Try not to get sidetracked by all the other options until you become more familiar with Intune.
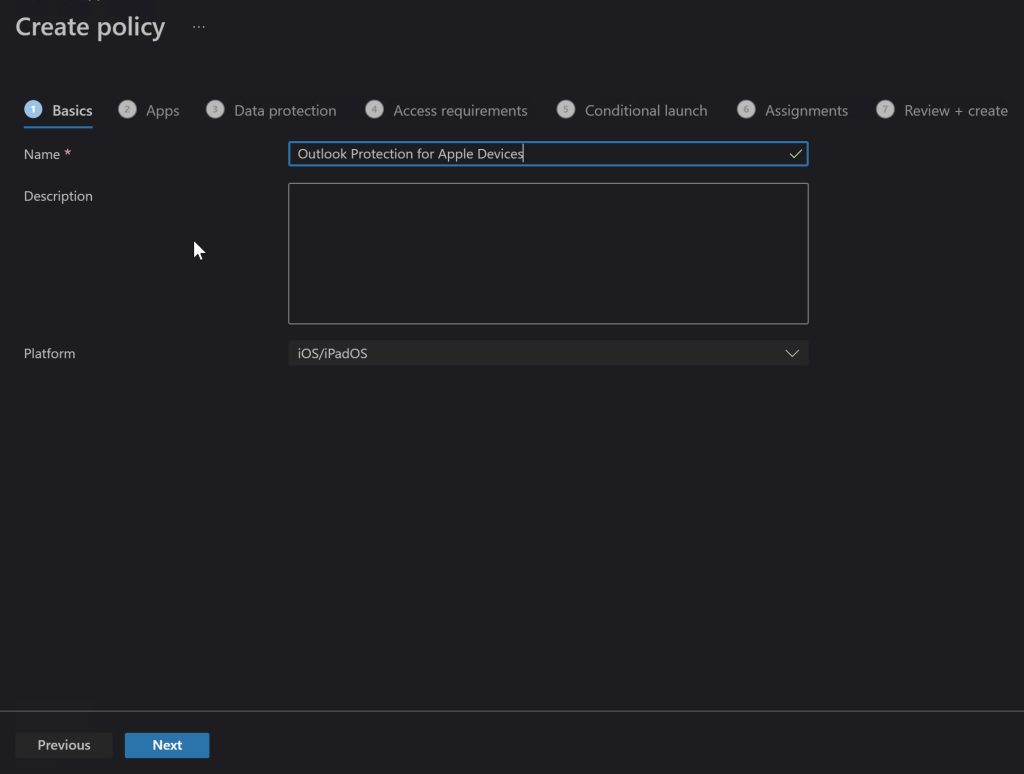
On the next screen, name your new policy something appropriate and add a description if you like. Click Next.
Naming becomes important when you have lots of rules so give it some thought.
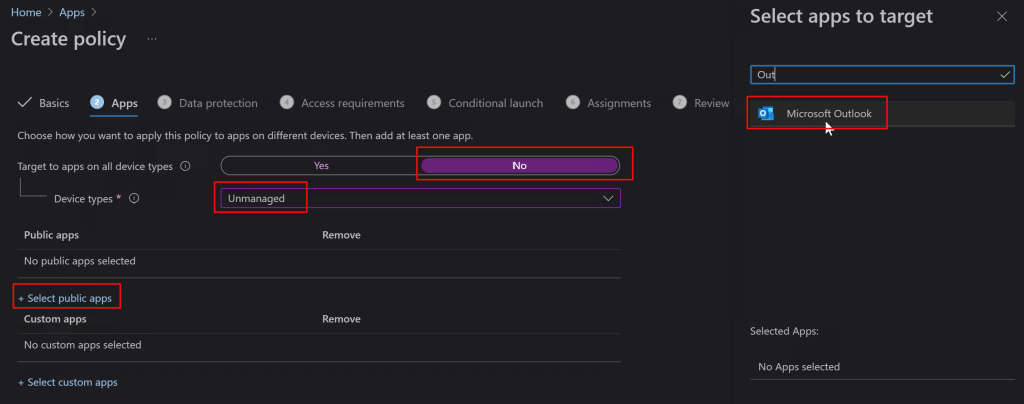
On the Apps screen, toggle the option to Target All Device Types to “No”. Then use the drop down to select device types and check “Unmanaged”. Now click the link to select public apps and type the name of the application you are interested in protecting in the search box, in our case Outlook. Select it and then click the next button to continue.
You can add your companies in-house apps too, but that is out of scope for this post.
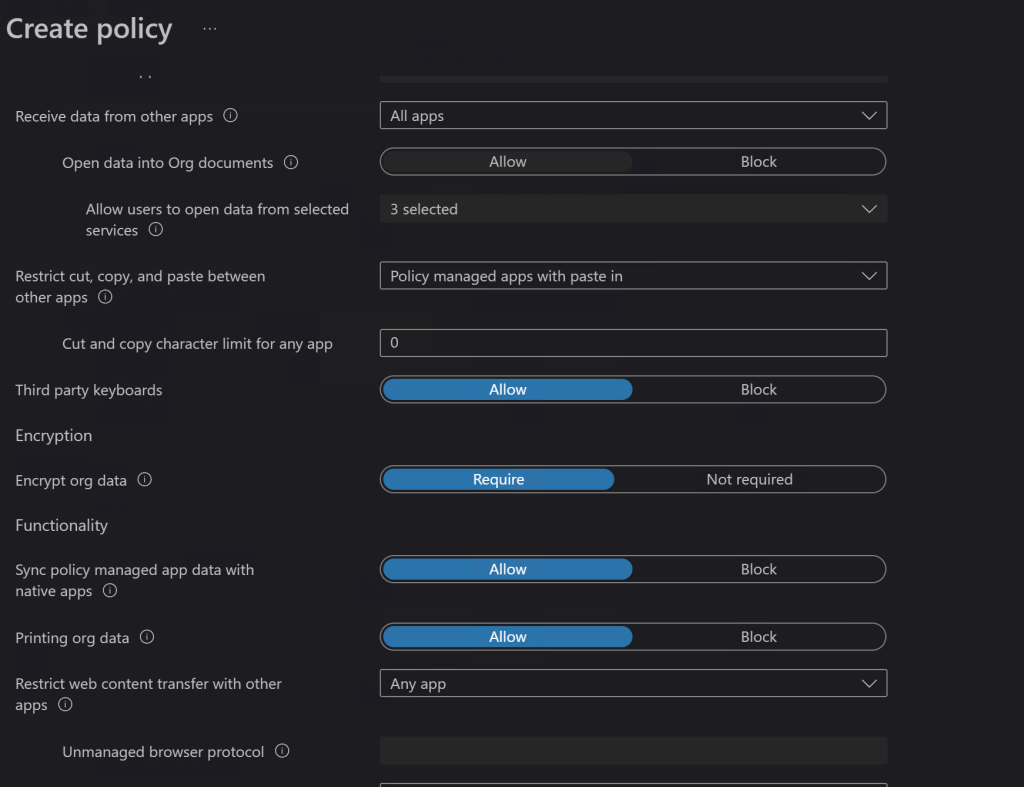
On the Data Protection screen you’ll choose the options that you feel best protect your corporate resources. Will you let them print from Outlook? Should the app encrypt the data on phone or tablet? What about copying and pasting between apps? There are lots of choices and combinations to choose from. Luckily the explanations are pretty straight forward. If you need more information the official Microsoft documentation is located here for iOS: iOS/iPadOS app protection policy settings – Microsoft Intune | Microsoft Docs and here for Android: iOS/iPadOS app protection policy settings – Microsoft Intune | Microsoft Docs.
Data connection options let you control how the device and its apps can interact with your cloud data.
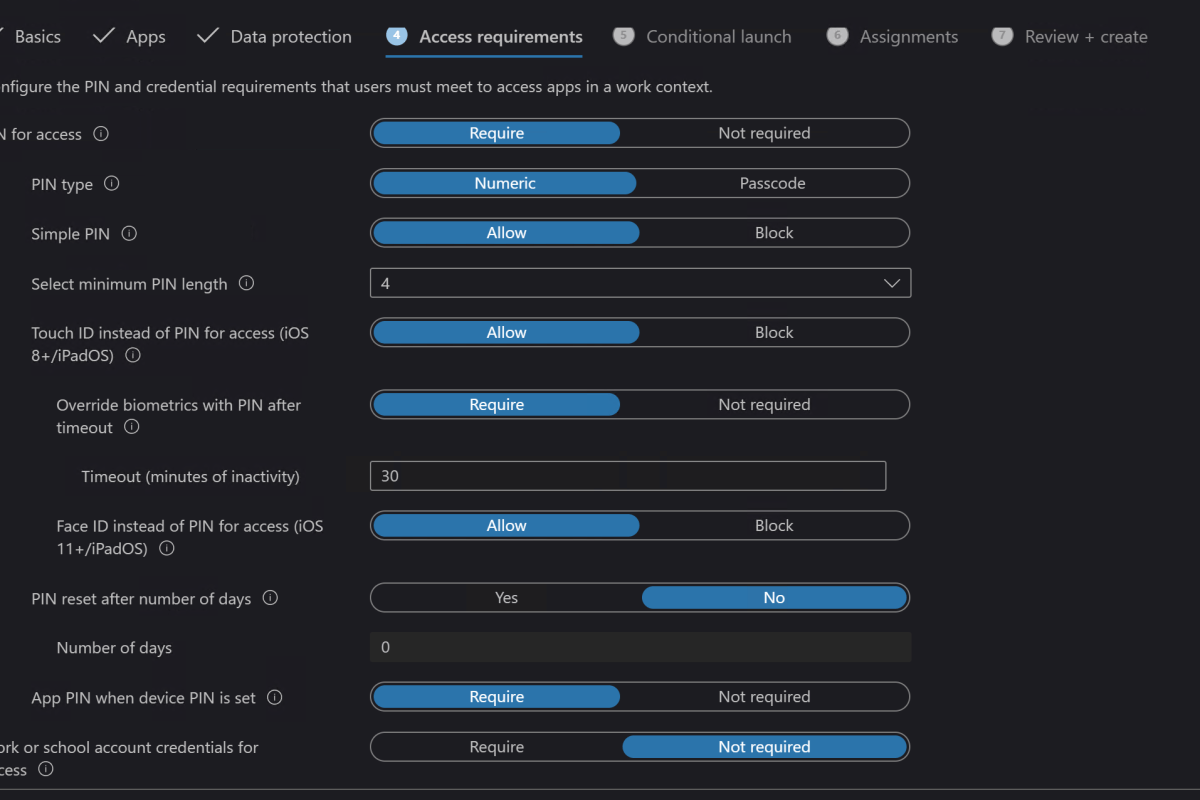
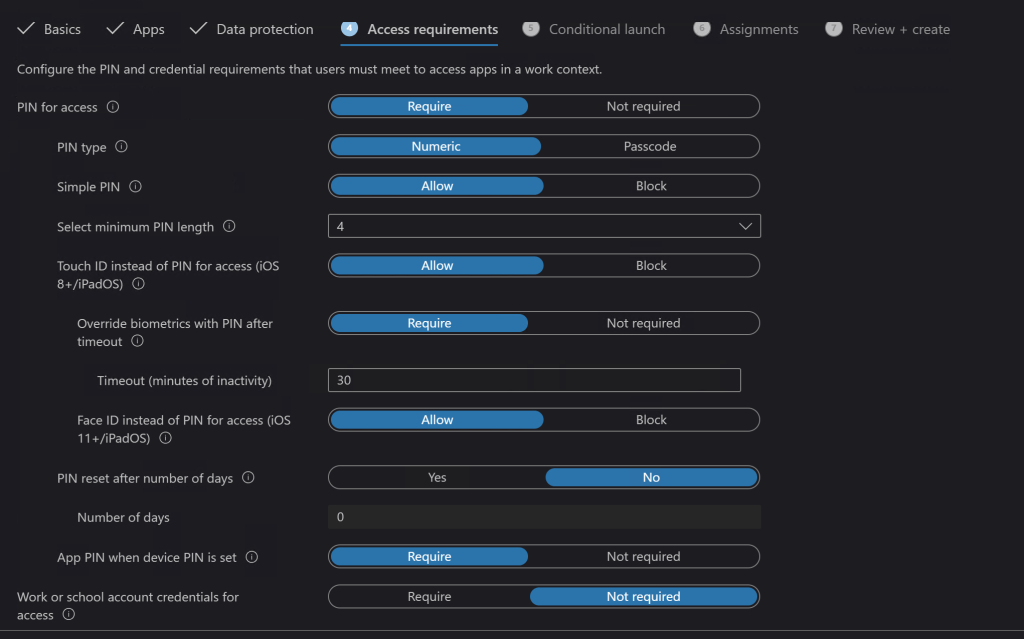
Next up are the access requirements where you will choose what hoops the devices have to jump through to access your data (Outlook). Do they need a device PIN? Should Outlook have its own PIN that prompts every time they open it? Are you going to allow the devices biometric features? There are a lot of choices in this section. I can tell you from experience that these choices are what will annoy your co-workers the most, so don’t be more aggressive than you need to.
You don’t want to go overboard on the access requirements.
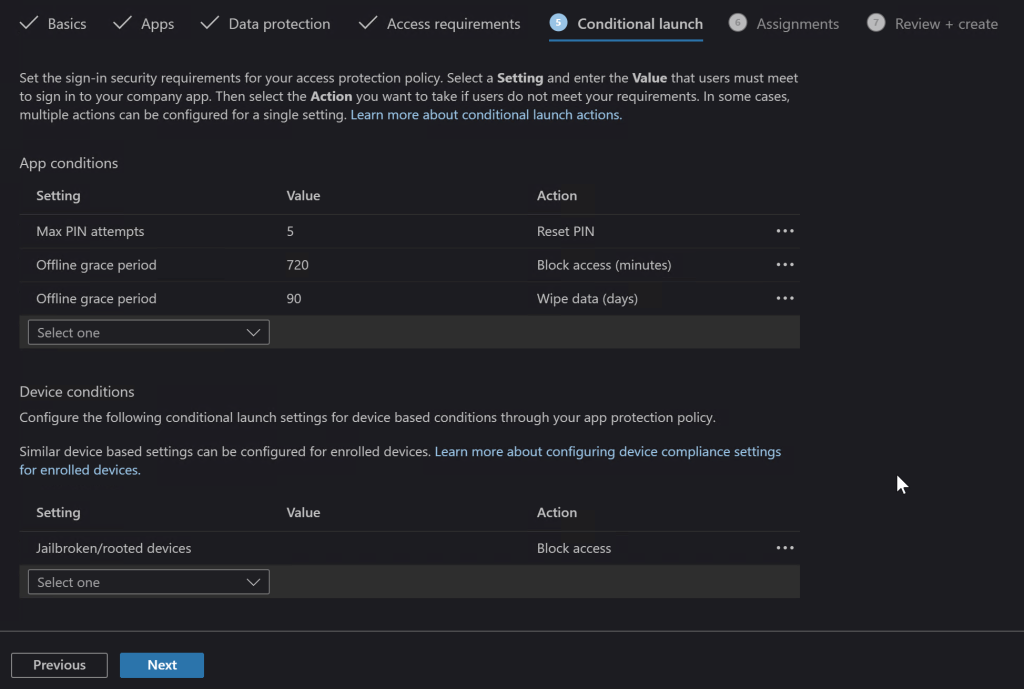
Launch conditions let you control certain aspects that are required for your user’s device to open the app (Outlook) in the first place. A popular choice is to block jailbroken or rooted devices since they are more likely to contain malware. You may also want to consider warning users when their devices are on old versions of their operating systems.
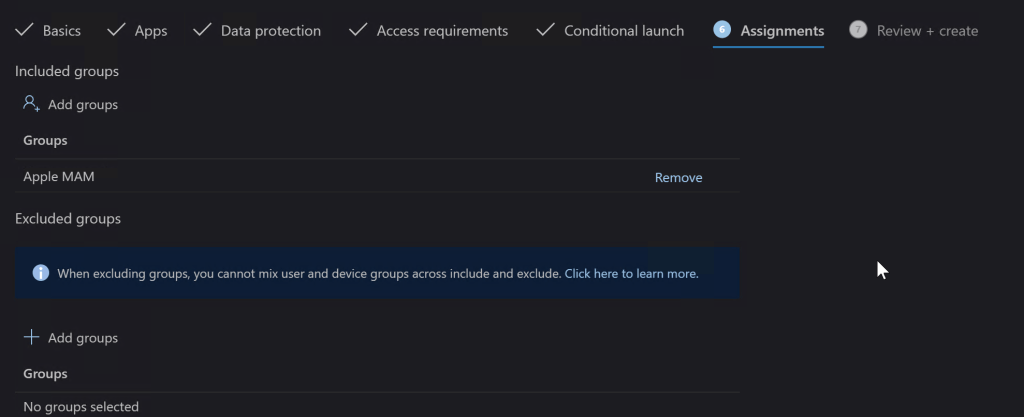
The Assignments tab is where you select the groups of users that the rule you made either applies to, or those that are excluded from it. I typically use the inclusive option and create a group that matches the rule name. If you don’t already have a group that will work you do not need to exit the Endpoint Manager session to make one, you’ll loose your progress and have to start over if you do. Just open another tab in your browser and go to Microsoft 365 admin center – Groups to create your group and add the users. Then switch back to the Endpoint Manager tab and add the group you’ve created.
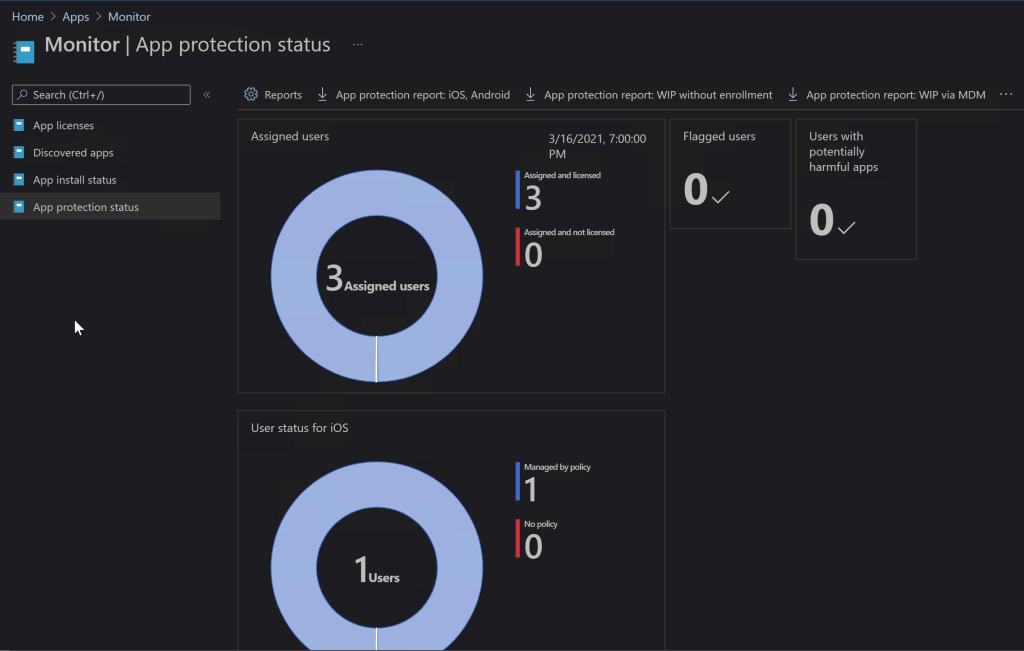
On the last screen you be given a chance to review all the options you’ve selected and create the rule. It can take up to eight hours before Microsoft deploys the rule in your instance of Intune and up to eight more before the devices check in and get the policy applied, be patient. You can check on the status of your rules and devices by using the monitor. In the Endpoint Manager console go to Home -> Apps -> Monitor -> App Protection Status to see the available options.
In today’s world every business should take steps to protect their data. Until the age of ransomware, small businesses were largely exempt from the perils of hackers. Now they are prime targets, data doesn’t need to be valuable on the black market. It only needs to be worth something to you and your company. Often when we think about security we focus on computers and servers, but our mobile devices have just as much access and we don’t want to leave them vulnerable. If all of this proves a bit much to tackle on your own, don’t let that stop you. Reach out to a Microsoft 365 partner or Microsoft themselves and get your mobile endpoints protected.
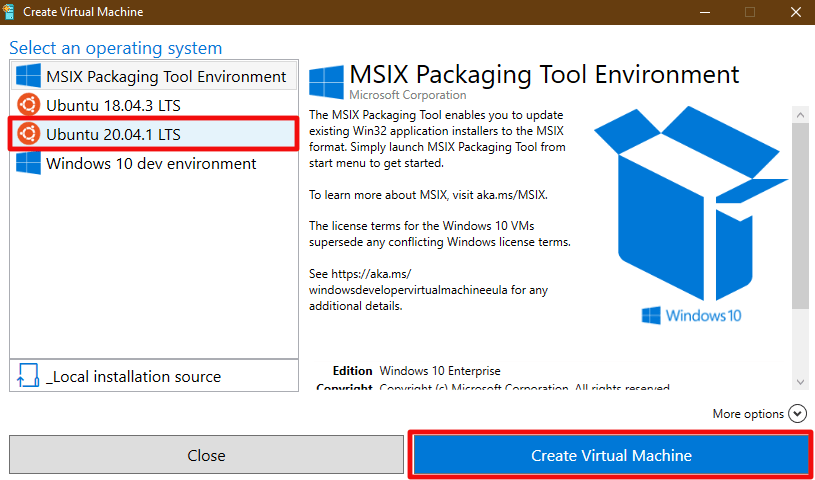
I’ve written several posts on creating Hyper-V virtual machines on Windows 10. One of my most popular covers how to create a Linux VM with sound. Inevitably, somebody will follow up with a question along the lines of, “How do I access XRDP (Linux RDP Server) from other machines on my network?”
One might be tempted to think the answer to this question is just a simple firewall rule. It isn’t. After the Windows 10 1607 update, Hyper-V started including a default virtual switch that uses NAT to allow your virtual machines access to the same network resources that your host machine can reach. This default switch makes the Quick Create function extremely useful. With a couple of button clicks, you can deploy a VM that has full outbound (Internet) network access. No network chops required.
Your newly deployed VM will be running on its own network segment that uses NAT to reach the host network’s resources. It is fantastic when you are trying to go from your VM out to the world. Getting traffic to go in from your host network(s) to your VM is another matter. Since the VM is running in its own network, there’s no path for traffic to reach it. The NAT is handled on your Windows host system so your router won’t be much help either.
Like all technical problems there are multiple ways to address this challenge. For example, if all the machines you intend to access the VM from are running Windows 10 Pro +, or Windows Server 2012 + you could configure the Hyper-V manager to access the host remotely. I’ve written those instructions here. You could also create an external virtual switch that would allow your VMs to use the same network your host system is attached to. In this post I’ll create a new NAT virtual switch and forward the traffic to the VMs.
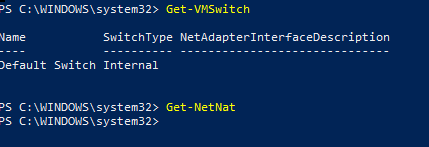
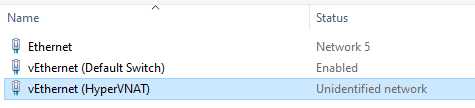
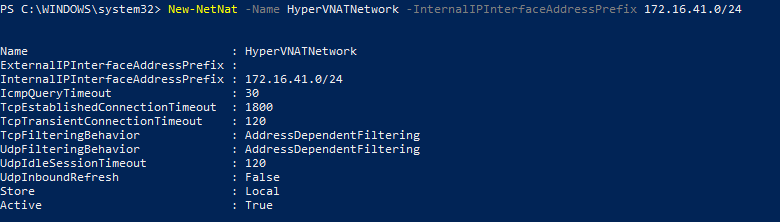
Windows 10 has built-in port forwarding and NAT mapping. Normally you would need a few lines of PowerShell to forward the packets to your VM, but there’s a problem. The Hyper-V default switch’s NAT is not exposed to the OS. If you open PowerShell and run Get-NetNat you will probably see no return (assuming you haven’t configured other NAT mappings). We need to create a virtual switch that uses NAT and allows us to control it. Microsoft has not included this functionality in the GUI, but it can be done.
First we need to create a new Hyper-V switch. In an elevated PowerShell console run:
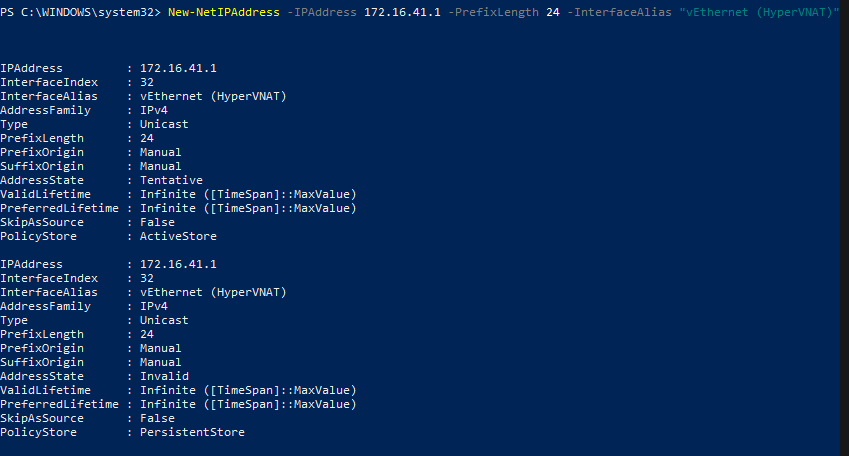
If you look in the Windows network adapter console, or list them with PowerShell (Get-NetAdapter), you will see that a new NIC has been created with the name you specified between the “” marks in the command above. It can’t access anything because it isn’t configured. First we need to give the switch adapter an IP address. This address will be the gateway for all the VMs that are attached to this virtual switch.
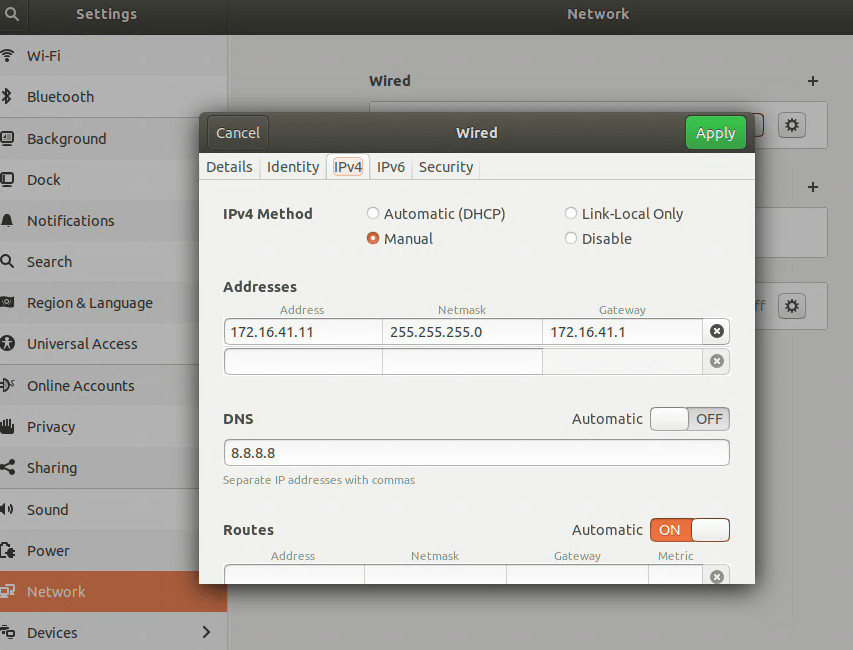
The built-in default virtual switch includes a DHCP function that automatically assigns IP addresses to the attached VMs. Our new virtual switch does not. You will need to manually assign your VM an IP address in the same subnet. If you followed my example, the useable addresses are 172.16.41.2 – 172.16.41.254 the subnet is 255.255.255.0, and the gateway is 172.16.41.1. You’ll also need to configure DNS if you plan on surfing the web or accessing named resources, 8.8.8.8 is Google’s public DNS server.
There are numerous ways to configure the IP information for a computer. They all differ according to the operating system. Generally, somewhere in the settings of your OS should be the network options. Set the IPv4 interface to manual (not automatic or DHCP) and enter the correct numbers for each. Below I’ve configured an Ubuntu Linux machine for the network we’re creating in this post.
It is always a good idea to reboot after changing an IP address.
Now the VM should be able to use our new virtual switch to access the outside world. Also, when we run Get-NetNat on the host in PowerShell you’ll see information returned. You should be able to open a web browser on your VM and hit your favorite sites or check your email. We’ve done all of this and basically ended up where we started LOL. The key difference is that the NAT rules can be controlled now.
The problem we started out to solve was to allow XRDP access to a Linux VM on our Windows 10 host from other computers on our network. Add a NAT mapping to forward a custom port (3391) from our host to our VM as XRDP (3389) by using the PowerShell command below. Note: Do not forward 3389 to 3389 unless you do not use RDP on your host system.
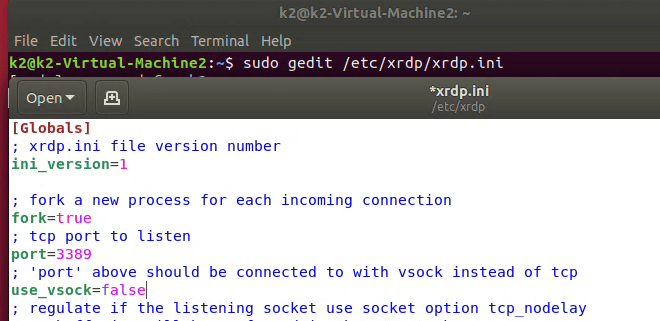
Depending on how XRDP was installed and configured on your Linux machine, you may also have to edit the XRDP.INI file. If XRDP is configured for vsock, it is not listening on the traditional RDP port. Vsock is only accessible via the Hyper-V management console’s enhanced session function.
sudo gedit /etc/xrdp/xrdp.ini
Depending on the distro, you may need to use nano or vim to make sudo changes to the xrdp.ini file. Change the line use_vsock=true to use_vsock=false. Make sure there is a port=3389 line that is not commented out (;) and save the file. Reboot the VM.
Note: chaining this setting will mean that to connect to an enhanced session, you will always need to manually open an RDP connection. Right clicking on the VM in the Hyper-V Management console and choosing connect will only open a basic session if vsock is disabled.
You should now be able to connect to RDP via the Windows 10 host’s IP (not the VM’s) address to port 3391 (X.X.X.X:3391) from any machine that is able to reach your Windows 10 host computer. If you want to access the VM from the Internet you would need to forward the custom port (3391) from your external firewall to your Windows 10 host system.
This technique was demonstrated in Windows 10, but it would work for Windows Server and a Windows Docker Container as well. You can find more details about the NAT abilities built into Windows at Set up a NAT network | Microsoft Docs .
If there’s one thing Outlook really likes to do, it is to make sure that you are notified. Sometimes it can be a little overbearing, especially if you are a member of very many shared mailboxes, a room delegate, or have full access to another individual’s mailbox. You will get all of those notifications too.
Often the solution is to reduce the number of Exchange objects that a person has access to, but how do you find out what those are? The easiest way is to use PowerShell. The little script below will prompt you for your Global or Exchange administrator credentials for Microsoft 365. Then it will prompt you for the email address of the user account you are working with. It will use those pieces of information to connect to Exchange online and generate a list of all the objects that person has full access to. Note: this does not include share permissions assigned by a user in Outlook.
Once you have the list of Exchange objects you’ll want to investigate each and decide if the user really needs the level of access they have. Full access or delegation results in notifications. If the number of objects can not be reduced to a satisfactory level, there is another strategy available in Outlook itself. You will need to disable the general alerts function and then create alert rules for the specific objects that matter.
In Outlook, go to File -> Options -> Mail and then uncheck the box for “Display a Desktop Alert”. This will do what you think, disable all Outlook notification pop-ups.
Now we’ll need to build rules for the alerts that we still want to see. Use the chevron at the far right of the Outlook ribbon to expand it. Then click the drop down for rules. Click “Manage Rules and Alerts”.
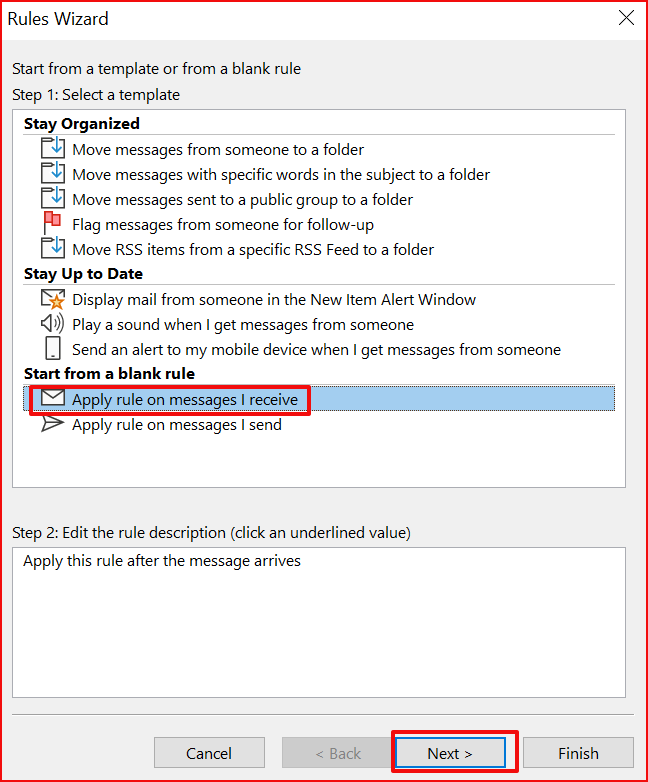
In the rules wizard select “Apply a Rule on Messages I receive” then click the Next button. Now select the most appropriate condition, often I use “through the specified account”, click on the word specified and pick the account you are creating a rule for. You may find another option more useful. From people or group is a good one too. You can actually select as many conditions as you like for the rule.
On the next screen scroll down and check the box for “display a desktop alert”. Then click Next, you probably don’t need any exceptions. When you click Finish your rule is done. You can use a series of rules like this to customize all the notifications that Outlook displays.
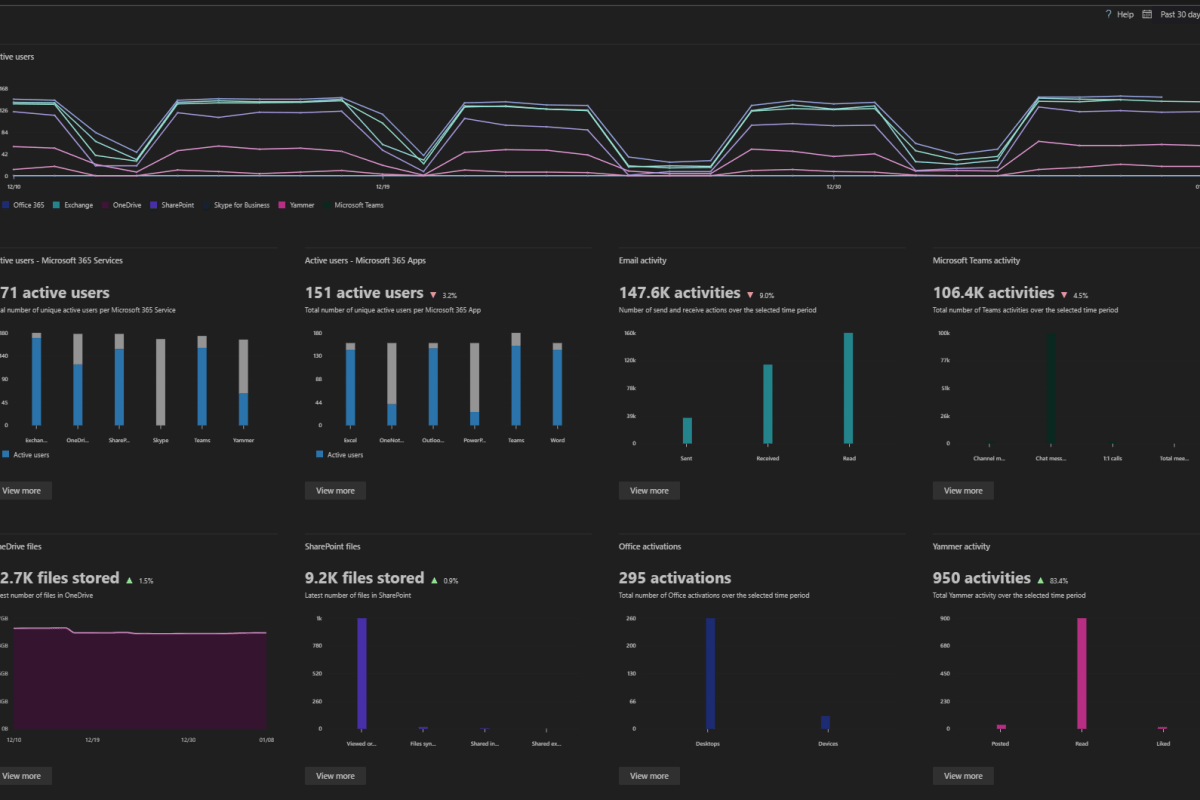
A question that I am often asked after a Microsoft 365 implementation is, “How do I know what people are doing with it ?” Microsoft’s ever evolving cloud platform has recently added an improved reporting feature that is easy to use and very informative.
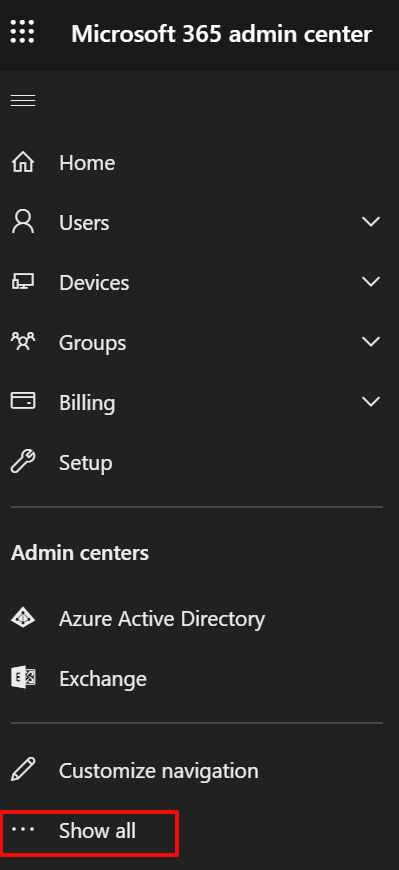
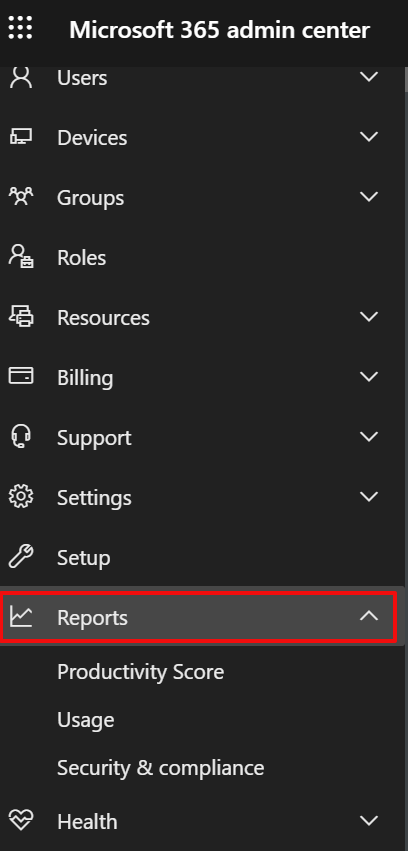
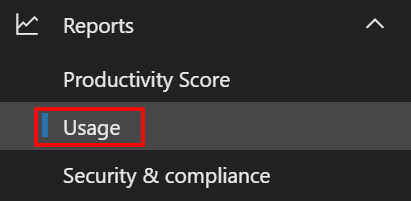
Logon to the Microsoft 365 admin portal with your global administration account by going to https://portal.microsoft.com/ and entering your credentials when prompted. In the menu on the left click the option at the bottom to “Show all”, click the drop down next to Reports, then click on Usage.
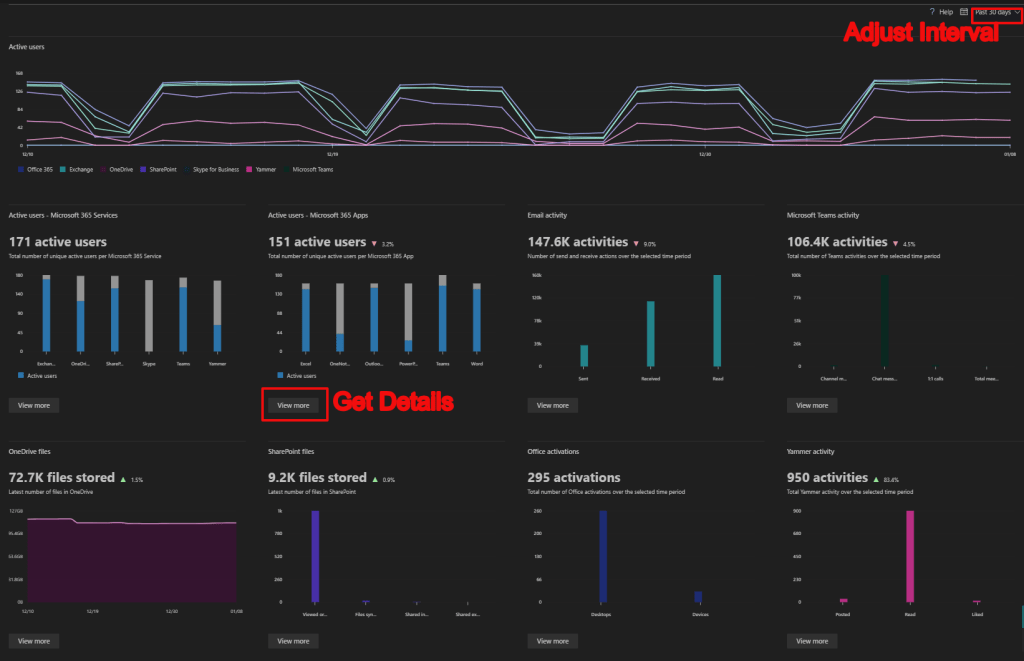
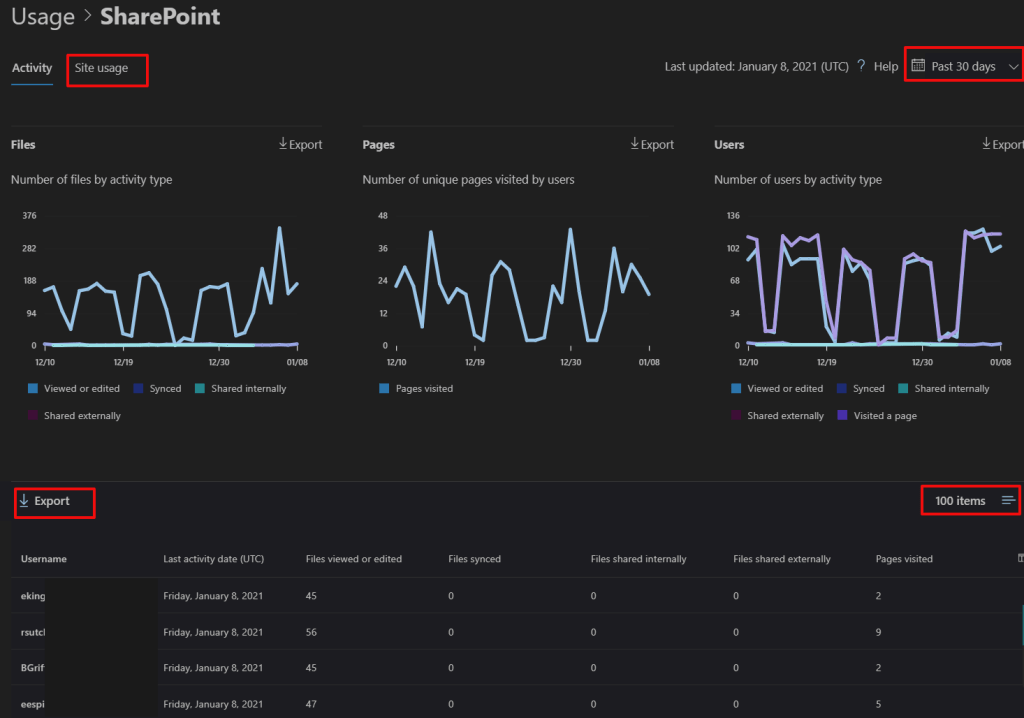
Once you have located the reporting feature using it is straight forward. There’s a drop down in the upper-right corner that changes the number of days worth of data you are viewing. The “View More” buttons on each section drill into more detailed views of each product like SharePoint or OneDrive. Some of the widgets also feature an export button to create a report that you can share with non-administrators.
There is a surprising amount of detail for each piece of Microsoft 365. You can see who is sharing data from their OneDrive and how many files they store there, along with what is in your SharePoint sites and how often they are accessed. You can even see which of the Office application are used most often.
I’ve been able to use the reporting facility to answer a lot of questions for the tenants that I support. I’m sure that you and your business will find the data useful as well.
Security and auditing efforts often increase the workload of your network administrators. The frequent requests to look up information can interrupt the admin’s own workflow. The auditor’s and security team member’s requests are legitimately required. However, those groups are often unable to retrieve the data themselves due to a lack of access to, or knowledge of, the administrative management toolsets.
One of the requests I get most often is to provide a report showing the membership of various active directory groups. Generally, any account in an AD domain has enough permission to view the membership of groups, although administrators can adjust who can see the roster. Teaching your auditors and security department to use the Active Directory Users and Computers console is not out of the question, but it lacks good reporting facilities.
When I get tickets requesting the data I lean on PowerShell to create the reports. One afternoon I thought that if I could make a script simple enough to operate, I could turn it over to the people making the requests. They could get the information they needed without waiting on my availability. Below is the script I came up with. It uses PowerShell’s Grid View to show a list of all the groups for the person to select from and then exports a report with the most commonly requested information.
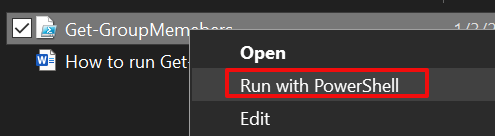
Copy the code and paste it into Notepad, save the file as Get-GroupMembers.ps1. Right click on the file you saved and choose the option Run with PowerShell.
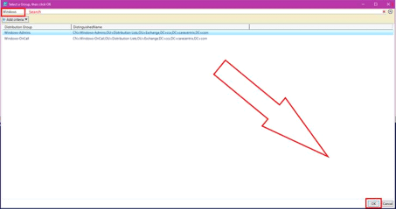
The Grid View will display all of the groups in the Active Directory forest. Use the search mechanism, or scroll through the groups and select the one you want to create a report for. Use CTRL + Click to select more than one group for your report. Then click the Ok button in the bottom right corner.
A report showing the Name, Logon Account, Email Address, Employee ID, Telephone Number, Created, Department, and City for each of the members of the group or groups you selected will be saved in your documents folder and opened on your screen.
To run this script you will need to have the Remote Server Administration Tools for Active Directory installed on the system you are running it from. The RSAT tools install the required Active Directory PowerShell module. You could also run the script from a domain controller.
Most Administrators know that you can use a GPO to disable the ability to use USB storage devices on Windows computers. So you look up the instructions and implement the policy, but how do you know if it’s working?
I’m sure you made a test OU while you were working out the best option for your situation, but if you are disabling access for security reasons you’ll need a report. There are a few ways that you could go about getting the data. I like PowerShell. The code below will search your domain computers for USB storage. You should aware that savy users can use online tools to fool detection. As always, use at your own risk.
So you have downloaded, installed, and configured an evaluation edition of Windows Server 2019. You’ve installed your software and been cruising along with everything working fine. The decision has been made to keep the machine permanently, so you get procurement to purchase a volume license and figure you’ll activate the server with the new keys once the financial transactions are all squared away. Piece of cake.
Purchasing tells you the new keys are in the VLSC. You logon and retrieve them, open up the system properties, paste in the new key and blamo! It won’t activate. Fine you think, I’ll switch over and use the CLI, it always works. Open an elevated console, type in slmgr /ipk XXXX-XXXX-XXXX-XXXX-XXXX (your key) and hit enter. Huh, that didn’t work either?
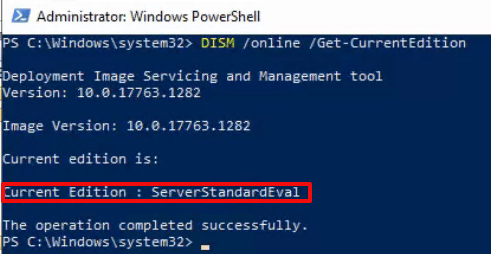
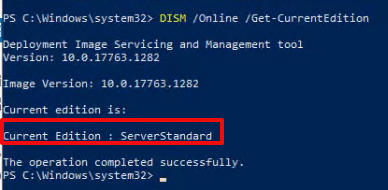
Here’s the deal, you can not apply a VLSC MAK Key to an evaluation edition because they are not the same version. The “Evaluation Edition” is considered to be a standalone edition of Windows. You can see this by opening an administrative PowerShell console and running: DISM /Online /Get-CurrentEdition
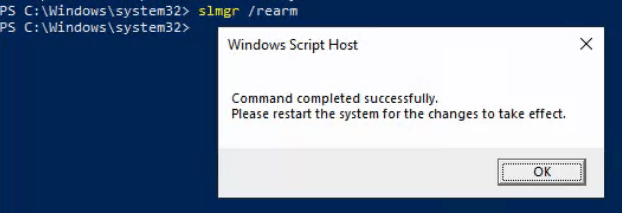
Contrary to some of the posts that I read when I ran into this snafu, the server can be upgraded to a full edition and your key can be applied without re-installing the server’s OS. It’s just a more circuitous route than you would probably like. If you are running low on time, you can extend the evaluation license for another 180 days by re-arming it. In the same administrative PowerShell console run: slmgr /rearm. You will be prompted to reboot.
You can re-arm the Evaluation Edition of Windows Server up to 5 times every 180 days.
Now that you have bought yourself some time. You will need to convert the evaluation edition of Windows to a production version using a General Volume License Key (GVLK), which are used when setting up KMS clients. Microsoft publishes a list of those keys here. I suggest that you make a backup or snapshot of the server before attempting a conversion.
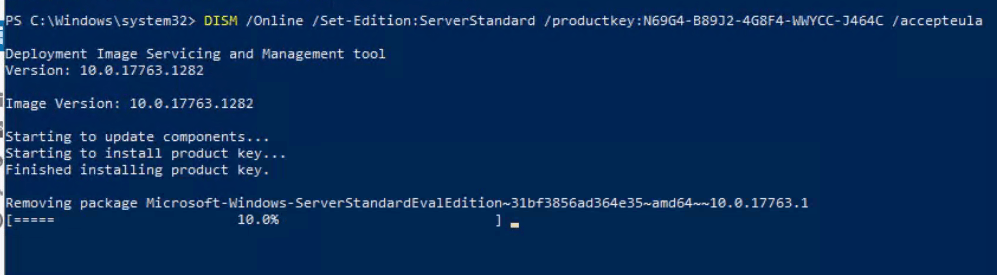
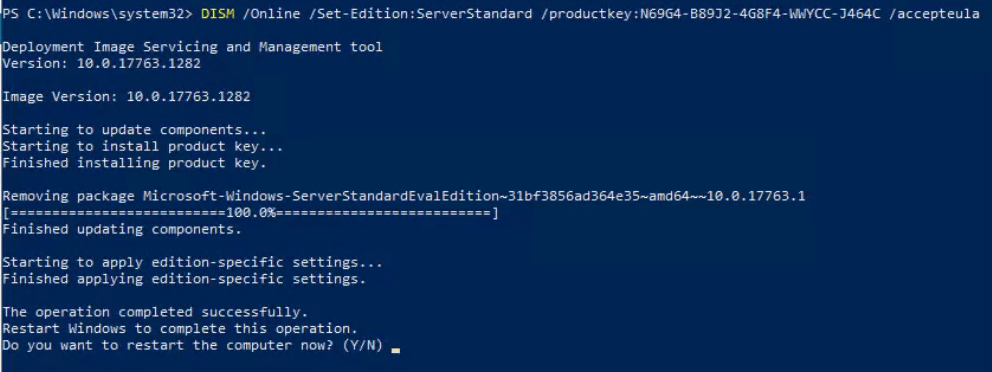
Open an administrative PowerShell prompt and run: DISM /Online /Set-Edition:ServerStandard /productkey:N69G4-B89J2-4G8F4-WWYCC-J464C /accepteula. Match the product key to the edition you want to end up on, listed in the Microsoft link above. The conversion can take hours to complete. I recommend that you reboot when the process is finished, even if you are not prompted to do so.
It is normal for the tool to look like it is hung at 10%. Be patient, it can take a long time to move.
Verify everything worked by opening an administrative PowerShell console and running: DISM /Online /Get-CurrentEdition again. This time the version should match the GLVK key that you used.
In the same PowerShell console run: slmgr /ipk XXXX-XXXX-XXXX-XXXX-XXXX (your key) and hit enter. This time you should get a pop-up saying the product key was installed successfully. Click the OK button. Now run slmgr /ato, you should get another pop-up that says Activating Windows XXXXXXX edition Product activated successfully. Click the OK button. You’re done.
User Profile Disks in Remote Desktop Services allow for a consistent user experience in a distributed computing environment. UPDs utilize Hyper-V VHDX technology to ensure a user’s profile and data is available for their use regardless of which session host the connection broker directs the client to.
User Profile Disks replace the more well known roaming profile and folder redirection solutions. UPDs are easier to manage and use, for the most part. However, they occasionally become orphaned which requires an administrator to dismount the virtual disk. Unfortunately, this can be easier said than done. There isn’t a direct way to perform this function in the RDS Server Manager.
If you search the web for “find user profile disk”, you will inevitably encounter the Sidder app. This tool was a godsend when it was released during the 2012 era. Just download the app, double click the .exe, browse to the location of your UPDs, and a popup lists each user’s mounted virtual hard disk.
The Sidder App
The Sidder app worked great in its time, but in today’s remote work environments most RDS farms have more than a single session host and multiple UPD storage locations. Searching them all one at a time is tedious. PowerShell to the rescue. The code below will prompt for a username, just enter the name part, the domain will be added automatically. You’ll need to run it from an RDS server or a workstation with the RDS RSAT loaded.
 $UserToFind = Read-Host "Enter Username (e.g. firstname.lastname)?"
 $User = $env:USERDOMAIN + '\' + $UserToFind
 $RDCollection = Get-RDSessionCollection
 $RDHosts = Get-RDSessionHost -CollectionName $RDCollection.CollectionName | select SessionHost

 $Array = Invoke-Command -ComputerName $RDHosts.SessionHost -ScriptBlock {Get-Disk | select Location,DiskNumber | where {($_.Location -notmatch "Integrated") -and ($_.Location -notlike "PCI Slot *")}}

 $UPDs = @()

 foreach ($VHD in $Array){
 $DiskID = (Get-Item $VHD.Location).Name.Substring(5).Split(".")[0]
 $objSID = New-Object System.Security.Principal.SecurityIdentifier ($DiskID)
 $objUser = $objSID.Translate( [System.Security.Principal.NTAccount])
   if ($objUser.Value -eq $User){
    $UPDs += "$($objUser.Value) has user disk number $($VHD.DiskNumber) on $($VHD.PSComputername)"
   }
 }
 If ($UPDS -ne $null) {$UPDs}
 Else {"$User does not have any user profile disks mounted in RDS"}
 pause
This version will list all of the user profile disks in the RDS farm.
 $RDCollection = Get-RDSessionCollection
 $RDHosts = Get-RDSessionHost -CollectionName $RDCollection.CollectionName | select SessionHost

 $Array = Invoke-Command -ComputerName $RDHosts.SessionHost -ScriptBlock {Get-Disk | select Location,DiskNumber | where {($_.Location -notmatch "Integrated") -and ($_.Location -notlike "PCI Slot *")}}

 $UPDs = @()

 foreach ($VHD in $Array){
 $DiskID = (Get-Item $VHD.Location).Name.Substring(5).Split(".")[0]
 $objSID = New-Object System.Security.Principal.SecurityIdentifier ($DiskID)
 $objUser = $objSID.Translate( [System.Security.Principal.NTAccount])
 $UPDs += "$($objUser.Value) has user disk number $($VHD.DiskNumber) on $($VHD.PSComputername)"
   }
 $UPDs
With all of the ransomware attacks that are making the headlines this year, many businesses are looking to improve their security posture. One of the methods security professionals find most effective is to use software that controls what applications any networked computer is able to run. If an employee can’t open the bad actor’s malware package, then the attack can’t happen.
VMware’s Carbon-Black, Microsoft’s Windows AppLocker, and Trend’s Apex One all operate by allowing only a list of approved applications to run on any given system. A key step in deploying tools of this nature is to have a full understanding of the applications and services that are installed and running on your systems now. Some of these tools include discovery mechanisms that will help you locate the data. What do you do if your chosen tool lacks this feature?
Application Control Solutions
PowerShell can get the data we need. First up is to list the applications running on your workstations. We’ll scan in the registry keys that record what software is installed on the systems that are part of your Windows domain. You’ll need to run the code below from a domain controller, or a system that has RSAT installed and is a member of the domain.
Programs that automatically execute and keep running once you’ve booted your computer are called services. Most of the application control methods will automatically approve Microsoft services. However, other program packages also use services to enable their functions. Hackers know this and are starting to hide their tools by running them as a service. The code below will find and list all of the non-Microsoft services running on your computers. Again, you’ll need to run the script from a domain controller, or a system that has RSAT installed and is a member of the domain.
Locking down computer networks is almost always a painful experience for both the administrators and users. Knowing what apps your people need to do their jobs and ensuring they aren’t entangled in your security efforts will help soften the blows.
Microsoft Project is the king of planning software. I’ve been using it for more than a decade but my current employer uses a different tool for the job which isn’t a problem on it’s own, I’m flexible.
The issue arises when a client sends me their plan in an mpp file. There is no Project Viewer application anymore. In the recent past this meant I would need to ask my customer to export their project to different format such as Excel or a PDF. Often this resulted in multiple communications, explaing the why and how.
I’ve had some success in finding alternatives for other popular software like Visio and PhotoShop in the Microsoft Store so I decided to try my luck. I installed and removed quite a few apps on my test VM, but eventually I found a suitable solution.
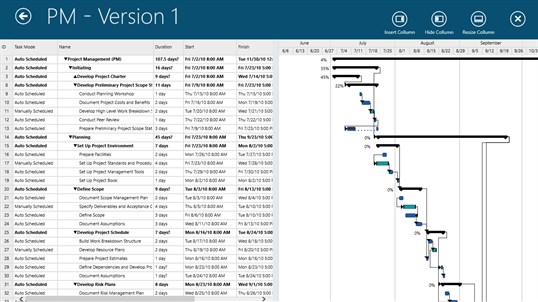
Seavus Project Viewer does exactly what its name implies. Not only will it open Microsoft Project files, but it supports the most popular views. Gnatt charts, task sheets, and resource are all available. I tested the app with multiple complex Project files and was satisfied with the results.
Once upon a time in an IT shop far, far away I thought that Windows offline files was a fantastic feature. Who remembers when it used to be called the briefcase? Now with DFS, SharePoint, Folder Redirection, and other modern file services taking over from standard file shares, the technology is dated and often causes conflicts.
Recently I was tasked with disabling all offline files for a large organization. If I didn’t care how much pain I caused the end users or the helpdesk, I could have just flipped a few settings in a GPO and moved on. I knew that just turning them off would cause trouble because the offline database is easily corrupted. When this happens the clients end up with files on them that have not synchronized with the sever.
I needed a way to identify which workstations had been configured to use offline files. I opened my browser and ran some searches. I came up empty. I’d have to come up with my own solution. I guessed that WMI would have the info I needed and I was right; win32_OfflineFilesCache would give me the status. A little PowerShell magic let me find every workstation on the domain, check for offline files, and output everything to a CSV report.
As an employee of an MSP, I am often tossed into the ring, so to speak. I’ve found that configuring Microsoft’s tools to see all of the virtual machines in a clustered Hyper-V environment consumes too much time in high-pressure situations. Depending on the version of Windows the hosts are running, you may not see the information you’re after, even when you take the time to set them up.
To save time and see the info most admins need I’ve come up with the simple script below. Run it from one of the clustered hosts and it will pop up a sortable, searchable, grid view for each host in the cluster. You will see the name, number of CPUs, assigned memory, IP addresses, on / off status, and uptime for each of the host’s VMs at a glance. Each pop-up table will be named for the host it represents.
$HyperVClusterNodes = Get-ClusterNode|Select Name -ExpandProperty Name
Foreach ($Node in $HyperVClusterNodes){
    Get-VM -ComputerName $Node|Get-VM -ComputerName $Node|Select Name,State,ProcessorCount,CPUUsage,@{Name="MemoryAssigned(MB)"; Expression={$_.MemoryAssigned/1MB}},@{Name="IPAddresses"; Expression={$_.NetworkAdapters.IPAddresses}},Uptime,Status|Out-GridView -Title "$Node"}
To most of us SSO (Single-Sign-On) means that we only need to enter our username and password one time to access our company’s services and applications. It sounds simple enough but is quite complex. As we have migrated to working remotely many of us have switched to using our personal computing systems for various reasons.
Many organizations have transitioned their server-based services (Web, Email, VoIP, Chat, etc.) to Microsoft’s 365 cloud platform. During this process software is installed on systems in the company datacenter that allow SSO to occur from company computers and accounts to the cloud resources. People expect this seamless process to work from their personal computers as well. Many are disappointed to find that it often does not.
Their thinking is along the lines of, “If I am accessing Outlook, Teams, and SharePoint in the cloud then my username and password aren’t going through the company network anyway.” Unfortunately, that is generally not the case. The confusion is compounded by the “used to work” factor. Cloud computing environments have greatly increased their security postures and as a result, saving a password in your browser, and other “SSO” techniques no longer work as they once did.
There are methods that allow you to emulate the SSO experience from a personal device. Keep in mind that any or all these solutions may be blocked by your company. Also be aware that you are undertaking these methods at your own risk. Your personal computer systems are not usually covered by your employer’s technical support. Some of the methods result in your company gaining access to your equipment.
Microsoft 365 Chrome Browser Plug-In
Microsoft publishes a Google Chrome extension that stores and submits your Microsoft 365 username and password from the Chrome Browser. Follow the instructions below to install and configure the extension.
Please note that installing this extension does not mean that you will never need to enter your password again. It will reduce the frequency of requests, but cloud computing environments like Microsoft 365, Amazon Web Services, or Google Docs will always require re-authentication at various points.
Find the App’s icon in the Chrome tool bar (sometimes behind the “Manage Extensions Button”), click it once then click the “Sign in to get Started” button.
Enter your Microsoft 365 email address and password when prompted to sign In.
Check the box for “Don’t show this again” and click the “Yes” button.
Add Your Work Account
Windows 10 computers have an included feature that permanently links your personal system to your company’s Microsoft 365 Tenant. It requires a supported version of Windows 10. This method is not always 100% successful depending on several factors of your home computing environment and security policies enforced by your employer.
Use the notifications slide out to access “All Setting” on your computer.
In the Windows Settings screen click on Accounts.
In the window that opens click on Access work or School then click Connect.
Enter your work email address when prompted and click Next. Enter your work account password and click Next. You may be asked to accept various security policies; do so or the account addition process will fail.
Once you have completed this process try accessing your company resources. From time to time you will be prompted to enter your username and password or PIN, but for the most part SSO should function.
Microsoft 365 Sign-In Assistant
The Microsoft 365 Sign-In Assistant is what the name implies, a piece of software that was intended to make signing into Microsoft’s cloud services more seamless. It is not required on Windows 10 computers, but if you are using an older version of Windows this tool can be effective. Download it from Microsoft.
Azure AD Join
The ultimate method to ensure that SSO is possible from your personal systems is to Azure AD Join them. The process is similar to adding a work account. Once completed, SSO is automatic because the system literally becomes a part of your organization’s Microsoft 365 subscription.
Note: Not all Microsoft 365 licenses support Azure AD Domain Joining. This procedure will result in your company’s Microsoft 365 Administrators having control over your personal computers.
Use the notifications slide out to access “All Setting” on your computer.
In the Windows Settings screen click on Accounts.
In the window that opens click on Access work or School then click Connect.
On the next screen select the Join this device to Azure Active Directory link.
You will be prompted to enter your work email address and your passwords. You will also be prompted to allow your employer’s administrators to have control over your system.
In my previous post, I explained how to run a report in OneDrive that lists all of the data you have shared and who you have shared it with. These shares build up over time and it is easy to forget who has access to what. So you’ve run the report and found some data you would like to stop sharing, but how do you?
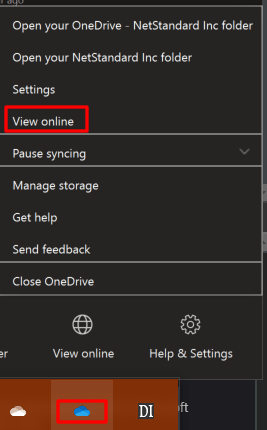
Find the OneDrive icon in your system tray (next to clock) right-click on the icon and then select View Online from the menu.
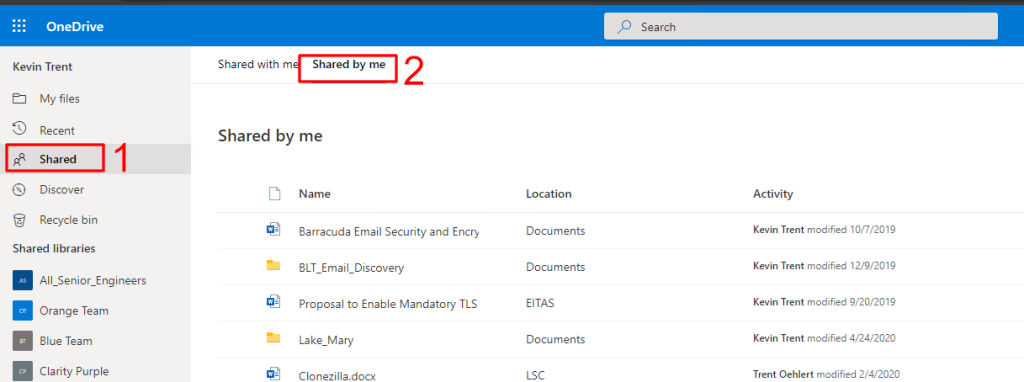
OneDrive will launch in your default web browser. ClickShared in the menu on the left. Then clickShared by me in the menu on top.
Click the icon at the end of the file that you want to stop sharing. Then click on Manage Access from the menu that appears.
In the menu that opens, click Stop Sharing or use the other controls to adjust the permissions to your liking. The advanced link in the lower left will help you remove links you have sent to others via email or text message. If you have trouble see this Microsoft support document for more information.














 icon at the end of the file that you want to stop sharing. Then click on Manage Access from the menu that appears.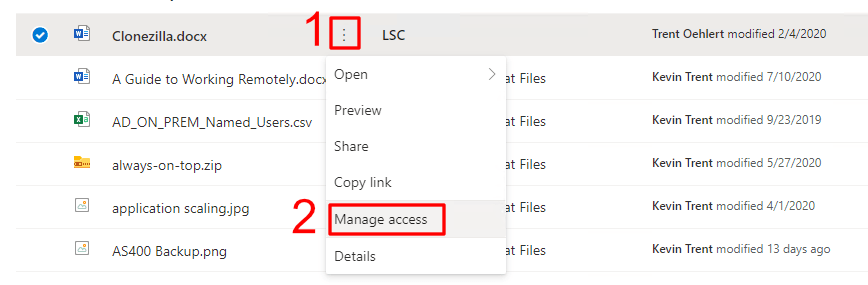
 techbloggingfool.com